
阶段角度
MapReduce进程
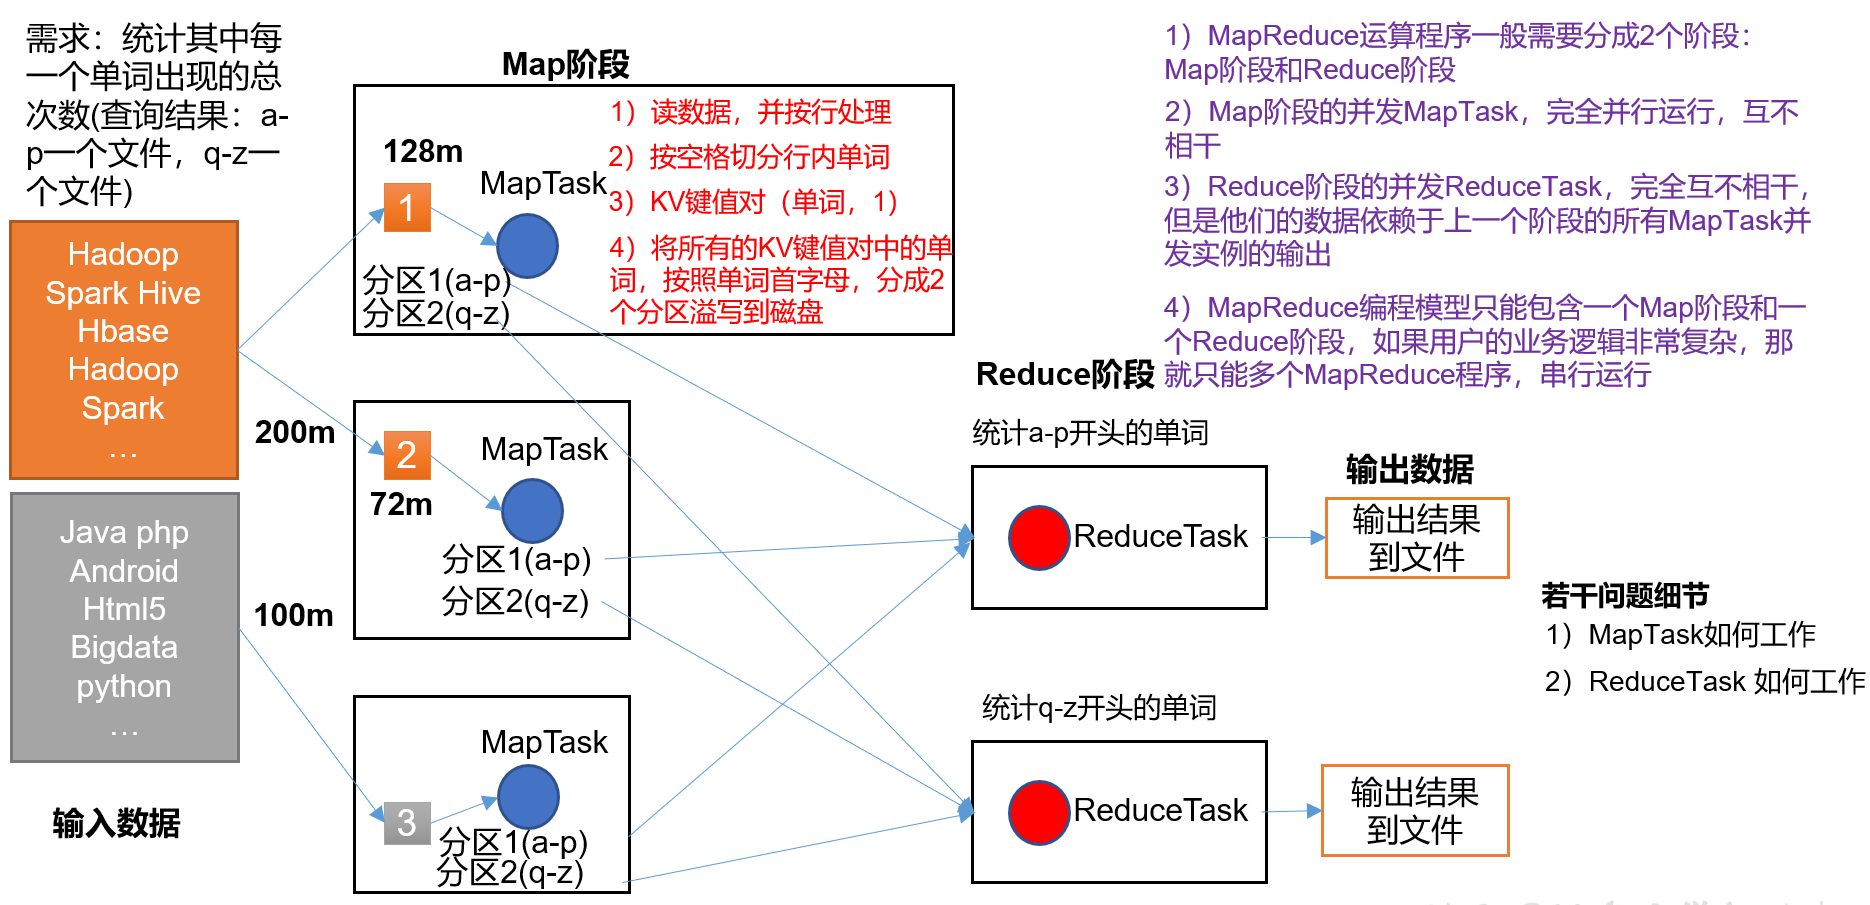
一个完整的MapReduce程序在分布式运行时有三类实例进程:
(1)MrAppMaster:负责整个程序的过程调度及状态协调。
(2)MapTask:负责Map阶段的整个数据处理流程。
(3)ReduceTask:负责Reduce阶段的整个数据处理流程。
案例操作:
wordcount
Mapper(MapTask)
Reducer(ReduceTask)
Driver
编程思路: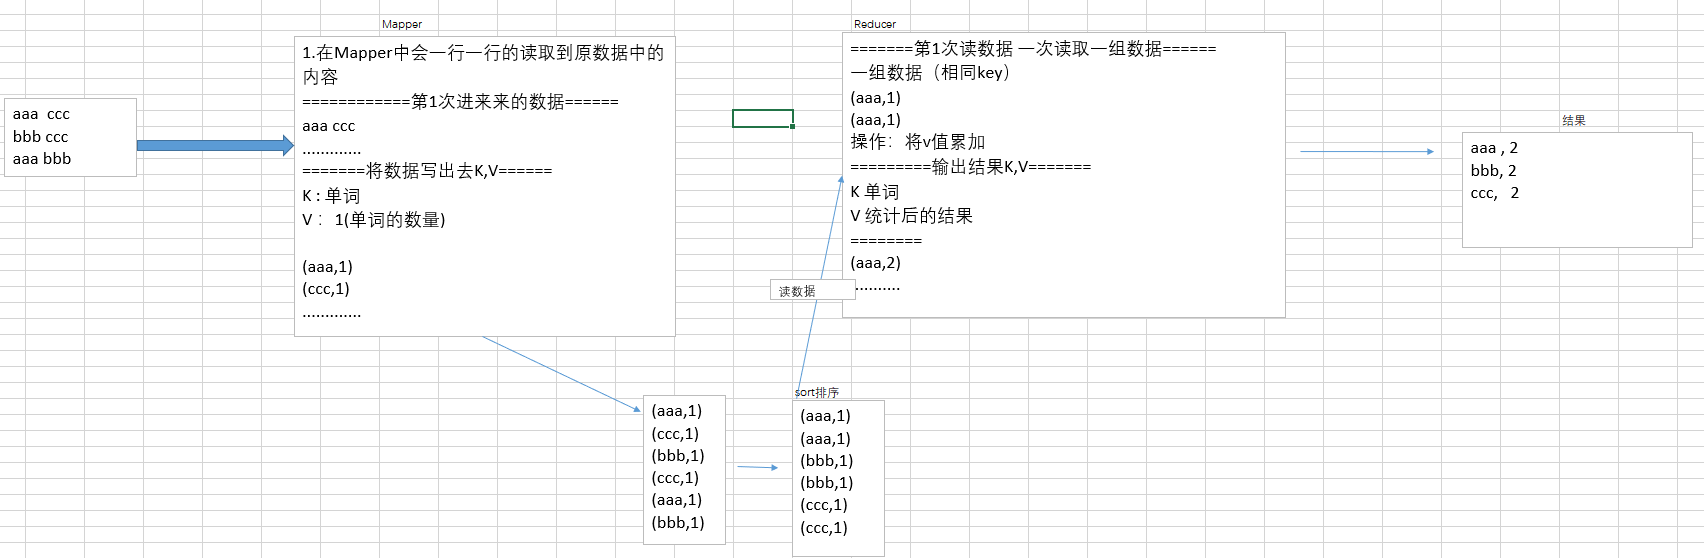
步骤简述:
- 创建maven工程
- 添加pom依赖
- 配置log4j2.xml文件
- 创建Mapper,Reducer,Driver分别编写程序
数据流角度
说明:input是读入磁盘的内容
output是写出的内容,可以理解为在input处提交job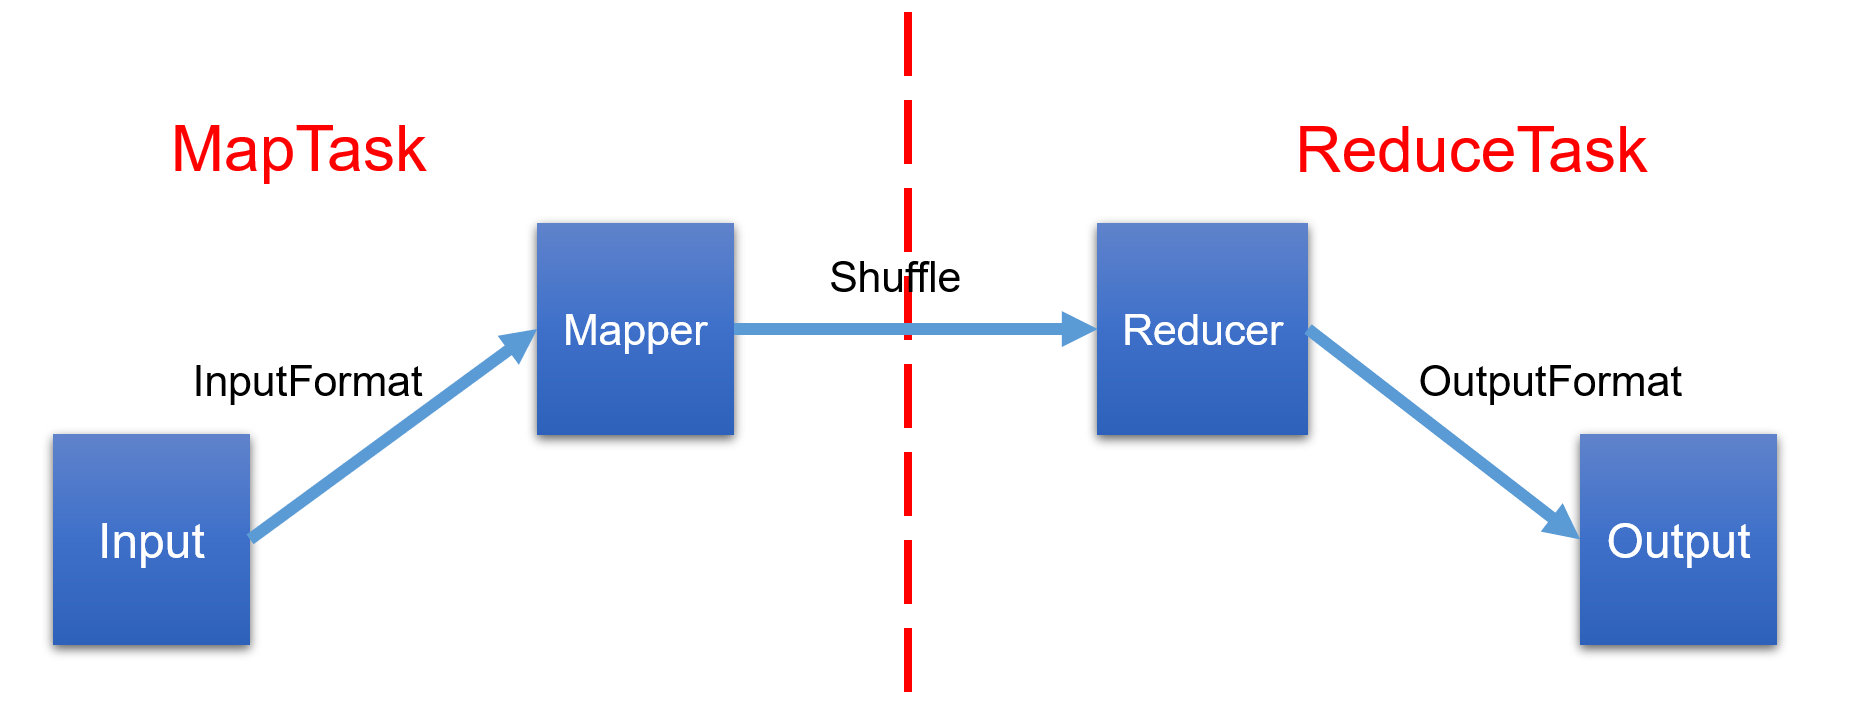
inputFormat(读数据\切片)
抽象方法:createRecordReader+getSplits
继承树:
|——-InputFormat(抽象类)
|———FileInputFormat(抽象类)
|——-TextInputFormat(默认使用的InputFormat,特点是一行一行的读取数据)
|——-CombineFileInputFormat
|——-CombineTextInputFormat(可以将多个小文件切成一片)
各类介绍
InputFormat(抽象类)//该方法用来获取切片信息public abstractList<InputSplit> getSplits(JobContext context) throws IOException, InterruptedException;//该方法用来获取RecordReader对象,该对象是用来读取数据的。public abstractRecordReader<K,V> createRecordReader(InputSplit split,TaskAttemptContext context) throws IOException,InterruptedException;------------------------------------------------------------------FileInputFormat(抽象类)重写了 getSplits方法,该方法是用来进行切片的方法。------------------------------------------------------------------TextInputFormat(默认使用的InputFormat)1.重写了createRecordReader方法,变成了一行一行读取2.createRecordReader方法中返回了LineRecordReader对象,该对象就是真正的用来读取数据的那个对象。该对象读取数据的特点是一行一行的读取。3.LineRecordReader是RecordReader的子类。@Overridepublic RecordReader<LongWritable, Text> createRecordReader(InputSplit split,TaskAttemptContext context) {return new LineRecordReader(recordDelimiterBytes);}
切片与MapTask并行决定机制
作用:解决用多少map任务去处理数据,才合适的问题。
分析:多少数据?—>block的数量—>多block进行切片管理—>切片如何设置
方案:map任务由切片数决定
关系:切片数=map任务数
切片大小的确定:
1、当block=128M:
关键:与block阈值保持一致(这是默认情况,但有时候还是有修改的需求)
原因:不能比block大,因为处理的文件的单位是block
不能比block小,因为如果一个切片比block小,那么block剩下一部分文件就需要被另外一个切片(maptask)去处理,而另外一个切片有可能在另外一台节点上(看block是否存在于另外一节点上),这样会造成夸机传输,产生io流,浪费宝贵的网络资源。
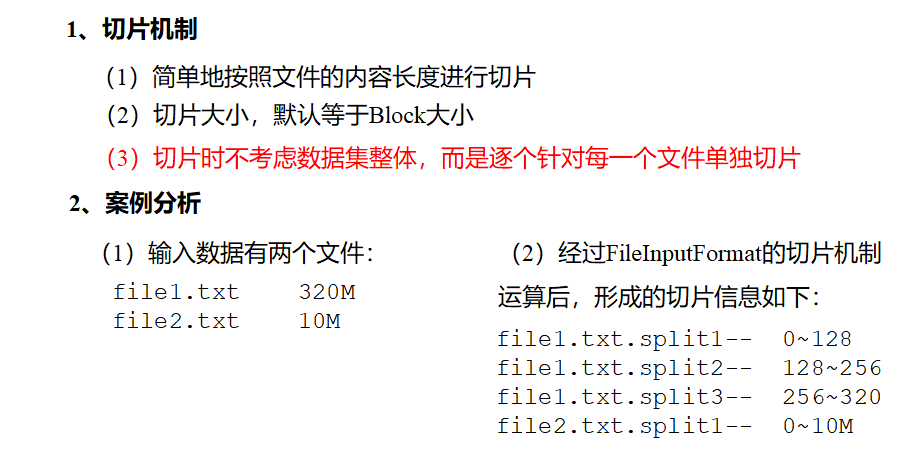
方式:切片时不考虑数据集整体,只针对每个单独文件进行切片:
比如:有两个50m的文件,但就只分为2个50m的切片,而不会集合成一个128m的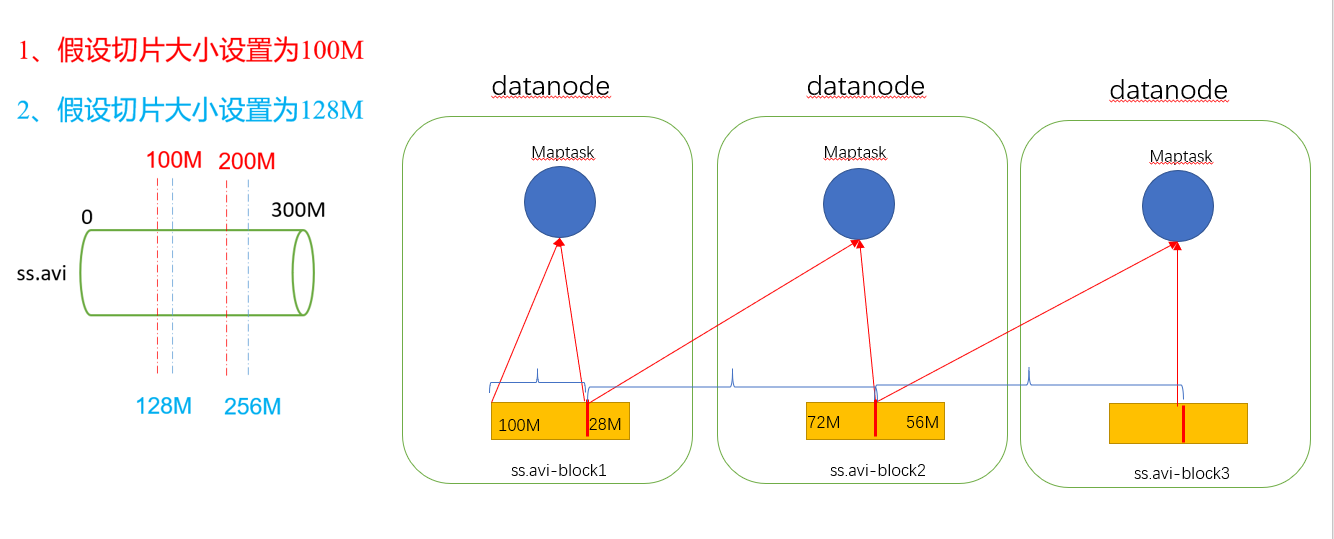
当切片小于128时图示
2、block大小<128m时
切片大小任意设置都不会产生磁盘io,
对于行数比较多的情况建议减小切片大小,
因为切片数和map数是一致的,当map处理的数据逻辑简单,但是行数多的情况,因为map是一行行读的所以效率会非常慢
所以通过调小切片大小来增加map数量,实现并行处理,提升效率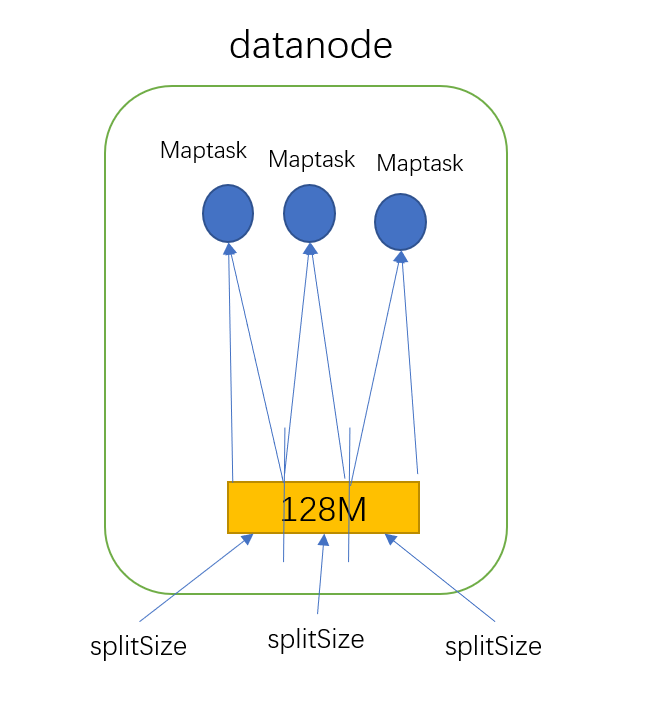
当切片<128M
切片的几种模式
说明:可通过driver去设置切片job.setInputFormatClass(xxx.class)
1.FileInputFormat
//获取minSize的值。//getMinSplitSize(job) :如果设置了mapreduce.input.fileinputformat.split.minsize就获取设置的内容,如果没有设置内容返回1//getFormatMinSplitSize() : 返回1long minSize = Math.max(getFormatMinSplitSize(), getMinSplitSize(job));// 也就是说默认minSize=1//获取maxSize的值。//getMaxSplitSize(job) :如果设置了mapreduce.input.fileinputformat.split.maxsize那么就返回设置的内容,如果没有设置返回Long.MAX_VALUElong maxSize = getMaxSplitSize(job);// 也就是说默认maxSize=Long.MAX_VALUE//用来存放所有的切片信息List<InputSplit> splits = new ArrayList<InputSplit>();//获取文件的状态(信息)List<FileStatus> files = listStatus(job);//获取文件的路径Path path = file.getPath();//获取文件的大小long length = file.getLen();//获取块大小long blockSize = file.getBlockSize();//获取切片大小long splitSize = computeSplitSize(blockSize, minSize, maxSize);protected long computeSplitSize(long blockSize, long minSize,long maxSize) {/*默认 : 切片大小等于块大小切片大小 > 块大小 :修改minSize(默认为1)-->修改到大于128M切片大小 < 块大小 :修改maxSize(默认为Long.MAX_VALUE)-->修改小于128M,以增加切片(map)个数*/return Math.max(minSize, Math.min(maxSize, blockSize));!!!!!!!!!!!!!!!!!!!!!!!!!!!}//剩余文件的大小long bytesRemaining = length;//剩余文件大小/片大小 > 1.1while (((double) bytesRemaining)/splitSize > SPLIT_SLOP) {//获取块的索引位置int blkIndex = getBlockIndex(blkLocations, length-bytesRemaining);//生成切片并将切片放入到spilts集合中//makeSplit :生成切片的方法。//path(文件路径), length-bytesRemaining(片的起始位置), splitSize(片的大小)splits.add(makeSplit(path, length-bytesRemaining, splitSize,blkLocations[blkIndex].getHosts(),blkLocations[blkIndex].getCachedHosts()));bytesRemaining -= splitSize;}//剩余文件大小/片大小 <= 1.1的文件整体切一片if (bytesRemaining != 0) {int blkIndex = getBlockIndex(blkLocations, length-bytesRemaining);splits.add(makeSplit(path, length-bytesRemaining, bytesRemaining,blkLocations[blkIndex].getHosts(),blkLocations[blkIndex].getCachedHosts()));}
2.CombineTextInputFormat()
说明:
框架默认的TextInputFormat切片机制是对任务按文件规划切片,不管文件多小,都会是一个单独的切片,这样如果有大量小文件,就会产生大量的MapTask,处理效率极其低下
作用:
用于小文件过多的场景,它可以将多个小文件从逻辑上规划到一个切片中,这样,多个小文件就可以交给一个MapTask处理
切片机制: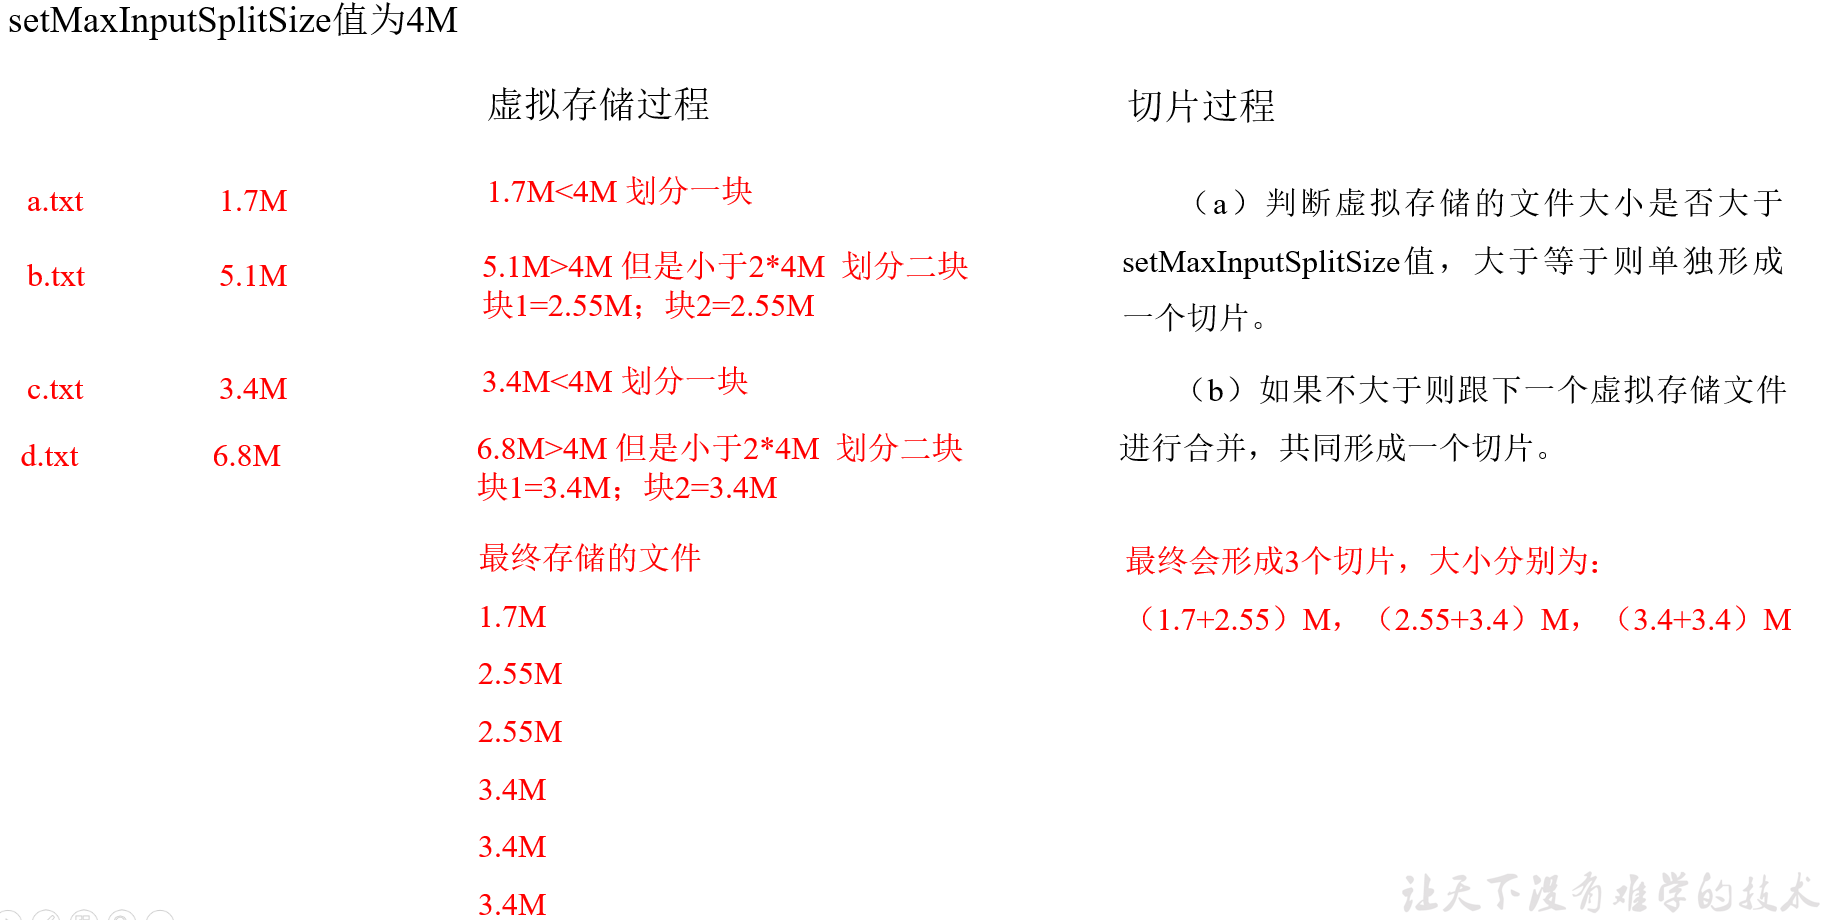
Maptask机制
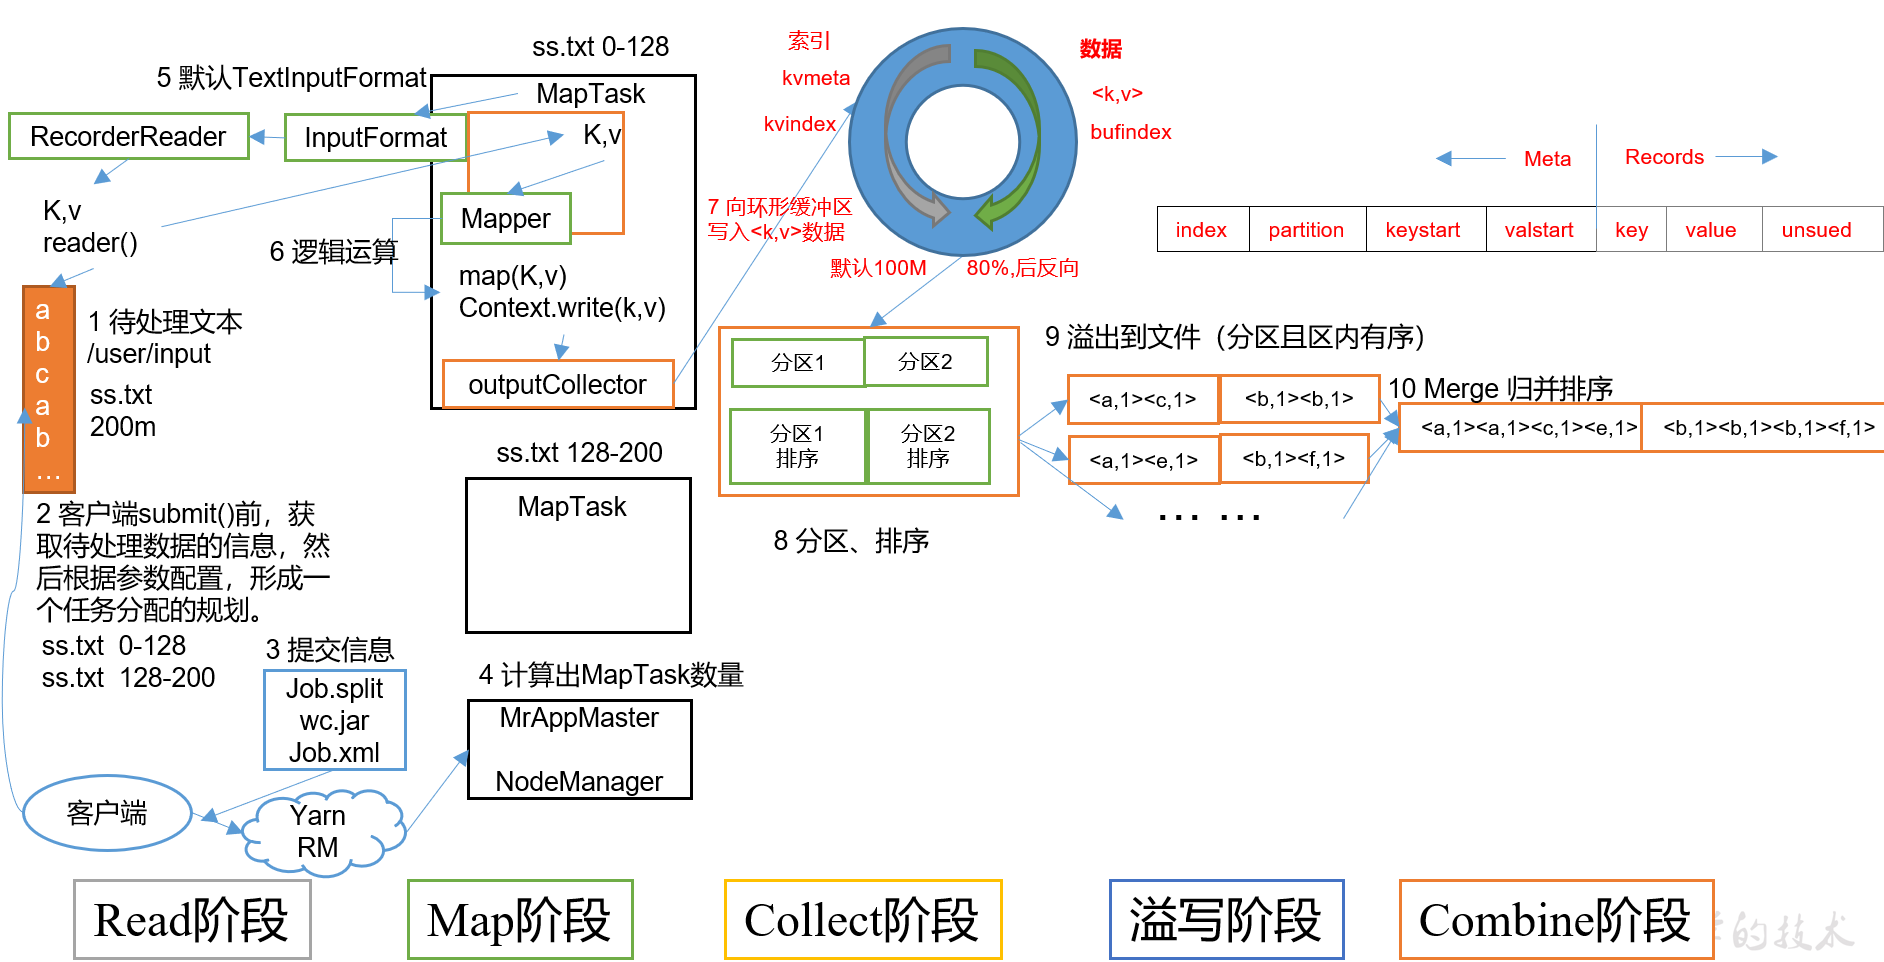
(1)Read阶段:
MapTask通过用户编写的RecordReader,从输入InputSplit中解析出一个个key/value。
(2)Map阶段:
该节点主要是将解析出的key/value交给用户编写map()函数处理,负责按需求封装,例如sum等,并产生一系列新的key/value。
在MapTask类中调用runNewMapper方法:
private <INKEY,INVALUE,OUTKEY,OUTVALUE>void runNewMapper(final JobConf job,final TaskSplitIndex splitIndex,final TaskUmbilicalProtocol umbilical,TaskReporter reporter) throws IOException, ClassNotFoundException,InterruptedException {....try {input.initialize(split, mapperContext);mapper.run(mapperContext);// 此处调用Mapper类的run方法mapPhase.complete();setPhase(TaskStatus.Phase.SORT);statusUpdate(umbilical);input.close();input = null;output.close(mapperContext);//将所有数据封装成键值对后,准备结束maptask,里面有collector溢写磁盘的代码output = null;} finally {closeQuietly(input);closeQuietly(output, mapperContext);}}
(3)Collect收集阶段(进入环形缓冲区):
在用户编写map()函数中,当数据处理完成后,
对键值对进行写出writer.context:进入环形缓冲区类(内部类):MapOutputBuffer类调用Collector.collect()。
在该函数内部,它会将生成的key/value添加partion分区属性(Partitioner.getPartition)
并生成对应的元数据:一个元数据对应一条kv,内容包括:index\partition\keystart\valstart
环形缓冲区的作用:
1、他是一个FIFO消息队列,可以缓存数据,读写效率高
2、对元数据先按照分区进行排序后按照key进行排序。
(4)Spill阶段:(具体的图看shuffle阶段)
即“溢写”,当环形缓冲区满后,MapReduce会将数据写到本地磁盘上,生成一个临时文件。需要注意的是,将数据写入本地磁盘之前,先要对数据进行一次本地排序,并在必要时对数据进行合并、压缩等操作。(maptask的缓冲区出来后都是溢出阶段)
MapTask类—>runNewMapper方法—>
output.close(mapperContext)—>collector.flush()—>sortAndSpill()
—>collector.close // flush(溢写)完之后,关闭缓冲区,maptask关闭
溢写阶段详情:<br /> 步骤1(内存中排序):利用快速排序算法对缓存区内的数据进行排序,排序方式是,先按照分区编号Partition进行排序,然后按照key进行排序(只对索引进行排序,不会改变真实数据的位置)。这样,经过排序后,数据以分区为单位聚集在一起,且同一分区内所有数据按照key有序。<br /> 步骤2(写入磁盘):按照分区编号由小到大依次将每个分区中的数据写入任务工作目录下的临时文件output/spillN.out(N表示当前溢写次数)中。如果用户设置了Combiner(Reduce),则写入文件之前,对每个分区中的数据进行一次聚集操作。
private void sortAndSpill() throws IOException, ClassNotFoundException,InterruptedException {...final Path filename = // 临时文件:output/spillN.outmapOutputFile.getSpillFileForWrite(numSpills, size);...sorter.sort(MapOutputBuffer.this, mstart, mend, reporter); // 排序,快排int spindex = mstart;final IndexRecord rec = new IndexRecord();final InMemValBytes value = new InMemValBytes();for (int i = 0; i < partitions; ++i) { // 按分区遍历IFile.Writer<K, V> writer = null;try {long segmentStart = out.getPos();partitionOut = CryptoUtils.wrapIfNecessary(job, out, false);writer = new Writer<K, V>(job, partitionOut, keyClass, valClass, codec,spilledRecordsCounter);if (combinerRunner == null) {// spill directlyDataInputBuffer key = new DataInputBuffer();while (spindex < mend && kvmeta.get(offsetFor(spindex % maxRec) + PARTITION) == i) {final int kvoff = offsetFor(spindex % maxRec);int keystart = kvmeta.get(kvoff + KEYSTART); // 对索引进行分区排序int valstart = kvmeta.get(kvoff + VALSTART);key.reset(kvbuffer, keystart, valstart - keystart);getVBytesForOffset(kvoff, value);writer.append(key, value); // 写入临时文件++spindex;}..}
步骤3(元数据信息-->内存/磁盘):将分区数据的元信息写到内存索引数据结构SpillRecord中,其中每个分区的元信息包括在临时文件中的偏移量、压缩前数据大小和压缩后数据大小。如果当前内存索引大小超过1MB,则将内存索引写到文件output/spillN.out.index中。<br />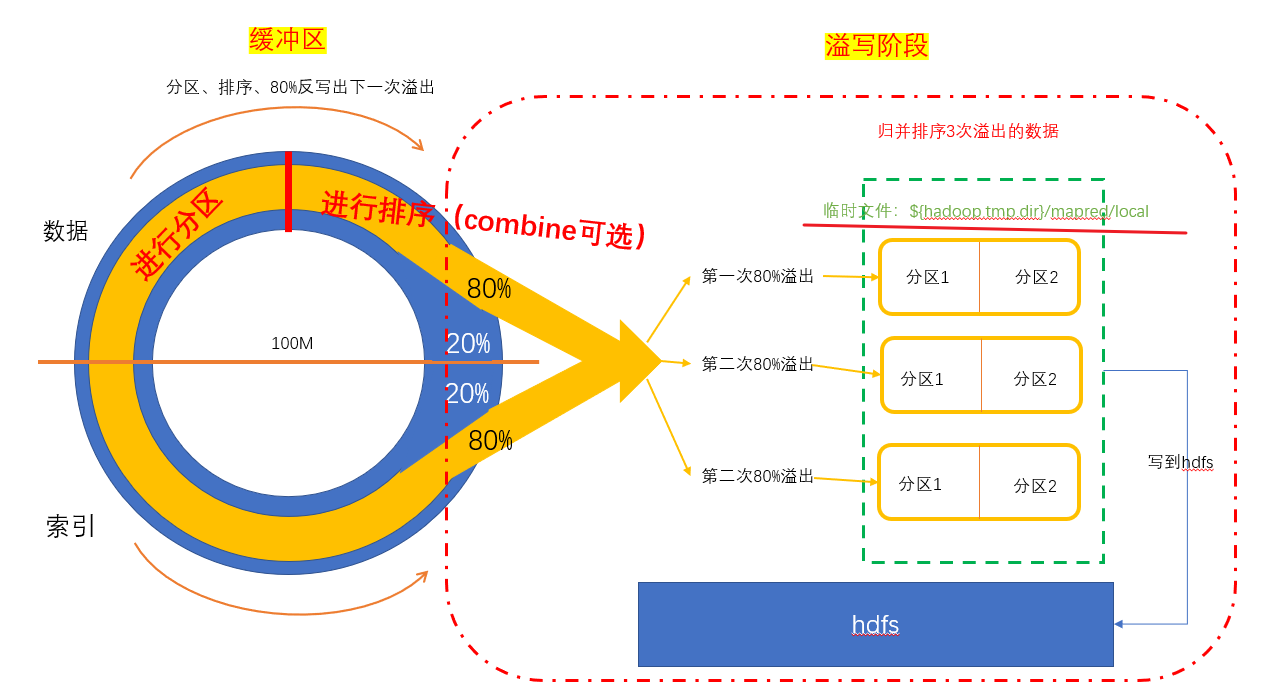<br />**细节:**<br />排序时机:溢写前(collector.close)需要进行排序,保证同一个溢写文件中的数据有序<br />排序原因:让进入reduce的key有序,增加reduce的执行效率,这样reduce阶段就不用一条一条第判断数据了
(5)Combine阶段:
maptask只是给数据进行分区、排序,而不会涉及计算,计算一般交给reduce去计算,所以,combine就是为了让map阶段先进行计算以减小reduce负担,提升效率。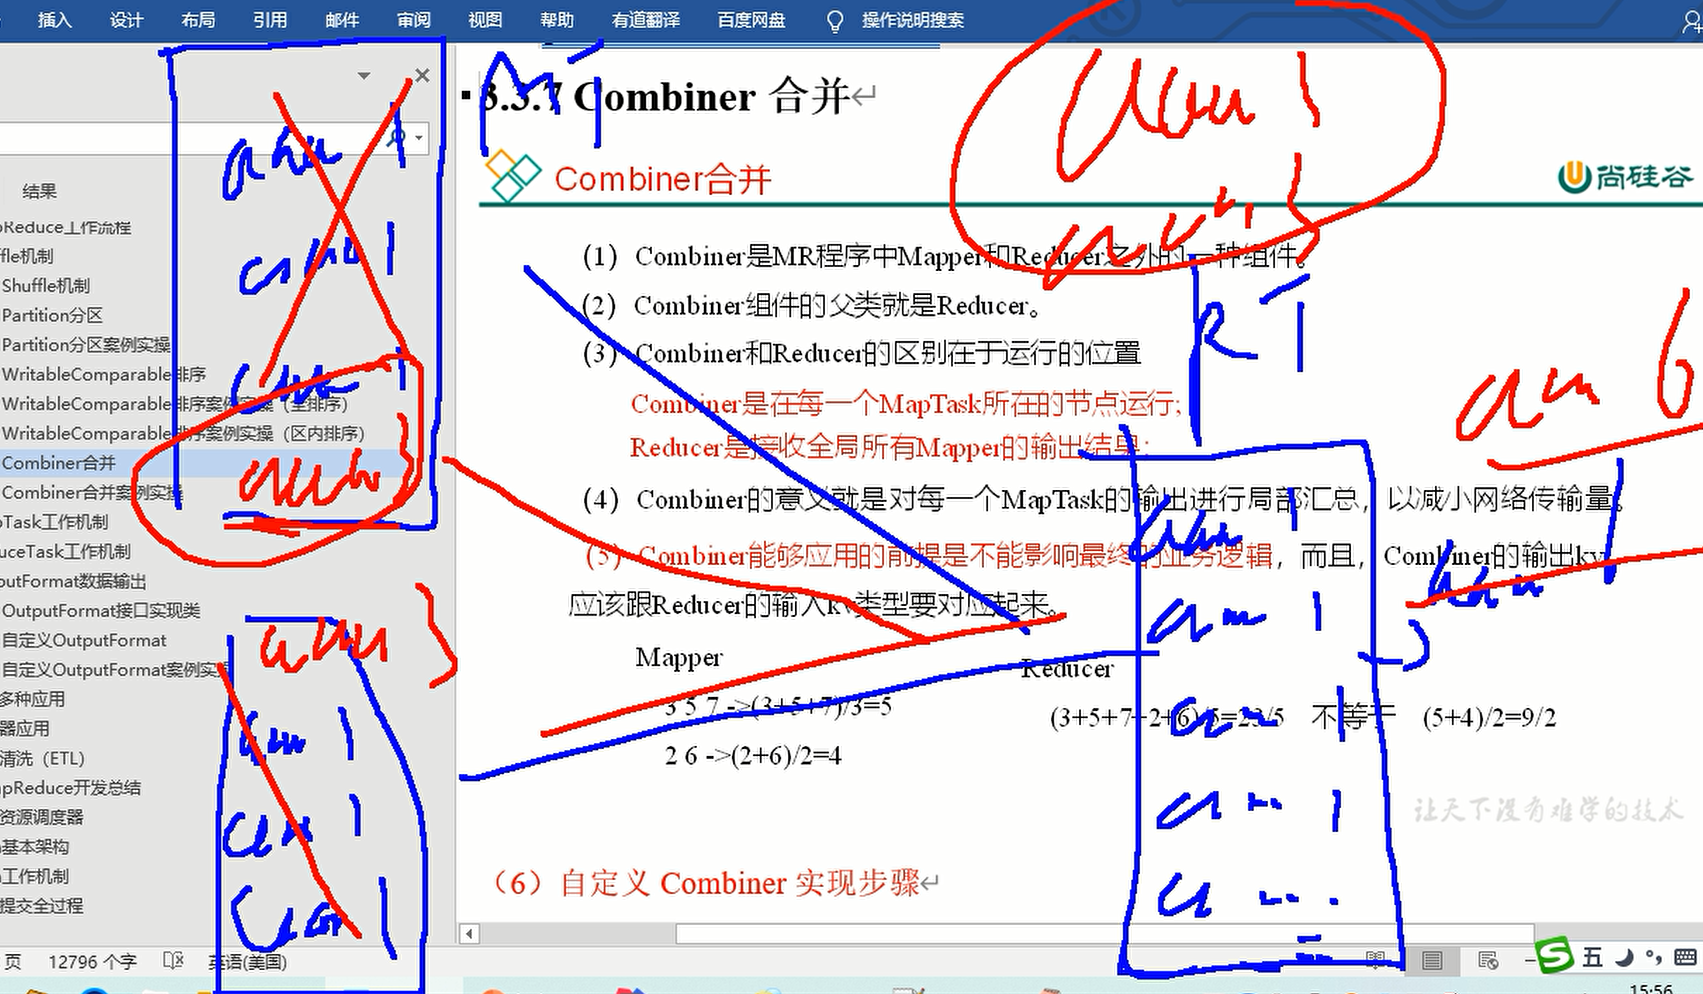
(6)归并排序
MapTask类
output.close(mapperContext)—>collector.flush()—>sortAndSpill()
—>mergeParts()
—>collector.close // flush(溢写)完之后,关闭缓冲区,关闭maptask
归并排序将output/spillN.out文件合併为file.out的大文件,在内存中的output/spillN.out.index也变成file.out.index
private void mergeParts() throws IOException, InterruptedException,ClassNotFoundException {// get the approximate size of the final output/index fileslong finalOutFileSize = 0;long finalIndexFileSize = 0;final Path[] filename = new Path[numSpills];final TaskAttemptID mapId = getTaskID();for(int i = 0; i < numSpills; i++) { // 遍历溢写文件filename[i] = mapOutputFile.getSpillFile(i); // 真实数据存储文件finalOutFileSize += rfs.getFileStatus(filename[i]).getLen();}if (numSpills == 1) { //the spill is the final outputsameVolRename(filename[0],mapOutputFile.getOutputFileForWriteInVolume(filename[0]));if (indexCacheList.size() == 0) {sameVolRename(mapOutputFile.getSpillIndexFile(0),mapOutputFile.getOutputIndexFileForWriteInVolume(filename[0]));} else {indexCacheList.get(0).writeToFile(mapOutputFile.getOutputIndexFileForWriteInVolume(filename[0]), job);}sortPhase.complete();return;}
在进行文件合并过程中,MapTask以分区为单位进行合并。对于某个分区,它将采用多轮递归合并的方式。每轮(一次merge)合并io.sort.factor(默认10)个文件,并将产生的文件重新加入待合并列表中,对文件排序后,重复以上过程,直到最终得到一个大文件。<br /> 让每个MapTask最终只生成一个数据文件,可避免同时打开大量文件和同时读取大量小文件产生的随机读取带来的开销。
Shuffle机制
总结
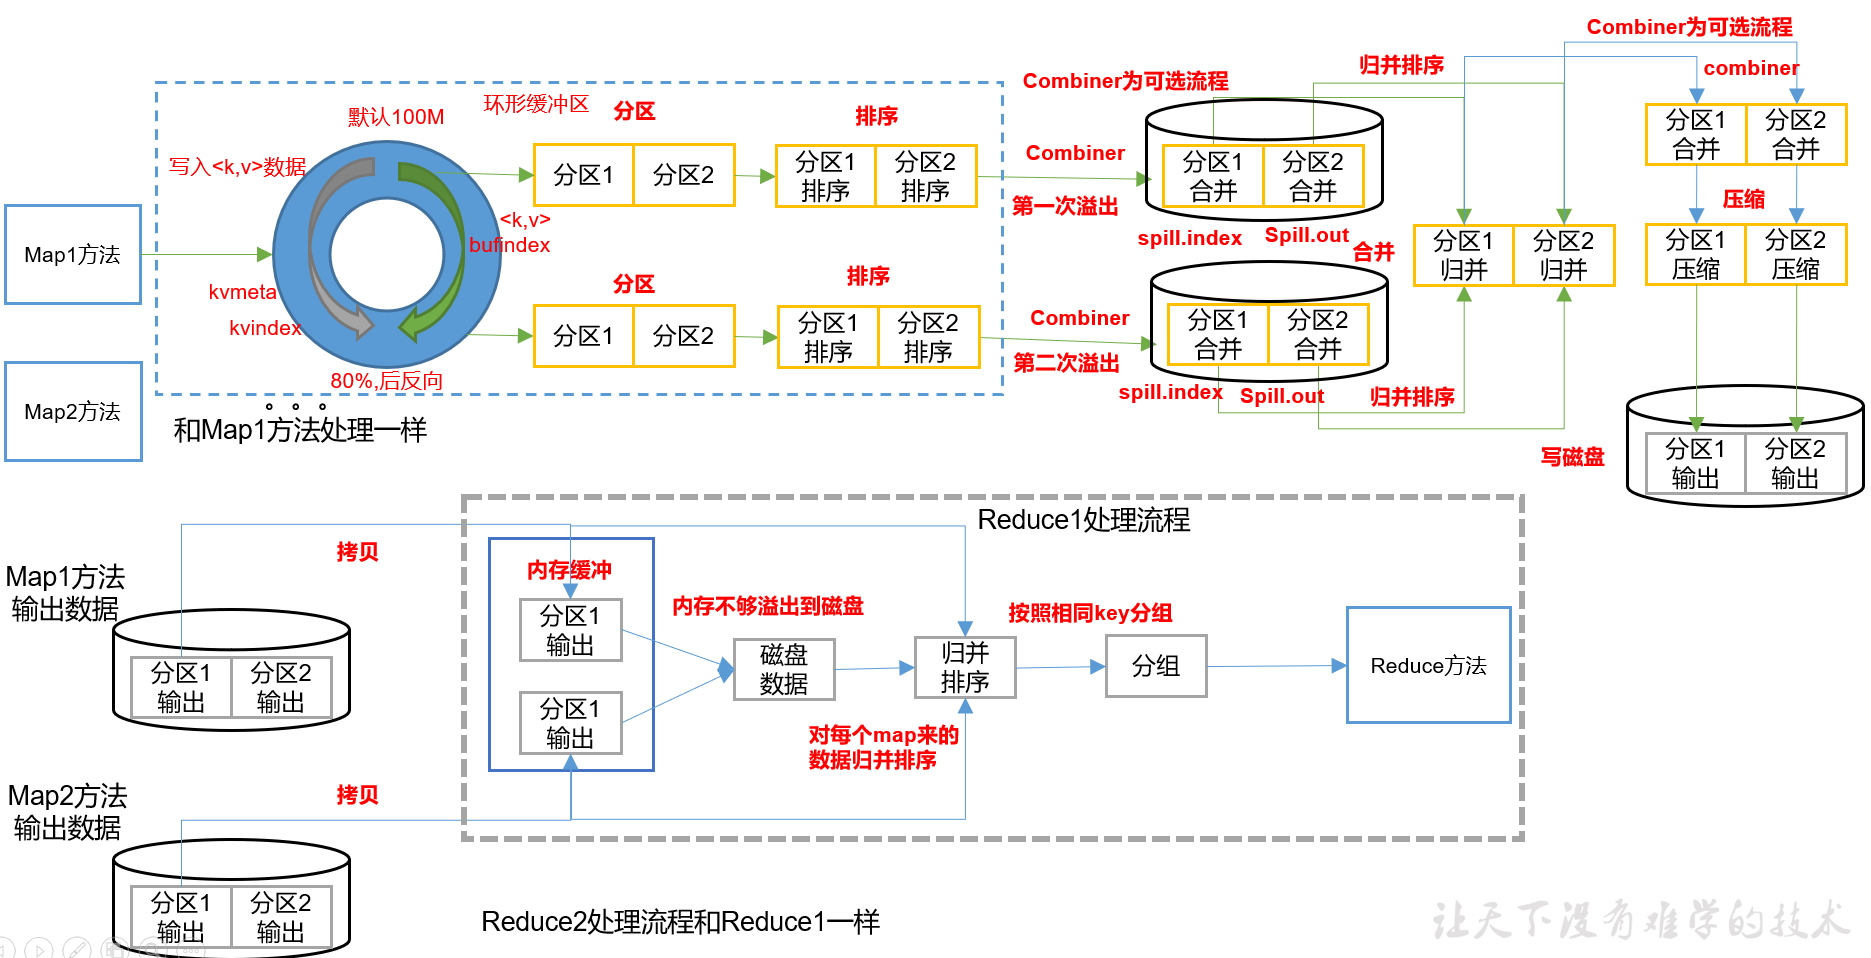
map方法之后,reduce方法之前 的数据处理过程称为shuffler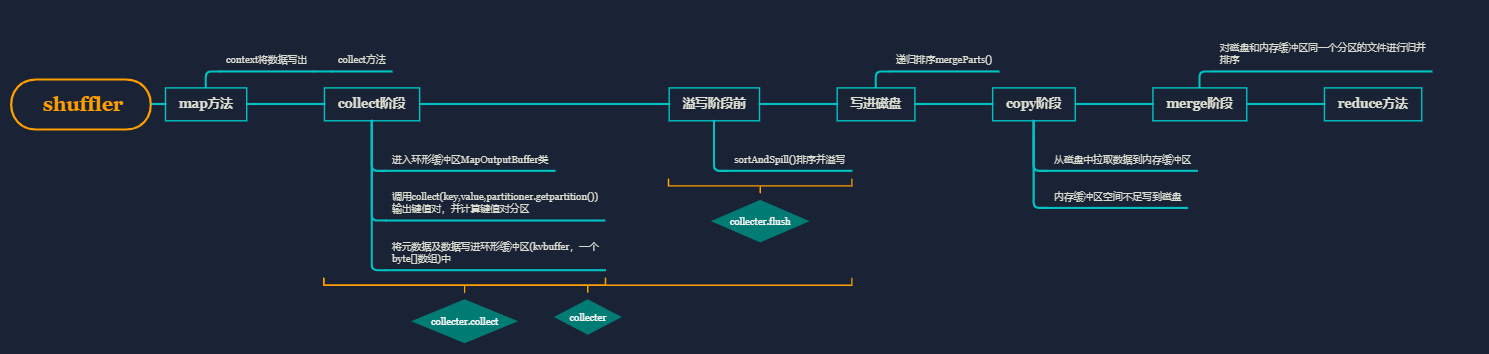
流程:fileinputformat—>map方法(封装)—>在collect阶段,给数据标记分区属性—>将数据写进 环形缓冲区,实现分区、快速排序(以字典序)、 combine(可选)—>溢写到临时文件—>读取文件到内存,进行归并排序(merge)—>(如果选择了combine,在这里还会进行一次combine)—> 压缩 —>写进磁盘—>从磁盘copy进内存,不同分区去到不同的reduce(内存不够再写进磁盘)—>相同分区的文件进行归并排序(merge)—>相同的key分为一组—>Reduce方法
细节:
排序:利用快排对key的索引(spill.index)进行字典排序
存储:缓冲区默认的100兆还存储了元数据信息,所以可能不只两次溢写
combiner:如果开启了combiner,会默认调用两次,一次在溢写前,一次在归并后
涉及到文件的排序都是归并排序。
partition分区
位置:map函数输出之后到collect方法前中调用getPartitioner方法进行分区标记,将标记值传进collect方法中
@Overridepublic void write(K key, V value) throws IOException, InterruptedException {collector.collect(key, value,partitioner.getPartition(key, value, partitions));}
最终输出文件有reducetask个数决定,而不是分区
所以reducetask个数要大于等于分区个数;
生产环境中分区原则:
根据reducetask个数进行设置,而reducetask又会根据集群性能和业务需求来进行分配
一、如果设置了job.setNumReduceTasks(2及以上),则会调用此方法public class HashPartitioner<K, V> extends Partitioner<K, V> {/*key : map方法写出的keyvalue : map方法写出的valuenumReduceTasks :ReduceTask的数量*/public int getPartition(K key, V value,int numReduceTasks) {//分区号 = key.hashCode()% reduceTask的数量//key.hashCode() & Integer.MAX_VALUE 保证结果为正数return (key.hashCode() & Integer.MAX_VALUE) % numReduceTasks;}}//二、不设置reduceTask,使用默认值1:partitions = jobContext.getNumReduceTasks();// 获取驱动设置的reducetasks个数if (partitions > 1) { // 如果分区数判断使用大于1 则使用 hashpartitionerpartitioner = (org.apache.hadoop.mapreduce.Partitioner<K,V>)ReflectionUtils.newInstance(jobContext.getPartitionerClass(), job);// 利用反射获取hashPartitioner} else {//如果等于1则使用如下默认分区(定义一个匿名内部类)partitioner = new org.apache.hadoop.mapreduce.Partitioner<K,V>() {@Overridepublic int getPartition(K key, V value, int numPartitions) {return partitions - 1;// 返回只有0号分区的分区}};}
combiner
概述:
目的:1、减少网络传输量(io流)
2、大量相同的key分布在同一个maptask中,可减少数据倾斜
位置:maptask上
使用1:不同场景结果是不一样的!!
**以上业务案例是求平均值。**
使用2:
内容其实和自定义的myReducer一模一样
job.setCombinerClass(WCCombiner.class);//内容其实和自定义的myReducer一模一样public class WCCombiner extends Reducer<Text, IntWritable,Text,IntWritable> {//封装的valueprivate IntWritable outvalue = new IntWritable();/*** 作用 :该方法会被循环调用,每调用一次就传入一组(在这单词相同为一组)读取的内容* @param key :读取一组中的数据的key值* @param values :读取一组中所有value值* @param context : 上下文 在这用来写出key,value* @throws IOException* @throws InterruptedException*/@Overrideprotected void reduce(Text key, Iterable<IntWritable> values, Context context) throws IOException, InterruptedException {int sum = 0;//1.遍历所有的valuefor (IntWritable value : values) {//2.对所有value进行累加int v = value.get();//将IntWritable转成基本数据类型sum += v;}//3.封装key,valueoutvalue.set(sum);//可以理解成将基本数据类型转成IntWritable(实际上是赋值)//4.写出key,valuecontext.write(key,outvalue);}}
Reduce机制
(0)reduceTask:
reduceTask的个数由默认参数决定:
1、需要根据集群性能测试而定
2、业务需求,有时候
默认为1(hive中设置为-1),只有一个分区
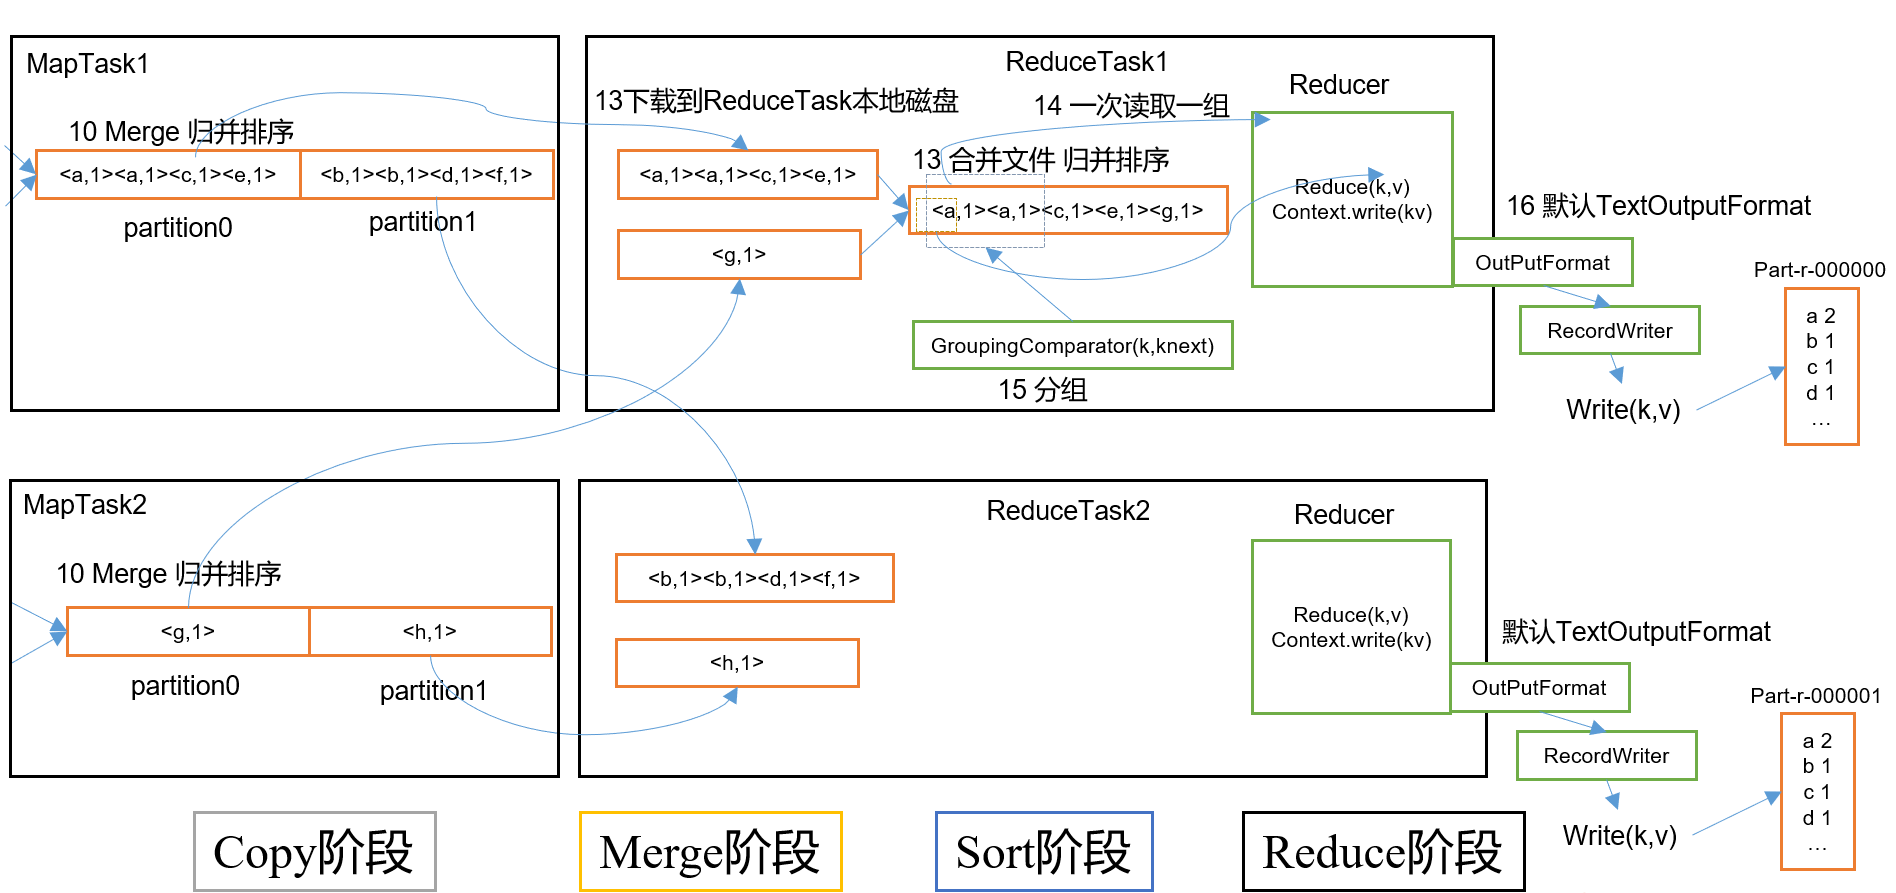
(1)Copy阶段:
ReduceTask从各个MapTask上远程拷贝一片数据,并针对某一片数据,如果其大小超过一定阈值,则写到磁盘上,否则直接放到内存中。
(2)Merge(融合)阶段:
在远程拷贝数据的同时,ReduceTask启动了两个后台线程对内存和磁盘上的文件进行合并(各个maptask的结果)
(3)Sort阶段:
将Merge过来的无序文件进行排序
(4)Reduce阶段:
reduce()函数将计算结果写到HDFS上。
OutputFormat
常见实现类
TextOutputFormat
默认的输出格式是TextOutputFormat,它把每条记录写为文本行。它的键和值可以是任意类型,因为TextOutputFormat调用toString()方法把它们转换为字符串。
SequenceFileOutputFormat
将SequenceFileOutputFormat输出作为后续 MapReduce任务的输入,这便是一种好的输出格式,因为它的格式紧凑,很容易被压缩。
自定义OutputFormat
自定义实现类
思路:
1、创建自定义类MyOutputFormat对默认的
TextOutputFormat进行模仿:继承FileOutFormat,重写getRecordWriter方法,返回一个MycodeRecordWritr()对象,
这时候MycodeRecordWritr也是自定义的。所以需要创建这个类
public class MyOutputFormat extends FileOutputFormat<LongWritable, Text> {@Overridepublic RecordWriter<LongWritable, Text> getRecordWriter(TaskAttemptContext job) throws IOException, InterruptedException {return new MycodeRecordWriter(job);}}
2、创建MycodeRecordWritr类,对数据进行读写,需要用到hadoop提供的IO流类
public class MycodeRecordWriter extends RecordWriter<LongWritable, Text> {private FSDataOutputStream atguigu;private FSDataOutputStream other;public MycodeRecordWriter(TaskAttemptContext job) throws IOException {try {//创建文本对象FileSystem fs = FileSystem.get(new Configuration(job.getConfiguration()));// 创建输出流,就是有输出流才能吧文件输出到磁盘atguigu = fs.create(new Path(FileOutputFormat.getOutputPath(job),"atguigu.txt"));other = fs.create(new Path(FileOutputFormat.getOutputPath(job), "other"));} catch (IOException e) {e.printStackTrace();throw new RuntimeException("程序出错");}}@Overridepublic void write(LongWritable key, Text value) throws IOException, InterruptedException {String line = value.toString()+"/n";if (line.contains("atguigu")) {atguigu.write(line.getBytes());} else {other.write(line.getBytes());}}@Overridepublic void close(TaskAttemptContext context) throws IOException, InterruptedException {IOUtils.closeStream(atguigu);IOUtils.closeStream(other);}}
3、入口必不可少:
public class OutputDirver {public static void main(String[] args) throws IOException, ClassNotFoundException, InterruptedException {Job job = Job.getInstance(new Configuration());job.setNumReduceTasks(0);job.setOutputFormatClass(MyOutputFormat.class);job.setOutputKeyClass(LongWritable.class);job.setOutputKeyClass(Text.class);FileInputFormat.setInputPaths(job,new Path("C:\\tmp\\input1\\log.txt"));FileOutputFormat.setOutputPath(job,new Path("C:\\tmp\\output012"));job.waitForCompletion(true);}}
总结:
这是一个阉割了mapper和reducer的示例展示

若有收获,就点个赞吧
0 人点赞
