1.添加Gateway微服务网关
本阶段项目完成总架构图中的第五阶段,添加Gateway微服务网关,并实现Gateway的熔断降级、负载均衡、跨越配置等处理。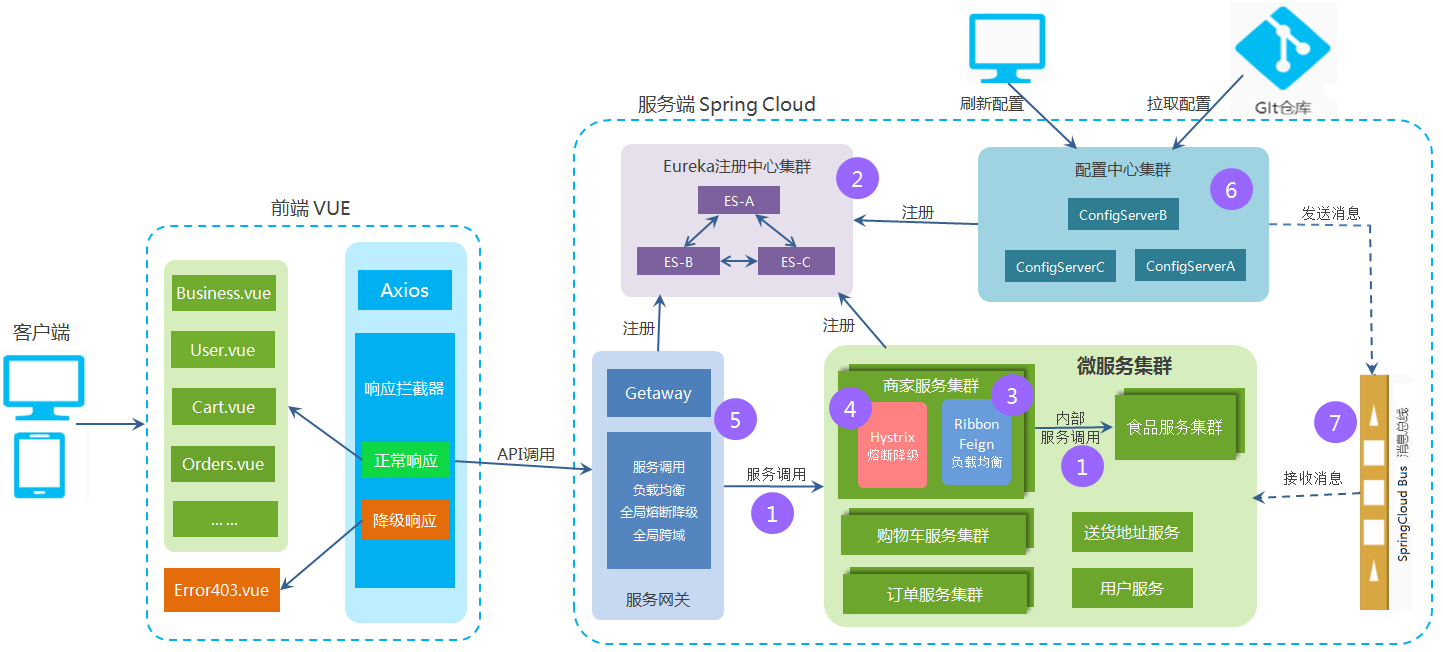
1.1.创建Gateway工程
- 在父工程下,创建 Maven Module 子工程(工程名:gateway_server_14000;Packaging:jar)
- 在pom.xm文件中添加Gateway依赖
<dependencies><!--加入gateway依赖 --><dependency><groupId>org.springframework.cloud</groupId><artifactId>spring-cloud-starter-gateway</artifactId></dependency><!--加入hystrix的依赖,gateway也要实现熔断降级 --><dependency><groupId>org.springframework.cloud</groupId><artifactId>spring-cloud-starter-netflix-hystrix</artifactId></dependency><!-- gateway也要向Eureka注册 --><dependency><groupId>org.springframework.cloud</groupId><artifactId>spring-cloud-starter-netflix-eureka-client</artifactId></dependency><!--热部署 gav --><dependency><groupId>org.springframework.boot</groupId><artifactId>spring-boot-devtools</artifactId><scope>runtime</scope><optional>true</optional></dependency></dependencies>
- 添加主启动类
```java package com.neusoft;
import org.springframework.boot.SpringApplication; import org.springframework.boot.autoconfigure.SpringBootApplication;
@SpringBootApplication public class MyApplication { public static void main(String[] args) { SpringApplication.run(MyApplication.class, args); } }
4. 创建application.yml 配置文件<br />```yamlserver:port: 14000spring:application:name: gateway-server
1.2.修改application.yml 文件
修改application.yml 配置文件,为Gateway添加:全局跨越设置、全局熔断降级过滤器、所有微服务的路由配置、以及将Gateway自身向Eureka注册。
server:
    port: 14000

spring:
    application:
        name: gateway-server
    #下面是关于Gateway的配置
    cloud:
        gateway:
            globalcors:           #设置全局跨域处理
                corsConfigurations:
                    '[/**]':
                        allowedOrigins: "*"
                        allowedHeaders: "*"
                        allowedMethods:
                        -   GET
                        -   POST
                        -   PUT
                        -   DELETE
            default-filters:      #设置全局熔断处理
            -   name: Hystrix
                args:
                    name: fallbackcmd
                    fallbackUri: forward:/fallback
            routes:               #设置路由
            -   id: userServer
                uri: lb://user-server
                predicates:
                -   Path=/UserController/*/**

            -   id: foodServer
                uri: lb://food-server
                predicates:
                -   Path=/FoodController/*/**

            -   id: businessServer
                uri: lb://business-server
                predicates:
                -   Path=/BusinessController/*/**

            -   id: cartServer
                uri: lb://cart-server
                predicates:
                -   Path=/CartController/*/**

            -   id: deliveryaddressServer
                uri: lb://deliveryaddress-server
                predicates:
                -   Path=/DeliveryaddressController/*/**

            -   id: ordersServer
                uri: lb://orders-server
                predicates:
                -   Path=/OrdersController/*/**

#eureka配置
eureka:
    client:
        service-url:
            defaultZone: http://eurekaServer13000:13000/eureka/,http://eurekaServer13001:13001/eureka/
    instance:
        prefer-ip-address: true   #使用ip地址向eureka server进行注册
        instance-id: ${spring.cloud.client.ip-address}:${server.port}
        lease-renewal-interval-in-seconds: 5         #续约间隔时间
        lease-expiration-duration-in-seconds: 15     #续约到期时间
注意:每个微服务的控制器组件上的@CrossOrigin(“*”)注解必须要删除。
1.3.创建Controller
创建Controller,并在Controller中添加降级逻辑:
package com.neusoft.controller;

import org.springframework.web.bind.annotation.RestController;
import org.springframework.web.bind.annotation.RequestMapping;
import com.neusoft.po.CommonResult;

@RestController
public class FallbackController {

    @RequestMapping("/fallback")
    public CommonResult fallback() {
        return new CommonResult(403,"Gateway触发了熔断降级",null);
    }
}
1.4.创建其它微服务集群
Gateway网关创建好之后,前端所有请求都通过Gateway网关来实现。并且Gateway网关也可以实现集群调用的负载均衡。所以,这里将商家微服务、购物车微服务、订单微服务都做成集群。
1.4.1.创建商家微服务集群
在父工程下,创建 Maven Module 子工程(工程名:business_server_10301;Packaging:jar)。此工程与business_server_10200工程内容一致,除了端口不同。
server:
    port: 10301

spring:
    application:
        name: business-server
    #业务配置
    datasource:
        username: root
        password: 123
        url: jdbc:mysql://localhost:3306/elm?characterEncoding=utf-8
        driver-class-name: com.mysql.jdbc.Driver

#业务配置
logging:
    level:
        org.springframework: debug
        com.neusoft.mapper: debug
#业务配置
mybatis:
    mapper-locations: classpath:mapper/*.xml
    type-aliases-package: com.neusoft.po

#eureka配置
eureka:
    client:
        service-url:
            #将自己注册给defaultZone所指定的eureka server集群上
            defaultZone: http://eurekaServer13000:13000/eureka/,http://eurekaServer13001:13001/eureka/
    instance:
        prefer-ip-address: true   #使用ip地址向eureka server进行注册
        instance-id: ${spring.cloud.client.ip-address}:${server.port}   #设置eureka控制台中显示的注册信息
        lease-renewal-interval-in-seconds: 5         #续约间隔时间
        lease-expiration-duration-in-seconds: 15     #续约到期时间

feign:
    hystrix:
        enabled: true     #在feign中开启hystrix熔断机制
1.4.2.创建购物车微服务集群
在父工程下,创建 Maven Module 子工程(工程名:cart_server_10401;Packaging:jar)。此工程与cart_server_10400工程内容一致,除了端口不同。
server:
    port: 10401

spring:
    application:
        name: cart-server
    #业务配置
    datasource:
        username: root
        password: 123
        url: jdbc:mysql://localhost:3306/elm?characterEncoding=utf-8
        driver-class-name: com.mysql.jdbc.Driver

#业务配置
logging:
    level:
        org.springframework: debug
        com.neusoft.mapper: debug
#业务配置
mybatis:
    mapper-locations: classpath:mapper/*.xml
    type-aliases-package: com.neusoft.po

#eureka配置
eureka:
    client:
        service-url:
            #将自己注册给defaultZone所指定的eureka server集群上
            defaultZone: http://eurekaServer13000:13000/eureka/,http://eurekaServer13001:13001/eureka/
    instance:
        prefer-ip-address: true   #使用ip地址向eureka server进行注册
        instance-id: ${spring.cloud.client.ip-address}:${server.port}   #设置eureka控制台中显示的注册信息
        lease-renewal-interval-in-seconds: 5         #续约间隔时间
        lease-expiration-duration-in-seconds: 15     #续约到期时间
1.4.3.创建订单微服务集群
在父工程下,创建 Maven Module 子工程(工程名:orders_server_10601;Packaging:jar)。此工程与orders_server_10600工程内容一致,除了端口不同。
server:
    port: 10601

spring:
    application:
        name: orders-server
    #业务配置
    datasource:
        username: root
        password: 123
        url: jdbc:mysql://localhost:3306/elm?characterEncoding=utf-8
        driver-class-name: com.mysql.jdbc.Driver

#业务配置
logging:
    level:
        org.springframework: debug
        com.neusoft.mapper: debug
#业务配置
mybatis:
    mapper-locations: classpath:mapper/*.xml
    type-aliases-package: com.neusoft.po

#eureka配置
eureka:
    client:
        service-url:
            #将自己注册给defaultZone所指定的eureka server集群上
            defaultZone: http://eurekaServer13000:13000/eureka/,http://eurekaServer13001:13001/eureka/
    instance:
        prefer-ip-address: true   #使用ip地址向eureka server进行注册
        instance-id: ${spring.cloud.client.ip-address}:${server.port}   #设置eureka控制台中显示的注册信息
        lease-renewal-interval-in-seconds: 5         #续约间隔时间
        lease-expiration-duration-in-seconds: 15     #续约到期时间
1.5.前端工程的修改
1.5.1.修改main.js文件
添加axios基础url部分的设置。(所有请求都通过网关,所以所有请求的url基础部分都一致了)
//设置axios的基础url部分
axios.defaults.baseURL = 'http://localhost:14000/';
在components文件夹中创建Error403.vue组件
<template>
    <div class="wrapper">
        <img src="../assets/error403.png"><br>
        <router-link to="/index">返回重试</router-link>
    </div>
</template>

<script>
</script>

<style scoped>
    .wrapper{
        text-align: center;
    }
    .wrapper img{
        margin: 120px 0 20px;
    }
    .wrapper a{
        color: #0097EF;
    }
</style>
设置axios响应拦截器。(用于处理403状况。也就是对熔断降级响应的处理)
//设置响应拦截器
axios.interceptors.response.use(function(response){
 if(response.data.code==403){
     location.href = '/error403';
 }
 return response;
},function(error){
 console.log(error);
 return Promise.reject(error);
});
Error403.vue组件不需要登陆验证,所以在路由守卫中添加配置
router.beforeEach(function(to,from,next){
 let user = sessionStorage.getItem('user');
 //除了登录、注册、首页、商家列表、商家信息之外,都需要判断是否登录
 if(!(to.path=='/'||to.path=='/index'||to.path=='/businessList'||to.path=='/businessInfo'||to.path=='/login'||to.path=='/register'||to.path=='/error403')){
     if(user==null){
         router.push('/login');
         location.reload();
     }
 }
 next();
});
1.5.2.修改所有组件的请求url
所有组件的axios请求url都要进行修改:
let url = `http://localhost:10300/BusinessController/listBusinessByOrderTypeId/${this.orderTypeId}`;
//修改为:
let url = `BusinessController/listBusinessByOrderTypeId/${this.orderTypeId}`;
1.6.测试
前后端工程启动后进行测试。

若有收获,就点个赞吧
0 人点赞
