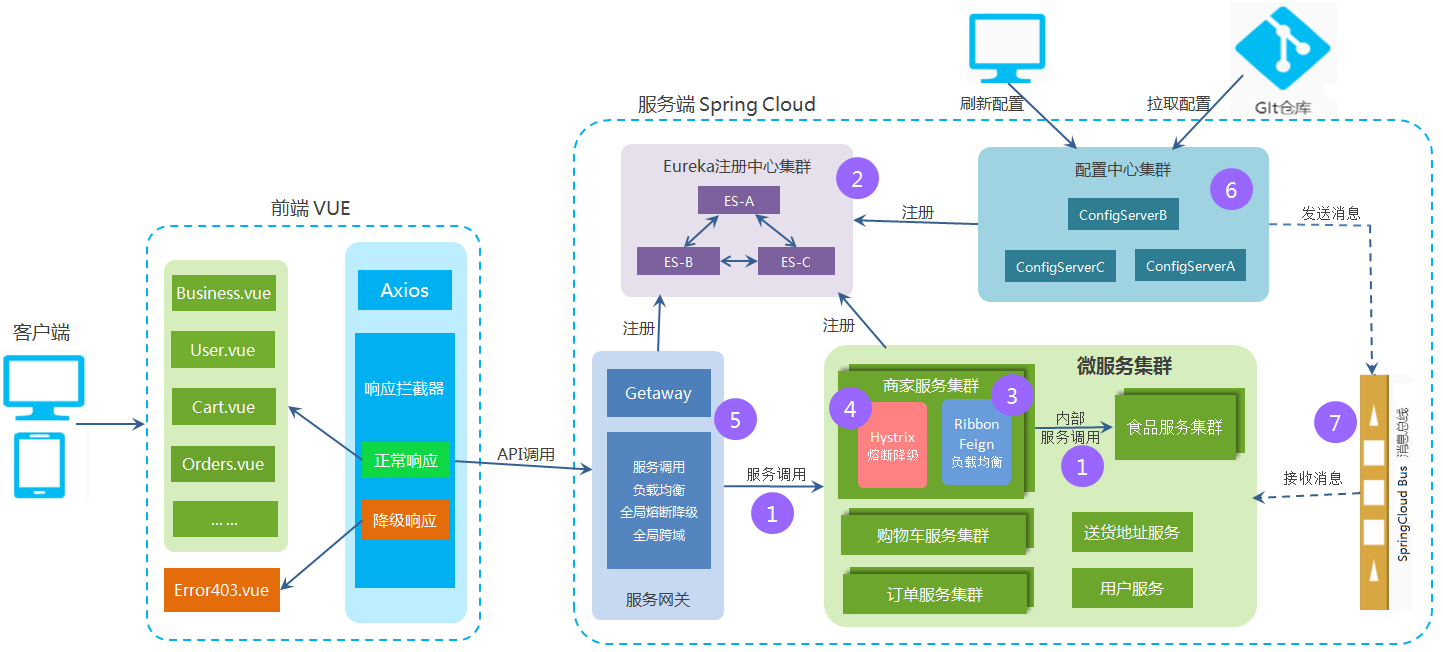
1.添加Bus配置刷新
本阶段项目完成总架构图中的第七阶段,添加Spring cloud bus 实现配置刷新。
1.1.安装rabbitMQ
按照 “SpringCloud课件” 中 “08.Bus消息总线.md” 章节中的内容,安装rabbitMQ。
1.2.config server端配置
- 修改 config_server_15000工程和config_server_15001 工程,添加依赖:
<!-- 消息总线依赖 --><dependency><groupId>org.springframework.cloud</groupId><artifactId>spring-cloud-bus</artifactId></dependency><dependency><groupId>org.springframework.cloud</groupId><artifactId>spring-cloud-stream-binder-rabbit</artifactId></dependency><!-- 监听依赖 --><dependency><groupId>org.springframework.boot</groupId><artifactId>spring-boot-starter-actuator</artifactId></dependency>
- 修改配置文件:
```yaml server: port: 15000
spring: application: name: config-server cloud: config: server: git: uri: https://gitee.com/yuhongjun01/scc-test.git #git仓库地址
# rabbitmq的配置
rabbitmq:
    host: 127.0.0.1
    port: 5672
    username: guest
    password: guest
使用bus总线刷新配置文件
management: endpoints: web: exposure: include: bus-refresh #暴露bus-refresh节点,通过此节点刷新配置
eureka配置
…
   1. rabbitmq的配置和bus总线配置是新添加的
   1. rabbitmq的通信端口是5672,而后台管理端口是15672

<a name="Iurwy"></a>
## 1.3.微服务端配置

1. 给每一个微服务添加依赖(与config server是一样的)<br />
```xml
<!-- 消息总线依赖 -->
<dependency>
    <groupId>org.springframework.cloud</groupId>
    <artifactId>spring-cloud-bus</artifactId>
</dependency>
<dependency>
    <groupId>org.springframework.cloud</groupId>
    <artifactId>spring-cloud-stream-binder-rabbit</artifactId>
</dependency>

<!-- 监听依赖 -->
<dependency>
    <groupId>org.springframework.boot</groupId>
    <artifactId>spring-boot-starter-actuator</artifactId>
</dependency>
- 给每一个微服务的Controller组件添加@RefreshScope注解,开启动态刷新
@RestController
@RequestMapping("/user")
@RefreshScope       //开启动态刷新
public class UserController {}
1.4.测试
- 修改 Git仓库中配置文件内容。
- 在Postman中发送请求:http://localhost:15000/actuator/bus-refresh (必须是post请求)
- 访问微服务,可以看到配置信息已经刷新。

