1.SpringCloud概述
Spring Cloud官方网址:https://spring.io/projects/spring-cloud
Spring Cloud 提供一站式的微服务架构解决方案。也就是说:Spring Cloud 提供了一整套的微服务架构解决方案:服务注册与发现,服务调用,服务保护与熔断,网关,统一消息中间件、配置管理、链路追踪等。
1.1.SpringCloud核心组件
SpringCloud是在SpringBoot的基础上,增加了很多微服务相关的规范。目前,SpringCloud规范已经由Spring官方、SpringCloud Netflix、SpringCloud Alibaba等实现。通过组件化的方式,SpringCloud将这些实现整合起来,构成全家桶式的微服务技术栈。
SpringCloud Netflix组件: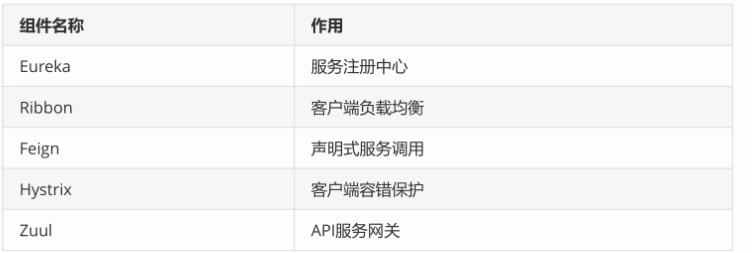
SpringCloud Alibaba组件:
SpringCloud原生组件: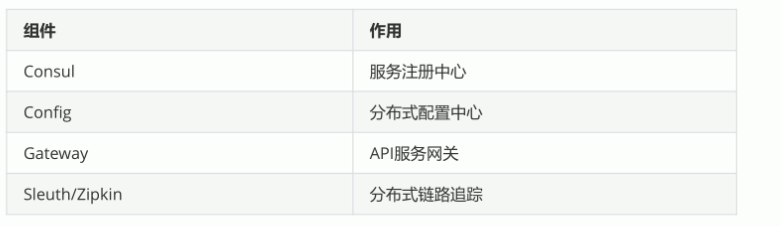
1.2.SpringBoot与SpringCloud
- Spring boot 是 Spring 的一套快速配置脚手架,可以基于spring boot 快速开发单个微服务。
- Spring Cloud是一个基于Spring Boot的为服务治理框架。
- Spring Boot专注于快速、方便集成的单个微服务个体,Spring Cloud关注全局的服务治理框架;
spring cloud 与 spring boot 的版本兼容问题
- Spring Cloud是一个由众多独立子项目组成的大型综合项目,每个子项目有不同的发行节奏,都维护着自己的发布版本号。Spring Cloud通过一个资源清单BOM(Bill of Materials)来管理每个版本的子项目清单。为避免与子项目的发布号混淆,所以没有采用版本号的方式,而是通过命名的方式。
- 这些版本名称的命名方式采用了伦敦地铁站的名称,同时根据字母表的顺序来对应版本时间顺序,比如:最早的Release版本:Angel,第二个Release版本:Brixton,然后是Camden、Dalston、Edgware、Finchley等。
- 当一个版本的Spring Cloud项目的发布内容积累到临界点或者解决了一个严重bug后,就会发布一个“Service Releases”版本,简称SR X版本,其中X是一个递增数字。
- spring cloud 与 spring boot 的区别与版本兼容问题查询: https://spring.io/projects/spring-cloud
1.3.SpringCloud体系架构图
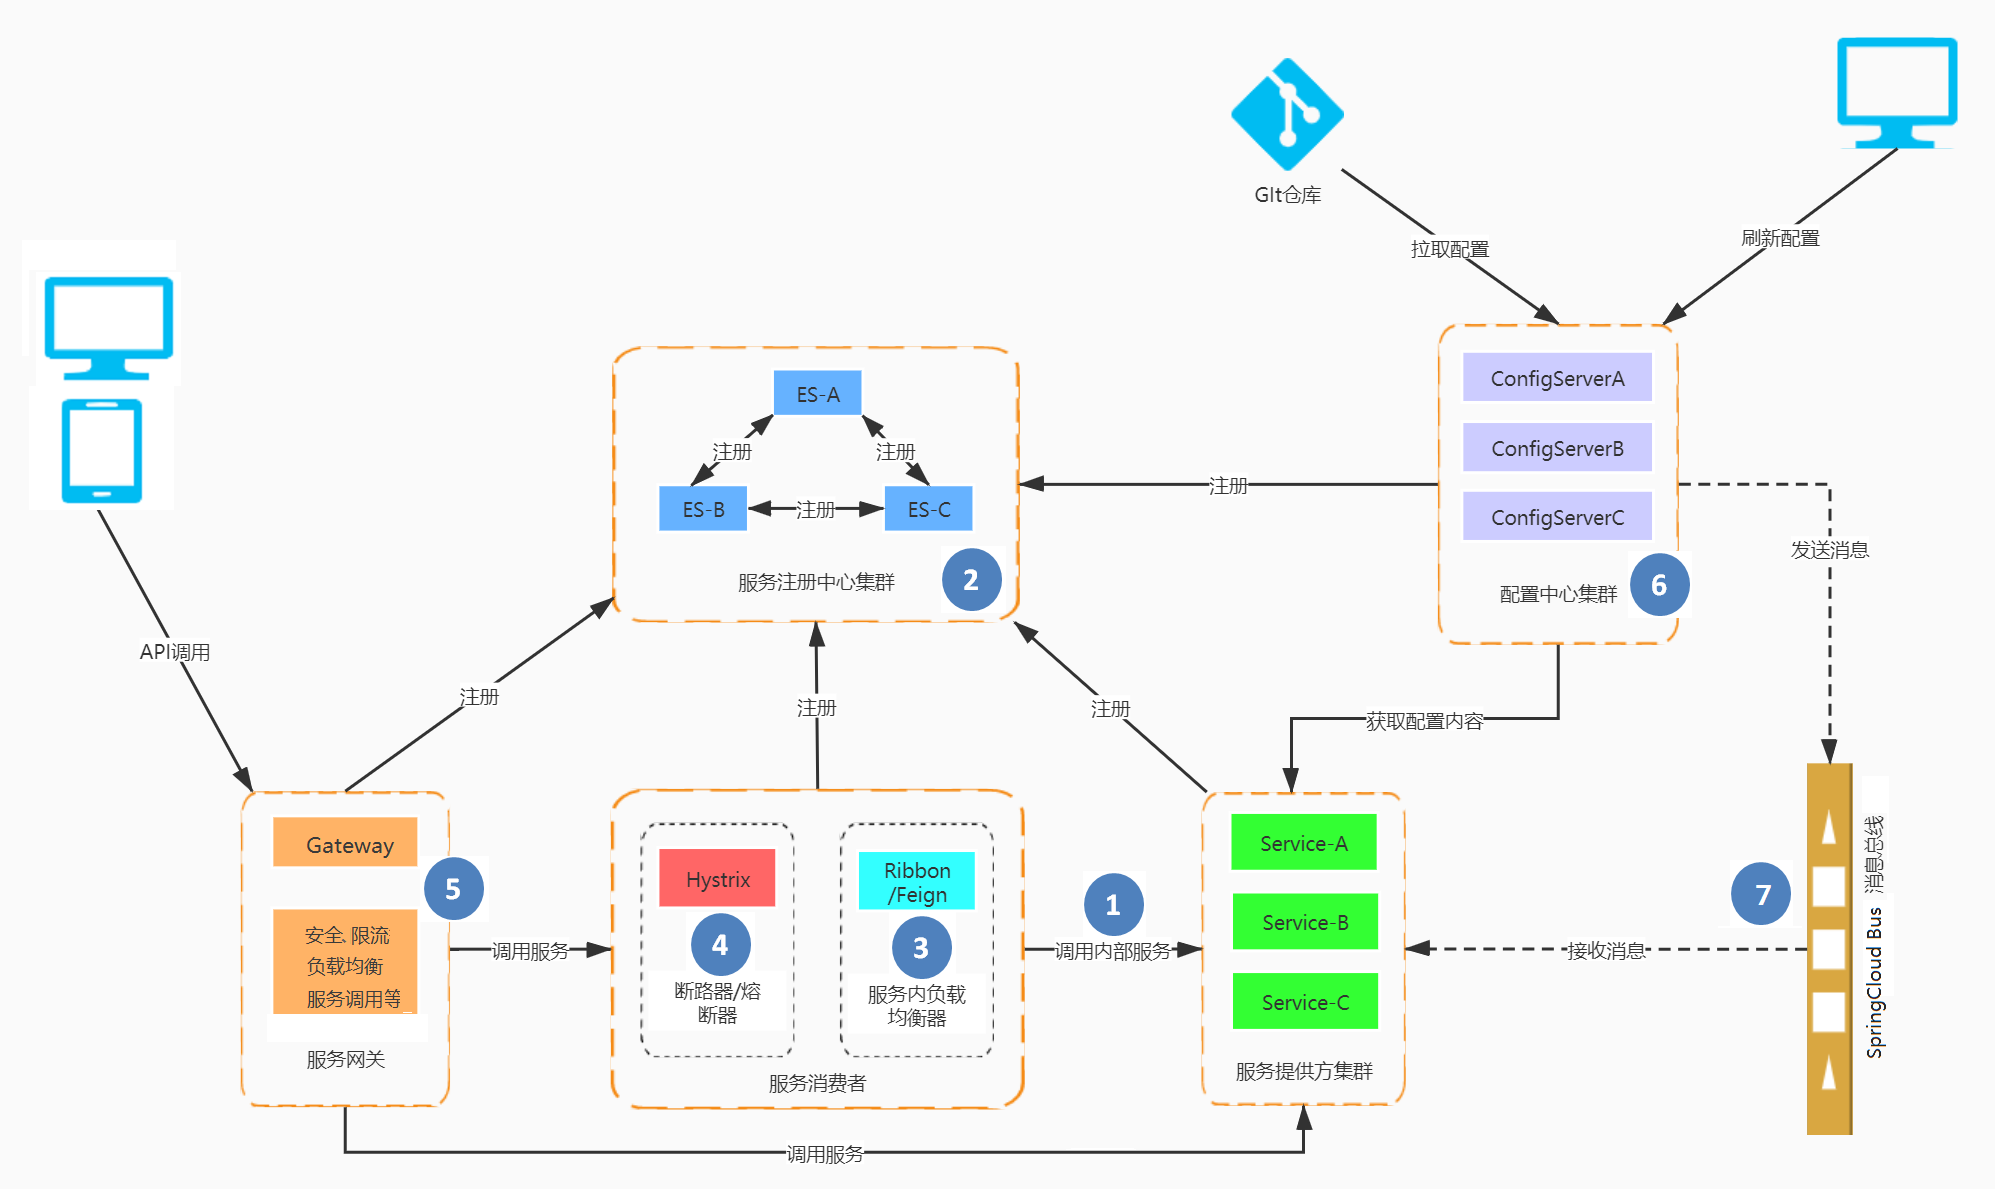
后续课程中,会将上图中的各个部分逐步的实现:
- 对应第二章内容:基于RestTemplate的微服务调用
- 对应第三章内容:Eureka服务注册与发现,Eureka高可用集群
- 对应第四章内容:基于HTTP的客户端负载均衡器Ribbon,在Ribbon基础上的改进Feign组件
- 对应第五章内容:Hystrix延迟和容错
- 对应第六章内容:基于Spring Cloud Gateway的微服务网关
- 对应第七章内容:基于Spring Cloud Config的集中配置管理
- 对应第八章内容:基于Spring Cloud Bus的配置刷新
2.SpringCloud微服务调用
本章所讲内容为 Spring Cloud 架构图中的第一个部分,基于RestTemplate的微服务调用。
2.1.微服务调用概述
- 在微服务中,最基本的两个角色是服务提供者与服务消费者。
- 服务提供者:服务的被调用方(即:为其它服务提供服务的服务)
- 服务消费者:服务的调用方(即:依赖其它服务的服务)

- 使用SpringCloud提供的RestTemplate类可用于微服务之间的调用
- RestTemplate是从Spring3.0开始支持的一个HTTP请求工具。它简化了HTTP服务的通信方式,统一了RESTful的标准,我们只需要传入url及返回值类型即可。相较于其它方式(HttpClient),RestTemplate是一种更优雅的调用RESTful服务的方式。
- RestTemplate 还有提供了如下功能:
- 支持Restful方式请求。
- 支持自动转换JSON数据。
- 使用 RestTemplate 完成 GET、POST、PUT、DELETE 请求的用法:
请求方式 操作类型 方法
GET 查询 getForObject( 请求url , 返回类型 );
POST 插入 postForObject( 请求url , 返回类型 );
PUT 更新 put( 请求url , 提交参数 );
DELETE 删除 delete( 请求url , 提交参数 );
2.2.创建父工程
创建 Maven Project 父工程(工程名:springcloud_demo;Packaging:pom)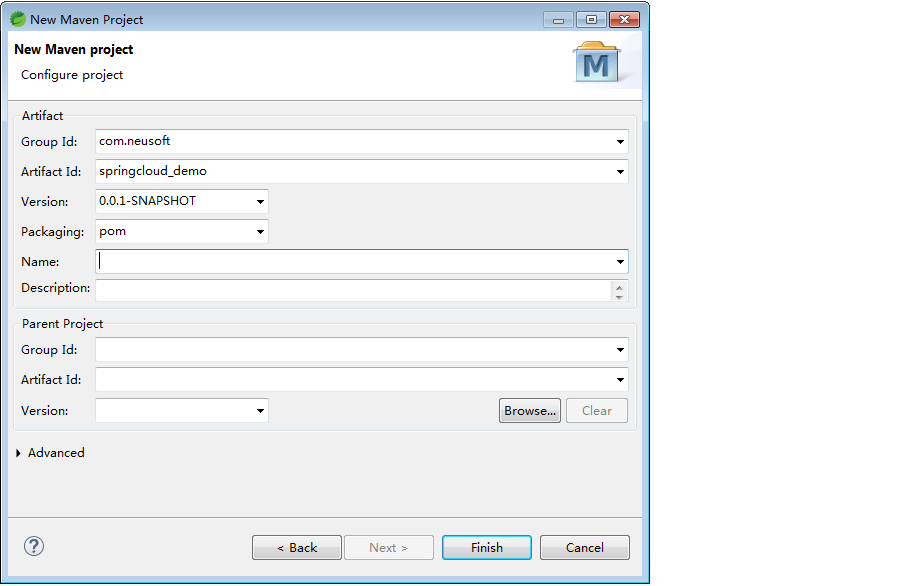
删除src目录,并修改pom.xml文件
<project xmlns="http://maven.apache.org/POM/4.0.0"xmlns:xsi="http://www.w3.org/2001/XMLSchema-instance"xsi:schemaLocation="http://maven.apache.org/POM/4.0.0 https://maven.apache.org/xsd/maven-4.0.0.xsd"><modelVersion>4.0.0</modelVersion><groupId>com.neusoft</groupId><artifactId>spring_cloud_demo</artifactId><version>0.0.1-SNAPSHOT</version><packaging>pom</packaging><!-- 统一JAR包和版本号的管理 --><properties><project.build.sourceEncoding>UTF-8</project.build.sourceEncoding><maven.compiler.source>1.8</maven.compiler.source><maven.compiler.target>1.8</maven.compiler.target></properties><!--dependmanagement是用在父工程中声明依赖,不引用。子模块继承之后再引包。作用是,锁定版本,子模块不用写grouid and version--><dependencyManagement><dependencies><!--boot 2.3.3 --><dependency><groupId>org.springframework.boot</groupId><artifactId>spring-boot-dependencies</artifactId><version>2.3.3.RELEASE</version><type>pom</type><!-- Maven也是单继承。这里继承了spring-boot中的dependencyManagement但是下面还要继承spring-cloud中的dependencyManagement。使用scope=import就可以实现多继承了--><scope>import</scope></dependency><!--cloud hoxton.sr9 --><dependency><groupId>org.springframework.cloud</groupId><artifactId>spring-cloud-dependencies</artifactId><version>Hoxton.SR9</version><type>pom</type><scope>import</scope></dependency></dependencies></dependencyManagement><!-- 创建完子工程后,此处自动添加子工程模块 --><modules><module>provider_server_8001</module><module>consumer_server8888</module></modules></project>
注意:根据Spring官方提供的SpringCloud与SpringBoot版本兼容说明中,SpringCloud的Hoxton版本必须使用SpringBoot的2.2.x或2.3.x版本。
2.3.创建服务提供者子工程
在父工程下,创建 Maven Module 子工程(工程名:provider_server_11000;Packaging:jar)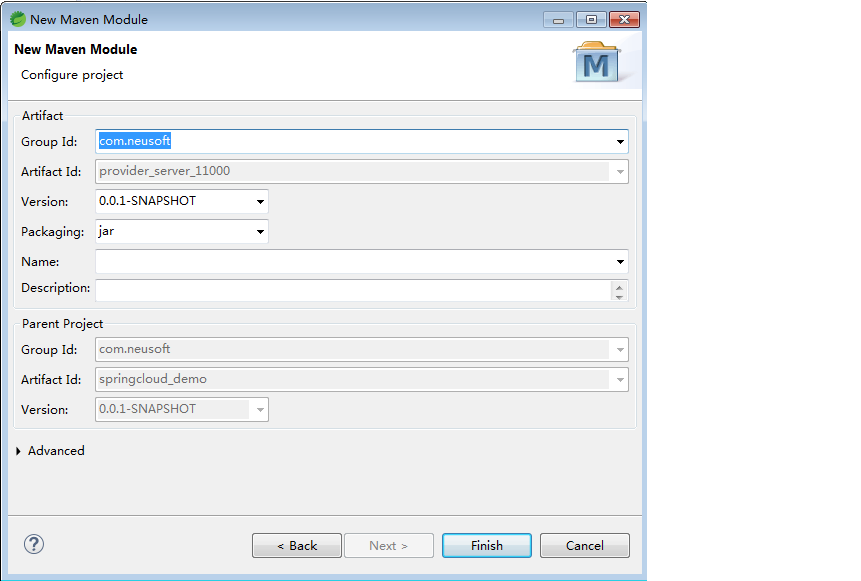
修改pom.xml文件
<project xmlns="http://maven.apache.org/POM/4.0.0"
    xmlns:xsi="http://www.w3.org/2001/XMLSchema-instance"
    xsi:schemaLocation="http://maven.apache.org/POM/4.0.0 https://maven.apache.org/xsd/maven-4.0.0.xsd">
    <modelVersion>4.0.0</modelVersion>
    <parent>
        <groupId>com.neusoft</groupId>
        <artifactId>spring_cloud_demo</artifactId>
        <version>0.0.1-SNAPSHOT</version>
    </parent>
    <artifactId>provider_server_11000</artifactId>

    <dependencies>
        <!--以下是boot -->
        <dependency>
            <groupId>org.springframework.boot</groupId>
            <artifactId>spring-boot-starter-web</artifactId>
        </dependency>

        <!--热部署 gav -->
        <dependency>
            <groupId>org.springframework.boot</groupId>
            <artifactId>spring-boot-devtools</artifactId>
            <scope>runtime</scope>
            <optional>true</optional>
        </dependency>
    </dependencies>
</project>
创建主启动类
package com.neusoft;

import org.springframework.boot.SpringApplication;
import org.springframework.boot.autoconfigure.SpringBootApplication;

@SpringBootApplication
public class MyApplication {

    public static void main(String[] args) {
        SpringApplication.run(MyApplication.class, args);
    }
}
创建共通数据接口
public class CommonResult<T> implements Serializable {

    private Integer code;
    private String message;
    private T result;

    //构造方法...

    //get/set方法 ...
}
创建Controller组件
import org.springframework.web.bind.annotation.GetMapping;
import org.springframework.web.bind.annotation.PathVariable;
import org.springframework.web.bind.annotation.RequestMapping;
import org.springframework.web.bind.annotation.RestController;

import com.neusoft.po.CommonResult;
import com.neusoft.po.User;

@RestController
@RequestMapping("/user")
public class UserController {

    @GetMapping("/getUserById/{userId}")
    public CommonResult<User> getUserById(@PathVariable("userId") Integer userId){
        //模拟返回业务数据
        return new CommonResult(200,"success",new User(userId,"张三","123"));
    }
}
创建application.yml
server:
    port: 11000

spring:
    application:
        name: provider-server
2.4.创建服务消费者子工程
在父工程下,创建 Maven Module 子工程(工程名:consumer_server_12000;Packaging:jar)
修改pom.xml文件
<project xmlns="http://maven.apache.org/POM/4.0.0"
    xmlns:xsi="http://www.w3.org/2001/XMLSchema-instance"
    xsi:schemaLocation="http://maven.apache.org/POM/4.0.0 https://maven.apache.org/xsd/maven-4.0.0.xsd">
    <modelVersion>4.0.0</modelVersion>
    <parent>
        <groupId>com.neusoft</groupId>
        <artifactId>spring_cloud_demo</artifactId>
        <version>0.0.1-SNAPSHOT</version>
    </parent>
    <artifactId>consumer_server_12000</artifactId>

    <dependencies>
        <!--以下是boot -->
        <dependency>
            <groupId>org.springframework.boot</groupId>
            <artifactId>spring-boot-starter-web</artifactId>
        </dependency>

        <!--热部署 gav -->
        <dependency>
            <groupId>org.springframework.boot</groupId>
            <artifactId>spring-boot-devtools</artifactId>
            <scope>runtime</scope>
            <optional>true</optional>
        </dependency>
    </dependencies>
</project>
创建主启动类
package com.neusoft;

import org.springframework.boot.SpringApplication;
import org.springframework.boot.autoconfigure.SpringBootApplication;
import org.springframework.context.annotation.Bean;
import org.springframework.web.client.RestTemplate;

@SpringBootApplication
public class MyApplication {

    /**
     * 使用spring提供的RestTemplate发送http请求调用微服务
     * 这里创建RestTemplate对象交给容器管理
     */
    @Bean
    public RestTemplate getRestTemplate() {
        return new RestTemplate();
    }

    public static void main(String[] args) {
        SpringApplication.run(MyApplication.class, args);
    }
}
在主启动类中,将RestTemplate实例放入Spring容器中。
创建Controller组件
package com.neusoft.controller;

import org.springframework.beans.factory.annotation.Autowired;
import org.springframework.web.bind.annotation.GetMapping;
import org.springframework.web.bind.annotation.PathVariable;
import org.springframework.web.bind.annotation.RequestMapping;
import org.springframework.web.bind.annotation.RestController;
import org.springframework.web.client.RestTemplate;

import com.neusoft.po.CommonResult;

@RestController
@RequestMapping("/cart")
public class CartController {

    @Autowired
    private RestTemplate restTemplate;

    @GetMapping("/getUserById/{userId}")
    public CommonResult getUserById(@PathVariable("userId") Integer userId){
        //使用getForObject方法调用提供者微服务
        CommonResult result = restTemplate.getForObject(
               "http://localhost:11000/user/getUserById/"+userId, CommonResult.class);
        return result;
    }
}
注意:在这里的请求url中,直接写IP与端口,这属于硬编码方式,不利于维护。后续会有改进措施。
创建application.yml
server:
    port: 12000

spring:
    application:
        name: consumer-server
2.5.测试
分别启动服务提供者和服务消费者,在浏览器地址栏中输入:http://localhost:12000/cart/getUserById/1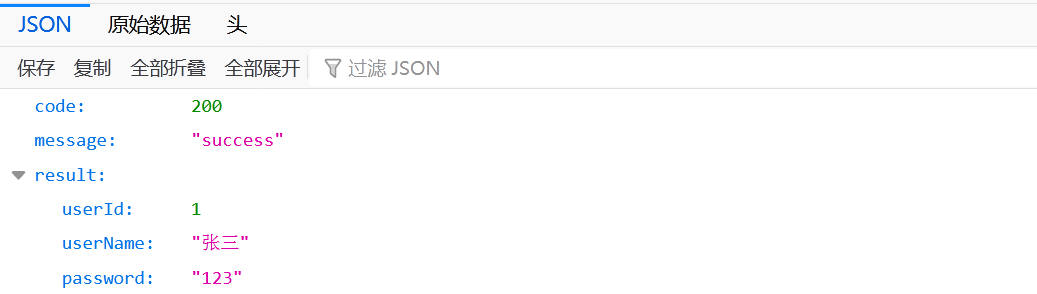
至此,我们完成了一个微服务的内部调用,即服务消费者调用服务提供者。

若有收获,就点个赞吧
0 人点赞
