1.搭建Vue-Cli脚手架
vue-cli 是一个官方发布 vue.js 项目脚手架,使用 vue-cli 可以快速创建 vue 项目。
Vue Cli 官网:https://cli.vuejs.org/zh/
下面介绍 vue-cli 的整个搭建过程。
注意:以下内容是基于vue3.0以上版本的, vue-cli是基于5.0.0以上版本的。
1.1.安装npm
NPM(node package manager)是随同node.js一起安装的包管理工具,能解决前端代码部署上的很多问题,常见的使用场景有以下几种:
- 允许用户从NPM服务器下载别人编写的第三方包到本地使用。
- 允许用户从NPM服务器下载并安装别人编写的命令行程序到本地使用。
- 允许用户将自己编写的包或命令行程序上传到NPM服务器供别人使用。
实际上,npm就是前端的Maven。
从node官网下载并安装node,安装步骤很简单,只要一路next就可以了。 安装完成后,打开命令行工具输入命令node -v,如下图,如果出现对应版本号,就说明安装成功了。
C:\Users\Administrator>node -vv10.16.0
我们所需要的npm也已经安装好了,输入如下命令,显示出npm的版本信息。
C:\Users\Administrator>npm -v6.9.0
1.2.全局安装 vue-cli
全局安装vuecli(就相当与在本机的npm仓库中有了vuecli):
//安装最新@vue/cli版本npm install -g @vue/cli//安装指定的@vue/cli版本npm install -g @vue/cli@x.x.x
安装完成后,使用 vue -V 显示版本号来测试vue是否安装成功。
C:\Users\Administrator>vue -V@vue/cli 5.x.x
其它命令:
# 查看远程仓库中的@vue/cli版本号:npm view @vue/cli versions --json# 卸载旧版本的vue-cli:npm uninstall vue-cli -g
1.3.创建vue-cli工程
- 在命令行下进入到工作空间文件夹中,输入如下命令:
vue create hello hello是工程名(注意:工程名必须全部小写) 如果系统检测到你的网络环境不好,会自动提示是否要切换npm仓库地址:
?  Your connection to the default npm registry seems to be slow.
Use https://registry.npmmirror.com for faster installation? (Y/n)
如果出现此选项,选择”Y”即可。选择预设模板。这里选择“Manually select features”(手动选择特征)
- 通过 ↑↓ 箭头选择依赖,按 “空格” 选中,按 “a” 全选,按 “i” 反选。
- Babel:转码器,可以将ES6代码转为ES5代码,可兼容不支持ES6的浏览器。
- TypeScript:是JavaScript的超集(.ts文件),包含并扩展了 JavaScript 的语法。。
- Progressive Web App (PWA) Support:渐进式Web应用程序
- Router :vue-router(vue路由)
- Vuex :vuex(vue的状态管理模式)
- CSS Pre-processors :CSS 预处理器(如:less、sass)
- Linter / Formatter:代码风格检查和格式化(如:ESlint)
- Unit Testing :单元测试(unit tests)
- E2E Testing :e2e(end to end) 测试
第一次创建工程时,可以只选择Babel和Router即可。
- 选择Vue版本,这里选择Vue3.0。
> 3.x
2.x
- 选择是否使用history 形式的路由,也就是询问路径是否带 # 号,这里选择 n。
? Use history mode for router? (Requires proper server setup for index fallback in production) (Y/n) n
- 询问将依赖文件放在独立文件中,还是package.json中:为了保持工程配置文件的整洁性,这里选择“In package.json”。
? Where do you prefer placing config for Babel, ESLint, etc.?
In dedicated config files
> In package.json
- 询问是否将当前选择保存以备下次使用。这里选择“n”。
? Save this as a preset for future projects? (y/N) n
接下来耐心等待安装:最后出现:
$ cd hello
$ npm run serve
按照提示,进入工程根目录。输入:npm run serve 启动工程。
E:\vueCliWork>cd hello
E:\vueCliWork\hello>npm run serve
- 启动成功。
App running at:
- Local:   http://localhost:8080/
- Network: http://10.10.20.42:8080/

Note that the development build is not optimized.
To create a production build, run npm run build.
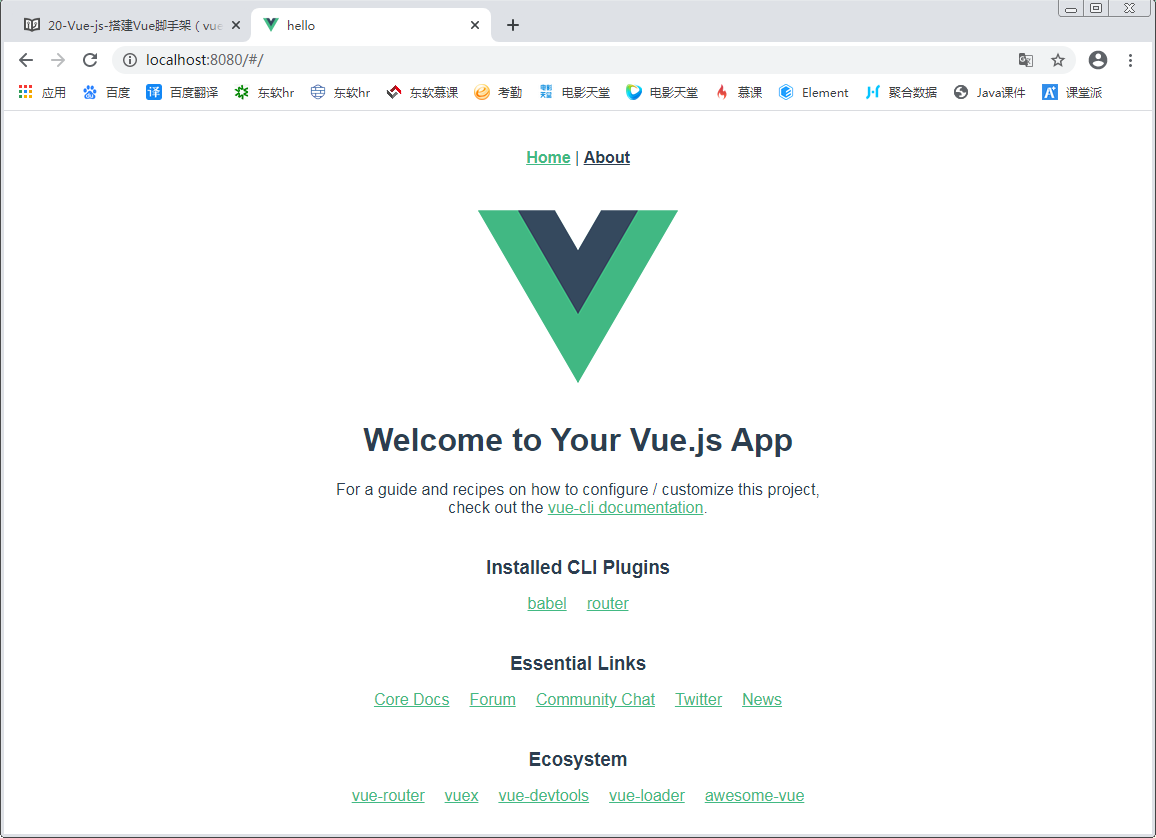
- 在浏览器中测试:http://localhost:8080
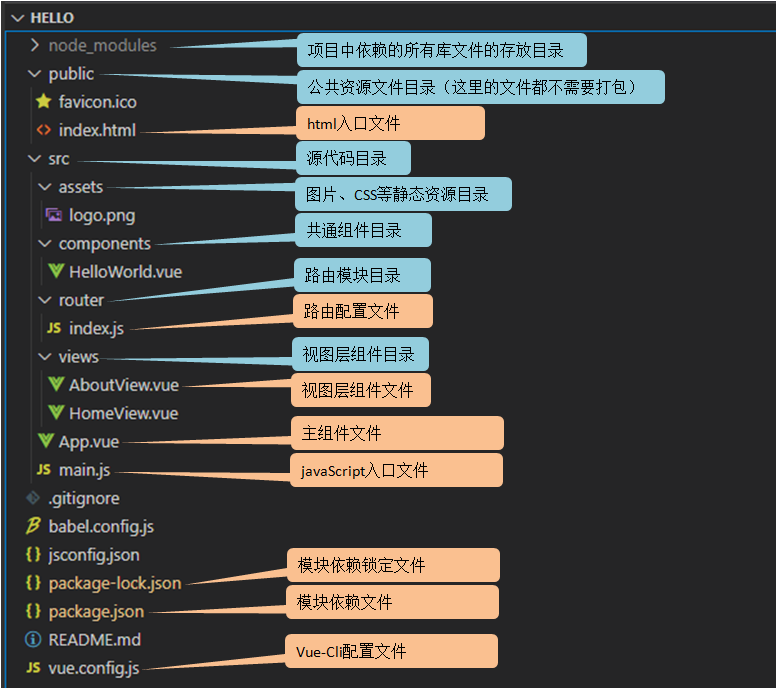
2.Vue-cli工程目录结构及运行分析
- package.json文件:这里配置了本工程中安装的模块:
"dependencies": {
"core-js": "^3.8.3",
"vue": "^3.2.13",
"vue-router": "^4.0.3"
}
- html入口文件:public目录中的index.html文件。在此文件中有一个总容器:
注意:整个工程中只有index.html一个页面,所以,Vue-cli工程就是一个SPA(单页应用)工程。
- javascript入口文件:src目录中的main.js文件是应用程序的入口文件: ```javascript import { createApp } from ‘vue’ import App from ‘./App.vue’ import router from ‘./router’
createApp(App).use(router).mount(‘#app’)
4.  App.vue主组件(一个vue文件,就是一个Vue组件):
   - template标签中书写当前组件html代码。这里写了两个路由跳转。
   - script标签中书写当前组件的js代码。
   - style标签中书写当前组件的css代码。

阅读App.vue中的代码,并根据路由跳转,继续阅读其它Vue组件。最终我们就会知道:为什么运行后浏览器中会显示这样的页面。

5.  最后,在package.json文件中有这样的配置:
```javascript
"scripts": {
    "serve": "vue-cli-service serve",
    "build": "vue-cli-service build"
}
于是,我们知道了,npm run serve命令,实际上就是运行“vue-cli-service serve”
根据上面的分析我们知道,在一个npm构建的工程中(Vue-cli就是一个npm构建的工程),package.json文件至关重要。它保存了本工程的所有依赖信息。
所以,当工程中的node_modules文件夹丢失或损坏时,只要有package.json文件在,那么只要使用 npm install命令,所有依赖就都可以恢复。
3.Vue-cli工程配置文件
vuecli3.x以上版本中为了精简配置文件,专门设置了一个可选的配置文件。
只要在项目的根目录(与package.json同级)中,添加名称为vue.config.js的文件,就能自动被vue-cli加载。
在此文件中可以配置vuecli工程中的一些配置。
在vuecli5.x以上版本中,在创建工程时就已经自动添加vue.config.js配置文件了。
const { defineConfig } = require('@vue/cli-service')
module.exports = defineConfig({
  transpileDependencies: true
})
在此配置文件中可以添加自定义配置。比如:修改端口号:
const { defineConfig } = require('@vue/cli-service')
module.exports = defineConfig({
  transpileDependencies: true,
  devServer: {
    port: 8081  //修改启动端口
  }
})
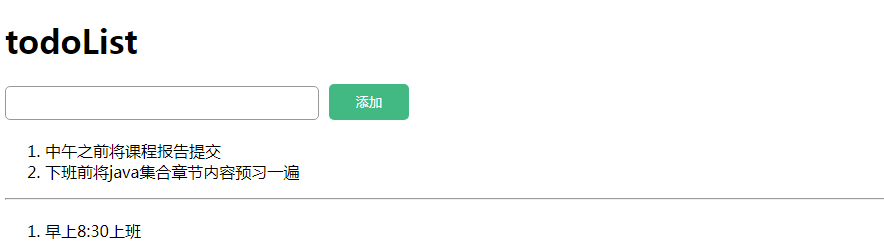
4.使用Vue-cli完成todoList案例
ToDoList官网:www.todolist.com.cn
todoList案例功能介绍:
- 输入框输入待办事项后点击添加,该事项会出现在todo区域内,输入框内的文字消失
- todo区域内的事项为待办事项,点击某一事项后,该事项移入done区域
- done区域内的事项为完成事项,点击某一事项后,该事项消失
4.1.工程目录结构
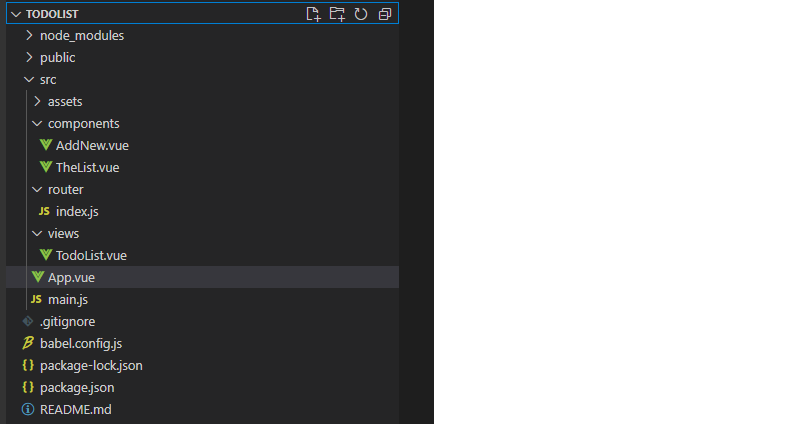
- 主组件:App.vue
- 视图组件:views目录下的 TodoList.vue
- 共通组件:components目录下的 AddNew.vue、TheList.vue
- 路由组件:router 目录下的 index.js
4.2.组件代码
主组件:App.vue
<template>
  <router-view/>
</template>

<style>
</style>
视图组件:TodoList.vue
<template>
  <div id="app">
    <h1>todoList</h1>
    <AddNew @submitNewItem="addNewItem"></AddNew>
    <!-- todo 代办区域 -->
    <TheList @handleJudge="toDone" :list="todoList"></TheList>
    <hr />
    <!-- done 完成区域 -->
    <TheList
      @handleDelete="toDelete"
      :list="doneList"
      :listType="true"
    ></TheList>
  </div>
</template>

<script>
import AddNew from "../components/AddNew";
import TheList from "../components/TheList";

export default {
  name: "TodoList",
  data() {
    return {
      todoList: [], //代办事项
      doneList: [], //完成事项
    };
  },
  methods: {
    addNewItem(newItem) {
      this.todoList.push(newItem);
    },
    toDone(index) {
      this.doneList.push(this.todoList.splice(index, 1)[0]);
    },
    toDelete(index) {
      this.doneList.splice(index, 1);
    },
  },
  components: {
    AddNew,
    TheList,
  },
};
</script>
共通组件 AddNew.vue
<template>
  <div id="add-new">
    <input type="text" v-model="newItem" />
    <button @click="handleAdd">添加</button>
  </div>
</template>

<script>
export default {
  name: "AddNew",
  data() {
    return {
      newItem: "",
    };
  },
  methods: {
    handleAdd() {
      if (this.newItem == "") {
        alert("不能为空");
        return;
      }
      this.$emit("submitNewItem", this.newItem);
      this.newItem = "";
    },
  },
};
</script>

<style scoped>
input {
  border: none;
  outline: none;
  width: 300px;
  height: 30px;
  border: solid 1px #999;
  border-radius: 5px;
  padding-left: 10px;
}
button {
  border: none;
  outline: none;
  width: 80px;
  height: 36px;
  background-color: #42b983;
  border-radius: 5px;
  margin-left: 10px;
  color: #fff;
}
</style>
共通组件 TheList.vue
<template>
  <ol>
    <li v-for="(item, index) in list" :key="index" @click="judgeItem(index)">
      {{ item }}
    </li>
  </ol>
</template>

<script>
export default {
  name: "TheList",
  /*
   * props除了使用字符串数组形式,还可以使用对象形式。
   * 这样就可以对传入的数据进行验证。
   * 包括数据类型验证、必填验证、设置默认值等。
   */
  props: {
    list: {
      type: Array,
      required: true,
    },
    listType: {
      type: Boolean,
      default: false,
    },
  },
  methods: {
    judgeItem(index) {
      if (!this.listType) {
        this.$emit("handleJudge", index);
      } else {
        this.$emit("handleDelete", index);
      }
    },
  },
};
</script>

<style scoped>
ol {
  margin-top: 20px;
}
ol li {
  cursor: pointer;
}
</style>
路由组件
import { createRouter, createWebHashHistory } from 'vue-router'
import TodoList from '../views/TodoList.vue'

const routes = [
  {
    path: '/',
    name: 'TodoList',
    component: TodoList
  }
]

const router = createRouter({
  history: createWebHashHistory(),
  routes
})

export default router
5.Vue-cli的打包部署
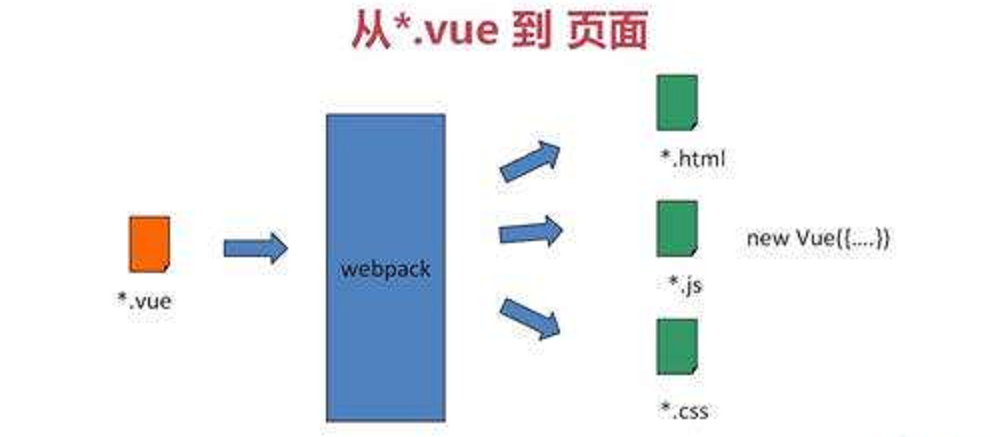
5.1.Vue-cli工程为什么要打包部署
我们所完成的工程,最终都是要部署到服务器(Tomcat、Nginx等等)上运行的。但是,服务器是不可能识别vue文件的,因为vue文件只是Vue-cli工程中的一种自定义文件。
所以,我们需要将vue文件中的html代码、css代码、js代码抽取出来,重新打包成真正的html文件、css、文件和js文件,然后才能部署到服务器上。
5.2.Vue-cli工程打包配置
在vue.config.js文件中添加如下配置:
module.exports = {
    //打包基本目录
    publicPath:'./',
    //输出目录
    outputDir:'dist',
    //静态资源目录
    assetsDir:'assets',

    ... ...
}
在命令行中进入到工程目录,运行如下命令:
npm run build
当出现如下信息时,就表示打包成功:
D:\vswork\hello>npm run build

> hello@0.1.0 build D:\vswork\hello
> vue-cli-service build

All browser targets in the browserslist configuration have supported ES module.
Therefore we don't build two separate bundles for differential loading.


|  Building for production...

 DONE  Compiled successfully in 9830ms                         3:55:44 ├F10: PM
┤

  File                                      Size             Gzipped

  dist\assets\js\chunk-vendors.017df1e4.    97.24 KiB        35.95 KiB
  js
  dist\assets\js\app.d9edd01d.js            3.63 KiB         1.72 KiB
  dist\assets\css\app.4b579015.css          0.34 KiB         0.20 KiB

  Images and other types of assets omitted.
  Build at: 2022-04-02T07:55:44.769Z - Hash: 0bb120b23a145c5a - Time: 9830ms

 DONE  Build complete. The dist directory is ready to be deployed.
 INFO  Check out deployment instructions at https://cli.vuejs.org/guide/deployme
nt.html
在工程目录中,就会出现 “dist” 目录,这就是打包好的工程。
此时,就可以在浏览器中运行 index.html 文件了。

若有收获,就点个赞吧
0 人点赞
