如何使用Apache Spark中的实时机器学习管道构建预测模型?

在前一篇题为“使用Apache Kafka和Spark的实时数据管道”的文章中,我描述了如何构建高吞吐量,可扩展,可靠且容错的数据管道,能够获取基于事件的数据并最终将这些事件流式传输到我们处理它们的Apache Spark。我通过简单地使用Apache Spark来使用基于事件的数据并将它们打印到控制台来结束上一篇文章。在我上一篇题为“带有Avro Bijection的Apache Kafka Producer”的文章中,我更新了我们的数据管道,使用Apache Kafka Producer在Twitter4j包装器中使用Twitter的Hosebird客户端收集推文,其中推文使用Avro库和Bijection进行序列化。在本文中,我们将使用更新的基于事件的数据管道,使用Apache Spark实时构建预测模型。
目标
我们在本文中的目标是对有关航空公司的推文进行实时情绪分析 - 特别是考虑到英国航空公司最近的全球IT故障!我们将尝试自动将关于航空公司的推文分类为对该航空公司的负面或非负面因为我们的数据管道几乎实时接收它们。
数据
我们将用于构建我们的训练模型的数据集是来自CrowdFlower的 2015年2月美国航空公司的14,640条推文的集合。这些推文已经被分类,以确定他们的文字内容是否对所涉及的航空公司是积极的,消极的或中立的。可以使用以下链接下载数据集。
基础
让我们首先解释一些建模概念背后的基本理论,我将在本文后面介绍。我们知识库背后的首要目标是让尽可能多的人能够获得有关大数据和数据分析的知识。话虽如此,虽然本节旨在介绍一些更基本的概念,但很难在一页中详细解释数学理论。因此,如果这篇文章引起您的兴趣(我希望它会!),我建议您查看一些在Coursera和edX等网站上提供的精彩在线课程,或者甚至注册更正式的课程。像开放大学这样的组织。
预测模型
建立预测模型以进行预测!监督学习是一种机器学习算法,它使用训练数据集根据已知结果训练模型。然后将该模型应用于之前未见过的新数据进行预测。这些预测可以采用分类预测的形式(例如,是/否,正/负/中性等) - 称为分类算法 - 或连续预测(例如价格,权重等) - 称为回归算法。示例监督学习算法包括线性回归,逻辑回归以及分类和回归树。在本文中,我将介绍后者 - 分类和回归树 - 并展示我们如何使用这些算法来训练模型,以根据我们上面下载的训练数据集对我们的推文进行分类。
分类和回归树(CART)
分类和回归树(CART)模型生成可以遍历以预测结果的树。对于那些熟悉线性回归和Logistic回归的人来说,CART不假设像线性回归这样的线性模型,与Logistic回归相比,它更容易理解和解释。以下来自维基百科的图片显示了一个简单的树,它可以帮助我们根据一些属性或属性来预测您是否可能作为泰坦尼克号的乘客生存,其中每个叶子下方的数字显示生存概率和百分比该叶子中的观察结果。
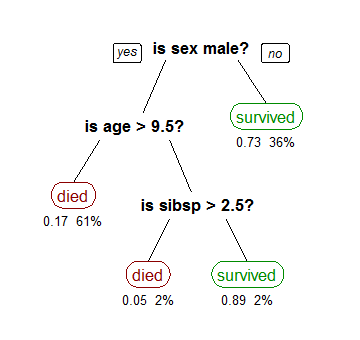
CART模型旨在将数据拆分为同类子集 - 您可以从CART模型中得出的基本预测因此只占每个子集中的大多数。根据您现有的CART模型,新的观察结果将属于一个子集,您可以只预测该子集中的现有多数。树有助于使CART模型具有可解释性 - 您可以从树的顶部开始向下移动,向左移动以获得积极响应,向右移动以获得否定响应。顾名思义,CART模型允许您预测连续结果或分类结果。在本文中,我们将使用CART模型来帮助我们将推文归类为对航空公司的否定或非负面即分类问题。
随机森林
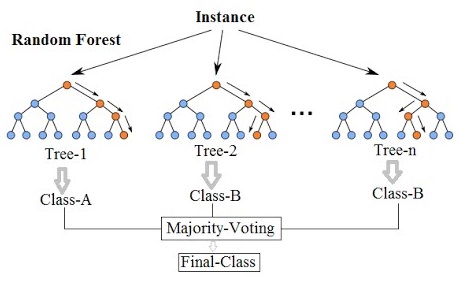
随机森林旨在通过构建多个CART树(即森林)来进一步提高CART模型的准确性。使用随机森林的缺点是您的模型变得不易理解且解释性较差,但它们可能会提高预测的准确性。为了预测新观察,森林中的每棵树都投票在结果上你可以简单地选择获得最多选票的结果。为了构建随机森林,每个组成树被迫仅从一个自举的数据样本中拆分可用自变量的随机子集。例如,每个树的训练数据随机选择替换 - 因为每个树使用不同的自变量和不同的训练数据,我们生成不同树的森林。下图概述了随机森林背后的基本原理。
 分类矩阵
分类矩阵分类(或混淆)矩阵可以帮助我们量化预测模型的准确性。通过将模型(列)中的预测值与实际值(行)进行比较来构建分类矩阵,如下所示:
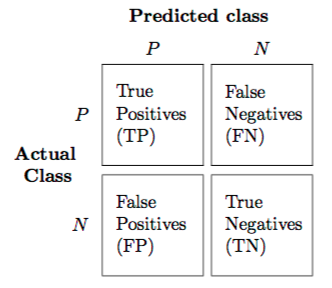 然后,Matrix中的每个单元格都会提供属于该类别的观察数量。TRUE Negatives和TRUE Positives是模型正确预测的观测数。FALSE Negatives和FALSE Positives是模型预测错误的观察数量。因此,这产生了许多可量化的度量,使我们能够说明模型与其他模型相比的准确度:
- 灵敏度或真阳性率 = TP /(TP + FN)测量模型正确预测的阳性结果的百分比。
- 特异性或真阴性率 = TN /(TN + FP)测量模型正确预测的阴性结果的百分比。
- 总体准确度 =(TN + TP)/ N测量给定N个观测值的模型的总体准确度。
- 总误差率 =(FP + FN)/ N测量给定N个观测值的模型的总误差率。
自然语言处理(NLP)
然后,Matrix中的每个单元格都会提供属于该类别的观察数量。TRUE Negatives和TRUE Positives是模型正确预测的观测数。FALSE Negatives和FALSE Positives是模型预测错误的观察数量。因此,这产生了许多可量化的度量,使我们能够说明模型与其他模型相比的准确度:
- 灵敏度或真阳性率 = TP /(TP + FN)测量模型正确预测的阳性结果的百分比。
- 特异性或真阴性率 = TN /(TN + FP)测量模型正确预测的阴性结果的百分比。
- 总体准确度 =(TN + TP)/ N测量给定N个观测值的模型的总体准确度。
- 总误差率 =(FP + FN)/ N测量给定N个观测值的模型的总误差率。
自然语言处理(NLP)推文显然是文本性质的。这意味着它们不符合任何预定义的结构,并且可能包括拼写错误,俚语和其他形式的非传统语法。此外,每天都会产生数以亿计的推文,这使得人们无法进行大量的分析。自然语言处理(NLP)是使用计算机理解文本的领域 - 理解人类语言并从中获得意义。在我们将要构建的模型中,单词本身将是我们在CART模型中使用的变量,用于对我们的推文背后的情绪进行分类!
常用术语
以下是我的解释中经常出现的一些常用术语供您参考: - 文档 - 文档是单词的定义容器。文档可以是单个记录,文章或推文。 - 语料库 - 语料库是文档的集合。 - 术语频率 - 术语在文档中出现的次数。 - 反向文档频率 - 衡量一个术语在语料库中是常见的还是罕见的度量。例如,术语的可以在给定的语料库出现无数次。仅使用术语频率,该术语可以被赋予与其频率成比例的权重,而其他更有意义的术语不一定被赋予更多权重。逆文档频率通过考虑更广泛的语料库来抵消术语的简单频率。 预处理数据
NLP的基本特征之一是在构建预测模型之前预处理文本数据的想法,以尽可能地标准化来自不同源的文本。常见的预处理技术包括: - Common Casing - 将所有文本转换为小写或大写。 - 无意义的标点符号 - 基本方法是删除所有非字母数字字符。但要小心,因为一些非字母数字字符是有意义的,例如推文中的@和#。因此,应根据您尝试回答的问题来定义删除的非字母数字字符集。 - 停止词语 - 诸如I,this,there等词语用于表达句子以表达其含义,但不一定有助于确定潜在的情绪。这些停用词通常从文本中删除,还有减少数据集大小的额外好处。 - 词干 - 这是将常用词减少到共同词干的过程。例如,词语连接,连接,结缔组织,连接和连接都可以被减少到其的共用杆连接而不去除潜在的意思。这并不是说Stemming没有错误 - 事实上,词干算法容易出错。然而,为了建立预测模型并进一步减小数据集的大小,这是一种有价值的技术。 - Lemmatisation - 虽然Stemming迅速将单词缩减为基本形式,但它没有考虑上下文,因此无法区分具有不同含义的单词,这取决于它在句子或上下文中的位置。Lemmatisation并没有粗略地简化基于共同词干的单词,而是旨在删除屈折结尾只是为了返回一个单词的词典形式,称为引理。例如,词语是,被,被和被可以减小到引理是虽然Stemmer无法推断出这种语境意义。虽然Lemmatisation可用于更好地保留背景和意义,但它会带来额外的复杂性和时间。 一袋字
在我们预处理了数据之后,我们如何从仅仅文本中识别出用于我们的预测模型的自变量?好吧,一种方法叫做Bag of Words。在这种方法中,您只需计算每个单词在文本中出现的次数(即该单词的频率),从而为每个单词生成一个可用作基线的功能。然后,每个字频配对成为我们可以在模型中使用的独立变量。
术语频率 - 逆文档频率(TF-IDF)
术语频率 - 反向文档频率(TF-IDF)不仅仅是简单地计算每个单词的频率,而是旨在提供一个单词考虑单词在整个数据集中出现的频率的重要性。TF-IDF度量与单词在文档中出现的次数成比例增加,与整个数据集中单词的频率相抵消。
特征向量
通过将文本转换为一系列词频配对(如Bag of Words方法)或一系列单词重要性配对(与TF-IDF方法一样),我们实际上将文本转换为称为特征的数字向量向量。这很重要,因为正是这些特征向量被传递到机器学习算法以训练和测试监督预测模型。
Apache Spark机器学习管道
在我们开始构建预测模型之前,我想解释一下Apache Spark的机器学习库中的一些核心组件,它们允许我们构建预测模型。 - Transformer - Spark中的Transformer实际上将DataFrame作为其输入并生成新的DataFrame,通常是通过将新列附加到原始DataFrame作为读取和映射操作的结果。例如,在学习模型中,输入DataFrame可以包含包含特征向量的列。然后,变换器可以读取该列并预测每个特征向量的结果(标签),生成包含预测标签的新列。 - Estimator - Spark中的Estimator本质上是一种学习算法,可以训练数据生成模型 - 模型是变换器。例如,可以调用Spark Estimator LogisticRegression来训练训练数据集,生成LogisticRegressionModel,它是生成的Model和Transformer。 - 管道 - Spark中的管道是一系列有序的阶段,每个阶段都是变压器或估算器。 典型的Training Pipeline如下所示:
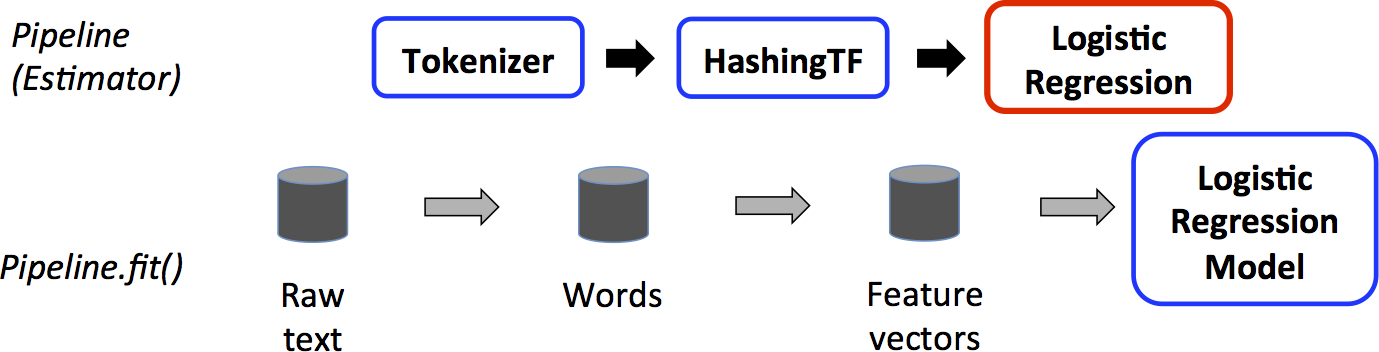 在上面的示例中,原始文本被拆分以生成每个文档的单词序列。使用某种术语频率算法从这些序列创建特征向量,然后将其传递给估计器以训练模型。
生成的测试管道可能如下所示:
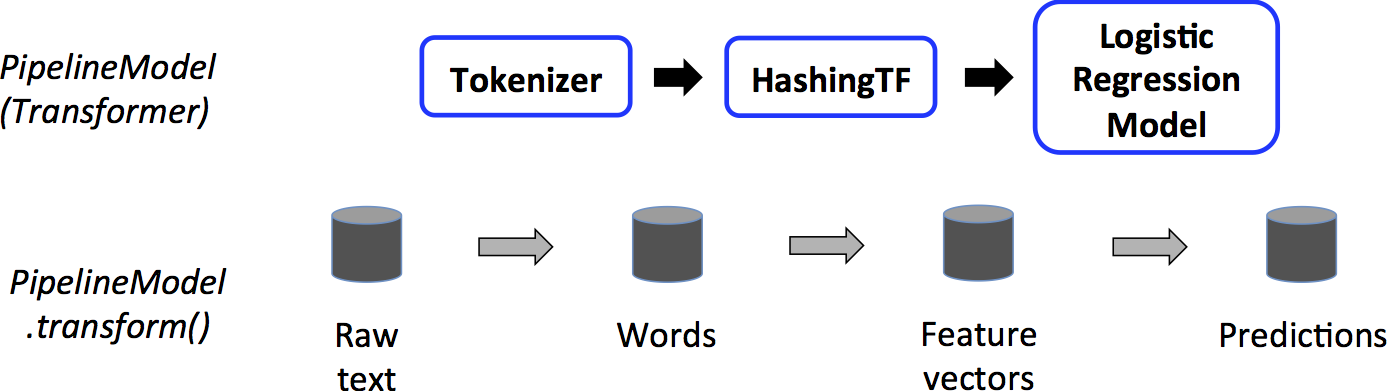 这里,再次拆分新的未见原始文本以生成每个文档的单词序列,并遵循相同的处理步骤。但这一次,上面生成的估计模型应用于新的特征向量以生成预测。通过使用这些管道和管道模型,我们可以构建训练模型,然后将相同的过程应用于我们的基于实时事件的数据流!
Apache Maven
现在我们已经介绍了一些基本概念,让我们开始编码!与前面的文章一样,我们将使用Apache Maven来处理构建依赖项。我的POM中需要注意的几件事情是: - ApacheSpark提供的依赖 -我已经被标记为Apache的Spark依赖性提供,因为它们包含在Apache的Spark实例。 - Stanford NLP - 我将使用Stanford NLP Library对文本进行词形还原。这个库是用Java编写的,因此可以在Java和Scala Spark应用程序中使用(我将在Scala中编写我们的机器学习管道)。 ```xml
<groupId>io.keisan.knowledgebase.spark.mllib</groupId><artifactId>keisan-spark-mllib</artifactId><version>0.0.1-SNAPSHOT</version><packaging>jar</packaging><!-- Project Information --><name>Example Spark Machine Learning Pipelines</name><description>Keisan Knowledgebase Spark MLlib Project - Example Spark Machine Learning Pipelines</description><url>https://www.keisan.io/knowledgebase/real-time-ml-pipeline-spark</url><organization><name>Keisan Ltd</name><url>https://www.keisan.io</url></organization><developers><developer><id>jillur.quddus</id><name>Jillur Quddus</name><email>contactus@keisan.io</email><url>https://www.keisan.io</url><organization>Keisan Ltd</organization><organizationUrl>https://www.keisan.io</organizationUrl><roles><role>Lead Engineer</role><role>Data Scientist</role></roles><timezone>Europe/London</timezone></developer></developers><!-- Properties --><properties><apache.spark.core.2.11.version>2.1.0</apache.spark.core.2.11.version><apache.spark.mllib.2.11.version>2.1.0</apache.spark.mllib.2.11.version><apache.spark.sql.2.11.version>2.1.0</apache.spark.sql.2.11.version><jdk.version>1.8</jdk.version><maven.plugins.maven-assembly-plugin.version>3.0.0</maven.plugins.maven-assembly-plugin.version><maven.plugins.maven-compiler-plugin.version>3.6.1</maven.plugins.maven-compiler-plugin.version><output.directory>/keisan/knowledgebase/spark/mllib/jars</output.directory><project.build.sourceEncoding>UTF-8</project.build.sourceEncoding><scala.library.version>2.11.8</scala.library.version><scala.maven.plugin.version>3.2.2</scala.maven.plugin.version><stanford.corenlp.version>3.7.0</stanford.corenlp.version></properties><!-- Dependencies --><dependencies><!-- Apache Spark --><dependency><groupId>org.apache.spark</groupId><artifactId>spark-core_2.11</artifactId><version>${apache.spark.core.2.11.version}</version><scope>provided</scope></dependency><dependency><groupId>org.apache.spark</groupId><artifactId>spark-sql_2.11</artifactId><version>${apache.spark.sql.2.11.version}</version><scope>provided</scope></dependency><dependency><groupId>org.apache.spark</groupId><artifactId>spark-mllib_2.11</artifactId><version>${apache.spark.mllib.2.11.version}</version><scope>provided</scope></dependency><!-- Scala --><dependency><groupId>org.scala-lang</groupId><artifactId>scala-library</artifactId><version>${scala.library.version}</version></dependency><!-- Stanford NLP --><dependency><groupId>edu.stanford.nlp</groupId><artifactId>stanford-corenlp</artifactId><version>${stanford.corenlp.version}</version></dependency><dependency><groupId>edu.stanford.nlp</groupId><artifactId>stanford-corenlp</artifactId><version>${stanford.corenlp.version}</version><classifier>models</classifier></dependency></dependencies><!-- Project Builder --><build><!-- Plugins --><plugins><!-- Maven Compiler: Compile the Sources of the Project --><plugin><groupId>org.apache.maven.plugins</groupId><artifactId>maven-compiler-plugin</artifactId><version>${maven.plugins.maven-compiler-plugin.version}</version><configuration><source>${jdk.version}</source><target>${jdk.version}</target></configuration></plugin><!-- Maven Assembly: Aggregate project output with its dependencies --><plugin><groupId>org.apache.maven.plugins</groupId><artifactId>maven-assembly-plugin</artifactId><version>${maven.plugins.maven-assembly-plugin.version}</version><configuration><!-- Final JAR Filename --><finalName>keisan-spark-mllib-${project.version}</finalName><appendAssemblyId>false</appendAssemblyId><!-- Include all Project Dependencies --><descriptorRefs><descriptorRef>jar-with-dependencies</descriptorRef></descriptorRefs><!-- JAR with dependencies Output Target Directory --><outputDirectory>${output.directory}</outputDirectory></configuration><executions><!-- Bind the assembly to the package phase --><execution><id>make-assembly</id><phase>package</phase><goals><goal>single</goal></goals></execution></executions></plugin><!-- Scala Maven Plugin --><plugin><groupId>net.alchim31.maven</groupId><artifactId>scala-maven-plugin</artifactId><version>${scala.maven.plugin.version}</version></plugin></plugins></build>
**预处理管道**<br />正如我上面提到的,我将使用[Scala](https://www.scala-lang.org/)编写我的Spark Machine学习管道。Scala在JVM上运行,因此允许我们在Scala应用程序中使用用Java编写的库。此外,与Java相比,Scala在开发Spark应用程序时往往不那么冗长,而且对于新数据科学家来说更容易学习。<br />我要执行的第一个编码是在Scala中定义一系列函数,这些函数将允许我们预处理Spark Dataframes中的文本。如上所述,我将定义一系列函数,这些函数将允许我们小写文本,删除无意义的标点符号,删除停用词和lemmatize文本(使用Stanford Core NLP库)。```scalapackage io.keisan.knowledgebase.spark.mllib;import java.util.Properties;import edu.stanford.nlp.ling.CoreAnnotations.LemmaAnnotation;import edu.stanford.nlp.ling.CoreAnnotations.SentencesAnnotation;import edu.stanford.nlp.ling.CoreAnnotations.TokensAnnotation;import edu.stanford.nlp.pipeline.Annotation;import edu.stanford.nlp.pipeline.StanfordCoreNLP;import edu.stanford.nlp.util.CoreMap;import org.apache.spark.sql.Dataset;import org.apache.spark.sql.Row;import org.apache.spark.sql.functions._;import org.apache.spark.sql.types._;import org.apache.spark.ml.feature.StopWordsRemover;import scala.collection.JavaConversions._;import scala.collection.mutable.ArrayBuffer;/*** Pre-Processor Utilities / Helper Functions* A collection of functions to pre-process text** @author jillur.quddus* @version 0.0.1*/object PreProcessorUtils {/*** Lowercase and Remove Punctuation* Lowercase and remove non-alphanumeric-space characters from the text field** @param corpus The collection of documents as a Dataframe* @param textColumn The name of the column containing the text to be pre-processed* @return A Dataframe with the text lowercased and non-alphanumeric-space characters removed**/def lowercaseRemovePunctuation(corpus:Dataset[Row], textColumn:String): Dataset[Row] = {return corpus.withColumn(textColumn, regexp_replace(lower(corpus(textColumn)), "[^a-zA-Z0-9 ]", ""));}/*** Text Lemmatizer* Given a text string, generate a sequence of Lemmas** @param text The text string to lemmatize* @param pipeline The Stanford Core NLP Pipeline* @return A sequence of lemmas**/def lemmatizeText(text: String, pipeline:StanfordCoreNLP): Seq[String] = {val doc = new Annotation(text);pipeline.annotate(doc);val lemmas = new ArrayBuffer[String]();val sentences = doc.get(classOf[SentencesAnnotation]);for (sentence <- sentences; token <- sentence.get(classOf[TokensAnnotation])) {val lemma = token.get(classOf[LemmaAnnotation])if (lemma.length > 2 && isOnlyLetters(lemma)) {lemmas += lemma.toLowerCase}}return lemmas;}/*** Check that a given String is made up entirely of alpha characters** @param str The string to test for alpha characters* @return Boolean*/def isOnlyLetters(str: String) = str.forall(c => Character.isLetter(c));/*** Stop Words Remover* Remove Stop Words from a given input column containing a sequence of String** @param corpus The collection of documents as a Dataframe* @param inputColumn The name of the column containing a sequence of Strings to filter* @param outputColumn The name of the column to output the filtered sequence of Strings to*/def stopWordRemover(corpus:Dataset[Row], inputColumn:String, outputColumn:String): Dataset[Row] = {val stopWordsRemover = new StopWordsRemover().setInputCol(inputColumn).setOutputCol(outputColumn);return stopWordsRemover.transform(corpus);}}
摄取,标记和预处理数据
我们现在可以提取我们从CrowdFlower下载的数据。我们已经下载的数据包含了标签栏(即)的结果,即airline_sentiment要么是正面,负面或中立的。我们可以保留标签,即多分类。但是,我们通过使用二进制分类标记数据(负面或非负面)来使其更简单一些。然后,我们的模型将能够预测推文是否只是对有问题的航空公司是负面的。要做到这一点,在我的代码下面我创建了一个新的String列,被称为negative_sentiment_label要么是真正的负情绪推特(我们取得积极成果)或在所有其他情况下都是假的(我们的负面结果,其中推文被分类为情绪的自然或积极)。在我们标记了数据之后,我们可以应用上面定义的预处理技术来删除非含义标点符号,将我们的文本解释并删除停用词。
object TrainDecisionTreeClassifier {def main(args: Array[String]) = {/********************************************************************* SPARK CONTEXT********************************************************************/// Create the Spark Contextval conf = new SparkConf().setAppName("Sentiment Models").setMaster("spark://<Spark Master Hostname>:7077");val sc = new SparkContext(conf);val sparkSession = SparkSession.builder().getOrCreate();import sparkSession.implicits._;/********************************************************************* INGEST THE CORPUS********************************************************************/// Define the CSV Dataset Schemaval schema = new StructType(Array(StructField("unit_id", LongType, true),StructField("golden", BooleanType, true),StructField("unit_state", StringType, true),StructField("trusted_judgements", IntegerType, true),StructField("last_judgement_at", StringType, true),StructField("airline_sentiment", StringType, true),StructField("airline_sentiment_confidence", DoubleType, true),StructField("negative_reason", StringType, true),StructField("negative_reason_confidence", DoubleType, true),StructField("airline", StringType, true),StructField("airline_sentiment_gold", StringType, true),StructField("name", StringType, true),StructField("negative_reason_gold", StringType, true),StructField("retweet_count", IntegerType, true),StructField("text", StringType, true),StructField("tweet_coordinates", StringType, true),StructField("tweet_created", StringType, true),StructField("tweet_id", StringType, true),StructField("tweet_location", StringType, true),StructField("user_timezone", StringType, true)));// Read the CSV Dataset, keeping only those columns that we need to build our modelvar tweetsDF = SparkSession.builder().getOrCreate().read.format("csv").option("header", true).option("delimiter", ",").option("mode", "DROPMALFORMED").schema(schema).load("hdfs://<Namenode Hostname>:9000/keisan/knowledgebase/spark/mllib/raw/Airline-Sentiment-2-w-AA.csv").select("airline_sentiment", "text");/********************************************************************* LABEL THE DATA********************************************************************/// We are interested in detecting tweets with negative sentiment. Let us create a new column whereby// if the sentiment is negative, this new column is TRUE (Positive Outcome), and FALSE (Negative Outcome)// in all other casestweetsDF = tweetsDF.withColumn("negative_sentiment_label", when(tweetsDF("airline_sentiment") === "negative", lit("true")).otherwise(lit("false"))).select("text", "negative_sentiment_label");/********************************************************************* APPLY THE PRE-PROCESSING PIPELINE********************************************************************/// Let us now perform some simple pre-processing including converting the text column to lowercase// and removing all non-alphanumeric charactersval lowercasedDF = PreProcessorUtils.lowercaseRemovePunctuation(tweetsDF, "text");// Lemmatize the text to generate a sequence of Lemmas using the Stanford NLP Library// By using mapPartitions, we create the Stanford NLP Pipeline once per partition rather than once per RDD entryval lemmatizedDF = lowercasedDF.select("text", "negative_sentiment_label").rdd.mapPartitions(p => {// Define the NLP Lemmatizer Pipeline once per partitionval props = new Properties();props.put("annotators", "tokenize, ssplit, pos, lemma");val pipeline = new StanfordCoreNLP(props);// Lemmatize the text and preserve the Negative Sentiment Labelp.map{case Row(text: String, negative_sentiment_label:String) => (PreProcessorUtils.lemmatizeText(text, pipeline), negative_sentiment_label);};}).toDF("lemmas", "negative_sentiment_label");// Remove Stop Words from the sequence of Lemmasval stopWordsRemovedDF = PreProcessorUtils.stopWordRemover(lemmatizedDF, "lemmas", "filtered_lemmas").where(size(col("filtered_lemmas")) > 1);
现在,如果你运行动作stopWordsRemovedDF.show(false),你应该看到一个类似于下面的DataFrame:
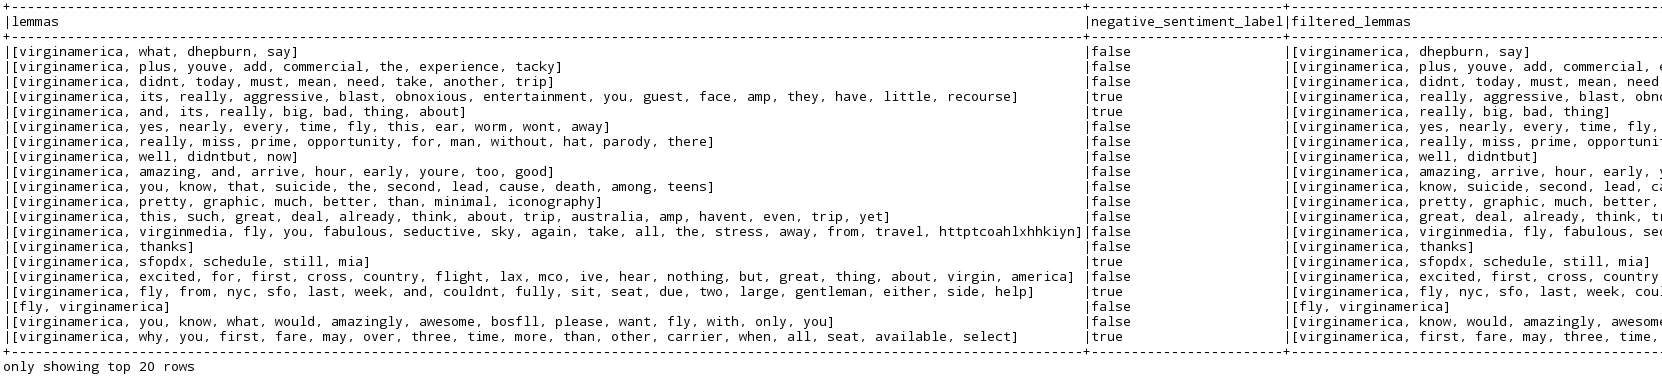
希望您应该看到3列 - 从原始文本派生的词条序列,删除了停用词的过滤的词条序列,以及我们的标签列,对于负面情绪推文是真的,对于所有其他情况都是假的。
特征向量和训练模型
我们现在准备生成我们的训练模型。第一步是将我们过滤的引理序列转换为特征向量,以便我们可以将它们传递给Estimator以生成我们的训练模型。如上所述,我们将使用TF-IDF方法生成特征向量,其中考虑术语对语料库中文档的重要性,而不仅仅考虑术语频率(TF)。
为了使事情更正式,我们可以说术语频率TF(t,d)是术语t出现在文档d中的次数。我们可以说文档频率DF(t,D)是我们的语料库D中包含术语t的文档数。然而,正如我上面所描述的那样,简单地使用TF可能过分强调经常出现但没有表达意义的术语。我们可以说反向文档频率IDF(t,D)是一个数字度量,通过考虑术语在语料库中出现的频率,术语的重要程度,可以计算如下:

在这个等式中,| D | 是语料库D中的文档总数。并且由于使用了对数,如果一个术语出现在所有文档中,其IDF值将变为0.要计算最终的TF-IDF度量,您可以将TF乘以IDF,如下所示:

在Spark的MLlib库中,Term Frequency TF向量可以使用Transformer HashingTF生成,它采用一系列术语并将它们转换为固定长度的特征向量。然后可以将这些特征向量传递给IDFModel,IDFModel由适合数据集的IDF估计器生成,以根据跨语料库的频率对列进行缩放。
一旦我们从引理序列生成了缩放的特征向量,我们就可以将它们传递给Estimators来构建我们的训练模型。在本文中,我们将基于决策树分类器构建训练模型估计。在下面的代码中,我定义了一个新的Scala对象来保存模型助手函数。第一个函数将从一系列(过滤的)引理中生成缩放的特征向量。第二个函数将使用这些缩放的特征向量和先前定义的标签来训练和输出决策树分类器。第三个函数将再次使用这些缩放的特征向量和先前定义的标签来训练和输出随机森林分类器。第四个功能将允许我们生成指标,例如我们的模型精度,从应用我们的训练模型到测试数据。
package io.keisan.knowledgebase.spark.mllib;import org.apache.spark.sql.Dataset;import org.apache.spark.sql.functions._;import org.apache.spark.sql.types._;import org.apache.spark.sql.Row;import org.apache.spark.ml.Pipeline;import org.apache.spark.ml.PipelineModel;import org.apache.spark.ml.classification.DecisionTreeClassifier;import org.apache.spark.ml.classification.RandomForestClassifier;import org.apache.spark.ml.feature.IndexToString;import org.apache.spark.ml.feature.StringIndexer;import org.apache.spark.ml.feature.HashingTF;import org.apache.spark.ml.feature.IDF;import org.apache.spark.mllib.evaluation.MulticlassMetrics;import scala.collection.JavaConversions._;/*** Predictive Model Utilities / Helper Functions* A collection of functions to build Predictive Models** @author jillur.quddus* @version 0.0.1*/object ModelUtils {// Size of the fixed-length Feature Vectorsval numFeatures = 4096;// Number of trees in our random forestsval numTrees = 256;/*** Term Frequency-Inverse Document Frequency (TF-IDF)* Generate Term Frequency Feature Vectors by passing the sequence of lemmas to the HashingTF Transformer.* Fit the IDF Estimator to the Featurized Dataset to generate the IDFModel.* Pass the TF Feature Vectors to the IDFModel to scale based on frequency across the corpus** @param corpus Dataset containing the sequence of lemmas* @param inputColumn The name of the column containing the sequence of (filtered) lemmas* @param outputColumn The name of the column to store the Scaled Feature Vectors* @return A DataFrame with the Scaled Feature Vectors**/def tfidf(corpus:Dataset[Row], inputColumn:String, outputColumn:String): Dataset[Row] = {// Convert the sequence of Lemmas into fixed-length feature vectors using the HashingTF Transformerval hashingTF = new HashingTF().setInputCol(inputColumn).setOutputCol("raw_features").setNumFeatures(numFeatures);val featurizedData = hashingTF.transform(corpus);// Takes the feature vectors and scale each column based on how frequently it appears in the corpusval idf = new IDF().setInputCol("raw_features").setOutputCol(outputColumn);val idfModel = idf.fit(featurizedData);return idfModel.transform(featurizedData);}/*** Build a Decision Tree Classifier* Train a Decision Tree Model by supplying the training dataset that includes the label and feature vector columns** @param featuresDF The full DataFrame containing the labels and feature vectors* @param trainingDF The training split DataFrame to be used to train the Model* @param labelColumn The name of the column containing the labels* @param featuresColumn The name of the column containing the scaled feature vectors* @return The PipelineModel containing our trained decision tree model**/def trainDecisionTreeModel(featurizedDF:Dataset[Row], trainingDF:Dataset[Row], labelColumn:String,featuresColumn:String): PipelineModel = {// Index the Labelsval labelIndexer = new StringIndexer().setInputCol(labelColumn).setOutputCol("indexed_label").fit(featurizedDF);// Define the Decision Tree Modelval decisionTreeModel = new DecisionTreeClassifier().setLabelCol("indexed_label").setFeaturesCol(featuresColumn);// Convert the Indexed Labels back to the original Labels based on the trained predictionsval labelConverter = new IndexToString().setInputCol("prediction").setOutputCol("predicted_label").setLabels(labelIndexer.labels);// Chain the Indexers and Decision Tree Model to form a Pipelineval pipeline = new Pipeline().setStages(Array(labelIndexer, decisionTreeModel, labelConverter));// Run the Indexers and Train the Model on the Training Datareturn pipeline.fit(trainingDF);}/*** Build a Random Forest Classifier* Train a Random Forest Model by supplying the training dataset that includes the label and feature vector columns** @param featuresDF The full DataFrame containing the labels and feature vectors* @param trainingDF The training split DataFrame to be used to train the Model* @param labelColumn The name of the column containing the labels* @param featuresColumn The name of the column containing the scaled feature vectors* @return The PipelineModel containing our trained random forest model**/def trainRandomForestModel(featurizedDF:Dataset[Row], trainingDF:Dataset[Row], labelColumn:String,featuresColumn:String): PipelineModel = {// Index the Labelsval labelIndexer = new StringIndexer().setInputCol(labelColumn).setOutputCol("indexed_label").fit(featurizedDF);// Define a Random Forest modelval randomForestModel = new RandomForestClassifier().setLabelCol("indexed_label").setFeaturesCol(featuresColumn).setNumTrees(numTrees);// Convert the Indexed Labels back to the original Labels based on the trained predictionsval labelConverter = new IndexToString().setInputCol("prediction").setOutputCol("predicted_label").setLabels(labelIndexer.labels);// Chain the Indexers and Random Forest Model to form a Pipelineval pipeline = new Pipeline().setStages(Array(labelIndexer, randomForestModel, labelConverter));// Run the Indexers and Train the Model on the Training Datareturn pipeline.fit(trainingDF);}/*** Generate Multi-class Metrics* Generate multi-class metrics given a predictions dataframe containing prediction and indexed label double columns.* Such metrics allow us to generate classification matrices, false and true positive rates etc.** @param predictionsDF A DataFrame containing predictions and indexed labels* @param predictionColumn The name of the column containing the predictions [Double]* @param indexedLabelColumn The name of the column containing the indexed labels [Double]* @return A MulticlassMetrics object that can be used to output model metrics**/def generateMulticlassMetrics(predictionsDF:Dataset[Row], predictionColumn:String, indexedLabelColumn:String): MulticlassMetrics = {val predictionAndLabels = predictionsDF.select(predictionColumn, indexedLabelColumn).rdd.map{case Row(predictionColumn: Double, indexedLabelColumn:Double) => (predictionColumn, indexedLabelColumn);};return new MulticlassMetrics(predictionAndLabels);}}
训练决策树分类器
现在让我们返回主应用程序并通过执行以下操作完成它:
- 从我们的滤波Lemmas序列生成缩放的特征向量
- 随机将我们的语料库分成训练(70%)和测试(30%)数据集
- 在训练数据集上训练决策树分类器估计器
- 将生成的决策树分类器模型应用于测试数据集,允许我们生成有关模型准确性的指标
- 将我们的决策树分类器模型保存到HDFS,以便稍后在我们的实时基于事件的流数据管道中使用
package io.keisan.knowledgebase.spark.mllib;import edu.stanford.nlp.pipeline.StanfordCoreNLP;import java.util.Properties;import org.apache.spark.SparkConf;import org.apache.spark.SparkContext;import org.apache.spark.ml.evaluation.MulticlassClassificationEvaluator;import org.apache.spark.sql.Dataset;import org.apache.spark.sql.functions._;import org.apache.spark.sql.types._;import org.apache.spark.sql.Row;import org.apache.spark.sql.SparkSession;import org.apache.spark.sql.SparkSession.Builder;import scala.collection.JavaConversions._;/*** Tweet Sentiment Decision Tree Classifier* Train a Decision Tree Classifier on a collection of pre-labelled tweets about airlines** @author jillur.quddus* @version 0.0.1*/object TrainDecisionTreeClassifier {def main(args: Array[String]) = {/********************************************************************* SPARK CONTEXT********************************************************************/// Create the Spark Contextval conf = new SparkConf().setAppName("Sentiment Models").setMaster("spark://<Spark Master Hostname>:7077");val sc = new SparkContext(conf);val sparkSession = SparkSession.builder().getOrCreate();import sparkSession.implicits._;/********************************************************************* INGEST THE CORPUS********************************************************************/// Define the CSV Dataset Schemaval schema = new StructType(Array(StructField("unit_id", LongType, true),StructField("golden", BooleanType, true),StructField("unit_state", StringType, true),StructField("trusted_judgements", IntegerType, true),StructField("last_judgement_at", StringType, true),StructField("airline_sentiment", StringType, true),StructField("airline_sentiment_confidence", DoubleType, true),StructField("negative_reason", StringType, true),StructField("negative_reason_confidence", DoubleType, true),StructField("airline", StringType, true),StructField("airline_sentiment_gold", StringType, true),StructField("name", StringType, true),StructField("negative_reason_gold", StringType, true),StructField("retweet_count", IntegerType, true),StructField("text", StringType, true),StructField("tweet_coordinates", StringType, true),StructField("tweet_created", StringType, true),StructField("tweet_id", StringType, true),StructField("tweet_location", StringType, true),StructField("user_timezone", StringType, true)));// Read the CSV Dataset, keeping only those columns that we need to build our modelvar tweetsDF = SparkSession.builder().getOrCreate().read.format("csv").option("header", true).option("delimiter", ",").option("mode", "DROPMALFORMED").schema(schema).load("hdfs://<Namenode Hostname>:9000/keisan/knowledgebase/spark/mllib/raw/Airline-Sentiment-2-w-AA.csv").select("airline_sentiment", "text");/********************************************************************* LABEL THE DATA********************************************************************/// We are interested in detecting tweets with negative sentiment. Let us create a new column whereby// if the sentiment is negative, this new column is TRUE (Positive Outcome), and FALSE (Negative Outcome)// in all other casestweetsDF = tweetsDF.withColumn("negative_sentiment_label", when(tweetsDF("airline_sentiment") === "negative", lit("true")).otherwise(lit("false"))).select("text", "negative_sentiment_label");/********************************************************************* APPLY THE PRE-PROCESSING PIPELINE********************************************************************/// Let us now perform some simple pre-processing including converting the text column to lowercase// and removing all non-alphanumeric charactersval lowercasedDF = PreProcessorUtils.lowercaseRemovePunctuation(tweetsDF, "text");// Lemmatize the text to generate a sequence of Lemmas using the Stanford NLP Library// By using mapPartitions, we create the Stanford NLP Pipeline once per partition rather than once per RDD entryval lemmatizedDF = lowercasedDF.select("text", "negative_sentiment_label").rdd.mapPartitions(p => {// Define the NLP Lemmatizer Pipeline once per partitionval props = new Properties();props.put("annotators", "tokenize, ssplit, pos, lemma");val pipeline = new StanfordCoreNLP(props);// Lemmatize the text and preserve the Negative Sentiment Labelp.map{case Row(text: String, negative_sentiment_label:String) => (PreProcessorUtils.lemmatizeText(text, pipeline), negative_sentiment_label);};}).toDF("lemmas", "negative_sentiment_label");// Remove Stop Words from the sequence of Lemmasval stopWordsRemovedDF = PreProcessorUtils.stopWordRemover(lemmatizedDF, "lemmas", "filtered_lemmas").where(size(col("filtered_lemmas")) > 1);/********************************************************************* SCALED FEATURE VECTOR********************************************************************/// Generate the Scaled Feature Vectorsval featurizedDF = ModelUtils.tfidf(stopWordsRemovedDF, "filtered_lemmas", "features");/********************************************************************* TRAIN AND EVALUATE A DECISION TREE CLASSIFIER********************************************************************/// Split the data into Training and Test Datasetsval Array(trainingDF, testDF) = featurizedDF.randomSplit(Array(0.7, 0.3))// Train a Decision Tree Model using the Training Datasetval decisionTreeModel = ModelUtils.trainDecisionTreeModel(featurizedDF, trainingDF, "negative_sentiment_label", "features");// Apply the Decision Tree Training Model to the Test Datasetval decisionTreePredictions = decisionTreeModel.transform(testDF);decisionTreePredictions.select("negative_sentiment_label", "predicted_label", "filtered_lemmas", "features").show(false);// Compute the accuracy of the Decision Tree Training Model on the Test Datasetval decisionTreeEvaluator = new MulticlassClassificationEvaluator().setLabelCol("indexed_label").setPredictionCol("prediction").setMetricName("accuracy");val decisionTreeAccuracy = decisionTreeEvaluator.evaluate(decisionTreePredictions);println("Decision Tree Test Accuracy Rate = " + decisionTreeAccuracy);println("Decision Tree Test Error Rate = " + (1.0 - decisionTreeAccuracy));// Generate a Classification Matrixval metrics = ModelUtils.generateMulticlassMetrics(decisionTreePredictions, "prediction", "indexed_label");println(metrics.confusionMatrix);// Generate Label Accuracy Metricsval labelMetrics = metrics.labels;labelMetrics.foreach { l =>println(s"False Positive Rate ($l) = " + metrics.falsePositiveRate(l));}/********************************************************************* SAVE THE DECISION TREE CLASSIFIER FOR REAL-TIME STREAMING********************************************************************/decisionTreeModel.save("hdfs://<Namenode Hostname>:9000/keisan/knowledgebase/spark/mllib/models/decisionTreeClassifier");}}
多级度量标准
上面的应用程序将打印一些关于我们训练的决策树分类器模型在测试数据集上的准确性的指标。确切的数字可能与您的略有不同,因为我们随机分割语料库,但通常您应该看到以下结果:
- 测试准确率:71%
- 测试错误率:29%,
和以下分类矩阵:
| 2285.0 | 293.0 |
|---|---|
| 945.0 | 681.0 |
该分类矩阵告诉我们,在4,204次测试观察中,经过训练的决策树分类器模型得到2,285个预测正确,从而预测负面情绪,测试推文实际上是负面情绪(真实肯定)。该模型得到了进一步的681个预测正确,从而预测了积极的情绪,测试推文实际上是积极的情绪(真阴性)。因此,在总共4,204次测试观察中,该模型得到2,966个预测正确 - 准确率为71%。
然而,通过遵循分类矩阵中的相反对角线,模型得到293个预测不正确,从而预测正面情绪,但测试推文实际上是负面情绪(假阴性)。该模型得到了进一步的945预测不正确,因此它预测负面情绪,但测试推文实际上是积极的情绪(误报)。因此,在总共4,204次测试观察中,该模型得出1,238个预测错误 - 错误率为29%。
因此,我们的决策树分类器在71%的时间内正确地预测了推文的情绪。我们现在将我们训练有素的模型应用于我们基于事件的实时流媒体数据管道,以尝试预测航空公司推文创建时的情绪!
Apache Kafka 生产者
在我的上一篇文章中,我们更新了我们的数据管道,使用Apache Kafka Producer在Twitter4j包装器中使用Twitter的Hosebird客户端收集推文,其中推文使用Avro库和Bijection进行序列化。如果您运行该Producer,您应该观察发布到Kafka主题的推文。
Apache Spark消费者流应用程序
我们现在要创建一个Apache Spark Consumer Streaming Application,它将使用来自Kafka主题的Avro推文。然后,我们将扩展我们的高级实时数据处理流程,方法是将这些推文传递给上述相同的预处理管道,然后再对其应用我们经过训练的决策树分类器,尝试近乎实时地对其潜在情绪进行分类。 !

我将在我们上面训练决策树分类器的同一个项目中编写Spark Consumer Streaming Application。或者,您可以为Consumer Streaming Application创建一个新项目 - 这取决于您。由于我将使用相同的项目,我需要更新我的Maven POM以包含一些额外的依赖项 - 即Apache Avro,Apache Spark Streaming(已提供),Apache Kafka(请注意,我将使用与之兼容的0.8.2.2版本)我从上一篇文章中得到了 Spark 2.1.0 Streaming,Bijection和我的Kafka Twitter Producer应用程序(在这里我定义了Avro Tweet Schema,当我从Kafka主题消费并解析消息时我将再次需要它):
<project xmlns="http://maven.apache.org/POM/4.0.0" xmlns:xsi="http://www.w3.org/2001/XMLSchema-instance"xsi:schemaLocation="http://maven.apache.org/POM/4.0.0 http://maven.apache.org/xsd/maven-4.0.0.xsd"><modelVersion>4.0.0</modelVersion><!-- Project Information --><groupId>io.keisan.knowledgebase.spark.mllib</groupId><artifactId>keisan-spark-mllib</artifactId><version>0.0.1-SNAPSHOT</version><packaging>jar</packaging><!-- Project Information --><name>Example Spark Predictive Models</name><description>Keisan Knowledgebase Spark MLlib Project - Example Spark Machine Learning Pipelines</description><url>https://www.keisan.io/knowledgebase/real-time-ml-pipeline-spark</url><organization><name>Keisan Ltd</name><url>https://www.keisan.io</url></organization><developers><developer><id>jillur.quddus</id><name>Jillur Quddus</name><email>contactus@keisan.io</email><url>https://www.keisan.io</url><organization>Keisan Ltd</organization><organizationUrl>https://www.keisan.io</organizationUrl><roles><role>Lead Engineer</role><role>Data Scientist</role></roles><timezone>Europe/London</timezone></developer></developers><!-- Properties --><properties><apache.avro.version>1.8.1</apache.avro.version><apache.kafka.2.11.version>0.8.2.2</apache.kafka.2.11.version><apache.spark.core.2.11.version>2.1.0</apache.spark.core.2.11.version><apache.spark.mllib.2.11.version>2.1.0</apache.spark.mllib.2.11.version><apache.spark.sql.2.11.version>2.1.0</apache.spark.sql.2.11.version><apache.spark.streaming.2.11.version>2.1.0</apache.spark.streaming.2.11.version><apache.spark.streaming.kafka-0-8_2.11.version>2.1.0</apache.spark.streaming.kafka-0-8_2.11.version><bijection.avro.2.11.version>0.9.5</bijection.avro.2.11.version><jdk.version>1.8</jdk.version><keisan.kafka.producers.version>0.0.1-SNAPSHOT</keisan.kafka.producers.version><maven.plugins.maven-assembly-plugin.version>3.0.0</maven.plugins.maven-assembly-plugin.version><maven.plugins.maven-compiler-plugin.version>3.6.1</maven.plugins.maven-compiler-plugin.version><output.directory>/keisan/knowledgebase/spark/mllib/jars</output.directory><project.build.sourceEncoding>UTF-8</project.build.sourceEncoding><scala.library.version>2.11.8</scala.library.version><scala.maven.plugin.version>3.2.2</scala.maven.plugin.version><stanford.corenlp.version>3.7.0</stanford.corenlp.version></properties><!-- Dependencies --><dependencies><!-- Apache Avro --><dependency><groupId>org.apache.avro</groupId><artifactId>avro</artifactId><version>${apache.avro.version}</version></dependency><!-- Apache Kafka --><dependency><groupId>org.apache.kafka</groupId><artifactId>kafka_2.11</artifactId><version>${apache.kafka.2.11.version}</version></dependency><!-- Apache Spark --><dependency><groupId>org.apache.spark</groupId><artifactId>spark-core_2.11</artifactId><version>${apache.spark.core.2.11.version}</version><scope>provided</scope></dependency><dependency><groupId>org.apache.spark</groupId><artifactId>spark-mllib_2.11</artifactId><version>${apache.spark.mllib.2.11.version}</version><scope>provided</scope></dependency><dependency><groupId>org.apache.spark</groupId><artifactId>spark-sql_2.11</artifactId><version>${apache.spark.sql.2.11.version}</version><scope>provided</scope></dependency><dependency><groupId>org.apache.spark</groupId><artifactId>spark-streaming_2.11</artifactId><version>${apache.spark.streaming.2.11.version}</version><scope>provided</scope></dependency><dependency><groupId>org.apache.spark</groupId><artifactId>spark-streaming-kafka-0-8_2.11</artifactId><version>${apache.spark.streaming.kafka-0-8_2.11.version}</version></dependency><!-- Bijection --><dependency><groupId>com.twitter</groupId><artifactId>bijection-avro_2.11</artifactId><version>${bijection.avro.2.11.version}</version></dependency><!-- Keisan Kafka Producers --><dependency><groupId>io.keisan.knowledgebase.kafka.producers</groupId><artifactId>keisan-kafka-producers</artifactId><version>${keisan.kafka.producers.version}</version></dependency><!-- Scala --><dependency><groupId>org.scala-lang</groupId><artifactId>scala-library</artifactId><version>${scala.library.version}</version></dependency><!-- Stanford NLP --><dependency><groupId>edu.stanford.nlp</groupId><artifactId>stanford-corenlp</artifactId><version>${stanford.corenlp.version}</version></dependency><dependency><groupId>edu.stanford.nlp</groupId><artifactId>stanford-corenlp</artifactId><version>${stanford.corenlp.version}</version><classifier>models</classifier></dependency></dependencies><!-- Project Builder --><build><!-- Plugins --><plugins><!-- Maven Compiler: Compile the Sources of the Project --><plugin><groupId>org.apache.maven.plugins</groupId><artifactId>maven-compiler-plugin</artifactId><version>${maven.plugins.maven-compiler-plugin.version}</version><configuration><source>${jdk.version}</source><target>${jdk.version}</target></configuration></plugin><!-- Maven Assembly: Aggregate project output with its dependencies --><plugin><groupId>org.apache.maven.plugins</groupId><artifactId>maven-assembly-plugin</artifactId><version>${maven.plugins.maven-assembly-plugin.version}</version><configuration><!-- Final JAR Filename --><finalName>keisan-spark-mllib-${project.version}</finalName><appendAssemblyId>false</appendAssemblyId><!-- Include all Project Dependencies --><descriptorRefs><descriptorRef>jar-with-dependencies</descriptorRef></descriptorRefs><!-- JAR with dependencies Output Target Directory --><outputDirectory>${output.directory}</outputDirectory></configuration><executions><!-- Bind the assembly to the package phase --><execution><id>make-assembly</id><phase>package</phase><goals><goal>single</goal></goals></execution></executions></plugin><!-- Scala Maven Plugin --><plugin><groupId>net.alchim31.maven</groupId><artifactId>scala-maven-plugin</artifactId><version>${scala.maven.plugin.version}</version></plugin></plugins></build></project>
Spark Streaming Context
我将在Scala中编写Spark消费者流应用程序,但Java等效项应该在结构上类似,尽管更冗长。首先要做的是创建Spark Streaming Context。我将把正常的Spark Context传递给Spark Streaming Context Constructors之一来创建Streaming Context,在我的例子中使用5秒的批处理间隔。
// Spark Streaming Contextval conf = new SparkConf().setAppName("Streaming Twitter Sentiment Classifier").setMaster("spark://<Spark Master Hostname>:7077");val sc = new SparkContext(conf);val ssc = new StreamingContext(sc, Seconds(5));val sparkSession = SparkSession.builder().getOrCreate();import sparkSession.implicits._;
加载管道模型
第二步是将我们先前持久化的训练决策树分类器流水线模型加载到HDFS。要做到这一点很简单:
// Load the Trained Decision Tree Classifierval decisionTreeModel = PipelineModel.read.load("hdfs://<Namenode Hostname>:9000/keisan/knowledgebase/spark/mllib/models/decisionTreeClassifier");
实时流媒体情感分析
我们现在准备编写我们的主要Consumer Streaming应用程序。我们的Spark Streaming应用程序将执行以下操作:
- Kafka直接流 - 我们将使用默认解码器定期向Kafka查询每个主题和分区中的最新偏移量,以返回表示我们的Avro推文的原始字节数组,从而产生离散化的流。
- Bijection - 然后我们将通过使用Bijection和我的Kafka Twitter Producer中定义的Tweet Schema反转原始字节数组来开始处理离散化的流,从而产生一个RDD of Rows,然后我们将转换为包含我们解析的tweet字段的DataFrame,包括推文的核心文本。
- 预处理 - 接下来,我们将对我们在训练决策树分类器时应用的这些DataFrame应用相同的预处理管道,即小写文本,删除无意义的标点符号,使用斯坦福的Core NLP库对文本进行词典化,最后删除从由此产生的引理序列中停止。
- 缩放特征向量 - 接下来,我们将使用TF-IDF从这些过滤的词条序列生成缩放特征向量。
- 决策树分类器预测 - 最后,我们将这些缩放的特征向量传递给我们之前创建和加载的训练过的决策树分类器,以预测推文中的推文是负面还是非负面!
package io.keisan.knowledgebase.spark.mllib;import com.twitter.bijection.Injection;import com.twitter.bijection.avro.GenericAvroCodecs;import edu.stanford.nlp.pipeline.StanfordCoreNLP;import io.keisan.knowledgebase.kafka.producers.TwitterProducer;import java.util.HashMap;import java.util.Properties;import kafka.serializer.DefaultDecoder;import kafka.serializer.StringDecoder;import org.apache.avro.Schema;import org.apache.avro.generic.GenericRecord;import org.apache.spark.ml.PipelineModel;import org.apache.spark.rdd.RDD;import org.apache.spark.SparkConf;import org.apache.spark.SparkContext;import org.apache.spark.sql.Dataset;import org.apache.spark.sql.Row;import org.apache.spark.sql.SparkSession;import org.apache.spark.sql.functions._;import org.apache.spark.sql.types._;import org.apache.spark.streaming.Seconds;import org.apache.spark.streaming.StreamingContext;import org.apache.spark.streaming.kafka.KafkaUtils;import scala.collection.JavaConversions._;/*** Streaming Twitter Sentiment Classifier* Consume and deserialise Avro Tweets from Kafka Topics. Apply the same pre-processing* pipeline to the stream of tweets as our Decision Tree Classifier trainer and generate* scaled Feature Vectors. Finally apply the trained Decision Tree Classifier on the* stream of tweets to predict their sentiment in near real-time.** Usage: KafkaStreamingSentimentClassifier <brokers> <topics>* brokers: List of one or more Kafka Brokers* topics: List of one or more Kafka Topics to consume from** @author jillur.quddus* @version 0.0.1*/object KafkaStreamingSentimentClassifier {// Spark Streaming Contextval conf = new SparkConf().setAppName("Streaming Twitter Sentiment Classifier").setMaster("spark://<Spark Master Hostname>:7077");val sc = new SparkContext(conf);val ssc = new StreamingContext(sc, Seconds(5));val sparkSession = SparkSession.builder().getOrCreate();import sparkSession.implicits._;// Load the Trained Decision Tree Classifierval decisionTreeModel = PipelineModel.read.load("hdfs://<Namenode Hostname>:9000/keisan/knowledgebase/spark/mllib/models/decisionTreeClassifier");/*** Consume and deserialise Avro messages from the Kafka Topics using a Direct Stream Approach.* Pass the stream of tweets through the same pre-processing pipeline as the training dataset* and generate scaled Feature Vectors. Pass the scaled Feature Vectors to the trained* Decision Tree Classifier to predict the underlying sentiment.** @param args List of Kafka Brokers and Topics from which to consume from*/def main(args: Array[String]) = {if ( args.length < 2 ) {System.err.println("Usage: KafkaStreamingSentimentClassifier <brokers> <topics>");System.exit(1);}val Array(brokers, topics) = args;/********************************************************************* KAFKA CONSUMER DSTREAM********************************************************************/// Specify the Kafka Broker Options and set of Topicsval kafkaParameters = Map[String, String]("metadata.broker.list" -> brokers);val topicSet = topics.split(",").toSet;// Create an input DStream using KafkaUtils and the DefaultDecoder to provide the raw array of Bytesval messages = KafkaUtils.createDirectStream[String, Array[Byte], StringDecoder, DefaultDecoder](ssc, kafkaParameters, topicSet);/********************************************************************* DESERIALISE USING INVERSION, PRE-PROCESS AND CLASSIFY********************************************************************/// Deserialise the Avro messages using Bijection and the Tweet Schemamessages.map(message => {val parser = new Schema.Parser();val schema = parser.parse(TwitterProducer.TWEET_SCHEMA);val recordInjection = GenericAvroCodecs.toBinary[GenericRecord](schema);val record = recordInjection.invert(message._2).get;Row(record.get("id").toString(), record.get("user_name").toString(), record.get("text").toString());}).foreachRDD(rdd => {// Check that the RDD is not null - otherwise applying the predictive model will raise an IllegalStateExceptionif (rdd != null && !rdd.isEmpty()) {// Convert the RDD of Rows to a DataFrame of Tweet ID, Username and Textval tweetsDF = sparkSession.createDataFrame(rdd,new StructType().add("id", StringType).add("user_name", StringType).add("text", StringType));/********************************************************************* APPLY THE SAME PRE-PROCESSING PIPELINE TO THE REAL-TIME TWEETS********************************************************************/// Lowercase and remove punctuationval lowercasedDF = PreProcessorUtils.lowercaseRemovePunctuation(tweetsDF, "text");// Lemmatizeval lemmatizedDF = lowercasedDF.select("user_name", "text").rdd.mapPartitions(p => {val props = new Properties();props.put("annotators", "tokenize, ssplit, pos, lemma");val pipeline = new StanfordCoreNLP(props);p.map{case Row(user_name:String, text: String) => (user_name, text, PreProcessorUtils.lemmatizeText(text, pipeline));};}).toDF("user_name", "text", "lemmas");// Remove Stop Words from the sequence of Lemmasval stopWordsRemovedDF = PreProcessorUtils.stopWordRemover(lemmatizedDF, "lemmas", "filtered_lemmas").where(size(col("filtered_lemmas")) > 1);/********************************************************************* SCALED FEATURE VECTORS********************************************************************/// Generate the Scaled Feature Vectorsval featurizedDF = ModelUtils.tfidf(stopWordsRemovedDF, "filtered_lemmas", "features");/********************************************************************* APPLY TRAINED DECISION TREE CLASSIFIER TO THE REAL-TIME TWEETS********************************************************************/// Apply the Decision Tree Classifier to the scaled Feature Vectors// Note that the Decision Tree Classifier was trained using a column called "features".// A column named "features" MUST also be present on the new dataset in order to make// predictions. If it is called anything else, an exception will be raised.val predictions = decisionTreeModel.transform(featurizedDF);// Output the original tweet's username, text and predicted labelpredictions.select("user_name", "text", "predicted_label").show(false);}});// Start the computationssc.start();// Wait for the computation to terminatessc.awaitTermination();}}
我们现在可以运行我们的端到端机器学习管道!首先,我将稍微更新我的Kafka Twitter 生产者,根据英国的常见航空公司进行过滤,包括British_Airways,Ryanair和easyJet。假设我的Kafka集群在线,并且我的Kafka Producer正在运行,我可以使用Maven构建我的Spark Consumer Streaming Application并使用以下命令将其部署到我的Spark集群:
# Deploy the Spark Consumer Streaming Application to the Spark Clusterbin/spark-submit --class io.keisan.knowledgebase.spark.mllib.KafkaStreamingSentimentClassifier --master spark://<Spark Master Hostname>:6066 --deploy-mode cluster /keisan/knowledgebase/spark/mllib/jars/keisan-spark-mllib-0.0.1-SNAPSHOT.jar <Kafka Broker Hostname>:9092 twitter
假设一切顺利,如果您检查Spark驱动程序的标准输出,您应该看到Spark Dataframes正在打印,包含推文的用户名,文本和预测标签 - 请记住,在我们的案例中,真正的结果是推文是负面的情绪,而错误的结果是推文在情绪上是积极的。以下是一些使用我们的决策树分类器自动分类的推文:

正如您所看到的,我们的决策树分类器并不完全完美,但在大多数情况下,它已正确预测了推文的潜在情绪!航空公司和其他组织可以使用这样的预测模型来告知他们如何近乎实时地改进他们的服务和产品。
在本文中,我们成功开发了一种近实时,高吞吐量,可靠且容错的机器学习管道,能够在流式传输和接收时对基于事件的数据进行准确预测。在以后的文章中,我将探讨其他类型的监督和非监督算法,以及如何将它们合并到实时管道中。

若有收获,就点个赞吧
0 人点赞
