1 自定义启动 Banner
- 在启动 SpringBoot 项目的时候可以发现有如下的一条启动的信息:

- 有的时候我们希望可以自定义启动的 Banner ,不希望使用原始的 Banner 来进行启动,需要一些个性化的设置,在 SpringBoot 之中所有的配置项都是可以由用户自定义完成的,其中也包括了启动的 Banner 。
- 如果要想实现这样的启动的 Banner ,那么首先就需要设置一个和以上结构类似的文本的操作,一般来讲可以通过一些在线的网络来完成配置。
- 在线 Banner 生成的地址:
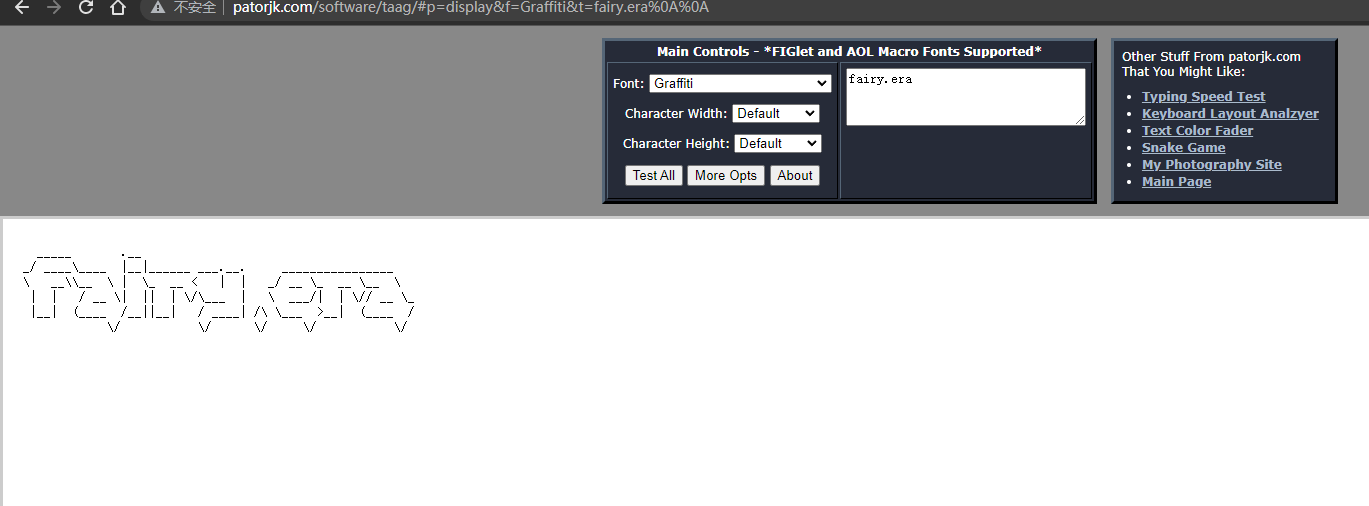
- 在底部提供的是一个文本,可以将文本复制到项目的 resources 目录中(src/main/resources/banner.txt),banner.txt 是一个固定的名称,不可修改。
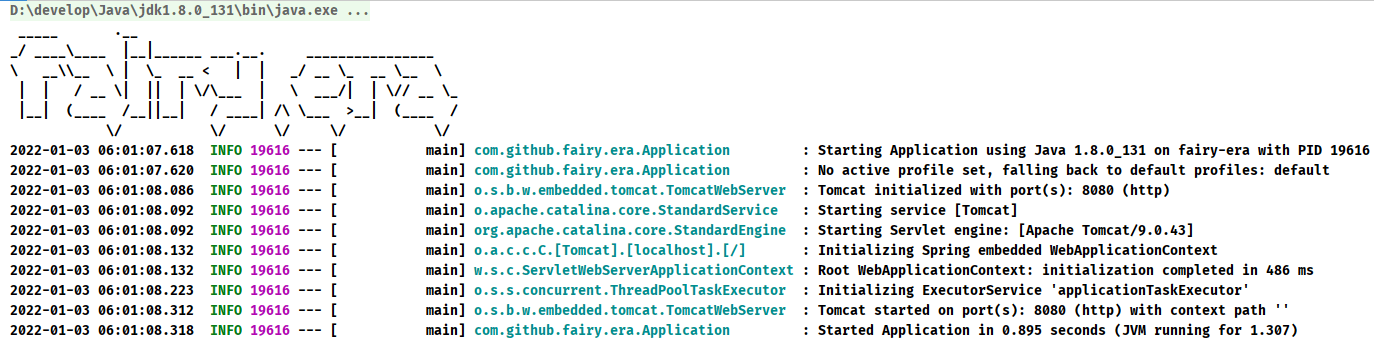
_____ .___/ ____\____ |__|______ ___.__. ________________\ __\\__ \ | \_ __ < | | _/ __ \_ __ \__ \| | / __ \| || | \/\___ | \ ___/| | \// __ \_|__| (____ /__||__| / ____| /\ \___ >__| (____ /\/ \/ \/ \/ \/
- 随后重新启动一下 SpringBoot 程序,就可以发现已经更换了对应的 Banner 信息了。
- 仅仅这样还不够,我们如何实现和 SpringBoot 默认 Banner 的实现效果?
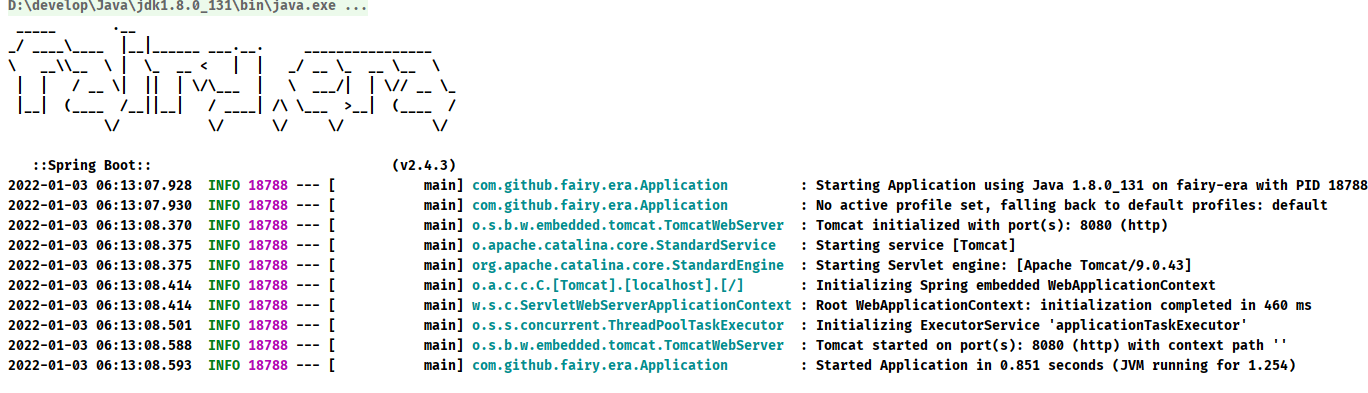
- ① 在 banner.txt 中可以输出一些全局变量,比如:
${application.version}:用来获取 MANIFEST.MF 文件中的版本号。${spring-boot.version}:Spring Boot 版本号。${spring-boot.formatted-version}:格式化后的 ${spring-boot.version} 版本信息。
_____ .___/ ____\____ |__|______ ___.__. ________________\ __\\__ \ | \_ __ < | | _/ __ \_ __ \__ \| | / __ \| || | \/\___ | \ ___/| | \// __ \_|__| (____ /__||__| / ____| /\ \___ >__| (____ /\/ \/ \/ \/ \/::Spring Boot:: ${spring-boot.formatted-version}
- ② SpringBoot 默认 Banner 中的 Spring Boot 是有颜色的,那么我们可以下面的三个枚举类来控制 banner 文字的样式:
- AnsiColor:用来设定字符的前景色。
- AnsiBackground:用来设定字符的背景色。
- AnsiStyle:用来控制加粗、斜体、下划线等等。
_____ .___/ ____\____ |__|______ ___.__. ________________\ __\\__ \ | \_ __ < | | _/ __ \_ __ \__ \| | / __ \| || | \/\___ | \ ___/| | \// __ \_|__| (____ /__||__| / ____| /\ \___ >__| (____ /\/ \/ \/ \/ \/${AnsiColor.GREEN} ::Spring Boot:: ${AnsiColor.BLACK}${spring-boot.formatted-version}
- 其实,之所以可以通过 banner.txt 实现自定义 Banner 是因为 Spring Boot 框架在启动时会按照以下顺序,查找 banner 信息:
- 先在 classpath 下找 文件 banner.gif 或 banner.jpg 或 banner.png ,先找到谁就用谁;
- 以上都没有就在 classpath 下找 banner.txt;
- 如果都没找到才会使用默认的 SpringBootBanner。
- 可以从 SpringApplicationBannerPrinter 的源码中知道上面的信息:
package org.springframework.boot;class SpringApplicationBannerPrinter {static final String BANNER_LOCATION_PROPERTY = "spring.banner.location";static final String BANNER_IMAGE_LOCATION_PROPERTY = "spring.banner.image.location";static final String DEFAULT_BANNER_LOCATION = "banner.txt";static final String[] IMAGE_EXTENSION = { "gif", "jpg", "png" };private static final Banner DEFAULT_BANNER = new SpringBootBanner();private final ResourceLoader resourceLoader;private final Banner fallbackBanner;// 其他略private Banner getBanner(Environment environment) {Banners banners = new Banners();、// 获取图片形式 bannerbanners.addIfNotNull(getImageBanner(environment));// 获取文字形式 bannerbanners.addIfNotNull(getTextBanner(environment));if (banners.hasAtLeastOneBanner()) {return banners;}if (this.fallbackBanner != null) {return this.fallbackBanner;}return DEFAULT_BANNER;}private Banner getTextBanner(Environment environment) {String location = environment.getProperty(BANNER_LOCATION_PROPERTY, DEFAULT_BANNER_LOCATION);Resource resource = this.resourceLoader.getResource(location);try {if (resource.exists() && !resource.getURL().toExternalForm().contains("liquibase-core")) {return new ResourceBanner(resource);}}catch (IOException ex) {// Ignore}return null;}private Banner getImageBanner(Environment environment) {String location = environment.getProperty(BANNER_IMAGE_LOCATION_PROPERTY);if (StringUtils.hasLength(location)) {Resource resource = this.resourceLoader.getResource(location);return resource.exists() ? new ImageBanner(resource) : null;}for (String ext : IMAGE_EXTENSION) {Resource resource = this.resourceLoader.getResource("banner." + ext);if (resource.exists()) {return new ImageBanner(resource);}}return null;}}
- 除了采用以上的方式实现了 Banner 的配置之外,实际上也可以在项目中基于 Bean 的方式来进行配置(如果使用的是一个文本,那么 Banner 就会固定一个,但是如果说希望可以进行不同的 Banner 的切换,那么就可以基于 Bean 的方式来进行配置了),如果要想配置启动的 Banner 的文字,最终的一个接口就是 org.springframework.boot.Banner 接口。
package org.springframework.boot;import java.io.PrintStream;import org.springframework.core.env.Environment;@FunctionalInterface // 函数式接口public interface Banner { // 由 SpringBoot 提供的内部接口/*** 通过指定的 PrintStream 来实现启动 Banner 的输出* @param environment 项目启动的时候指定的 profile* @param sourceClass 应用的程序类* @param out 实现 Banner 的信息输出*/void printBanner(Environment environment, Class<?> sourceClass, PrintStream out);/*** Banner 启动的模式*/enum Mode {OFF, // 不输出 Banner 的信息CONSOLE, // 在控制台输出 BannerLOG // 在日志中输出 Banner}}
- 下面可以考虑实现一个 Banner 接口的实现类,随后基于一个随机数的方式在每次启动的时候实现动态 Banner 的配置,这样一来 src/main/resources 目录下的 banner.txt 就不需要再使用了,删除即可。
- 定义一个 Banner 接口的实现类:
package com.github.fairy.era.banner;import org.springframework.boot.Banner;import org.springframework.core.env.Environment;import java.io.PrintStream;import java.security.SecureRandom;/*** 实现自定义 Banner 输出** @author 许大仙* @since 2022-01-03 06-34*/public class FairyBanner implements Banner {private static final String[] BANNER = {" _____ .__","_/ ____\\____ |__|______ ___.__. ________________","\\ __\\\\__ \\ | \\_ __ < | | _/ __ \\_ __ \\__ \\"," | | / __ \\| || | \\/\\___ | \\ ___/| | \\// __ \\_"," |__| (____ /__||__| / ____| /\\ \\___ >__| (____ /"," \\/ \\/ \\/ \\/ \\/"};private static final String[] EDU_BANNER = {" .___ _____ .__ "," ____ __| _/_ __ _/ ____\\____ |__|______ ___.__. ________________ ","_/ __ \\ / __ | | \\ \\ __\\\\__ \\ | \\_ __ < | | _/ __ \\_ __ \\__ \\ ","\\ ___// /_/ | | / | | / __ \\| || | \\/\\___ | \\ ___/| | \\// __ \\_"," \\___ >____ |____/ /\\ |__| (____ /__||__| / ____| /\\ \\___ >__| (____ /"," \\/ \\/ \\/ \\/ \\/ \\/ \\/ \\/"};private static final String COMMON_BANNER = "许大仙";private static final SecureRandom random = new SecureRandom();@Overridepublic void printBanner(Environment environment, Class<?> sourceClass, PrintStream out) {// 输出换行out.println();// 生成一个 0 ~ 9 的随机数int num = random.nextInt(10);if (0 == num) {for (String line : BANNER) {out.println(line);}} else if (num % 2 == 0) {for (String line : EDU_BANNER) {out.println(line);}} else {out.println(COMMON_BANNER);}// 输出换行out.println("");out.flush();}}
- 此时的配置类如果想在 SpringBoot 中生效,就需要修改 SpringBoot 的启动类:
package com.github.fairy.era;import com.github.fairy.era.banner.FairyBanner;import org.springframework.boot.SpringApplication;import org.springframework.boot.autoconfigure.SpringBootApplication;/*** 启动类** @author 许大仙* @version 1.0* @since 2021-12-31 09:14*/@SpringBootApplicationpublic class Application {public static void main(String[] args) {// 获取实例化对象SpringApplication springApplication = new SpringApplication(Application.class);// 设置 BannerspringApplication.setBanner(new FairyBanner());// 运行 SpringBoot 程序springApplication.run(args);}}
- 既然已经可以实现 Banner 的生成了,那么就可以考虑进行 Banner 模式的配置了,需要修改 SpringBoot 的启动类:
package com.github.fairy.era;import com.github.fairy.era.banner.FairyBanner;import org.springframework.boot.Banner;import org.springframework.boot.SpringApplication;import org.springframework.boot.autoconfigure.SpringBootApplication;/*** 启动类** @author 许大仙* @version 1.0* @since 2021-12-31 09:14*/@SpringBootApplicationpublic class Application {public static void main(String[] args) {// 获取实例化对象SpringApplication springApplication = new SpringApplication(Application.class);// 设置 BannerspringApplication.setBanner(new FairyBanner());// Banner.Mode 的配置:关闭 Banner 的输出springApplication.setBannerMode(Banner.Mode.OFF);// 运行 SpringBoot 程序springApplication.run(args);}}
- 在实际开发中,很少有人愿意做这么繁琐的 Banner 的处理,此处演示自定义 Banner 的目的就是为了后面的 SpringBoot 启动流程而准备的,因为源代码中就有 Banner 接口。
2 导入 Spring 配置文件(不推荐)
2.1 概述
- 在进行 SpringBoot 项目开发的时候,一般常用的做法就是在
@SpringBootApplication注解所在包及其子包下,保存有其他的相关组件,那么下面就按照 SpringBoot 的约定来实现一个业务层的咖啡啊。
2.2 micro-web 子模块
- 创建一个消息处理的业务接口:
package com.github.fairy.era.service;/*** @author 许大仙* @since 2022-01-03 07-06*/public interface IMessageService {String echo(String msg);}
- 按照 Spring 的处理方法来定义业务接口的子类,同时使用
@Service注解进行配置。
package com.github.fairy.era.service.impl;import com.github.fairy.era.service.IMessageService;import org.springframework.stereotype.Service;/*** @author 许大仙* @since 2022-01-03 07-52*/@Servicepublic class MessageServiceImpl implements IMessageService {@Overridepublic String echo(String msg) {return "【ECHO】" + msg;}}
- 在 MessageHandler 程序类之中利用 IOC 机制实现 IMessageService 接口的注入:
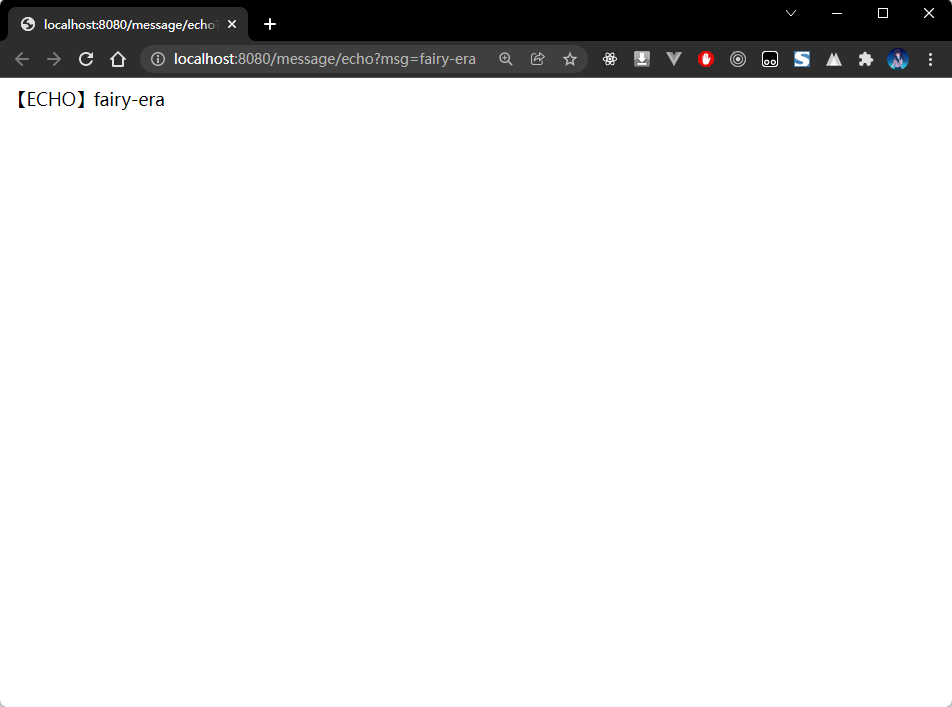
package com.github.fairy.era.web;import com.github.fairy.era.service.IMessageService;import org.slf4j.Logger;import org.slf4j.LoggerFactory;import org.springframework.beans.factory.annotation.Autowired;import org.springframework.web.bind.annotation.GetMapping;import org.springframework.web.bind.annotation.RequestMapping;import org.springframework.web.bind.annotation.RestController;/*** @author 许大仙* @since 2022-01-03 07-55*/@RestController@RequestMapping("/message")public class MessageHandler {// 获取日志对象private static final Logger LOGGER = LoggerFactory.getLogger(MessageHandler.class);@Autowiredprivate IMessageService messageService;@GetMapping("/echo")public String echo(String msg) {LOGGER.info("接收 msg 的请求参数,参数内容是 {}", msg);return this.messageService.echo(msg);}}
- 程序执行路径:http://localhost:8080/message/echo?msg=fairy-era。
- 页面响应结果:
- 以上的处理操作是根据 Spring 所提供的一些 Bean 配置注解的方式来完成的,此时的程序是新编写的,所以使用注解没什么问题。
- 但是,如果说有这么一种情况,在 2010 年的时候公司投资了一个项目(SSH、SSM),这个项目现在要求使用 SpringBoot 框架进行二期开发,传统项目里面已经采用了大量的 Spring 配置文件模式(XML)来进行项目诶只,如果将其更换为 SpringBoot ,所需要修改的就会非常的多,为了解决这个问题,在 SpringBoot 里面支持开发者导入 XML 配置文件。
- 模拟传统的 XML 形式的 Spring 项目:
- ① 删除 MessageServiceImpl 实现类的
@Service注解。 ```java package com.github.fairy.era.service.impl;
- ① 删除 MessageServiceImpl 实现类的
import com.github.fairy.era.service.IMessageService;
/**
- @author 许大仙
@since 2022-01-03 07-52 */ public class MessageServiceImpl implements IMessageService { @Override public String echo(String msg) {
return "【ECHO】" + msg;
} }
- ② 在 src/main/resource 目录之中创建 META-INF/spring/spring-service.xml 配置文件,并进行 MessageServiceImpl 的 Bean 的配置:```xml<?xml version="1.0" encoding="UTF-8"?><beans xmlns="http://www.springframework.org/schema/beans"xmlns:xsi="http://www.w3.org/2001/XMLSchema-instance"xsi:schemaLocation="http://www.springframework.org/schema/beans http://www.springframework.org/schema/beans/spring-beans.xsd"><bean id="messageService" class="com.github.fairy.era.service.impl.MessageServiceImpl"></bean></beans>
- 如果要想将当前的配置文件和 SpringBoot 项目整合到一起,那么就需要在启动类中追加响应的配置注解
@ImportSource,该注解可以引入要导入的 Spring 配置文件:
package com.github.fairy.era;import org.springframework.boot.SpringApplication;import org.springframework.boot.autoconfigure.SpringBootApplication;import org.springframework.context.annotation.ImportResource;/*** 启动类** @author 许大仙* @version 1.0* @since 2021-12-31 09:14*/@ImportResource(locations = "classpath:META-INF/spring/spring-*.xml")@SpringBootApplicationpublic class Application {public static void main(String[] args) {SpringApplication.run(Application.class, args);}}
- 配置完成之后,需要重新启动 SpringBoot 应用程序。
3 项目热部署
3.1 概述
- 在进行 Java 项目开发过程中,最痛苦的一件事情就是每次修改代码之后都需要重启服务器,为了解决这个问题,在 SpringBoot 就提供了所谓的热加载机制,只要程序发生变更,就会自动进行 SpringBoot 容器的重新启动,而后加载新的配置。
3.2 microboot 项目
- 如果要想解决这种自动加载的问题,需要在项目中引入如下的依赖:
implementation group: 'org.springframework.boot', name: 'spring-boot-devtools', version: '2.4.3'
- 因为目前项目是通过 Gradle 来进行依赖库的管理,所以可以修改 microboot 项目的 build.gradle 文件在公共模块依赖处进行依赖配置:
subprojects { // 子模块的配置dependencies { // 公共依赖管理implementation group: 'org.springframework.boot', name: 'spring-boot-devtools' // 允许进行项目的热部署}// 其他略}
- microboot 项目的完整的 build.gradle 文件内容如下:
buildscript { // 定义脚本使用资源apply from: 'dependencies.gradle' // 引入所需要的依赖库文件repositories { // 脚本资源仓库maven {url 'https://maven.aliyun.com/repository/gradle-plugin'}}dependencies { // 依赖管理classpath libraries.'spring-boot-gradle-plugin'}}apply from: 'dependencies.gradle' // 引入所需要的依赖库文件allprojects { // 所有模块/项目的通用配置apply plugin: 'idea'apply plugin: 'java'apply plugin: 'java-library'group project_group // 组织名称version project_version // 版本号sourceCompatibility = project_jdk // 本次的项目都是基于 JDK-8 的版本targetCompatibility = project_jdk // 本次的项目都是基于 JDK-8 的版本}subprojects { // 子模块的配置apply plugin: 'org.springframework.boot' // 将版本编号配置在插件内部apply plugin: 'io.spring.dependency-management' // 由此插件负责版本号的维护repositories { // 仓库配置maven { // 阿里云的 Maven 仓库url 'https://maven.aliyun.com/repository/public/'}mavenCentral() // 默认情况下所提供的是 Maven 的中央仓库}dependencies { // 公共依赖管理implementation group: 'org.springframework.boot', name: 'spring-boot-devtools' // 允许进行项目的热部署}test {useJUnitPlatform()}sourceSets { // 建立源代码的目录集合main {java {srcDirs = ['src/main/java']}resources {srcDirs = ['src/main/resources']}}test {java {srcDirs = ['src/test/java']}resources {srcDirs = ['src/test/resources']}}}gradle.taskGraph.whenReady { // 在所有的操作准备好之后触发tasks.each { task ->if (task.name.contains('test')) { // 如果发现有 test 任务,就跳过task.enabled = true // 当前任务不执行}}}// 最终生成的 jar 文件名称:baseName-version-classifier.extensiontask sourceJar(type: Jar, dependsOn: classes) { // 定义一个源代码的打包任务,并依赖于 classes 这种 Gradle 内置的任务archiveClassifier.set 'sources' // 文件的分类from sourceSets.main.allSource // 所有源代码的读取路径}task javadocTask(type: Javadoc) {source sourceSets.main.allJava // 定义所有的 Java 源代码的路径}tasks.withType(Javadoc) { // 文档生成一定要有乱码处理options.encoding = "UTF-8"}tasks.withType(JavaCompile) { // 针对程序编译的任务进行配置options.encoding = "UTF-8"}task javadocJar(type: Jar, dependsOn: javadocTask) { // 先生成 javadoc,才可以打包archiveClassifier.set 'javadoc' // 文件的分类from javadocTask.destinationDir // 通过 javaDocTask 任务中找到目标路径}artifacts { // 最终的打包操作任务archives sourceJararchives javadocJar}[compileJava, compileTestJava]*.options*.encoding = 'UTF-8'}project(':microboot-common') { // 设置子项目的配置,独享配置dependencies { // 配置子模块依赖}}project(':microboot-web') { // 设置子项目的配置,独享配置dependencies { // 配置子模块依赖implementation(project(':microboot-common')) // 引入其他子模块implementation 'org.springframework.boot:spring-boot-starter-web' // 引入 SpringBoot 的 web 的依赖}gradle.taskGraph.whenReady { // 在所有的操作准备好之后触发tasks.each { task ->if (task.name.contains('javadoc')) { // 如果发现有 javadoc 任务,就跳过task.enabled = false // 当前任务不执行}}}}
3.3 IDEA 工具
- 如果使用的开发工具是 IDEA ,还需要进行如下的配置。
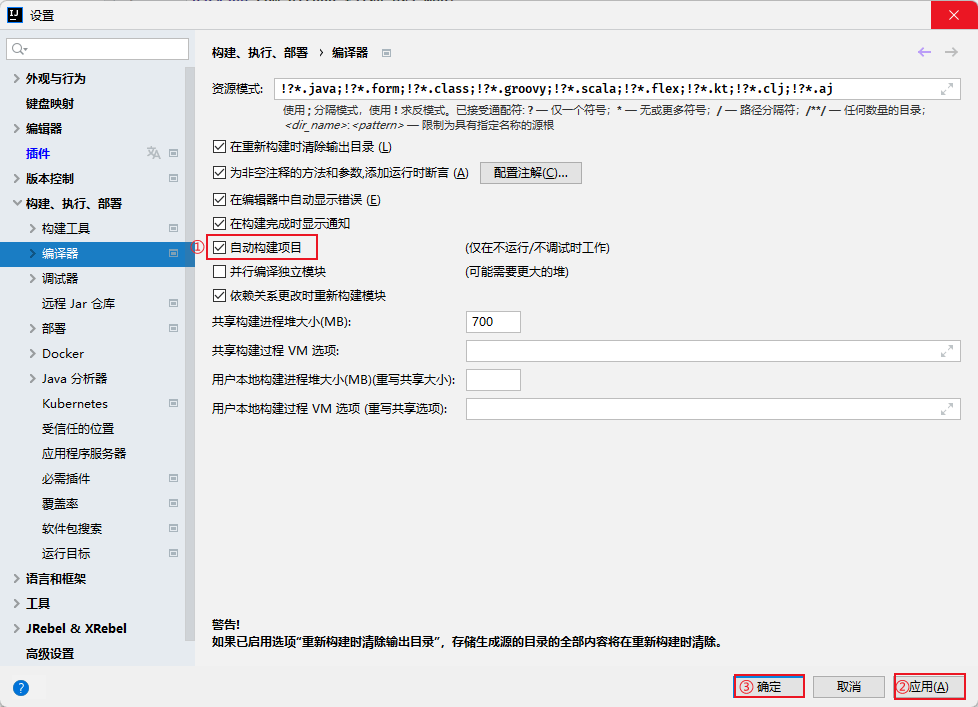
- 仅仅配置以上的选项还不能支持自动的部署处理,如果要想实现部署的自动配置,在 IDEA 中还需要进行一些配置的注册,Win 平台下按
Ctrl + Shift + Alt + /的快捷键。
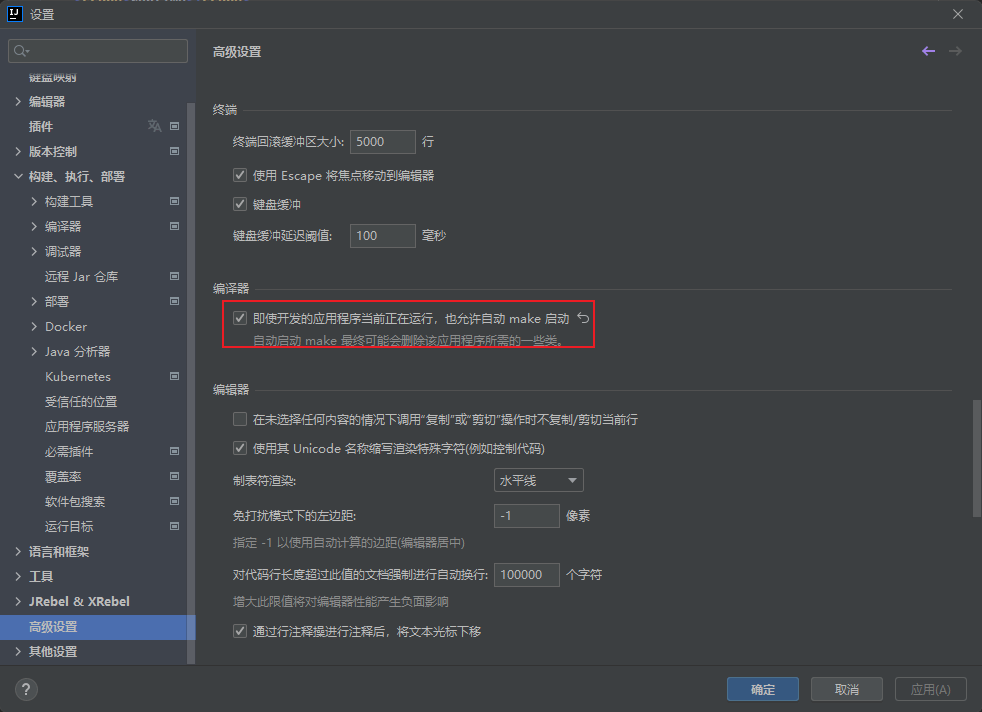
- 不过,在最新的版本的 IDEA 工具中已经内置开启了该选项参数了。
- 当所有的配置都完成之后,最好重新启动 IDEA ,这样在每次代码修改并且保存之后都会自动的重新启动 SpringBoot 的容器(并不是整个容器的重新启动,而是内部的部分程序类的启动)。
- 激活方式:IDEA 失去焦点 5 秒后启动热部署。
3.4 热部署范围配置
- 默认不触发重启的目录列表:
- /META-INF/maven
- /META-INF/resources
- /resources
- /static
- /public
- /templates
- ……
- 自定义不参与重启排除项:
spring:devtools:restart:# 设置不参与热部署的文件或文件夹exclude: static/**,public/**,config/application.yml
3.5 关闭热部署
- ① 在 application.yml 中通过配置关闭热部署:
spring:devtools:restart:enabled: false # 关闭热部署
- ② 设置高优先级属性禁用热部署:
package com.github.fairy.era;import org.springframework.boot.SpringApplication;import org.springframework.boot.autoconfigure.SpringBootApplication;/*** @author 许大仙*/@SpringBootApplicationpublic class Application {public static void main(String[] args) {System.setProperty("spring.devtools.restart.enabled", "false");SpringApplication.run(Application.class, args);}}
4 整合 Junit 5 测试工具
4.1 概述
- 在学习 Spring 框架的时候,我们知道在 Spring 里面为了方便用户的测试提供了一个
spring-test的依赖,那么在进行 SpringBoot 项目开发的时候由于运行的方式有一些变更,所以在 SpringBoot 中提供了spring-boot-starter-test的依赖,其内部采用的测试组件为 Junit 5 。
4.2 microboot 项目
- 在 build.gradle 配置文件中的对 microboot-web 进行依赖管理:
subprojects { // 子模块的配置dependencies { // 公共依赖管理implementation group: 'org.springframework.boot', name: 'spring-boot-devtools' // 允许进行项目的热部署testImplementation 'org.springframework.boot:spring-boot-starter-test' //引入 SpringBoot 的 test 的依赖}}
- 完整的 build.gradle 文件内容如下:
buildscript { // 定义脚本使用资源apply from: 'dependencies.gradle' // 引入所需要的依赖库文件repositories { // 脚本资源仓库maven {url 'https://maven.aliyun.com/repository/gradle-plugin'}}dependencies { // 依赖管理classpath libraries.'spring-boot-gradle-plugin'}}apply from: 'dependencies.gradle' // 引入所需要的依赖库文件allprojects { // 所有模块/项目的通用配置apply plugin: 'idea'apply plugin: 'java'apply plugin: 'java-library'group project_group // 组织名称version project_version // 版本号sourceCompatibility = project_jdk // 本次的项目都是基于 JDK-8 的版本targetCompatibility = project_jdk // 本次的项目都是基于 JDK-8 的版本}subprojects { // 子模块的配置apply plugin: 'org.springframework.boot' // 将版本编号配置在插件内部apply plugin: 'io.spring.dependency-management' // 由此插件负责版本号的维护repositories { // 仓库配置maven { // 阿里云的 Maven 仓库url 'https://maven.aliyun.com/repository/public/'}mavenCentral() // 默认情况下所提供的是 Maven 的中央仓库}dependencies { // 公共依赖管理implementation group: 'org.springframework.boot', name: 'spring-boot-devtools' // 允许进行项目的热部署testImplementation 'org.springframework.boot:spring-boot-starter-test' //引入 SpringBoot 的 test 的依赖}test {useJUnitPlatform()}sourceSets { // 建立源代码的目录集合main {java {srcDirs = ['src/main/java']}resources {srcDirs = ['src/main/resources']}}test {java {srcDirs = ['src/test/java']}resources {srcDirs = ['src/test/resources']}}}gradle.taskGraph.whenReady { // 在所有的操作准备好之后触发tasks.each { task ->if (task.name.contains('test')) { // 如果发现有 test 任务,就跳过task.enabled = true // 当前任务不执行}}}// 最终生成的 jar 文件名称:baseName-version-classifier.extensiontask sourceJar(type: Jar, dependsOn: classes) { // 定义一个源代码的打包任务,并依赖于 classes 这种 Gradle 内置的任务archiveClassifier.set 'sources' // 文件的分类from sourceSets.main.allSource // 所有源代码的读取路径}task javadocTask(type: Javadoc) {source sourceSets.main.allJava // 定义所有的 Java 源代码的路径}tasks.withType(Javadoc) { // 文档生成一定要有乱码处理options.encoding = "UTF-8"}tasks.withType(JavaCompile) { // 针对程序编译的任务进行配置options.encoding = "UTF-8"}task javadocJar(type: Jar, dependsOn: javadocTask) { // 先生成 javadoc,才可以打包archiveClassifier.set 'javadoc' // 文件的分类from javadocTask.destinationDir // 通过 javaDocTask 任务中找到目标路径}artifacts { // 最终的打包操作任务archives sourceJararchives javadocJar}[compileJava, compileTestJava]*.options*.encoding = 'UTF-8'}project(':microboot-common') { // 设置子项目的配置,独享配置dependencies { // 配置子模块依赖}}project(':microboot-web') { // 设置子项目的配置,独享配置dependencies { // 配置子模块依赖implementation(project(':microboot-common')) // 引入其他子模块implementation 'org.springframework.boot:spring-boot-starter-web' // 引入 SpringBoot 的 web 的依赖}gradle.taskGraph.whenReady { // 在所有的操作准备好之后触发tasks.each { task ->if (task.name.contains('javadoc')) { // 如果发现有 javadoc 任务,就跳过task.enabled = false // 当前任务不执行}}}}
- 如果要想让当前的配置在 IDEA 中生效,则一定要进行 Gradle 的刷新(新版本的 IDEA 中不会自动更新 Gradle 的依赖了)。
4.3 microboot-web 子模块
此时一切的环境就已经配置成功了,随后就可以在项目中进行 Junit 测试类的编写了。
示例:
package com.github.fairy.era;import com.github.fairy.era.web.MessageHandler;import org.junit.jupiter.api.AfterEach;import org.junit.jupiter.api.BeforeEach;import org.junit.jupiter.api.Test;import org.springframework.beans.factory.annotation.Autowired;import org.springframework.boot.test.context.SpringBootTest;/*** @author 许大仙* @version 1.0* @since 2022-01-04 09:36*/@SpringBootTestpublic class ApplicationTest {@Autowiredprivate MessageHandler messageHandler;@BeforeEachpublic void beforeEach() {System.out.println("【@BeforeEach】ApplicationTest 开始执行测试操作");}@AfterEachpublic void afterEach() {System.out.println("【@AfterEach】ApplicationTest 测试完成");}@Testpublic void test() {String msg = this.messageHandler.echo("你好啊");System.out.println("msg = " + msg); // msg = 【ECHO】SpringBoot你好啊}}
5 Lombok
5.1 概述
- 在最早学习 Java 基础的时候,我们学习到类的时候就学习了封装,而后就需要开发者手工实现 setter 和 getter ,后来到了开发工具支持的年代(Eclipse 或 IDEA),这些开发工具可以帮助使用者自动生成这些 setter 和 getter 等方法。
- 原始的 setter 和 getter 生成:
package com.github.fairy.era.vo;/*** @author 许大仙* @version 1.0* @since 2022-01-04 11:01*/public class Dept {private Integer deptNo;private String deptName;private String deptLocation;public Integer getDeptNo() {return deptNo;}public void setDeptNo(Integer deptNo) {this.deptNo = deptNo;}public String getDeptName() {return deptName;}public void setDeptName(String deptName) {this.deptName = deptName;}public String getDeptLocation() {return deptLocation;}public void setDeptLocation(String deptLocation) {this.deptLocation = deptLocation;}}
- 每次都需要重复的定义属性,而后按照既定的规则来重复的生成 setter 和 getter ,实在是太繁琐了,于是 Lombok 应运而生,它可以通过注解的形式自动生成相关类的结构。
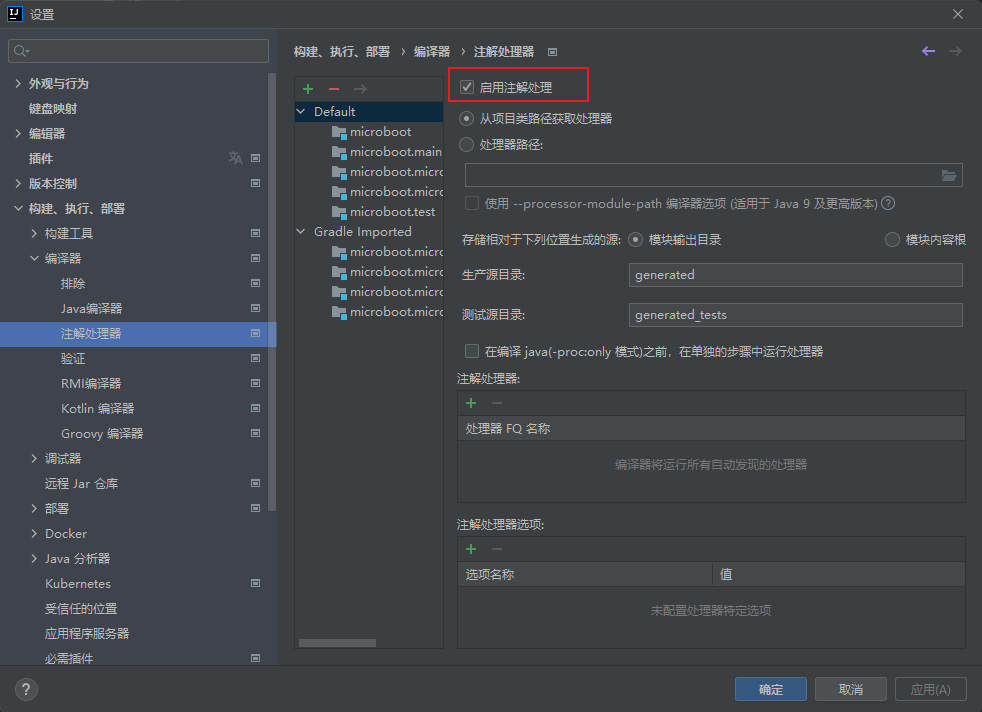
- 如果要想正确的使用该插件,除了项目本身的环境支持外,还需要在开发工具(IDEA)中安装对应的插件,幸运的是,最新版的 IDEA 已经集成了该插件。
- IDEA 需要启用注解处理。
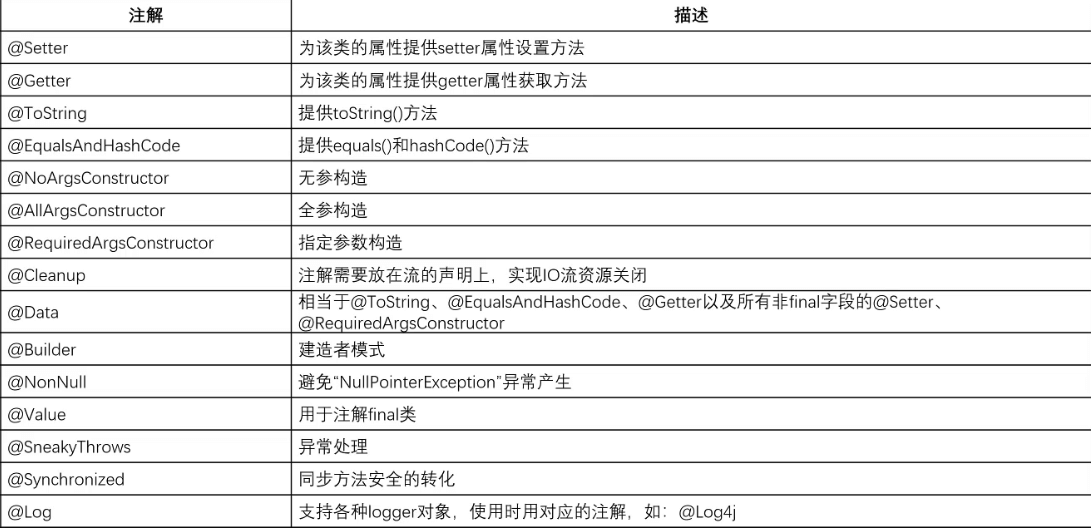
5.2 Lombok 支持的注解
5.3 microboot 项目
- 如果要想实现当前的自动代码生成的处理操作,则一定要引入 lombok 的依赖:
compileOnly group: 'org.projectlombok', name: 'lombok', version: '1.18.22'
- 由于各个项目模块都有可能存在这种自动生成类结构的需求,那么最佳的做法就是在公共的依赖库之中进行 Lombok 的配置, 此时的配置需要准备两种不同的环境:编译生效和注解生效。
- 修改 microboot 项目的 build.gradle 文件在公共模块依赖处进行依赖配置:
subprojects { // 子模块的配置dependencies { // 公共依赖管理implementation group: 'org.springframework.boot', name: 'spring-boot-devtools' // 允许进行项目的热部署testImplementation 'org.springframework.boot:spring-boot-starter-test' //引入 SpringBoot 的 test 的依赖// lombokcompileOnly 'org.projectlombok:lombok' // 编译生效annotationProcessor 'org.projectlombok:lombok' // 注解生效testCompileOnly 'org.projectlombok:lombok' // 编译生效testAnnotationProcessor 'org.projectlombok:lombok' // 注解生效}}
- 完整的 build.gradle 配置文件:
buildscript { // 定义脚本使用资源apply from: 'dependencies.gradle' // 引入所需要的依赖库文件repositories { // 脚本资源仓库maven {url 'https://maven.aliyun.com/repository/gradle-plugin'}}dependencies { // 依赖管理classpath libraries.'spring-boot-gradle-plugin'}}apply from: 'dependencies.gradle' // 引入所需要的依赖库文件allprojects { // 所有模块/项目的通用配置apply plugin: 'idea'apply plugin: 'java'apply plugin: 'java-library'group project_group // 组织名称version project_version // 版本号sourceCompatibility = project_jdk // 本次的项目都是基于 JDK-8 的版本targetCompatibility = project_jdk // 本次的项目都是基于 JDK-8 的版本}subprojects { // 子模块的配置apply plugin: 'org.springframework.boot' // 将版本编号配置在插件内部apply plugin: 'io.spring.dependency-management' // 由此插件负责版本号的维护repositories { // 仓库配置maven { // 阿里云的 Maven 仓库url 'https://maven.aliyun.com/repository/public/'}mavenCentral() // 默认情况下所提供的是 Maven 的中央仓库}dependencies { // 公共依赖管理implementation group: 'org.springframework.boot', name: 'spring-boot-devtools' // 允许进行项目的热部署testImplementation 'org.springframework.boot:spring-boot-starter-test' //引入 SpringBoot 的 test 的依赖// lombokcompileOnly 'org.projectlombok:lombok' // 编译生效annotationProcessor 'org.projectlombok:lombok' // 注解生效testCompileOnly 'org.projectlombok:lombok' // 编译生效testAnnotationProcessor 'org.projectlombok:lombok' // 注解生效}test {useJUnitPlatform()}sourceSets { // 建立源代码的目录集合main {java {srcDirs = ['src/main/java']}resources {srcDirs = ['src/main/resources']}}test {java {srcDirs = ['src/test/java']}resources {srcDirs = ['src/test/resources']}}}gradle.taskGraph.whenReady { // 在所有的操作准备好之后触发tasks.each { task ->if (task.name.contains('test')) { // 如果发现有 test 任务,就跳过task.enabled = true // 当前任务不执行}}}// 最终生成的 jar 文件名称:baseName-version-classifier.extensiontask sourceJar(type: Jar, dependsOn: classes) { // 定义一个源代码的打包任务,并依赖于 classes 这种 Gradle 内置的任务archiveClassifier.set 'sources' // 文件的分类from sourceSets.main.allSource // 所有源代码的读取路径}task javadocTask(type: Javadoc) {source sourceSets.main.allJava // 定义所有的 Java 源代码的路径}tasks.withType(Javadoc) { // 文档生成一定要有乱码处理options.encoding = "UTF-8"}tasks.withType(JavaCompile) { // 针对程序编译的任务进行配置options.encoding = "UTF-8"}task javadocJar(type: Jar, dependsOn: javadocTask) { // 先生成 javadoc,才可以打包archiveClassifier.set 'javadoc' // 文件的分类from javadocTask.destinationDir // 通过 javaDocTask 任务中找到目标路径}artifacts { // 最终的打包操作任务archives sourceJararchives javadocJar}[compileJava, compileTestJava]*.options*.encoding = 'UTF-8'}project(':microboot-common') { // 设置子项目的配置,独享配置dependencies { // 配置子模块依赖}}project(':microboot-web') { // 设置子项目的配置,独享配置dependencies { // 配置子模块依赖implementation(project(':microboot-common')) // 引入其他子模块implementation 'org.springframework.boot:spring-boot-starter-web' // 引入 SpringBoot 的 web 的依赖}gradle.taskGraph.whenReady { // 在所有的操作准备好之后触发tasks.each { task ->if (task.name.contains('javadoc')) { // 如果发现有 javadoc 任务,就跳过task.enabled = false // 当前任务不执行}}}}
5.4 生成简单 Java 类结构
5.4.1 概述
- 在任何一个项目中都会存在有大量的简单的 Java 类,而这些简单的 Java 类的定义结构是非常类似的,此时就可以直接通过 Lombok 来进行定义了。
5.4.2 microboot-web 子模块(@Data 注解)
- 生成简单的 Java 类基本结构:
package com.github.fairy.era.domain;import lombok.Data;import java.util.Date;/*** @author 许大仙* @version 1.0* @since 2022-01-04 13:35*/@Data // 这就是一个 Lombok 注解,此注解使用的最频繁public class Message {private String title;private Date publishDate;private String content;}
- 通过 IDEA 查看反编译生成的 class 文件,目录为 build/classes :
//// Source code recreated from a .class file by IntelliJ IDEA// (powered by FernFlower decompiler)//package com.github.fairy.era.domain;import java.util.Date;public class Message {private String title;private Date publishDate;private String content;public Message() {}public String getTitle() {return this.title;}public Date getPublishDate() {return this.publishDate;}public String getContent() {return this.content;}public void setTitle(String title) {this.title = title;}public void setPublishDate(Date publishDate) {this.publishDate = publishDate;}public void setContent(String content) {this.content = content;}public boolean equals(Object o) {if (o == this) {return true;} else if (!(o instanceof Message)) {return false;} else {Message other = (Message)o;if (!other.canEqual(this)) {return false;} else {label47: {Object this$title = this.getTitle();Object other$title = other.getTitle();if (this$title == null) {if (other$title == null) {break label47;}} else if (this$title.equals(other$title)) {break label47;}return false;}Object this$publishDate = this.getPublishDate();Object other$publishDate = other.getPublishDate();if (this$publishDate == null) {if (other$publishDate != null) {return false;}} else if (!this$publishDate.equals(other$publishDate)) {return false;}Object this$content = this.getContent();Object other$content = other.getContent();if (this$content == null) {if (other$content != null) {return false;}} else if (!this$content.equals(other$content)) {return false;}return true;}}}protected boolean canEqual(Object other) {return other instanceof Message;}public int hashCode() {int PRIME = true;int result = 1;Object $title = this.getTitle();int result = result * 59 + ($title == null ? 43 : $title.hashCode());Object $publishDate = this.getPublishDate();result = result * 59 + ($publishDate == null ? 43 : $publishDate.hashCode());Object $content = this.getContent();result = result * 59 + ($content == null ? 43 : $content.hashCode());return result;}public String toString() {return "Message(title=" + this.getTitle() + ", publishDate=" + this.getPublishDate() + ", content=" + this.getContent() + ")";}}
- 现在可以发现,只要在类中使用
@Data注解,就可以自动的根据当前类中所定义的属性来生成相应的 setter、getter、toString()、equals()、hashCode() 等方法,而这些方法在最早的时候需要人工或开发工具帮助我们来生成。 - 通过测试类对生成的方法进行测试:
package com.github.fairy.era;import com.github.fairy.era.domain.Message;import org.junit.jupiter.api.Test;import org.springframework.boot.test.context.SpringBootTest;import java.util.Date;/*** @author 许大仙* @version 1.0* @since 2022-01-04 09:36*/@SpringBootTestpublic class ApplicationTest {@Testpublic void test() {Message message = new Message();message.setTitle("你大爷的");message.setPublishDate(new Date());message.setContent("许大仙");System.out.println("message = " + message);}}
- 测试结果:
message = Message(title=你大爷的, publishDate=Tue Jan 04 13:49:11 CST 2022, content=许大仙)
5.4.3 microboot-web 子模块(@NonNull 注解)
- 希望希望某些属性在进行对象构造的时候必须全部传递,即 Lombok 需要生成有参构造方法:
package com.github.fairy.era.domain;import lombok.Data;import lombok.NonNull;/*** @author 许大仙* @version 1.0* @since 2022-01-04 13:51*/@Data // 本身不会生成构造方法(默认的无参构造)public class Dept {@NonNull // 该属性不允许为空private String deptNo;@NonNull // 该属性不允许为空private String deptName;private String location;}
- 通过 IDEA 查看反编译生成的 class 文件,目录为 build/classes :
//// Source code recreated from a .class file by IntelliJ IDEA// (powered by FernFlower decompiler)//package com.github.fairy.era.domain;import lombok.NonNull;public class Dept {@NonNullprivate String deptNo;@NonNullprivate String deptName;private String location;public Dept(@NonNull String deptNo, @NonNull String deptName) { // 生成了有参构造if (deptNo == null) {throw new NullPointerException("deptNo is marked non-null but is null");} else if (deptName == null) {throw new NullPointerException("deptName is marked non-null but is null");} else {this.deptNo = deptNo;this.deptName = deptName;}}@NonNullpublic String getDeptNo() {return this.deptNo;}@NonNullpublic String getDeptName() {return this.deptName;}public String getLocation() {return this.location;}public void setDeptNo(@NonNull String deptNo) {if (deptNo == null) {throw new NullPointerException("deptNo is marked non-null but is null");} else {this.deptNo = deptNo;}}public void setDeptName(@NonNull String deptName) {if (deptName == null) {throw new NullPointerException("deptName is marked non-null but is null");} else {this.deptName = deptName;}}public void setLocation(String location) {this.location = location;}public boolean equals(Object o) {if (o == this) {return true;} else if (!(o instanceof Dept)) {return false;} else {Dept other = (Dept)o;if (!other.canEqual(this)) {return false;} else {label47: {Object this$deptNo = this.getDeptNo();Object other$deptNo = other.getDeptNo();if (this$deptNo == null) {if (other$deptNo == null) {break label47;}} else if (this$deptNo.equals(other$deptNo)) {break label47;}return false;}Object this$deptName = this.getDeptName();Object other$deptName = other.getDeptName();if (this$deptName == null) {if (other$deptName != null) {return false;}} else if (!this$deptName.equals(other$deptName)) {return false;}Object this$location = this.getLocation();Object other$location = other.getLocation();if (this$location == null) {if (other$location != null) {return false;}} else if (!this$location.equals(other$location)) {return false;}return true;}}}protected boolean canEqual(Object other) {return other instanceof Dept;}public int hashCode() {int PRIME = true;int result = 1;Object $deptNo = this.getDeptNo();int result = result * 59 + ($deptNo == null ? 43 : $deptNo.hashCode());Object $deptName = this.getDeptName();result = result * 59 + ($deptName == null ? 43 : $deptName.hashCode());Object $location = this.getLocation();result = result * 59 + ($location == null ? 43 : $location.hashCode());return result;}public String toString() {return "Dept(deptNo=" + this.getDeptNo() + ", deptName=" + this.getDeptName() + ", location=" + this.getLocation() + ")";}}
5.4.4 microboot-web 子模块(@NoArgsConstructor 注解)
- 希望提供无参构造,那么直接在类上使用无参的构造注解
@NoArgsConstructor注解即可。
package com.github.fairy.era.domain;import lombok.Data;import lombok.NoArgsConstructor;import lombok.NonNull;/*** @author 许大仙* @version 1.0* @since 2022-01-04 14:02*/@Data@NoArgsConstructor // 会为当前的类自动生成无参构造public class Emp {@NonNull // 一旦生成无参构造方法,这个注解就失效了private String empNo;@NonNull // 一旦生成无参构造方法,这个注解就失效了private String empName;private Double salary;}
- 通过 IDEA 查看反编译生成的 class 文件,目录为 build/classes :
//// Source code recreated from a .class file by IntelliJ IDEA// (powered by FernFlower decompiler)//package com.github.fairy.era.domain;import lombok.NonNull;public class Emp {@NonNullprivate String empNo;@NonNullprivate String empName;private Double salary;@NonNullpublic String getEmpNo() {return this.empNo;}@NonNullpublic String getEmpName() {return this.empName;}public Double getSalary() {return this.salary;}public void setEmpNo(@NonNull String empNo) {if (empNo == null) {throw new NullPointerException("empNo is marked non-null but is null");} else {this.empNo = empNo;}}public void setEmpName(@NonNull String empName) {if (empName == null) {throw new NullPointerException("empName is marked non-null but is null");} else {this.empName = empName;}}public void setSalary(Double salary) {this.salary = salary;}public boolean equals(Object o) {if (o == this) {return true;} else if (!(o instanceof Emp)) {return false;} else {Emp other = (Emp)o;if (!other.canEqual(this)) {return false;} else {label47: {Object this$salary = this.getSalary();Object other$salary = other.getSalary();if (this$salary == null) {if (other$salary == null) {break label47;}} else if (this$salary.equals(other$salary)) {break label47;}return false;}Object this$empNo = this.getEmpNo();Object other$empNo = other.getEmpNo();if (this$empNo == null) {if (other$empNo != null) {return false;}} else if (!this$empNo.equals(other$empNo)) {return false;}Object this$empName = this.getEmpName();Object other$empName = other.getEmpName();if (this$empName == null) {if (other$empName != null) {return false;}} else if (!this$empName.equals(other$empName)) {return false;}return true;}}}protected boolean canEqual(Object other) {return other instanceof Emp;}public int hashCode() {int PRIME = true;int result = 1;Object $salary = this.getSalary();int result = result * 59 + ($salary == null ? 43 : $salary.hashCode());Object $empNo = this.getEmpNo();result = result * 59 + ($empNo == null ? 43 : $empNo.hashCode());Object $empName = this.getEmpName();result = result * 59 + ($empName == null ? 43 : $empName.hashCode());return result;}public String toString() {return "Emp(empNo=" + this.getEmpNo() + ", empName=" + this.getEmpName() + ", salary=" + this.getSalary() + ")";}public Emp() { // 无参构造方法}}
5.4.5 microboot-web 子模块(@RequiredArgsConstructor 注解)
@RequiredArgsConstructor注解会为 final 修改 或者@NonNull注解修改的属性生成构造方法。
package com.github.fairy.era.domain;import lombok.NonNull;import lombok.RequiredArgsConstructor;/*** @author 许大仙* @version 1.0* @since 2022-01-04 14:02*/@RequiredArgsConstructorpublic class Emp {private final String age;@NonNullprivate String empNo;@NonNullprivate String empName;private Double salary;}
- 通过 IDEA 查看反编译生成的 class 文件,目录为 build/classes :
//// Source code recreated from a .class file by IntelliJ IDEA// (powered by FernFlower decompiler)//package com.github.fairy.era.domain;import lombok.NonNull;public class Emp {private final String age;@NonNullprivate String empNo;@NonNullprivate String empName;private Double salary;public Emp(final String age, @NonNull final String empNo, @NonNull final String empName) {if (empNo == null) {throw new NullPointerException("empNo is marked non-null but is null");} else if (empName == null) {throw new NullPointerException("empName is marked non-null but is null");} else {this.age = age;this.empNo = empNo;this.empName = empName;}}}
5.4.6 microboot-web 子模块(@AllArgsConstructor 注解)
- 会为所有的属性生成构造方法,不管此属性是否是
@NonNull注解或 final 关键字修饰。
@AllArgsConstructorpublic class Emp {private final String age;@NonNullprivate String empNo;@NonNullprivate String empName;private Double salary;}
- 通过 IDEA 查看反编译生成的 class 文件,目录为 build/classes :
//// Source code recreated from a .class file by IntelliJ IDEA// (powered by FernFlower decompiler)//package com.github.fairy.era.domain;import lombok.NonNull;public class Emp {private final String age;@NonNullprivate String empNo;@NonNullprivate String empName;private Double salary;public Emp(String age, @NonNull String empNo, @NonNull String empName, Double salary) {if (empNo == null) {throw new NullPointerException("empNo is marked non-null but is null");} else if (empName == null) {throw new NullPointerException("empName is marked non-null but is null");} else {this.age = age;this.empNo = empNo;this.empName = empName;this.salary = salary;}}}
5.5 Accessor(访问器模式)
5.5.1 概述
- 虽然 Lombok 最为常用的是生成基本的类结构(
@Data注解是最为常用的一个),但是在 Lombok 设计的时候也充分的考虑到了各种设计模式的需求,所以对于属性的访问就存在了访问器模式,同时对于访问器操作形式提供了三种不同的方案:fluent、chain、prefix。
5.5.2 microboot-web 子模块(fluent 模式)
- fluent 模式的特点在于直接将属性名称作为属性设置和返回的方法名称(基于方法的重载来进行处理),随后可以在进行属性配置的时候直接使用代码链的方法来实现相关属性的设置。
- 在 Message 类中采用访问器模式,随后基于 fluent 操作形式定义:
package com.github.fairy.era.domain;import lombok.Data;import lombok.experimental.Accessors;import java.util.Date;/*** @author 许大仙* @version 1.0* @since 2022-01-04 13:35*/@Data@Accessors(fluent = true)public class Message {private String title;private Date publishDate;private String content;}
- 通过 IDEA 查看反编译生成的 class 文件,目录为 build/classes :
//// Source code recreated from a .class file by IntelliJ IDEA// (powered by FernFlower decompiler)//package com.github.fairy.era.domain;import java.util.Date;public class Message {private String title;private Date publishDate;private String content;public Message() {}public String title() { // 属性获取方法使用的是属性名称进行配置return this.title;}public Date publishDate() {return this.publishDate;}public String content() {return this.content;}public Message title(String title) { // 属性设置方法使用的是属性名称进行配置this.title = title;return this;}public Message publishDate(Date publishDate) {this.publishDate = publishDate;return this;}public Message content(String content) {this.content = content;return this;}public boolean equals(Object o) {if (o == this) {return true;} else if (!(o instanceof Message)) {return false;} else {Message other = (Message)o;if (!other.canEqual(this)) {return false;} else {label47: {Object this$title = this.title();Object other$title = other.title();if (this$title == null) {if (other$title == null) {break label47;}} else if (this$title.equals(other$title)) {break label47;}return false;}Object this$publishDate = this.publishDate();Object other$publishDate = other.publishDate();if (this$publishDate == null) {if (other$publishDate != null) {return false;}} else if (!this$publishDate.equals(other$publishDate)) {return false;}Object this$content = this.content();Object other$content = other.content();if (this$content == null) {if (other$content != null) {return false;}} else if (!this$content.equals(other$content)) {return false;}return true;}}}protected boolean canEqual(Object other) {return other instanceof Message;}public int hashCode() {int PRIME = true;int result = 1;Object $title = this.title();int result = result * 59 + ($title == null ? 43 : $title.hashCode());Object $publishDate = this.publishDate();result = result * 59 + ($publishDate == null ? 43 : $publishDate.hashCode());Object $content = this.content();result = result * 59 + ($content == null ? 43 : $content.hashCode());return result;}public String toString() {return "Message(title=" + this.title() + ", publishDate=" + this.publishDate() + ", content=" + this.content() + ")";}}
- 测试:
package com.github.fairy.era;import com.github.fairy.era.domain.Message;import org.junit.jupiter.api.Test;import org.springframework.boot.test.context.SpringBootTest;import java.util.Date;/*** @author 许大仙* @version 1.0* @since 2022-01-04 09:36*/@SpringBootTestpublic class ApplicationTest {@Testpublic void test() {Message message = new Message();message.title("许大仙").publishDate(new Date()).content("你大爷的");System.out.println("message = " + message);}}
- 测试结果:
message = Message(title=许大仙, publishDate=Tue Jan 04 15:26:24 CST 2022, content=你大爷的)
- 在进行一个开发框架处理的时候(Mybatis、SpringDataJPA),都要求通过 setter 方法进行设置,以及在输出的时候要求通过 getter 方法获取内容,这样一来就无法满足正常的开发设计要求了。
- 但是对于一个独立的程序类来说,此时的功能还是比较强大的,因为有了更加简单的属性设置模式。
5.5.3 microboot-web 子模块(chain 模式)
- chain 模式的特点在于每个 setter 方法都返回当前对象的实例,这样就可以基于代码链的方式来进行设置处理了。
- 在 Message 类中采用访问器模式,随后基于 chain 操作形式定义:
package com.github.fairy.era.domain;import lombok.Data;import lombok.experimental.Accessors;import java.util.Date;/*** @author 许大仙* @version 1.0* @since 2022-01-04 13:35*/@Data@Accessors(chain = true)public class Message {private String title;private Date publishDate;private String content;}
- 通过 IDEA 查看反编译生成的 class 文件,目录为 build/classes :
//// Source code recreated from a .class file by IntelliJ IDEA// (powered by FernFlower decompiler)//package com.github.fairy.era.domain;import java.util.Date;public class Message {private String title;private Date publishDate;private String content;public Message() {}public String getTitle() {return this.title;}public Date getPublishDate() {return this.publishDate;}public String getContent() {return this.content;}public Message setTitle(final String title) { // setter 方法的返回值不是 voidthis.title = title;return this;}public Message setPublishDate(final Date publishDate) {this.publishDate = publishDate;return this;}public Message setContent(final String content) {this.content = content;return this;}public boolean equals(final Object o) {if (o == this) {return true;} else if (!(o instanceof Message)) {return false;} else {Message other = (Message)o;if (!other.canEqual(this)) {return false;} else {label47: {Object this$title = this.getTitle();Object other$title = other.getTitle();if (this$title == null) {if (other$title == null) {break label47;}} else if (this$title.equals(other$title)) {break label47;}return false;}Object this$publishDate = this.getPublishDate();Object other$publishDate = other.getPublishDate();if (this$publishDate == null) {if (other$publishDate != null) {return false;}} else if (!this$publishDate.equals(other$publishDate)) {return false;}Object this$content = this.getContent();Object other$content = other.getContent();if (this$content == null) {if (other$content != null) {return false;}} else if (!this$content.equals(other$content)) {return false;}return true;}}}protected boolean canEqual(final Object other) {return other instanceof Message;}public int hashCode() {int PRIME = true;int result = 1;Object $title = this.getTitle();int result = result * 59 + ($title == null ? 43 : $title.hashCode());Object $publishDate = this.getPublishDate();result = result * 59 + ($publishDate == null ? 43 : $publishDate.hashCode());Object $content = this.getContent();result = result * 59 + ($content == null ? 43 : $content.hashCode());return result;}public String toString() {return "Message(title=" + this.getTitle() + ", publishDate=" + this.getPublishDate() + ", content=" + this.getContent() + ")";}}
- 测试:
package com.github.fairy.era;import com.github.fairy.era.domain.Message;import org.junit.jupiter.api.Test;import org.springframework.boot.test.context.SpringBootTest;import java.util.Date;/*** @author 许大仙* @version 1.0* @since 2022-01-04 09:36*/@SpringBootTestpublic class ApplicationTest {@Testpublic void test() {Message message = new Message();message.setTitle("许大仙").setPublishDate(new Date()).setContent("你大爷的");System.out.println("message = " + message);}}
- 测试结果:
message = Message(title=许大仙, publishDate=Tue Jan 04 15:38:03 CST 2022, content=你大爷的)
- 在大部分基于反射的模式来获取 setter 方法对象都是采用 void 返回值类型来进行获取的,所以即便此时有了返回值,对于框架来说也无法正常的采用代码链来处理,但是,对于我们手动设置属性来说是很方便的。
5.5.4 microboot-web 子模块(prefix 模式)
- 如果习惯于给属性定义前缀,但是又想在生成 setter 和 getter 的时候不带有前缀,那么就可以使用 refix 模式 了。
- 在 Message 类中采用访问器模式,随后基于 prefix 操作形式定义:
package com.github.fairy.era.domain;import lombok.Data;import lombok.experimental.Accessors;import java.util.Date;/*** @author 许大仙* @version 1.0* @since 2022-01-04 13:35*/@Data@Accessors(prefix = "spring")public class Message {private String springTitle;private Date springPublishDate;private String springContent;}
- 通过 IDEA 查看反编译生成的 class 文件,目录为 build/classes :
//
// Source code recreated from a .class file by IntelliJ IDEA
// (powered by FernFlower decompiler)
//

package com.github.fairy.era.domain;

import java.util.Date;

public class Message {
    private String springTitle;
    private Date springPublishDate;
    private String springContent;

    public Message() {
    }

    public String getTitle() {
        return this.springTitle;
    }

    public Date getPublishDate() {
        return this.springPublishDate;
    }

    public String getContent() {
        return this.springContent;
    }

    public void setTitle(String springTitle) {
        this.springTitle = springTitle;
    }

    public void setPublishDate(Date springPublishDate) {
        this.springPublishDate = springPublishDate;
    }

    public void setContent(String springContent) {
        this.springContent = springContent;
    }

    public boolean equals(Object o) {
        if (o == this) {
            return true;
        } else if (!(o instanceof Message)) {
            return false;
        } else {
            Message other = (Message)o;
            if (!other.canEqual(this)) {
                return false;
            } else {
                label47: {
                    Object this$springTitle = this.getTitle();
                    Object other$springTitle = other.getTitle();
                    if (this$springTitle == null) {
                        if (other$springTitle == null) {
                            break label47;
                        }
                    } else if (this$springTitle.equals(other$springTitle)) {
                        break label47;
                    }

                    return false;
                }

                Object this$springPublishDate = this.getPublishDate();
                Object other$springPublishDate = other.getPublishDate();
                if (this$springPublishDate == null) {
                    if (other$springPublishDate != null) {
                        return false;
                    }
                } else if (!this$springPublishDate.equals(other$springPublishDate)) {
                    return false;
                }

                Object this$springContent = this.getContent();
                Object other$springContent = other.getContent();
                if (this$springContent == null) {
                    if (other$springContent != null) {
                        return false;
                    }
                } else if (!this$springContent.equals(other$springContent)) {
                    return false;
                }

                return true;
            }
        }
    }

    protected boolean canEqual(Object other) {
        return other instanceof Message;
    }

    public int hashCode() {
        int PRIME = true;
        int result = 1;
        Object $springTitle = this.getTitle();
        int result = result * 59 + ($springTitle == null ? 43 : $springTitle.hashCode());
        Object $springPublishDate = this.getPublishDate();
        result = result * 59 + ($springPublishDate == null ? 43 : $springPublishDate.hashCode());
        Object $springContent = this.getContent();
        result = result * 59 + ($springContent == null ? 43 : $springContent.hashCode());
        return result;
    }

    public String toString() {
        return "Message(springTitle=" + this.getTitle() + ", springPublishDate=" + this.getPublishDate() + ", springContent=" + this.getContent() + ")";
    }
}
- 测试:
package com.github.fairy.era;

import com.github.fairy.era.domain.Message;
import org.junit.jupiter.api.Test;
import org.springframework.boot.test.context.SpringBootTest;

import java.util.Date;

/**
 * @author 许大仙
 * @version 1.0
 * @since 2022-01-04 09:36
 */
@SpringBootTest
public class ApplicationTest {

    @Test
    public void test() {
        Message message = new Message();
        message.setTitle("许大仙");
        message.setPublishDate(new Date());
        message.setContent("你大爷的");
        System.out.println("message = " + message);
    }
}
- 测试结果:
message = Message(springTitle=许大仙, springPublishDate=Tue Jan 04 15:55:37 CST 2022, springContent=你大爷的)
5.4 builder(构造者模式)
5.4.1 概述
- 传统的简单 Java 类如果要想进行属性的设置,肯定需要下进行对象的实例化,随后利用一系列的 setter 方法设置属性;当然,也可以基于 Accessor 模式采用代码链的形式进行处理。
- 在 Java 里面还存在一种构造者模式,可以直接利用其内部所提供的一个方法实现对象的完整构建。
5.4.2 microboot-web 子模块
- 采用
@Builder注解进行配置。
package com.github.fairy.era.domain;

import lombok.Builder;

import java.util.Date;

/**
 * @author 许大仙
 * @version 1.0
 * @since 2022-01-04 13:35
 */
@Builder
public class Message {

    private String title;

    private Date publishDate;

    private String content;

}
- 通过 IDEA 查看反编译生成的 class 文件,目录为 build/classes :
//
// Source code recreated from a .class file by IntelliJ IDEA
// (powered by FernFlower decompiler)
//

package com.github.fairy.era.domain;

import java.util.Date;

public class Message {
    private String title;
    private Date publishDate;
    private String content;

    Message(String title, Date publishDate, String content) {
        this.title = title;
        this.publishDate = publishDate;
        this.content = content;
    }

    public static Message.MessageBuilder builder() {
        return new Message.MessageBuilder();
    }

    public static class MessageBuilder { // 用来帮助开发者创建 Message 实例
        private String title;
        private Date publishDate;
        private String content;

        MessageBuilder() {
        }

        public Message.MessageBuilder title(String title) {
            this.title = title;
            return this;
        }

        public Message.MessageBuilder publishDate(Date publishDate) {
            this.publishDate = publishDate;
            return this;
        }

        public Message.MessageBuilder content(String content) {
            this.content = content;
            return this;
        }

        public Message build() {
            return new Message(this.title, this.publishDate, this.content);
        }

        public String toString() {
            return "Message.MessageBuilder(title=" + this.title + ", publishDate=" + this.publishDate + ", content=" + this.content + ")";
        }
    }
}
- 测试:
package com.github.fairy.era;

import com.github.fairy.era.domain.Message;
import org.junit.jupiter.api.Test;
import org.springframework.boot.test.context.SpringBootTest;

import java.util.Date;

/**
 * @author 许大仙
 * @version 1.0
 * @since 2022-01-04 09:36
 */
@SpringBootTest
public class ApplicationTest {

    @Test
    public void test() {
        Message message = Message.builder().title("许大仙").publishDate(new Date()).content("你大爷").build();
        System.out.println("message = " + message);
    }
}
- 此时 Message 类如果加上
@Data注解依然会提供 setter 和 getter 方法,和其他开发框架的整合不会成为问题,强烈推荐。
5.5 异常处理
5.5.1 概述
- 在 Java 编程里面最强大的部分莫过于异常处理机制了,但是每次编写代码的时候都需要自己手动输入 try…catch..finally 之类的,实现是太繁琐了。
- 原始的异常处理:
package com.github.fairy.era.lombok;

/**
 * @author 许大仙
 * @version 1.0
 * @since 2022-01-04 16:26
 */
public class MessageHandler {

    public static void print(String msg) {// 信息输出
        if (null == msg) { // 内容为空
            try {
                throw new Exception("传递的 msg 参数为空");
            } catch (Exception e) {
                e.printStackTrace();
                throw new RuntimeException(e);
            }
        }
        System.out.println("msg = " + msg);
    }
}
- Lombok 为了解决此类的异常处理的繁琐代码定义,提供了一个专门处理异常的
@SneakyThrows注解 ,帮助用户自动的进行异常捕获。
5.5.2 microboot-web 子模块
- 使用
@SneakyThrows注解处理异常。
package com.github.fairy.era.lombok;

import lombok.SneakyThrows;

/**
 * @author 许大仙
 * @version 1.0
 * @since 2022-01-04 16:26
 */
public class MessageHandler {

    @SneakyThrows // 会自动的生成 try...catch
    public static void print(String msg) {// 信息输出
        if (null == msg) {
            throw new Exception("传递的 msg 参数为空");
        }

        System.out.println("msg = " + msg);
    }
}
- 通过 IDEA 查看反编译生成的 class 文件,目录为 build/classes :
//
// Source code recreated from a .class file by IntelliJ IDEA
// (powered by FernFlower decompiler)
//

package com.github.fairy.era.lombok;

public class MessageHandler {
    public MessageHandler() {
    }

    public static void print(String msg) {
        try {
            if (null == msg) {
                throw new Exception("传递的 msg 参数为空");
            } else {
                System.out.println("msg = " + msg);
            }
        } catch (Throwable var2) {
            throw var2;
        }
    }
}
- 此时就可以直接发现,对于当前的代码会自动的帮助用户进行整个的 try..catch 处理,同时会将捕获的异常继续向上抛。
5.6 IO 流自动关闭
5.6.1 概述
- IO 流是属于资源操作的,操作完之后一定需要进行资源的释放,但是传统的资源释放都是手动的形式完成的,例如:可以在 try 之中实例化 IO 流对象,随后基于 AutoCloseable 实现自动关闭,但是在 Lombok 里面,提供了
@Cleanup注解使得这一切的操作又得到了极大的简化,可以帮助用户自动关闭 IO 流处理。
5.6.2 microboot-web 子模块
- 定义一个数据读取类,并使用
@Cleanup帮助我们自动关闭 IO 流。
package com.github.fairy.era.lombok;

import lombok.Cleanup;
import lombok.Data;
import lombok.NonNull;
import lombok.SneakyThrows;

import java.io.*;
import java.nio.charset.StandardCharsets;

/**
 * @author 许大仙
 * @version 1.0
 * @since 2022-01-04 16:26
 */
@Data
public class MessageReader {

    /**
     * 文件路径
     */
    @NonNull
    private String filePath;

    /**
     * 文件名称
     */
    @NonNull
    private String fileName;

    /**
     * 数据读取
     *
     * @return
     */
    @SneakyThrows
    public String read() {
        StringBuilder sb = new StringBuilder();
        @Cleanup InputStream is = new FileInputStream(new File(this.filePath, this.fileName));
        @Cleanup BufferedReader reader = new BufferedReader(new InputStreamReader(is, StandardCharsets.UTF_8));
        String readLine = reader.readLine();
        if (null != readLine) {
            sb.append(readLine);
        }
        return sb.toString();
    }
}
- 通过 IDEA 查看反编译生成的 class 文件,目录为 build/classes :
//
// Source code recreated from a .class file by IntelliJ IDEA
// (powered by FernFlower decompiler)
//

package com.github.fairy.era.lombok;

import java.io.BufferedReader;
import java.io.File;
import java.io.FileInputStream;
import java.io.InputStreamReader;
import java.nio.charset.StandardCharsets;
import java.util.Collections;
import lombok.NonNull;

public class MessageReader {
    @NonNull
    private String filePath;
    @NonNull
    private String fileName;

    public String read() {
        try {
            StringBuilder sb = new StringBuilder();
            FileInputStream is = new FileInputStream(new File(this.filePath, this.fileName));

            String var5;
            try {
                BufferedReader reader = new BufferedReader(new InputStreamReader(is, StandardCharsets.UTF_8));

                try {
                    String readLine = reader.readLine();
                    if (null != readLine) {
                        sb.append(readLine);
                    }

                    var5 = sb.toString();
                } finally {
                    if (Collections.singletonList(reader).get(0) != null) {
                        reader.close();
                    }

                }
            } finally {
                if (Collections.singletonList(is).get(0) != null) {
                    is.close();
                }

            }

            return var5;
        } catch (Throwable var16) {
            throw var16;
        }
    }

    public MessageReader(@NonNull String filePath, @NonNull String fileName) {
        if (filePath == null) {
            throw new NullPointerException("filePath is marked non-null but is null");
        } else if (fileName == null) {
            throw new NullPointerException("fileName is marked non-null but is null");
        } else {
            this.filePath = filePath;
            this.fileName = fileName;
        }
    }

    @NonNull
    public String getFilePath() {
        return this.filePath;
    }

    @NonNull
    public String getFileName() {
        return this.fileName;
    }

    public void setFilePath(@NonNull String filePath) {
        if (filePath == null) {
            throw new NullPointerException("filePath is marked non-null but is null");
        } else {
            this.filePath = filePath;
        }
    }

    public void setFileName(@NonNull String fileName) {
        if (fileName == null) {
            throw new NullPointerException("fileName is marked non-null but is null");
        } else {
            this.fileName = fileName;
        }
    }

    public boolean equals(Object o) {
        if (o == this) {
            return true;
        } else if (!(o instanceof MessageReader)) {
            return false;
        } else {
            MessageReader other = (MessageReader)o;
            if (!other.canEqual(this)) {
                return false;
            } else {
                Object this$filePath = this.getFilePath();
                Object other$filePath = other.getFilePath();
                if (this$filePath == null) {
                    if (other$filePath != null) {
                        return false;
                    }
                } else if (!this$filePath.equals(other$filePath)) {
                    return false;
                }

                Object this$fileName = this.getFileName();
                Object other$fileName = other.getFileName();
                if (this$fileName == null) {
                    if (other$fileName != null) {
                        return false;
                    }
                } else if (!this$fileName.equals(other$fileName)) {
                    return false;
                }

                return true;
            }
        }
    }

    protected boolean canEqual(Object other) {
        return other instanceof MessageReader;
    }

    public int hashCode() {
        int PRIME = true;
        int result = 1;
        Object $filePath = this.getFilePath();
        int result = result * 59 + ($filePath == null ? 43 : $filePath.hashCode());
        Object $fileName = this.getFileName();
        result = result * 59 + ($fileName == null ? 43 : $fileName.hashCode());
        return result;
    }

    public String toString() {
        return "MessageReader(filePath=" + this.getFilePath() + ", fileName=" + this.getFileName() + ")";
    }
}
- 在以后的项目开发中进行数据库开发、文件开发、网络开发等,就不需要再去费劲心思的进行 close() 方法的调用了,直接交给 Lombok 的
@Cleanup注解即可。
5.7 同步方法
5.7.1 概述
- 要进行多线程的售票处理,就需要进行同步的操作,可以通过 Lombok 提供的
@Synchronized注解轻松处理。
5.7.2 microboot-web 子模块
- 创建一个售票的程序类:
package com.github.fairy.era.lombok;

import lombok.SneakyThrows;
import lombok.Synchronized;

import java.util.concurrent.TimeUnit;

/**
 * @author 许大仙
 * @version 1.0
 * @since 2022-01-04 17:13
 */
public class SellTickets implements Runnable {

    private int tickets = 100;

    @Synchronized
    @SneakyThrows
    @Override
    public void run() {
        while (true) {
            if (this.tickets > 0) {
                TimeUnit.SECONDS.sleep(1); // 模拟延迟
                System.out.println(Thread.currentThread().getName() + ":售第" + this.tickets-- + "张票");
            }
        }
    }
}
- 通过 IDEA 查看反编译生成的 class 文件,目录为 build/classes :
//
// Source code recreated from a .class file by IntelliJ IDEA
// (powered by FernFlower decompiler)
//

package com.github.fairy.era.lombok;

import java.util.concurrent.TimeUnit;

public class SellTickets implements Runnable {
    private final Object $lock = new Object[0];
    private int tickets = 100;

    public SellTickets() {
    }

    public void run() {
        try {
            synchronized(this.$lock){}

            try {
                while(true) {
                    while(this.tickets <= 0) {
                    }

                    TimeUnit.SECONDS.sleep(1L);
                    System.out.println(Thread.currentThread().getName() + ":售第" + this.tickets-- + "张票");
                }
            } finally {
                ;
            }
        } catch (Throwable var6) {
            throw var6;
        }
    }
}
- 测试:
package com.github.fairy.era;

import com.github.fairy.era.lombok.SellTickets;
import org.springframework.boot.test.context.SpringBootTest;

/**
 * @author 许大仙
 * @version 1.0
 * @since 2022-01-04 09:36
 */
@SpringBootTest
public class ApplicationTest {

    public static void main(String[] args) {
        SellTickets sellTickets = new SellTickets();
        for (int i = 0; i < 10; i++) {
            Thread t = new Thread(sellTickets, "窗口" + i);
            t.start();
        }
    }

}
- 在实际的项目开发过程之中,对于多线程的同步处理绝对没有这么简单,毕竟还有一个最为庞大的 juc 的组件包,这个组件包里面还需要考虑 AQS、CAS 的设计问题,以上的同步仅仅实现了一个最为基础的同步,同时这个同步也存在有死锁的安全隐患,所以在使用的时候请慎用。

若有收获,就点个赞吧
0 人点赞
