- 第一章:环境准备
- 第二章:创建 Bean(⭐)
- 第三章:获取 Bean(⭐)
- 第四章:给 bean 的属性赋值:setter 注入(⭐)
- 第五章:给 bean 的属性赋值:引用外部已经声明的 bean(⭐)
- 第六章:给 bean 的属性赋值:内部 bean(⭐)
- 第七章:给 bean 的属性赋值:引入外部属性文件(⭐)
- 第八章:给 bean 的属性赋值:级联属性赋值
- 第九章:给 bean 的属性赋值:构造器注入
- 第十章:给 bean 的属性赋值:特殊值处理
- 第十一章:给 bean 的属性赋值:p 命名空间
- 第十二章:给 bean 的属性赋值:集合属性
- 第十三章:给 bean 的属性赋值:自动装配
- 第十四章:FactoryBean 机制(⭐)
- 第十五章:bean 的作用域
- 第十六章:bean 的生命周期
- 第十七章:后置处理器
⭐表示重要。
第一章:环境准备
- JDK 11+。
- IDEA 2021+。
- Maven 3.8。
第二章:创建 Bean(⭐)
2.1 目标和思路
2.1.1 目标
- 由 Spring 的 IOC 容器创建类的对象。
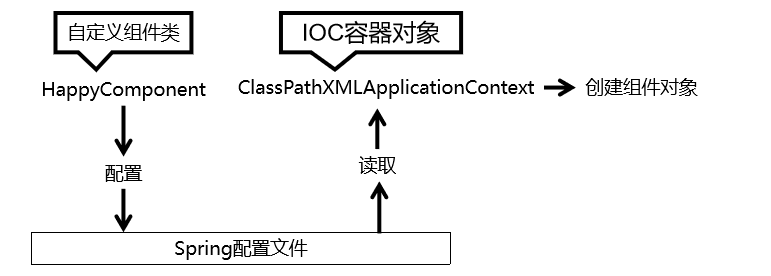
2.1.2 思路
2.2 导入依赖
- pom.xml
<dependency><groupId>org.springframework</groupId><artifactId>spring-context</artifactId><version>5.3.12</version></dependency><dependency><groupId>junit</groupId><artifactId>junit</artifactId><version>4.13.2</version></dependency>
2.3 创建组件类
- HappyComponent.java
package com.github.fairy.era.bean;/*** @author 许大仙* @version 1.0* @since 2021-11-05 09:32*/public class HappyComponent {public void doWork(){System.out.println("我每天愉快的工作(#^.^#)");}}
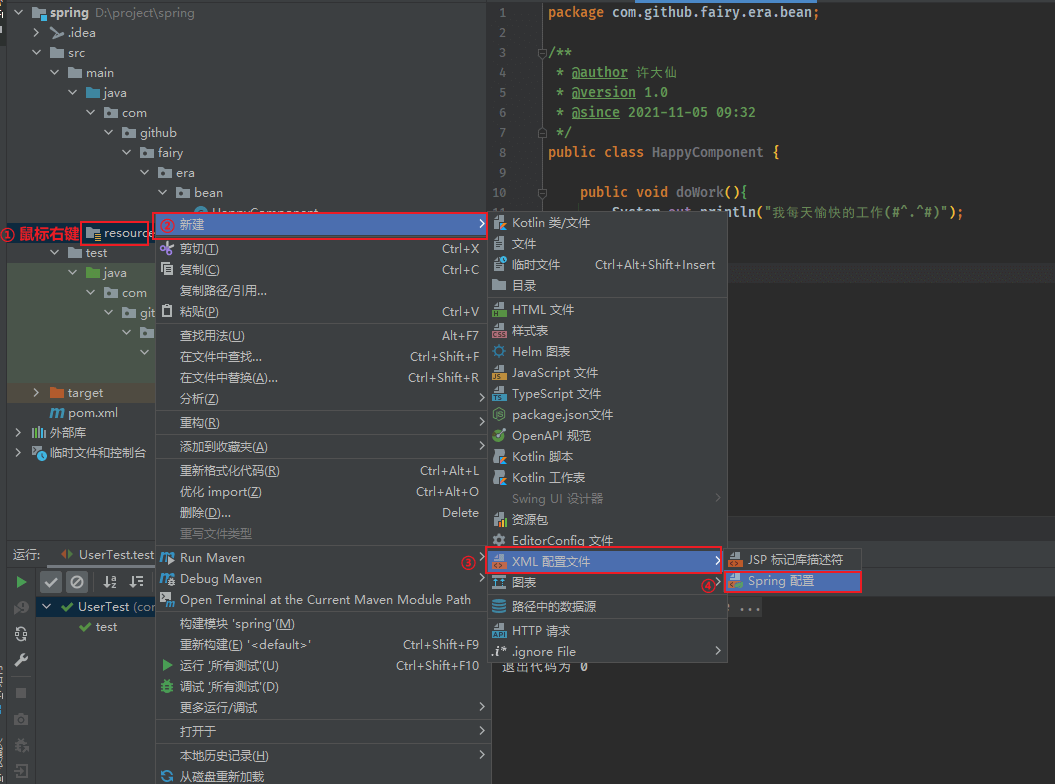
2.3 IDEA 创建 Spring 的配置文件
2.4 配置组件
- applicationContext.xml
<?xml version="1.0" encoding="UTF-8"?><beans xmlns="http://www.springframework.org/schema/beans"xmlns:xsi="http://www.w3.org/2001/XMLSchema-instance"xsi:schemaLocation="http://www.springframework.org/schema/beans http://www.springframework.org/schema/beans/spring-beans.xsd"><!--bean标签:通过配置bean标签告诉IOC容器需要创建对象的组件是什么id属性:bean的唯一标识class属性:组件类的全类名--><bean id="happyComponent" class="com.github.fairy.era.bean.HappyComponent"></bean></beans>
2.5 创建测试类
package com.github.fairy.era.bean;import org.junit.Test;import org.springframework.context.ApplicationContext;import org.springframework.context.support.ClassPathXmlApplicationContext;/*** @author 许大仙* @version 1.0* @since 2021-11-05 09:38*/public class HappyComponentTest {@Testpublic void test() {// 创建IOC容器ApplicationContext context = new ClassPathXmlApplicationContext("applicationContext.xml");// 从ioc容器中获取bean,即组件对象HappyComponent happyComponent = context.getBean("happyComponent", HappyComponent.class);// 调用方法happyComponent.doWork();}}
2.6 无参构造器
- Spring 底层默认通过反射技术调用组件类的无参构造器来创建组件对象,这一点需要注意,如果组件类没有无参构造器,那么会抛出如下的异常:
Caused by: org.springframework.beans.BeanInstantiationException: Failed to instantiate [com.github.fairy.era.bean.HappyComponent]: No default constructor found; nested exception is java.lang.NoSuchMethodException: com.github.fairy.era.bean.HappyComponent.<init>()at org.springframework.beans.factory.support.SimpleInstantiationStrategy.instantiate(SimpleInstantiationStrategy.java:83)at org.springframework.beans.factory.support.AbstractAutowireCapableBeanFactory.instantiateBean(AbstractAutowireCapableBeanFactory.java:1326)... 38 moreCaused by: java.lang.NoSuchMethodException: com.github.fairy.era.bean.HappyComponent.<init>()at java.base/java.lang.Class.getConstructor0(Class.java:3349)at java.base/java.lang.Class.getDeclaredConstructor(Class.java:2553)at org.springframework.beans.factory.support.SimpleInstantiationStrategy.instantiate(SimpleInstantiationStrategy.java:78)... 39 more
- 在使用框架的时候,
无参构造器、属性的setter和getter方法都是必须存在的,这是框架和我们的约定。
2.7 用 IOC 容器创建对象和自己创建对象的区别
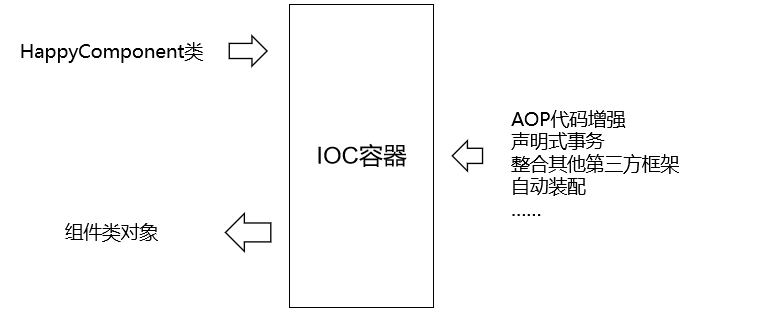
- 在 Spring 环境下能够享受到的所有福利,都必须通过 IOC 容器附加到组件类上,所以随着我们在 Spring 中学习的功能越来越多,IOC 容器创建的组件类的对象就会比自己 new 的对象强大的越来越多。
第三章:获取 Bean(⭐)
3.1 获取 Bean 的方式
- 方式一:根据 bean 的 id 获取。
- 方式二:根据类型获取。
3.2 方式一:根据 bean 的 id 获取
由于 id 属性指定了 bean 的唯一标识,所以根据 bean 标签的 id 属性可以精确到获取到一个组件对象。
示例:
- HappyComponent.java
package com.github.fairy.era.bean;/*** @author 许大仙* @version 1.0* @since 2021-11-05 09:32*/public class HappyComponent {public void doWork(){System.out.println("我每天愉快的工作(#^.^#)");}}
- applicationContext.xml
<?xml version="1.0" encoding="UTF-8"?><beans xmlns="http://www.springframework.org/schema/beans"xmlns:xsi="http://www.w3.org/2001/XMLSchema-instance"xsi:schemaLocation="http://www.springframework.org/schema/beans http://www.springframework.org/schema/beans/spring-beans.xsd"><!--bean标签:通过配置bean标签告诉IOC容器需要创建对象的组件是什么id属性:bean的唯一标识class属性:组件类的全类名--><bean id="happyComponent" class="com.github.fairy.era.bean.HappyComponent"></bean></beans>
- 测试:
package com.github.fairy.era.bean;

import org.junit.Test;
import org.springframework.context.ApplicationContext;
import org.springframework.context.support.ClassPathXmlApplicationContext;

/**
 * @author 许大仙
 * @version 1.0
 * @since 2021-11-05 09:38
 */
public class HappyComponentTest {

    @Test
    public void test() {
        // 创建IOC容器
        ApplicationContext context = new ClassPathXmlApplicationContext("applicationContext.xml");
        // 从ioc容器中获取bean,即组件对象
        HappyComponent happyComponent = context.getBean("happyComponent", HappyComponent.class);
        // 调用方法
        happyComponent.doWork();
    }
}
3.3 方式二:根据类型获取
3.3.1 指定的类型的 bean 唯一
- 示例:
- HappyComponent.java
package com.github.fairy.era.bean;

/**
 * @author 许大仙
 * @version 1.0
 * @since 2021-11-05 09:32
 */
public class HappyComponent {

    public void doWork(){
        System.out.println("我每天愉快的工作(#^.^#)");
    }
}
- applicationContext.xml
<?xml version="1.0" encoding="UTF-8"?>
<beans xmlns="http://www.springframework.org/schema/beans"
       xmlns:xsi="http://www.w3.org/2001/XMLSchema-instance"
       xsi:schemaLocation="http://www.springframework.org/schema/beans http://www.springframework.org/schema/beans/spring-beans.xsd">
    <!--
        bean标签:通过配置bean标签告诉IOC容器需要创建对象的组件是什么
        id属性:bean的唯一标识
        class属性:组件类的全类名
    -->
    <bean id="happyComponent" class="com.github.fairy.era.bean.HappyComponent"></bean>
</beans>
- 测试:
package com.github.fairy.era.bean;

import org.junit.Test;
import org.springframework.context.ApplicationContext;
import org.springframework.context.support.ClassPathXmlApplicationContext;

/**
 * @author 许大仙
 * @version 1.0
 * @since 2021-11-05 09:38
 */
public class HappyComponentTest {

    @Test
    public void test() {
        // 创建IOC容器
        ApplicationContext context = new ClassPathXmlApplicationContext("applicationContext.xml");
        // 从ioc容器中获取bean,即组件对象
        // 根据类型获取bean
        HappyComponent happyComponent = context.getBean(HappyComponent.class);
        // 调用方法
        happyComponent.doWork();
    }
}
3.3.2 指定的类型的 bean 不唯一
相同类型的 bean 在 IOC 容器中配置了两个或以上,那么根据类型获取 bean 会抛出
NoUniqueBeanDefinitionException异常。示例:
- HappyComponent.java
package com.github.fairy.era.bean;

/**
 * @author 许大仙
 * @version 1.0
 * @since 2021-11-05 09:32
 */
public class HappyComponent {

    public void doWork(){
        System.out.println("我每天愉快的工作(#^.^#)");
    }
}
- applicationContext.xml
<?xml version="1.0" encoding="UTF-8"?>
<beans xmlns="http://www.springframework.org/schema/beans"
       xmlns:xsi="http://www.w3.org/2001/XMLSchema-instance"
       xsi:schemaLocation="http://www.springframework.org/schema/beans http://www.springframework.org/schema/beans/spring-beans.xsd">
    <!--
        bean标签:通过配置bean标签告诉IOC容器需要创建对象的组件是什么
        id属性:bean的唯一标识
        class属性:组件类的全类名
    -->
    <bean id="happyComponent" class="com.github.fairy.era.bean.HappyComponent"></bean>
    <bean id="happyComponent2" class="com.github.fairy.era.bean.HappyComponent"></bean>
</beans>
- 测试:
package com.github.fairy.era.bean;

import org.junit.Test;
import org.springframework.context.ApplicationContext;
import org.springframework.context.support.ClassPathXmlApplicationContext;

/**
 * @author 许大仙
 * @version 1.0
 * @since 2021-11-05 09:38
 */
public class HappyComponentTest {

    @Test
    public void test() {
        // 创建IOC容器
        ApplicationContext context = new ClassPathXmlApplicationContext("applicationContext.xml");
        // 从ioc容器中获取bean,即组件对象
        // 根据类型获取bean
        HappyComponent happyComponent = context.getBean(HappyComponent.class);
        // 调用方法
        happyComponent.doWork();
    }
}
- 结果:
D:\develop\Java\jdk-11.0.6\bin\java.exe -ea -Didea.test.cyclic.buffer.size=1048576 "-javaagent:D:\develop\IntelliJ IDEA 2021.2\lib\idea_rt.jar=1032:D:\develop\IntelliJ IDEA 2021.2\bin" -Dfile.encoding=UTF-8 -classpath "D:\develop\IntelliJ IDEA 2021.2\lib\idea_rt.jar;D:\develop\IntelliJ IDEA 2021.2\plugins\junit\lib\junit5-rt.jar;D:\develop\IntelliJ IDEA 2021.2\plugins\junit\lib\junit-rt.jar;D:\project\spring\target\test-classes;D:\project\spring\target\classes;D:\develop\apache-maven-3.8.3\repository\org\springframework\spring-context\5.3.12\spring-context-5.3.12.jar;D:\develop\apache-maven-3.8.3\repository\org\springframework\spring-aop\5.3.12\spring-aop-5.3.12.jar;D:\develop\apache-maven-3.8.3\repository\org\springframework\spring-beans\5.3.12\spring-beans-5.3.12.jar;D:\develop\apache-maven-3.8.3\repository\org\springframework\spring-core\5.3.12\spring-core-5.3.12.jar;D:\develop\apache-maven-3.8.3\repository\org\springframework\spring-jcl\5.3.12\spring-jcl-5.3.12.jar;D:\develop\apache-maven-3.8.3\repository\org\springframework\spring-expression\5.3.12\spring-expression-5.3.12.jar;D:\develop\apache-maven-3.8.3\repository\junit\junit\4.13.2\junit-4.13.2.jar;D:\develop\apache-maven-3.8.3\repository\org\hamcrest\hamcrest-core\1.3\hamcrest-core-1.3.jar" com.intellij.rt.junit.JUnitStarter -ideVersion5 -junit4 com.github.fairy.era.bean.HappyComponentTest,test

org.springframework.beans.factory.NoUniqueBeanDefinitionException: No qualifying bean of type 'com.github.fairy.era.bean.HappyComponent' available: expected single matching bean but found 2: happyComponent,happyComponent2

    at org.springframework.beans.factory.support.DefaultListableBeanFactory.resolveNamedBean(DefaultListableBeanFactory.java:1262)
    at org.springframework.beans.factory.support.DefaultListableBeanFactory.resolveBean(DefaultListableBeanFactory.java:494)
    at org.springframework.beans.factory.support.DefaultListableBeanFactory.getBean(DefaultListableBeanFactory.java:349)
    at org.springframework.beans.factory.support.DefaultListableBeanFactory.getBean(DefaultListableBeanFactory.java:342)
    at org.springframework.context.support.AbstractApplicationContext.getBean(AbstractApplicationContext.java:1172)
    at com.github.fairy.era.bean.HappyComponentTest.test(HappyComponentTest.java:20)
    at java.base/jdk.internal.reflect.NativeMethodAccessorImpl.invoke0(Native Method)
    at java.base/jdk.internal.reflect.NativeMethodAccessorImpl.invoke(NativeMethodAccessorImpl.java:62)
    at java.base/jdk.internal.reflect.DelegatingMethodAccessorImpl.invoke(DelegatingMethodAccessorImpl.java:43)
    at java.base/java.lang.reflect.Method.invoke(Method.java:566)
    at org.junit.runners.model.FrameworkMethod$1.runReflectiveCall(FrameworkMethod.java:59)
    at org.junit.internal.runners.model.ReflectiveCallable.run(ReflectiveCallable.java:12)
    at org.junit.runners.model.FrameworkMethod.invokeExplosively(FrameworkMethod.java:56)
    at org.junit.internal.runners.statements.InvokeMethod.evaluate(InvokeMethod.java:17)
    at org.junit.runners.ParentRunner$3.evaluate(ParentRunner.java:306)
    at org.junit.runners.BlockJUnit4ClassRunner$1.evaluate(BlockJUnit4ClassRunner.java:100)
    at org.junit.runners.ParentRunner.runLeaf(ParentRunner.java:366)
    at org.junit.runners.BlockJUnit4ClassRunner.runChild(BlockJUnit4ClassRunner.java:103)
    at org.junit.runners.BlockJUnit4ClassRunner.runChild(BlockJUnit4ClassRunner.java:63)
    at org.junit.runners.ParentRunner$4.run(ParentRunner.java:331)
    at org.junit.runners.ParentRunner$1.schedule(ParentRunner.java:79)
    at org.junit.runners.ParentRunner.runChildren(ParentRunner.java:329)
    at org.junit.runners.ParentRunner.access$100(ParentRunner.java:66)
    at org.junit.runners.ParentRunner$2.evaluate(ParentRunner.java:293)
    at org.junit.runners.ParentRunner$3.evaluate(ParentRunner.java:306)
    at org.junit.runners.ParentRunner.run(ParentRunner.java:413)
    at org.junit.runner.JUnitCore.run(JUnitCore.java:137)
    at com.intellij.junit4.JUnit4IdeaTestRunner.startRunnerWithArgs(JUnit4IdeaTestRunner.java:69)
    at com.intellij.rt.junit.IdeaTestRunner$Repeater.startRunnerWithArgs(IdeaTestRunner.java:33)
    at com.intellij.rt.junit.JUnitStarter.prepareStreamsAndStart(JUnitStarter.java:235)
    at com.intellij.rt.junit.JUnitStarter.main(JUnitStarter.java:54)
3.4 思考🤔
- 问:如果组件类实现了接口,那么根据接口类型可以获取 bean 吗?
答:如果 bean 是唯一的,那么可以。
问:如果一个接口有多个实现类,并且这些实现类配置了 bean ,那么根据接口类型可以获取 bean 吗?
- 答:不可以,因为 bean 不唯一。
3.5 总结
- 根据类型来获取 bean 时,在满足 bean 唯一性的前提下,其实只是看
对象 instanceof 指定的类型的返回结果,只要返回的是 true 就可以认定为和类型匹配,能够获取到。
第四章:给 bean 的属性赋值:setter 注入(⭐)
4.1 给组件类添加一个属性
- HappyComponent.java
package com.github.fairy.era.bean;

/**
 * @author 许大仙
 * @version 1.0
 * @since 2021-11-05 09:32
 */
public class HappyComponent {

    private String componentName;

    public String getComponentName() {
        return componentName;
    }

    public void setComponentName(String componentName) {
        this.componentName = componentName;
    }

    public void doWork(){
        System.out.println("我每天愉快的工作(#^.^#)");
    }
}
4.2 在配置的时候给属性指定值
- 在applicationContext.xml文件中通过property标签配置的属性值会通过setXxx()方法注入。
<?xml version="1.0" encoding="UTF-8"?>
<beans xmlns="http://www.springframework.org/schema/beans"
       xmlns:xsi="http://www.w3.org/2001/XMLSchema-instance"
       xsi:schemaLocation="http://www.springframework.org/schema/beans http://www.springframework.org/schema/beans/spring-beans.xsd">
    <bean id="happyComponent" class="com.github.fairy.era.bean.HappyComponent">
        <!--
            property标签:通过组件类的setXxx()方法给组件对象设置属性
            name属性:指定属性名(这个属性名是getXxx()、setXxx()方法定义的,和成员变量无关)
            value属性:指定属性值
        -->
        <property name="componentName" value="许大仙"/>
    </bean>
</beans>
4.3 测试
package com.github.fairy.era.bean;

import org.junit.Test;
import org.springframework.context.ApplicationContext;
import org.springframework.context.support.ClassPathXmlApplicationContext;

/**
 * @author 许大仙
 * @version 1.0
 * @since 2021-11-05 09:38
 */
public class HappyComponentTest {

    @Test
    public void test() {
        // 创建IOC容器
        ApplicationContext context = new ClassPathXmlApplicationContext("applicationContext.xml");
        // 从ioc容器中获取bean,即组件对象
        // 根据类型获取bean
        HappyComponent happyComponent = context.getBean(HappyComponent.class);
        // 调用方法获取属性值
        String componentName = happyComponent.getComponentName();
        System.out.println("componentName = " + componentName);
    }
}
第五章:给 bean 的属性赋值:引用外部已经声明的 bean(⭐)
5.1 声明新的组件类
- HappyMachine.java
package com.github.fairy.era.bean;

/**
 * @author 许大仙
 * @version 1.0
 * @since 2021-11-05 10:34
 */
public class HappyMachine {

    private String machineName;

    public String getMachineName() {
        return machineName;
    }

    public void setMachineName(String machineName) {
        this.machineName = machineName;
    }
}
5.2 原组件引用新的组件
- HappyComponent.java
package com.github.fairy.era.bean;

/**
 * @author 许大仙
 * @version 1.0
 * @since 2021-11-05 09:32
 */
public class HappyComponent {

    private String componentName;

    private HappyMachine happyMachine;

    public String getComponentName() {
        return componentName;
    }

    public void setComponentName(String componentName) {
        this.componentName = componentName;
    }

    public HappyMachine getHappyMachine() {
        return happyMachine;
    }

    public void setHappyMachine(HappyMachine happyMachine) {
        this.happyMachine = happyMachine;
    }

    public void doWork(){
        System.out.println("我每天愉快的工作(#^.^#)");
    }
}
5.3 配置组件
- applicationContext.xml
<?xml version="1.0" encoding="UTF-8"?>
<beans xmlns="http://www.springframework.org/schema/beans"
       xmlns:xsi="http://www.w3.org/2001/XMLSchema-instance"
       xsi:schemaLocation="http://www.springframework.org/schema/beans http://www.springframework.org/schema/beans/spring-beans.xsd">

    <!-- 配置新组件的bean -->
    <bean id="happyMachine" class="com.github.fairy.era.bean.HappyMachine">
        <property name="machineName" value="国家5轴机床"/>
    </bean>

    <!-- 配置原组件的bean -->
    <bean id="happyComponent" class="com.github.fairy.era.bean.HappyComponent">
        <property name="componentName" value="许大仙"/>
        <!--
            ref属性:通过bean的id引用另一个bean
        -->
        <property name="happyMachine" ref="happyMachine"/>
    </bean>
</beans>
5.4 测试
package com.github.fairy.era.bean;

import org.junit.Test;
import org.springframework.context.ApplicationContext;
import org.springframework.context.support.ClassPathXmlApplicationContext;

/**
 * @author 许大仙
 * @version 1.0
 * @since 2021-11-05 09:38
 */
public class HappyComponentTest {

    @Test
    public void test() {
        // 创建IOC容器
        ApplicationContext context = new ClassPathXmlApplicationContext("applicationContext.xml");
        // 从ioc容器中获取bean,即组件对象
        // 根据类型获取bean
        HappyComponent happyComponent = context.getBean("happyComponent", HappyComponent.class);
        // 调用方法
        HappyMachine happyMachine = happyComponent.getHappyMachine();
        String machineName = happyMachine.getMachineName();
        System.out.println("machineName = " + machineName);
    }
}
第六章:给 bean 的属性赋值:内部 bean(⭐)
6.1 组件类
- HappyMachine.java
package com.github.fairy.era.bean;

/**
 * @author 许大仙
 * @version 1.0
 * @since 2021-11-05 10:34
 */
public class HappyMachine {

    private String machineName;

    public String getMachineName() {
        return machineName;
    }

    public void setMachineName(String machineName) {
        this.machineName = machineName;
    }
}
- HappyComponent.java
package com.github.fairy.era.bean;

/**
 * @author 许大仙
 * @version 1.0
 * @since 2021-11-05 09:32
 */
public class HappyComponent {

    private String componentName;

    private HappyMachine happyMachine;

    public String getComponentName() {
        return componentName;
    }

    public void setComponentName(String componentName) {
        this.componentName = componentName;
    }

    public HappyMachine getHappyMachine() {
        return happyMachine;
    }

    public void setHappyMachine(HappyMachine happyMachine) {
        this.happyMachine = happyMachine;
    }

    public void doWork(){
        System.out.println("我每天愉快的工作(#^.^#)");
    }
}
6.2 配置组件
- applicationContext.xml
<?xml version="1.0" encoding="UTF-8"?>
<beans xmlns="http://www.springframework.org/schema/beans"
       xmlns:xsi="http://www.w3.org/2001/XMLSchema-instance"
       xsi:schemaLocation="http://www.springframework.org/schema/beans http://www.springframework.org/schema/beans/spring-beans.xsd">

    <!-- 给bean的属性赋值:内部bean -->
    <bean id="happyComponent" class="com.github.fairy.era.bean.HappyComponent">
        <property name="componentName" value="许大仙"/>
        <property name="happyMachine">
            <!-- 在一个 bean 中再声明一个 bean 就是内部 bean -->
            <!-- 内部 bean 可以直接用于给属性赋值,可以省略 id 属性 -->
            <bean class="com.github.fairy.era.bean.HappyMachine">
                <property name="machineName" value="国家5轴机床"/>
            </bean>
        </property>
    </bean>
</beans>
6.3 测试
package com.github.fairy.era.bean;

import org.junit.Test;
import org.springframework.context.ApplicationContext;
import org.springframework.context.support.ClassPathXmlApplicationContext;

/**
 * @author 许大仙
 * @version 1.0
 * @since 2021-11-05 09:38
 */
public class HappyComponentTest {

    @Test
    public void test() {
        // 创建IOC容器
        ApplicationContext context = new ClassPathXmlApplicationContext("applicationContext.xml");
        // 从ioc容器中获取bean,即组件对象
        // 根据类型获取bean
        HappyComponent happyComponent = context.getBean("happyComponent", HappyComponent.class);
        // 调用方法
        HappyMachine happyMachine = happyComponent.getHappyMachine();
        String machineName = happyMachine.getMachineName();
        System.out.println("machineName = " + machineName);
    }
}
第七章:给 bean 的属性赋值:引入外部属性文件(⭐)
7.1 导入依赖
- pom.xml
<!-- Spring -->
<dependency>
    <groupId>org.springframework</groupId>
    <artifactId>spring-context</artifactId>
    <version>5.3.12</version>
</dependency>
<!-- junit单元测试 -->
<dependency>
    <groupId>junit</groupId>
    <artifactId>junit</artifactId>
    <version>4.13.2</version>
</dependency>
<!-- MySQL的驱动 -->
<dependency>
    <groupId>mysql</groupId>
    <artifactId>mysql-connector-java</artifactId>
    <version>8.0.26</version>
</dependency>
<!-- 数据库连接池 -->
<dependency>
    <groupId>com.alibaba</groupId>
    <artifactId>druid</artifactId>
    <version>1.2.8</version>
</dependency>
7.2 创建外部属性文件
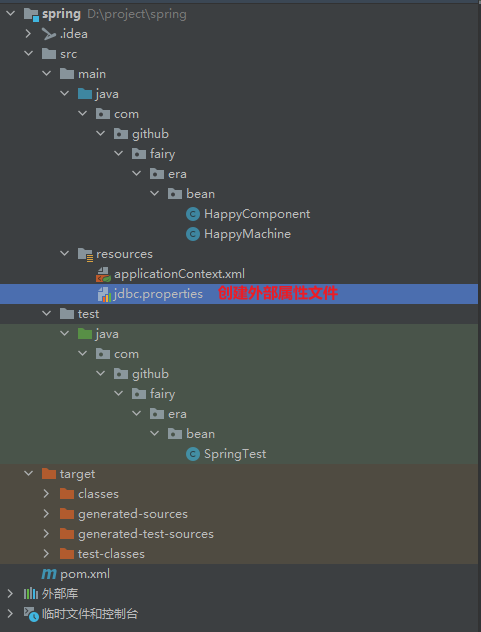
- jdbc.properties
jdbc.user=root
jdbc.password=123456
jdbc.url=jdbc:mysql://localhost:3306/test
jdbc.driver=com.mysql.cj.jdbc.Driver
7.3 引入外部属性文件
- applicationContext.xml
<?xml version="1.0" encoding="UTF-8"?>
<beans xmlns="http://www.springframework.org/schema/beans"
       xmlns:xsi="http://www.w3.org/2001/XMLSchema-instance"
       xmlns:context="http://www.springframework.org/schema/context"
       xsi:schemaLocation="http://www.springframework.org/schema/beans http://www.springframework.org/schema/beans/spring-beans.xsd http://www.springframework.org/schema/context https://www.springframework.org/schema/context/spring-context.xsd">
    <!-- 引入外部属性文件 -->
   <context:property-placeholder location="classpath:jdbc.properties"/>

    <!-- 配置数据库连接池 -->
    <bean id="dataSource" class="com.alibaba.druid.pool.DruidDataSource">
        <property name="driverClassName" value="${jdbc.driver}"/>
        <property name="url" value="${jdbc.url}"/>
        <property name="username" value="${jdbc.user}"/>
        <property name="password" value="${jdbc.password}"/>
    </bean>
</beans>
7.4 测试
package com.github.fairy.era.bean;

import org.junit.Test;
import org.springframework.context.ApplicationContext;
import org.springframework.context.support.ClassPathXmlApplicationContext;

import javax.sql.DataSource;

/**
 * @author 许大仙
 * @version 1.0
 * @since 2021-11-05 11:02
 */
public class SpringTest {

    @Test
    public void test(){
        ApplicationContext context = new ClassPathXmlApplicationContext("applicationContext.xml");

        DataSource dataSource = context.getBean("dataSource", DataSource.class);

        System.out.println("dataSource = " + dataSource);
    }
}
第八章:给 bean 的属性赋值:级联属性赋值
8.1 组件类
- HappyMachine.java
package com.github.fairy.era.bean;

/**
 * @author 许大仙
 * @version 1.0
 * @since 2021-11-05 10:34
 */
public class HappyMachine {

    private String machineName;

    public String getMachineName() {
        return machineName;
    }

    public void setMachineName(String machineName) {
        this.machineName = machineName;
    }
}
- HappyComponent.java
package com.github.fairy.era.bean;

/**
 * @author 许大仙
 * @version 1.0
 * @since 2021-11-05 09:32
 */
public class HappyComponent {

    private String componentName;

    // 级联属性赋值的时候,需要手动new,Spring不会帮助我们实例化对象
    private HappyMachine happyMachine = new HappyMachine();

    public String getComponentName() {
        return componentName;
    }

    public void setComponentName(String componentName) {
        this.componentName = componentName;
    }

    public HappyMachine getHappyMachine() {
        return happyMachine;
    }

    public void setHappyMachine(HappyMachine happyMachine) {
        this.happyMachine = happyMachine;
    }

    public void doWork(){
        System.out.println("我每天愉快的工作(#^.^#)");
    }
}
8.2 配置组件
- applicationContext.xml
<?xml version="1.0" encoding="UTF-8"?>
<beans xmlns="http://www.springframework.org/schema/beans"
       xmlns:xsi="http://www.w3.org/2001/XMLSchema-instance"
       xmlns:context="http://www.springframework.org/schema/context"
       xsi:schemaLocation="http://www.springframework.org/schema/beans http://www.springframework.org/schema/beans/spring-beans.xsd http://www.springframework.org/schema/context https://www.springframework.org/schema/context/spring-context.xsd">

    <bean id="happyComponent" class="com.github.fairy.era.bean.HappyComponent">
        <!--
            此处,有坑,要么我们自己在HappyComponent中手动实例化happyMachine的对象,要么使用ref或内部bean的方式创建happyMachine对象
        -->
        <!--
            对HappyComponent来说,happyMachine的machineName属性就是级联属性
         -->
        <property name="happyMachine.machineName" value="国家5轴机床"/>
    </bean>

</beans>
8.3 测试
package com.github.fairy.era.bean;

import org.junit.Test;
import org.springframework.context.ApplicationContext;
import org.springframework.context.support.ClassPathXmlApplicationContext;

/**
 * @author 许大仙
 * @version 1.0
 * @since 2021-11-05 11:02
 */
public class SpringTest {

    @Test
    public void test(){
        ApplicationContext context = new ClassPathXmlApplicationContext("applicationContext.xml");

        HappyComponent happyComponent = context.getBean("happyComponent", HappyComponent.class);

        String machineName = happyComponent.getHappyMachine().getMachineName();

        System.out.println("machineName = " + machineName);
    }
}
第九章:给 bean 的属性赋值:构造器注入
9.1 组件类
- Person.java
package com.github.fairy.era.bean;

/**
 * @author 许大仙
 * @version 1.0
 * @since 2021-11-05 11:11
 */
public class Person {

    private String name;

    private Integer age;

    private Double salary;

    public Person() {
    }

    public Person(String name, Integer age, Double salary) {
        this.name = name;
        this.age = age;
        this.salary = salary;
    }

    public String getName() {
        return name;
    }

    public void setName(String name) {
        this.name = name;
    }

    public Integer getAge() {
        return age;
    }

    public void setAge(Integer age) {
        this.age = age;
    }

    public Double getSalary() {
        return salary;
    }

    public void setSalary(Double salary) {
        this.salary = salary;
    }

    @Override
    public String toString() {
        return "Person{" +
                "name='" + name + '\'' +
                ", age=" + age +
                ", salary=" + salary +
                '}';
    }
}
9.2 配置组件
- applicationContext.xml
<?xml version="1.0" encoding="UTF-8"?>
<beans xmlns="http://www.springframework.org/schema/beans"
       xmlns:xsi="http://www.w3.org/2001/XMLSchema-instance"
       xmlns:context="http://www.springframework.org/schema/context"
       xsi:schemaLocation="http://www.springframework.org/schema/beans http://www.springframework.org/schema/beans/spring-beans.xsd http://www.springframework.org/schema/context https://www.springframework.org/schema/context/spring-context.xsd">

    <bean id="person" class="com.github.fairy.era.bean.Person">
        <!--
            constructor-arg标签还有两个属性可以进一步描述构造器参数:
                index属性:指定参数所在位置的索引(从0开始)
                name属性:指定参数名
        -->
        <constructor-arg name="name" value="许大仙"/>
        <constructor-arg name="age" value="18"/>
        <constructor-arg name="salary" value="99.99"/>
    </bean>

</beans>
9.3 测试
package com.github.fairy.era.bean;

import org.junit.Test;
import org.springframework.context.ApplicationContext;
import org.springframework.context.support.ClassPathXmlApplicationContext;

/**
 * @author 许大仙
 * @version 1.0
 * @since 2021-11-05 11:02
 */
public class SpringTest {

    @Test
    public void test(){
        ApplicationContext context = new ClassPathXmlApplicationContext("applicationContext.xml");

        Person person = context.getBean("person", Person.class);

        System.out.println("person = " + person);
    }
}
第十章:给 bean 的属性赋值:特殊值处理
10.1 组件类
- Person.java
package com.github.fairy.era.bean;

/**
 * @author 许大仙
 * @version 1.0
 * @since 2021-11-05 11:11
 */
public class Person {

    private String name;

    private Integer age;

    private Double salary;

    private String address;

    public String getName() {
        return name;
    }

    public void setName(String name) {
        this.name = name;
    }

    public Integer getAge() {
        return age;
    }

    public void setAge(Integer age) {
        this.age = age;
    }

    public Double getSalary() {
        return salary;
    }

    public void setSalary(Double salary) {
        this.salary = salary;
    }

    public String getAddress() {
        return address;
    }

    public void setAddress(String address) {
        this.address = address;
    }

    @Override
    public String toString() {
        return "Person{" +
                "name='" + name + '\'' +
                ", age=" + age +
                ", salary=" + salary +
                ", address='" + address + '\'' +
                '}';
    }
}
10.2 配置组件
- applicationContext.xml
<?xml version="1.0" encoding="UTF-8"?>
<beans xmlns="http://www.springframework.org/schema/beans"
       xmlns:xsi="http://www.w3.org/2001/XMLSchema-instance"
       xmlns:context="http://www.springframework.org/schema/context"
       xsi:schemaLocation="http://www.springframework.org/schema/beans http://www.springframework.org/schema/beans/spring-beans.xsd http://www.springframework.org/schema/context https://www.springframework.org/schema/context/spring-context.xsd">

    <bean id="person" class="com.github.fairy.era.bean.Person">
        <property name="name">
            <!-- 注入null值 -->
            <null/>
        </property>
        <property name="age" value="18"></property>
        <property name="address" >
            <!-- 属性值中包含特殊字符 -->
            <value><![CDATA[a < b]]></value>
        </property>
        <property name="salary" value="9.99"/>
    </bean>

</beans>
10.3 测试
package com.github.fairy.era.bean;

import org.junit.Test;
import org.springframework.context.ApplicationContext;
import org.springframework.context.support.ClassPathXmlApplicationContext;

/**
 * @author 许大仙
 * @version 1.0
 * @since 2021-11-05 11:02
 */
public class SpringTest {

    @Test
    public void test(){
        ApplicationContext context = new ClassPathXmlApplicationContext("applicationContext.xml");

        Person person = context.getBean("person", Person.class);

        System.out.println("person = " + person);
    }
}
第十一章:给 bean 的属性赋值:p 命名空间
11.1 概述
- 使用 p 名称空间的方式可以省略子标签 property,将组件属性的设置作为 bean 标签的属性来完成。
11.2 组件类
- HappyComponent.java
package com.github.fairy.era.bean;

/**
 * @author 许大仙
 * @version 1.0
 * @since 2021-11-05 09:32
 */
public class HappyComponent {

    private String componentName;


    public HappyComponent() {
    }

    public HappyComponent(String componentName) {
        this.componentName = componentName;
    }

    public String getComponentName() {
        return componentName;
    }

    public void setComponentName(String componentName) {
        this.componentName = componentName;
    }

    public void doWork(){
        System.out.println("我每天愉快的工作(#^.^#)");
    }
}
11.3 配置组件
- applicatoinContext.xml
<?xml version="1.0" encoding="UTF-8"?>
<beans xmlns="http://www.springframework.org/schema/beans"
       xmlns:xsi="http://www.w3.org/2001/XMLSchema-instance"
       xmlns:context="http://www.springframework.org/schema/context" xmlns:p="http://www.springframework.org/schema/p"
       xsi:schemaLocation="http://www.springframework.org/schema/beans http://www.springframework.org/schema/beans/spring-beans.xsd http://www.springframework.org/schema/context https://www.springframework.org/schema/context/spring-context.xsd">

    <!-- 给bean的属性赋值:使用p名称空间  -->
    <bean id="happyComponent" class="com.github.fairy.era.bean.HappyComponent" p:componentName="许大仙"></bean>

</beans>
11.4 测试
package com.github.fairy.era.bean;

import org.junit.Test;
import org.springframework.context.ApplicationContext;
import org.springframework.context.support.ClassPathXmlApplicationContext;

/**
 * @author 许大仙
 * @version 1.0
 * @since 2021-11-05 11:02
 */
public class SpringTest {

    @Test
    public void test(){
        ApplicationContext context = new ClassPathXmlApplicationContext("applicationContext.xml");

        HappyComponent happyComponent = context.getBean("happyComponent", HappyComponent.class);

        String componentName = happyComponent.getComponentName();

        System.out.println("componentName = " + componentName);
    }
}
第十二章:给 bean 的属性赋值:集合属性
12.1 组件类
- Person.java
package com.github.fairy.era.bean;

import java.util.List;
import java.util.Map;
import java.util.Properties;
import java.util.Set;

/**
 * @author 许大仙
 * @version 1.0
 * @since 2021-11-05 11:11
 */
public class Person {

    private String name;

    private Integer age;

    private Double salary;

    private List<String> addressList;

    private Set<String> addressSet;

    private Map<String,Object> addressMap;

    private Properties properties;

    public String getName() {
        return name;
    }

    public void setName(String name) {
        this.name = name;
    }

    public Integer getAge() {
        return age;
    }

    public void setAge(Integer age) {
        this.age = age;
    }

    public Double getSalary() {
        return salary;
    }

    public void setSalary(Double salary) {
        this.salary = salary;
    }

    public List<String> getAddressList() {
        return addressList;
    }

    public void setAddressList(List<String> addressList) {
        this.addressList = addressList;
    }

    public Set<String> getAddressSet() {
        return addressSet;
    }

    public void setAddressSet(Set<String> addressSet) {
        this.addressSet = addressSet;
    }

    public Map<String, Object> getAddressMap() {
        return addressMap;
    }

    public void setAddressMap(Map<String, Object> addressMap) {
        this.addressMap = addressMap;
    }

    public Properties getProperties() {
        return properties;
    }

    public void setProperties(Properties properties) {
        this.properties = properties;
    }

    @Override
    public String toString() {
        return "Person{" +
                "name='" + name + '\'' +
                ", age=" + age +
                ", salary=" + salary +
                ", addressList=" + addressList +
                ", addressSet=" + addressSet +
                ", addressMap=" + addressMap +
                ", properties=" + properties +
                '}';
    }
}
12.2 配置组件
- applicationContext.xml
<?xml version="1.0" encoding="UTF-8"?>
<beans xmlns="http://www.springframework.org/schema/beans"
       xmlns:xsi="http://www.w3.org/2001/XMLSchema-instance"
       xmlns:context="http://www.springframework.org/schema/context" xmlns:p="http://www.springframework.org/schema/p"
       xsi:schemaLocation="http://www.springframework.org/schema/beans http://www.springframework.org/schema/beans/spring-beans.xsd http://www.springframework.org/schema/context https://www.springframework.org/schema/context/spring-context.xsd">

    <bean id="person" class="com.github.fairy.era.bean.Person">
        <property name="name" value="许大仙"/>
        <property name="age" value="18"/>
        <property name="salary" value="9.99"/>
        <!-- 集合类型的bean -->
        <property name="addressList">
            <!-- 给list类型的属性赋值 -->
            <list>
                <value>北京</value>
                <value>江苏</value>
                <value>江苏</value>
                <value>上海</value>
            </list>
        </property>
        <property name="addressSet">
            <!-- 给Set类型的属性赋值 -->
            <!--
                set标签具有去重的功能
            -->
            <set>
                <value>北京</value>
                <value>江苏</value>
                <value>江苏</value>
                <value>上海</value>
            </set>
        </property>
        <property name="addressMap">
            <!-- 给Map类型的属性赋值 -->
            <map>
                <entry key="北京" value="天安门"></entry>
                <entry key="上海" value="黄浦区"></entry>
                <entry key="江苏" value="南京"></entry>
            </map>
        </property>
        <property name="properties">
            <props>
                <prop key="行政部">张三</prop>
                <prop key="开发部">李四</prop>
                <prop key="测试部">王五</prop>
            </props>
        </property>
    </bean>

</beans>
12.3 测试
package com.github.fairy.era.bean;

import org.junit.Test;
import org.springframework.context.ApplicationContext;
import org.springframework.context.support.ClassPathXmlApplicationContext;

/**
 * @author 许大仙
 * @version 1.0
 * @since 2021-11-05 11:02
 */
public class SpringTest {

    @Test
    public void test(){
        ApplicationContext context = new ClassPathXmlApplicationContext("applicationContext.xml");

        Person person = context.getBean("person", Person.class);

        System.out.println("person = " + person);
    }
}
第十三章:给 bean 的属性赋值:自动装配
13.1 概述
- 所谓的自动装配就是当一个组件需要其他组件的时候,由 IOC 容器负责找到那个需要的组件,并装配(注入)进去。
13.2 组件类
- DemoService.java
package com.github.fairy.era.service;

/**
 * @author 许大仙
 * @version 1.0
 * @since 2021-11-05 13:31
 */
public class DemoService {
}
- DemoController.java
package com.github.fairy.era.controller;

import com.github.fairy.era.service.DemoService;

/**
 * @author 许大仙
 * @version 1.0
 * @since 2021-11-05 13:32
 */
public class DemoController {

    private DemoService demoService;

    public DemoService getDemoService() {
        return demoService;
    }

    public void setDemoService(DemoService demoService) {
        this.demoService = demoService;
    }
}
13.3 配置组件
- applicationContext.xml
<?xml version="1.0" encoding="UTF-8"?>
<beans xmlns="http://www.springframework.org/schema/beans"
       xmlns:xsi="http://www.w3.org/2001/XMLSchema-instance"
       xmlns:context="http://www.springframework.org/schema/context" xmlns:p="http://www.springframework.org/schema/p"
       xsi:schemaLocation="http://www.springframework.org/schema/beans http://www.springframework.org/schema/beans/spring-beans.xsd http://www.springframework.org/schema/context https://www.springframework.org/schema/context/spring-context.xsd">

    <bean id="demoService" class="com.github.fairy.era.service.DemoService"></bean>
    <!--
        autowire:自动装配
        byType表示根据类型进行装配,此时如果类型匹配的bean不止一个,那么会抛NoUniqueBeanDefinitionException
        byName表示根据bean的id进行匹配。而bean的id是根据需要装配组件的属性的属性名来确定的
    -->
    <bean id="demoController" class="com.github.fairy.era.controller.DemoController" autowire="byType"></bean>
</beans>
13.4 测试
package com.github.fairy.era.bean;

import com.github.fairy.era.controller.DemoController;
import com.github.fairy.era.service.DemoService;
import org.junit.Test;
import org.springframework.context.ApplicationContext;
import org.springframework.context.support.ClassPathXmlApplicationContext;

/**
 * @author 许大仙
 * @version 1.0
 * @since 2021-11-05 11:02
 */
public class SpringTest {

    @Test
    public void test(){
        ApplicationContext context = new ClassPathXmlApplicationContext("applicationContext.xml");

        DemoController demoController = context.getBean("demoController", DemoController.class);

        DemoService demoService = demoController.getDemoService();

        System.out.println("demoService = " + demoService);
    }
}
第十四章:FactoryBean 机制(⭐)
14.1 概述
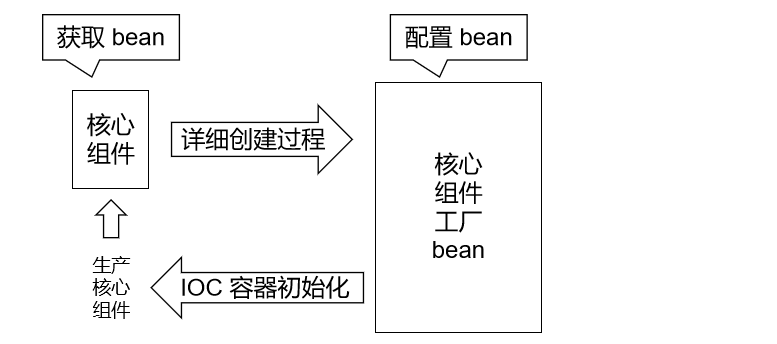
- FactoryBean 是 Spring 提供的一种 整合第三方框架 的常用机制。和普通的 bean 不同,配置一个 FactoryBean 类型的 bean,在获取 bean 的时候得到的并不是 class 属性中配置的这个类的对象,而是 getObject() 方法的返回值。通过这种机制,Spring 可以帮我们把复杂组件创建的详细过程和繁琐细节都屏蔽起来,只把最简洁的使用方式展示给我们。
- 将来我们整合 Mybatis 时,Spring 就是通过 FactoryBean 机制来帮我们创建 SqlSessionFactory 对象的。
- FactoryBean的源码:
package org.springframework.beans.factory;

import org.springframework.lang.Nullable;

public interface FactoryBean<T> {
    String OBJECT_TYPE_ATTRIBUTE = "factoryBeanObjectType";

    @Nullable
    T getObject() throws Exception;

    @Nullable
    Class<?> getObjectType();

    default boolean isSingleton() {
        return true;
    }
}
14.2 组件类
- HappyMachine.java
package com.github.fairy.era.bean;

/**
 * @author 许大仙
 * @version 1.0
 * @since 2021-11-05 10:34
 */
public class HappyMachine {

    private String machineName;

    public String getMachineName() {
        return machineName;
    }

    public void setMachineName(String machineName) {
        this.machineName = machineName;
    }
}
14.3 实现 FactoryBean 接口
- HappyFactoryBean.java
package com.github.fairy.era.bean;

import org.springframework.beans.factory.FactoryBean;

/**
 * 实现FactoryBean接口时需要指定泛型
 * 泛型类型就是当前工厂要生产的对象的类型
 *
 * @author 许大仙
 * @version 1.0
 * @since 2021-11-05 13:38
 */
public class HappyFactoryBean implements FactoryBean<HappyMachine> {

    private String machineName;

    public String getMachineName() {
        return machineName;
    }

    public void setMachineName(String machineName) {
        this.machineName = machineName;
    }

    @Override
    public HappyMachine getObject() throws Exception {
        // 方法内部模拟创建、设置一个对象的复杂过程
        HappyMachine happyMachine = new HappyMachine();
        happyMachine.setMachineName(machineName);
        return happyMachine;
    }

    @Override
    public Class<?> getObjectType() {
        return HappyMachine.class;
    }
}
14.4 配置组件
- applicationContext.xml
<?xml version="1.0" encoding="UTF-8"?>
<beans xmlns="http://www.springframework.org/schema/beans"
       xmlns:xsi="http://www.w3.org/2001/XMLSchema-instance"
       xmlns:context="http://www.springframework.org/schema/context" xmlns:p="http://www.springframework.org/schema/p"
       xsi:schemaLocation="http://www.springframework.org/schema/beans http://www.springframework.org/schema/beans/spring-beans.xsd http://www.springframework.org/schema/context https://www.springframework.org/schema/context/spring-context.xsd">

    <bean id="happyMachine" class="com.github.fairy.era.bean.HappyFactoryBean">
        <property name="machineName" value="国家5轴机床"/>
    </bean>
</beans>
14.5 测试
package com.github.fairy.era.bean;

import org.junit.Test;
import org.springframework.context.ApplicationContext;
import org.springframework.context.support.ClassPathXmlApplicationContext;

/**
 * @author 许大仙
 * @version 1.0
 * @since 2021-11-05 11:02
 */
public class SpringTest {

    @Test
    public void test(){
        ApplicationContext context = new ClassPathXmlApplicationContext("applicationContext.xml");

        HappyMachine happyMachine = context.getBean("happyMachine", HappyMachine.class);

        System.out.println("happyMachine = " + happyMachine);
    }
}
第十五章:bean 的作用域
15.1 概述
- 在 Spring 中可以通过配置 bean 标签的 scope 属性来指定 bean 的作用域范围,各取值含义参加下表: | 取值 | 含义 | 创建对象的时机 | 默认值 | | —- | —- | —- | —- | | singleton | 在 IOC 容器中,这个 bean 的对象始终为单实例 | IOC 容器初始化时 | 是 | | prototype | 这个 bean 在 IOC 容器中有多个实例 | 获取 bean 时 | 否 |
- 如果是在 WebApplicationContext 环境下还会有另外两个作用域(但不常用): | 取值 | 含义 | | —- | —- | | request | 在一个请求范围内有效 | | session | 在一个会话范围内有效 |
15.2 组件类
- HappyMachine.java
package com.github.fairy.era.bean;

/**
 * @author 许大仙
 * @version 1.0
 * @since 2021-11-05 10:34
 */
public class HappyMachine {

    private String machineName;

    public String getMachineName() {
        return machineName;
    }

    public void setMachineName(String machineName) {
        this.machineName = machineName;
    }
}
15.3 配置组件
- applicationContext.xml
<?xml version="1.0" encoding="UTF-8"?>
<beans xmlns="http://www.springframework.org/schema/beans"
       xmlns:xsi="http://www.w3.org/2001/XMLSchema-instance"
       xmlns:context="http://www.springframework.org/schema/context" xmlns:p="http://www.springframework.org/schema/p"
       xsi:schemaLocation="http://www.springframework.org/schema/beans http://www.springframework.org/schema/beans/spring-beans.xsd http://www.springframework.org/schema/context https://www.springframework.org/schema/context/spring-context.xsd">
    <!--
        bean的作用域
        scope属性:取值singleton(默认值),bean在IOC容器中只有一个实例,IOC容器初始化时创建对象
        scope属性:取值prototype,bean在IOC容器中可以有多个实例,getBean()时创建对象
    -->
    <bean id="happyMachine" class="com.github.fairy.era.bean.HappyMachine" scope="singleton">
        <property name="machineName" value="国家5轴机床"/>
    </bean>
</beans>
15.4 测试
package com.github.fairy.era.bean;

import org.junit.Test;
import org.springframework.context.ApplicationContext;
import org.springframework.context.support.ClassPathXmlApplicationContext;

/**
 * @author 许大仙
 * @version 1.0
 * @since 2021-11-05 11:02
 */
public class SpringTest {

    @Test
    public void test(){
        ApplicationContext context = new ClassPathXmlApplicationContext("applicationContext.xml");

        HappyMachine happyMachine1 = context.getBean("happyMachine", HappyMachine.class);
        HappyMachine happyMachine2 = context.getBean("happyMachine", HappyMachine.class);

        System.out.println("happyMachine1 = " + happyMachine1);
        System.out.println("happyMachine2 = " + happyMachine2);

        System.out.println(happyMachine1 == happyMachine2); // true
    }
}
第十六章:bean 的生命周期
16.1 概述
- 生命周期:从对象的创建到对象的销毁的过程。
- Bean 生命周期:
- ① 通过构造器创建 Bean 实例(默认是通过无参构造器)。
- ② 为 Bean 的属性设置值和对其他 Bean 的引用(调用 Setter 方法)。
- ③ 调用 Bean 的初始化的方法(需要进行配置初始化的方法)。
- ④ 使用 Bean 对象。
- ⑤ 当容器的关闭的时候,会调用 Bean 的销毁方法(需要进行配置销毁的方法)。
16.2 组件类
- HappyMachine.java
package com.github.fairy.era.bean;

/**
 * @author 许大仙
 * @version 1.0
 * @since 2021-11-05 10:34
 */
public class HappyMachine {

    private String machineName;

    public String getMachineName() {
        return machineName;
    }

    public void setMachineName(String machineName) {
        this.machineName = machineName;
    }

    public void init(){
        System.out.println("初始化");
    }

    public void destroy(){
        System.out.println("销毁");
    }
}
16.3 配置组件
- applicationContext.xml
<?xml version="1.0" encoding="UTF-8"?>
<beans xmlns="http://www.springframework.org/schema/beans"
       xmlns:xsi="http://www.w3.org/2001/XMLSchema-instance"
       xmlns:context="http://www.springframework.org/schema/context" xmlns:p="http://www.springframework.org/schema/p"
       xsi:schemaLocation="http://www.springframework.org/schema/beans http://www.springframework.org/schema/beans/spring-beans.xsd http://www.springframework.org/schema/context https://www.springframework.org/schema/context/spring-context.xsd">

    <bean id="happyMachine" class="com.github.fairy.era.bean.HappyMachine" init-method="init" destroy-method="destroy">
        <property name="machineName" value="国家5轴机床"/>
    </bean>
</beans>
16.4 测试
package com.github.fairy.era.bean;

import org.junit.Test;
import org.springframework.context.support.ClassPathXmlApplicationContext;

/**
 * @author 许大仙
 * @version 1.0
 * @since 2021-11-05 11:02
 */
public class SpringTest {

    @Test
    public void test(){
        ClassPathXmlApplicationContext context = new ClassPathXmlApplicationContext("applicationContext.xml");

        HappyMachine happyMachine = context.getBean("happyMachine", HappyMachine.class);

        System.out.println("happyMachine = " + happyMachine);

        context.close();
    }
}
第十七章:后置处理器
17.1 概述
- 后置处理器:会在 Bean 的初始化前后处理,将 Bean 传递给 Bean 的后置处理器方法
- 添加后置处理器的 Bean 的生命周期:
- ① 通过构造器创建 Bean 实例(默认是通过无参构造器)。
- ② 为 Bean 的属性设置值和对其他 Bean 的引用(调用 Setter 方法)。
- ③ 将 Bean 实例传递给 Bean 的后置处理器的方法。
- ④ 调用 Bean 的初始化的方法(需要进行配置初始化的方法)。
- ⑤ 将 Bean 实例传递给 Bean 的后置处理器的方法。
- ⑥ 使用 Bean 对象。
- ⑦ 当容器的关闭的时候,会调用 Bean 的销毁方法(需要进行配置销毁的方法)。
17.2 组件类
- HappyMachine.java
package com.github.fairy.era.bean;

/**
 * @author 许大仙
 * @version 1.0
 * @since 2021-11-05 10:34
 */
public class HappyMachine {

    private String machineName;

    public String getMachineName() {
        return machineName;
    }

    public void setMachineName(String machineName) {
        this.machineName = machineName;
    }

    public void init(){
        System.out.println("初始化");
    }

    public void destroy(){
        System.out.println("销毁");
    }
}
17.3 实现 BeanPostProcessor 接口
- BeanPostProcessorImpl.java
package com.github.fairy.era.self;

import org.springframework.beans.BeansException;
import org.springframework.beans.factory.config.BeanPostProcessor;

/**
 * @author 许大仙
 * @version 1.0
 * @since 2021-11-05 13:56
 */
public class BeanPostProcessorImpl implements BeanPostProcessor {

    @Override
    public Object postProcessBeforeInitialization(Object bean, String beanName) throws BeansException {
        System.out.println("初始化前...");
        return bean;
    }

    @Override
    public Object postProcessAfterInitialization(Object bean, String beanName) throws BeansException {
        System.out.println("初始化后...");
        return bean;
    }
}
17.4 配置组件
- applicationContext.xml
<?xml version="1.0" encoding="UTF-8"?>
<beans xmlns="http://www.springframework.org/schema/beans"
       xmlns:xsi="http://www.w3.org/2001/XMLSchema-instance"
       xmlns:context="http://www.springframework.org/schema/context" xmlns:p="http://www.springframework.org/schema/p"
       xsi:schemaLocation="http://www.springframework.org/schema/beans http://www.springframework.org/schema/beans/spring-beans.xsd http://www.springframework.org/schema/context https://www.springframework.org/schema/context/spring-context.xsd">

    <!-- 配置组件 -->
    <bean id="happyMachine" class="com.github.fairy.era.bean.HappyMachine" init-method="init" destroy-method="destroy">
        <property name="machineName" value="国家5轴机床"/>
    </bean>

    <!-- 配置后置处理器 -->
    <bean class="com.github.fairy.era.self.BeanPostProcessorImpl"></bean>
</beans>
17.5 测试
package com.github.fairy.era.bean;

import org.junit.Test;
import org.springframework.context.support.ClassPathXmlApplicationContext;

/**
 * @author 许大仙
 * @version 1.0
 * @since 2021-11-05 11:02
 */
public class SpringTest {

    @Test
    public void test(){
        ClassPathXmlApplicationContext context = new ClassPathXmlApplicationContext("applicationContext.xml");

        HappyMachine happyMachine = context.getBean("happyMachine", HappyMachine.class);

        System.out.println("happyMachine = " + happyMachine);

        context.close();
    }
}

若有收获,就点个赞吧
0 人点赞
