1 什么是配置中心
1.1 配置中心概述
- 对于传统的单体应用而言,常使用配置文件来管理所有配置,比如SpringBoot的application.yml文件,但是在微服务架构中全部手动修改的话很麻烦而且不易维护。
- 微服务的配置管理一般有以下需求:
 集中配置管理,一个微服务架构中可能有成百上千个微服务,所以集中配置管理很重要。
 不同环境不同配置:比如数据源配置在不同环境(开发、测试、生产)中是不同的。
 运行期间可动态调整。比如可以根据各个微服务的负载情况,动态调整数据源连接池的大小等。
 配置修改后可以自动更新。比如配置内容发生改变,微服务可以自动更新配置。
- 综上所述,对于微服务架构来说,一套统一的、通用的管理配置机制是不可缺少的重要组成部分。常见的做法就是通过配置服务器进行管理。
1.2 常见的配置中心
1.2.1 Spring Cloud Config
- Spring Cloud Config是分布式系统中的外部配置提供服务器和客户端支持。
1.2.2 Apollo(阿波罗)
- Apollo(阿波罗)是携程框架部门研发的分布式配置中心,能够集中化管理应用不同环境、不同集群的配置,配置修改后能够实时推送到应用端,并且具备规范的权限、流程治理等特性,适用于微服务配置管理场景。
1.2.3 Nacos
- Nacos 致力于帮助您发现、配置和管理微服务。Nacos 提供了一组简单易用的特性集,帮助您快速实现动态服务发现、服务配置、服务元数据及流量管理。
- Nacos 帮助您更敏捷和容易地构建、交付和管理微服务平台。 Nacos 是构建以“服务”为中心的现代应用架构 (例如微服务范式、云原生范式) 的服务基础设施。
2 Spring Cloud Config简介
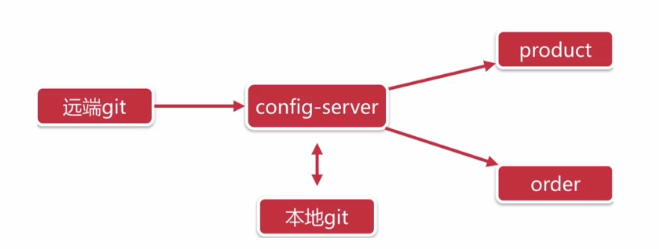
- Spring Cloud Config项目是一个解决分布式系统的配置解决方案。它包含了Client和Server两个部分,Server提供配置文件的存储,以接口的形式将配置文件的内容提供出去;Client通过接口获取数据,并依据此数据初始化自己的应用。
- Spring Cloud Config为分布式系统的外部配置提供服务器和客户端支持。使用Config Server,您可以为所有环境中的应用程序管理其外部属性。它非常适合Spring应用,也可以使用在其他语言的应用上。随着应用程序通过从开发到测试和生产的部署流程,您可以管理这些环境之间的配置,并确定应用程序具有迁移时需要运行的一切。服务器存储后端的默认使用使用Git,因此他轻松的支持标签版本的配置环境以及可以访问用于管理内容的各种工具。
- Spring Cloud Config服务端的特性:
- Http,为外部配置提供基于资源的API(键值对或者等价的YAML内容)。
- 属性值的加密和解密(对称加密和非对称加密)。
- 通过使用@EnableConfigServer在Spring Boot应用中非常简单的嵌入。
- Spring Cloud Config客户端的 特性:
- 绑定Config服务端,并使用远程的属性源初始化Spring环境。
- 属性值的加密和解密(对称加密和非对称加密)。
3 Spring Cloud Config入门
3.1 准备工作
- Config Server是一个可横向扩展、集中式的配置服务器,它用于集中管理应用程序各个环境下的配置,默认使用Git存储配置文件内容,也可以使用SVN存储(但是又有谁使用SVN呢?)或者是本地文件存储。
- 在码云上创建仓库:

- 创建
product-dev.yml和product-prod.yml文件上传到创建的仓库上。 - product-dev.yml:
server:port: 9008 # 微服务的端口号spring:application:name: service-product # 微服务的名称datasource:url: jdbc:mysql://192.168.1.57:3306/test?useUnicode=true&characterEncoding=UTF-8&autoReconnect=true&useSSL=false&serverTimezone=GMT%2B8&allowPublicKeyRetrieval=truedriver-class-name: com.mysql.cj.jdbc.Driverusername: rootpassword: 123456jpa:generate-ddl: trueshow-sql: trueopen-in-view: truedatabase: mysql# 配置 eurekaeureka:instance:# 主机名称:服务名称修改,其实就是向eureka server中注册的实例idinstance-id: service-product-dev:${server.port}# 显示IP信息prefer-ip-address: trueclient:service-url: # 此处修改为 Eureka Server的集群地址defaultZone: http://eureka7001.com:7001/eureka/,http://eureka7002.com:7002/eureka/,http://eureka7003.com:7003/eureka/
- product-prod.yml:
server:port: 9009 # 微服务的端口号spring:application:name: service-product # 微服务的名称datasource:url: jdbc:mysql://192.168.1.57:3306/test?useUnicode=true&characterEncoding=UTF-8&autoReconnect=true&useSSL=false&serverTimezone=GMT%2B8&allowPublicKeyRetrieval=truedriver-class-name: com.mysql.cj.jdbc.Driverusername: rootpassword: 123456jpa:generate-ddl: trueshow-sql: trueopen-in-view: truedatabase: mysql# 配置 eurekaeureka:instance:# 主机名称:服务名称修改,其实就是向eureka server中注册的实例idinstance-id: service-product-prod:${server.port}# 显示IP信息prefer-ip-address: trueclient:service-url: # 此处修改为 Eureka Server的集群地址defaultZone: http://eureka7001.com:7001/eureka/,http://eureka7002.com:7002/eureka/,http://eureka7003.com:7003/eureka/
文件命名规则:
- {application}-{profile}.yml
- {application}-{profile}.properties
- application为应用名称,profile指的是开发环境(用于区分开发环境、测试环境和生产环境等)
3.2 搭建服务端程序
3.2.1 新建模块并导入相关依赖
- 修改部分:
<dependency><groupId>org.springframework.cloud</groupId><artifactId>spring-cloud-config-server</artifactId></dependency>
- 完整部分:
<?xml version="1.0" encoding="UTF-8"?><project xmlns:xsi="http://www.w3.org/2001/XMLSchema-instance"xmlns="http://maven.apache.org/POM/4.0.0"xsi:schemaLocation="http://maven.apache.org/POM/4.0.0 http://maven.apache.org/xsd/maven-4.0.0.xsd"><parent><artifactId>spring_cloud_demo</artifactId><groupId>org.sunxiaping</groupId><version>1.0</version></parent><modelVersion>4.0.0</modelVersion><artifactId>config_server9010</artifactId><dependencies><dependency><groupId>org.springframework.cloud</groupId><artifactId>spring-cloud-config-server</artifactId></dependency><!-- 导入Eureka Client对应的坐标 --><dependency><groupId>org.springframework.cloud</groupId><artifactId>spring-cloud-starter-netflix-eureka-client</artifactId></dependency></dependencies></project>
3.2.2 配置application.yml
server:port: 9010spring:application:name: config-servercloud:config:server:git:# git服务地址uri: https://gitee.com/AncientFairy/config-repo.git# 配置git的用户名username:# 配置git的密码password:search-paths:- config-repo# 分支label: master# 配置 eurekaeureka:instance:# 主机名称:服务名称修改,其实就是向eureka server中注册的实例idinstance-id: config-server:${server.port}# 显示IP信息prefer-ip-address: trueclient:service-url: # 此处修改为 Eureka Server的集群地址defaultZone: http://eureka7001.com:7001/eureka/,http://eureka7002.com:7002/eureka/,http://eureka7003.com:7003/eureka/
3.2.3 配置启动类
package com.sunxiaping.config;import org.springframework.boot.SpringApplication;import org.springframework.boot.autoconfigure.SpringBootApplication;import org.springframework.cloud.config.server.EnableConfigServer;/*** @author 许大仙* @version 1.0* @since 2020-10-09 16:48*/@SpringBootApplication@EnableConfigServer //开启配置中心功能public class ConfigServer9010Application {public static void main(String[] args) {SpringApplication.run(ConfigServer9010Application.class, args);}}
3.2.4 测试
- 启动微服务,可以在浏览器,通过访问http://localhost:9010/master/product-dev.yml请求访问到Git服务器上的文件。

配置读取规则(label:分支,name:服务名,profile:环境):
- /label/{application}-{profile}.yml(推荐方式):
- {application}-{profile}.yml(其实就是/master/{application}-{profile}.yml):
- /{application}-{profile}[/{label}]:

3.3 搭建客户端程序
3.3.1 新建模块并导入相关依赖
- 修改部分:
<dependency><groupId>org.springframework.cloud</groupId><artifactId>spring-cloud-starter-config</artifactId></dependency>
- 完整部分:
<?xml version="1.0" encoding="UTF-8"?><project xmlns:xsi="http://www.w3.org/2001/XMLSchema-instance"xmlns="http://maven.apache.org/POM/4.0.0"xsi:schemaLocation="http://maven.apache.org/POM/4.0.0 http://maven.apache.org/xsd/maven-4.0.0.xsd"><parent><artifactId>spring_cloud_demo</artifactId><groupId>org.sunxiaping</groupId><version>1.0</version></parent><modelVersion>4.0.0</modelVersion><artifactId>config_client9011</artifactId><dependencies><dependency><groupId>org.springframework.cloud</groupId><artifactId>spring-cloud-starter-config</artifactId></dependency><dependency><groupId>org.springframework.cloud</groupId><artifactId>spring-cloud-starter-netflix-eureka-client</artifactId></dependency><dependency><groupId>org.springframework.boot</groupId><artifactId>spring-boot-starter-web</artifactId></dependency><dependency><groupId>org.springframework.boot</groupId><artifactId>spring-boot-starter-data-jpa</artifactId></dependency><dependency><groupId>mysql</groupId><artifactId>mysql-connector-java</artifactId></dependency><dependency><groupId>org.springframework.boot</groupId><artifactId>spring-boot-starter-actuator</artifactId></dependency></dependencies></project>
3.3.2 配置bootstrap.yml
- bootstrap.yml是系统级别的资源配置项,application.yml是用户级别的资源配置项。
- Spring Cloud会创建一个“Boostrap Context”,作为Spring应用的“Application Context”的父上下文。初始化的时候,“Boostrap Context”负载从外部源加载配置属性并解析配置。这两个上下文共享一个从外部获取的“Environment”。
- “Boostrap”属性有高优先级,默认情况下,不会覆盖本地配置项。“Bootstrap Context”和“Application Context”有着不同的约定,所以新增了一个“bootstrap.yml”,保证“BootStrap Context”和“Application Context”配置的分离。
- 要将Client模块下的application.yml改为bootstrap.yml,很关键。因为bootstrap.yml比application.yml优先加载。
spring:cloud:config:name: product # 应用名称,需要对应git中配置文件名称的前半部分profile: prod # 开发环境,需要对应git中配置文件名称的后半部分label: master # 分支名称uri: http://localhost:9010 # config-server的请求地址
3.3.3 实体类
package com.sunxiaping.product.domain;import lombok.AllArgsConstructor;import lombok.Getter;import lombok.NoArgsConstructor;import lombok.Setter;import javax.persistence.*;import java.io.Serializable;import java.math.BigDecimal;@Setter@Getter@AllArgsConstructor@NoArgsConstructor@Entity@Table(name = "tb_product")public class Product implements Serializable {@Id@GeneratedValue(strategy = GenerationType.IDENTITY)private Long id;@Column(name = "product_name")private String productName;@Column(name = "status")private Integer status;@Column(name = "price")private BigDecimal price;@Column(name = "product_desc")private String productDesc;@Column(name = "caption")private String caption;@Column(name = "inventory")private String inventory;}
3.3.4 Dao层
package com.sunxiaping.product.dao;import com.sunxiaping.product.domain.Product;import org.springframework.data.jpa.repository.JpaRepository;import org.springframework.data.jpa.repository.JpaSpecificationExecutor;import org.springframework.stereotype.Repository;@Repositorypublic interface ProductRepository extends JpaRepository<Product, Long>, JpaSpecificationExecutor<Product> {}
3.3.5 Service层
- ProductService.java
package com.sunxiaping.product.service;import com.sunxiaping.product.domain.Product;public interface ProductService {/*** 根据id查询** @param id* @return*/Product findById(Long id);/*** 保存** @param product*/void save(Product product);/*** 更新** @param product*/void update(Product product);/*** 删除** @param id*/void delete(Long id);}
- ProductServiceImpl.java
package com.sunxiaping.product.service.impl;import com.sunxiaping.product.dao.ProductRepository;import com.sunxiaping.product.domain.Product;import com.sunxiaping.product.service.ProductService;import org.springframework.beans.factory.annotation.Autowired;import org.springframework.stereotype.Service;import javax.transaction.Transactional;@Service@Transactionalpublic class ProductServiceImpl implements ProductService {@Autowiredprivate ProductRepository productRepository;@Overridepublic Product findById(Long id) {return this.productRepository.findById(id).orElse(new Product());}@Overridepublic void save(Product product) {this.productRepository.save(product);}@Overridepublic void update(Product product) {this.productRepository.save(product);}@Overridepublic void delete(Long id) {this.productRepository.deleteById(id);}}
3.3.6 Controller层
package com.sunxiaping.product.controller;import com.sunxiaping.product.domain.Product;import com.sunxiaping.product.service.ProductService;import org.springframework.beans.factory.annotation.Autowired;import org.springframework.beans.factory.annotation.Value;import org.springframework.web.bind.annotation.*;@RestController@RequestMapping(value = "/product")public class ProductController {@Value("${server.port}")private String port;@Value("${spring.cloud.client.ip-address}")private String ip;@Autowiredprivate ProductService productService;@PostMapping(value = "/save")public String save(@RequestBody Product product) {this.productService.save(product);return "新增成功";}@GetMapping(value = "/findById/{id}")public Product findById(@PathVariable(value = "id") Long id) {Product product = this.productService.findById(id);product.setProductName("访问的地址是:" + this.ip + ":" + this.port);return product;}}
3.3.7 配置类
package com.sunxiaping.product;import org.springframework.boot.SpringApplication;import org.springframework.boot.autoconfigure.SpringBootApplication;import org.springframework.cloud.netflix.eureka.EnableEurekaClient;@SpringBootApplication@EnableEurekaClient //开启Eureka Clientpublic class ProductApplication {public static void main(String[] args) {SpringApplication.run(ProductApplication.class, args);}}
3.4 手动刷新
3.4.1 概述
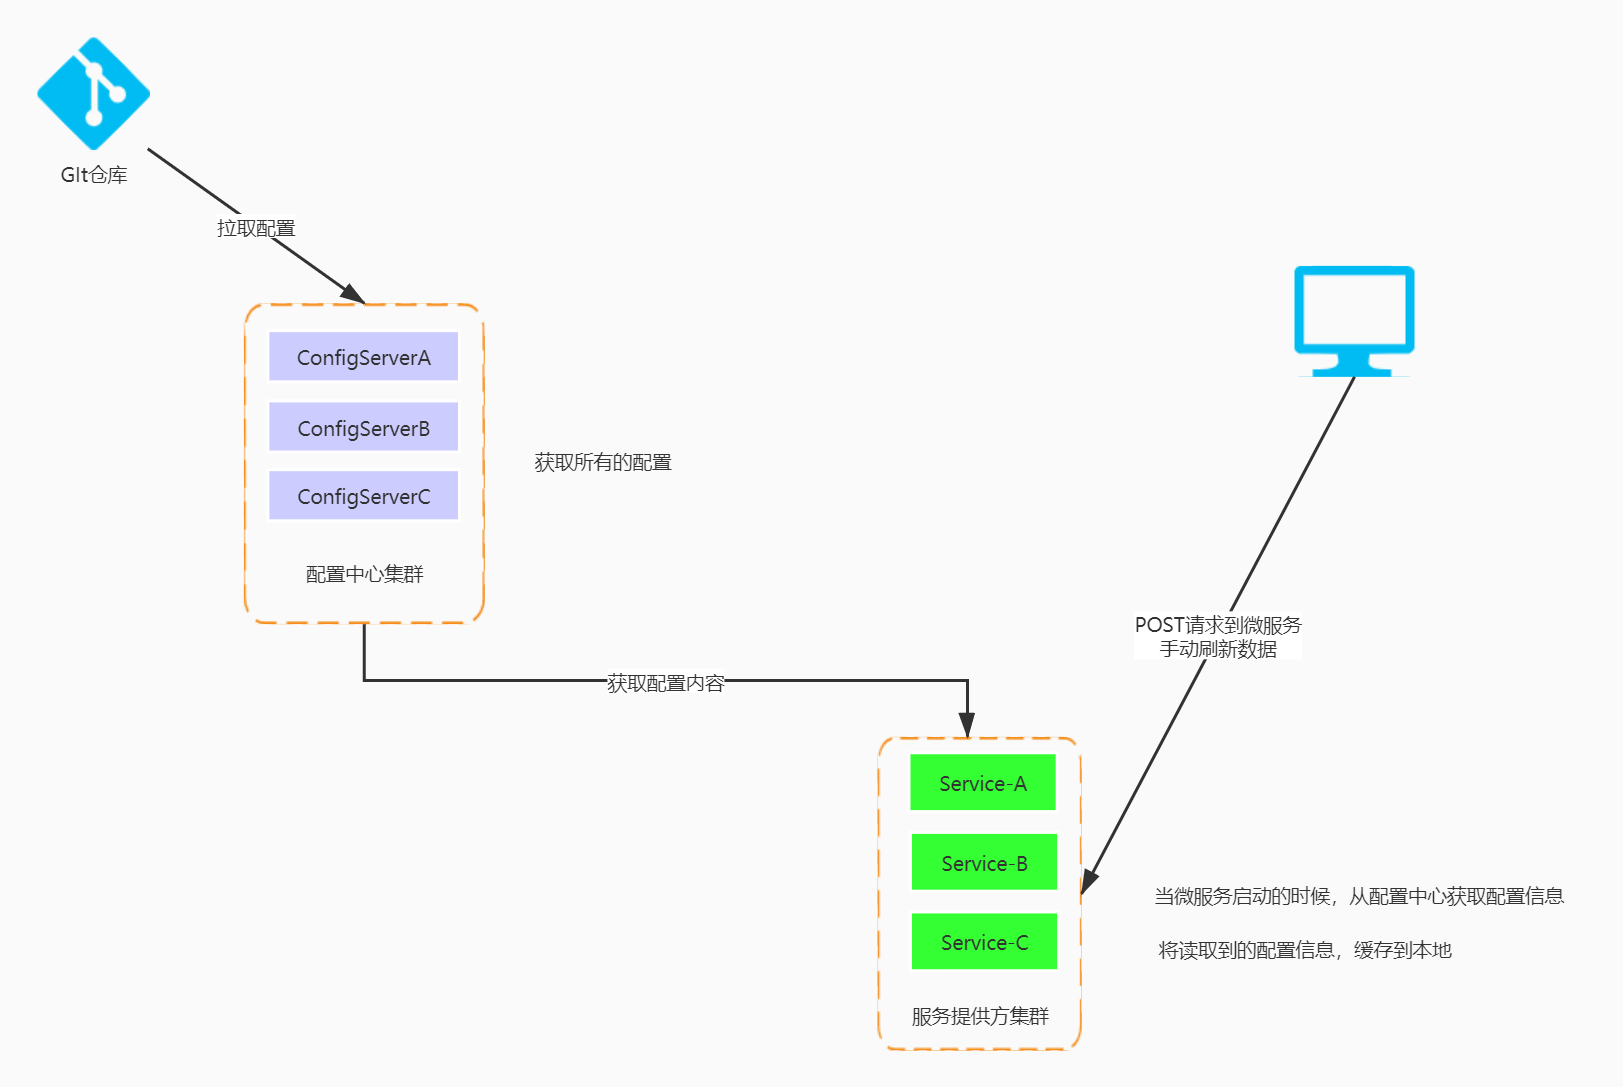
- 我们已经在客户端获取到了配置中心的值,但是当我们修改git中的值的时候,服务端(Config Server)能实时的获取到最新的值,但是客户端(Config Client)读取的是缓存,无法实时获取最新值。SpringCloud已经为我们解决了这个问题,那就是客户端使用POST去触发refresh,获取最新数据,需要依赖spring-boot-starter-actuator。
3.4.2 应用示例
- 导入依赖:
<dependency><groupId>org.springframework.boot</groupId><artifactId>spring-boot-starter-actuator</artifactId></dependency>
- 在对应的Controller类中添加@RefreshScope注解:
package com.sunxiaping.product.controller;import com.sunxiaping.product.domain.Product;import com.sunxiaping.product.service.ProductService;import org.springframework.beans.factory.annotation.Autowired;import org.springframework.beans.factory.annotation.Value;import org.springframework.cloud.context.config.annotation.RefreshScope;import org.springframework.web.bind.annotation.*;@RestController@RequestMapping(value = "/product")@RefreshScope //开启动态刷新public class ProductController {@Value("${server.port}")private String port;@Value("${spring.cloud.client.ip-address}")private String ip;@Autowiredprivate ProductService productService;@PostMapping(value = "/save")public String save(@RequestBody Product product) {this.productService.save(product);return "新增成功";}@GetMapping(value = "/findById/{id}")public Product findById(@PathVariable(value = "id") Long id) {Product product = this.productService.findById(id);product.setProductName("访问的地址是:" + this.ip + ":" + this.port);return product;}}
- 在application.yml中开放端点配置:
spring:cloud:config:name: product # 应用名称,需要对应git中配置文件名称的前半部分profile: dev # 开发环境,需要对应git中配置文件名称的后半部分label: master # 分支名称uri: http://localhost:9010 # config-server的请求地址# 暴露监控端点management:endpoints:web:exposure:include: '*'
- 测试:在Git服务器上修改配置之后,需要使用
curl -X POST "http://localhost:9008/actuator/refresh"发送请求。
4 配置中心的高可用
4.1 概述
- 在之前的代码中,客户端都是直接调用配置中心的Server端来获取配置信息。这样就存在了一个问题,客户端和服务端的耦合性太高,如果Server要做集群,客户端只能通过原始的方式来路由,Server端改变IP地址的时候,客户端也需要修改配置,不符合Spring Cloud 服务治理的概念。
- Spring Cloud提供了这样的解决方案,我们只需要将Server端当做一个服务注册到Eureka中,Client端去Eureka中去获取配置中心Server端的服务即可。
4.2 服务端改造
- 导入Eureka Client的依赖:
<!-- 导入Eureka Client对应的坐标 --><dependency><groupId>org.springframework.cloud</groupId><artifactId>spring-cloud-starter-netflix-eureka-client</artifactId></dependency>
- application.yml
server:port: 9010spring:application:name: config-servercloud:config:server:git:# git服务地址uri: https://gitee.com/AncientFairy/config-repo.git# 配置git的用户名username:# 配置git的密码password:search-paths:- config-repo# 分支label: master# 配置 eurekaeureka:instance:# 主机名称:服务名称修改,其实就是向eureka server中注册的实例idinstance-id: config-server:${server.port}# 显示IP信息prefer-ip-address: trueclient:service-url: # 此处修改为 Eureka Server的集群地址defaultZone: http://eureka7001.com:7001/eureka/,http://eureka7002.com:7002/eureka/,http://eureka7003.com:7003/eureka/
4.3 客户端改造
- bootstrap.yml:
spring:cloud:config:name: product # 应用名称,需要对应git中配置文件名称的前半部分profile: dev # 开发环境,需要对应git中配置文件名称的后半部分label: master # 分支名称# uri: http://localhost:9010 # config-server的请求地址discovery: # 服务发现service-id: config-serverenabled: true # 从Eureka中获取配置信息# 配置 eurekaeureka:instance:# 主机名称:服务名称修改,其实就是向eureka server中注册的实例idinstance-id: service-product-dev:${server.port}# 显示IP信息prefer-ip-address: trueclient:service-url: # 此处修改为 Eureka Server的集群地址defaultZone: http://eureka7001.com:7001/eureka/,http://eureka7002.com:7002/eureka/,http://eureka7003.com:7003/eureka/# 暴露监控端点management:endpoints:web:exposure:include: '*'

若有收获,就点个赞吧
0 人点赞
