第一章:相关概念
1.1 并发和并行
并行( parallel ):指两个或多个事件在同一时刻发生(同时发生)。指在同一时刻,有多条指令在多个处理器上同时执行。并发( concurrency ):指两个或多个事件在同一个时间段内发生。指在同一个时刻只能有一条指令执行,但多个进程的指令被快速轮换执行,使得在宏观上具有多个进程同时执行的效果。
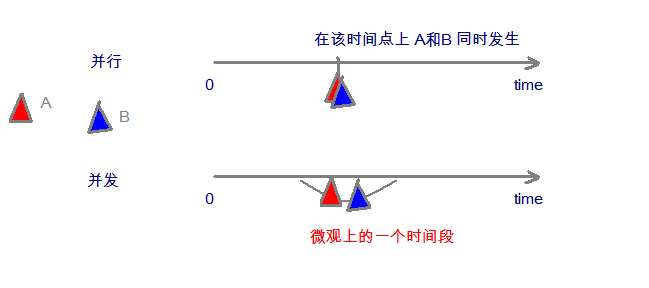
- 在操作系统中,安装了多个程序,并发指的是在一段时间内宏观上有多个程序同时运行,这在单 CPU 系统中,每一时刻只能有一个程序执行,即微观上这些程序是分时的交替运行,只不过是给人的感觉是同时运行,那是因为分时交替运行的时间是非常短的。
- 而在多个 CPU 系统中,则这些可以并发执行的程序便可以分配到多个处理器上( CPU ),实现多任务并行执行,即利用每个处理器来处理一个可以并发执行的程序,这样多个程序便可以同时执行。目前电脑市场上说的多核 CPU ,便是多核处理器,核越多,
并行处理的程序越多,能大大的提高电脑运行的效率。
注意:
单核处理器的计算机肯定是不能并行的处理多个任务的,只能是多个任务在单个 CPU 上并发运行。同理,线程也是一样的,从宏观角度上理解线程是并行运行的,但是从微观角度上分析却是串行运行的,即一个线程一个线程的去运行,当系统只有一个 CPU 时,线程会以某种顺序执行多个线程,我们把这种情况称之为线程调度。
- 单核 CPU :只能并发。
多核 CPU :并发+并行。
例子:
- 并行:多项工作一起执行,之后再汇总,例如:泡方便面,电水壶烧水,一边撕调料倒入桶中
- 并发:同一时刻多个线程在访问同一个资源,多个线程对一个点,例如:春运抢票、电商秒杀…
1.2 进程和线程
程序:为了完成某个任务和功能,选择一种编程语言编写的一组指令的集合。软件:1个或多个应用程序+相关的素材和资源文件等构成一个软件系统。进程:是指一个内存中运行的应用程序,每个进程都有一个独立的内存空间,进程也是程序的一次执行过程,是系统运行程序的基本单位;系统运行一个程序即是一个进程从创建、运行到消亡的过程。线程:线程是进程中的一个执行单元,负责当前进程中程序的执行,一个进程中至少有一个线程。一个进程中是可以有多个线程的,这个应用程序也可以称之为多线程程序。- 简而言之:一个软件中至少有一个应用程序,应用程序的一次运行就是一个进程,一个进程中至少有一个线程。
进程是操作系统调度和分配资源的最小单位,线程是 CPU 调度的最小单位。不同的进程之间是不共享内存的。进程之间的数据交换和通信的成本是很高。不同的线程是共享同一个进程的内存的。当然不同的线程也有自己独立的内存空间。对于方法区,堆中中的同一个对象的内存,线程之间是可以共享的,但是栈的局部变量永远是独立的。
1.3 线程调度
- 分时调度:所有线程轮流使用 CPU 的使用权,平均分配每个线程占用 CPU 的时间。
- 抢占式调度:优先让优先级高的线程使用 CPU,如果线程的优先级相同,那么会随机选择一个(线程随机性),Java 使用的为抢占式调度。
1.4 多线程的应用场景
- 程序需要同时执行两个或多个任务。
- 程序需要实现一些需要等待的任务时,如用户输入、文件读写 操作、网络操作、搜索等。
- 需要一些后台运行的程序时。
第二章:线程的创建和使用
2.1 概述
- Java 语言的 JVM 允许程序运行多个线程,它通过
java.lang.Thread类来体现。 - Thread 类的特性:
- 每个线程都是通过某个特定 Thread 对象的 run() 方法来完成操作的,经常 把 run() 方法的主体称为
线程体。 - 通过该 Thread 对象的 start() 方法来启动这个线程,而非直接调用 run() 。
- 每个线程都是通过某个特定 Thread 对象的 run() 方法来完成操作的,经常 把 run() 方法的主体称为
2.1 JDK 5之前创建线程的方式
2.1.1 概述
- JDK 5 之前创建线程的两种方式:
- ① 继承Thread类。
- ② 实现Runnable接口。
2.1.2 继承 Thread 类
- 步骤:
- ① 定义子类继承 Thread 类。
- ② 子类中重写 Thread 类中的 run 方法。
- ③ 创建 Thread 子类对象,即创建了线程对象。。
- ④ 调用线程对象 start 方法:启动线程,调用 run 方法。
注意事项:
- ① 如果自己手动调用 run() 方法,那么就只是普通方法,没有启动多线程模式。
- ② run() 方法由 JVM 调用,什么时候调用,执行的过程控制都有操作系统的 CPU 调度决定。
- ③ 想要启动多线程,必须调用 start 方法。
- ④ 一个线程对象只能调用一次 start() 方法启动,如果重复调用了,则将抛出以上的异常
IllegalThreadStateException。
- 示例:
package com.github.thread.demo1;/*** 继承Thread类并重写run方法的方式创建线程类** @author 许大仙* @version 1.0* @since 2021-09-15 11:07*/public class SubThread extends Thread {@Overridepublic void run() {for (int i = 0; i < 50; i++) {System.out.println(Thread.currentThread().getName() + ":run--" + i);}}}
package com.github.thread.demo1;/*** @author 许大仙* @version 1.0* @since 2021-09-15 11:08*/public class Test {public static void main(String[] args) {// 创建线程对象SubThread subThread = new SubThread();// 调用start方法启动线程,JVM会调用run方法// start不能调用多次subThread.start();for (int i = 0; i < 50; i++) {System.out.println(Thread.currentThread().getName() + ":run--" + i);}}}

2.1.3 实现 Runnable 接口
- 步骤:
- ① 定义子类,实现 Runnable 接口。
- ② 子类中重写 Runnable 接口中的 run 方法。
- ③ 通过 Thread 类含参构造器创建线程对象。
- ④ 将 Runnable 接口的子类对象作为实际参数传递给 Thread 类的构造器中。
- ⑤ 调用 Thread 类的 start 方法:开启线程,调用 Runnable 子类接口的 run 方法。
- 示例:
package com.github.thread.demo4;/*** @author 许大仙* @version 1.0* @since 2021-09-15 14:11*/public class SubRunnable implements Runnable {@Overridepublic void run() {for (int i = 0; i < 50; i++) {System.out.println(Thread.currentThread().getName() + ":run--" + i);}}}
package com.github.thread.demo4;/*** @author 许大仙* @version 1.0* @since 2021-09-15 14:11*/public class Test {public static void main(String[] args) {SubRunnable runnable = new SubRunnable();Thread thread = new Thread(runnable);thread.start();Thread thread2 = new Thread(runnable);thread2.start();}}
2.1.4 继承方式和实现方式的区别
- 区别:
- ① 继承 Thread 类:线程代码存放在 Thread 子类的 run() 方法中。
- ② 实现 Runnable 接口:线程代码存放在接口的子类的 run() 方法中。
- 实现方式的好处:
- ① 避免了单继承的局限性。
- ② 多个线程可以共享同一个接口实现类的对象,非常适合多个相同线 程来处理同一份资源。
2.2 设置线程名称和获取线程名称
- 设置线程名称:
public final synchronized void setName(String name)
public Thread(Runnable target, String name)
public Thread(String name)
- 获取当前线程:
public static native Thread currentThread();
- 获取线程的名称:
public final String getName()
- 示例:
package com.github.thread.demo2;/*** @author 许大仙* @version 1.0* @since 2021-09-15 13:46*/public class SubThread extends Thread {public SubThread(String name) {super(name);}@Overridepublic void run() {for (int i = 0; i < 50; i++) {System.out.println(Thread.currentThread().getName() + ":run--" + i);}}}
package com.github.thread.demo3;/*** @author 许大仙* @version 1.0* @since 2021-09-15 11:08*/public class Test {public static void main(String[] args) {SubThread subThread1 = new SubThread();subThread1.setName("旺财");subThread1.start();SubThread subThread2 = new SubThread();subThread2.setName("狗剩");subThread2.start();}}
2.3 线程的优先级
- 每个线程都有一定的优先级,优先级高的线程将获得较多的执行机会。
Thread 类提供了以下方法来设置和获取线程的优先级:
设置线程的优先级:
setPriority(int newPriority)
获取线程的优先级:
getPriority()
其中 setPriority 方法需要一个整数,并且范围在 [1,10] 之间,通常推荐设置 Thread 类的三个优先级常量:
public final static int MIN_PRIORITY = 1;
public final static int NORM_PRIORITY = 5;
public final static int MAX_PRIORITY = 10;
注意:
- 线程创建时继承的是父线程的优先级。
- 低优先级只是获得调度的概率低,并非一定是在高优先级线程之后才被调用。
- 示例:
package com.github.thread.demo5;/*** @author 许大仙* @version 1.0* @since 2021-09-15 14:27*/public class SubThread extends Thread {@Overridepublic void run() {for (int i = 0; i < 50; i++) {System.out.println(Thread.currentThread().getName() + ":" + i);}}}
package com.github.thread.demo5;/*** @author 许大仙* @version 1.0* @since 2021-09-15 14:28*/public class Test {public static void main(String[] args) {SubThread t1 = new SubThread();SubThread t2 = new SubThread();// 获取线程的优先级System.out.println("t1线程的优先级:" + t1.getPriority()); // 5System.out.println("t2线程的优先级:" + t2.getPriority()); // 5t1.start();t2.start();}}
- 示例:
package com.github.thread.demo6;/*** @author 许大仙* @version 1.0* @since 2021-09-15 14:27*/public class SubThread extends Thread {@Overridepublic void run() {for (int i = 0; i < 50; i++) {System.out.println(Thread.currentThread().getName() + ":" + i);}}}
package com.github.thread.demo6;/*** @author 许大仙* @version 1.0* @since 2021-09-15 14:28*/public class Test {public static void main(String[] args) {SubThread t1 = new SubThread();SubThread t2 = new SubThread();// 设置线程的优先级t1.setPriority(Thread.MIN_PRIORITY);t2.setPriority(Thread.MAX_PRIORITY);t1.start();t2.start();}}
2.4 等待线程终止(了解)
- 等待该线程终止:
void join()
- 等待该线程终止的时间最长为 millis 毫秒。如果 millis 时间到,将不再等待:
void join(long millis)
- 等待该线程终止的时间最长为 millis 毫秒 + nanos 纳秒:
void join(long millis, int nanos)
- 示例:
package com.github.thread.demo7;/*** @author 许大仙* @version 1.0* @since 2021-09-15 14:27*/public class SubThread extends Thread {@Overridepublic void run() {for (int i = 0; i < 50; i++) {System.out.println(Thread.currentThread().getName() + ":" + i);}}}
package com.github.thread.demo7;

/**
 * @author 许大仙
 * @version 1.0
 * @since 2021-09-15 14:39
 */
public class Test {
    public static void main(String[] args) throws InterruptedException {
        SubThread s1 = new SubThread();

        SubThread s2 = new SubThread();

        s1.start();
        s1.join();
        s2.start();
    }
}
2.5 线程礼让(了解)
- 线程礼让:
public static void yield()
- 暂停当前正在执行的线程,把执行机会让给优先级相同或更高的线程。
若队列中没有同优先级的线程,忽略此方法。
示例:
package com.github.thread.demo8;

/**
 * @author 许大仙
 * @version 1.0
 * @since 2021-09-15 14:27
 */
public class SubThread extends Thread {
    @Override
    public void run() {
        for (int i = 0; i < 50; i++) {
            Thread.yield();
            System.out.println(Thread.currentThread().getName() + ":" + i);
        }
    }
}
package com.github.thread.demo8;

/**
 * @author 许大仙
 * @version 1.0
 * @since 2021-09-15 14:44
 */
public class Test {
    public static void main(String[] args) {
        SubThread s1 = new SubThread();

        SubThread s2 = new SubThread();

        s1.start();
        s2.start();
    }
}
第三章:线程安全
3.1 售票程序引出线程安全
- 示例:
package com.github.thread.demo9;

/**
 * 票源
 *
 * @author 许大仙
 * @version 1.0
 * @since 2021-09-15 15:12
 */
public class Ticket implements Runnable {

    private int tickets = 100;

    @Override
    public void run() {
        while (true) {
            if (this.tickets > 0) {
                try {
                    Thread.sleep(10);
                } catch (InterruptedException e) {
                    e.printStackTrace();
                }
                System.out.println(Thread.currentThread().getName() + "出售第" + this.tickets-- + "张");
            } else {
                break;
            }
        }
    }
}
package com.github.thread.demo9;

/**
 * @author 许大仙
 * @version 1.0
 * @since 2021-09-15 15:13
 */
public class Test {
    public static void main(String[] args) {
        Ticket ticket = new Ticket();

        Thread t1 = new Thread(ticket, "窗口1");
        Thread t2 = new Thread(ticket, "窗口2");
        Thread t3 = new Thread(ticket, "窗口3");

        t1.start();
        t2.start();
        t3.start();
    }
}
- 内存示意图:
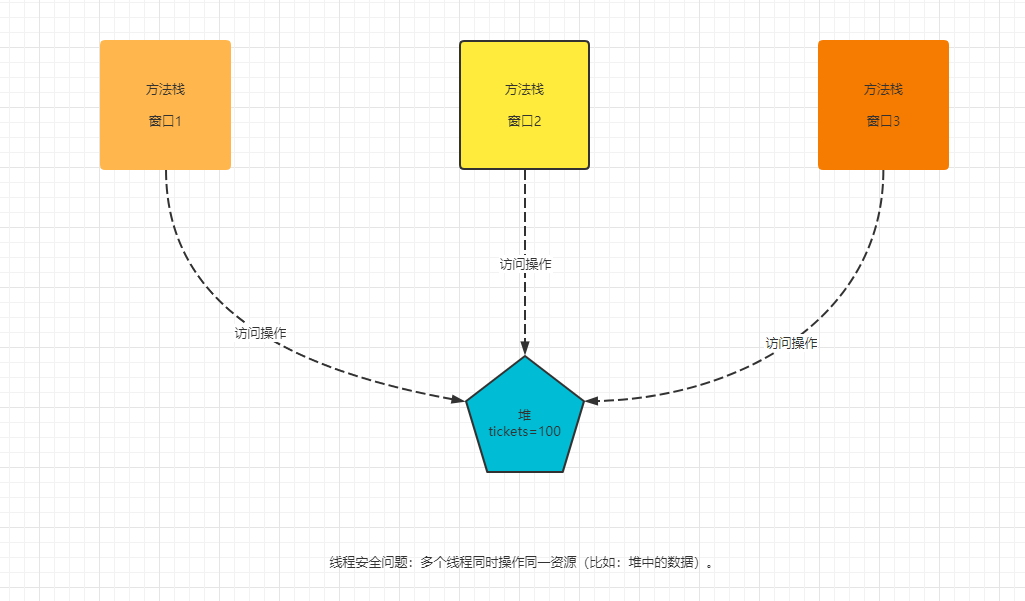
3.2 线程安全的原因
- 多线程环境下操作同一个资源(成员变量)。
3.3 线程安全的解决方法
- 对多条操作共享数据的语句,只能让一个线程都执行完,在执行过程中,其他线程不可以参与执行。
3.4 JDK 5 之前解决线程安全
3.4.1 概述
- Java 对于多线程的安全问题提供了专业的解决方式:
同步机制。
- 同步代码块:
synchronized (对象){
    // 需要被同步的代码
}
- 同步方法:
权限修饰符 synchronized 返回值类型 方法名(形参列表){
    // 需要被同步的代码
}
3.4.2 同步机制中的锁
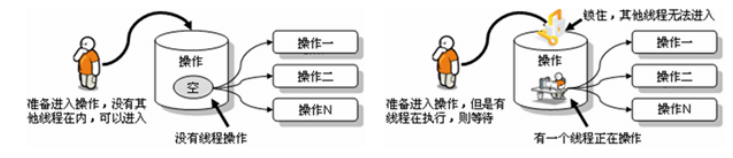
- 同步锁机制:在《Thinking in Java》中,是这么说的:对于并发工作,你需要某种方式来防止两个任务访问相同的资源(其实就是共享资源竞争)。 防止这种冲突的方法 就是当资源被一个任务使用时,在其上加锁。第一个访问某项资源的任务必须 锁定这项资源,使其他任务在其被解锁之前,就无法访问它了,而在其被解锁之时,另一个任务就可以锁定并使用它了。
- synchronized 的锁是什么?
- 任意对象都可以作为同步锁。所有对象都自动含有单一的锁(监视器)。
- 同步方法的锁:静态方法( 类名.class )、非静态方法( this )。
- 同步代码块:自己指定,很多时候也是指定为 this 或 类名.class 。
- 注意事项:
- 必须确保使用同一个资源的
多个线程共用一把锁,这个非常重要,否则就无法保证共享资源的安全。 - 一个线程类中的所有静态方法共用同一把锁( 类名.class ),所有非静态方 法共用同一把锁( this ),同步代码块(指定需谨慎)。
- 必须确保使用同一个资源的
3.4.3 应用示例
- 示例:同步代码块
package com.github.thread.demo10;

/**
 * 票源
 *
 * @author 许大仙
 * @version 1.0
 * @since 2021-09-15 15:12
 */
public class Ticket implements Runnable {

    private int tickets = 100;

    @Override
    public void run() {
        while (true) {
            synchronized (this) {
                if (this.tickets > 0) {
                    try {
                        Thread.sleep(10);
                    } catch (InterruptedException e) {
                        e.printStackTrace();
                    }
                    System.out.println(Thread.currentThread().getName() + "出售第" + this.tickets-- + "张");
                } else {
                    break;
                }
            }
        }
    }
}
package com.github.thread.demo10;

/**
 * @author 许大仙
 * @version 1.0
 * @since 2021-09-15 16:23
 */
public class Test {
    public static void main(String[] args) {
        Ticket ticket = new Ticket();

        Thread t1 = new Thread(ticket, "窗口1");
        Thread t2 = new Thread(ticket, "窗口2");
        Thread t3 = new Thread(ticket, "窗口3");

        t1.start();
        t2.start();
        t3.start();
    }
}
- 示例:同步方法
package com.github.thread.demo11;

/**
 * 票源
 *
 * @author 许大仙
 * @version 1.0
 * @since 2021-09-15 15:12
 */
public class Ticket implements Runnable {

    private int tickets = 100;

    @Override
    public void run() {
        while (true) {
            this.sellTicket();
        }
    }

    private synchronized void sellTicket() {
        if (this.tickets > 0) {
            try {
                Thread.sleep(10);
            } catch (InterruptedException e) {
                e.printStackTrace();
            }
            System.out.println(Thread.currentThread().getName() + "出售第" + this.tickets-- + "张");
        }
    }
}
package com.github.thread.demo11;

/**
 * @author 许大仙
 * @version 1.0
 * @since 2021-09-15 16:23
 */
public class Test {
    public static void main(String[] args) {
        Ticket ticket = new Ticket();

        Thread t1 = new Thread(ticket, "窗口1");
        Thread t2 = new Thread(ticket, "窗口2");
        Thread t3 = new Thread(ticket, "窗口3");

        t1.start();
        t2.start();
        t3.start();
    }
}
3.5 JDK 5 之后解决线程安全
- 从 JDK 5.0 开始,Java 提供了更强大的线程同步机制——通过显式定义同 步锁对象来实现同步。
java.util.concurrent.locks.Lock接口是控制多个线程对共享资源进行访问的 工具。锁提供了对共享资源的独占访问,每次只能有一个线程对Loc k对象加锁,线程开始访问共享资源之前应先获得 Lock 对象。ReentrantLock 类实现了 Lock ,它拥有与 synchronized 相同的并发性和内存语义,在实现线程安全的控制中,比较常用的是 ReentrantLock ,可以显式加锁、释放锁。
示例:
package com.github.thread.demo13;

import java.util.concurrent.locks.Lock;
import java.util.concurrent.locks.ReentrantLock;

/**
 * @author 许大仙
 * @version 1.0
 * @since 2021-09-16 08:37
 */
public class Ticket implements Runnable {

    private final Lock lock = new ReentrantLock();
    private int tickets = 100;

    @Override
    public void run() {
        while (true) {
            // 加锁
            this.lock.lock();
            try {
                if (this.tickets > 0) {
                    System.out.println(Thread.currentThread().getName() + "卖第" + this.tickets-- + "张票");
                }
            } finally {
                // 释放锁
                this.lock.unlock();
            }
        }
    }
}
package com.github.thread.demo13;

/**
 * @author 许大仙
 * @version 1.0
 * @since 2021-09-16 08:40
 */
public class Test {
    public static void main(String[] args) {
        Ticket ticket = new Ticket();

        new Thread(ticket, "窗口1").start();
        new Thread(ticket, "窗口2").start();
    }
}
3.6 死锁
- 死锁:
- 不同的线程分别占用对方需要的同步资源不放弃,都在等待对方放弃自己需要的同步资源,就形成了线程的死锁。
- 出现死锁后,不会出现异常,不会出现提示,只是所有的线程都处于阻塞状态,无法继续。
解决方法:
- 专门的算法、原则。
- 尽量减少同步资源的定义。
- 尽量避免嵌套同步。
示例:死锁
package com.github.thread.demo12;

/**
 * @author 许大仙
 * @version 1.0
 * @since 2021-09-16 08:00
 */
public class LockA {
    public static final LockA LOCK_A = new LockA();
}
package com.github.thread.demo12;

/**
 * @author 许大仙
 * @version 1.0
 * @since 2021-09-16 08:02
 */
public class LockB {
    public static final LockB LOCK_B = new LockB();
}
package com.github.thread.demo12;

/**
 * 实现死锁程序
 *
 * @author 许大仙
 * @version 1.0
 * @since 2021-09-16 08:03
 */
public class ThreadDeadLock implements Runnable {

    private final boolean flag;

    public ThreadDeadLock(boolean flag) {
        this.flag = flag;
    }

    @Override
    public void run() {
        while (true) {
            if (this.flag) {
                // 先进入A锁同步
                synchronized (LockA.LOCK_A) {
                    System.out.println("线程获取A锁");
                    // 再进入B锁同步
                    synchronized (LockB.LOCK_B) {
                        System.out.println("线程获取B锁");
                    }
                }
            } else {
                // 先进入B锁同步
                synchronized (LockB.LOCK_B) {
                    System.out.println("进入B");
                    // 再进入A锁同步
                    synchronized (LockA.LOCK_A) {
                        System.out.println("进入A");
                    }
                }
            }
        }
    }
}
package com.github.thread.demo12;

/**
 * @author 许大仙
 * @version 1.0
 * @since 2021-09-16 08:09
 */
public class Test {
    public static void main(String[] args) {
        ThreadDeadLock deadLock1 = new ThreadDeadLock(false);
        ThreadDeadLock deadLock2 = new ThreadDeadLock(true);

        Thread t1 = new Thread(deadLock1);
        Thread t2 = new Thread(deadLock2);
        t1.start();
        t2.start();
    }
}
3.7 synchronized 与 Lock 的对比
- ① Lock 是显式锁(手动开启和关闭锁,别忘记关闭锁),synchronized 是隐式锁,出了作用域自动释放。
- ② Lock 只有代码块锁,synchronized 有代码块锁和方法锁。
- ③ 使用 Lock 锁,JVM 将花费较少的时间来调度线程,性能更好。并且具有更好的扩展性(提供更多的子类)。
第四章:线程通信
4.1 为什么需要线程通信?
- 多个线程在处理同一个资源,但是处理的动作(线程的任务)却不相同。而多个线程并发执行时, 在默认情况下CPU是随机切换线程的,当我们需要多个线程来共同完成一件任务,并且我们希望他们有规律的执行, 那么多线程之间需要一些通信机制,可以协调它们的工作,以此来帮我们达到多线程共同操作一份数据。
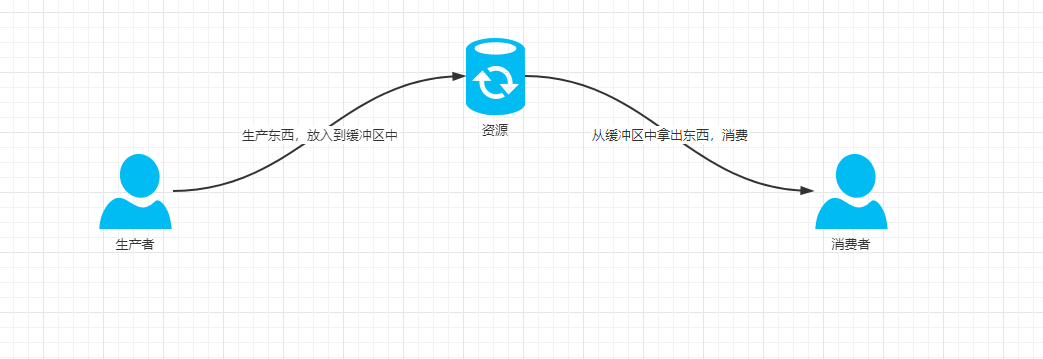
- 比如:线程A用来生成包子的,线程B用来吃包子的,包子可以理解为同一资源,线程A与线程B处理的动作,一个是生产,一个是消费,此时B线程必须等到A线程完成后才能执行,那么线程A与线程B之间就需要线程通信,即——
等待唤醒机制。
4.2 等待唤醒机制
- 等待唤醒机制是多个线程的一种
协作机制。谈到线程我们经常想到的是线程间的竞争(race),比如去争夺锁,但是线程间也会有协作机制。 等待唤醒机制就是在一个线程满足某个条件时,就进入等待状态(
wait()/wait(time)), 等待其他线程执行完他们的指定代码过后再将其唤醒(notify())或可以指定 wait 的时间,等时间到了自动唤醒;在有多个线程进行等待时,如果需要,可以使用notifyAll()来唤醒所有的等待线程。wait/notify就是线程间的一种协作机制。- wait() :令当前线程挂起并放弃CPU、同步资源并等待,使别的线程可访问并修改共享资源,而当 前线程排队等候其他线程调用notify()或notifyAll() 方法唤醒,唤醒后等待重新获得对监视器的所有 权后才能继续执行。
- notify() :唤醒正在排队等待同步资源的线程中优先级最高者结束等待。
- notifyAll () :唤醒正在排队等待资源的所有线程结束等待。
注意:
- 被通知线程被唤醒后也不一定能立即恢复执行,因为它当初中断的地方是在同步块内,而此刻它已经不持有锁,所以她需要再次尝试去获取锁(很可能面临其它线程的竞争),成功后才能在当初调用 wait 方法之后的地方恢复执行。
- 如果能获取锁,线程就从 WAITING 状态变成 RUNNABLE(可运行) 状态;否则,线程就从 WAITING 状态又变成 BLOCKED(等待锁) 状态
调用 wait 和 notify 方法需要注意的细节:
- ① wait 方法与 notify 方法必须要由同一个锁对象调用。因为:对应的锁对象可以通过 notify 唤醒使用同一个锁对象调用的 wait 方法后的线程。
- ② wait 方法与 notify 方法是属于 Object 类的方法的。因为:锁对象可以是任意对象,而任意对象的所属类都是继承了Object 类的。
- ③ wait 方法与 notify 方法必须要在同步代码块或者是同步函数中使用。因为:必须要通过锁对象调用这 2 个方法。
4.3 生产者和消费者问题
- 等待唤醒机制可以解决经典的
生产者与消费者的问题。 - 生产者与消费者问题,也称有限缓冲问题,是一个多线程同步问题的经典案例。该问题描述了两个(多个)共享固定大小缓冲区的线程——即所谓的
生产者和消费者——在实际运行时会发生的问题。生产者的主要作用是生成一定量的数据放到缓冲区中,然后重复此过程。与此同时,消费者也在缓冲区消耗这些数据。该问题的关键就是要保证生产者不会在缓冲区满时加入数据,消费者也不会在缓冲区中空时消耗数据。
生产者与消费者问题中其实隐含了两个问题:
- ① 线程安全问题:因为生产者与消费者共享数据缓冲区,不过这个问题可以使用同步解决。
- ② 线程的协调工作问题:
- 要解决该问题,就必须让生产者线程在缓冲区满时等待( wait ),暂停进入阻塞状态,等到下次消费者消耗了缓冲区中的数据的时候,通知( notify )正在等待的线程恢复到就绪状态,重新开始往缓冲区添加数据。
- 同样,也可以让消费者线程在缓冲区空时进入等待( wait ),暂停进入阻塞状态,等到生产者往缓冲区添加数据之后,再通知( notify )正在等待的线程恢复到就绪状态。
- 通过这样的通信机制来解决此类问题。
示例:使用同步代码块和等待唤醒机制解决生产者和消费者问题(单生产者和单消费者)
package com.github.thread.demo14;

/**
 * 资源
 *
 * @author 许大仙
 * @version 1.0
 * @since 2021-09-16 10:24
 */
public class Resource {
    // 生产商品的计数
    int count;
    // 标记,如果flag是true,表示生产好了,等待消费;如果是false,表示消费好了,等待生产
    boolean flag;
}
package com.github.thread.demo14;

/**
 * 生产者
 *
 * @author 许大仙
 * @version 1.0
 * @since 2021-09-16 10:25
 */
public class Producer implements Runnable {

    private final Resource r;

    public Producer(Resource r) {
        this.r = r;
    }

    @Override
    public void run() {
        while (true) {
            synchronized (this.r) {
                if (this.r.flag) { // 如果flag为true,表示生产好了,等待消费
                    try {
                        // 修改标志位
                        this.r.flag = false;
                        // 等待
                        this.r.wait();
                    } catch (InterruptedException e) {
                        e.printStackTrace();
                    }
                } // 如果flag为false,表示消费好了,等待生产
                try {
                    Thread.sleep(1000);
                } catch (InterruptedException e) {
                    e.printStackTrace();
                }
                this.r.count++;
                System.out.println("生产第" + this.r.count + "个");
                // 修改标志位
                this.r.flag = true;
                // 唤醒消费者线程
                this.r.notify();
            }
        }
    }
}
package com.github.thread.demo14;

/**
 * 消费者
 *
 * @author 许大仙
 * @version 1.0
 * @since 2021-09-16 10:27
 */
public class Consumer implements Runnable {

    private final Resource r;

    public Consumer(Resource r) {
        this.r = r;
    }

    @Override
    public void run() {
        while (true) {
            synchronized (this.r) {
                if (this.r.flag) {
                    try {
                        Thread.sleep(1000);
                    } catch (InterruptedException e) {
                        e.printStackTrace();
                    }
                    System.out.println("消费第" + this.r.count + "个");

                    try {
                        this.r.flag = false;
                        this.r.wait();
                    } catch (InterruptedException e) {
                        e.printStackTrace();
                    }
                }
                this.r.flag = true;
                this.r.notify();
            }
        }
    }
}
package com.github.thread.demo14;

/**
 * @author 许大仙
 * @version 1.0
 * @since 2021-09-16 10:29
 */
public class Test {
    public static void main(String[] args) {
        Resource resource = new Resource();

        Producer producer = new Producer(resource);
        Consumer consumer = new Consumer(resource);

        new Thread(producer).start();
        new Thread(consumer).start();
    }
}
- 示例:使用同步方法和等待唤醒机制解决生产者和消费者问题(单生产者和单消费者)
package com.github.thread.demo15;

/**
 * 资源
 *
 * @author 许大仙
 * @version 1.0
 * @since 2021-09-16 10:24
 */
public class Resource {
    // 生产商品的计数
    private int count;
    // 标记,如果flag是true,表示生产好了,等待消费;如果是false,表示消费好了,等待生产
    private boolean flag;

    /**
     * 供生产者生产的方法
     */
    public synchronized void produce() {
        // flag为true,生产完成,等待消费
        if (this.flag) {
            try {
                Thread.sleep(1000);
            } catch (InterruptedException e) {
                e.printStackTrace();
            }
            try {
                this.wait();
            } catch (InterruptedException e) {
                e.printStackTrace();
            }
        }
        this.count++;
        System.out.println("生产第" + this.count + "个");
        // 修改标志位,生产完成
        this.flag = true;
        this.notify();
    }

    /**
     * 供消费者消费的方法
     */
    public synchronized void consume() {
        // flag为false,消费完成,等待生产
        if (!this.flag) {
            try {
                Thread.sleep(1000);
            } catch (InterruptedException e) {
                e.printStackTrace();
            }
            try {
                this.wait();
            } catch (InterruptedException e) {
                e.printStackTrace();
            }
        }
        System.out.println("消费第" + this.count + "个");
        // 修改标志位,消费完成
        this.flag = false;
        this.notify();
    }
}
package com.github.thread.demo15;

/**
 * @author 许大仙
 * @version 1.0
 * @since 2021-09-16 14:43
 */
public class Producer implements Runnable {

    private final Resource resource;

    public Producer(Resource resource) {
        this.resource = resource;
    }

    @Override
    public void run() {
        while (true) {
            this.resource.produce();
        }
    }
}
package com.github.thread.demo15;

/**
 * @author 许大仙
 * @version 1.0
 * @since 2021-09-16 14:44
 */
public class Consumer implements Runnable {

    private final Resource resource;

    public Consumer(Resource resource) {
        this.resource = resource;
    }

    @Override
    public void run() {
        while (true) {
            this.resource.consume();
        }
    }
}
package com.github.thread.demo15;

/**
 * @author 许大仙
 * @version 1.0
 * @since 2021-09-16 14:44
 */
public class Test {
    public static void main(String[] args) {
        Resource resource = new Resource();

        new Thread(new Producer(resource)).start();
        new Thread(new Consumer(resource)).start();
    }
}
- 示例:使用同步方法和等待唤醒机制解决生产者和消费者问题(多生产者和多消费者)
package com.github.thread.demo16;

/**
 * 资源
 *
 * @author 许大仙
 * @version 1.0
 * @since 2021-09-16 10:24
 */
public class Resource {
    // 生产商品的计数
    private int count;
    // 标记,如果flag是true,表示生产好了,等待消费;如果是false,表示消费好了,等待生产
    private boolean flag;

    /**
     * 供生产者生产的方法
     */
    public synchronized void produce() {
        // flag为true,生产完成,等待消费
        while (this.flag) {
            try {
                Thread.sleep(1000);
            } catch (InterruptedException e) {
                e.printStackTrace();
            }
            try {
                this.wait();
            } catch (InterruptedException e) {
                e.printStackTrace();
            }
        }
        this.count++;
        System.out.println("生产第" + this.count + "个");
        // 修改标志位,生产完成
        this.flag = true;
        this.notifyAll();
    }

    /**
     * 供消费者消费的方法
     */
    public synchronized void consume() {
        // flag为false,消费完成,等待生产
        while (!this.flag) {
            try {
                Thread.sleep(1000);
            } catch (InterruptedException e) {
                e.printStackTrace();
            }
            try {
                this.wait();
            } catch (InterruptedException e) {
                e.printStackTrace();
            }
        }
        System.out.println("消费第" + this.count + "个");
        // 修改标志位,消费完成
        this.flag = false;
        this.notifyAll();
    }
}
package com.github.thread.demo16;

/**
 * @author 许大仙
 * @version 1.0
 * @since 2021-09-16 14:43
 */
public class Producer implements Runnable {

    private final Resource resource;

    public Producer(Resource resource) {
        this.resource = resource;
    }

    @Override
    public void run() {
        while (true) {
            this.resource.produce();
        }
    }
}
package com.github.thread.demo16;

/**
 * @author 许大仙
 * @version 1.0
 * @since 2021-09-16 14:44
 */
public class Consumer implements Runnable {

    private final Resource resource;

    public Consumer(Resource resource) {
        this.resource = resource;
    }

    @Override
    public void run() {
        while (true) {
            this.resource.consume();
        }
    }
}
package com.github.thread.demo16;

/**
 * 多生产者和多消费者安全问题产生的原因:
 * ① 线程本身就是一个新创建的方法栈内存(CPU进来读取数据)
 * ② 线程的notify()只能唤醒一个等待的线程。 解决办法:全部唤醒 notifyAll()
 * ③ 被唤醒的线程,已经经过if判断,一旦醒来继续执行 线程被唤醒后,不能立刻就执行,需要再次判断标志位,利用循环。 while(标志位):标志位永远是true,永远也出不去
 *
 * @author 许大仙
 * @version 1.0
 * @since 2021-09-16 14:44
 */
public class Test {
    public static void main(String[] args) {
        Resource resource = new Resource();

        new Thread(new Producer(resource)).start();
        new Thread(new Producer(resource)).start();
        new Thread(new Producer(resource)).start();
        new Thread(new Consumer(resource)).start();
        new Thread(new Consumer(resource)).start();
    }
}
4.4 sleep() 和 wait() 方法的区别
- sleep() 不释放锁,wait() 释放锁。
- sleep() 指定休眠的时间,wait() 可以指定时间也可以无限等待直到 notify 或 notifyAll 。
- sleep( )在 Thread 类中声明的静态方法,wait 方法在 Object 类中声明。
4.5 生产者和消费者性能问题(多生产者和多消费者案例)
- wait() 方法和 notify() 方法都是本地方法,会调用 OS 的功能,和操作系统交互,JVM 找 OS ,把线程停止,频繁等待与唤醒,导致 JVM 和 OS 交互的次数过多。
- notifyAll() 唤醒全部的线程,也浪费线程资源,为了一个线程,不得以唤醒的了全部的线程。
4.6 Lock 接口的深入
- Lock 接口替换了同步 synchronized ,提供了更加灵活,性能更好的锁定操作。
- 返回线程的阻塞队列:
Condition newCondition();
- 生产者与消费者改进为 Lock 接口(借助 Condition 接口 (线程的阻塞队列)):
- ① 进入队列的线程,释放锁。
- ② 出去队列的线程,再次的获取锁。
- ③ 接口的方法 : await() 线程释放锁,进入队列。
- ④ 接口的方法 : signal() 线程出去队列,再次获取锁。
注意:线程的阻塞队列,依赖 Lock 接口创建。
- 示例:
package com.github.thread2.demo1;

import java.util.concurrent.locks.Condition;
import java.util.concurrent.locks.Lock;
import java.util.concurrent.locks.ReentrantLock;

/**
 * @author 许大仙
 * @version 1.0
 * @since 2021-09-16 20:47
 */
public class Resource {
    private final Lock lock = new ReentrantLock();
    // 通过Lock接口锁,创建出2个线程的阻塞队列
    private final Condition prod = this.lock.newCondition(); // 生产者线程阻塞队列
    private final Condition cust = this.lock.newCondition(); // 消费者线程阻塞队列
    private int count;
    private boolean flag;

    public void produce() {
        // 获取锁
        try {
            Thread.sleep(1000);
        } catch (InterruptedException e) {
            e.printStackTrace();
        }
        this.lock.lock();
        while (this.flag) {
            // 无限等待,生产线程等待,执行到这里的线程,释放锁,进入到生产者的阻塞队列
            try {
                this.prod.await();
            } catch (InterruptedException e) {
                e.printStackTrace();
            }
        }
        this.count++;
        System.out.println("生产第:" + this.count + "个");
        // 修改标志位
        this.flag = true;
        // 唤醒消费线程队列中的一个
        this.cust.signal();
        // 释放锁
        this.lock.unlock();
    }

    public void consume() {
        // 获取锁
        this.lock.lock();
        try {
            Thread.sleep(1000);
        } catch (InterruptedException e) {
            e.printStackTrace();
        }
        while (!this.flag) {
            // 无限等待,消费线程等待,执行到这里的线程,释放锁,进入到消费者的阻塞队列
            try {
                this.cust.await();
            } catch (InterruptedException e) {
                e.printStackTrace();
            }
        }
        System.out.println("消费第:" + this.count);
        // 修改标志位
        this.flag = false;
        // 唤醒生产线程队列中的一个
        this.prod.signal();
        // 释放锁
        this.lock.unlock();
    }
}
package com.github.thread2.demo1;

/**
 * @author 许大仙
 * @version 1.0
 * @since 2021-09-16 19:03
 */
public class Producer implements Runnable {
    private final Resource resource;

    public Producer(Resource resource) {
        this.resource = resource;

    }

    @Override
    public void run() {
        while (true) {
            this.resource.produce();
        }
    }
}
package com.github.thread2.demo1;

/**
 * @author 许大仙
 * @version 1.0
 * @since 2021-09-16 19:04
 */
public class Consumer implements Runnable {

    private final Resource resource;

    public Consumer(Resource resource) {
        this.resource = resource;
    }

    @Override
    public void run() {
        while (true) {
            this.resource.consume();
        }
    }
}
package com.github.thread2.demo1;

/**
 * @author 许大仙
 * @version 1.0
 * @since 2021-09-16 19:05
 */
public class Test {
    public static void main(String[] args) {
        Resource resource = new Resource();
        Producer producer = new Producer(resource);
        Consumer consumer = new Consumer(resource);
        new Thread(producer).start();
        new Thread(producer).start();
        new Thread(producer).start();
        new Thread(consumer).start();
        new Thread(consumer).start();

    }
}
第五章:单例设计模式
5.1 概述
- 单例设计模式:保证一个类的对象在内存中是唯一的。
- 实现步骤:
- ① 私有化构造方法。
- ② 类的内部实例化该类的对象,并且修饰符是 private static 的。
- ③ 提供一个公开的静态方法,返回刚才实例化的类的对象。
5.2 单例模式
- 示例:饿汉式
package com.github.thread2.demo2;

/**
 * 饿汉式
 *
 * @author 许大仙
 * @version 1.0
 * @since 2021-09-17 14:30
 */
public class Singleton {

    private static Singleton singleton = new Singleton();

    private Singleton() {}

    public static Singleton getInstance() {
        return singleton;
    }
}
package com.github.thread2.demo2;

/**
 * @author 许大仙
 * @version 1.0
 * @since 2021-09-17 14:32
 */
public class Test {
    public static void main(String[] args) {
        Singleton s1 = Singleton.getInstance();
        Singleton s2 = Singleton.getInstance();

        System.out.println(s1 == s2);
    }
}
- 示例:懒汉式
package com.github.thread2.demo3;

/**
 * 懒汉式
 *
 * @author 许大仙
 * @version 1.0
 * @since 2021-09-17 14:30
 */
public class Singleton {

    private static Singleton singleton;

    private Singleton() {}

    public synchronized static Singleton getInstance() {
        if (null == singleton) {
            singleton = new Singleton();
        }
        return singleton;
    }
}
package com.github.thread2.demo3;

/**
 * @author 许大仙
 * @version 1.0
 * @since 2021-09-17 14:32
 */
public class Test {
    public static void main(String[] args) {
        Singleton s1 = Singleton.getInstance();
        Singleton s2 = Singleton.getInstance();

        System.out.println(s1 == s2);
    }
}
第六章:线程池
6.1 概述
- 背景:经常创建和销毁、使用量特别大的资源,比如:并发情况下的线程,对性能影响很大。
- 思路:提前创建好多个线程,放入线程池中,使用的时候直接获取,使用完毕放回池中。可以避免频繁的创建销毁、实现重复利用。
- 好处:
- ① 提高响应速度(减少了创建新线程的时间)。
- ② 减低资源消耗(重复利用线程池中的线程,不需要每次使用都创建)。
- ③ 便于线程管理:
- corePoolSize :核心池的大小。
- maximumPoolSize :最大线程数。
- keepAliveTime :线程没有任务时最多保持多长时间后会终止。
- ……
6.2 线程池相关的API
- JDK 5 提供了线程池相关的API:ExecutorService 和 Executors 。
- Executors :工具类,线程池的工厂类,用于创建并返回不同类型的线程池
// 创建一个可根据需要创建新线程的线程池
public static ExecutorService newCachedThreadPool()
// 创建指定线程个数的线程池
public static ExecutorService newFixedThreadPool(int nThreads)
// 创建只有1个线程的线程池
public static ExecutorService newSingleThreadExecutor()
// 创阿金一个可以用于定期、周期任务的并指定线程个数的线程池
public static ScheduledExecutorService newScheduledThreadPool(int corePoolSize)
- ExecutorService:真正的线程池接口。常见子类ThreadPoolExecutor
// 提交任务,交给线程池中的线程执行
Future<?> submit(Runnable task);
// 提交任务,交给线程池中的线程执行
<T> Future<T> submit(Callable<T> task);
// 关闭线程池
void shutdown();
- 示例:
package com.github.thread2.demo4;

import java.util.concurrent.ExecutorService;
import java.util.concurrent.Executors;

/**
 * @author 许大仙
 * @version 1.0
 * @since 2021-09-17 15:28
 */
public class Test {
    public static void main(String[] args) {
        // 创建线程池
        ExecutorService executorService = Executors.newFixedThreadPool(2);
        // 提交任务
        executorService.submit(new Runnable() {
            @Override
            public void run() {
                System.out.println(Thread.currentThread().getName() + "线程开始启动");
            }
        });
        executorService.submit(new Runnable() {
            @Override
            public void run() {
                System.out.println(Thread.currentThread().getName() + "线程开始启动");
            }
        });

        // 销毁线程池
        executorService.shutdown();

    }
}
6.2 实现 Callable 接口
- 和使用 Runnable 相比,Callable功能更加强大:
- 可以有返回值。
- 可以抛出异常。
- 支持泛型的返回值。
- 需要借助 FutureTask 类,比如获取返回结果。
Future 接口:
- 可以对具体 Runnable 、Callable 任务的执行结果进行取消、查询是否完成、获取结果等。
- FutureTask 是 Future 接口的唯一实现类。
- FutureTask 同时实现了 Runnable 、Future 接口。它既可以作为 Runnable 被线程执行,也可以作为 Future 得到 Callable 的返回值。
示例:
package com.github.thread2.demo5;

import java.util.concurrent.Callable;

/**
 * @author 许大仙
 * @version 1.0
 * @since 2021-09-17 15:46
 */
public class Call implements Callable<String> {
    @Override
    public String call() throws Exception {
        return "你好,世界";
    }
}
package com.github.thread2.demo5;

import java.util.concurrent.ExecutionException;
import java.util.concurrent.ExecutorService;
import java.util.concurrent.Executors;
import java.util.concurrent.Future;

/**
 * @author 许大仙
 * @version 1.0
 * @since 2021-09-17 15:47
 */
public class Test {
    public static void main(String[] args) throws ExecutionException, InterruptedException {
        // 创建线程池
        ExecutorService executorService = Executors.newFixedThreadPool(2);

        Future<String> submit = executorService.submit(new Call());

        String s = submit.get();
        System.out.println(s);

        // 关闭线程池
        executorService.shutdown();

    }
}
6.3 ThreadPoolExecutor
- 构造方法:
public ThreadPoolExecutor(int corePoolSize,
                          int maximumPoolSize,
                          long keepAliveTime,
                          TimeUnit unit,
                          BlockingQueue<Runnable> workQueue,
                          ThreadFactory threadFactory,
                          RejectedExecutionHandler handler) {
    ...
}
解释:
- corePoolSize :核心线程数量。
- maximumPoolSize :线程池中的最大线程数量(核心线程数量 + 临时线程数量)。
- keepAliveTime :空闲时间值(也可以称为存活时间),即临时线程空闲多少时间被销毁,比如:1。
- unit :空闲时间单位(存活时间单位),即临时线程空闲多少时间被销毁,如:TimeUnit.SECONDS 表示秒。
- workQueue :任务队列(阻塞队列),如:20 个任务只有 10 个线程同时工作,那么多余的 10 个任务将放到任务队列中,等有线程空闲了,再从任务队列中取出任务继续执行。
- threadFactory :创建线程工厂,一般都是采用
Executors.defaultThreadFactory()方式。 - handler :任务的拒绝策略,当任务太多(提交任务超过了线程池中的最大线程数量+任务队列的容量)的时候的解决方案。
new ThreadPoolExecutor.AbortPolicy():默认的策略,丢弃任务并抛出 RejectedExecutionException 异常。new ThreadPoolExecutor.DiscardPolicy():丢失任务,但是不抛出异常,不推荐。new ThreadPoolExecutor.DiscardOldestPolicy():抛弃队列中等待最久的任务,然后将当前任务加入到队列中。new ThreadPoolExecutor.CallerRunsPolicy():调用任务的run()方法绕过线程池直接执行。
示例:
package com.github.demo10;

import java.util.concurrent.ArrayBlockingQueue;
import java.util.concurrent.Executors;
import java.util.concurrent.ThreadPoolExecutor;
import java.util.concurrent.TimeUnit;

/**
 * @author 许大仙
 * @version 1.0
 * @since 2021-10-14 17:04
 */
public class Test {
    public static void main(String[] args) {
        // 参数1:核心线程数量
        // 参数2:最大线程数量
        // 参数3:空闲线程的最大存活时间
        // 参数4:时间单位
        // 参数5:任务队列
        // 参数6:创建线程工程
        // 参数7:任务的拒绝策略
        ThreadPoolExecutor pool = new ThreadPoolExecutor(2, 5, 2, TimeUnit.SECONDS, new ArrayBlockingQueue<>(10),
            Executors.defaultThreadFactory(), new ThreadPoolExecutor.AbortPolicy());

        pool.submit(() -> System.out.println(Thread.currentThread().getName() + ":你好啊"));

        pool.submit(() -> System.out.println(Thread.currentThread().getName() + ":我很好"));

        pool.submit(() -> System.out.println(Thread.currentThread().getName() + ":哦"));

        pool.submit(() -> System.out.println(Thread.currentThread().getName() + ":再见"));

        pool.submit(() -> System.out.println(Thread.currentThread().getName() + ":再见"));

        pool.shutdown();
    }
}
第七章:线程的生命周期
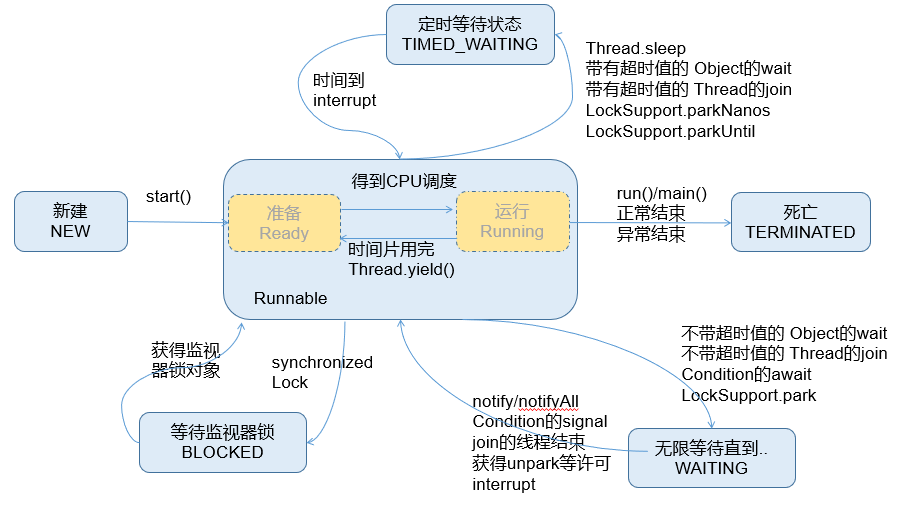
- 在
java.lang.Thread.State的枚举类中这样定义:
 public enum State {
        NEW,
        RUNNABLE,
        BLOCKED,
        WAITING,
        TIMED_WAITING,
        TERMINATED;
}
- 首先它没有区分:就绪和运行状态,因为对于 Java 对象来说,只能标记为可运行,至于什么时候运行,不是 JVM 来控制的了,是 OS 来进行调度的,而且时间非常短暂,因此对于 Java 对象的状态来说,无法区分。只能我们人为的进行想象和理解。
- 其次根据 Thread.State 的定义,阻塞状态是分为三种的:BLOCKED 、WAITING 、TIMED_WAITING 。
- BLOCKED :是指互有竞争关系的几个线程,其中一个线程占有锁对象时,其他线程只能等待锁。只有获得锁对象的线程才能有执行机会。
- TIMED_WAITING :当前线程执行过程中遇到 Thread 类的 sleep 或 join ,Object 类的 wait ,LockSupport 类的 park 方法,并且在调用这些方法时,设置了时间,那么当前线程会进入TIMED_WAITING ,直到时间到,或被中断。
- WAITING :当前线程执行过程中遇到遇到 Object 类的 wait ,Thread 类的 join ,LockSupport 类的 park 方法,并且在调用这些方法时,没有指定时间,那么当前线程会进入 WAITING 状态,直到被唤醒。
- 通过 Object 类的 wait 进入 WAITING 状态的要有 Object 的 notify/notifyAll 唤醒。
- 通过 Condition 的 await 进入WAITING 状态的要有 Conditon 的 signal 方法唤醒。
- 通过 LockSupport 类的park方法进入 WAITING 状态的要有 LockSupport 类的 unpark 方法唤醒。
- 通过 Thread 类的 join 进入WAITING 状态,只有调用 join 方法的线程对象结束才能让当前线程恢复。
- 说明:当从 WAITING 或 TIMED_WAITING 恢复到 Runnable 状态时,如果发现当前线程没有得到监视器锁,那么会立刻转入 BLOCKED 状态。
第八章:volatile 关键字
8.1 概述
当线程 A 修改了共享数据的时候,B 线程没有及时获取到最新的值,如果还在使用原先的值,就会出现问题。
示例:
package com.github.demo11;

/**
 * @author 许大仙
 * @version 1.0
 * @since 2021-10-15 08:43
 */
public class Money {
    public static int money = 100000;
}
package com.github.demo11;

/**
 * 女孩线程
 *
 * @author 许大仙
 * @version 1.0
 * @since 2021-10-15 08:43
 */
public class SubThread1 extends Thread {

    @Override
    public void run() {
        while (Money.money == 100000) {

        }
        System.out.println("结婚基金已经不是10万了");
    }
}
package com.github.demo11;

/**
 * 男孩线程
 *
 * @author 许大仙
 * @version 1.0
 * @since 2021-10-15 09:09
 */
public class SubThread2 extends Thread {

    @Override
    public void run() {
        try {
            Thread.sleep(10);
        } catch (InterruptedException e) {
            e.printStackTrace();
        }

        Money.money = 90000;
    }
}
package com.github.demo11;

/**
 * @author 许大仙
 * @version 1.0
 * @since 2021-10-15 09:10
 */
public class Test {
    public static void main(String[] args) {
        SubThread1 subThread1 = new SubThread1();
        subThread1.setName("小路同学");
        SubThread2 subThread2 = new SubThread2();
        subThread2.setName("小皮同学");

        subThread1.start();
        subThread2.start();
    }
}
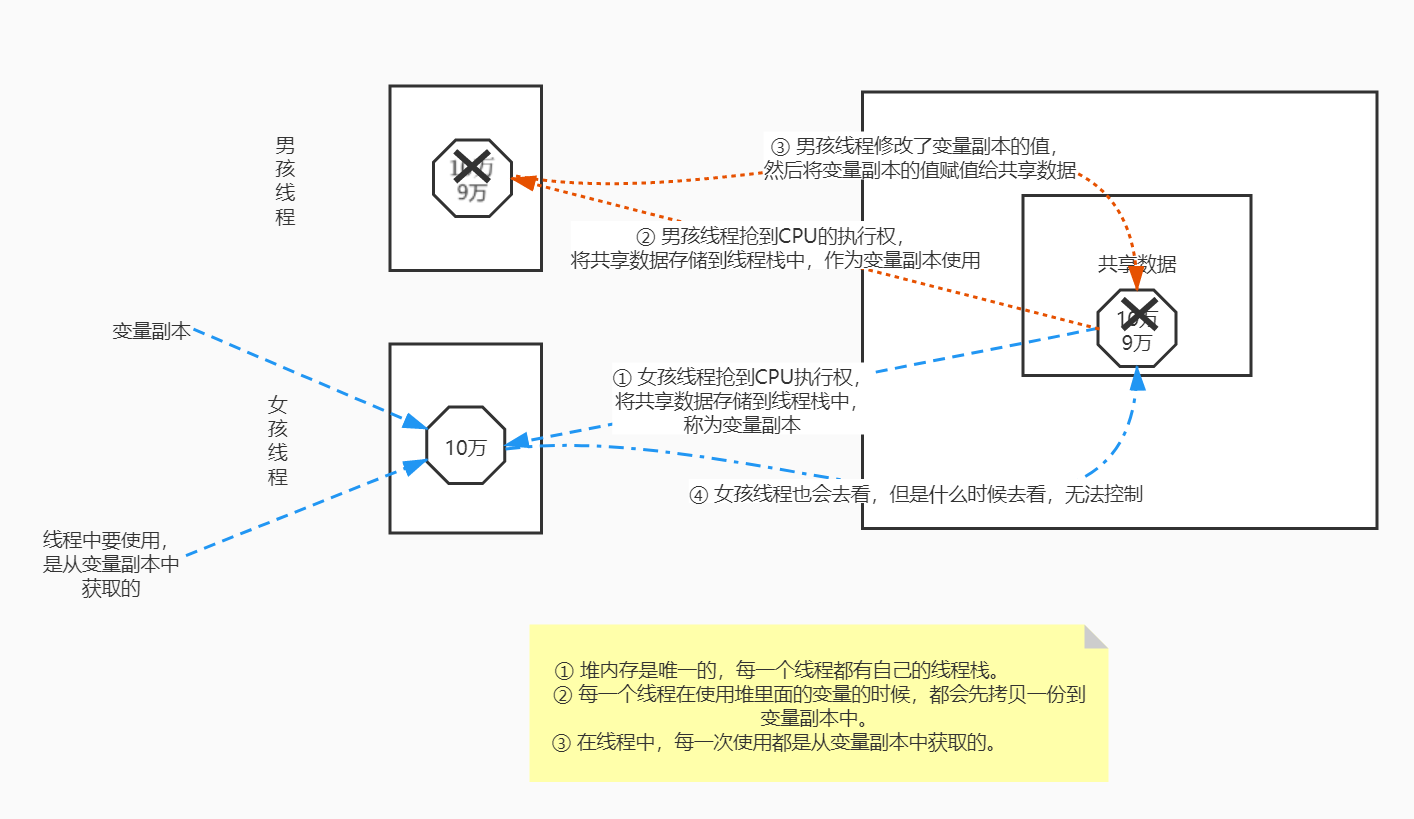
- volatile 关键字,强制线程在每次使用的时候,都会看一下共享区域最新的值。
8.2 应用示例
- 示例:使用 volatile 关键字
package com.github.demo11;

/**
 * @author 许大仙
 * @version 1.0
 * @since 2021-10-15 08:43
 */
public class Money {
    public static volatile int money = 100000;
}
package com.github.demo11;

/**
 * 女孩线程
 *
 * @author 许大仙
 * @version 1.0
 * @since 2021-10-15 08:43
 */
public class SubThread1 extends Thread {

    @Override
    public void run() {
        while (Money.money == 100000) {

        }
        System.out.println("结婚基金已经不是10万了");
    }
}
package com.github.demo11;

/**
 * 男孩线程
 *
 * @author 许大仙
 * @version 1.0
 * @since 2021-10-15 09:09
 */
public class SubThread2 extends Thread {

    @Override
    public void run() {
        try {
            Thread.sleep(10);
        } catch (InterruptedException e) {
            e.printStackTrace();
        }

        Money.money = 90000;
    }
}
package com.github.demo11;

/**
 * @author 许大仙
 * @version 1.0
 * @since 2021-10-15 09:10
 */
public class Test {
    public static void main(String[] args) {
        SubThread1 subThread1 = new SubThread1();
        subThread1.setName("小路同学");
        SubThread2 subThread2 = new SubThread2();
        subThread2.setName("小皮同学");

        subThread1.start();
        subThread2.start();
    }
}
- 示例:使用 synchronized 同步代码块
package com.github.demo12;

/**
 * @author 许大仙
 * @version 1.0
 * @since 2021-10-15 08:43
 */
public class Money {
    public static int money = 100000;
}
package com.github.demo12;

/**
 * 女孩线程
 *
 * @author 许大仙
 * @version 1.0
 * @since 2021-10-15 08:43
 */
public class SubThread1 extends Thread {

    @Override
    public void run() {
        while (true) {
            synchronized (Money.class) {
                if (Money.money != 100000) {
                    System.out.println("结婚基金已经不是10万了");
                    break;
                }
            }
        }

    }
}
package com.github.demo12;

/**
 * 男孩线程
 *
 * @author 许大仙
 * @version 1.0
 * @since 2021-10-15 09:09
 */
public class SubThread2 extends Thread {

    @Override
    public void run() {
        synchronized (Money.class) {
            try {
                Thread.sleep(10);
            } catch (InterruptedException e) {
                e.printStackTrace();
            }

            Money.money = 90000;
        }
    }
}
package com.github.demo12;

/**
 * synchronized同步代码块
 * ① 线程获取锁
 * ② 清空变量副本
 * ③ 拷贝共享变量最新值到变量副本中
 * ④ 执行代码
 * ⑤ 将修改后的变量副本中的值赋值给共享数据
 * ⑥ 释放锁
 *
 * @author 许大仙
 * @version 1.0
 * @since 2021-10-15 09:10
 */
public class Test {
    public static void main(String[] args) {
        SubThread1 subThread1 = new SubThread1();
        subThread1.setName("小路同学");
        SubThread2 subThread2 = new SubThread2();
        subThread2.setName("小皮同学");

        subThread1.start();
        subThread2.start();
    }
}
第九章:原子性
9.1 概述
所谓的原子性指的是一次操作或多次操作,要么所有的操作全部得到了执行并且不会受到任何因素的干扰而中断,要么所有的操作都不执行,
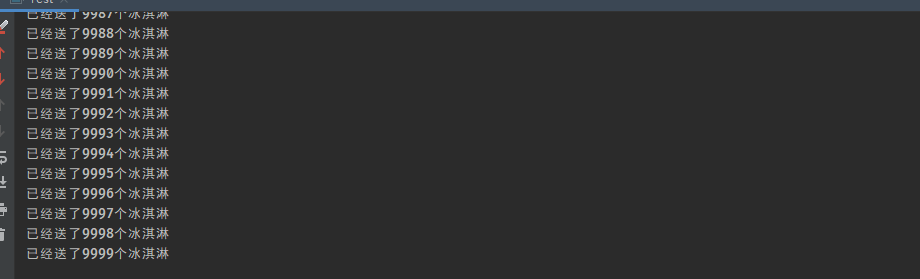
多个操作是一个不可分割的整体。示例:引入原子性问题
package com.github.demo13;

/**
 * @author 许大仙
 * @version 1.0
 * @since 2021-10-15 10:12
 */
public class SubRunnable implements Runnable {

    private int count;

    @Override
    public void run() {
        for (int i = 0; i < 100; i++) {
            /*
             * count++;
             *
             * ① 从共享数据中读取数据到本线程栈中
             * ② 修改本线程栈中变量副本的值
             * ③ 将本线程栈中变量副本的值赋值给共享数据
             */
            this.count++;
            System.out.println("已经送了" + this.count + "个冰淇淋");
        }
    }
}
package com.github.demo13;

/**
 * @author 许大仙
 * @version 1.0
 * @since 2021-10-15 10:13
 */
public class Test {
    public static void main(String[] args) {
        Runnable r = new SubRunnable();

        for (int i = 0; i < 100; i++) {
            new Thread(r).start();
        }
        // 有问题,不应该是10000吗,咋是9999。
        // 是因为count++不是原子性操作,他在执行的过程中,可能会被其他线程打断操作。
    }
}

- 示例:volatile 关键字只能保证每次使用共享数据的时候是最新值,但是不能保证原子性
package com.github.demo13;

/**
 * @author 许大仙
 * @version 1.0
 * @since 2021-10-15 10:12
 */
public class SubRunnable implements Runnable {

    private volatile int count;

    @Override
    public void run() {
        for (int i = 0; i < 100; i++) {
            /*
             * count++;
             *
             * ① 从共享数据中读取数据到本线程栈中
             * ② 修改本线程栈中变量副本的值
             * ③ 将本线程栈中变量副本的值赋值给共享数据
             */
            this.count++;
            System.out.println("已经送了" + this.count + "个冰淇淋");
        }
    }
}
package com.github.demo13;

/**
 * @author 许大仙
 * @version 1.0
 * @since 2021-10-15 10:13
 */
public class Test {
    public static void main(String[] args) {
        Runnable r = new SubRunnable();

        for (int i = 0; i < 100; i++) {
            new Thread(r).start();
        }
    }
}

- JDK 5 之后引入了新的包
java.util.concurrent.atomic(atomic:原子的),其中有很多类可以用来保证原子性。

9.2 AtomicInteger
9.2.1 常用方法
- 构造方法:
public AtomicInteger() {
}
public AtomicInteger(int initialValue) {
    value = initialValue;
}
- 获取值:
public final int get() {}
- 以原子方式将当前值值加1,返回的是自增前的值:
public final int getAndIncrement() {}
- 以原子方式将当前值加1,返回的是自增后的值:
public final int incrementAndGet() {}
- 以原子方式将输入的数值和实例中的值( AtomicInteger 里的 value )相加,并返回新值:
public final int addAndGet(int delta) {}
- 以原子方式设置为 newValue 的值,并返回旧值:
public final int getAndSet(int newValue) {}
- 示例:
package com.github.demo14;

import java.util.concurrent.atomic.AtomicInteger;

/**
 * @author 许大仙
 * @version 1.0
 * @since 2021-10-15 13:36
 */
public class Test {
    public static void main(String[] args) {
        AtomicInteger a1 = new AtomicInteger();
        System.out.println("a1 = " + a1); // a1 = 0

        AtomicInteger a2 = new AtomicInteger(10);
        System.out.println("a2 = " + a2); // a2 = 10
    }
}
- 示例:
package com.github.demo14;

import java.util.concurrent.atomic.AtomicInteger;

/**
 * @author 许大仙
 * @version 1.0
 * @since 2021-10-15 13:38
 */
public class Test1 {
    public static void main(String[] args) {
        AtomicInteger a1 = new AtomicInteger(10);
        int i = a1.get();
        System.out.println("a1 = " + a1); // a1 = 10
        System.out.println("获取值 = " + i); // 获取值 = 10

        int andDecrement = a1.getAndIncrement();
        System.out.println("a1 = " + a1); // a1 = 11
        System.out.println("以原子的方式将当前值加1,返回的是旧值 = " + andDecrement); // 以原子的方式将当前值加1,返回的是旧值 = 10

        a1 = new AtomicInteger(10);
        int incrementAndGet = a1.incrementAndGet();
        System.out.println("a1 = " + a1); // a1 = 11
        System.out.println("以原子的方式将当前值加1,返回的是新值 = " + incrementAndGet); // 以原子的方式将当前值加1,返回的是新值 = 11

        a1 = new AtomicInteger(10);
        int andSet = a1.getAndSet(5);
        System.out.println("a1 = " + a1); // a1 = 5
        System.out.println("以原子的方式设置为newValue的值,返回的是旧值 = " + andSet); //以原子的方式设置为newValue的值,返回的是旧值 = 10

        a1 = new AtomicInteger(10);
        int addAndGet = a1.addAndGet(5);
        System.out.println("a1 = " + a1); // a1 = 15
        System.out.println("以原子的方式将参数和对象中的值相加,返回新值 = " + addAndGet); // 以原子的方式将参数和对象中的值相加,返回新值 = 15
    }
}
- 示例:使用 AtomicInteger 来解决原子性问题
package com.github.demo15;

import java.util.concurrent.atomic.AtomicInteger;

/**
 * @author 许大仙
 * @version 1.0
 * @since 2021-10-15 10:12
 */
public class SubRunnable implements Runnable {
    private AtomicInteger ac = new AtomicInteger();

    @Override
    public void run() {
        for (int i = 0; i < 100; i++) {
            int count = this.ac.incrementAndGet();
            System.out.println("已经送了" + count + "个冰淇淋");
        }
    }
}
package com.github.demo15;

/**
 * @author 许大仙
 * @version 1.0
 * @since 2021-10-15 10:13
 */
public class Test {
    public static void main(String[] args) {
        Runnable r = new SubRunnable();

        for (int i = 0; i < 100; i++) {
            new Thread(r).start();
        }
    }
}
9.2.2 原理
自旋锁+CAS算法。- CAS 算法:有 3 个操作数( 内存值V ,旧的预期值A ,要修改的值B )
- 当旧的 预期值A == 内存值 ,此时修改成功,将 V 改为 B 。
- 当旧的 预期值A != 内存值 ,此时修改失败,不做任何操作,并重新获取现在的值(这个重新获取的动作就是自旋)。
CSA 算法总结:
- ① 在修改共享数据的时候,将原来的旧值记录下来。
- ② 如果现在内存中的值和原来的旧值一样,就证明没有其他线程操作过内存值,则修改成功。
- ③ 如果现在内存中的值和原来的旧值不一样,证明已经有其他线程操作做内存值,则修改失败,需要获取现在最新的值,再次进行操作,这个重新获取就是自旋。
9.2.3 源码解析
- AtomicInteger.java
public class AtomicInteger extends Number implements java.io.Serializable {
     private volatile int value;

    private static final Unsafe unsafe = Unsafe.getUnsafe();

    public AtomicInteger(int initialValue) {
        value = initialValue;
    }

    public AtomicInteger() {
    }
    // 先自增,然后获取自增后的结果
    public final int incrementAndGet() {
        // this:表示AtomicInteger对象,AtomicInteger(int initialValue)
        // 1:表示自增1次
        // + 1:就是自增后的结果
        return unsafe.getAndAddInt(this, valueOffset, 1) + 1;
    }
    ...
}
- Unsafe.java
public final class Unsafe {

    public final int getAndAddInt(Object var1, long var2, int var4) {
        // 旧值
        int var5;
        // 自旋的过程
        do {
            // 不断的获取旧值
            var5 = this.getIntVolatile(var1, var2);
            // 如果compareAndSwapInt这个方法返回值为false,那么继续自旋;如果为true,那么自旋结束
            // compareAndSwapInt的作用:比较内存中的值和旧值是否相等,如果相等,就将修改后的值写到内存中,返回true;否则,返回false,继续自旋
            // var1表示的是内存值
            // var5表示的是旧值
            // var5 + var4表示的是修改后的值
        } while(!this.compareAndSwapInt(var1, var2, var5, var5 + var4));

        return var5;
    }
    ...
}
9.3 synchronized 和 CAS 的区别?
- 相同点:在多线程的情况下,都可以保证共享数据的安全性。
- 不同点:
- synchronized 总是从最坏的角度出发,认为每次获取数据的时候,别人都有可能修改。所以在每次操作共享数据之前,都会上锁(
悲观锁)。 - CAS 是从乐观的角度出发,假设每次获取数据别人都不会修改,所以不会上锁。只不过在修改共享数据的时候,会检查一下,别人是否修改过共享数据。如果别人修改过,那么我再次获取现在最新的值,如果别人没有修改过,那么我直接修改共享数据的值(
乐观锁)。
- synchronized 总是从最坏的角度出发,认为每次获取数据的时候,别人都有可能修改。所以在每次操作共享数据之前,都会上锁(
第十章:并发工具类
10.1 Hashtable
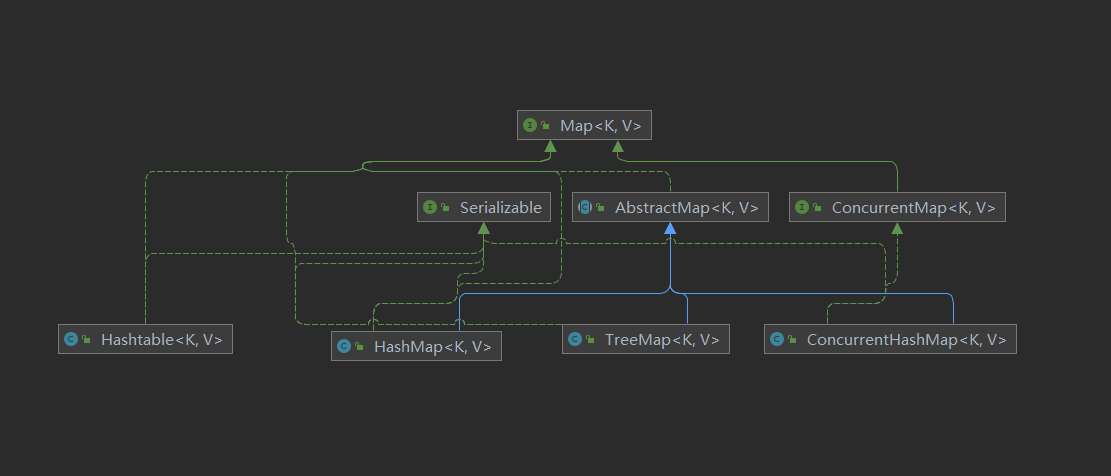
- HashMap 是线程不安全的,多线程环境下可能会存在问题。
- 为了保证数据的安全性,我们可以使用 Hashtable ,但是 Hashtable 的性能很低(因为其所有的方法都是 synchronized 同步方法)。
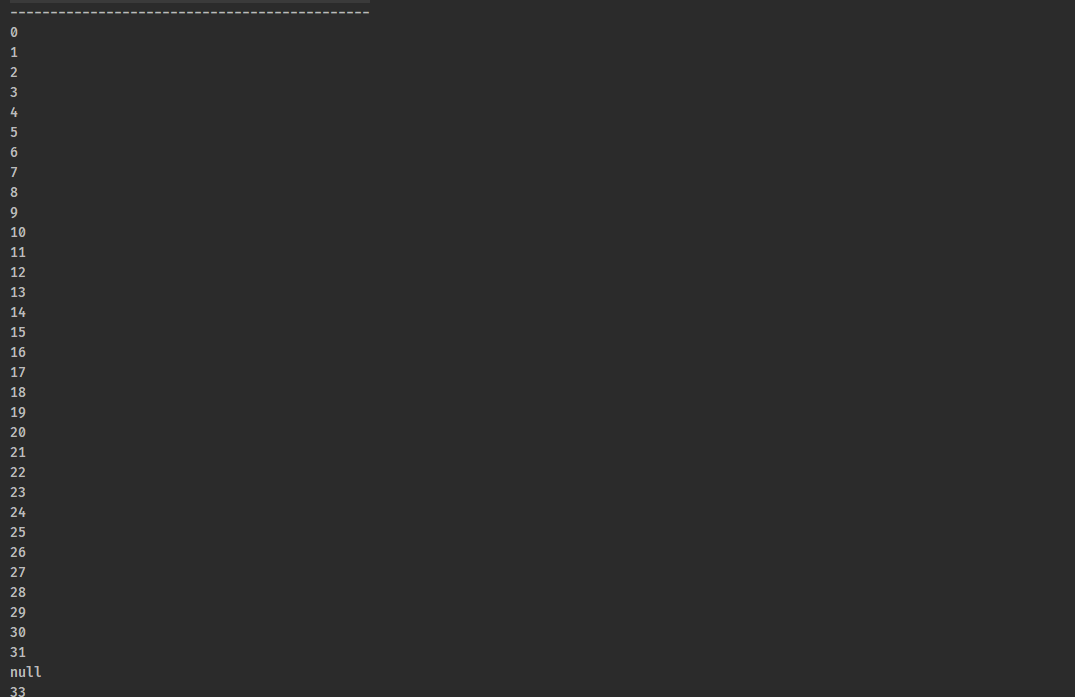
- 示例:演示 HashMap 的线程不安全问题
package com.github.demo16;

import java.util.HashMap;

/**
 * @author 许大仙
 * @version 1.0
 * @since 2021-10-15 15:03
 */
public class Test {
    public static void main(String[] args) throws InterruptedException {
        HashMap<String, String> map = new HashMap<>();

        Thread t1 = new Thread(() -> {
            for (int i = 0; i < 25; i++) {
                map.put(String.valueOf(i), String.valueOf(i));
            }
        });

        Thread t2 = new Thread(() -> {
            for (int i = 25; i < 51; i++) {
                map.put(String.valueOf(i), String.valueOf(i));
            }
        });

        t1.start();
        t2.start();

        System.out.println("---------------------------------------------");
        // 主要是为了让t1和t2将数据插入到Map中
        Thread.sleep(1000);

        for (int i = 0; i < 51; i++) {
            System.out.println(map.get(String.valueOf(i)));
        }

    }
}
- 示例:使用 HashTable 来解决 HashMap 中的线程安全问题
package com.github.demo17;


import java.util.Hashtable;

/**
 * @author 许大仙
 * @version 1.0
 * @since 2021-10-15 15:13
 */
public class Test {
    public static void main(String[] args) throws InterruptedException {
        Hashtable<String, String> hashtable = new Hashtable<>();

        Thread t1 = new Thread(() -> {
            for (int i = 0; i < 25; i++) {
                hashtable.put(String.valueOf(i), String.valueOf(i));
            }
        });

        Thread t2 = new Thread(() -> {
            for (int i = 25; i < 51; i++) {
                hashtable.put(String.valueOf(i), String.valueOf(i));
            }
        });

        t1.start();
        t2.start();

        System.out.println("---------------------------------------------");

        Thread.sleep(1000);

        for (int i = 0; i < 51; i++) {
            System.out.println(hashtable.get(String.valueOf(i)));
        }
    }
}
10.2 ConcurrentHashMap
ConcurrentHashMap出现的原因:在集合类中的 HashMap 是比较常用的集合对象,但是 HashMap 是线程不安全的,为了保证线程安全,我们可以使用 Hashtable ,但是 Hashtable 的效率很低。- 基于上面的两个原因,JDK 5 提供了 ConcurrentHashMap 。
- ConcurrentHashMap 在 JDK 7 和 JDK 8 中的原理不一样。
- ConcurrentHashMap 在 JDK 7 中的原理:
- ConcurrentHashMap 在 JDK 8 中的原理:
- 底层结构:数组 + 链表 + 红黑树。
- 结合 CAS 机制 + synchronized 同步代码块形式保证线程安全。

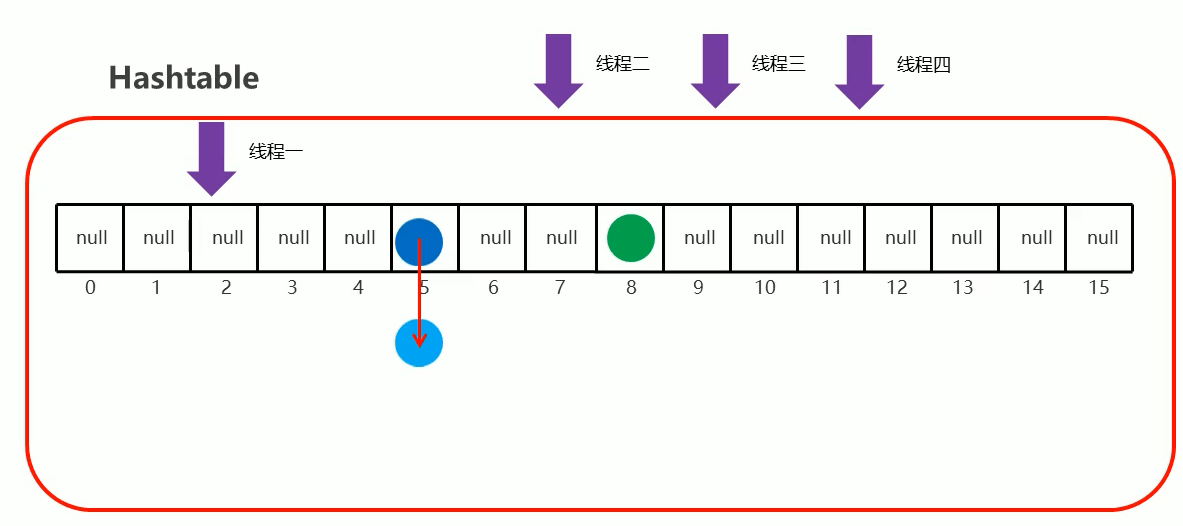
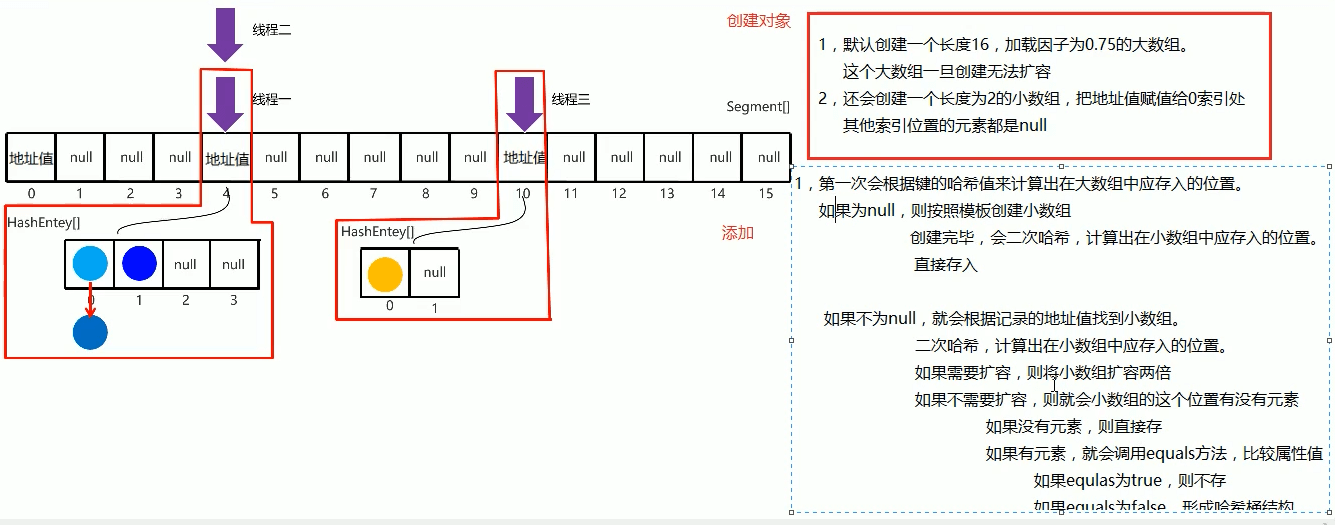
ConcurrentHashMap 在 JDK 8 中的原理:
- 如果使用空参构造创建 ConcurrentHashMap 对象,则什么事情都不做。在第一次添加元素的时候创建哈希表。
- 计算当前元素应存入的索引。
- 如果该索引位置为 null ,则利用 cas 算法,将本结点添加到数组中。
- 如果该索引位置不为 null ,则利用 volatile 关键字获得当前位置最新的结点地址,挂在他下面,变成链表。
- 当链表的长度大于等于 8 时,自动转换成红黑树。
- 以链表或者红黑树头结点为锁对象,配合悲观锁保证多线程操作集合时数据的安全性。
- 示例:
package com.github.demo18;

import java.util.Map;
import java.util.concurrent.ConcurrentHashMap;

/**
 * @author 许大仙
 * @version 1.0
 * @since 2021-10-15 15:27
 */
public class Test {
    public static void main(String[] args) {
        Map<String, String> map = new ConcurrentHashMap<>();

        Thread t1 = new Thread(() -> {
            for (int i = 0; i < 25; i++) {
                map.put(String.valueOf(i), String.valueOf(i));
            }
        });

        Thread t2 = new Thread(() -> {
            for (int i = 25; i < 51; i++) {
                map.put(String.valueOf(i), String.valueOf(i));
            }
        });

        t1.start();
        t2.start();

        System.out.println("---------------------------------------------");

        try {
            Thread.sleep(1000);
        } catch (InterruptedException e) {
            e.printStackTrace();
        }

        for (int i = 0; i < 51; i++) {
            System.out.println(map.get(String.valueOf(i)));
        }
    }
}
10.3 CountDownLatch
- CountDownLatch 的应用场景:让某一条线程等待其它线程执行完毕之后再执行。
- 构造方法:
// count表示等待线程数量,底层定义了一个计数器
public CountDownLatch(int count) {}
- 让线程等待:
// 当计数器为0的时候,会唤醒等待的线程
public void await() throws InterruptedException {}
- 当前线程执行完毕:
// 线程执行完毕时调用,会将计数器-1
public void countDown() {}
- 示例:模拟妈妈等待孩子吃完饭之后才收拾碗筷
package com.github.demo19;

import java.util.concurrent.CountDownLatch;

/**
 * @author 许大仙
 * @version 1.0
 * @since 2021-10-15 16:19
 */
public class MotherThread extends Thread {
    private CountDownLatch countDownLatch;

    public MotherThread(CountDownLatch countDownLatch) {
        this.countDownLatch = countDownLatch;
    }

    @Override
    public void run() {
        // 等待
        try {
            this.countDownLatch.await();
        } catch (InterruptedException e) {
            e.printStackTrace();
        }
        // 收拾碗筷
        System.out.println(Thread.currentThread().getName() + "收拾碗筷");
    }
}
package com.github.demo19;

import java.util.concurrent.CountDownLatch;

/**
 * @author 许大仙
 * @version 1.0
 * @since 2021-10-15 16:20
 */
public class SonThread1 extends Thread {

    private CountDownLatch countDownLatch;

    public SonThread1(CountDownLatch countDownLatch) {
        this.countDownLatch = countDownLatch;
    }

    @Override
    public void run() {
        // 吃饭
        for (int i = 0; i < 10; i++) {
            System.out.println(Thread.currentThread().getName() + "吃了第" + (i + 1) + "个饺子");
        }
        // 告诉妈妈吃完了
        this.countDownLatch.countDown();
    }
}
package com.github.demo19;

import java.util.concurrent.CountDownLatch;

/**
 * @author 许大仙
 * @version 1.0
 * @since 2021-10-15 16:20
 */
public class SonThread2 extends Thread {
    private CountDownLatch countDownLatch;

    public SonThread2(CountDownLatch countDownLatch) {
        this.countDownLatch = countDownLatch;
    }

    @Override
    public void run() {
        // 吃饭
        for (int i = 0; i < 20; i++) {
            System.out.println(Thread.currentThread().getName() + "吃了第" + (i + 1) + "个饺子");
        }
        // 告诉妈妈吃完了
        this.countDownLatch.countDown();
    }
}
package com.github.demo19;

import java.util.concurrent.CountDownLatch;

/**
 * @author 许大仙
 * @version 1.0
 * @since 2021-10-15 16:20
 */
public class SonThread3 extends Thread {
    private CountDownLatch countDownLatch;

    public SonThread3(CountDownLatch countDownLatch) {
        this.countDownLatch = countDownLatch;
    }

    @Override
    public void run() {
        // 吃饭
        for (int i = 0; i < 30; i++) {
            System.out.println(Thread.currentThread().getName() + "吃了第" + (i + 1) + "个饺子");
        }
        // 告诉妈妈吃完了
        this.countDownLatch.countDown();
    }
}
package com.github.demo19;

import java.util.concurrent.CountDownLatch;

/**
 * @author 许大仙
 * @version 1.0
 * @since 2021-10-15 16:17
 */
public class Test {
    public static void main(String[] args) {
        // CountDownLatch的对象,需要传递给四个线程
        CountDownLatch countDownLatch = new CountDownLatch(3);
        // 创建四个线程对象并开启它们
        MotherThread motherThread = new MotherThread(countDownLatch);
        motherThread.setName("妈妈");
        SonThread1 sonThread1 = new SonThread1(countDownLatch);
        sonThread1.setName("孩子1");
        SonThread2 sonThread2 = new SonThread2(countDownLatch);
        sonThread2.setName("孩子2");
        SonThread3 sonThread3 = new SonThread3(countDownLatch);
        sonThread3.setName("孩子3");
        // 启动线程
        motherThread.start();
        sonThread2.start();
        sonThread3.start();
        sonThread1.start();
    }
}
10.4 Semaphore
Semaphore 的应用场景:可以控制访问特定资源的线程数量。
示例:模拟高速公路上的收费者,一次只能通行一辆车
package com.github.demo20;

import java.util.concurrent.Semaphore;

/**
 * @author 许大仙
 * @version 1.0
 * @since 2021-10-15 16:43
 */
public class SubRunnable implements Runnable {
    // 获取Semaphore对象
    private Semaphore semaphore;

    public SubRunnable(Semaphore semaphore) {
        this.semaphore = semaphore;
    }

    @Override
    public void run() {

        try {
            // 获取通行证
            this.semaphore.acquire();
            // 执行任务
            System.out.println(Thread.currentThread().getName() + "行驶。。。。。。");
            Thread.sleep(2000);
            System.out.println(Thread.currentThread().getName() + "归还通行证");
            // 归还通行证
            this.semaphore.release();
        } catch (InterruptedException e) {
            e.printStackTrace();
        }

    }
}
package com.github.demo20;

import java.util.concurrent.Semaphore;

/**
 * @author 许大仙
 * @version 1.0
 * @since 2021-10-15 16:39
 */
public class Test {
    public static void main(String[] args) {
        Semaphore semaphore = new Semaphore(1);

        Runnable runnable = new SubRunnable(semaphore);

        for (int i = 0; i < 10; i++) {
            new Thread(runnable).start();
        }

    }
}

若有收获,就点个赞吧
0 人点赞
