1 项目打包
1.1 项目打包
1.1.1 概述
- 所有的项目最终一定要部署上线,如果要想让代码上线,那么就需要进行项目的打包,传统的 WEB 项目需要
*.war来进行部署,而对于 SpringBoot 应用程序可以直接基于 jar 的方式运行。
1.1.2 microboot-web 子模块
- 当前的模块属于一个 WEB 模块,所以本次将针对于此模块进行打包控制,但是在进行打包之前需要做一些基本的配置项定义,修改 microboot-web 子模块的 build.gradle 配置文件:
plugins {id 'idea'id 'java'}bootJar { // 是由 SpringBoot 提供的任务名称// 如果开发者需要也可以自定义一些打包后的任务配置项,如:后缀、版本号、执行类archiveClassifier = 'boot' // 打包名称后追加后缀archivesBaseName = 'micro' // 设置打包文件的名称archiveVersion = project_version // 使用项目版本作为打包的版本mainClass = 'com.github.fairy.era.Application'}
- 通过 Gradle 执行打包处理:
gradle clean build
1.2 调整 JVM 运行参数
1.2.1 概述
- 所有的 SpringBoot 打包之后肯定要通过 JVM 来直接运行,这样的话就会牵扯到 JVM 内存调整策略问题了,那么首先来看一下默认情况下 SpringBoot 项目所占用的内存空间大小。
1.2.2 microboot-web 子模块
- 创建一个 Handler 类,在这个类中进行 JVM 的内存参数获取:
package com.github.fairy.era.web;import org.springframework.web.bind.annotation.GetMapping;import org.springframework.web.bind.annotation.RestController;import java.util.HashMap;import java.util.Map;/*** @author 许大仙* @version 1.0* @since 2021-12-31 09:22*/@RestControllerpublic class MemoryHandler {@GetMapping(value = "/memory")public Map<String, Object> memory() {Runtime runtime = Runtime.getRuntime();Map<String, Object> result = new HashMap<>(16);result.put("freeMemory", runtime.freeMemory());result.put("maxMemory", runtime.maxMemory());result.put("totalMemory", runtime.totalMemory());return result;}}
1.2.3 浏览器
- 通过浏览器获取 JVM 的内存参数。
- 请求如下:
http://localhost:8081/memory
- 请求内容:
- 程序执行结果(本人机器的内存是 32 G):
{"totalMemory": 493355008(470.5 MB,物理内存的 1/64),"freeMemory": 281243328(268.2 MB),"maxMemory": 7600078848(7.07 GB,物理内存的 1/4)}
1.2.4 命令行
- 在运行 SpringBoot 项目的时候添加上 JVM 的运行参数:
java -jar -Xms30g -Xss256k -Xlog:gc -XX:+UseG1GC -Xmx30g micro-1.0-boot.jar
- 程序执行结果:
1.3 配置 WEB 环境
1.3.1 概述
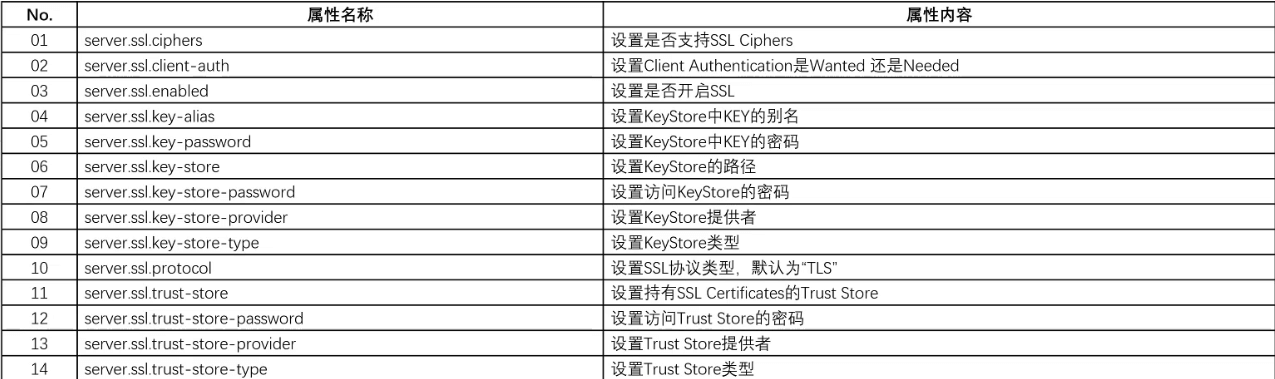
- 在当前为止所有 SpringBoot 应用程序都是可以直接进行 WEB 容器启动的,因为 SpringBoot 程序是内嵌了 Tomcat 服务器,并且提供了相关的服务端的配置项,开发者可以根据自己需要修改 application.yml 配置文件来实现最终 WEB 运行环境的处理。 | 属性名称 | 属性内容 | | —- | —- | | server.address | 设置服务绑定地址 | | server.compression.enabled | 是否开启压缩,默认为 false | | server.compression.excluded-user-agents | 设置不压缩的 user-agents | | server.compression.mime-types | 设置要进行压缩处理的 mime-types,多个设置之间使用逗号隔开 | | server.compression.min-response-size | 设置压缩的阈值,默认为 2KB | | server.servlet.context-parameters.[paramName] | 设置 ServletContext 的参数 | | server.servlet.context-path | 设置 ContextPath | | server.servlet.application-display-name | 设置应用展示名称,默认为 application | | server.servlet.jsp.class-name | 设置编译 JSP 文件所使用的 Servlet | | server.servlet.jsp.init-parameters.[paramName] | 设置 JSP 初始化参数 | | server.servlet.jsp.registered | 设置 JSP 是否注册到内嵌的 Servlet 容器之中,默认为 true | | server.port | 设置 HTTP 服务端口 | | spring.mvc.servlet.path | 设置 Servlet 监听路径,默认为 / | | server.servlet.session.cookie.comment | 设置 Session Cookie 的 comment 属性 | | server.servlet.session.cookie.domain | 设置 Session Cookie 的 domain 属性 | | server.servlet.session.cookie.http-only | 设置 Session Cookie 是否开启 HttpOnly | | server.servlet.session.cookie.max-age | 设置 Session Cookie 最大保存时间 | | server.servlet.session.cookie.name | 设置 Session Cookie 的名称 | | server.servlet.session.cookie.path | 设置 Session Cookie 的存储路径 | | server.servlet.session.cookie.secure | 设置 Session Cookie 的 secure 属性 | | server.servlet.session.persistent | 设置重启是否持久化 Session, 默认为 true | | server.servlet.session.timeout | 设置 session 的超时时间,默认为 30m | | server.servlet.session.tracking-modes | 设置 session 的追踪模式(cookie、url、ssl) | | server.tomcat.accesslog.enabled | 设置是否开启 Access log ,默认为 false | | server.tomcat.accesslog.pattern | 设置 Access log 格式,默认为 common | | server.tomcat.accesslog.directory | 设置 Access log 的存储路径,默认为 logs | | server.tomcat.accesslog.prefix | 设置 Access log 的前缀,默认为 access_log | | server.tomcat.accesslog.suffix | 设置 Access log 的后缀,默认为 .log | | server.tomcat.background-processor-delay | 设置后台线程的 Delay 大小,默认为 30 | | server.tomcat.basedir | 设置 Tomcat 的 basedir 配置目录 | | server.tomcat.remoteip.internal-proxies | 设置要信任的代理的正则表达式 | | server.max-http-header-size | HTTP 消息头的最大值,默认为 8KB | | server.tomcat.threads.max | Tomcat 最大工作线程数,默认 200 | | server.tomcat.remote.port-header | 用于覆盖原始端口值的 HTTP 头的名称,默认为 X-Forwarded-Port | | server.tomcat.remoteip.protocol-header | 保存传入协议的标头,通常称为 X-Forwarded-Proto | | server.tomcat.remoteip.protocol-header-https-value | 设置 ssl 的头消息内容,默认为 https | | server.tomcat.remoteip.remote-ip-header | 设置远程 IP 的头信息,例如:X-FORWARDED-FOR | | server.tomcat.uri-encoding | 设置 URI 的编码字符集,默认为 UTF-8 |
- 只要在项目中引入 spring-boot-starter-web 依赖库,就可以直接进行 Tomcat 相关的配置。
1.3.2 microboot-web 子模块
- 修改 application.yml 文件:
server:port: 8081 # 端口号servlet:context-path: /micro # contextPath
1.4 profile 环境配置
1.4.1 多环境概述
- 自己电脑上的写的程序放在服务器上去运行,每个计算机的环境不一样,这就是多环境。常见的多环境主要有:开发环境、测试环境和生产环境等。
1.4.2 多环境开发(yaml 单一文件版)
多环境开发就是针对不同的环境配置不同的属性。
示例:application.yml
# 应用环境# 公共配置spring:profiles:active: prod---# 设置环境# 开发环境spring:profiles: devserver:port: 80---# 测试环境spring:profiles: testserver:port: 81---# 生产环境spring:profiles: prodserver:port: 82
注意:spring.profiles 已经过时,可以使用 spring.config.activate.on-profile 代替。示例:application.yml
# 应用环境# 公共配置spring:profiles:active: prod---# 设置环境# 开发环境spring:config:activate:on-profile: devserver:port: 80---# 测试环境spring:config:activate:on-profile: testserver:port: 81---# 生产环境spring:config:activate:on-profile: prodserver:port: 82
1.4.3 多环境开发(yaml 多文件版)
- 将所有的配置都放在一个配置文件中,尤其是每一个配置应用场景不一样,,这显然不合理,于是就有了将一个配置文件拆分成多个配置文件的想法。拆分后,每个配置文件中写自己的配置,主配置文件中写清楚用哪一个配置文件就好了。
- 在配置文件中,如果某些配置项所有环境都一样,可以将这些项写入到主配置中,只有哪些有区别的项才写入到环境配置文件中。
- 主配置文件中设置公共配置(全局)。
环境分类配置文件中常用于设置冲突属性(局部)。
示例:
- 主配置文件(application.yml)
# 应用环境# 公共配置spring:profiles:active: dev
- 开发环境配置文件(application-dev.yml)
# 开发环境server:port: 80
- 测试环境配置文件(application-test.yml)
# 测试环境server:port: 81
- 生产环境配置文件(application-prod.yml)
# 生产环境server:port: 82
1.4.4 多环境开发独立配置文件书写技巧
- 根据功能对配置文件中的信息进行拆分,并制作成独立的配置文件,命名规则如下:
- application-devDB.yaml
- application-devRedis.yaml
- application-devMVC.yaml
- 使用 include 属性在激活指定环境的情况下,同时对多个环境进行加载使其生效,多个环境间使用逗号隔开:
# 应用环境# 公共配置spring:profiles:active: devinclude: devDB,devRedis,devMVC # 注意,当主环境 dev 和其他环境有相同属性的时候,主环境属性生效。其他环境有相同属性时,最后加载的环境属性生效
- 但是上面的设置也有一个问题,如果我要切换 dev 环境为 prod 环境,那么对应的 include 也修改,因为 include 属性只能使用一次,太繁琐了。
- SpringBoot 从 2.4 开始使用 group 属性代替 include 属性,降低了配置书写量,简单的说,我先定义好,爱用哪个就用哪个。
# 应用环境# 公共配置spring:profiles:active: devgroup:"dev": devDB,devRedis,devMVC"test": testDB,testRedis,testMVC"prod": prodDB,prodRedis,prodMVC
1.5 打成 war 包(不推荐)
1.5.1 概述
- 使用 SpringBoot 开发代码,最大的特点就是可以直接进行 jar 文件的打包,同时这个 jar 文件还可以直接进行项目的运行,但是有些传统项目人员,还是喜欢 war 文件的这种格式。
- 其实,在引入了 SpringBoot 相关的依赖之后,实际就会存在有一个 bootWar 的任务。
1.5.2 microboot-web 子模块
- 修改 build.gradle 文件,追加一个 war 插件:
plugins {id 'idea'id 'java'id 'war'}
- 如果说现在打算以 war 文件的形式来运行当前的项目,那么就需要修改当前项目的启动类:
package com.github.fairy.era;import org.springframework.boot.SpringApplication;import org.springframework.boot.autoconfigure.SpringBootApplication;import org.springframework.boot.builder.SpringApplicationBuilder;import org.springframework.boot.web.servlet.support.SpringBootServletInitializer;/*** 启动类** @author 许大仙* @version 1.0* @since 2021-12-31 09:14*/@SpringBootApplicationpublic class Application extends SpringBootServletInitializer {//重写配置方法@Overrideprotected SpringApplicationBuilder configure(SpringApplicationBuilder application) {return application.sources(Application.class);}public static void main(String[] args) {SpringApplication.run(Application.class, args);}}
- 通过 Gradle 提供的任务,进行打包处理:
gradle bootWar
- 程序执行结果:
2 WEB 运行支持(不推荐)
2.1 整合 Jetty 容器
- 修改 microboot 项目的 build.gradle 配置文件:
project(':microboot-common') { // 设置子项目的配置,独享配置dependencies { // 配置子模块依赖// 引入 SpringBoot 的 web 的依赖// implementation 'org.springframework.boot:spring-boot-starter-web'implementation('org.springframework.boot:spring-boot-starter-web') {exclude group: 'org.springframework.boot', module: 'spring-boot-starter-tomcat'}implementation group: 'org.springframework.boot', name: 'spring-boot-starter-jetty'}}project(':microboot-web') { // 设置子项目的配置,独享配置dependencies { // 配置子模块依赖implementation(project(':microboot-common')) // 引入其他子模块// 引入 SpringBoot 的 web 的依赖implementation('org.springframework.boot:spring-boot-starter-web') {exclude group: 'org.springframework.boot', module: 'spring-boot-starter-tomcat'}implementation group: 'org.springframework.boot', name: 'spring-boot-starter-jetty'}gradle.taskGraph.whenReady { // 在所有的操作准备好之后触发tasks.each { task ->if (task.name.contains('javadoc')) { // 如果发现有 javadoc 任务,就跳过task.enabled = false // 当前任务不执行}}}}
2.2 整合 Undertow 容器
- 修改 microboot 项目的 build.gradle 配置文件:
project(':microboot-common') { // 设置子项目的配置,独享配置dependencies { // 配置子模块依赖// 引入 SpringBoot 的 web 的依赖// implementation 'org.springframework.boot:spring-boot-starter-web'implementation('org.springframework.boot:spring-boot-starter-web') {exclude group: 'org.springframework.boot', module: 'spring-boot-starter-tomcat'}implementation group: 'org.springframework.boot', name: 'spring-boot-starter-undertow'}}project(':microboot-web') { // 设置子项目的配置,独享配置dependencies { // 配置子模块依赖implementation(project(':microboot-common')) // 引入其他子模块// 引入 SpringBoot 的 web 的依赖implementation('org.springframework.boot:spring-boot-starter-web') {exclude group: 'org.springframework.boot', module: 'spring-boot-starter-tomcat'}implementation group: 'org.springframework.boot', name: 'spring-boot-starter-undertow'}gradle.taskGraph.whenReady { // 在所有的操作准备好之后触发tasks.each { task ->if (task.name.contains('javadoc')) { // 如果发现有 javadoc 任务,就跳过task.enabled = false // 当前任务不执行}}}}
3 获取 WEB 内置对象
3.1 获取 WEB 内置对象
3.1.1 概述
- 按照原始的基本概念来讲,如果获取了 ServletRequest 内置对象,那么就相当于可以获取了 ServletContext、ServletConfig、HttpSession 内置对象,同时基于 SpringMVC 的运行机制,可以直接在控制层的方法上进行内置对象的配置。
3.1.2 microboot-web 子模块
- 新建 Handler 类,用于获取 WEB 内置对象:
package com.github.fairy.era.web;import org.springframework.web.bind.annotation.GetMapping;import org.springframework.web.bind.annotation.RestController;import javax.servlet.http.HttpServletRequest;import javax.servlet.http.HttpServletResponse;import java.util.HashMap;import java.util.Map;/*** @author 许大仙* @version 1.0* @since 2022-01-07 16:54*/@RestControllerpublic class BuiltInObjectHandler {@GetMapping(value = "/first")public Map<String, Object> first(HttpServletRequest request, HttpServletResponse response) {Map<String, Object> map = new HashMap<>(16);map.put("request[contextPath]", request.getContextPath());map.put("request[method]", request.getMethod());map.put("request[message]", request.getParameter("message"));map.put("request[sessionId]", request.getSession().getId());map.put("application[virtualServerName]", request.getServletContext().getVirtualServerName());return map;}}
- 浏览器发送请求:
http://localhost:8081/first?message=123
- 程序执行结果:

3.1.3 microboot-web 子模块
- 除了采取上面的方法接收的形式获取内置对象之外,实际上在传统的 SpringMVC 开发过程之中,也可以通过一个内置对象的获取操作方法来完成。
package com.github.fairy.era.web;import org.springframework.web.bind.annotation.GetMapping;import org.springframework.web.bind.annotation.RestController;import org.springframework.web.context.request.RequestContextHolder;import org.springframework.web.context.request.ServletRequestAttributes;import javax.servlet.http.HttpServletRequest;import javax.servlet.http.HttpServletResponse;import java.util.HashMap;import java.util.Map;/*** @author 许大仙* @version 1.0* @since 2022-01-07 16:54*/@RestControllerpublic class BuiltInObjectHandler {@GetMapping(value = "/second")public Map<String, Object> second() {ServletRequestAttributes requestAttributes = (ServletRequestAttributes) RequestContextHolder.getRequestAttributes();HttpServletRequest request = requestAttributes.getRequest();Map<String, Object> map = new HashMap<>(16);map.put("request[contextPath]", request.getContextPath());map.put("request[method]", request.getMethod());map.put("request[message]", request.getParameter("message"));map.put("request[sessionId]", request.getSession().getId());map.put("application[virtualServerName]", request.getServletContext().getVirtualServerName());return map;}}
3.2 国际化
3.2.1 概述
- 在 Spring 里面提供有一个 MessageSource 接口实现资源文件(
*.properties文件)的数据读取,在 SpringBoot 里面也采用同样的形式来完成此类操作。 - 既然要进行资源文件的处理,那么就需要知道,在 Java 开发之中国际化的程序应用也是可以通过资源文件的形式来处理的。
3.2.2 microboot-web 子模块
- 在 src/main/resource 目录中创建 i18n 的目录,并在其中创建 Message.properties 文件(基名文件),内容如下:
message=许大仙
- 随后在 i18n 目录中创建 Message_zh_CN.properties 和 Message_en_US.properties 资源文件,内容如下:
# Message_zh_CN.propertiesmessage=许大仙
# Message_en_US.propertiesmessage=xudaxian
- 现在已经成功的实现了资源文件的配置,此时需要将资源文件和当前的 SpringBoot 的容器进行关联,修改 application.yml 配置文件,内容如下:
server:port: 8081spring:messages:basename: i18n/Message
- 新建 Handler 类,根据资源文件中的 key 读取对应的信息:
package com.github.fairy.era.web;import lombok.NonNull;import lombok.RequiredArgsConstructor;import org.springframework.context.MessageSource;import org.springframework.util.StringUtils;import org.springframework.web.bind.annotation.GetMapping;import org.springframework.web.bind.annotation.RestController;import java.util.Locale;/*** @author 许大仙* @version 1.0* @since 2022-01-09 16:07*/@RestController@RequiredArgsConstructorpublic class MessageHandler {/*** 在容器启动的时候就提供此 Bean 的实例,所以直接注入即可*/@NonNullprivate MessageSource messageSource;/*** @param loc 格式为 zh_CN 或 en_US* @return*/@GetMapping(value = "message")public String message(String loc) {Locale locale;if (!StringUtils.hasText(loc)) {locale = Locale.getDefault();} else {locale = new Locale(loc.split("_")[0], loc.split("_")[1]);}return this.messageSource.getMessage("message", null, locale);}}
- 虽然上面也能实现国际化,但是我们不可能在每个需要国际化处理的接口中都去处理 loc 字段,太繁琐了,怎么办?
- 需要在 SpringBoot 中配置一个转换器,这个转换器可以直接将请求的字符串内容转为 Locale 对象实例。
package com.github.fairy.era.config;import org.springframework.context.annotation.Bean;import org.springframework.context.annotation.Configuration;import org.springframework.util.StringUtils;import org.springframework.web.servlet.LocaleResolver;import javax.servlet.http.HttpServletRequest;import javax.servlet.http.HttpServletResponse;import java.util.Locale;/*** 配置转换器** @author 许大仙* @version 1.0* @since 2022-01-09 16:38*/@Configurationpublic class DefaultLocaleResolver implements LocaleResolver {@Overridepublic Locale resolveLocale(HttpServletRequest request) {Locale locale;// 接收请求参数,参数的格式是 zh_CNString loc = request.getParameter("loc");if (!StringUtils.hasText(loc)) {locale = Locale.getDefault();} else {locale = new Locale(loc.split("_")[0], loc.split("_")[1]);}return locale;}@Overridepublic void setLocale(HttpServletRequest request, HttpServletResponse response, Locale locale) {}@Beanpublic LocaleResolver localeResolver() {return new DefaultLocaleResolver();}}
- 修改 Handler 类:
package com.github.fairy.era.web;import lombok.NonNull;import lombok.RequiredArgsConstructor;import org.springframework.context.MessageSource;import org.springframework.web.bind.annotation.GetMapping;import org.springframework.web.bind.annotation.RestController;import java.util.Locale;/*** @author 许大仙* @version 1.0* @since 2022-01-09 16:07*/@RestController@RequiredArgsConstructorpublic class MessageHandler {/*** 在容器启动的时候就提供此 Bean 的实例,所以直接注入即可*/@NonNullprivate MessageSource messageSource;@GetMapping(value = "message")public String message(Locale locale) {return this.messageSource.getMessage("message", null, locale);}}
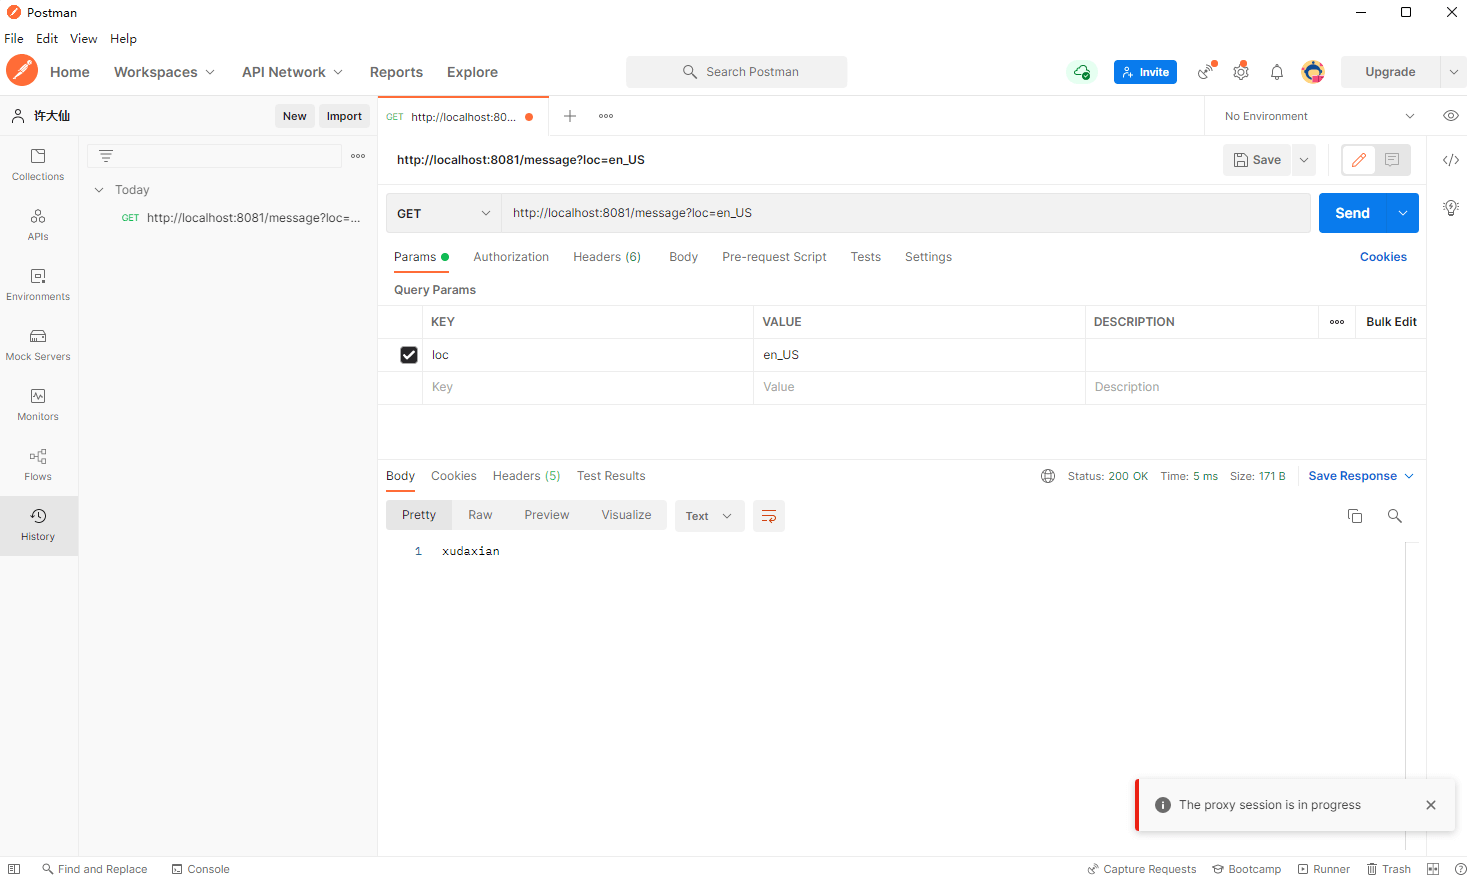
3.3.3 Postman
- 可以使用 Postman 来进行测试。
- 请求如下:
http://192.168.193.1:8081/message?loc=en_US
- 请求结果:
3.3 文件上传
3.3.1 概述
- 我们知道,在 SpringMVC 中已经整合好了 FileUpload 组件,在 SpringBoot 中同样如此。
3.3.2 microboot-web 子模块
- 修改 application.yml 配置文件:
server:port: 8081 # 端口号spring:servlet:multipart: # 实现文件上传的配置enabled: true # 启动文件上传功能,默认为 truemax-file-size: 10MB # 支持单个文件最大的大小max-request-size: 20MB # 每次请求允许上传文件的总大小file-size-threshold: 512KB # 每当达到 512 KB进行磁盘文件的写入location: / # 临时存储的目录,Linux 服务器一般为 /var 目录
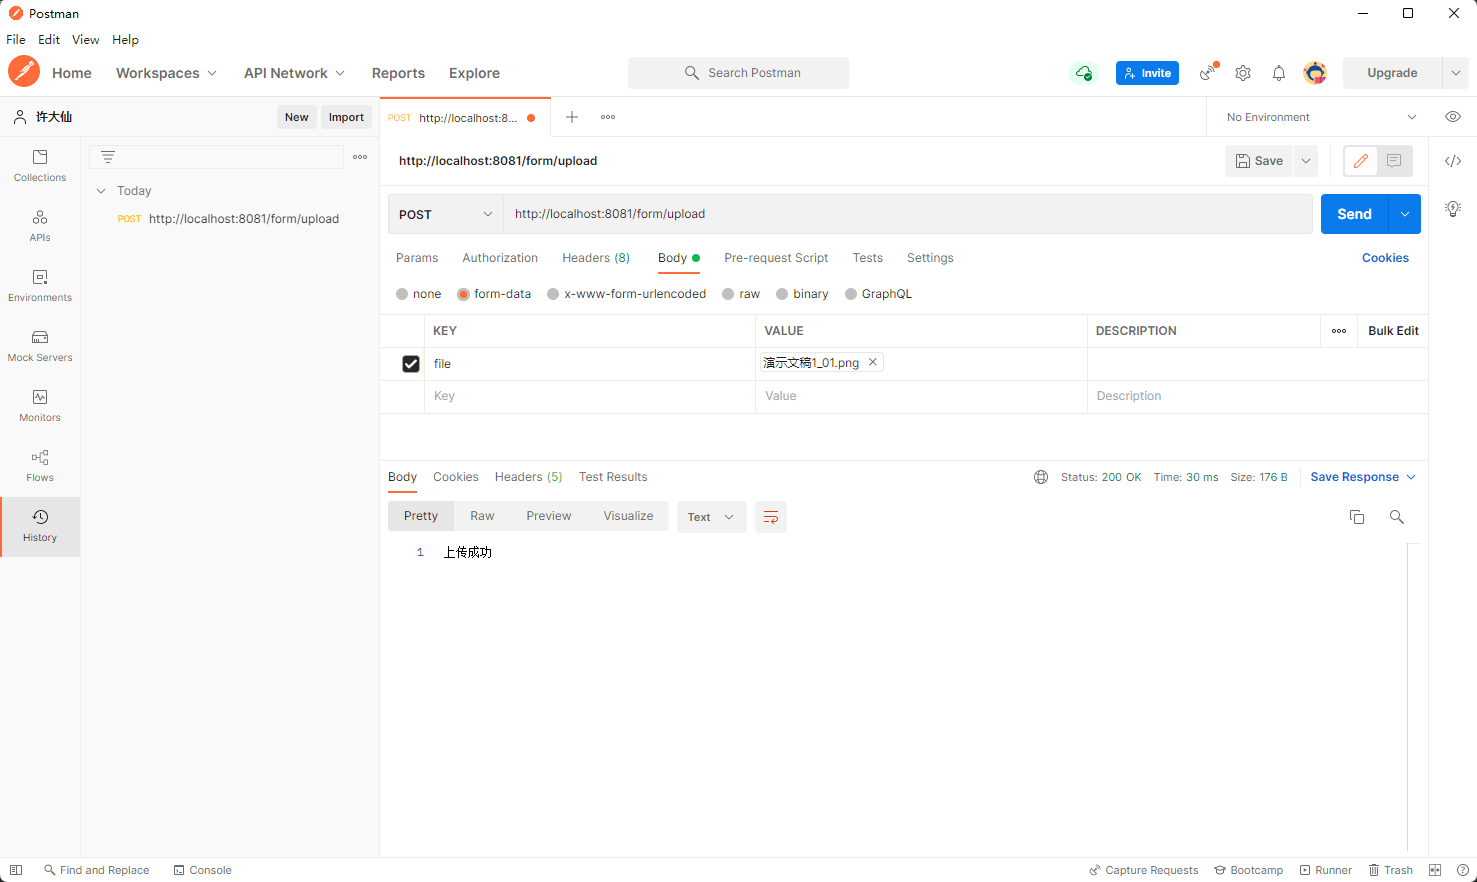
- 新建 Handler 类,实现文件上传:
package com.github.fairy.era.web;import lombok.NonNull;import lombok.RequiredArgsConstructor;import lombok.SneakyThrows;import org.springframework.web.bind.annotation.PostMapping;import org.springframework.web.bind.annotation.RequestMapping;import org.springframework.web.bind.annotation.RestController;import org.springframework.web.multipart.MultipartFile;import org.springframework.web.util.WebUtils;import javax.servlet.ServletContext;import javax.servlet.http.HttpServletResponse;import java.io.File;import java.util.UUID;/*** @author 许大仙* @version 1.0* @since 2022-01-09 16:52*/@RequestMapping("/form")@RequiredArgsConstructor@RestControllerpublic class UploadHandler {@NonNullprivate ServletContext servletContext;@PostMapping(value = "/upload")@SneakyThrowspublic String upload(MultipartFile file, HttpServletResponse response) {// 获取文件原始的名称String originalFilename = file.getOriginalFilename();// 新文件的名称String newFileName = UUID.randomUUID() + originalFilename;// upload 目录真实的路径String uploadPath = WebUtils.getRealPath(this.servletContext, "/upload");if (!new File(uploadPath).exists()) {new File(uploadPath).mkdirs();}// 上传文件file.transferTo(new File(WebUtils.getRealPath(this.servletContext, "/upload" + File.separator + newFileName)));return "上传成功";}}
- 测试:
4 请求拦截
4.1 整合 WEB 过滤器
4.1.1 概述
- 在 SpringMVC 中的过滤器可以直接在 web.xml 中配置或者通过实现 AbstractDispatcherServletInitializer 的方式进行配置,但是在 SpringBoot 中配置过滤器和传统的 SpringMVC 会有所区别。
4.1.2 microboot-web 子模块
- 新建 Handler 类,用于接收参数,并返回响应结果:
package com.github.fairy.era.web;import org.springframework.web.bind.annotation.GetMapping;import org.springframework.web.bind.annotation.RequestMapping;import org.springframework.web.bind.annotation.RestController;/*** @author 许大仙* @since 2022-01-09 19-56*/@RestController@RequestMapping(value = "/message")public class MessageHandler {@GetMapping(value = "/echo")public String echo(String msg) {return "【ECHO】:" + msg;}}
- 创建一个过滤器:
package com.github.fairy.era.filter;import org.springframework.util.StringUtils;import javax.servlet.FilterChain;import javax.servlet.ServletException;import javax.servlet.http.HttpFilter;import javax.servlet.http.HttpServletRequest;import javax.servlet.http.HttpServletResponse;import java.io.IOException;/*** @author 许大仙* @since 2022-01-09 19-54*/public class MessageFilter extends HttpFilter {@Overrideprotected void doFilter(HttpServletRequest request, HttpServletResponse response, FilterChain chain) throws IOException, ServletException {// 判断当前的路径if ("/message/echo".equals(request.getRequestURI())) {String msg = request.getParameter("msg");if (StringUtils.hasText(msg)) {System.out.println("msg = " + msg);}}chain.doFilter(request, response);}}
- 注册 Filter :
package com.github.fairy.era.config;import com.github.fairy.era.filter.MessageFilter;import org.springframework.boot.web.servlet.FilterRegistrationBean;import org.springframework.context.annotation.Bean;import org.springframework.context.annotation.Configuration;/*** @author 许大仙* @since 2022-01-09 20-22*/@Configurationpublic class ServletConfig {/*** 注册Servlet,向容器中添加ServletRegistrationBean组件* 注册Filter,向容器中添加FilterRegistrationBean组件* 注册Listener,向容器中添加ServletListenerRegistrationBean组件** @return*/@Beanpublic FilterRegistrationBean<MessageFilter> filterRegistrationBean() {FilterRegistrationBean<MessageFilter> filterRegistrationBean = new FilterRegistrationBean<>();// 注册自定义过滤器filterRegistrationBean.setFilter(new MessageFilter());// 设置 urlPatternfilterRegistrationBean.addUrlPatterns("/*");// 设置优先级filterRegistrationBean.setOrder(1);return filterRegistrationBean;}}
4.2 整合 WEB 监听器
4.2.1 概述
- 在 JavaWEB 开发里面,监听器是针对于整个环境的事件来进行处理的基本结构,那么根据不同的事件可以有 Servlet 上下文监听、Session 监听、Request 监听,同理在 SpringBoot 里面由于其在内部进行了 Tomcat 容器的启动,所以如果要想进行监听器的实现也需要通过配置的方式来完成。
4.2.2 microboot-web 子模块
- 创建一个 Servlet 上下文的监听器:
package com.github.fairy.era.lister;import javax.servlet.ServletContextEvent;import javax.servlet.ServletContextListener;/*** @author 许大仙* @since 2022-01-09 20-49*/public class WebServletContextListener implements ServletContextListener {@Overridepublic void contextInitialized(ServletContextEvent sce) {System.out.println("ServletContext 初始化");}@Overridepublic void contextDestroyed(ServletContextEvent sce) {System.out.println("ServletContext 销毁了");}}
- 注册 Listener :
package com.github.fairy.era.lister;import javax.servlet.ServletContextEvent;import javax.servlet.ServletContextListener;/*** @author 许大仙* @since 2022-01-09 20-49*/public class WebServletContextListener implements ServletContextListener {@Overridepublic void contextInitialized(ServletContextEvent sce) {System.out.println("ServletContext 初始化");}@Overridepublic void contextDestroyed(ServletContextEvent sce) {System.out.println("ServletContext 销毁了");}}
4.3 拦截器
4.3.1 概述
- 不管在 SpringMVC 里面还是在 SpringBoot 中,拦截器的作用不言而喻,基本上只要有项目都可能存在有拦截器的处理操作。
4.3.2 microboot-web 子模块
- 创建 Handler 类:
package com.github.fairy.era.web;import org.springframework.web.bind.annotation.GetMapping;import org.springframework.web.bind.annotation.RequestMapping;import org.springframework.web.bind.annotation.RestController;/*** @author 许大仙* @since 2022-01-09 19-56*/@RestController@RequestMapping(value = "/message")public class MessageHandler {@GetMapping(value = "/echo")public String echo(String msg) {return "【ECHO】:" + msg;}}
- 创建一个拦截器,同时该拦截器主要针对于 Handler 层调用前进行拦截:
package com.github.fairy.era.interceptor;import org.springframework.web.method.HandlerMethod;import org.springframework.web.servlet.HandlerInterceptor;import javax.servlet.http.HttpServletRequest;import javax.servlet.http.HttpServletResponse;/*** 自定义拦截器** @author 许大仙* @since 2022-01-09 21-37*/public class DefaultHandlerInterceptor implements HandlerInterceptor {@Overridepublic boolean preHandle(HttpServletRequest request, HttpServletResponse response, Object handler) throws Exception {// 判断是否为指定类型实例if (handler instanceof HandlerMethod) {HandlerMethod handlerMethod = (HandlerMethod) handler;System.out.println("[Handler 实例]" + handlerMethod.getBean());System.out.println("[Handler 类型]" + handlerMethod.getBeanType());System.out.println("[Handler 处理的方法]" + handlerMethod.getMethod());}return true;}}
- 所有的拦截器都是需要进行配置的,直接定义一个配置类:
package com.github.fairy.era.config;import com.github.fairy.era.interceptor.DefaultHandlerInterceptor;import org.springframework.context.annotation.Configuration;import org.springframework.web.servlet.config.annotation.InterceptorRegistry;import org.springframework.web.servlet.config.annotation.WebMvcConfigurer;/*** @author 许大仙* @version 1.0* @since 2022-01-06 09:39*/@Configurationpublic class MvcConfig implements WebMvcConfigurer {/*** 追加拦截器** @param registry*/@Overridepublic void addInterceptors(InterceptorRegistry registry) {registry.addInterceptor(new DefaultHandlerInterceptor()).addPathPatterns("/**");}}
4.4 AOP
4.4.1 概述
- 既然说到拦截器的操作处理,那么肯定离不来 Spring 的 AOP 技术了,AOP 的最大特点在于可以直接进行指定类结构的拦截处理。
4.4.2 microboot 项目
- 修改 build.gradle 配置文件,增加 aop 的依赖:
project(':microboot-web') { // 设置子项目的配置,独享配置dependencies { // 配置子模块依赖implementation(project(':microboot-common')) // 引入其他子模块implementation 'org.springframework.boot:spring-boot-starter-web' // 引入 SpringBoot 的 web 的依赖implementation group: 'org.springframework.boot', name: 'spring-boot-starter-aop' // 引入 SpringBoot 的 aop 的依赖}gradle.taskGraph.whenReady { // 在所有的操作准备好之后触发tasks.each { task ->if (task.name.contains('javadoc')) { // 如果发现有 javadoc 任务,就跳过task.enabled = false // 当前任务不执行}}}}
4.4.2 microboot-web 子模块
- 本次将实现一个业务层的 AOP 拦截。
- 新建业务层接口和实现类:
package com.github.fairy.era.service;/*** @author 许大仙* @since 2022-01-03 07-06*/public interface IMessageService {/*** echo** @param msg* @return*/String echo(String msg);}
package com.github.fairy.era.service.impl;import com.github.fairy.era.service.IMessageService;import org.springframework.stereotype.Service;/*** @author 许大仙* @since 2022-01-03 07-52*/@Servicepublic class MessageServiceImpl implements IMessageService {@Overridepublic String echo(String msg) {return "【ECHO】" + msg;}}
- 新建 Handler :
package com.github.fairy.era.web;import com.github.fairy.era.service.IMessageService;import lombok.NonNull;import lombok.RequiredArgsConstructor;import org.springframework.web.bind.annotation.GetMapping;import org.springframework.web.bind.annotation.RequestMapping;import org.springframework.web.bind.annotation.RestController;/*** @author 许大仙* @since 2022-01-09 19-56*/@RestController@RequestMapping(value = "/message")@RequiredArgsConstructorpublic class MessageHandler {@NonNullprivate IMessageService messageService;@GetMapping(value = "/echo")public String echo(String msg) {return this.messageService.echo(msg);}}
- 创建切面类:
package com.github.fairy.era.aspect;import org.aspectj.lang.JoinPoint;import org.aspectj.lang.Signature;import org.aspectj.lang.annotation.Aspect;import org.aspectj.lang.annotation.Before;import org.springframework.stereotype.Component;import java.lang.reflect.Modifier;import java.util.Arrays;/*** @author 许大仙* @since 2022-01-09 22-02*/@Component@Aspectpublic class LogAspect {@Before("execution(* *..MessageServiceImpl.echo(..))")public void before(JoinPoint joinPoint) {// 通过JoinPoint对象获取目标方法签名对象Signature signature = joinPoint.getSignature();// 通过方法的签名对象获取目标方法的详细信息String name = signature.getName();String modifier = Modifier.toString(signature.getModifiers());String declaringTypeName = signature.getDeclaringTypeName();// 通过JoinPoint对象获取外界调用目标方法时传入的实参列表Object[] args = joinPoint.getArgs();System.out.println("[AOP前置通知] 方法名:" + name + ",返回修饰符:" + modifier + ",声明类型的完全限定名称:" + declaringTypeName + ",方法参数:" + Arrays.asList(args));}}
5 整合 Email 邮件服务
5.1 概述
- Email 的出现是互联网沟通的真正开始。在一些系统的整合之中,有些情况下依然需要使用到邮件服务,如:密码丢失了,需要通过邮箱找回密码,但是如果要使用这种邮件,肯定需要有一个邮件服务器,如果自己搭建实在是太麻烦了,本次直接采用 QQ 邮箱。
5.2 QQ 邮箱
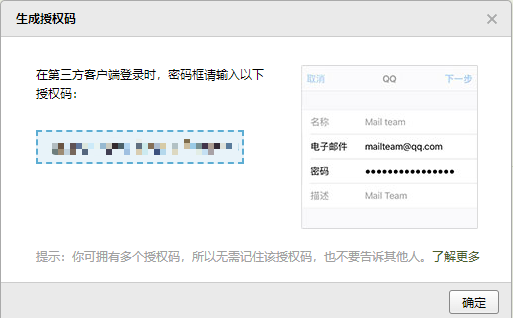
- 如果要进行邮箱的整合,那么一定需要指定的 SMTP 进行邮件的发送,但是对于邮件的发送处理来说,需要通过邮箱去获取一些必要的授权码。
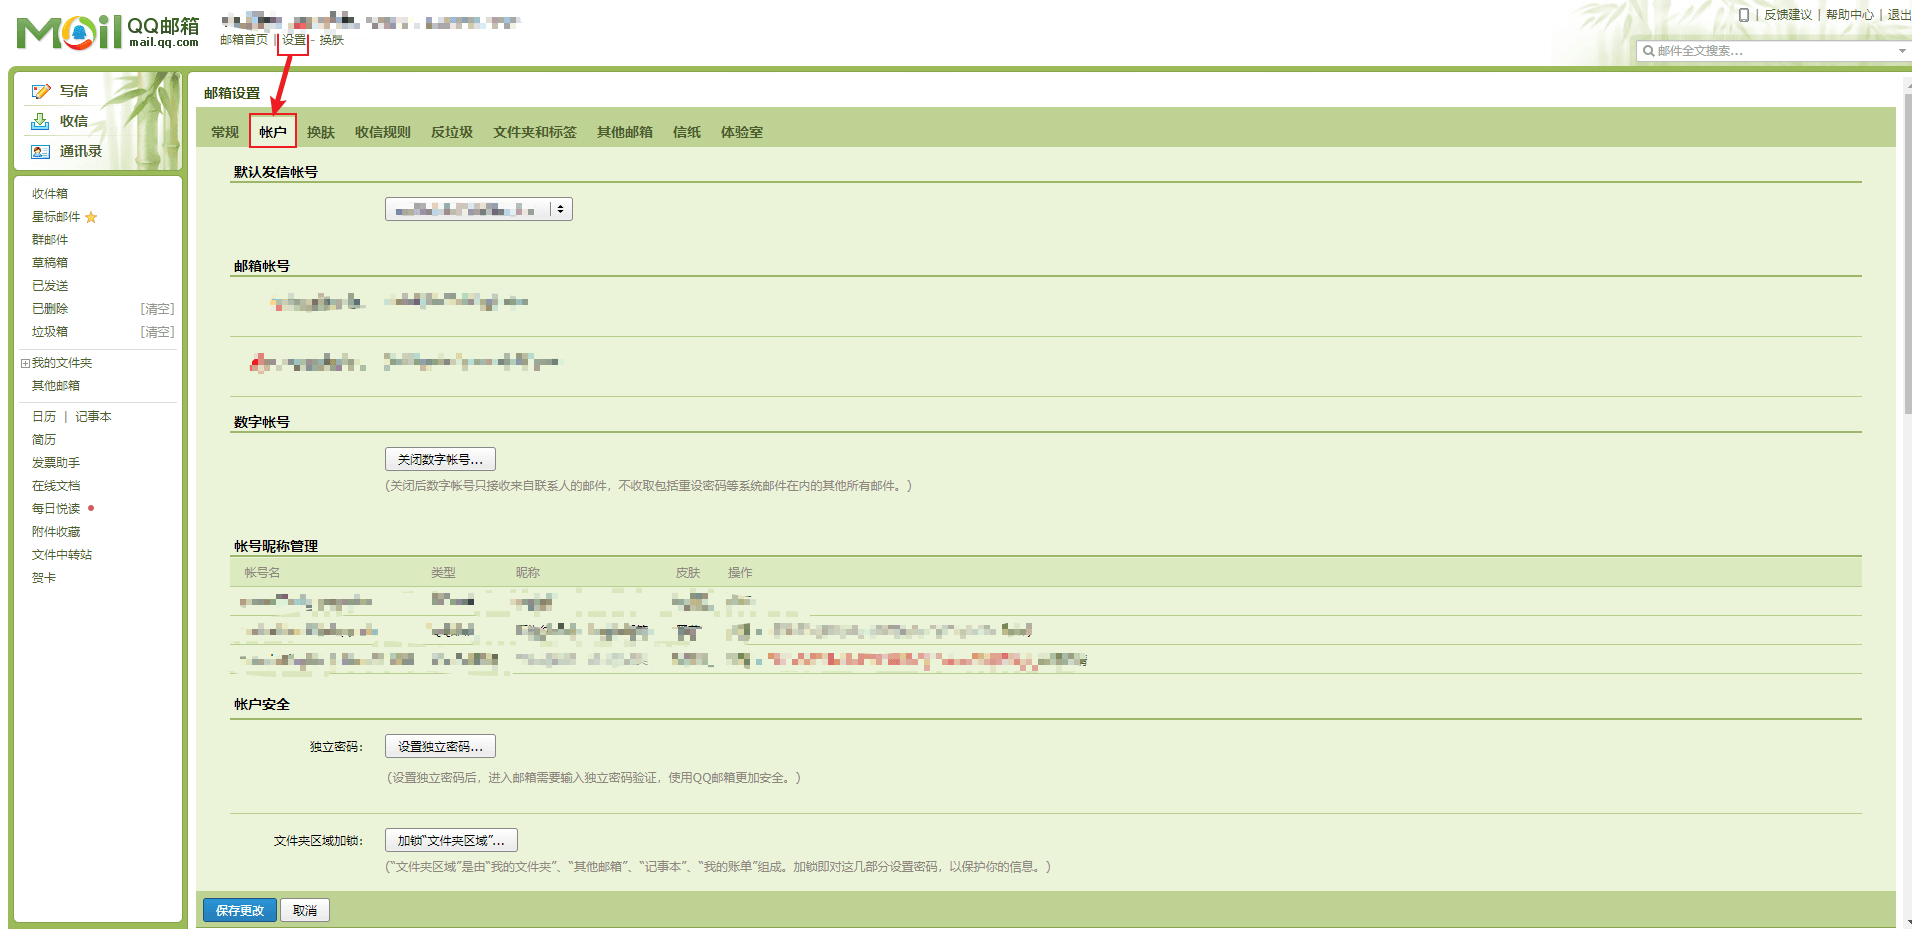
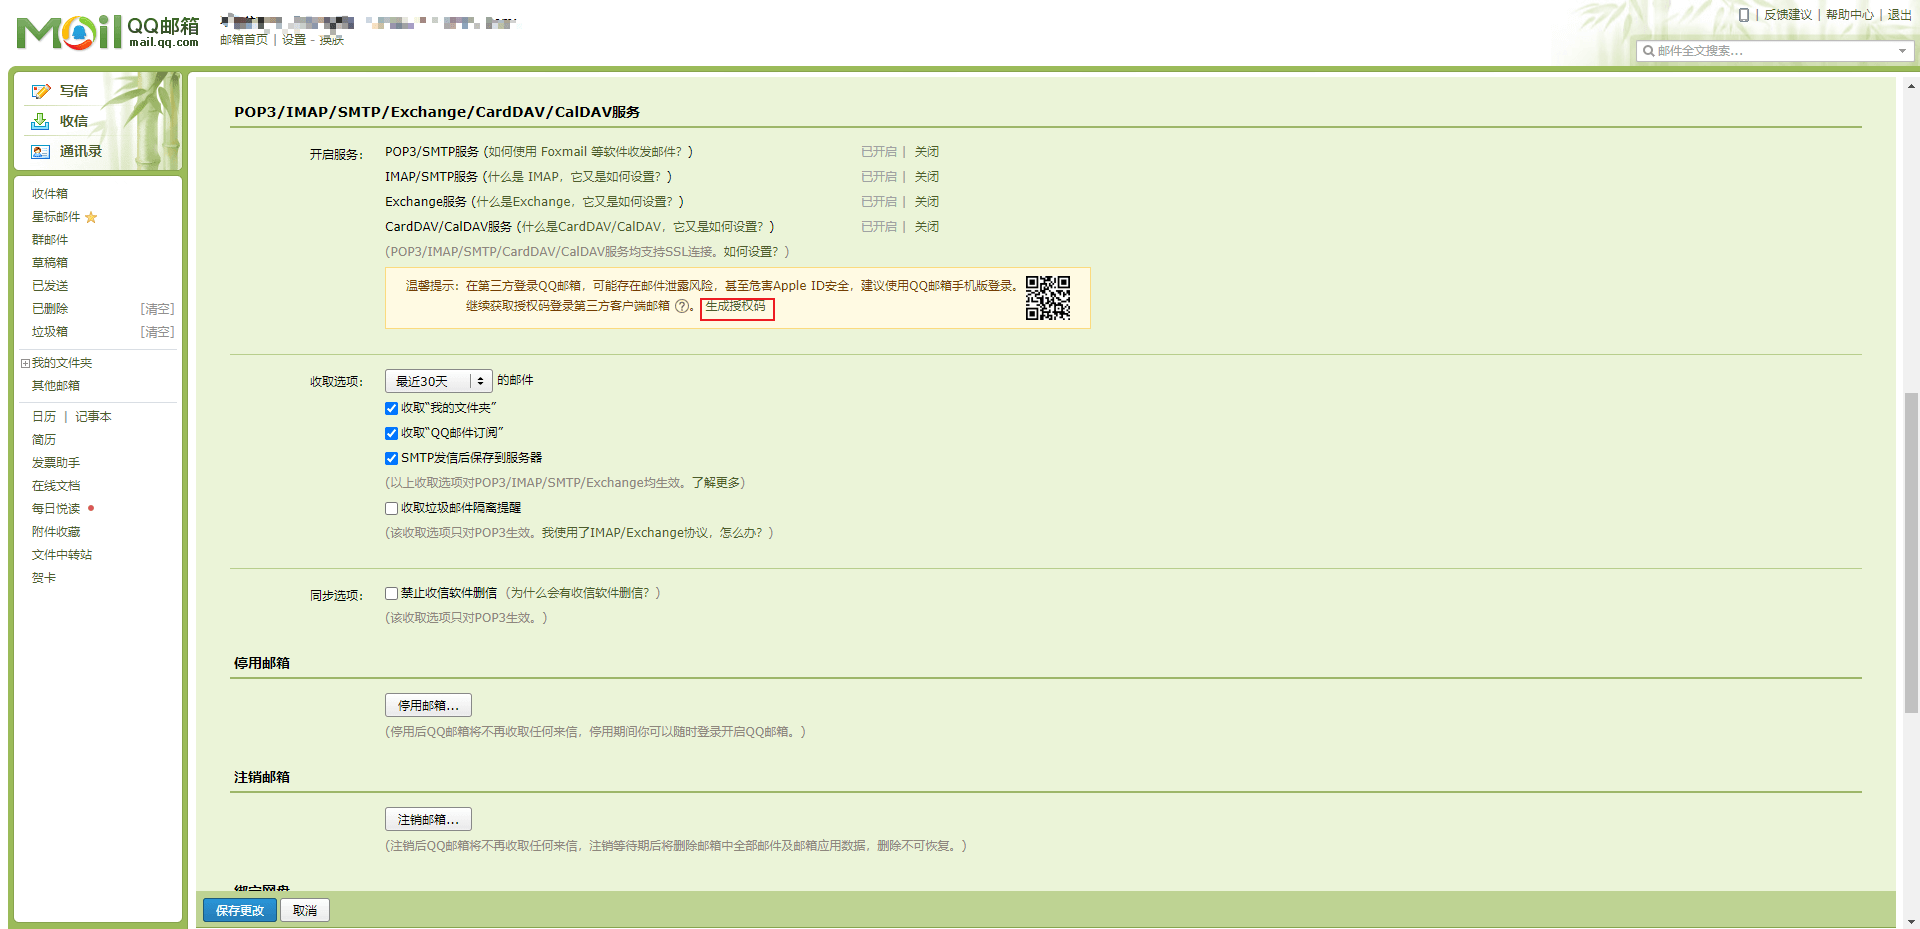
- 如果需要开启此类服务,那么一定要提供有完整的身份验证信息,随后还需要绑定手机。
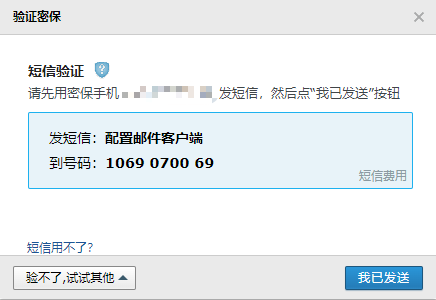
- 通过手机发送短信验证之后,就可以获取授权码了。
5.3 microboot 项目
- 修改 build.gradle 文件,添加 mail 的相关依赖:
project(':microboot-web') { // 设置子项目的配置,独享配置dependencies { // 配置子模块依赖implementation(project(':microboot-common')) // 引入其他子模块implementation 'org.springframework.boot:spring-boot-starter-web' // 引入 SpringBoot 的 web 的依赖implementation group: 'org.springframework.boot', name: 'spring-boot-starter-mail' // 引入 SpringBoot 的 mail 的依赖}gradle.taskGraph.whenReady { // 在所有的操作准备好之后触发tasks.each { task ->if (task.name.contains('javadoc')) { // 如果发现有 javadoc 任务,就跳过task.enabled = false // 当前任务不执行}}}}
5.4 microboot-web 子模块
- 修改 application.yml 文件:
spring:mail:default-encoding: utf-8protocol: smtphost: smtp.qq.com # 使用合法的 SMTPusername: # 用户名password: # 授权码# 如果是 https ,则必须配置 ssl,端口为 465;如果是 http 可以不配置 ssl,端口为 25port: 465properties:mail.smtp.auth: true # 启用 SMTP 认证mail.smtp.starttls.enable: true # 启动 TLSmail.smtp.starttls.required: true # 必须采用 TLS 加密连接# ssl 配置,如果是 http ,可以不配置 sslmail.smtp.ssl.enable: truemail.smtp.ssl.socketFactory.fallback: falsemail.smtp.ssl.socketFactory.class: com.sun.mail.util.MailSSLSocketFactorytest-connection: true # 测试连接
- 为了便于邮件的发送,直接编写一个测试类,直接使用 Mail 模块所提供的 Bean 组件即可:
package com.github.fairy.era;import lombok.SneakyThrows;import org.junit.jupiter.api.Test;import org.springframework.beans.factory.annotation.Value;import org.springframework.boot.test.context.SpringBootTest;import org.springframework.core.io.ClassPathResource;import org.springframework.mail.SimpleMailMessage;import org.springframework.mail.javamail.JavaMailSender;import org.springframework.mail.javamail.MimeMessageHelper;import javax.annotation.Resource;import javax.mail.internet.MimeMessage;import java.util.Date;/*** @author 许大仙* @version 1.0* @since 2022-01-04 09:36*/@SpringBootTestpublic class ApplicationTest {/*** 发送邮件的工具类*/@Resourceprivate JavaMailSender mailSender;@Value("${spring.mail.username}")private String mailFrom;/*** 发送简单的邮件*/@Testpublic void testSimpleMail() {// 建立一个简单的邮件结构SimpleMailMessage mailMessage = new SimpleMailMessage();// 邮件的发送人mailMessage.setFrom(this.mailFrom);// 邮件的收件人mailMessage.setTo(this.mailFrom);// 主题mailMessage.setSubject("简单邮件");// 邮件内容mailMessage.setText("这是一封简单邮件");mailMessage.setSentDate(new Date());// 发送邮件this.mailSender.send(mailMessage);}/*** 发送复杂的邮件*/@Test@SneakyThrowspublic void testComplexMail() {// 建立一个复杂的邮件结构MimeMessage mimeMessage = this.mailSender.createMimeMessage();// true 表示为 multipart 邮件MimeMessageHelper mimeMessageHelper = new MimeMessageHelper(mimeMessage, true);// 邮件的发送人mimeMessageHelper.setFrom(this.mailFrom);// 邮件的收件人mimeMessageHelper.setTo(this.mailFrom);// 主题mimeMessageHelper.setSubject("复杂邮件");// 内容String rscId = "9001";String content = "<html>\n" +"<body>这是有图片的邮件:<img src=\'cid:" + rscId +"\'></img>" +"</body>\n" +"</html>";mimeMessageHelper.setText(content, true);// 图片mimeMessageHelper.addInline(rscId, new ClassPathResource("logo/beauty.jpg"));// 附件// mimeMessageHelper.addAttachment("myDocument.pdf", new ClassPathResource("doc/myDocument.pdf"));// 发送邮件this.mailSender.send(mimeMessage);}}
6 https 安全访问
6.1 概述
- 如果真的在 Tomcat 容器或 SpringBoot 项目里面配置 https ,那么一般都属于单容器的环境配置,实际的开发之中一般都是在 Nginx 代理上进行 https 证书的配置。
- 本次为了简化操作,直接利用 JDK 所提供的工具来实现一个简单的证书签发。
6.2 JDK 命令
- 在 JDK 安装完成之后会提供有一个 keytool 工具。
keytool -genkey -alias springbootServer -storetype PKCS12 -keyalg RSA -keysize 2048 -keystore keystore.p12 -validity 3650 -dname "CN=SpringBoot,OU=SpringBoot,O=SpringBoot,L=BeiJing,S=BeiJing,C=China" -storepass 123456 -keypass 123456
- 当以上的命令执行完毕后,就会形成一个 Java 可以使用的
keystore.p12的证书文件。
6.3 microboot-web 子模块
- 将 keystore.p12 证书文件拷贝到项目的资源目录之中:
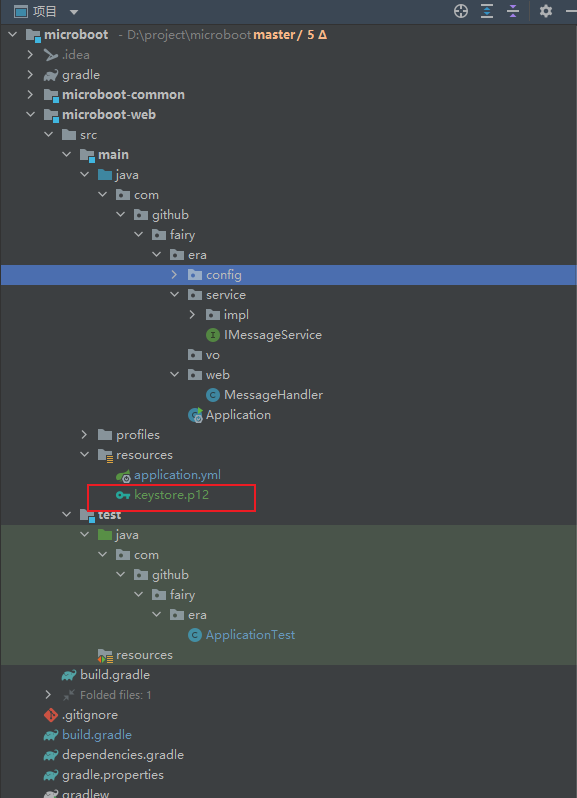
- 随后可以在 application.yml 配置文件中进行配置,同时 application.yml 中支持如下的配置项:
- 修改 application.yml 配置文件:
server:ssl: # 所有的证书都是在容器中进行配置enabled: truekey-store: classpath:keystore.p12 # 配置证书的路径key-alias: springbootServer # 证书的别名key-store-type: PKCS12 # 证书的类型key-store-password: 123456 # 证书存储的密码port: 443 # https 的端口一定是 443
6.4 浏览器
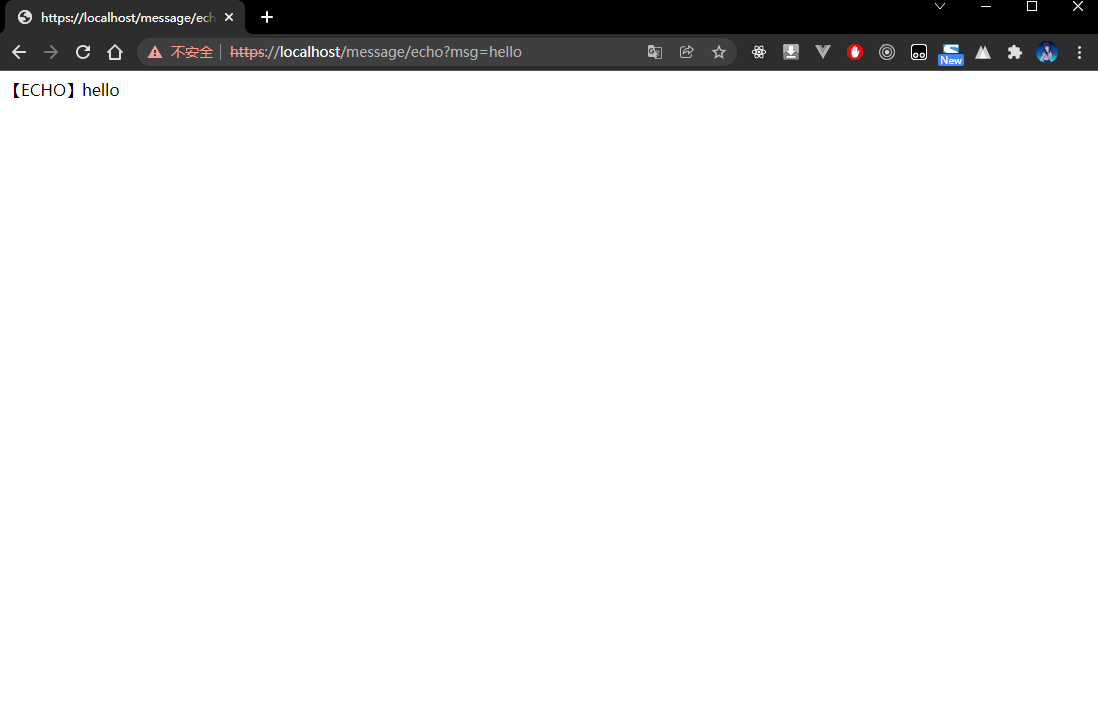
- 既然已经使用了 https 进行安全访问,所以本次将通过新的路径访问:
https://localhost/message/echo?msg=hello
- 程序执行结果:
6.4 microboot-web 子模块
- 按照 https 配置来说,如果此时开启了 http 协议对应的 80 端口,那么应该由 80 端口强制性的跳转到 443 端口进行服务访问,可以做一个连接器的配置类:
package com.github.fairy.era.config;import org.apache.catalina.Context;import org.apache.catalina.connector.Connector;import org.apache.tomcat.util.descriptor.web.SecurityCollection;import org.apache.tomcat.util.descriptor.web.SecurityConstraint;import org.springframework.boot.web.embedded.tomcat.TomcatServletWebServerFactory;import org.springframework.context.annotation.Bean;import org.springframework.context.annotation.Configuration;/*** 配置 HTTP 的连接器** @author 许大仙* @version 1.0* @since 2022-01-10 11:19*/@Configurationpublic class HttpConnectorConfig {/*** 获取新的连接器** @return*/public Connector httpConnector() {// 配置连接器的处理协议Connector connector = new Connector("org.apache.coyote.http11.Http11NioProtocol");// HTTP 协议访问connector.setScheme("http");// 非安全传输connector.setSecure(false);// HTTP 监听端口connector.setPort(80);// 强制跳转到 443 端口connector.setRedirectPort(443);return connector;}/*** 配置自动跳转** @return*/@Beanpublic TomcatServletWebServerFactory tomcatServletWebServerFactory() {TomcatServletWebServerFactory factory = new TomcatServletWebServerFactory() {/*** 发送处理** @param context*/@Overrideprotected void postProcessContext(Context context) {SecurityConstraint securityConstraint = new SecurityConstraint();// 设置约束securityConstraint.setUserConstraint("CONFIDENTIAL");SecurityCollection collection = new SecurityCollection();// 所有路径全部进行处理collection.addPattern("/*");securityConstraint.addCollection(collection);context.addConstraint(securityConstraint);}};factory.addAdditionalTomcatConnectors(this.httpConnector());return factory;}}
7 全局错误页
7.1 概述
- 如果现在使用的是传统的 SpringMVC,并且基于 Tomcat 实现的项目开发,可以直接使用 web.xml 配置文件来实现错误页的配置或者通过 SpringMVC 提供的配置项来实现错误页的配置。
- 在 SpringBoot 中默认情况下已经提供有错误页的显示处理。
7.2 浏览器
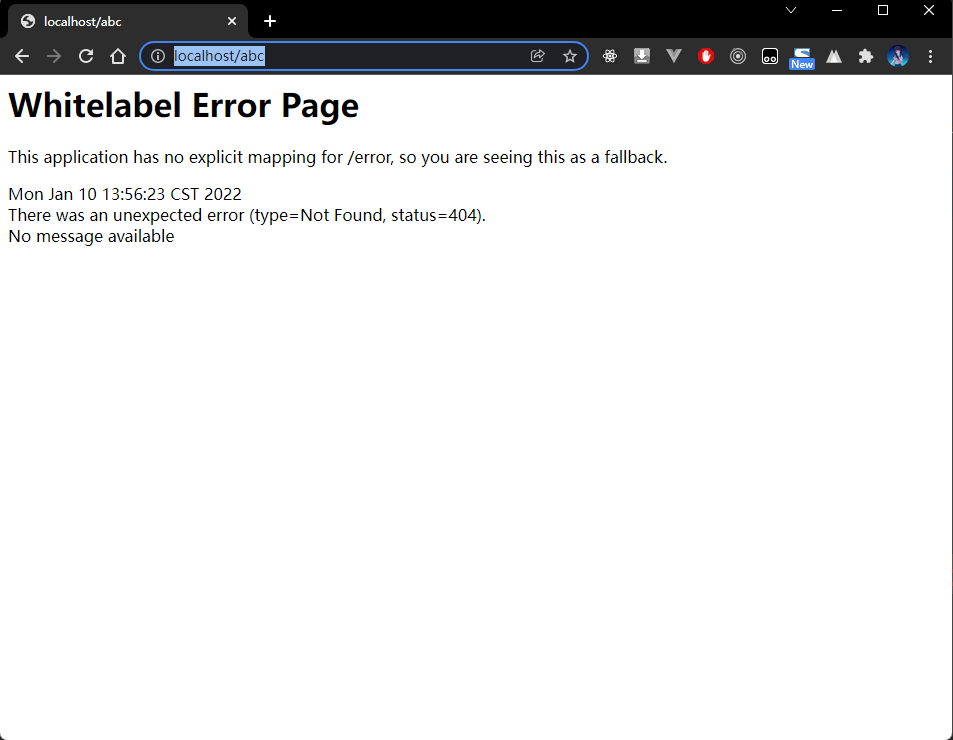
- 通过浏览器随意访问一个服务路径(路径对应的服务不存在),请求的路径如下:
http://localhost/abc
- 程序执行结果:
- 如果说现在使用的是一个单独的 SpringBoot 项目完成所有 WEB 程序的开发,那么上面的配置没什么问题;但是,如果结合当前流行的前后端分离,此时的数据返回的类型就不合适了,最佳的做法还是应该返回 JSON 数据信息。
7.3 microboot-web 子模块
- 为了便于程序的管理,创建一个基于 Restful 风格响应的数据内容,同时基于 Handler 来实现数据响应操作。
package com.github.fairy.era.web;import org.springframework.web.bind.annotation.GetMapping;import org.springframework.web.bind.annotation.RequestMapping;import org.springframework.web.bind.annotation.RestController;import javax.servlet.http.HttpServletRequest;import javax.servlet.http.HttpServletResponse;import java.util.HashMap;import java.util.Map;/*** 进行错误页的处理** @author 许大仙* @version 1.0* @since 2022-01-10 14:03*/@RestController@RequestMapping(value = "/errors")public class ErrorHandler {@GetMapping(value = "/error404")public Map<String, Object> error404(HttpServletRequest request, HttpServletResponse response) {// 设置响应编码response.setStatus(HttpServletResponse.SC_NOT_FOUND);// 设置响应内容Map<String, Object> map = new HashMap<>(16);map.put("status", HttpServletResponse.SC_NOT_FOUND);map.put("content", "无法找到用户访问的路径");map.put("referer", request.getHeader("Referer"));map.put("path", request.getRequestURI());return map;}}
- 在当前所配置的 Handler 仅仅描述的是错误页的显示,要想让其生效还需要替换掉已经存在的错误页,就需要编写一个配置类:
package com.github.fairy.era.config;import org.springframework.boot.web.server.ErrorPage;import org.springframework.boot.web.server.ErrorPageRegistrar;import org.springframework.boot.web.server.ErrorPageRegistry;import org.springframework.context.annotation.Configuration;import org.springframework.http.HttpStatus;/*** 错误页的配置** @author 许大仙* @version 1.0* @since 2022-01-10 14:14*/@Configurationpublic class ErrorPageConfig implements ErrorPageRegistrar {@Overridepublic void registerErrorPages(ErrorPageRegistry registry) {// 定义 404 错误页ErrorPage errorPage404 = new ErrorPage(HttpStatus.NOT_FOUND, "/errors/error404");// 追加新的错误页registry.addErrorPages(errorPage404);}}
7.4 浏览器
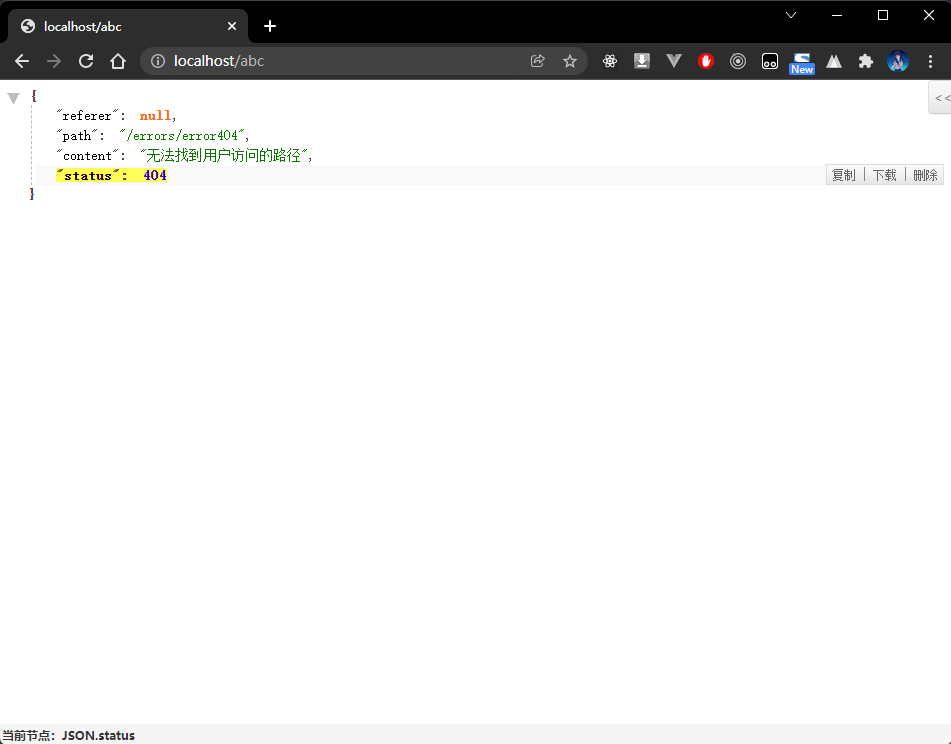
- 通过浏览器随意访问一个服务路径(路径对应的服务不存在),请求的路径如下:
http://localhost/abc
- 程序执行结果:
7.5 microboot-web 子模块
- 除了 404 的状态码之外,最重要的一项就是 500 的错误显示,首先来观察一下默认的 500 的显示是否正确。
- 新建一个 Handler 类,用来模拟 500 错误:
package com.github.fairy.era.web;import com.github.fairy.era.service.IMessageService;import lombok.NonNull;import lombok.RequiredArgsConstructor;import org.springframework.web.bind.annotation.GetMapping;import org.springframework.web.bind.annotation.RequestMapping;import org.springframework.web.bind.annotation.RestController;/*** @author 许大仙* @since 2022-01-09 19-56*/@RestController@RequestMapping(value = "/message")@RequiredArgsConstructorpublic class MessageHandler {@NonNullprivate IMessageService messageService;@GetMapping(value = "/echo")public String echo(String msg) {if ("1".equals(msg)) {int num = 10 / 0;}return this.messageService.echo(msg);}}
- 浏览器访问结果如下:
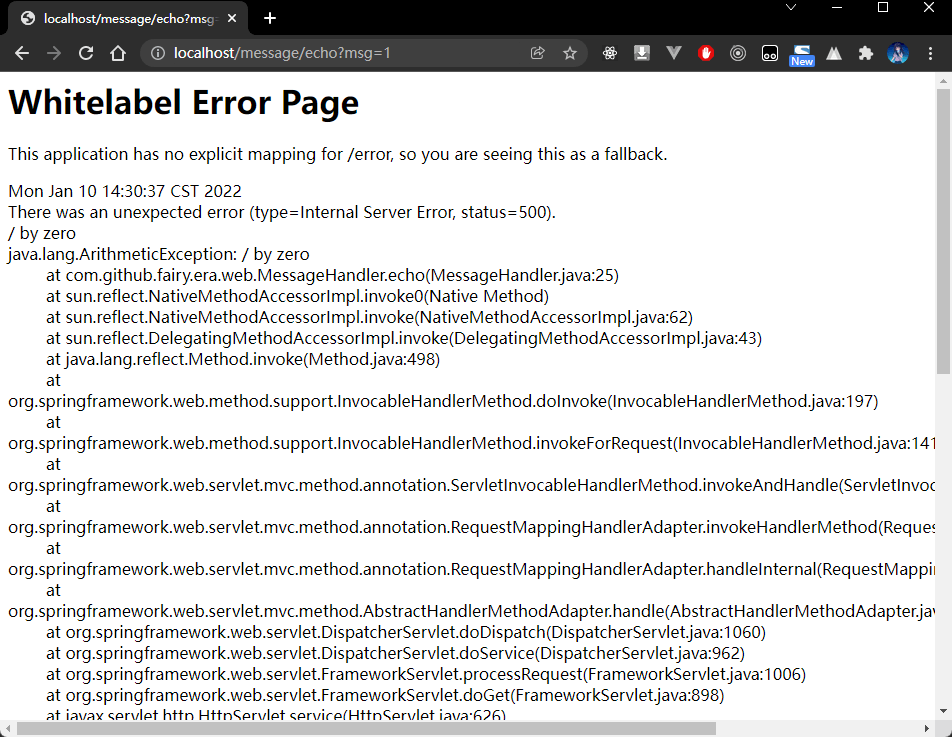
- 上面的错误显示并不合理,按照前后端分离的设计原则来说,即便出现了错误,也应该进行相关 REST 数据的响应。
- 给 ErrorHandler 类添加处理 500 的逻辑:
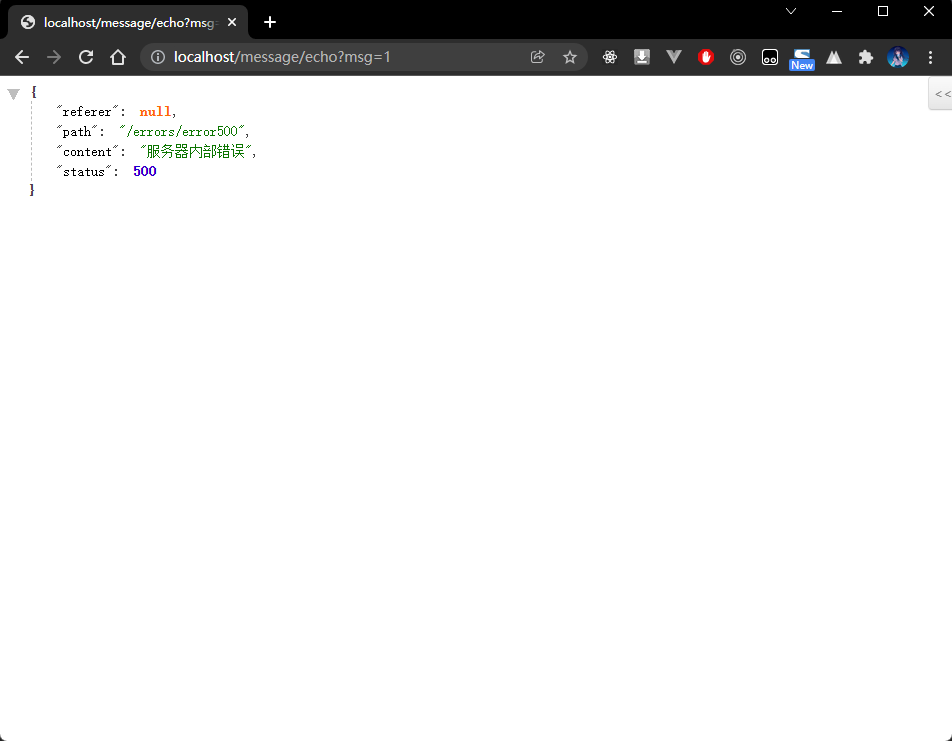
package com.github.fairy.era.web;import org.springframework.web.bind.annotation.GetMapping;import org.springframework.web.bind.annotation.RequestMapping;import org.springframework.web.bind.annotation.RestController;import javax.servlet.http.HttpServletRequest;import javax.servlet.http.HttpServletResponse;import java.util.HashMap;import java.util.Map;/*** 进行错误页的处理** @author 许大仙* @version 1.0* @since 2022-01-10 14:03*/@RestController@RequestMapping(value = "/errors")public class ErrorHandler {@GetMapping(value = "/error404")public Map<String, Object> error404(HttpServletRequest request, HttpServletResponse response) {// 设置响应编码response.setStatus(HttpServletResponse.SC_NOT_FOUND);// 设置响应内容Map<String, Object> map = new HashMap<>(16);map.put("status", HttpServletResponse.SC_NOT_FOUND);map.put("content", "无法找到用户访问的路径");map.put("referer", request.getHeader("Referer"));map.put("path", request.getRequestURI());return map;}@GetMapping(value = "/error500")public Map<String, Object> error500(HttpServletRequest request, HttpServletResponse response) {// 设置响应编码response.setStatus(HttpServletResponse.SC_INTERNAL_SERVER_ERROR);// 设置响应内容Map<String, Object> map = new HashMap<>(16);map.put("status", HttpServletResponse.SC_INTERNAL_SERVER_ERROR);map.put("content", "服务器内部错误");map.put("referer", request.getHeader("Referer"));map.put("path", request.getRequestURI());return map;}}
- 修改 ErrorPageConfig 类,增加 500 的错误页面:
package com.github.fairy.era.config;import org.springframework.boot.web.server.ErrorPage;import org.springframework.boot.web.server.ErrorPageRegistrar;import org.springframework.boot.web.server.ErrorPageRegistry;import org.springframework.context.annotation.Configuration;import org.springframework.http.HttpStatus;/*** 错误页的配置** @author 许大仙* @version 1.0* @since 2022-01-10 14:14*/@Configurationpublic class ErrorPageConfig implements ErrorPageRegistrar {@Overridepublic void registerErrorPages(ErrorPageRegistry registry) {// 定义 404 错误页ErrorPage errorPage404 = new ErrorPage(HttpStatus.NOT_FOUND, "/errors/error404");// 定义 500 错误页ErrorPage errorPage500 = new ErrorPage(HttpStatus.INTERNAL_SERVER_ERROR, "/errors/error500");// 追加新的错误页registry.addErrorPages(errorPage404, errorPage500);}}
- 浏览器访问结果如下:
8 @RestControllerAdvice
8.1 全局异常处理
8.1.1 概述
- 在进行程序开发的过程之中,需要明确的是,所有的问题除了错误页之外(根据 HTTP 状态码的方式进行匹配的),另外一种进行错误处理的形式就是全局异常配置。
8.1.2 microboot-web 子模块
- 既然要进行全局异常处理,那么首先要考虑到的问题就是 REST 响应处理,目的是符合当前的前后端分离设计的原则。
package com.github.fairy.era.advice;import org.springframework.web.bind.annotation.ExceptionHandler;import org.springframework.web.bind.annotation.RestControllerAdvice;import javax.servlet.http.HttpServletRequest;import javax.servlet.http.HttpServletResponse;import java.util.HashMap;import java.util.Map;/*** @author 许大仙* @version 1.0* @since 2022-01-10 14:49*/@RestControllerAdvicepublic class GlobalExceptionAdvice {/*** 捕获 Exception 异常** @param ex* @return*/@ExceptionHandler(Exception.class)public Map<String, Object> handleException(Exception ex, HttpServletRequest request) {Map<String, Object> resultMap = new HashMap<>(16);// 设置状态码resultMap.put("status", HttpServletResponse.SC_INTERNAL_SERVER_ERROR);// 设置异常信息resultMap.put("message", ex.getMessage());// 设置异常的类型resultMap.put("exception", ex.getClass().getName());// 设置异常发生的路径resultMap.put("path", request.getRequestURI());return resultMap;}}
- 创建一个产生异常的 Handler 类:
package com.github.fairy.era.web;import com.github.fairy.era.service.IMessageService;import lombok.NonNull;import lombok.RequiredArgsConstructor;import org.springframework.web.bind.annotation.GetMapping;import org.springframework.web.bind.annotation.RequestMapping;import org.springframework.web.bind.annotation.RestController;/*** @author 许大仙* @since 2022-01-09 19-56*/@RestController@RequestMapping(value = "/message")@RequiredArgsConstructorpublic class MessageHandler {@NonNullprivate IMessageService messageService;@GetMapping(value = "/echo")public String echo(String msg) {if ("1".equals(msg)) {int num = 10 / 0;}return this.messageService.echo(msg);}}
- 浏览器访问结果如下:
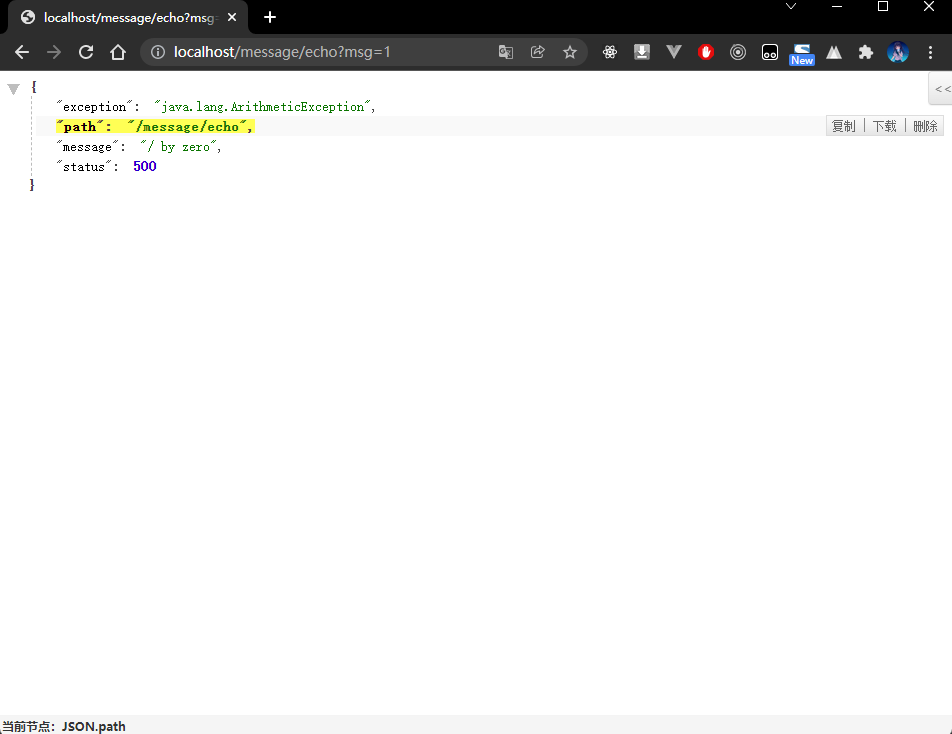
- 此时出现异常之后就可以实现正确的信息展示了,同时在展示的时候可以直接告诉用户具体产生异常的路径以及异常产生的原因。
8.1.3 404 的特殊处理
- 默认情况下,SpringBoot是不会抛出404异常的,所以
@RestControllerAdvice也不能捕获到404异常。我们可以通过以下配置来让这个注解能捕获到404异常。
spring:profiles:active: devmvc:throw-exception-if-no-handler-found: true # 发现404 的时候直接抛出异常web:resources:add-mappings: false # 关闭默认的静态资源路径映射
- 但是关闭默认的静态资源访问会出现问题,我们需要加上如下的配置:
package com.github.fairy.era.config;import org.springframework.context.annotation.Configuration;import org.springframework.web.servlet.config.annotation.ResourceHandlerRegistry;import org.springframework.web.servlet.config.annotation.WebMvcConfigurer;/*** @author 许大仙* @version 1.0* @since 2022-01-10 16:09*/@Configurationpublic class ResourceConfig implements WebMvcConfigurer {@Overridepublic void addResourceHandlers(ResourceHandlerRegistry registry) {//可以访问localhost:8095/static/images/image.jpgregistry.addResourceHandler("/static/**").addResourceLocations("classpath:/static/");}}
8.2 全局数据绑定
8.2.1 概述
- 在之前已经学习了全局异常的处理,我们知道在全局异常配置的过程中最重要的注解就是
@RestControllerAdvice了。 - 如果说现在采用的是前后端分离技术,那么就需要考虑到数据最终返回的结构了,因为除了所需要真正响应的数据之外,还可能会附加一些其他辅助性的数据,如:每次都需要返回一个 HTTP 状态码或自定义的状态码、认证数据等等,在这样的情况下,如果每一次进行响应的时候都需要重复的编写,就会显得非常的繁琐。
8.2.2 microboot-web 子模块
- 观察一种重复配置响应结构的数据
package com.github.fairy.era.web;import org.springframework.web.bind.annotation.GetMapping;import org.springframework.web.bind.annotation.RequestMapping;import org.springframework.web.bind.annotation.RestController;import javax.servlet.http.HttpServletRequest;import javax.servlet.http.HttpServletResponse;import java.time.LocalDateTime;import java.util.HashMap;import java.util.Map;/*** @author 许大仙* @since 2022-01-09 19-56*/@RestController@RequestMapping(value = "/message")public class MessageHandler {@GetMapping(value = "/echo")public Map<String, Object> echo(String msg, HttpServletRequest request) {Map<String, Object> resultMap = new HashMap<>(16);resultMap.put("status", HttpServletResponse.SC_OK); // 所有的配置都需要提供此类数据resultMap.put("msg", "成功");resultMap.put("data", "【ECHO】" + msg); // 不同的处理可能返回不同的结果resultMap.put("path", request.getRequestURI()); // 所有的配置都需要提供此类数据resultMap.put("timestamp", LocalDateTime.now()); // 所有的配置都需要提供此类数据return resultMap;}@GetMapping(value = "/calc")public Map<String, Object> calc(int x, int y, HttpServletRequest request) {Map<String, Object> resultMap = new HashMap<>(16);resultMap.put("status", HttpServletResponse.SC_OK); // 所有的配置都需要提供此类数据resultMap.put("msg", "成功");resultMap.put("data", "【CALC】" + (x / y)); // 不同的处理可能返回不同的结果resultMap.put("path", request.getRequestURI()); // 所有的配置都需要提供此类数据resultMap.put("timestamp", LocalDateTime.now()); // 所有的配置都需要提供此类数据return resultMap;}}
- 将封装结果的结构抽取到一个公共类中:
package com.github.fairy.era.vo;import lombok.Builder;import lombok.Data;/*** @author 许大仙* @version 1.0* @since 2022-01-10 15:42*/@Data@Builderpublic class Result<T> {private String status;private String msg;private T data;private String path;private String timestamp;}
- 此时已经固定了两个全局的数据信息,但是随着项目的不同,有可能这样的全局数据是需要修改的,或者要根据数据库来实现动态加载,牵一发而动全身,所以这种固定在 Handler 类中的做法明显是不可取的,所以此时可以考虑做一个全局的数据绑定处理。
package com.github.fairy.era.advice;import com.github.fairy.era.vo.Result;import org.springframework.http.HttpStatus;import org.springframework.web.bind.annotation.ModelAttribute;import org.springframework.web.bind.annotation.RestControllerAdvice;import javax.servlet.http.HttpServletRequest;import java.time.LocalDateTime;/*** 全局数据绑定** @author 许大仙* @version 1.0* @since 2022-01-10 15:32*/@RestControllerAdvicepublic class GlobalDataBindAdvice {@ModelAttribute(name = "bindModel")public Result<?> dataBind(HttpServletRequest request) {return Result.builder().status(HttpStatus.OK.getReasonPhrase()).timestamp(LocalDateTime.now().toString()).path(request.getRequestURI()).build();}}
- 此时绑定的是一个数据的内容,至于这个内容具体的 KEY 是什么,是需要在程序开发之前进行协商的。
- 修改 MessageHandler 类:
package com.github.fairy.era.web;import com.github.fairy.era.vo.Result;import org.springframework.ui.Model;import org.springframework.web.bind.annotation.GetMapping;import org.springframework.web.bind.annotation.RequestMapping;import org.springframework.web.bind.annotation.RestController;/*** @author 许大仙* @since 2022-01-09 19-56*/@RestController@RequestMapping(value = "/message")public class MessageHandler {@GetMapping(value = "/echo")public Result<String> echo(String msg, Model model) {Result<String> result = (Result<String>) model.asMap().getOrDefault("bindModel", Result.builder().build());result.setMsg("成功");result.setData("【ECHO】" + msg);return result;}@GetMapping(value = "/calc")public Result calc(int x, int y, Model model) {Result<String> result = (Result<String>) model.asMap().getOrDefault("bindModel", Result.builder().build());result.setMsg("成功");result.setData("【ECHO】" + +(x / y));return result;}}
- 在以后进行标准程序的开发过程中,不可能后端随意返回数据,除了真正所需要返回的内容之外,一定会有大量的附加信息,而这些附件信息就可以直接通过以上的数据绑定的处理操作来完成。
8.3 全局数据预处理
8.3.1 概述
- 在使用 SpringMVC 的时候,有一个非常重要的特点就是可以自动将接收的参数转为 VO 对象的属性内容,如果说现在有一个需求:有两个不同的 VO 类,但是类中有相同的属性,同时,这两个类的对象还都需要接收。
8.3.2 microboot-web 子模块
- 创建两个 VO 类:
package com.github.fairy.era.vo;import lombok.Data;/*** @author 许大仙* @version 1.0* @since 2022-01-11 10:58*/@Datapublic class Company {private Long cid;private String name;private String address;}
package com.github.fairy.era.vo;import lombok.Data;/*** @author 许大仙* @version 1.0* @since 2022-01-11 10:58*/@Datapublic class Dept {private Long did;private String name;}
- 新建 Handler 类:
package com.github.fairy.era.web;import java.util.HashMap;import java.util.Map;import org.springframework.web.bind.annotation.PostMapping;import org.springframework.web.bind.annotation.RequestMapping;import org.springframework.web.bind.annotation.RestController;import com.github.fairy.era.vo.Company;import com.github.fairy.era.vo.Dept;/*** @author 许大仙* @version 1.0* @since 2022-01-11 11:00*/@RestController@RequestMapping(value = "/member")public class DemoHandler {@PostMapping(value = "/add")public Map<String, Object> add(Company company, Dept dept) {Map<String, Object> map = new HashMap<>(16);map.put("company", company);map.put("dept", dept);return map;}}
- postman 进行参数的提交:
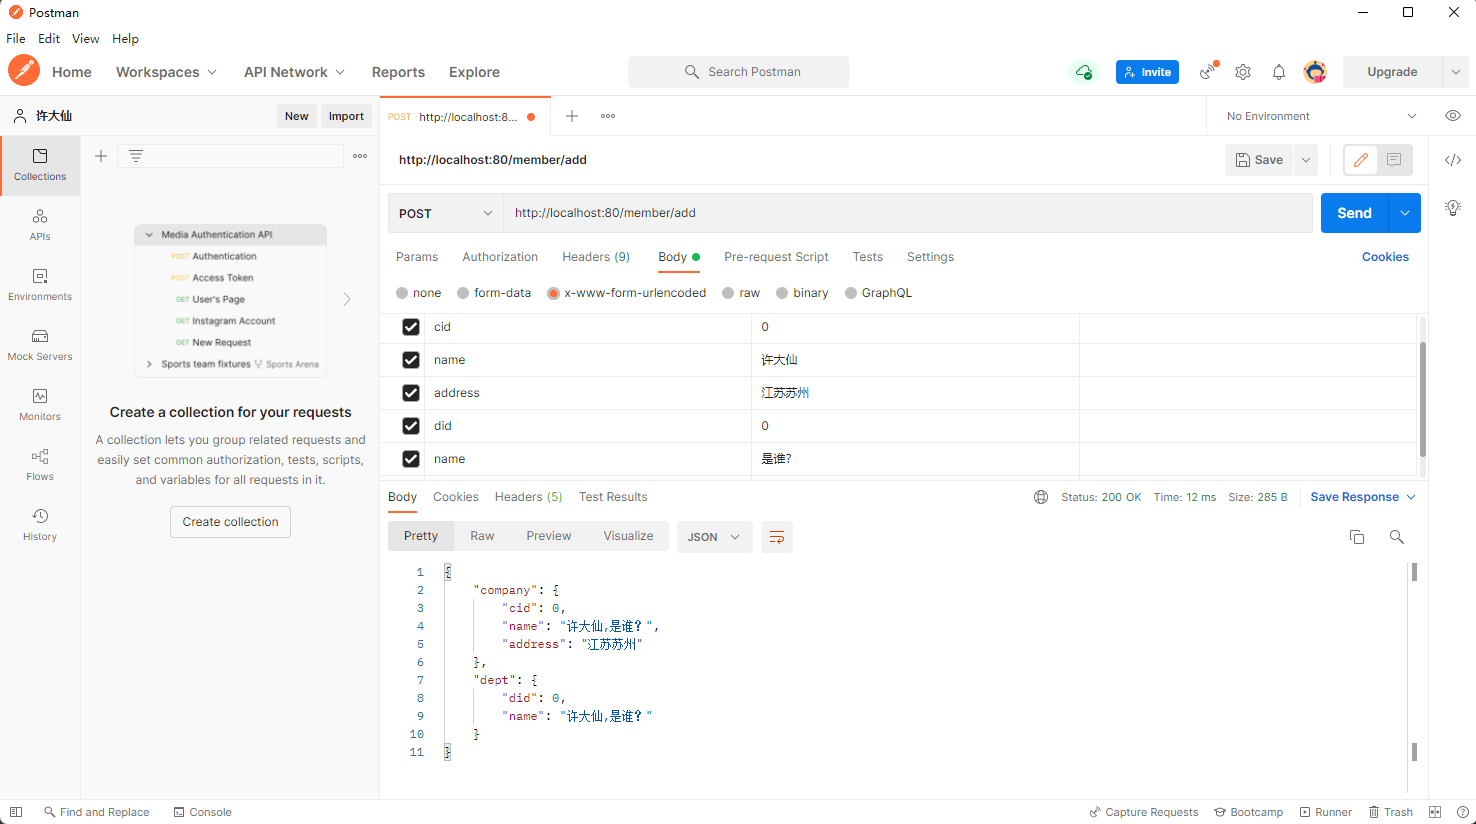
- 会发现不重复的参数名称的属性内容已经成功的设置了,但是如果是重复的参数就会发现中间有了一个
,进行分隔,此时程序没有出现错误,但是和我们的预想的结果不符。 - 如果要想解决以上的请求参数准备设置的问题,就必须采取一种全局预处理的方式来进行代码的配置,这种方式就相当于设置一些前缀。
package com.github.fairy.era.advice;import org.springframework.web.bind.WebDataBinder;import org.springframework.web.bind.annotation.InitBinder;import org.springframework.web.bind.annotation.RestControllerAdvice;/*** @author 许大仙* @version 1.0* @since 2022-01-11 13:12*/@RestControllerAdvicepublic class GlobalPretreatmentAdvice {@InitBinderpublic void company(WebDataBinder binder) {// 参数前缀binder.setFieldDefaultPrefix("company.");}@InitBinderpublic void dept(WebDataBinder binder) {// 参数前缀binder.setFieldDefaultPrefix("dept.");}}
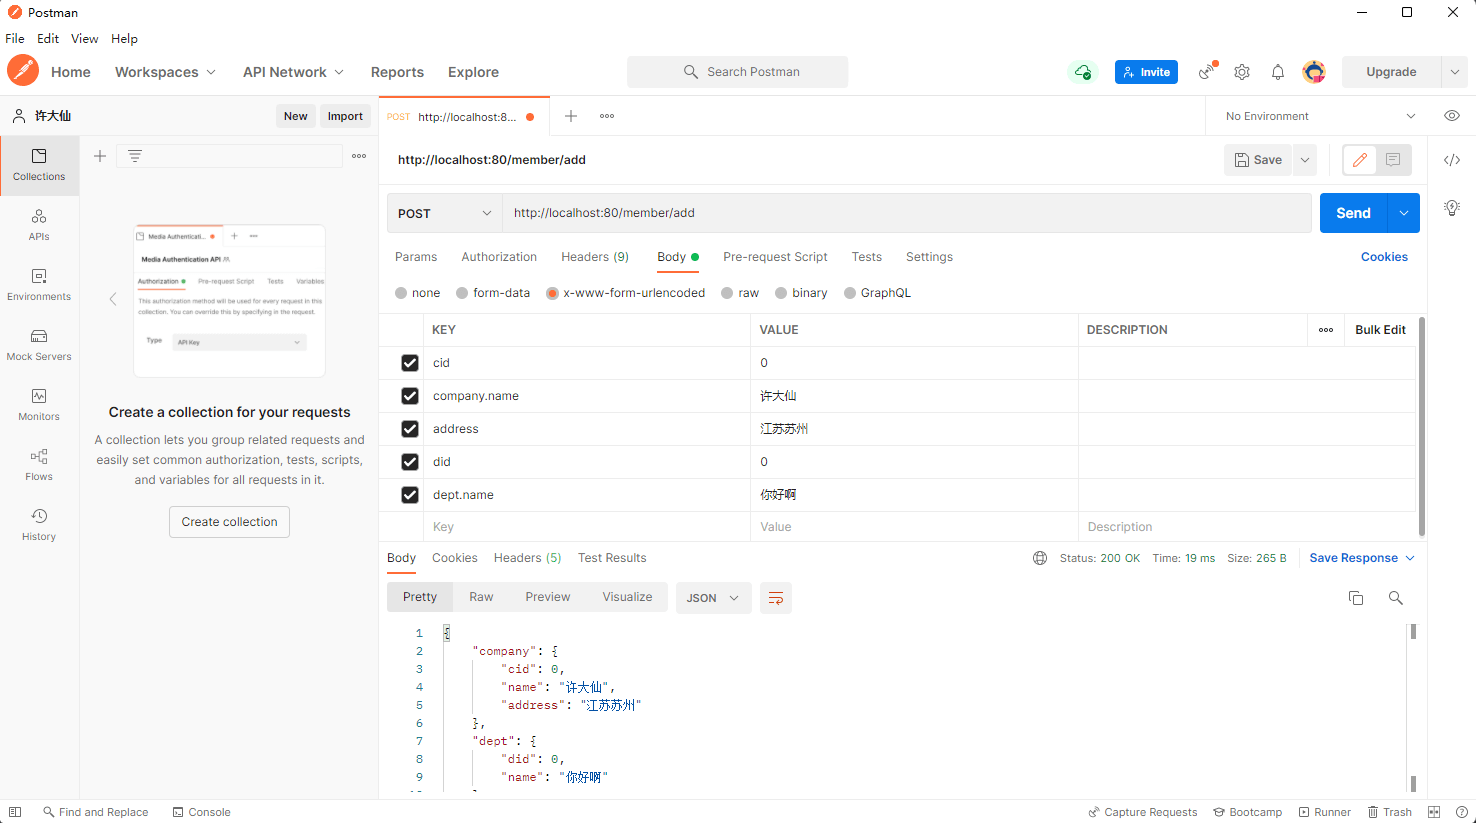
- 修改当前的 Handler 类,来进行前缀的设置:
package com.github.fairy.era.web;import java.util.HashMap;import java.util.Map;import org.springframework.web.bind.annotation.ModelAttribute;import org.springframework.web.bind.annotation.PostMapping;import org.springframework.web.bind.annotation.RequestMapping;import org.springframework.web.bind.annotation.RestController;import com.github.fairy.era.vo.Company;import com.github.fairy.era.vo.Dept;/*** @author 许大仙* @version 1.0* @since 2022-01-11 11:00*/@RestController@RequestMapping(value = "/member")public class DemoHandler {@PostMapping(value = "/add")public Map<String, Object> add(@ModelAttribute(value ="company") Company company,@ModelAttribute(value ="dept") Dept dept) {Map<String, Object> map = new HashMap<>(16);map.put("company", company);map.put("dept", dept);return map;}}
- postman 进行参数的提交:
9 请求数据验证
9.1 请求数据验证简介
9.1.1 概述
- 在标准的 MVC 设计模式之中,控制层的功能就是进行请求参数接收的,随后调用业务层来实现最终的业务处理,但是如果说现在用户传递的数据不正确,那么就会导致业务处理产生问题。
- 假设现在有一个 MessageHandler 的程序类,里面需要接收 Message 对象实例,同时这个 Handler 类还需要以 REST 的形式返回最终的处理结果,但是需要在每次处理的时候保证 Message 中的属性内容不为空。
9.1.2 microboot-web 子模块
- 定义 Message 类:
package com.github.fairy.era.vo;import lombok.Data;import java.util.Date;/*** @author 许大仙* @version 1.0* @since 2022-01-10 16:50*/@Datapublic class Message {private String title;private String content;private Date publishDate;}
- 最简单的处理形式就是在 Handler 类中进行配置:
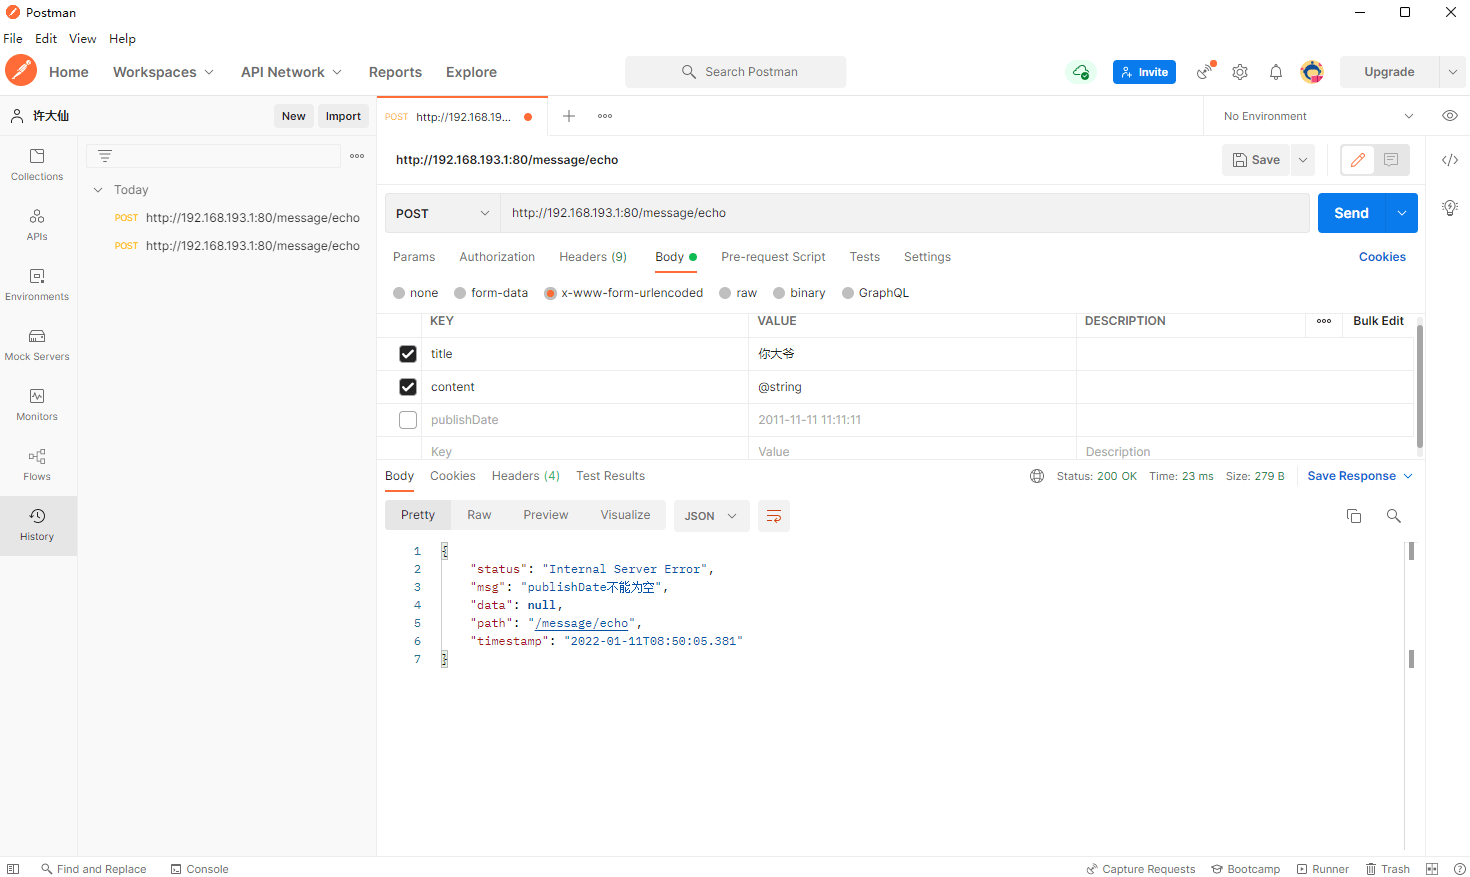
package com.github.fairy.era.web;import com.github.fairy.era.vo.Message;import org.springframework.util.ObjectUtils;import org.springframework.util.StringUtils;import org.springframework.web.bind.annotation.PostMapping;import org.springframework.web.bind.annotation.RequestMapping;import org.springframework.web.bind.annotation.RestController;import java.util.Date;import java.util.HashMap;import java.util.Map;/*** @author 许大仙* @since 2022-01-09 19-56*/@RestController@RequestMapping(value = "/message")public class MessageHandler {@PostMapping(value = "/echo")public Object echo(Message message) {Map<String, Object> errorMap = new HashMap<>(16);// 如果 title 属性为空if (!StringUtils.hasText(message.getTitle())) {errorMap.put("title", "请求提交的title参数为空");}// 如果 content 属性为空if (!StringUtils.hasText(message.getContent())) {errorMap.put("content", "请求提交的content参数为空");}// 如果 publishDate 属性为空if (ObjectUtils.isEmpty(message.getPublishDate())) {errorMap.put("publishDate", "请求提交的publishDate参数为空");}if (errorMap.isEmpty()) {message.setTitle("【ECHO】" + message.getTitle());message.setContent("【ECHO】" + message.getContent());message.setPublishDate(new Date());return message;}return errorMap;}}
- postman 提交正确的参数和错误的参数:

- 虽然以上的操作模式已经成功的实现了请求数据验证的功能,但是此时的控制层的设计时非常糟糕的,因为控制层的本质是进行 Service 层的调用,但是现在却增加了数据验证的功能。
9.1.3 microboot-web 子模块
- 这个时候可以考虑基于切面的形式来实现控制,可以基于 Spring 的 AOP ,也可以基于 SpringMVC 提供的拦截器(此处使用这个,
注意:从底层实现将 SpringMVC 的拦截器不是基于 AOP 技术的,但是实现的效果相似)。 - 新建 MessageValidateInterceptor 拦截器:
package com.github.fairy.era.interceptor;import com.fasterxml.jackson.databind.ObjectMapper;import org.springframework.util.ObjectUtils;import org.springframework.util.StringUtils;import org.springframework.web.servlet.HandlerInterceptor;import javax.servlet.http.HttpServletRequest;import javax.servlet.http.HttpServletResponse;import java.util.HashMap;import java.util.Map;/*** @author 许大仙* @version 1.0* @since 2022-01-10 17:11*/public class MessageValidateInterceptor implements HandlerInterceptor {@Overridepublic boolean preHandle(HttpServletRequest request, HttpServletResponse response, Object handler) throws Exception {response.setCharacterEncoding("UTF-8");Map<String, String> errorMap = new HashMap<>(16);String title = request.getParameter("title");String content = request.getParameter("content");String publishDate = request.getParameter("publishDate");// 如果 title 属性为空if (!StringUtils.hasText(title)) {errorMap.put("title", "请求提交的title参数为空");}// 如果 content 属性为空if (!StringUtils.hasText(content)) {errorMap.put("content", "请求提交的content参数为空");}// 如果 publishDate 属性为空if (ObjectUtils.isEmpty(publishDate)) {errorMap.put("publishDate", "请求提交的publishDate参数为空");}// 在拦截器中响应 REST 数据if (!errorMap.isEmpty()) {ObjectMapper objectMapper = new ObjectMapper();String json = objectMapper.writeValueAsString(errorMap);response.getWriter().write(json);return false;}return true;}}
- 在 SpringBoot 中注册拦截器:
package com.github.fairy.era.config;import com.github.fairy.era.interceptor.MessageValidateInterceptor;import org.springframework.context.annotation.Configuration;import org.springframework.web.servlet.config.annotation.InterceptorRegistry;import org.springframework.web.servlet.config.annotation.WebMvcConfigurer;/*** @author 许大仙* @version 1.0* @since 2022-01-06 09:39*/@Configurationpublic class MvcConfig implements WebMvcConfigurer {@Overridepublic void addInterceptors(InterceptorRegistry registry) {registry.addInterceptor(new MessageValidateInterceptor()).addPathPatterns("/message/**");}}
- 修改 Handler 类:
package com.github.fairy.era.web;

import com.github.fairy.era.vo.Message;
import org.springframework.web.bind.annotation.PostMapping;
import org.springframework.web.bind.annotation.RequestMapping;
import org.springframework.web.bind.annotation.RestController;

import java.util.Date;

/**
 * @author 许大仙
 * @since 2022-01-09 19-56
 */
@RestController
@RequestMapping(value = "/message")
public class MessageHandler {

    @PostMapping(value = "/echo")
    public Object echo(Message message) {
        message.setTitle("【ECHO】" + message.getTitle());
        message.setContent("【ECHO】" + message.getContent());
        message.setPublishDate(new Date());
        return message;
    }
}
- postman 提交正确的参数和错误的参数:

9.1.4 总结
- 以上的两种方式实际上也给出了关于传统 SpringMVC 所面临的数据验证问题,但是解决的效果实现不是很好,在前后端分离设计中,如果每一次都要求用户这么繁琐的进行开发,实在是太不人性化了。
9.2 JSR 303 数据验证规范
9.2.1 概述
- 如果要想保证用户发送的请求可以得到正确的处理,那么就需要对请求的参数进行验证,如果用户发送的请求数据符合既定的验证规则,则可以交给 Action(Handler、Controller) 正确处理,反之则应该进行错误信息提示。
- 为了简化开发者数据校验的处理操作,可以直接使用
JSR 303:Bean Validation 规范实现具体的数据校验操作。
- SpringBoot 支持 JSR 303 的验证规范,所以一旦验证出现了错误,就应该交给统一的异常处理机制进行标准化数据结构的响应,此时就不需要通过具体的程序来进行验证处理了,可以直接利用 JSR 303 验证规范在接收参数上实现请求参数的验证。
9.2.2 microboot 项目
- 修改 build.gradle 文件,添加 spring-boot-starter-validation 的依赖:
project(':microboot-web') { // 设置子项目的配置,独享配置
    dependencies { // 配置子模块依赖
        implementation(project(':microboot-common')) // 引入其他子模块
        // 引入 SpringBoot 的 web 依赖
        implementation 'org.springframework.boot:spring-boot-starter-web'
        // 引入 SpringBoot 的 aop 依赖
        implementation group: 'org.springframework.boot', name: 'spring-boot-starter-aop'
        // 引入 SpringBoot 的 mail 依赖
        implementation group: 'org.springframework.boot', name: 'spring-boot-starter-mail'
        // 引入 SpringBoot 的 validation 依赖
        implementation group: 'org.springframework.boot', name: 'spring-boot-starter-validation'

    }

    gradle.taskGraph.whenReady { // 在所有的操作准备好之后触发
        tasks.each { task ->
            if (task.name.contains('javadoc')) { // 如果发现有 javadoc 任务,就跳过
                task.enabled = false // 当前任务不执行
            }
        }
    }
}
- 实际上 JSR 303 是一系列的注解所组成的,换言之,在整个的程序代码之中会通过注解的形式来进行各种验证规则的配置。
9.2.3 microboot-web 子模块
- 下面来实现具体的验证处理操作,直接在接收的参数类型上使用。
package com.github.fairy.era.vo;

import lombok.Data;

import javax.validation.constraints.NotBlank;
import javax.validation.constraints.NotNull;
import java.util.Date;

/**
 * @author 许大仙
 * @version 1.0
 * @since 2022-01-10 16:50
 */
@Data
public class Message {

    @NotBlank(message = "title不能为空")
    private String title;

    @NotBlank(message = "content不能为空")
    private String content;

    @NotNull(message = "publishDate不能为空")
    private Date publishDate;

}
- 对于当前的 MessageHandler 程序代码,使用
@Validated注解启用验证。
package com.github.fairy.era.web;

import com.github.fairy.era.vo.Message;
import org.springframework.validation.annotation.Validated;
import org.springframework.web.bind.annotation.PostMapping;
import org.springframework.web.bind.annotation.RequestMapping;
import org.springframework.web.bind.annotation.RestController;

import java.util.Date;

/**
 * @author 许大仙
 * @since 2022-01-09 19-56
 */
@Validated
@RestController
@RequestMapping(value = "/message")
public class MessageHandler {

    @PostMapping(value = "/echo")
    public Object echo(@Validated Message message) {
        message.setTitle("【ECHO】" + message.getTitle());
        message.setContent("【ECHO】" + message.getContent());
        message.setPublishDate(new Date());
        return message;
    }
}
- 需要在全局异常处理那边进行数据验证失败的异常捕获处理:
package com.github.fairy.era.advice;

import java.time.LocalDateTime;
import java.util.Set;
import java.util.stream.Collectors;

import javax.servlet.http.HttpServletRequest;
import javax.validation.ConstraintViolation;
import javax.validation.ConstraintViolationException;

import org.springframework.context.support.DefaultMessageSourceResolvable;
import org.springframework.http.HttpStatus;
import org.springframework.validation.BindException;
import org.springframework.validation.BindingResult;
import org.springframework.web.bind.MethodArgumentNotValidException;
import org.springframework.web.bind.annotation.ExceptionHandler;
import org.springframework.web.bind.annotation.RestControllerAdvice;
import org.springframework.web.servlet.NoHandlerFoundException;

import com.github.fairy.era.vo.Result;

/**
 * @author 许大仙
 * @version 1.0
 * @since 2022-01-10 14:49
 */
@RestControllerAdvice
public class GlobalExceptionAdvice {

    /**
     * 捕获 Exception 异常
     *
     * @param ex
     * @return
     */
    @ExceptionHandler(Exception.class)
    public Result<?> handleException(Exception ex, HttpServletRequest request) {
        return Result.builder().status(HttpStatus.INTERNAL_SERVER_ERROR.getReasonPhrase()).msg(ex.getMessage())
            .path(request.getRequestURI()).timestamp(LocalDateTime.now().toString()).build();

    }

    /**
     * 捕获 NoHandlerFoundException 异常
     *
     * @param ex
     * @return
     */
    @ExceptionHandler(NoHandlerFoundException.class)
    public Result<?> handle404Exception(Exception ex, HttpServletRequest request) {
        return Result.builder().status(HttpStatus.NOT_FOUND.getReasonPhrase()).msg(ex.getMessage())
            .path(request.getRequestURI()).timestamp(LocalDateTime.now().toString()).build();
    }

    /**
     * 处理 form data方式调用接口校验失败抛出的异常
     *
     * @param ex
     * @return
     */
    @ExceptionHandler(BindException.class)
    public Result<?> handleBindException(BindException ex, HttpServletRequest request) {
        BindingResult bindingResult = ex.getBindingResult();
        String msg = bindingResult.getFieldErrors().stream().map(DefaultMessageSourceResolvable::getDefaultMessage)
            .collect(Collectors.joining(";"));
        return Result.builder().status(HttpStatus.INTERNAL_SERVER_ERROR.getReasonPhrase()).msg(msg)
            .path(request.getRequestURI())
            .timestamp(LocalDateTime.now().toString()).build();
    }

    /**
     * 处理 json 请求体调用接口校验失败抛出的异常
     *
     * @param ex
     * @return
     */
    @ExceptionHandler(MethodArgumentNotValidException.class)
    public Result<?> handleMethodArgumentNotValidException(MethodArgumentNotValidException ex,
        HttpServletRequest request) {
        BindingResult bindingResult = ex.getBindingResult();
        String msg = bindingResult.getFieldErrors().stream().map(DefaultMessageSourceResolvable::getDefaultMessage)
            .collect(Collectors.joining(";"));
        return Result.builder().status(HttpStatus.INTERNAL_SERVER_ERROR.getReasonPhrase()).msg(msg)
            .path(request.getRequestURI())
            .timestamp(LocalDateTime.now().toString()).build();
    }

    /**
     * 处理单个参数校验失败抛出的异常
     *
     * @param ex
     * @return
     */
    @ExceptionHandler(ConstraintViolationException.class)
    public Result<?> constraintViolationExceptionHandler(ConstraintViolationException ex, HttpServletRequest request) {
        Set<ConstraintViolation<?>> constraintViolations = ex.getConstraintViolations();
        String msg =
            constraintViolations.stream().map(ConstraintViolation::getMessage).collect(Collectors.joining(";"));
        return Result.builder().status(HttpStatus.INTERNAL_SERVER_ERROR.getReasonPhrase()).msg(msg)
            .path(request.getRequestURI())
            .timestamp(LocalDateTime.now().toString()).build();
    }

}
- postman 提交错误的参数:
9.3 自定义验证器
9.3.1 概述
- 在 JSR 303 规范里面提供了足够丰富的验证器了,但是我们无法回避各种项目开发之中可能存在的一些关于验证结构的不完全控制,如:有些业务只需要数据在指定的范围之内,有些业务需要可以灵活的进行一些正则的配置。
9.3.2 microboot-web 子模块
- 扩展一个新的实现正则验证的注解:
package com.github.fairy.era.common.validation.annotation;

import static java.lang.annotation.ElementType.FIELD;
import static java.lang.annotation.ElementType.PARAMETER;
import static java.lang.annotation.RetentionPolicy.RUNTIME;

import java.lang.annotation.Documented;
import java.lang.annotation.Repeatable;
import java.lang.annotation.Retention;
import java.lang.annotation.Target;

import javax.validation.Constraint;
import javax.validation.Payload;

import com.github.fairy.era.common.validation.handler.RegexConstraintValidator;

/**
 * @author 许大仙
 * @version 1.0
 * @since 2022-01-11 09:19
 */
@Documented
@Constraint(validatedBy = {RegexConstraintValidator.class}) // 正则的处理类
@Target({FIELD, PARAMETER})
@Retention(RUNTIME)
@Repeatable(Regex.List.class)
public @interface Regex {
    // 错误信息
    String message() default "{javax.validation.constraints.NotBlank.message}";

    // 验证分组
    Class<?>[] groups() default {};

    // 附加的原数据信息
    Class<? extends Payload>[] payload() default {};

    // 自定义属性,接收正则表达式
    String pattern() default "";

    @Target({FIELD, PARAMETER})
    @Retention(RUNTIME)
    @Documented
    public @interface List {
        Regex[] value();
    }

}
- 如果要想让某一个验证的注解生效,就一定要提供与之匹配的注解处理类:
package com.github.fairy.era.common.validation.handler;

import javax.validation.ConstraintValidator;
import javax.validation.ConstraintValidatorContext;

import com.github.fairy.era.common.validation.annotation.Regex;

/**
 * @author 许大仙
 * @version 1.0
 * @since 2022-01-11 09:28
 */
public class RegexConstraintValidator implements ConstraintValidator<Regex, Object> {

    /**
     * 保存正则表达式
     */
    private String regexExpression;

    /**
     * 通过注解配置的内容获取表达式的信息
     *
     * @param constraintAnnotation
     */
    @Override
    public void initialize(Regex constraintAnnotation) {
        this.regexExpression = constraintAnnotation.pattern();
    }

    /**
     * 校验数据
     *
     * @param value 目标请求参数
     * @param context
     * @return
     */
    @Override
    public boolean isValid(Object value, ConstraintValidatorContext context) {
        // 如果数据为空,直接返回
        if (null == value) {
            return true;
        }
        return value.toString().matches(this.regexExpression);
    }
}
- postman 提交正确的参数和错误的参数:
- 此时就实现了一个自定义的验证规则的处理,在实际的开发中,这样自定义的验证操作非常常见。
9.4 分组校验
9.4.1 概述
- 经常会需要这样的需求,有些字段在编辑的时候是必填,在的时候是新增是非必填,如:主键 id 。如果我们分别用两个 VO 类对象,也是可以的实现这样的业务处理的,但是会造成膨胀,那么怎么办?
- Validator 校验框架其实已经提供了解决方案:分组校验。
9.4.2 microboot-web 子模块
- 定义分组接口:
package com.github.fairy.era.common;

import javax.validation.groups.Default;

/**
 * @author 许大仙
 * @version 1.0
 * @since 2022-01-11 10:05
 */
public interface ValidGroup extends Default {

    interface Create extends ValidGroup {}

    interface Update extends ValidGroup {}

    interface Delete extends ValidGroup {}

    interface Query extends ValidGroup {}
}
- 在 Message 类中给参数分配分组:
package com.github.fairy.era.vo;
import javax.validation.constraints.Email;
import javax.validation.constraints.NotNull;
import javax.validation.constraints.Null;
import com.github.fairy.era.common.ValidGroup;
import lombok.Data;
/**
* @author 许大仙
* @version 1.0
* @since 2022-01-10 16:50
*/
@Data
public class Message {
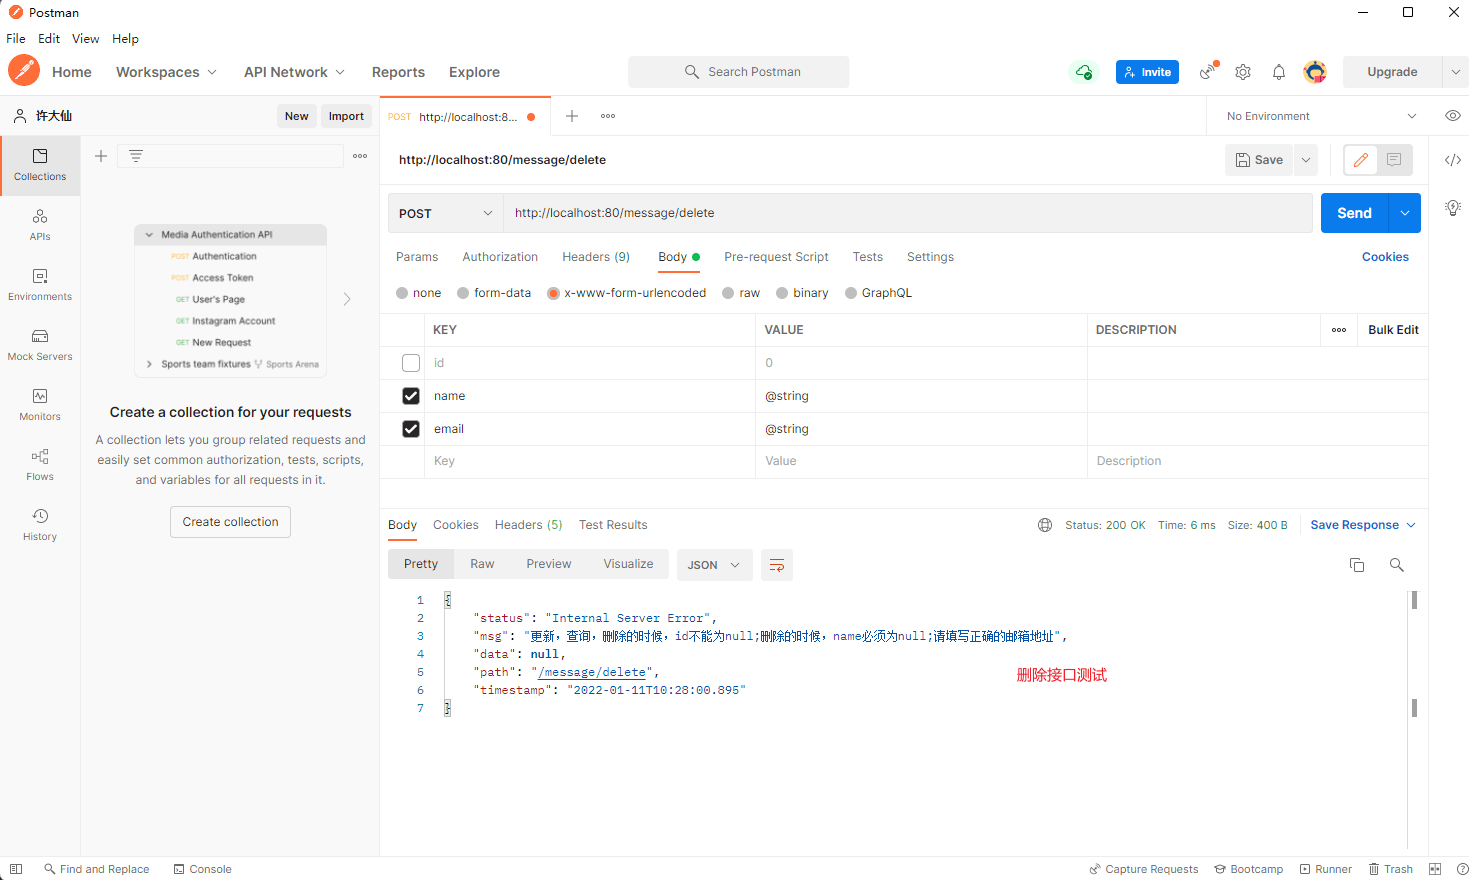
@Null(message = "新增的时候,id必须为null", groups = ValidGroup.Create.class)
@NotNull(message = "更新,查询,删除的时候,id不能为null",
groups = {ValidGroup.Delete.class, ValidGroup.Update.class, ValidGroup.Query.class})
private Long id;
@NotNull(message = "新增的时候,name不能为空", groups = ValidGroup.Create.class)
@Null(message = "删除的时候,name必须为null", groups = {ValidGroup.Delete.class})
private String name;
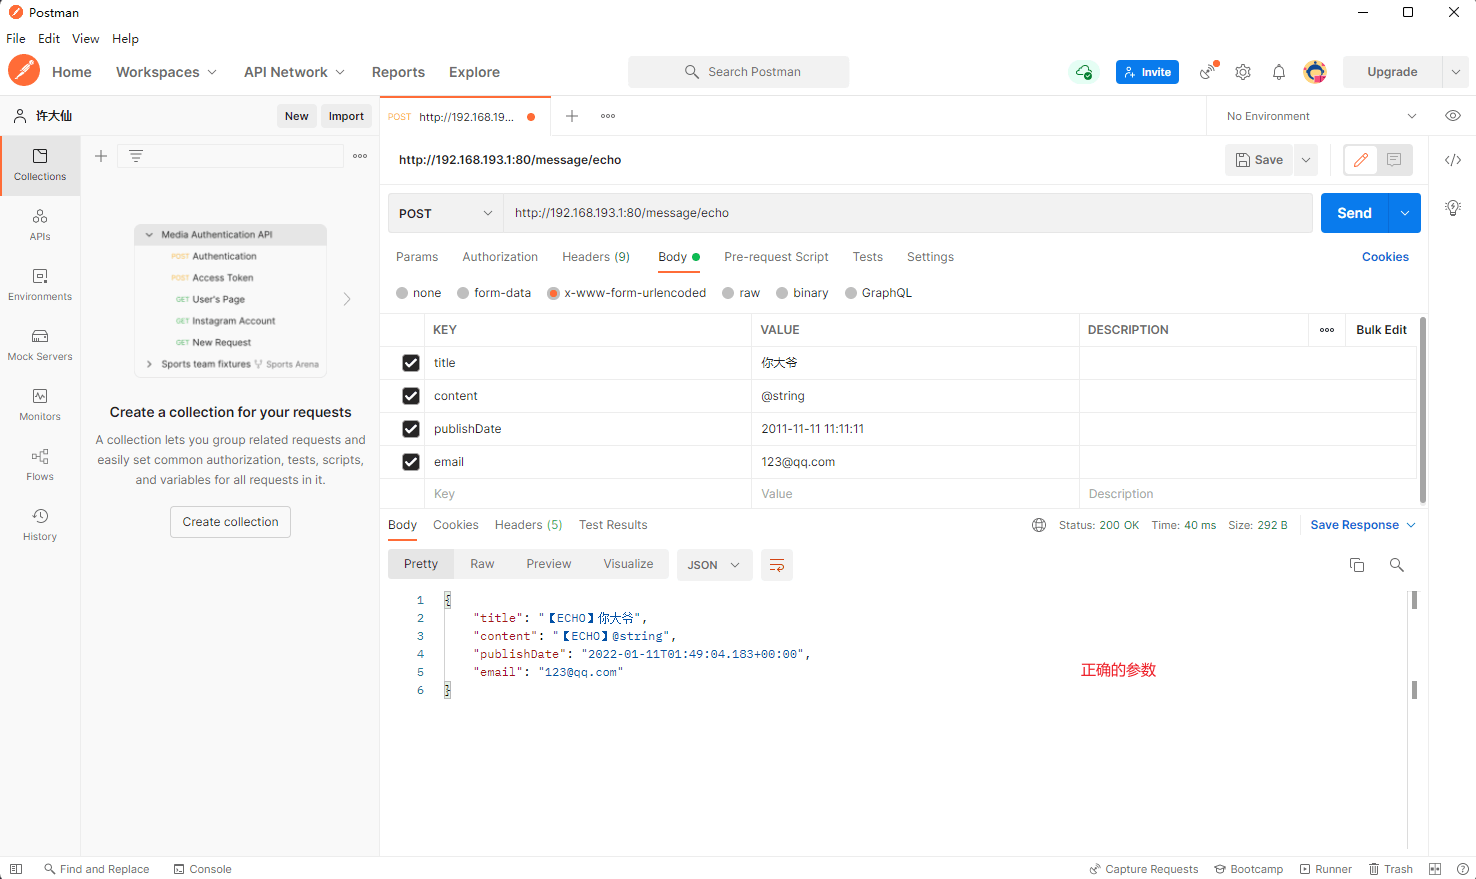
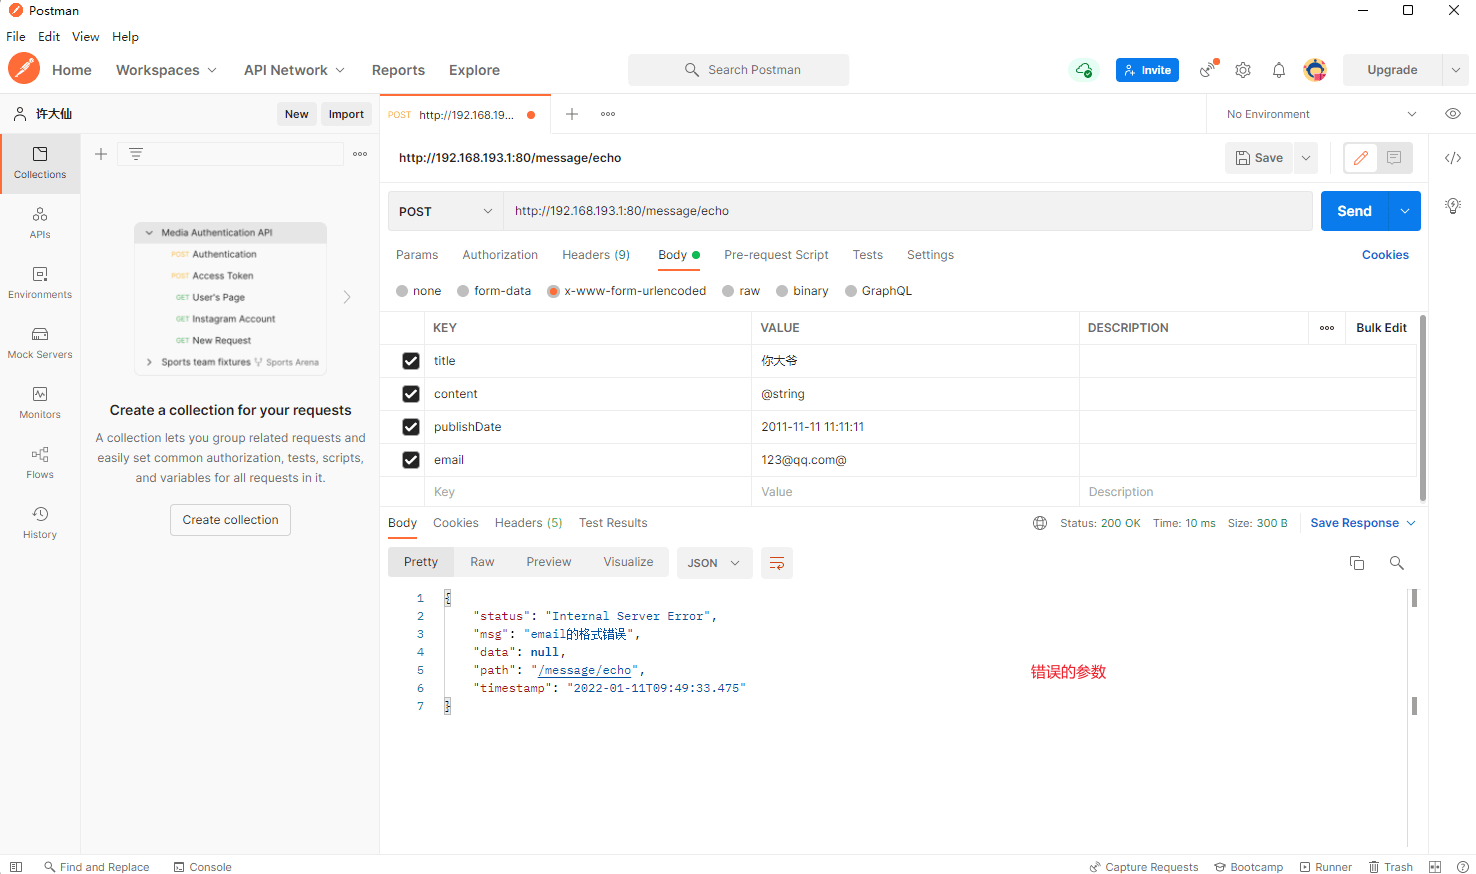
@Email(message = "请填写正确的邮箱地址")
private String email;
}
- 给需要参数校验的方法指定分组:
package com.github.fairy.era.web;

import java.time.LocalDateTime;

import javax.servlet.http.HttpServletRequest;

import org.springframework.http.HttpStatus;
import org.springframework.validation.annotation.Validated;
import org.springframework.web.bind.annotation.PostMapping;
import org.springframework.web.bind.annotation.RequestMapping;
import org.springframework.web.bind.annotation.RestController;

import com.github.fairy.era.common.ValidGroup;
import com.github.fairy.era.vo.Message;
import com.github.fairy.era.vo.Result;

/**
 * @author 许大仙
 * @since 2022-01-09 19-56
 */
@Validated
@RestController
@RequestMapping(value = "/message")
public class MessageHandler {

    /**
     * 新增接口
     *
     * @param message
     * @param request
     * @return
     */
    @PostMapping(value = "/add")
    public Result<?> add(@Validated(value = ValidGroup.Create.class) Message message, HttpServletRequest request) {
        return Result.builder().status(HttpStatus.OK.getReasonPhrase()).path(request.getRequestURI()).data(message)
            .timestamp(LocalDateTime.now().toString()).build();
    }

    /**
     * 修改接口
     *
     * @param message
     * @param request
     * @return
     */
    @PostMapping(value = "/update")
    public Result<?> update(@Validated(value = ValidGroup.Update.class) Message message, HttpServletRequest request) {
        return Result.builder().status(HttpStatus.OK.getReasonPhrase()).path(request.getRequestURI()).data(message)
            .timestamp(LocalDateTime.now().toString()).build();
    }

    /**
     * 查询接口
     *
     * @param message
     * @param request
     * @return
     */
    @PostMapping(value = "/view")
    public Result<?> view(@Validated(value = ValidGroup.Query.class) Message message, HttpServletRequest request) {
        return Result.builder().status(HttpStatus.OK.getReasonPhrase()).path(request.getRequestURI()).data(message)
            .timestamp(LocalDateTime.now().toString()).build();
    }

    /**
     * 删除接口
     *
     * @param message
     * @param request
     * @return
     */
    @PostMapping(value = "/delete")
    public Result<?> delete(@Validated(value = ValidGroup.Delete.class) Message message, HttpServletRequest request) {
        return Result.builder().status(HttpStatus.OK.getReasonPhrase()).path(request.getRequestURI()).data(message)
            .timestamp(LocalDateTime.now().toString()).build();
    }

}
- postman 测试:


若有收获,就点个赞吧
0 人点赞
