1 定时任务管理
1.1 Spring 定时任务
1.1.1 概述
- SpringBoot 是基于 Spring 之上的更加简化的应用开发框架,实际上在 Spring 里面支持的内容是比较丰富的,Spring 提供了 SpringTask 来实现简单的任务调度(相比较传统的 Java 内置的定时任务管理来讲的),传统的 Java 定时任务提供的只是一个间隔任务,但是却没有 CRON 表达式的支持,而 SpringTask 相比较 Quartz 组件来说更为简单,原因在于和 Spring 深度的融合。
1.1.2 开发步骤
- ① 在启动类加上
@EnableScheduling注解。 - ② 在任务的处理类上加上
@Component注解。 - ③ 在任务的方法上加上
@Scheduled注解。
1.1.3 microboot-web 子模块
- 创建一个任务的调度处理类,这个类将创建两类不同的任务:间隔任务和 CRON 任务
package com.github.fairy.era.task;import java.time.LocalDateTime;import java.time.format.DateTimeFormatter;import org.springframework.scheduling.annotation.Scheduled;import org.springframework.stereotype.Component;import lombok.extern.slf4j.Slf4j;/*** 任务的处理类** @author 许大仙* @version 1.0* @since 2022-01-13 15:24*/@Component // 任务的处理类需要注册到 Spring 的容器中@Slf4jpublic class ScheduleTask {private static DateTimeFormatter df = DateTimeFormatter.ofPattern("yyyy-MM-dd HH:mm:ss");/*** 间隔任务:每 2 秒触发一次当前的任务*/@Scheduled(fixedDelay = 2000)public void runJobInterval() {log.info("【间隔任务】 = {}", LocalDateTime.now().format(df));}/*** CRON 任务:每秒触发一次*/@Scheduled(cron = "0/1 * * * * ? ")public void runJobCron() {log.info("【CRON任务】 = {}", LocalDateTime.now().format(df));}}
- 在启动类上添加
@EnableScheduling注解:
package com.github.fairy.era;import org.springframework.boot.SpringApplication;import org.springframework.boot.autoconfigure.SpringBootApplication;import org.springframework.scheduling.annotation.EnableScheduling;/*** 启动类** @author 许大仙* @version 1.0* @since 2021-12-31 09:14*/@EnableScheduling // 开启定时任务@SpringBootApplicationpublic class Application {public static void main(String[] args) {SpringApplication.run(Application.class, args);}}
- 控制台日志输出:
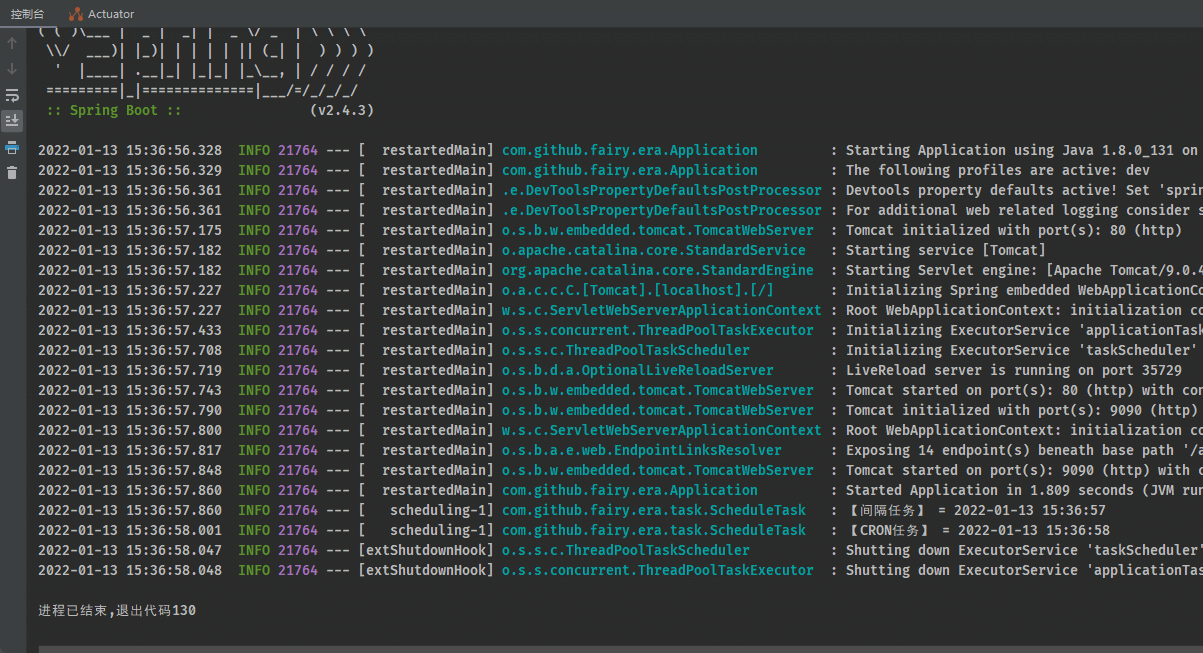
1.1.4 microboot-web 子模块
- 此时虽然可以正常的进行任务的启动了,但是如果说间隔任务会消耗大量的时间,那么程序又会怎么执行?
- 修改任务的调度处理类:
package com.github.fairy.era.task;import java.time.LocalDateTime;import java.time.format.DateTimeFormatter;import java.util.concurrent.TimeUnit;import org.springframework.scheduling.annotation.Scheduled;import org.springframework.stereotype.Component;import lombok.SneakyThrows;import lombok.extern.slf4j.Slf4j;/*** 任务的处理类** @author 许大仙* @version 1.0* @since 2022-01-13 15:24*/@Component // 任务的处理类需要注册到 Spring 的容器中@Slf4jpublic class ScheduleTask {private static DateTimeFormatter df = DateTimeFormatter.ofPattern("yyyy-MM-dd HH:mm:ss");/*** 间隔任务:每 2 秒触发一次当前的任务*/@Scheduled(fixedDelay = 2000)@SneakyThrowspublic void runJobInterval() {log.info("【间隔任务】 = {}", LocalDateTime.now().format(df));// 强制模拟 5 秒的延迟TimeUnit.SECONDS.sleep(5000);}/*** CRON 任务:每秒触发一次*/@Scheduled(cron = "0/1 * * * * ? ")public void runJobCron() {log.info("【CRON任务】 = {}", LocalDateTime.now().format(df));}}
- 控制台日志输出:
- 此时一般追加了 5 秒的操作延迟之后,那么随后的定时任务就开始进行等待,因为默认情况下定时任务的线程池中的长度是 1 。如果某一个任务线程占据很长时间,其他任务都需要等待调度。
1.1.5 microboot-web 子模块
- 如果要想解决当前的问题,则需要进行线程池的配置。
- 新建 ScheduleConfig 配置类:
package com.github.fairy.era.config;import java.util.concurrent.Executors;import org.springframework.context.annotation.Configuration;import org.springframework.scheduling.annotation.SchedulingConfigurer;import org.springframework.scheduling.config.ScheduledTaskRegistrar;/*** @author 许大仙* @version 1.0* @since 2022-01-13 15:55*/@Configurationpublic class ScheduleConfig implements SchedulingConfigurer {@Overridepublic void configureTasks(ScheduledTaskRegistrar taskRegistrar) {// 允许两个任务并行执行taskRegistrar.setScheduler(Executors.newScheduledThreadPool(2));}}
- 或者修改 application.yml 配置文件:
spring:task:scheduling:pool:size: 2 # 允许两个任务并行执行
- 修改任务的调度处理类:
package com.github.fairy.era.task;import java.time.LocalDateTime;import java.time.format.DateTimeFormatter;import java.util.concurrent.TimeUnit;import org.springframework.scheduling.annotation.Scheduled;import org.springframework.stereotype.Component;import lombok.SneakyThrows;import lombok.extern.slf4j.Slf4j;/*** 任务的处理类** @author 许大仙* @version 1.0* @since 2022-01-13 15:24*/@Component // 任务的处理类需要注册到 Spring 的容器中@Slf4jpublic class ScheduleTask {private static DateTimeFormatter df = DateTimeFormatter.ofPattern("yyyy-MM-dd HH:mm:ss");/*** 间隔任务:每 2 秒触发一次当前的任务*/@Scheduled(fixedDelay = 2000)@SneakyThrowspublic void runJobInterval() {log.info(Thread.currentThread().getName() + "【间隔任务】 = {}", LocalDateTime.now().format(df));// 强制模拟 5 秒的延迟TimeUnit.SECONDS.sleep(5000);}/*** CRON 任务:每秒触发一次*/@Scheduled(cron = "0/1 * * * * ? ")public void runJobCron() {log.info(Thread.currentThread().getName() + "【CRON任务】 = {}", LocalDateTime.now().format(df));}}
- 控制台信息输出:
- 通过此时的执行结果可以发现,所有的间隔任务和 CRON 任务同时运行,彼此之间没有任务的干扰。
1.2 ShedLock 分布式定时任务
1.2.1 概述
- 在之前已经发现了,可以在 SpringBoot 里面利用 SpringTask 进行定时任务的开发,那么为什么现在却要更换定时组件?如果要想了解其背后的原因,那么一定要清楚一个核心的问题:SpringBoot 是为了微服务而生的,一旦牵涉到微服务,那么就必然离不开集群的设计问题。
- ShedLock 是一个在分布式应用环境下使用的定时任务管理框架,主要的目的是解决在分布式环境中多个实例使用相同定时任务在同一时间点的重复执行问题。
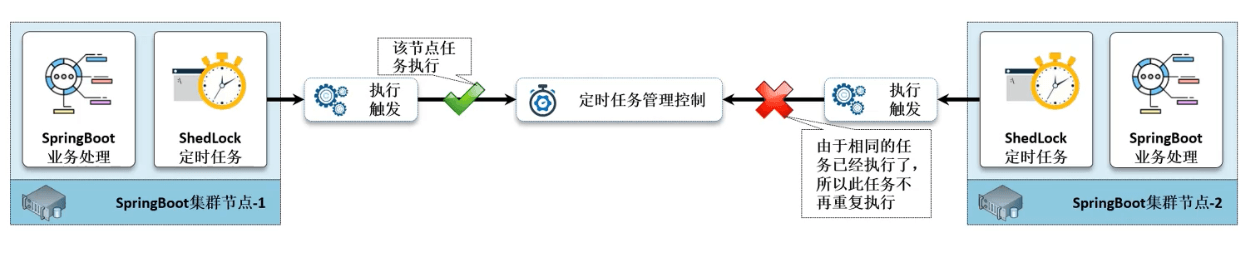
- 如果所有的定时任务分布在集群中的不同节点之中,所以就需要有一个专属的数据存储空间用来清除的记录下每一个定时任务的名称以及当前执行任务的主机和任务执行时间,而后在集群中不同的节点执行任务前,首先会查看数据存储中是否存在有指定的任务记录,如果没有相应的数据则可以启动该节点任务;反之,如果已经保存有此任务的相关信息,则代表当前的任务正在执行,则要跳过该节点的定时任务。

- 如果要想实现这种分布式任务的协调调度,那么就需要有一个公共的协调组件,存储任务调度的配置信息,这个公共的协调组件可以是 MySQL、Redis、Zookeeper 等,本次使用 Redis 。
1.2.2 microboot 项目
- 如果要想使用 ShedLock 和 Redis 组件需要在项目中配置如下的依赖。
- 修改 build.gradle 配置文件:
project(':microboot-web') { // 设置子项目的配置,独享配置dependencies { // 配置子模块依赖implementation(project(':microboot-common')) // 引入其他子模块// 引入 SpringBoot 的 web 依赖implementation group: 'org.springframework.boot', name: 'spring-boot-starter-data-redis'implementation group: 'net.javacrumbs.shedlock', name: 'shedlock-spring', version: '4.31.0'implementation group: 'net.javacrumbs.shedlock', name: 'shedlock-provider-redis-spring', version: '4.31.0'implementation group: 'org.apache.commons', name: 'commons-pool2'}// processResources {// apply from: "src/main/profiles/${env}/profile.gradle"// rootProject.ext["env"] = env// expand(project.properties)// }gradle.taskGraph.whenReady { // 在所有的操作准备好之后触发tasks.each { task ->if (task.name.contains('javadoc')) { // 如果发现有 javadoc 任务,就跳过task.enabled = false // 当前任务不执行}}}}
1.2.3 microboot-web 子模块
- 修改 application.yml 配置文件,添加 Redis 的相关配置:
spring:profiles:active: devredis: # redisport: 6379host: localhostpassword:database: 0connect-timeout: 200timeout: 200lettuce:pool:max-active: 100max-idle: 20min-idle: 10max-wait: 1000time-between-eviction-runs: 2000 # 每 2 秒回收一次空闲连接
1.2.4 microboot-web 子模块
- 现在外部的环境都已经准备好了,此时就需要引入分布式的任务管理了,整个的管理过程之中不需要开发者明确的进行 Redis 数据库的操作,所有的操作全部由 ShedLock 组件自动完成。
- 修改 ScheduleTask :
package com.github.fairy.era.task;import lombok.extern.slf4j.Slf4j;import net.javacrumbs.shedlock.spring.annotation.SchedulerLock;import org.springframework.scheduling.annotation.Scheduled;import org.springframework.stereotype.Component;import java.time.LocalDateTime;import java.time.format.DateTimeFormatter;/*** 任务的处理类** @author 许大仙* @version 1.0* @since 2022-01-13 15:24*/@Component // 任务的处理类需要注册到 Spring 的容器中@Slf4jpublic class ScheduleTask {private static DateTimeFormatter df = DateTimeFormatter.ofPattern("yyyy-MM-dd HH:mm:ss");/*** CRON 任务:每秒触发一次** @SchedulerLoc 注解里面对于任务独占锁的时间有两个配置项:* - lockAtLeastFor:成功执行定时任务时,时间节点所能拥有独占锁的最短时间* - lockAtMostFor:成功执行定时任务时,时间节点所能拥有独占锁的最长时间*/@SchedulerLock(name = "task", lockAtLeastFor = "5000")@Scheduled(cron = "0/1 * * * * ? ")public void runJobCron() {log.info(Thread.currentThread().getName() + "【CRON任务】 = {}", LocalDateTime.now().format(df));}}
- 如果要想使用 ShedLock 组件还需要为其配置有一个具体的配置类:
package com.github.fairy.era.config;import net.javacrumbs.shedlock.core.LockProvider;import net.javacrumbs.shedlock.provider.redis.spring.RedisLockProvider;import net.javacrumbs.shedlock.spring.annotation.EnableSchedulerLock;import org.springframework.beans.factory.annotation.Value;import org.springframework.context.annotation.Bean;import org.springframework.context.annotation.Configuration;import org.springframework.data.redis.connection.RedisConnectionFactory;import org.springframework.scheduling.annotation.EnableScheduling;/*** @author 许大仙* @since 2022-01-13 20-31*/@Configuration@EnableScheduling@EnableSchedulerLock(defaultLockAtMostFor = "PT30S") // 30 S 强制释放做public class ShedLockRedisConfig {@Value("${spring.profiles.active}") // 采用默认的环境private String env; // 当前应用环境@Beanpublic LockProvider lockProvider(RedisConnectionFactory connectionFactory) {return new RedisLockProvider(connectionFactory, this.env);}}
2 事件发布和监听
2.1 自定义事件概述
- 在项目开发过程中,关于解耦合的设计实在是太多了,常规的结构上的做法就是利用接口来实现解耦合的处理操作,而除了此类的操作之外,在 Java 开发里面也可以基于事件的方式来进行解耦合。
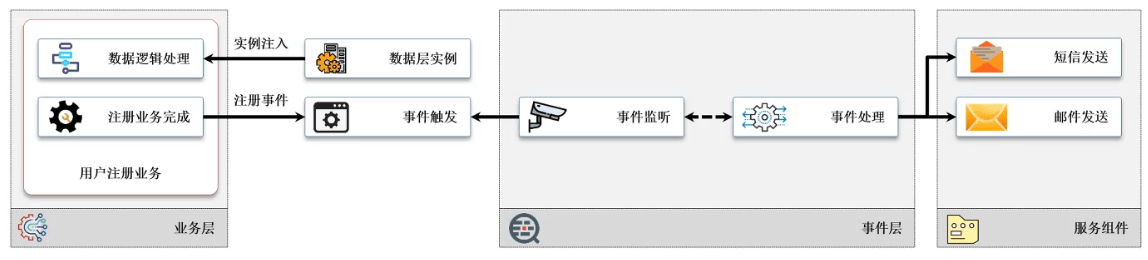
- 在完善的项目分层设计结构之中,常规性的做法就是将项目中所需要的大量业务处理逻辑直接定义在业务层之中,这样一来随着业务的不断完善,业务层中对应的程序代码也会越来越多,例如:当用户注册完成后需要向其对应的注册邮箱或者手机中发送验证的信息,而如果将这类的操作放在业务层,那么就会造成代码结构上的混乱,毕竟这些都只是辅助功能,最佳的做法就是让其发布一个用户注册的事件,而后具体的信息发送由事件的处理类去完成,这样就可以成功的实现业务的解耦和操作。
- 在 Java 之中所提供的事件处理机制只是最原始的操作形式,而在 Spring 开发框架里面就考虑到了这种自定义事件的影响,所以对于自定义的事件也存在加强。
- 在 Spring 3.x 开始就提供了自定义的事件处理支持,而在 SpringBoot 之中可以直接使用这样的事件处理支持来进行具体的开发。
2.2 自定义事件处理
2.2.1 概述
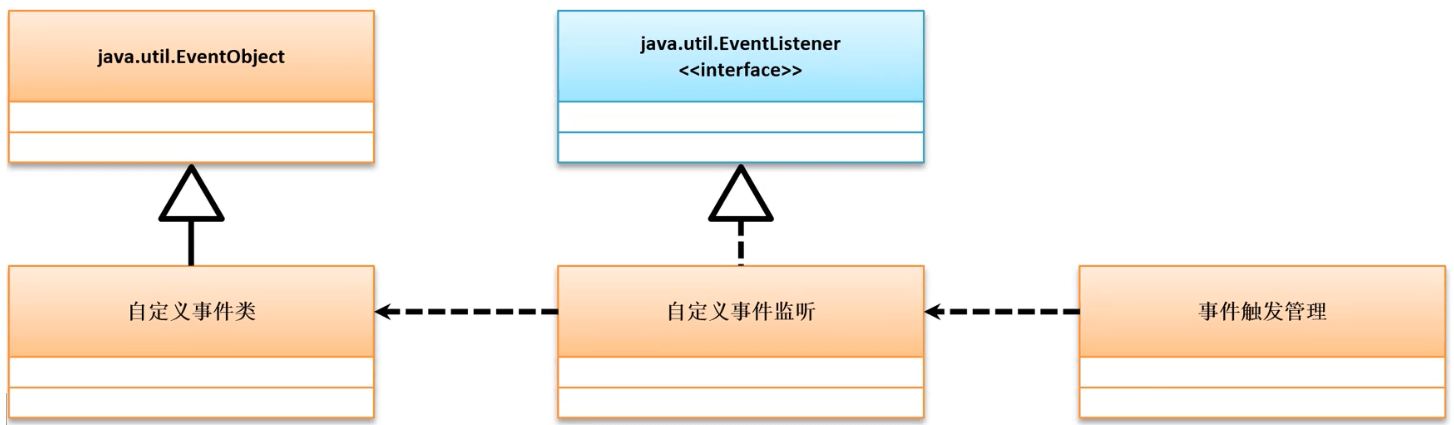
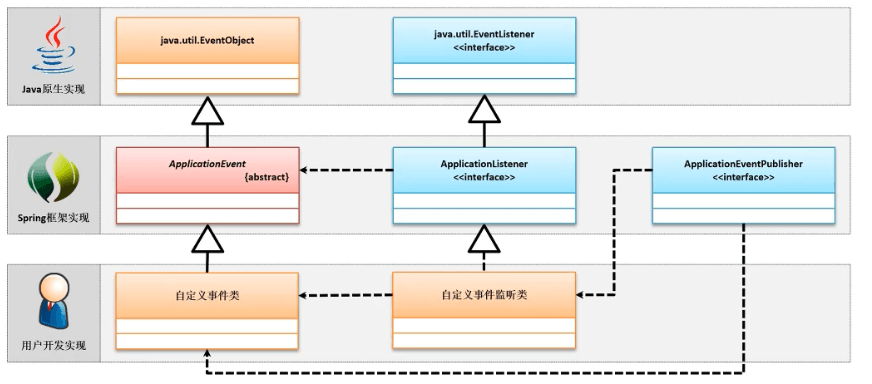
- Spring 中的事件处理实际上是针对于已有 Java 事件机制的一种延续,为了便于 Spring 实现事件操作,在已有的 EventObject 事件类的基础上扩充了 ApplicationEvent 抽象事件类,同时又在 EventListener 监听接口基础上扩充了 ApplicationListener 子接口,开发者如果要进行事件的监听注册,只需要将 ApplicationListener 接口子类实例进行 Bean 定义,则会自定在 Spring 容器中进行注册,所有的事件注册都是通过 ApplicationEventPublisher 接口实现,这样在产生了指定类型的事件对象实例后就可以自动的匹配事件监听并进行处理。
- 实际上在传统的 JavaSE 的事件操作应用之中比较常见的结构就属于 GUI编程了,后来到了 JavaWeb 阶段提供的监听器,其本质是针对于这些事件的封装。
2.2.2 microboot-web 子模块
- 如果要想进行事件的处理,就需要一个简单的数据包装类,此时定义一个 Message 程序类:
package com.github.fairy.era.vo;import lombok.Data;/*** @author 许大仙* @version 1.0* @since 2022-01-14 09:02*/@Datapublic class Message {private String title;private String url;}
- 在项目之中配置一个事件处理类,这个类需要继承 ApplicationEvent 父类:
package com.github.fairy.era.event;import org.springframework.context.ApplicationEvent;import com.github.fairy.era.vo.Message;import lombok.Getter;import lombok.extern.slf4j.Slf4j;/*** @author 许大仙* @version 1.0* @since 2022-01-14 09:04*/@Getter@Slf4jpublic class MessageEvent extends ApplicationEvent {/*** 数据的保存*/private Message message;/*** 产生事件后保存有具体的事件数据** @param source* @param message*/public MessageEvent(Object source, Message message) {super(source);// 数据保存this.message = message;}/*** 自定义方法*/public void fire() {log.info("message = {}", this.message);}}
- 定义一个事件监听处理类,该类需要实现 ApplicationListener 接口:
package com.github.fairy.era.event;import org.springframework.context.ApplicationListener;import org.springframework.stereotype.Component;import lombok.extern.slf4j.Slf4j;/*** @author 许大仙* @version 1.0* @since 2022-01-14 09:20*/@Component@Slf4jpublic class MessageListener implements ApplicationListener<MessageEvent> { // 事件绑定/*** 事件监听** @param event 事件监听之后得到事件对象*/@Overridepublic void onApplicationEvent(MessageEvent event) {log.info("事件处理:{}", event);// 自定义事件操作event.fire();}}
- 对此此时的事件如果要想使用,是需要进行事件发布的,此时可以使用测试类来进行测试:
package com.github.fairy.era;import org.junit.jupiter.api.Test;import org.springframework.beans.factory.annotation.Autowired;import org.springframework.boot.test.context.SpringBootTest;import org.springframework.context.ApplicationEventPublisher;import com.github.fairy.era.event.MessageEvent;import com.github.fairy.era.vo.Message;/*** @author 许大仙* @version 1.0* @since 2022-01-04 09:36*/@SpringBootTestpublic class ApplicationTest {// 事件发布类@Autowiredprivate ApplicationEventPublisher applicationEventPublisher;@Testpublic void test() {Message message = new Message();message.setTitle("许大仙");message.setUrl("https://github.com/");this.applicationEventPublisher.publishEvent(new MessageEvent(this, message));}}
- 但是,我们在实际开发中也是在业务层进行事件的发布的,怎么办,只需要让业务层实现 ApplicationEventPublisherAware 接口接口。
package com.github.fairy.era.service.impl;import org.springframework.context.ApplicationEventPublisher;import org.springframework.context.ApplicationEventPublisherAware;import org.springframework.stereotype.Service;import com.github.fairy.era.event.MessageEvent;import com.github.fairy.era.service.IMessageService;import com.github.fairy.era.vo.Message;import lombok.NonNull;import lombok.RequiredArgsConstructor;import lombok.extern.slf4j.Slf4j;/*** @author 许大仙* @since 2022-01-03 07-52*/@Service@Slf4j@RequiredArgsConstructorpublic class MessageServiceImpl implements IMessageService, ApplicationEventPublisherAware {@NonNullprivate ApplicationEventPublisher applicationEventPublisher;@Overridepublic String echo(Message msg) {log.info("消息回应消息处理,传递的消息参数是:msg = {}", msg);// 发布事件this.applicationEventPublisher.publishEvent(new MessageEvent(this, msg));return "【ECHO】" + msg;}@Overridepublic void setApplicationEventPublisher(ApplicationEventPublisher applicationEventPublisher) {this.applicationEventPublisher = applicationEventPublisher;}}
- 此时,会出现如下的两个问题:
- ① Spring 默认的事件发布机制是同步的,实际开发中是需要异步的。
- ② 自定义的监听器监听到事件之后,执行的顺序问题。
2.2.3 microboot-web 子模块
- 解决自定义的监听器监听到事件之后,执行的顺序问题:
- ① 让自定义的监听器实现 SmartApplicationListener 接口,而不是 ApplicationListener 接口,并在 getOrder() 方法中返回数值,数值越小,优先级越高。
- ② 使用 @Order() 注解。
- 修改 MessageListener ,给其设置指定的顺序。
package com.github.fairy.era.event;import org.springframework.context.ApplicationListener;import org.springframework.core.annotation.Order;import org.springframework.stereotype.Component;import lombok.extern.slf4j.Slf4j;/*** @author 许大仙* @version 1.0* @since 2022-01-14 09:20*/@Component@Slf4j@Order(1) // 使用 @Order(1) 设置顺序public class MessageListener implements ApplicationListener<MessageEvent> { // 事件绑定/*** 事件监听** @param event 事件监听之后得到事件对象*/@Overridepublic void onApplicationEvent(MessageEvent event) {log.info(Thread.currentThread().getName() + "事件处理:{}", event);// 自定义事件操作event.fire();}}
2.2.4 microboot-web 子模块
- 解决Spring 默认的事件发布机制是同步的,只需要定义了一个名称为
applicationEventMulticaster的事件广播器,内部设置了一个线程池用来异步调用监听器。
package com.github.fairy.era.config;import java.util.concurrent.Executor;import org.springframework.context.annotation.Bean;import org.springframework.context.annotation.Configuration;import org.springframework.context.event.ApplicationEventMulticaster;import org.springframework.context.event.SimpleApplicationEventMulticaster;import org.springframework.scheduling.concurrent.ThreadPoolExecutorFactoryBean;/*** 自定义 applicationEventMulticaster 的事件广播器,内部设置了一个线程池用来异步调用监听器** @author 许大仙* @version 1.0* @since 2022-01-15 10:35*/@Configurationpublic class SpringConfig {@Beanpublic ApplicationEventMulticaster applicationEventMulticaster() {// 创建一个事件广播器SimpleApplicationEventMulticaster result = new SimpleApplicationEventMulticaster();// 给广播器提供一个线程池,通过这个线程池来调用事件监听器Executor executor = this.applicationEventMulticasterThreadPool().getObject();// 设置异步执行器result.setTaskExecutor(executor);return result;}@Beanpublic ThreadPoolExecutorFactoryBean applicationEventMulticasterThreadPool() {ThreadPoolExecutorFactoryBean result = new ThreadPoolExecutorFactoryBean();result.setThreadNamePrefix("applicationEventMulticasterThreadPool-");result.setCorePoolSize(5);return result;}}
2.3 @EventListener 注解
2.3.1 概述
- 传统的事件监听处理往往需要有一个专属的监听程序类,同时在该类中必须明确的实现 ApplicationListener 父接口,这样对于程序开发的灵活性就有了一定的限制,为了进一步帮助开发者简化事件监听的处理模型,在 Spring 中可以直接通过一个配置类并使用
@EventListener注解直接定义事件监听的处理方法,同时多个监听操作方法还可以自动的根据传递参数的类型判断执行。
2.3.2 microboot-web 子模块
- 创建事件监听类,并定义监听处理方法:
package com.github.fairy.era.config;import org.springframework.context.annotation.Configuration;import org.springframework.context.event.EventListener;import com.github.fairy.era.event.MessageEvent;import lombok.extern.slf4j.Slf4j;/*** 事件的监听配置类** @author 许大仙* @version 1.0* @since 2022-01-15 10:46*/@Slf4j@Configurationpublic class EventListenerConfig {@EventListener // 代表了强制实现 ApplicationListener 接口public void handleAllEvent(Object event) {// 监听所有的事件log.info("handleAllEvent ==> {}", event);}@EventListener // 代表了强制实现 ApplicationListener 接口public void handleMessageEvent(MessageEvent event) {// 监听指定的事件log.info("handleMessageEvent ==> {}", event);}}
- 其余的和
2.2 自定义事件处理相同:略。
3 WebSocket
3.1 概述
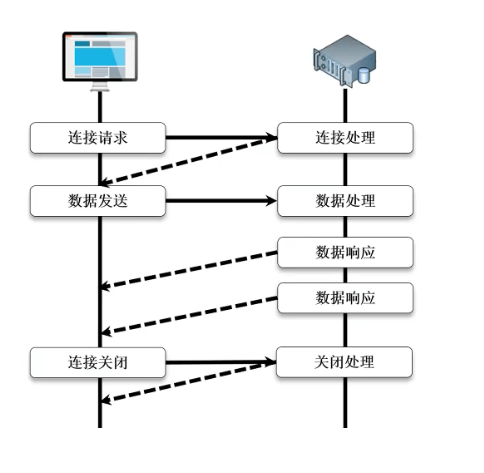
- 在程序的开发过程之中,WEB 2.0 技术最重要的代表就是 Ajax(伪异步应用),在 WEB 开发中 Ajax 异步数据加载是很多项目都会使用到的技术,而在每次使用 Ajax 进行异步请求处理的时候,都需要和服务器端建立一个新的请求连接,而后每次请求处理完成后服务器也会自动的进行该连接的关闭,这样一来如果频繁的 Ajax 数据交互过程中就会产生严重的性能问题。
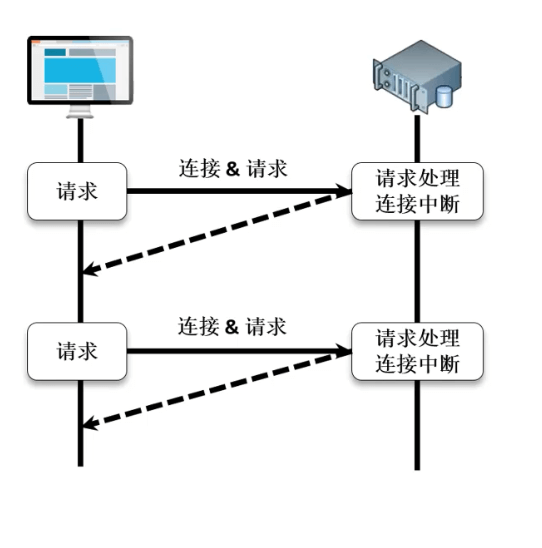
- 如果说现在要使用 Ajax 实现聊天室的功能,或者要进行一些动态数据的显示功能,传统的做法就是进行服务端的轮询:每隔 1 ~ 5 秒的时候就自动向服务器端发送查询的请求,而后针对于当前的查询结果进行显示。如果是一个用户进行此类的轮询,服务器还是可以承受的;如果是成百上千的用户,这就是所带来的服务器端的处理压力就会变得非常庞大了。
- HTML 5 的技术的推出,在 WEB 开发中又提供了一种新的 WebSocket 通讯技术,使用该技术可以在单个 TCP 连接中实现全双工的通讯协议,同时客户端和服务器端之间只需要建立一次握手连接,就可以创建持久性的连接,并实现双向实时数据传输的功能,相比较传统的 Ajax 轮询模拟,WebSocket 的通讯方式可以更好的解压服务器的资源和网络带宽。
- 如果要想开发 WebSocket 应用程序,首先一定要有专属的服务器的支持,比如:Tomcat、Netty ,本次是基于 SpringBoot 的基础上进行 WebSocket 的开发,毕竟 SpringBoot 内置了一个 Tomcat 服务器。
3.2 开发 WebSocket 服务端
3.2.1 概述
- 如果要基于 SpringBoot 开发 WebSocket 程序,必须要引入
spring-boot-starter-websocket依赖。 - WebSocket 的处理机制:WebSocket 是基于事件(事件源、事件监听类或事件处理类)的方式实现的通讯操作,所以在实现中需要创建有一个专属的 WebSocket 处理类,而后分别定义连接处理方法(使用
@OnOpen注解)、通讯处理方法(使用@OnMessage注解)、错误处理方法(使用@OnError注解)以及关闭处理方法(使用@OnClose注解),这样当用户请求发送后就可以根据不同的请求状态进行处理。
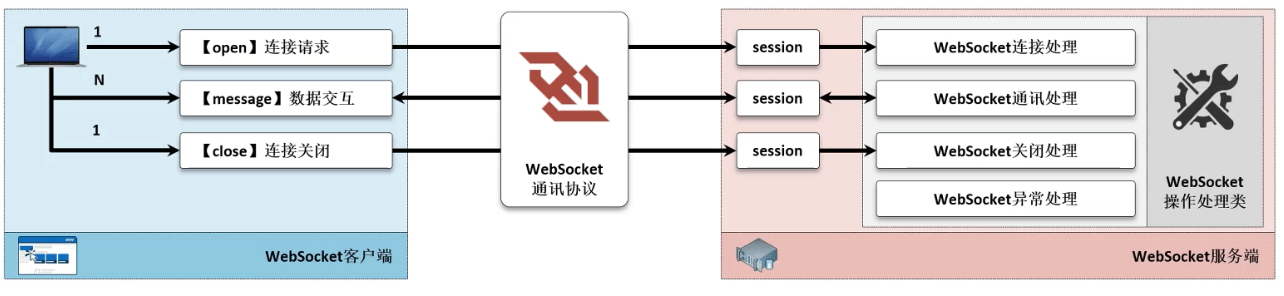
- 对于 WebSocket 来讲需要维护客户端和服务器端的长连接模式,所以在长连接的处理过程之中,会持续的进行服务器端的资源占用,一般解决此类问题的关键在于心跳机制的实现。
3.2.2 microboot 项目
- 修改 build.gradle 项目,给 microboot-web 子模块添加 websocket 的依赖:
project(':microboot-web') { // 设置子项目的配置,独享配置dependencies { // 配置子模块依赖implementation(project(':microboot-common')) // 引入其他子模块// 引入 SpringBoot 的 web 依赖implementation 'org.springframework.boot:spring-boot-starter-web'implementation group: 'org.springframework.boot', name: 'spring-boot-starter-websocket'}gradle.taskGraph.whenReady { // 在所有的操作准备好之后触发tasks.each { task ->if (task.name.contains('javadoc')) { // 如果发现有 javadoc 任务,就跳过task.enabled = false // 当前任务不执行}}}}
3.2.3 microboot-web 子模块
- 定义一个 WebSocket 的配置类,主要的目的是启用一个服务终端:
package com.github.fairy.era.config;import org.springframework.context.annotation.Bean;import org.springframework.context.annotation.Configuration;import org.springframework.web.socket.config.annotation.EnableWebSocket;import org.springframework.web.socket.server.standard.ServerEndpointExporter;/*** @author 许大仙* @version 1.0* @since 2022-01-15 13:55*/@Configuration@EnableWebSocketpublic class WebSocketConfig {/*** 注入一个 ServerEndpointExporter ,该 Bean 会自动注册使用 @ServerEndpoint 注解申明的 websocket endpoint** @return*/@Beanpublic ServerEndpointExporter serverEndpointExporter() {return new ServerEndpointExporter();}}
- 实现 WebSocket 的具体处理操作:
package com.github.fairy.era.websocket;import java.util.UUID;import javax.websocket.*;import javax.websocket.server.PathParam;import javax.websocket.server.ServerEndpoint;import org.springframework.stereotype.Component;import org.springframework.util.StringUtils;import lombok.extern.slf4j.Slf4j;/*** @author 许大仙* @version 1.0* @since 2022-01-15 14:01*/@Slf4j@Component@ServerEndpoint("/websocket/{token}") // 设置一个服务器端点,相当于以前的 REST 中的请求路径public class WebSocketHandler {/*** 实现连接的开启事件处理** @param session 实现客户端的身份保存* @param token 路径的参数*/@OnOpenpublic void handleOpen(Session session, @PathParam("token") String token) {// 本次的操作是基于 token 模拟的一次授权操作if (!StringUtils.hasText(token)) {this.sendMessage(session, "【ERROR】客户端 token 错误,连接失败");}log.info("客户端创建 websocket 连接,sessionId = {}", session.getId());// 考虑到后续用户的访问情况,可以继续发送一个 token 数据,本次直接通过 UUID 来模拟this.sendMessage(session, UUID.randomUUID().toString());}/*** 实现连接的消息处理** @param session 实现客户端的身份保存* @param message 消息*/@OnMessagepublic void handleMessage(Session session, String message) {log.info("【{}】用户发送请求,消息内容是:{}", session.getId(), message);this.sendMessage(session, "【ECHO】" + message);}/*** 实现连接的关闭事件处理** @param session*/@OnClosepublic void handleClose(Session session) {log.info("客户端断开 websocket 连接,sessionId = {}", session.getId());}/*** 实现连接的错误事件处理** @param session* @param ex*/@OnErrorpublic void handleError(Session session, Throwable ex) {log.info("程序出现了错误,错误信息是:{}", ex.getMessage());}/*** 不管是打开连接还是关闭连接以及最终需要进行数据的交互,都需要进行数据的发送处理** @param session 实现客户端的身份保存* @param message 消息*/private void sendMessage(Session session, String message) {if (null != session) {synchronized (session) {log.info("服务端给客户端【{}】发送消息【{}】", session.getId(), message);session.getAsyncRemote().sendText(message);}}}}
3.3 开发 WebSocket 客户端
3.3.1 概述
- WebSocket 这种处理协议不要求客户端和服务器端保存在同一个容器中,只要有正确的连接地址即可:
ws://localhost/websocket/abc
3.3.2 浏览器


若有收获,就点个赞吧
0 人点赞
