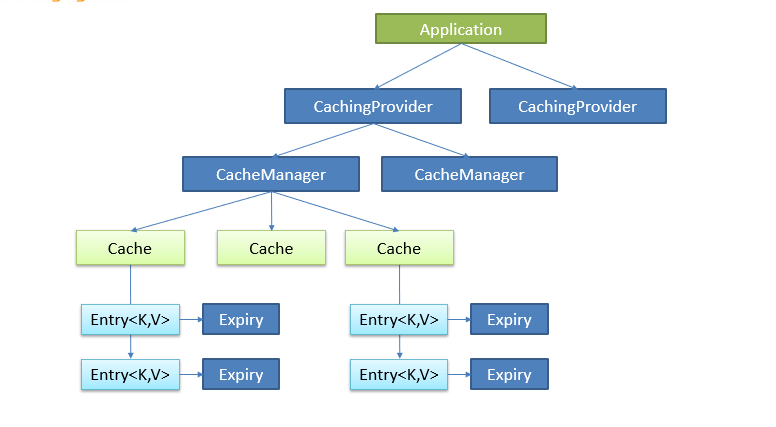
1 JSR107
- Java Caching定义了5个核心接口,分别是CachingProvider、CacheManager、Cache、Entry和Expiry。
 CachingProvider:定义了创建、配置、获取、管理和控制多个CacheManager。一个应用可以在运行期间访问多个CachingProvider。
 CacheManager:定义了创建、配置、获取、管理和控制多个唯一命名的Cache,这些Cache存在于CacheManager的上下文中。一个CacheManager仅被一个CachingProvider所拥有。
 Cache:是一个类似Map的数据结构并临时存储以key为索引的值。一个Cache仅被一个CacheManager所拥有。
 Entry:是一个存储在Cache中的key-value对。
 Expiry:每一个存储在Cache中的条目有一个定义的有效期。一旦超过这个时间,条目为过期的状态。一旦过期,条目将不可访问、更新和删除。缓存有效期可以通过ExpiryPolicy设置。
2 Spring缓存抽象
- Spring从3.1开始定义了org.springframework.cache.Cache和org.springframework.cache.CacheManager接口来统一不同的缓存技术,并支持使用JCache(JSR-107)注解来简化缓存开发。
- Cache接口为缓存的组件规范定义,包含缓存的各种操作集合。
- Cache接口下Spring提供了各种xxxCache的实现,如RedisCache、EhCacheCache等。
- 每次调用需要缓存功能的方法时,Spring会检查指定参数的目标方法是否已经被调用过,如果已经被调用过就直接从缓存中获取方法调用后的结果;如果没有调用过就调用方法并缓存结果后返回给用户,下次调用直接从缓存中获取。
- 使用Spring缓存抽象的时候我们需要关注:
- 确定方法需要被缓存以及它们的缓存策略。
- 从缓存中读取数据之前需要缓存存储的数据。
3 几个重要概念&缓存注解
3.1 接口和缓存注解
| 接口和注解 | 描述 |
|---|---|
| Cache | 缓存接口,定义缓存操作。实现有:RedisCache、EhCacheCache、ConcurrenMapCache等。 |
| CacheManager | 缓存管理器,管理各种缓存(Cache)组件。 |
| @Cacheable | 主要针对方法配置,能够根据方法的请求参数对其结果进行缓存。 |
| @CacheEvict | 清空缓存 |
| @CachePut | 保证方法被调用,又希望结果被缓存。 |
| @EnableCaching | 开启基于注解的缓存 |
| keyGenerator | 缓存数据时key的生成策略。 |
| serialize | 缓存数据时value序列化策略 |
| @Caching | @Caching注解中包含@Cacheable、@CacheEvict、@CachePut,指定复杂的缓存规则 |
| @CacheConfig | 统一配置本类的缓存注解的属性 |
3.2 Cache中可以书写的SPEL
| 名字 | 位置 | 描述 | 示例 |
|---|---|---|---|
| methodName | root object | 当前被调用的方法名 | #root.methodName |
| method | root object | 当前被调用的方法 | #root.method.name |
| target | root object | 当前被调用的目标对象 | #root.target |
| targetClass | root object | 当前被调用的目标对象类 | #root.targetClass |
| args | root object | 当前被调用的方法的参数列表 | #root.args[0] |
| caches | root object | 当前方法调用使用的缓存列表(如@Cacheable(value={“cache1”, “cache2”})),则有两个cache | #root.caches[0].name |
| argument name | evaluation context | 方法参数的名字. 可以直接 #参数名 ,也可以使用 #p0或#a0 的形式,0代表参数的索引; | #iban 、 #a0 、 #p0 |
| result | evaluation context | 方法执行后的返回值(仅当方法执行之后的判断有效,如‘unless’,’cache put’的表达式 ’cache evict’的表达式beforeInvocation=false) | #result |
4 缓存使用
4.1 基本环境搭建
- 导入相关jar包的Maven坐标:
<dependency><groupId>org.springframework.boot</groupId><artifactId>spring-boot-configuration-processor</artifactId><optional>true</optional></dependency><dependency><groupId>mysql</groupId><artifactId>mysql-connector-java</artifactId></dependency><dependency><groupId>org.springframework.boot</groupId><artifactId>spring-boot-starter-jdbc</artifactId></dependency><dependency><groupId>org.springframework.boot</groupId><artifactId>spring-boot-starter-test</artifactId><scope>test</scope></dependency><dependency><groupId>org.springframework.boot</groupId><artifactId>spring-boot-starter-cache</artifactId></dependency><dependency><groupId>org.springframework.boot</groupId><artifactId>spring-boot-starter-web</artifactId></dependency><dependency><groupId>com.alibaba</groupId><artifactId>druid-spring-boot-starter</artifactId><version>1.1.22</version></dependency><dependency><groupId>org.mybatis.spring.boot</groupId><artifactId>mybatis-spring-boot-starter</artifactId><version>2.1.3</version></dependency>
- sql脚本:
DROP TABLE IF EXISTS `employee`;CREATE TABLE `employee` (`id` int(11) NOT NULL AUTO_INCREMENT,`name` varchar(255) CHARACTER SET utf8mb4 COLLATE utf8mb4_general_ci NULL DEFAULT NULL,`gender` varchar(255) CHARACTER SET utf8mb4 COLLATE utf8mb4_general_ci NULL DEFAULT NULL,PRIMARY KEY (`id`) USING BTREE) ENGINE = InnoDB AUTO_INCREMENT = 1 CHARACTER SET = utf8mb4 COLLATE = utf8mb4_general_ci ROW_FORMAT = Dynamic;
- 实体类Employee.java
package com.sunxiaping.springboot.domain;import java.io.Serializable;/*** @author 许威威* @version 1.0*/public class Employee implements Serializable {private Integer id;private String name;private String gender;public Integer getId() {return id;}public void setId(Integer id) {this.id = id;}public String getName() {return name;}public void setName(String name) {this.name = name;}public String getGender() {return gender;}public void setGender(String gender) {this.gender = gender;}@Overridepublic String toString() {return "Employee{" +"id=" + id +", name='" + name + '\'' +", gender='" + gender + '\'' +'}';}}
- application.yml
spring:datasource:username: rootpassword: 123456url: jdbc:mysql://192.168.1.57:3306/test?useUnicode=true&characterEncoding=UTF-8&autoReconnect=true&useSSL=false&serverTimezone=GMT%2B8&allowPublicKeyRetrieval=true&nullCatalogMeansCurrent=truedriver-class-name: com.mysql.cj.jdbc.Drivertype: com.alibaba.druid.pool.DruidDataSource# 数据源的其他配置druid:# 初始化initial-size: 5# 最小min-idle: 5# 最大max-active: 20# 连接等待超时时间max-wait: 60000# 配置间隔多久才进行一次检测,检测需要关闭的空闲连接,单位是毫秒time-between-eviction-runs-millis: 60000# 配置一个连接在池中最小生存的时间,单位是毫秒min-evictable-idle-time-millis: 300000validation-query: SELECT 1 FROM DUALtest-on-borrow: falsetest-while-idle: truetest-on-return: false# 打开PSCache,并且指定每个连接上PSCache的大小pool-prepared-statements: truemax-pool-prepared-statement-per-connection-size: 20# 配置监控统计拦截的filters,去掉后监控界面sql无法统计,'wall'用于防火墙filters: stat,wall#合并多个DruidDataSource的监控数据use-global-data-source-stat: true# 通过connectProperties属性来打开mergeSql功能;慢SQL记录connection-properties: druid.stat.mergeSql=true;druid.stat.slowSqlMillis=5000# 配置DruidStatFilterweb-stat-filter:enabled: trueurl-pattern: "/*"exclusions: "*.js,*.gif,*.jpg,*.bmp,*.png,*.css,*.ico,/druid/*"# 配置DruidStatViewServletstat-view-servlet:enabled: trueurl-pattern: "/druid/*"# IP白名单(没有配置或者为空,则允许所有访问)# allow:# IP黑名单 (存在共同时,deny优先于allow)# deny:# 禁用HTML页面上的“Reset All”功能reset-enable: false# 登录名login-username: admin# 登录密码login-password: 123456# 开启mybatis的日志logging:level:com.sunxiaping.springboot.mapper: debug #打印sql
- EmployeeMapper.java
package com.sunxiaping.springboot.mapper;import com.sunxiaping.springboot.domain.Employee;import org.apache.ibatis.annotations.*;/*** @author 许威威* @version 1.0*/@Mapperpublic interface EmployeeMapper {@Results(id = "employeeMap", value = {@Result(id = true, column = "id", property = "id"),@Result(property = "name", column = "name"),@Result(property = "gender", column = "gender")})@Select("SELECT id,`name`,gender FROM employee WHERE id = #{id}")Employee findEmpById(Integer id);@Insert(value = "INSERT INTO employee (`name`,gender) VALUES (#{name},#{gender})")void saveEmp(Employee employee);@Update(value = "UPDATE employee SET `name` = #{name},gender =#{gender} WHERE id = #{id}")void updateEmp(Employee employee);@Delete(value = "DELETE FROM employee WHERE id = #{id}")void deleteEmpById(Integer id);}
- EmployeeService.java
package com.sunxiaping.springboot.service;import com.sunxiaping.springboot.domain.Employee;/*** @author 许威威* @version 1.0*/public interface EmployeeService {Employee findEmpById(Integer id);}
- EmployeeServiceImpl.java
package com.sunxiaping.springboot.service.impl;import com.sunxiaping.springboot.domain.Employee;import com.sunxiaping.springboot.mapper.EmployeeMapper;import com.sunxiaping.springboot.service.EmployeeService;import org.springframework.beans.factory.annotation.Autowired;import org.springframework.stereotype.Service;import javax.transaction.Transactional;import java.util.Optional;/*** @author 许威威* @version 1.0*/@Service@Transactionalpublic class EmployeeServiceImpl implements EmployeeService {@Autowiredprivate EmployeeMapper employeeMapper;@Overridepublic Employee findEmpById(Integer id) {return Optional.ofNullable(employeeMapper.findEmpById(id)).orElse(new Employee());}}
- EmployeeController.java
package com.sunxiaping.springboot.web;import com.sunxiaping.springboot.domain.Employee;import com.sunxiaping.springboot.service.EmployeeService;import org.springframework.beans.factory.annotation.Autowired;import org.springframework.web.bind.annotation.GetMapping;import org.springframework.web.bind.annotation.PathVariable;import org.springframework.web.bind.annotation.RequestMapping;import org.springframework.web.bind.annotation.RestController;/*** @author 许威威* @version 1.0*/@RestController@RequestMapping(value = "emp")public class EmployeeController {@Autowiredprivate EmployeeService employeeService;@GetMapping(value = "/view/{id}")public Employee view(@PathVariable(value = "id") Integer id) {return employeeService.findEmpById(id);}}
- 启动类:
package com.sunxiaping.springboot;import org.mybatis.spring.annotation.MapperScan;import org.springframework.boot.SpringApplication;import org.springframework.boot.autoconfigure.SpringBootApplication;@SpringBootApplication@MapperScan(basePackages = "com.sunxiaping.springboot.mapper")public class SpringbootApplication {public static void main(String[] args) {SpringApplication.run(SpringbootApplication.class, args);}}
- 测试:
package com.sunxiaping.springboot;import com.sunxiaping.springboot.domain.Employee;import com.sunxiaping.springboot.mapper.EmployeeMapper;import org.junit.Test;import org.junit.runner.RunWith;import org.springframework.beans.factory.annotation.Autowired;import org.springframework.boot.test.context.SpringBootTest;import org.springframework.test.context.junit4.SpringRunner;@SpringBootTest@RunWith(SpringRunner.class)public class SpringbootApplicationTests {@Autowiredprivate EmployeeMapper employeeMapper;@Testpublic void test() {Employee employee = employeeMapper.findEmpById(1);System.out.println("employee = " + employee);}}
4.2 体验缓存
4.2.1 步骤
- 开启注解的缓存(@EnableCaching)。
- 标注缓存注解即可(@Cacheable、@CachePut、@CacheEvict)。
4.2.2 @Cacheable注解
- @Cacheable注解:
- 将方法运行的结果进行缓存,以后再要相同的数据,直接从缓存中获取,不需要再调用方法。
- CacheManager管理多个Cache组件,对缓存真正的CRUD操作在Cache组件中,每一个缓存组件都有自己唯一的名称。
- 属性:
- value/cacheNames:指定缓存组件的名称
- key:缓存数据使用的key,默认是方法参数的值(如果传入的参数是1,那么值就是1对应的返回的返回值。),支持SPEL表达式。
- keyGenerator:key的生成器,可以自己指定key的生成器的组件id。key和keyGenerator只能二选一。
- cacheManager:指定缓存管理器。
- cacheResolver:指定缓存解析器。
- condition:指定符合条件的情况下才缓存。支持SPEL表达式。
- unless:否定缓存。当unless指定的条件为true,方法的返回值就不会返回;可以获取到结果进行判断。
- sync:是否同步,默认值是false,即异步,在多线程环境中需要设置为true,避免缓存击穿的问题。
- 示例:
- 在启动类上使用@EnableCaching注解开启缓存:
package com.sunxiaping.springboot;import org.mybatis.spring.annotation.MapperScan;import org.springframework.boot.SpringApplication;import org.springframework.boot.autoconfigure.SpringBootApplication;import org.springframework.cache.annotation.EnableCaching;@SpringBootApplication@MapperScan(basePackages = "com.sunxiaping.springboot.mapper")@EnableCachingpublic class SpringbootApplication {public static void main(String[] args) {SpringApplication.run(SpringbootApplication.class, args);}}
- 使用@Cacheable注解方法返回的结果缓存:
package com.sunxiaping.springboot.service.impl;import com.sunxiaping.springboot.domain.Employee;import com.sunxiaping.springboot.mapper.EmployeeMapper;import com.sunxiaping.springboot.service.EmployeeService;import org.springframework.beans.factory.annotation.Autowired;import org.springframework.cache.annotation.Cacheable;import org.springframework.stereotype.Service;import org.springframework.transaction.annotation.Transactional;import java.util.Optional;/*** @author 许威威* @version 1.0*/@Service@Transactionalpublic class EmployeeServiceImpl implements EmployeeService {@Autowiredprivate EmployeeMapper employeeMapper;/*** @Cacheable注解: 将方法的运行结果进行缓存,以后再要相同的数据,直接从缓存中获取,不需要再调用方法* CacheManager管理多个Cache组件,对缓存的真正CRUD操作在Cache组件中,每一个缓存组件都有自己唯一的名称* @Cacheable注解的属性:* value/cacheNames:指定缓存组件的名称* key:缓存数据使用的key,默认是方法参数的值(如果传入的参数是1,那么值就是1对应的返回的返回值。),支持SPEL表达式。* keyGenerator:key的生成器,可以自己指定key的生成器的组件id。key和keyGenerator二选一。* cacheManager:指定缓存管理器。* cacheResolver:指定缓存解析器。* condition:指定符合条件的情况下才缓存。支持SPEL表达式。* unless:否定缓存。当unless指定的条件为true,方法的返回值就不会返回。* sync:是否同步,默认值是false,即异步,在多线程环境中需要设置为true,避免缓存击穿的问题。*/@Cacheable(cacheNames = "emp", key = "#id")@Overridepublic Employee findEmpById(Integer id) {return Optional.ofNullable(employeeMapper.findEmpById(id)).orElse(new Employee());}}
4.3 缓存的工作原理
- 自动配置类:CacheAutoConfiguration,其源码片段如下:
@Configuration(proxyBeanMethods = false)@ConditionalOnClass(CacheManager.class)@ConditionalOnBean(CacheAspectSupport.class)@ConditionalOnMissingBean(value = CacheManager.class, name = "cacheResolver")@EnableConfigurationProperties(CacheProperties.class)@AutoConfigureAfter({ CouchbaseDataAutoConfiguration.class, HazelcastAutoConfiguration.class,HibernateJpaAutoConfiguration.class, RedisAutoConfiguration.class })@Import({ CacheConfigurationImportSelector.class, CacheManagerEntityManagerFactoryDependsOnPostProcessor.class })public class CacheAutoConfiguration {//其他略}
- 通过CacheAutoConfiguration上面的@Import注解,可以知道其向Spring容器中导入了一些组件,dubug后的缓存配置类如下所示:
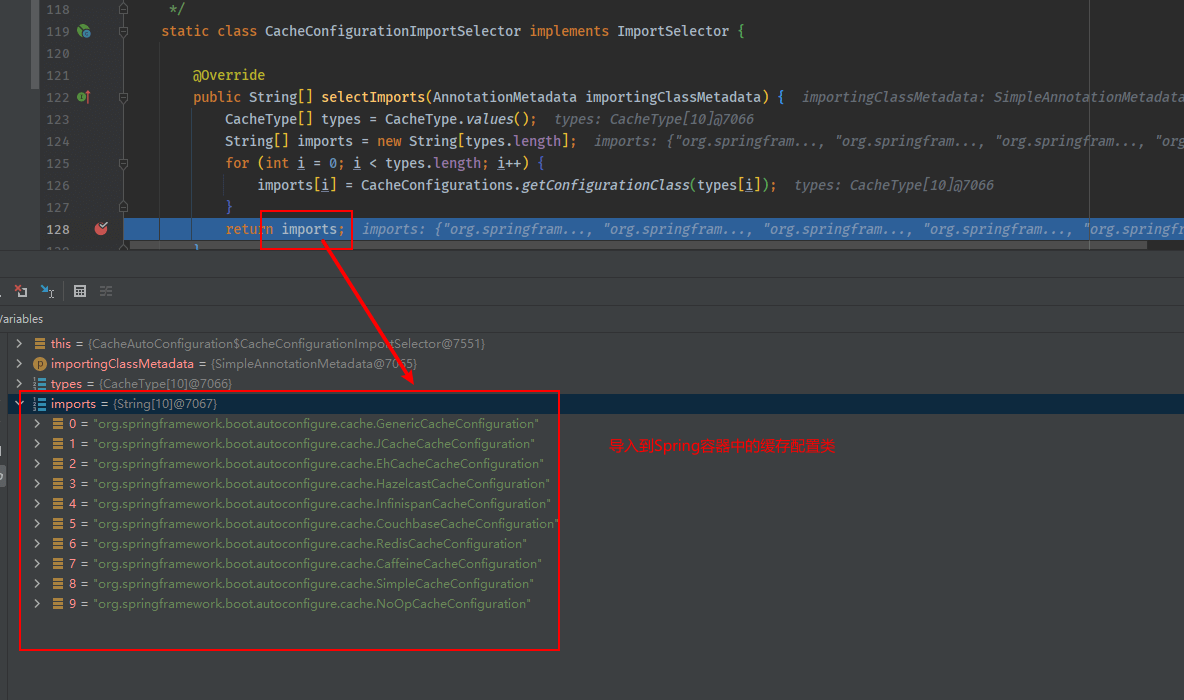
- 默认生效的缓存配置类。可以通过在application.yml中增加dubug=true,来查看那个缓存配置类生成。可以得知SimpleCacheConfiguration的缓存配置类生效:
- SimpleCacheConfiguration给容器中添加了ConcurrentMapCacheManager组件。
@Configuration(proxyBeanMethods = false)@ConditionalOnMissingBean(CacheManager.class)@Conditional(CacheCondition.class)class SimpleCacheConfiguration {//给容器中添加了ConcurrentMapCacheManager组件@BeanConcurrentMapCacheManager cacheManager(CacheProperties cacheProperties,CacheManagerCustomizers cacheManagerCustomizers) {ConcurrentMapCacheManager cacheManager = new ConcurrentMapCacheManager();List<String> cacheNames = cacheProperties.getCacheNames();if (!cacheNames.isEmpty()) {cacheManager.setCacheNames(cacheNames);}return cacheManagerCustomizers.customize(cacheManager);}}
- ConcurrentMapCacheManager的部分源码如下:可以获取和创建ConcurrentMapCache类型的缓存组件,并把数据保存在ConcurrentMap中。
public class ConcurrentMapCacheManager implements CacheManager, BeanClassLoaderAware {//重写CacheManager的getCache方法@Override@Nullablepublic Cache getCache(String name) {//根据传入的name从CacheManager中获取Cache对象Cache cache = this.cacheMap.get(name);//如果cache不存在if (cache == null && this.dynamic) {//加锁synchronized (this.cacheMap) {//再获取一次cache = this.cacheMap.get(name);//如果依然不遵从if (cache == null) {//创建一个新的ConcurrentMapCache并返回cache = createConcurrentMapCache(name);//将上面创建的ConcurrentMapCache作为value放入到CacheManager中,key就是传入的namethis.cacheMap.put(name, cache);}}}return cache;}}
4.4 @Cacheable注解的工作流程
- 方法运行之前,先去查询Cache(缓存组件),按照cacheNames(指定的缓存名称)从CacheManager中获取相应的缓存组件。
- 第一次获取缓存,如果没有对应的Cache组件,会自动创建Cache组件(默认为ConcurrentMapCache),然后将其保存到ConcurrentMapCacheManager中的cacheMap中,key是cacheNames,value是ConcurrentMapCache。
- 根据指定的key,即@Cacheable注解中属性key对应的值(默认是方法传入的实际参数值),去Cache中查找缓存的内容。
- key是按照某种策略自自动生成的,默认是使用keyGenerator(SimpleKeyGenerator)生成的。
- 如果没有参数,key=new SimpleKey()。
- 如果有一个参数,key=参数值。
- 如果有多个参数,key就是new SimipleKey(params)。
- 没有查到缓存就调用目标方法。
- 将目标方法返回的结果,放入到缓存。
4.5 @CachePut注解的使用
- EmployeeService.java
package com.sunxiaping.springboot.service;import com.sunxiaping.springboot.domain.Employee;/*** @author 许威威* @version 1.0*/public interface EmployeeService {/*** 根据id查询员工信息** @param id* @return*/Employee findEmpById(Integer id);/*** 更新员工信息** @param employee* @return*/Employee updateEmp(Employee employee);}
- EmployeeServiceImpl.java
package com.sunxiaping.springboot.service.impl;import com.sunxiaping.springboot.domain.Employee;import com.sunxiaping.springboot.mapper.EmployeeMapper;import com.sunxiaping.springboot.service.EmployeeService;import org.springframework.beans.factory.annotation.Autowired;import org.springframework.cache.annotation.CachePut;import org.springframework.cache.annotation.Cacheable;import org.springframework.stereotype.Service;import org.springframework.transaction.annotation.Transactional;import java.util.Optional;/*** @author 许威威* @version 1.0*/@Service@Transactionalpublic class EmployeeServiceImpl implements EmployeeService {@Autowiredprivate EmployeeMapper employeeMapper;/*** @Cacheable注解: 将方法的运行结果进行缓存,以后再要相同的数据,直接从缓存中获取,不需要再调用方法* CacheManager管理多个Cache组件,对缓存的真正CRUD操作在Cache组件中,每一个缓存组件都有自己唯一的名称* @Cacheable注解的属性: value/cacheNames:指定缓存组件的名称* key:缓存数据使用的key,默认是方法参数的值(如果传入的参数是1,那么值就是1对应的返回的返回值。),支持SPEL表达式。* keyGenerator:key的生成器,可以自己指定key的生成器的组件id。key和keyGenerator二选一。* cacheManager:指定缓存管理器。* cacheResolver:指定缓存解析器。* condition:指定符合条件的情况下才缓存。支持SPEL表达式。* unless:否定缓存。当unless指定的条件为true,方法的返回值就不会返回。* sync:是否同步,默认值是false,即异步,在多线程环境中需要设置为true,避免缓存击穿的问题。*/@Cacheable(cacheNames = "emp", key = "#id")@Overridepublic Employee findEmpById(Integer id) {return Optional.ofNullable(employeeMapper.findEmpById(id)).orElse(new Employee());}/*** @CachePut employee 既调用方法,又更新缓存数据* 修改了数据库的某个数据,同时更新缓存* 运行时机:①先调用目标方法②将目标方法的结果放入到缓存中*/@CachePut(cacheNames = "emp",key = "#employee.id")@Overridepublic Employee updateEmp(Employee employee) {employeeMapper.updateEmp(employee);return employee;}}
4.6 @CacheEvict注解的使用
- EmployeeService.java
package com.sunxiaping.springboot.service;import com.sunxiaping.springboot.domain.Employee;/*** @author 许威威* @version 1.0*/public interface EmployeeService {/*** 根据id查询员工信息** @param id* @return*/Employee findEmpById(Integer id);/*** 更新员工信息** @param employee* @return*/Employee updateEmp(Employee employee);/*** 根据主键删除员工信息** @param id*/void deleteEmp(Integer id);}
- EmployeeServiceImpl.java
package com.sunxiaping.springboot.service.impl;import com.sunxiaping.springboot.domain.Employee;import com.sunxiaping.springboot.mapper.EmployeeMapper;import com.sunxiaping.springboot.service.EmployeeService;import org.springframework.beans.factory.annotation.Autowired;import org.springframework.cache.annotation.CacheEvict;import org.springframework.cache.annotation.CachePut;import org.springframework.cache.annotation.Cacheable;import org.springframework.stereotype.Service;import org.springframework.transaction.annotation.Transactional;import java.util.Optional;/*** @author 许威威* @version 1.0*/@Service@Transactionalpublic class EmployeeServiceImpl implements EmployeeService {@Autowiredprivate EmployeeMapper employeeMapper;/*** @Cacheable注解: 将方法的运行结果进行缓存,以后再要相同的数据,直接从缓存中获取,不需要再调用方法* CacheManager管理多个Cache组件,对缓存的真正CRUD操作在Cache组件中,每一个缓存组件都有自己唯一的名称* @Cacheable注解的属性: value/cacheNames:指定缓存组件的名称* key:缓存数据使用的key,默认是方法参数的值(如果传入的参数是1,那么值就是1对应的返回的返回值。),支持SPEL表达式。* keyGenerator:key的生成器,可以自己指定key的生成器的组件id。key和keyGenerator二选一。* cacheManager:指定缓存管理器。* cacheResolver:指定缓存解析器。* condition:指定符合条件的情况下才缓存。支持SPEL表达式。* unless:否定缓存。当unless指定的条件为true,方法的返回值就不会返回。* sync:是否同步,默认值是false,即异步,在多线程环境中需要设置为true,避免缓存击穿的问题。*/@Cacheable(cacheNames = "emp", key = "#id")@Overridepublic Employee findEmpById(Integer id) {return Optional.ofNullable(employeeMapper.findEmpById(id)).orElse(new Employee());}/*** @CachePut employee 既调用方法,又更新缓存数据* 修改了数据库的某个数据,同时更新缓存* 运行时机:①先调用目标方法②将目标方法的结果放入到缓存中*/@CachePut(cacheNames = "emp", key = "#employee.id")@Overridepublic Employee updateEmp(Employee employee) {employeeMapper.updateEmp(employee);return employee;}/*** @CacheEvict 清除缓存* key:缓存的key。* allEntries:清空所有的缓存,默认是false。* beforeInvocation:是否在方法之前执行,默认值是false,即表示方法执行之后执行。*/@CacheEvict(cacheNames = "emp",key = "#id")@Overridepublic void deleteEmp(Integer id) {employeeMapper.deleteEmpById(id);}}
5 整合Redis实现缓存
5.1 导入SpringBoot和Redis的整合包的Maven坐标
- spring-boot-starter-data-redis的坐标:
<dependency><groupId>org.springframework.boot</groupId><artifactId>spring-boot-starter-data-redis</artifactId></dependency>
- 完整的pom.xml:
<dependency><groupId>org.springframework.boot</groupId><artifactId>spring-boot-configuration-processor</artifactId><optional>true</optional></dependency><dependency><groupId>mysql</groupId><artifactId>mysql-connector-java</artifactId></dependency><dependency><groupId>org.springframework.boot</groupId><artifactId>spring-boot-starter-jdbc</artifactId></dependency><dependency><groupId>org.springframework.boot</groupId><artifactId>spring-boot-starter-data-redis</artifactId></dependency><dependency><groupId>org.springframework.boot</groupId><artifactId>spring-boot-starter-test</artifactId><scope>test</scope></dependency><dependency><groupId>org.springframework.boot</groupId><artifactId>spring-boot-starter-web</artifactId></dependency><dependency><groupId>com.alibaba</groupId><artifactId>druid-spring-boot-starter</artifactId><version>1.1.22</version></dependency><dependency><groupId>org.springframework.boot</groupId><artifactId>spring-boot-starter-cache</artifactId></dependency><dependency><groupId>org.mybatis.spring.boot</groupId><artifactId>mybatis-spring-boot-starter</artifactId><version>2.1.3</version></dependency>
5.2 修改application.yml增加redis的相关配置
- application.yml:
spring:#redis的配置redis:# 主机地址host: 192.168.1.57# 端口port: 6379# 密码password:
- 完整的application.yml:
spring:datasource:username: rootpassword: 123456url: jdbc:mysql://192.168.1.57:3306/test?useUnicode=true&characterEncoding=UTF-8&autoReconnect=true&useSSL=false&serverTimezone=Asia/Shanghai&allowPublicKeyRetrieval=true&nullCatalogMeansCurrent=truedriver-class-name: com.mysql.cj.jdbc.Drivertype: com.alibaba.druid.pool.DruidDataSource# 数据源的其他配置druid:# 初始化initial-size: 5# 最小min-idle: 5# 最大max-active: 20# 连接等待超时时间max-wait: 60000# 配置间隔多久才进行一次检测,检测需要关闭的空闲连接,单位是毫秒time-between-eviction-runs-millis: 60000# 配置一个连接在池中最小生存的时间,单位是毫秒min-evictable-idle-time-millis: 300000validation-query: SELECT 1 FROM DUALtest-on-borrow: falsetest-while-idle: truetest-on-return: false# 打开PSCache,并且指定每个连接上PSCache的大小pool-prepared-statements: truemax-pool-prepared-statement-per-connection-size: 20# 配置监控统计拦截的filters,去掉后监控界面sql无法统计,'wall'用于防火墙filters: stat,wall#合并多个DruidDataSource的监控数据use-global-data-source-stat: true# 通过connectProperties属性来打开mergeSql功能;慢SQL记录connection-properties: druid.stat.mergeSql=true;druid.stat.slowSqlMillis=5000# 配置DruidStatFilterweb-stat-filter:enabled: trueurl-pattern: "/*"exclusions: "*.js,*.gif,*.jpg,*.bmp,*.png,*.css,*.ico,/druid/*"# 配置DruidStatViewServletstat-view-servlet:enabled: trueurl-pattern: "/druid/*"# IP白名单(没有配置或者为空,则允许所有访问)# allow:# IP黑名单 (存在共同时,deny优先于allow)# deny:# 禁用HTML页面上的“Reset All”功能reset-enable: false# 登录名login-username: admin# 登录密码login-password: 123456# redis的配置redis:# 主机地址host: 192.168.1.57# 端口port: 6379# 密码password:# 开启mybatis的日志logging:level:com.sunxiaping.springboot.mapper: debug #打印sql
5.3 修改默认的序列化机制
- spring-data-redis的默认序列化机制是JDK序列化器,实际使用的时候,可以改为JSON形式的序列化器。
- 更改默认的序列化器:
package com.sunxiaping.springboot.config;import org.springframework.context.annotation.Bean;import org.springframework.context.annotation.Configuration;import org.springframework.data.redis.connection.RedisConnectionFactory;import org.springframework.data.redis.core.RedisTemplate;import org.springframework.data.redis.serializer.Jackson2JsonRedisSerializer;/*** @author 许威威* @version 1.0*/@Configurationpublic class RedisConfig {@Beanpublic RedisTemplate redisTemplate(RedisConnectionFactory redisConnectionFactory) {RedisTemplate<Object, Object> redisTemplate = new RedisTemplate<>();redisTemplate.setConnectionFactory(redisConnectionFactory);redisTemplate.setDefaultSerializer(new Jackson2JsonRedisSerializer<>(Object.class));//开启事务redisTemplate.setEnableTransactionSupport(true);return redisTemplate;}}
5.4 测试SpringBoot整合Redis
- 测试:
package com.sunxiaping.springboot;import com.sunxiaping.springboot.domain.Employee;import com.sunxiaping.springboot.mapper.EmployeeMapper;import org.junit.Test;import org.junit.runner.RunWith;import org.springframework.beans.factory.annotation.Autowired;import org.springframework.boot.test.context.SpringBootTest;import org.springframework.data.redis.core.RedisTemplate;import org.springframework.data.redis.core.StringRedisTemplate;import org.springframework.data.redis.core.ValueOperations;import org.springframework.test.context.junit4.SpringRunner;import java.util.Optional;@SpringBootTest@RunWith(SpringRunner.class)public class SpringbootApplicationTests {/*** RedisTemplate k-v都是Object*/@Autowiredprivate RedisTemplate redisTemplate;@Autowiredprivate EmployeeMapper employeeMapper;/*** StringRedisTemplate k-v都是字符串*/@Autowiredprivate StringRedisTemplate stringRedisTemplate;/*** Redis常见的五大数据类型:* String(字符串)、List(列表)、Set(集合)、Hash(散列)、ZSet(有序集合)* <p>* //操作String字符串* ValueOperations valueOperations = stringRedisTemplate.opsForValue();* //操作List列表* ListOperations listOperations = stringRedisTemplate.opsForList();* //操作Set集合* SetOperations setOperations = stringRedisTemplate.opsForSet();* //操作Hash散列* HashOperations hashOperations = stringRedisTemplate.opsForHash();* //操作Zset有序集合* ZSetOperations zSetOperations = stringRedisTemplate.opsForZSet();*/@Testpublic void test() {ValueOperations valueOperations = stringRedisTemplate.opsForValue();valueOperations.set("k1", "v1");Object value = valueOperations.get("k1");System.out.println("value = " + value);}/*** RedisTemplate默认用的是JDK的序列化*/@Testpublic void test2() {Employee employee = employeeMapper.findEmpById(1);Optional.ofNullable(employee).ifPresent((emp) -> {redisTemplate.opsForValue().set("emp01", emp);});}}
5.5 自定义CacheManager,使其缓存变为Redis
SpringBoot的版本是2.x。
5.5.1 原理
- 引入spring-boot-starter-data-redis.jar包以后,容器中保存的是RedisCacheManager。
- RedisCacheManager帮我们创建RedisCache作为缓存组件,RedisCache通过操作Redis缓存数据。
- 默认保存数据k-v都是Object类型,利用的是JDK的序列化机制进行序列化的。
- 引入了Redis的starter,cacheManager变为RedisCacheManager。
- 默认创建的RedisCacheManager操作Redis的时候使用的是RedisTemplate
- RedisTemplate
- 自定义CacheManager。
5.5.2 SpringBoot使用Redis作为缓存管理器
- RedisConfig.java
package com.sunxiaping.springboot.config;import com.fasterxml.jackson.annotation.JsonAutoDetect;import com.fasterxml.jackson.annotation.PropertyAccessor;import com.fasterxml.jackson.databind.ObjectMapper;import org.springframework.context.annotation.Bean;import org.springframework.context.annotation.Configuration;import org.springframework.data.redis.cache.RedisCacheConfiguration;import org.springframework.data.redis.cache.RedisCacheManager;import org.springframework.data.redis.connection.RedisConnectionFactory;import org.springframework.data.redis.core.RedisTemplate;import org.springframework.data.redis.serializer.Jackson2JsonRedisSerializer;import org.springframework.data.redis.serializer.RedisSerializationContext;import org.springframework.data.redis.serializer.RedisSerializer;import org.springframework.data.redis.serializer.StringRedisSerializer;import java.time.Duration;/*** @author 许威威* @version 1.0*/@Configurationpublic class RedisConfig {@Beanpublic RedisTemplate redisTemplate(RedisConnectionFactory redisConnectionFactory) {RedisTemplate<Object, Object> redisTemplate = new RedisTemplate<>();redisTemplate.setConnectionFactory(redisConnectionFactory);redisTemplate.setDefaultSerializer(new Jackson2JsonRedisSerializer<>(Object.class));//开启事务redisTemplate.setEnableTransactionSupport(true);return redisTemplate;}/*** 自定义Redis缓存管理器** @param factory* @return*/@Beanpublic RedisCacheManager redisCacheManager(RedisConnectionFactory factory) {RedisSerializer<String> redisSerializer = new StringRedisSerializer();Jackson2JsonRedisSerializer jackson2JsonRedisSerializer = new Jackson2JsonRedisSerializer<>(Object.class);//解决查询缓存转换异常的问题ObjectMapper om = new ObjectMapper();om.setVisibility(PropertyAccessor.ALL, JsonAutoDetect.Visibility.ANY);om.enableDefaultTyping(ObjectMapper.DefaultTyping.NON_FINAL);jackson2JsonRedisSerializer.setObjectMapper(om);// 配置序列化(解决乱码的问题)RedisCacheConfiguration config = RedisCacheConfiguration.defaultCacheConfig().entryTtl(Duration.ZERO).serializeKeysWith(RedisSerializationContext.SerializationPair.fromSerializer(redisSerializer)).serializeValuesWith(RedisSerializationContext.SerializationPair.fromSerializer(jackson2JsonRedisSerializer)).disableCachingNullValues();RedisCacheManager cacheManager = RedisCacheManager.builder(factory).cacheDefaults(config).build();return cacheManager;}}

若有收获,就点个赞吧
0 人点赞
