- 第一章:主机规划
- 第二章:安装 Kubernetes
- 第三章:安装 KubeSphere 前置条件
- 第四章:安装 KuberSphere(v3.2.1)
- 可以使用各种公有云进行按量付费实验。
- 本次搭建的是单 master 的集群,不适合用于生产环境。
- 所有节点的机器需要联网。
第一章:主机规划
| 角色 | IP地址 | hostname | 操作系统 | 配置 | 设备 |
|---|---|---|---|---|---|
| Master | 192.168.65.100 | k8s-master | CentOS 7.9,基础设施服务器 | 4核CPU,8G内存,40G硬盘 | |
| Node1 | 192.168.65.101 | k8s-node1 | CentOS 7.9,基础设施服务器 | 8核CPU,16G内存,40G硬盘 | /dev/sdb 100G |
| Node2 | 192.168.65.102 | k8s-node2 | CentOS 7.9,基础设施服务器 | 8核CPU,16G内存,40G硬盘 | /dev/sdb 100G |
| Node3 | 192.168.65.103 | k8s-node3 | CentOS 7.9,基础设施服务器 | 8核CPU,16G内存,40G硬盘 | /dev/sdb 100G |
第二章:安装 Kubernetes
2.1 Kubernetes 和 Docker 的版本对应关系
- 官网。
从文档中,我们可以知道 Docker 的版本是 v20.10 ,对应的 Kubernetes 的版本是 v1.21 。
2.2 前置条件
- 如果是虚拟机则需要让所有机器互通,最简单的做法就是关闭防火墙。
systemctl stop firewalld
systemctl disable firewalld
2.3 准备工作
2.3.1 升级系统内核
- 查看当前系统的版本:
cat /etc/redhat-release
- 查看当前系统的内核:
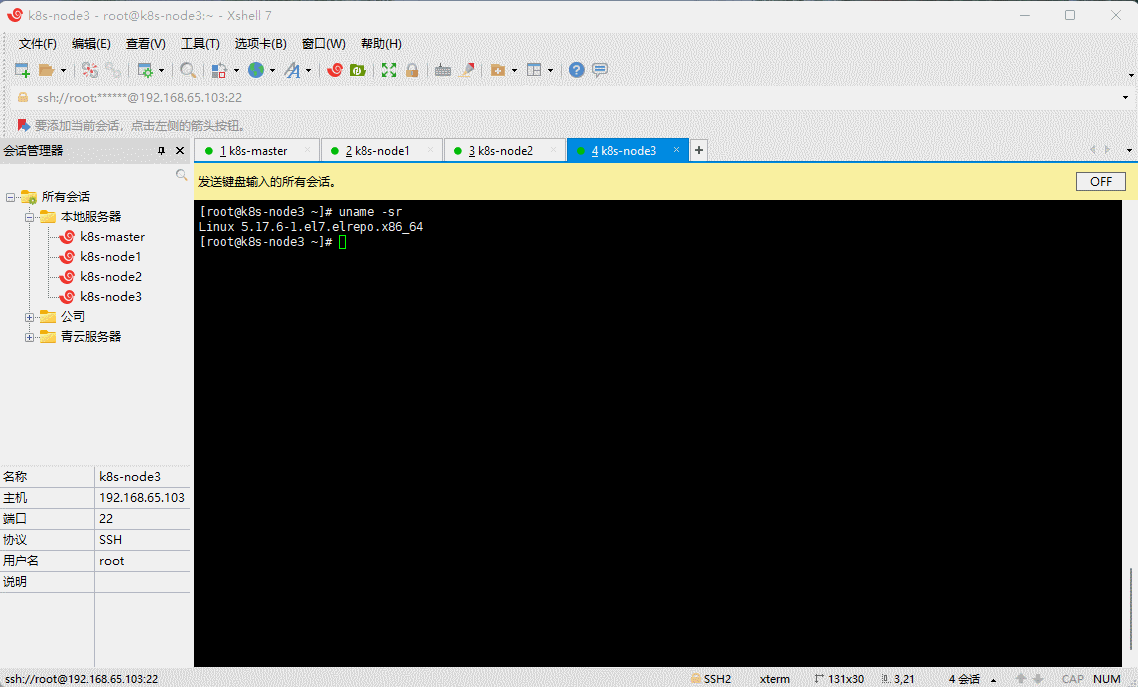
uname -sr
默认的 3.10.0 实在是太低了,需要升级内核。
- 在 CentOS 7.x 上启用 ELRepo 仓库:
rpm --import https://www.elrepo.org/RPM-GPG-KEY-elrepo.org
rpm -Uvh https://www.elrepo.org/elrepo-release-7.0-4.el7.elrepo.noarch.rpm

- 查看可用的系统内核相关包(选做):
yum --disablerepo="*" --enablerepo="elrepo-kernel" list available
- 安装最新主线内核版本:
yum -y --enablerepo=elrepo-kernel install kernel-ml

- 设置默认的内核版本:
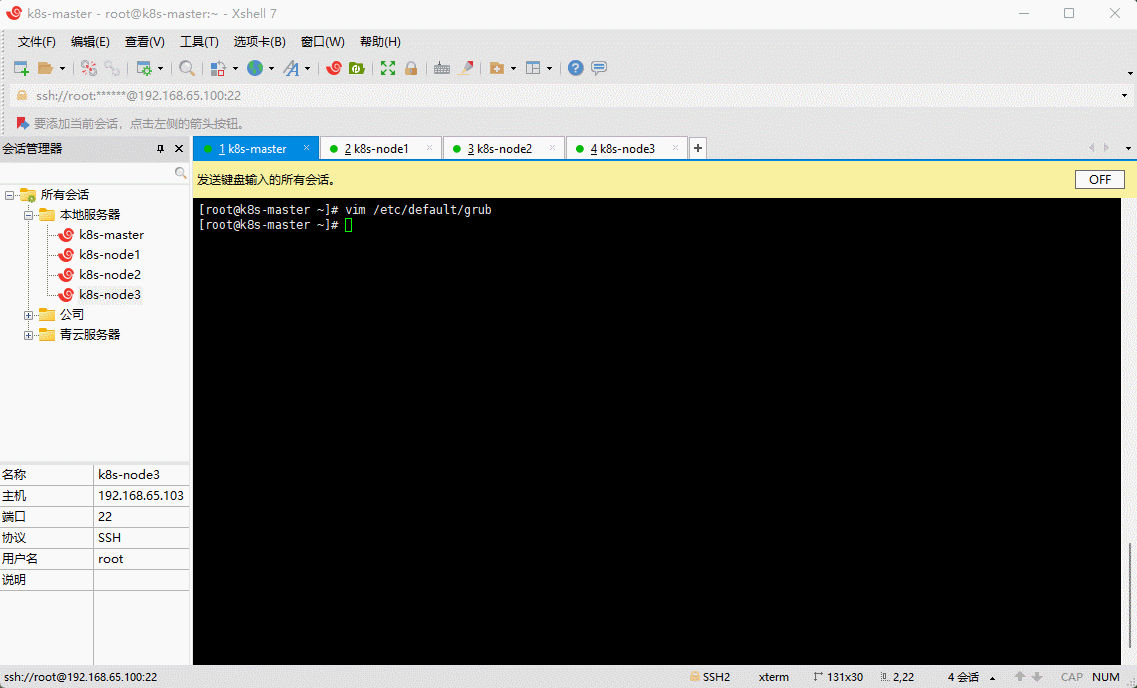
vim /etc/default/grub
GRUB_TIMEOUT=5GRUB_DISTRIBUTOR="$(sed 's, release .*$,,g' /etc/system-release)"GRUB_DEFAULT=0 # 修改此处,原来是 savedGRUB_DISABLE_SUBMENU=trueGRUB_TERMINAL_OUTPUT="console"GRUB_CMDLINE_LINUX="crashkernel=auto rd.lvm.lv=centos/root rd.lvm.lv=centos/swap rhgb quiet"GRUB_DISABLE_RECOVERY="true"
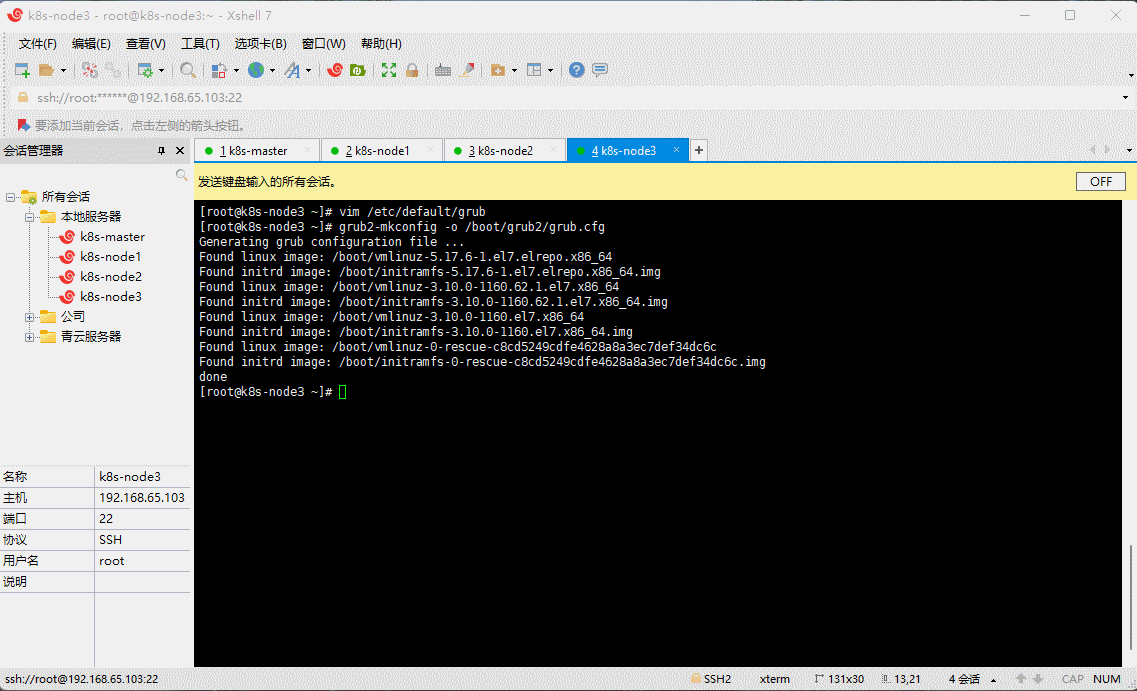
- 重新创建内核配置:
grub2-mkconfig -o /boot/grub2/grub.cfg
- 重启系统:
reboot
- 查看当前系统的内核:
uname -sr
2.3.2 设置主机名
- 命令:
hostnamectl set-hostname <hostname>
- 示例:
# 192.168.65.100hostnamectl set-hostname k8s-master
# 192.168.65.101hostnamectl set-hostname k8s-node1
# 192.168.65.102hostnamectl set-hostname k8s-node2
# 192.168.65.103hostnamectl set-hostname k8s-node3
2.3.3 主机名解析
- 为了方便后面集群节点间的直接调用,需要配置一下主机名解析,企业中推荐使用内部的 DNS 服务器。
cat >> /etc/hosts << EOF127.0.0.1 $(hostname)192.168.65.100 k8s-master192.168.65.101 k8s-node1192.168.65.102 k8s-node2192.168.65.103 k8s-node3EOF
2.3.4 时间同步
- Kubernetes 要求集群中的节点时间必须精确一致,所以在每个节点上添加时间同步:
yum install ntpdate -y
ntpdate time.windows.com
2.3.5 关闭 SELinux
- 查看 SELinux 是否开启:
getenforce
- 永久关闭 SELinux ,需要重启:
sed -i 's/enforcing/disabled/' /etc/selinux/config
- 关闭当前会话的 SELinux ,重启之后无效:
setenforce 0
2.3.6 关闭 swap 分区
- 永久关闭 swap ,需要重启:
sed -ri 's/.*swap.*/#&/' /etc/fstab
- 关闭当前会话的 swap ,重启之后无效:
swapoff -a

2.3.7 将桥接的 IPv4 流量传递到 iptables 的链
- 修改 /etc/sysctl.conf 文件:
# 如果有配置,则修改sed -i "s#^net.ipv4.ip_forward.*#net.ipv4.ip_forward=1#g" /etc/sysctl.confsed -i "s#^net.bridge.bridge-nf-call-ip6tables.*#net.bridge.bridge-nf-call-ip6tables=1#g" /etc/sysctl.confsed -i "s#^net.bridge.bridge-nf-call-iptables.*#net.bridge.bridge-nf-call-iptables=1#g" /etc/sysctl.confsed -i "s#^net.ipv6.conf.all.disable_ipv6.*#net.ipv6.conf.all.disable_ipv6=1#g" /etc/sysctl.confsed -i "s#^net.ipv6.conf.default.disable_ipv6.*#net.ipv6.conf.default.disable_ipv6=1#g" /etc/sysctl.confsed -i "s#^net.ipv6.conf.lo.disable_ipv6.*#net.ipv6.conf.lo.disable_ipv6=1#g" /etc/sysctl.confsed -i "s#^net.ipv6.conf.all.forwarding.*#net.ipv6.conf.all.forwarding=1#g" /etc/sysctl.conf
# 可能没有,追加echo "net.ipv4.ip_forward = 1" >> /etc/sysctl.confecho "net.bridge.bridge-nf-call-ip6tables = 1" >> /etc/sysctl.confecho "net.bridge.bridge-nf-call-iptables = 1" >> /etc/sysctl.confecho "net.ipv6.conf.all.disable_ipv6 = 1" >> /etc/sysctl.confecho "net.ipv6.conf.default.disable_ipv6 = 1" >> /etc/sysctl.confecho "net.ipv6.conf.lo.disable_ipv6 = 1" >> /etc/sysctl.confecho "net.ipv6.conf.all.forwarding = 1" >> /etc/sysctl.conf
- 加载 br_netfilter 模块:
modprobe br_netfilter
- 持久化修改(保留配置包本地文件,重启系统或服务进程仍然有效):
sysctl -p

2.3.8 开启 ipvs
- 在 Kubernetes 中 service 有两种代理模型,一种是基于 iptables ,另一种是基于 ipvs 的。
- ipvs 的性能要高于 iptables 的,但是如果要使用它,需要手动载入 ipvs 模块。
- 在所有机器安装 ipset 和 ipvsadm :
yum -y install ipset ipvsadm
- 在所有机器执行如下脚本:
cat > /etc/sysconfig/modules/ipvs.modules <<EOF#!/bin/bashmodprobe -- ip_vsmodprobe -- ip_vs_rrmodprobe -- ip_vs_wrrmodprobe -- ip_vs_shmodprobe -- nf_conntrackEOF
- 授权、运行、检查是否加载:
chmod 755 /etc/sysconfig/modules/ipvs.modules && bash /etc/sysconfig/modules/ipvs.modules && lsmod | grep -e ip_vs -e nf_conntrack_ipv4
2.3.9 重启
- 所有机器重启:
reboot

2.4 Docker 安装
所有机器都需要安装 Docker 。
- 卸载旧版本:
yum remove docker \docker-client \docker-client-latest \docker-common \docker-latest \docker-latest-logrotate \docker-logrotate \docker-engine
- yum 安装 gcc 相关:
yum -y install gcc
yum -y install gcc-c++

- 安装所需要的软件包:
yum -y install yum-utils

- 设置 stable 镜像仓库:
yum-config-manager --add-repo https://mirrors.aliyun.com/docker-ce/linux/centos/docker-ce.repo
- 更新 yum 软件包索引:
yum makecache fast

- 查看存储库中 Docker 的版本(选做):
yum list docker-ce --showduplicates | sort -r
- 安装指定版本的 Docker(v20.10) :
yum -y install docker-ce-3:20.10.8-3.el7.x86_64 docker-ce-cli-3:20.10.8-3.el7.x86_64 containerd.io
- 启动 Docker :
# 启动 Dockersystemctl start docker
# 开启自动启动systemctl enable docker
- 验证 Docker 是否安装成功:
docker version
- 阿里云镜像加速:
sudo mkdir -p /etc/docker
sudo tee /etc/docker/daemon.json <<-'EOF'{"exec-opts": ["native.cgroupdriver=systemd"],"registry-mirrors": ["https://du3ia00u.mirror.aliyuncs.com"],"live-restore": true,"log-driver":"json-file","log-opts": {"max-size":"500m", "max-file":"3"},"max-concurrent-downloads": 10,"max-concurrent-uploads": 5,"storage-driver": "overlay2"}EOF
sudo systemctl daemon-reload
sudo systemctl restart docker

2.5 添加阿里云的 Kubernetes 的 YUM 源
- 由于 Kubernetes 的镜像源在国外,非常慢,这里切换成国内的阿里云镜像源(所有机器均需执行下面命令):
cat > /etc/yum.repos.d/kubernetes.repo << EOF[kubernetes]name=Kubernetesbaseurl=https://mirrors.aliyun.com/kubernetes/yum/repos/kubernetes-el7-x86_64enabled=1gpgcheck=0repo_gpgcheck=0gpgkey=https://mirrors.aliyun.com/kubernetes/yum/doc/yum-key.gpg https://mirrors.aliyun.com/kubernetes/yum/doc/rpm-package-key.gpgEOF

2.6 安装 kubelet 、kubeadm 和 kubectl
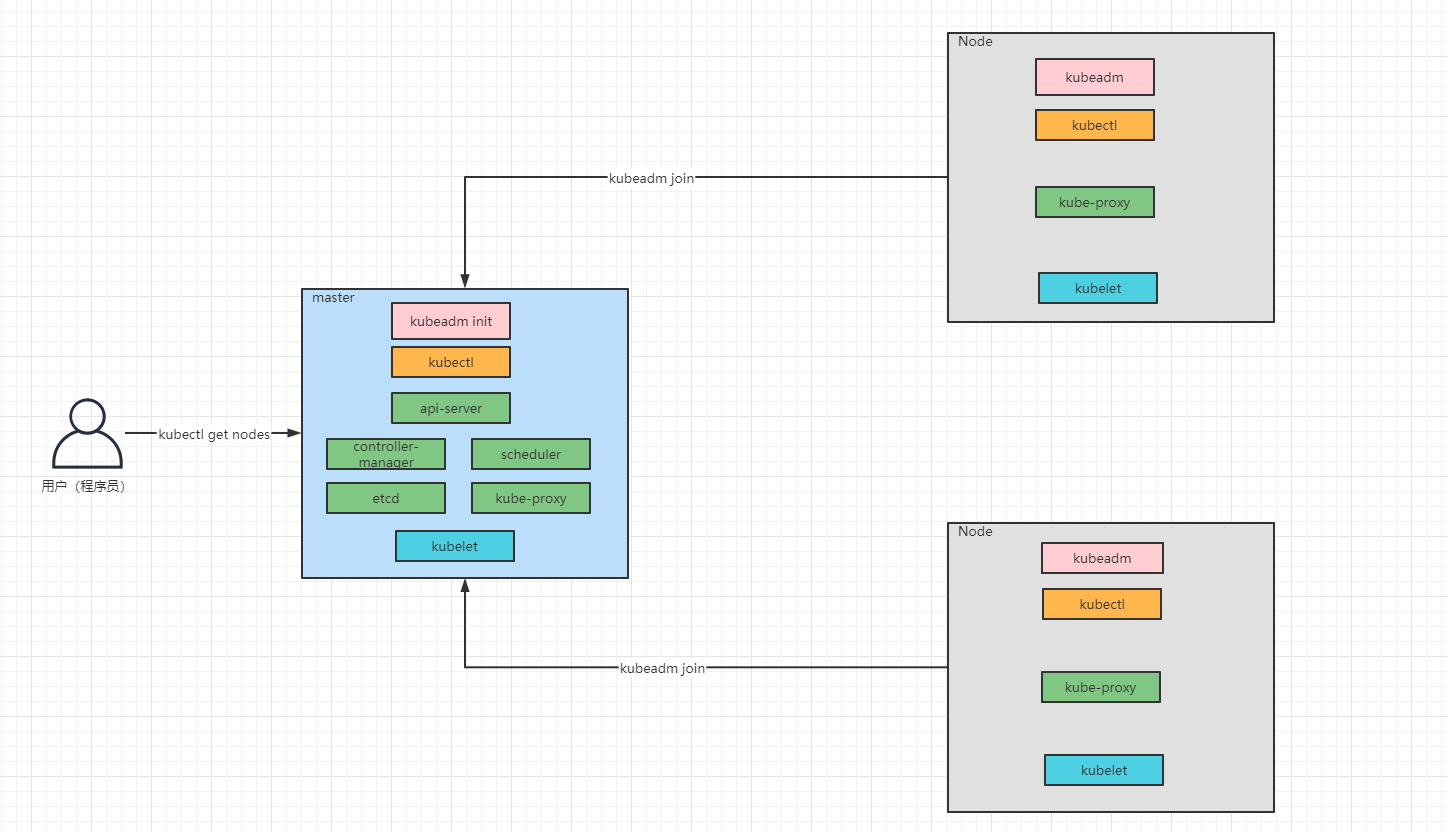
- Kubernetes 架构图:
- 安装 kubelet 、kubeadm 和 kubectl ,所有机器均需执行以下命令:
yum install -y kubelet-1.21.10 kubeadm-1.21.10 kubectl-1.21.10

- 为了实现 Docker 使用的 cgroup drvier 和 kubelet 使用的 cgroup drver 一致,建议修改
/etc/sysconfig/kubelet文件的内容,所有机器均需执行以下命令:
vim /etc/sysconfig/kubelet
# 修改KUBELET_EXTRA_ARGS="--cgroup-driver=systemd"KUBE_PROXY_MODE="ipvs"
- 设置为开机自启动即可,由于没有生成配置文件,集群初始化后自动启动:
systemctl enable kubelet

2.7 查看 Kubernetes 安装所需镜像(选做)
- 查看 Kubernetes 安装所需镜像:
kubeadm config images list

2.8 下载 Kubernetes 安装所需镜像
- 所有机器均通过 Docker 下载所需镜像:
docker pull registry.cn-hangzhou.aliyuncs.com/google_containers/kube-apiserver:v1.21.10docker pull registry.cn-hangzhou.aliyuncs.com/google_containers/kube-controller-manager:v1.21.10docker pull registry.cn-hangzhou.aliyuncs.com/google_containers/kube-scheduler:v1.21.10docker pull registry.cn-hangzhou.aliyuncs.com/google_containers/kube-proxy:v1.21.10docker pull registry.cn-hangzhou.aliyuncs.com/google_containers/pause:3.4.1docker pull registry.cn-hangzhou.aliyuncs.com/google_containers/etcd:3.4.13-0docker pull registry.cn-hangzhou.aliyuncs.com/google_containers/coredns:v1.8.0
- 给 coredns 镜像重新打 tag :
docker tag registry.cn-hangzhou.aliyuncs.com/google_containers/coredns:v1.8.0 registry.cn-hangzhou.aliyuncs.com/google_containers/coredns/coredns:v1.8.0

2.9 部署 Kubernetes 的 Master 节点
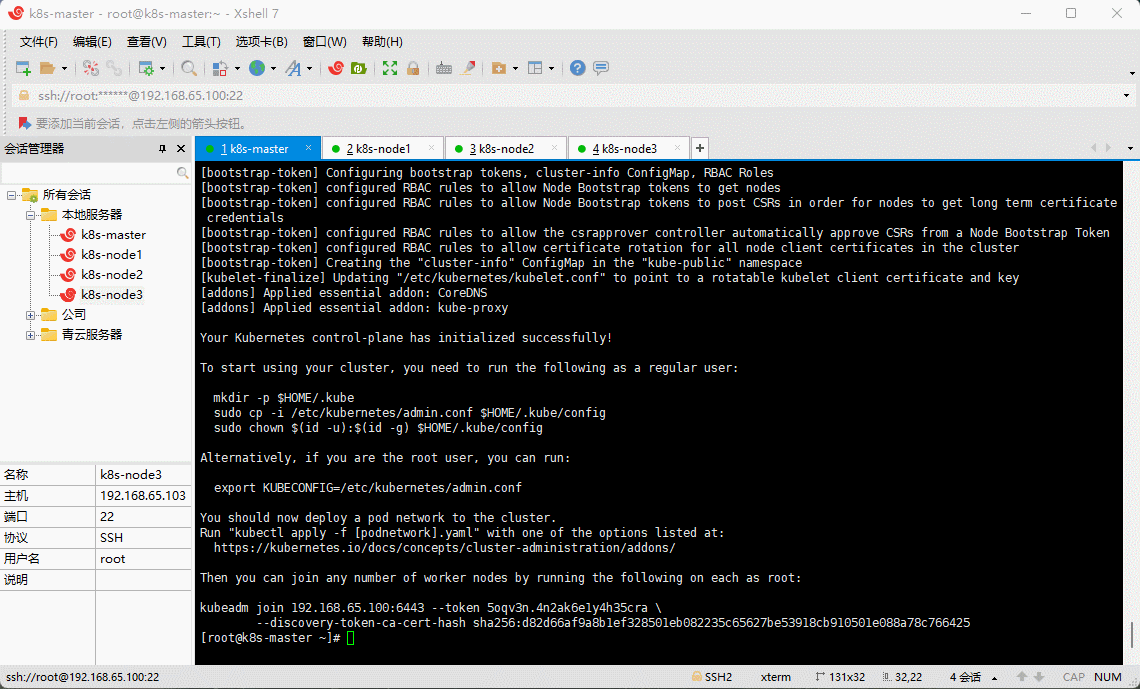
- 在 k8s-master (192.168.65.100)机器上部署 Kubernetes 的 Master 节点:
# 由于默认拉取镜像地址k8s.gcr.io国内无法访问,这里需要指定阿里云镜像仓库地址kubeadm init \--apiserver-advertise-address=192.168.65.100 \--image-repository=registry.cn-hangzhou.aliyuncs.com/google_containers \--kubernetes-version=v1.21.10 \--service-cidr=10.96.0.0/16 \--pod-network-cidr=10.244.0.0/16
注意:
- apiserver-advertise-address 一定要是主机的 IP 地址。
- apiserver-advertise-address 、service-cidr 和 pod-network-cidr 不能在同一个网络范围内。

- 日志:
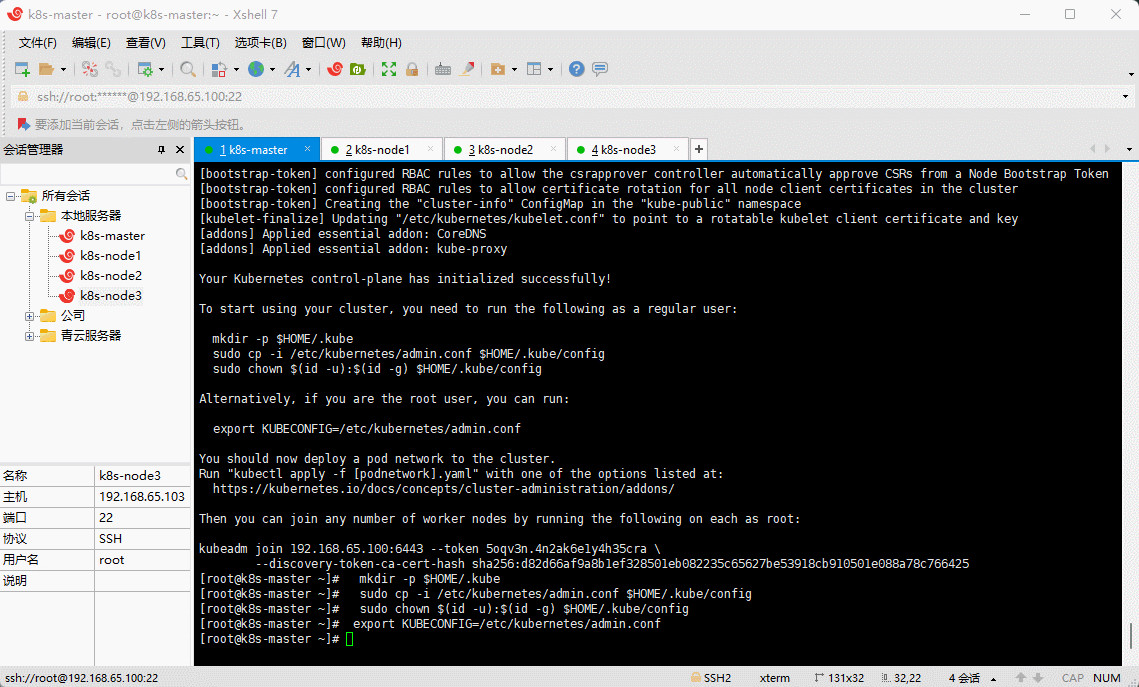
Your Kubernetes control-plane has initialized successfully!To start using your cluster, you need to run the following as a regular user:mkdir -p $HOME/.kubesudo cp -i /etc/kubernetes/admin.conf $HOME/.kube/configsudo chown $(id -u):$(id -g) $HOME/.kube/configAlternatively, if you are the root user, you can run:export KUBECONFIG=/etc/kubernetes/admin.confYou should now deploy a pod network to the cluster.Run "kubectl apply -f [podnetwork].yaml" with one of the options listed at:https://kubernetes.io/docs/concepts/cluster-administration/addons/Then you can join any number of worker nodes by running the following on each as root:kubeadm join 192.168.65.100:6443 --token 5oqv3n.4n2ak6e1y4h35cra \--discovery-token-ca-cert-hash sha256:d82d66af9a8b1ef328501eb082235c65627be53918cb910501e088a78c766425
- 根据日志提示操作,在 k8s-master (192.168.65.100) 执行如下命令:
mkdir -p $HOME/.kubesudo cp -i /etc/kubernetes/admin.conf $HOME/.kube/configsudo chown $(id -u):$(id -g) $HOME/.kube/config
# 如果是 root 用户,还可以执行如下命令export KUBECONFIG=/etc/kubernetes/admin.conf
- 默认的 token 有效期为 2 小时,当过期之后,该 token 就不能用了,这时可以使用如下的命令创建 token :
kubeadm token create --print-join-command
# 生成一个永不过期的tokenkubeadm token create --ttl 0 --print-join-command
2.10 部署 Kubernetes 的 Node节点
- 根据日志提示操作,在 k8s-node1(192.168.65.101)、k8s-node2(192.168.65.102)和 k8s-node3(192.168.65.103) 执行如下命令:
kubeadm join 192.168.65.100:6443 --token 5oqv3n.4n2ak6e1y4h35cra \--discovery-token-ca-cert-hash sha256:d82d66af9a8b1ef328501eb082235c65627be53918cb910501e088a78c766425
2.11 部署网络插件
- 官网。
- Kubernetes 支持多种网络插件,比如 flannel、calico、canal 等,任选一种即可,本次选择 calico。
- calico 和 k8s 的版本对应 。
kubectl apply -f https://projectcalico.docs.tigera.io/v3.19/manifests/calico.yaml
备注:为什么使用 3.19 , 原因在这里 。

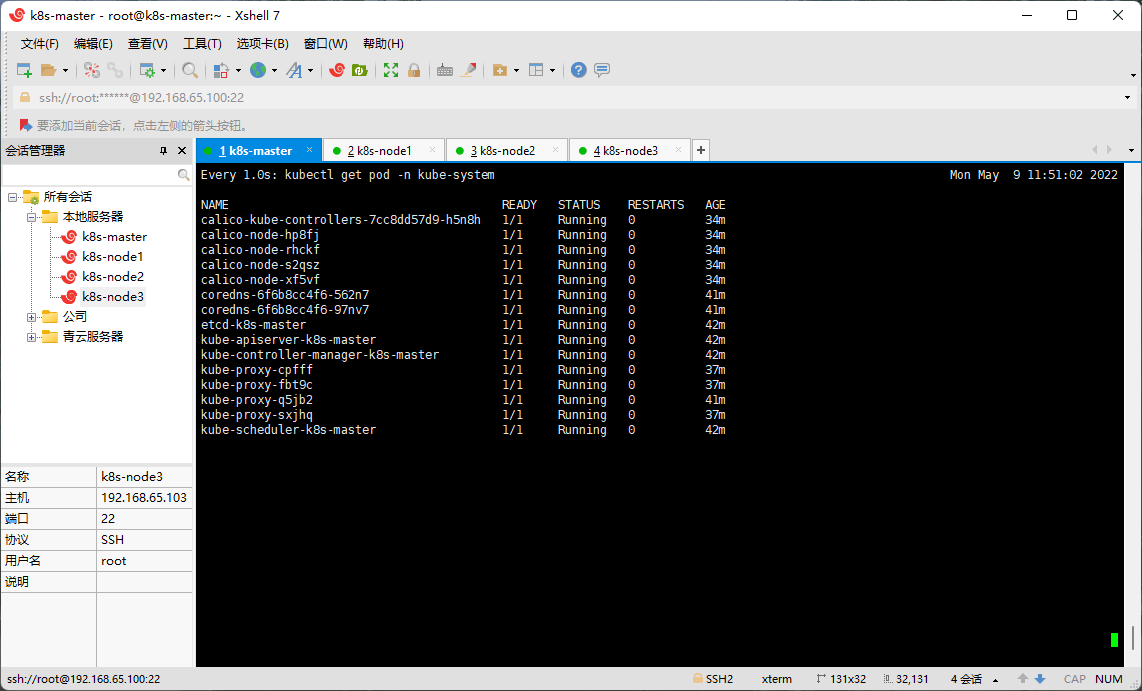
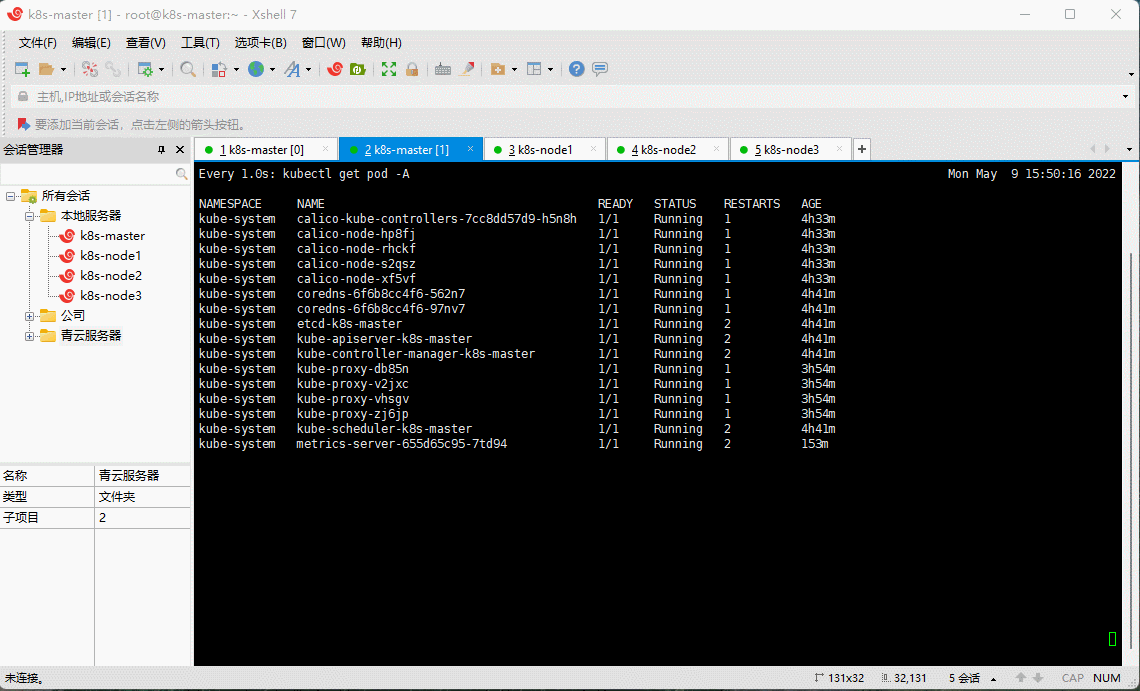
- 查看部署 CNI 网络插件进度:
watch -n 1 kubectl get pod -n kube-system
kubectl get pods -n kube-system
2.12 查看节点状态
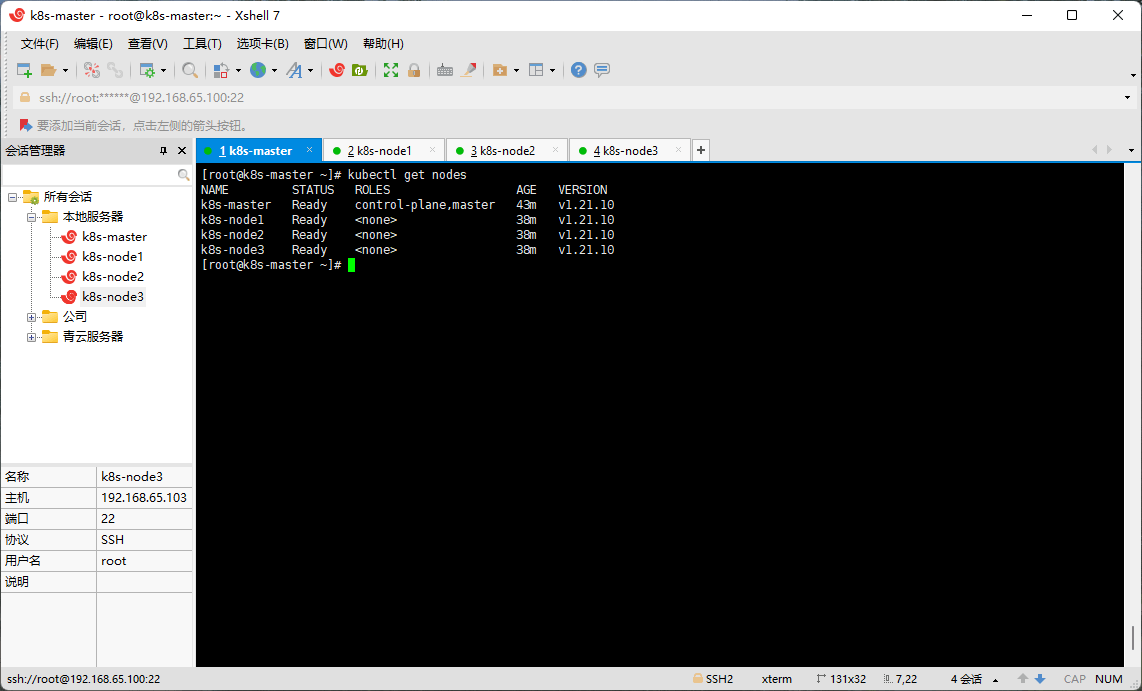
- 在 Master(192.168.65.100)节点上查看节点状态:
kubectl get nodes
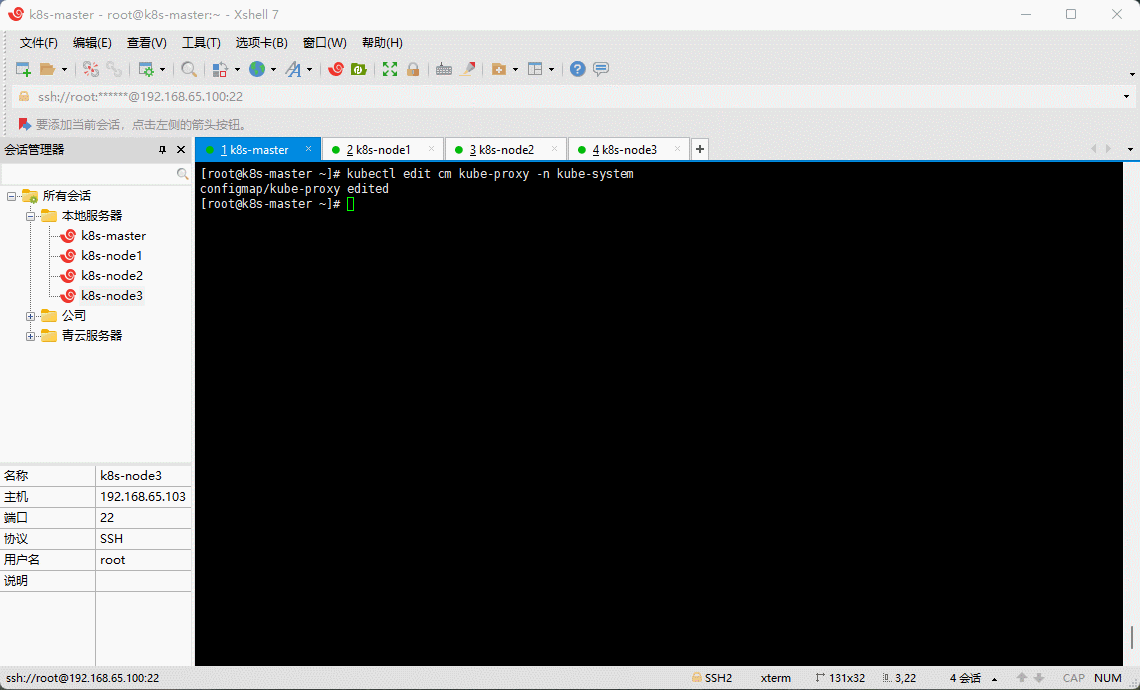
2.13 设置 kube-proxy 的 ipvs 模式
- 在 Master(192.168.65.100)节点设置 kube-proxy 的 ipvs 模式:
kubectl edit cm kube-proxy -n kube-system
apiVersion: v1data:config.conf: |-apiVersion: kubeproxy.config.k8s.io/v1alpha1bindAddress: 0.0.0.0bindAddressHardFail: falseclientConnection:acceptContentTypes: ""burst: 0contentType: ""kubeconfig: /var/lib/kube-proxy/kubeconfig.confqps: 0clusterCIDR: 10.244.0.0/16configSyncPeriod: 0sconntrack:maxPerCore: nullmin: nulltcpCloseWaitTimeout: nulltcpEstablishedTimeout: nulldetectLocalMode: ""enableProfiling: falsehealthzBindAddress: ""hostnameOverride: ""iptables:masqueradeAll: falsemasqueradeBit: nullminSyncPeriod: 0ssyncPeriod: 0sipvs:excludeCIDRs: nullminSyncPeriod: 0sscheduler: ""strictARP: falsesyncPeriod: 0stcpFinTimeout: 0stcpTimeout: 0sudpTimeout: 0skind: KubeProxyConfigurationmetricsBindAddress: ""mode: ""nodePortAddresses: nullminSyncPeriod: 0ssyncPeriod: 0sipvs:excludeCIDRs: nullminSyncPeriod: 0sscheduler: ""strictARP: falsesyncPeriod: 0stcpFinTimeout: 0stcpTimeout: 0sudpTimeout: 0skind: KubeProxyConfigurationmetricsBindAddress: ""mode: "ipvs" # 修改此处...
- 删除 kube-proxy ,让 Kubernetes 集群自动创建新的 kube-proxy :
kubectl delete pod -l k8s-app=kube-proxy -n kube-system
第三章:安装 KubeSphere 前置条件
3.1 安装 metrics-server(v 0.6.1)
- 在 Master(192.168.65.100)节点安装 metrics-server :
vi k8s-metrics.yaml
apiVersion: v1kind: ServiceAccountmetadata:labels:k8s-app: metrics-servername: metrics-servernamespace: kube-system---apiVersion: rbac.authorization.k8s.io/v1kind: ClusterRolemetadata:labels:k8s-app: metrics-serverrbac.authorization.k8s.io/aggregate-to-admin: "true"rbac.authorization.k8s.io/aggregate-to-edit: "true"rbac.authorization.k8s.io/aggregate-to-view: "true"name: system:aggregated-metrics-readerrules:- apiGroups:- metrics.k8s.ioresources:- pods- nodesverbs:- get- list- watch---apiVersion: rbac.authorization.k8s.io/v1kind: ClusterRolemetadata:labels:k8s-app: metrics-servername: system:metrics-serverrules:- apiGroups:- ""resources:- nodes/metricsverbs:- get- apiGroups:- ""resources:- pods- nodesverbs:- get- list- watch---apiVersion: rbac.authorization.k8s.io/v1kind: RoleBindingmetadata:labels:k8s-app: metrics-servername: metrics-server-auth-readernamespace: kube-systemroleRef:apiGroup: rbac.authorization.k8s.iokind: Rolename: extension-apiserver-authentication-readersubjects:- kind: ServiceAccountname: metrics-servernamespace: kube-system---apiVersion: rbac.authorization.k8s.io/v1kind: ClusterRoleBindingmetadata:labels:k8s-app: metrics-servername: metrics-server:system:auth-delegatorroleRef:apiGroup: rbac.authorization.k8s.iokind: ClusterRolename: system:auth-delegatorsubjects:- kind: ServiceAccountname: metrics-servernamespace: kube-system---apiVersion: rbac.authorization.k8s.io/v1kind: ClusterRoleBindingmetadata:labels:k8s-app: metrics-servername: system:metrics-serverroleRef:apiGroup: rbac.authorization.k8s.iokind: ClusterRolename: system:metrics-serversubjects:- kind: ServiceAccountname: metrics-servernamespace: kube-system---apiVersion: v1kind: Servicemetadata:labels:k8s-app: metrics-servername: metrics-servernamespace: kube-systemspec:ports:- name: httpsport: 443protocol: TCPtargetPort: httpsselector:k8s-app: metrics-server---apiVersion: apps/v1kind: Deploymentmetadata:labels:k8s-app: metrics-servername: metrics-servernamespace: kube-systemspec:selector:matchLabels:k8s-app: metrics-serverstrategy:rollingUpdate:maxUnavailable: 0template:metadata:labels:k8s-app: metrics-serverspec:containers:- args:- --cert-dir=/tmp- --secure-port=4443- --kubelet-preferred-address-types=InternalIP,ExternalIP,Hostname- --kubelet-use-node-status-port- --metric-resolution=15s- --kubelet-insecure-tls # 使用非安全的协议image: bitnami/metrics-server:0.6.1 # k8s.gcr.io/metrics-server/metrics-server:v0.6.1imagePullPolicy: IfNotPresentlivenessProbe:failureThreshold: 3httpGet:path: /livezport: httpsscheme: HTTPSperiodSeconds: 10name: metrics-serverports:- containerPort: 4443name: httpsprotocol: TCPreadinessProbe:failureThreshold: 3httpGet:path: /readyzport: httpsscheme: HTTPSinitialDelaySeconds: 20periodSeconds: 10resources:requests:cpu: 100mmemory: 200MisecurityContext:allowPrivilegeEscalation: falsereadOnlyRootFilesystem: truerunAsNonRoot: truerunAsUser: 1000volumeMounts:- mountPath: /tmpname: tmp-dirnodeSelector:kubernetes.io/os: linuxpriorityClassName: system-cluster-criticalserviceAccountName: metrics-servervolumes:- emptyDir: {}name: tmp-dir---apiVersion: apiregistration.k8s.io/v1kind: APIServicemetadata:labels:k8s-app: metrics-servername: v1beta1.metrics.k8s.iospec:group: metrics.k8s.iogroupPriorityMinimum: 100insecureSkipTLSVerify: trueservice:name: metrics-servernamespace: kube-systemversion: v1beta1versionPriority: 100
kubectl apply -f k8s-metrics.yaml

- 查看是否安装成功:
kubectl top nodes --use-protocol-buffers
kubectl top pods --use-protocol-buffers
3.2 安装 GlusterFS 存储系统
注意:
- 不建议您在生产环境中使用 NFS 存储(尤其是在 Kubernetes 1.20 或以上版本),这可能会引起
failed to obtain lock和input/output error等问题,从而导致 PodCrashLoopBackOff。此外,部分应用不兼容 NFS,例如 Prometheus 等。- 开发和测试的时候,可以使用 NFS 存储。
3.2.1 VMware 添加空硬盘
- 在 VMware 中的 k8s-node1 和 k8s-node2 以及 K8s-node3 节点添加硬盘,本次只以 k8s-node1 为例,其余节点依次类推即可:
- 添加完毕之后,需要重启 k8s-node1 和 k8s-node2 以及 K8s-node3 节点,以便让这些机器能识别到新添加的硬盘:
reboot

- 查看新添加的硬盘:
lsblk -f
注意:云厂商需要磁盘清零,假设
lsblk -f命令查询的结果是 vdc ,那么就需要执行dd if=/dev/zero of=/dev/vdc bs=1M status=progress命令。
3.2.2 在所有 Node 节点机器安装 GlusterFS
- 在所有 Node 机器上配置 yum 源:
yum -y install centos-release-gluster
- 在所有 Node 机器安装 GlusterFS 服务器:
yum -y install glusterfs glusterfs-server glusterfs-fuse
- 验证是否安装成功:
glusterfs -V
- 启动 glusterd 服务,并设置开机自启:
systemctl enable glusterd && systemctl start glusterd
- 查看 glusterd 服务是否启动成功:
systemctl status glusterd

3.2.3 创建 GlusterFS 集群
- 在任意节点添加其他节点,组成 GlusterFS 集群,本次以 k8s-node1 为例:
gluster peer probe k8s-node2
gluster peer probe k8s-node3

- 验证集群中的所有节点均已成功连接:
gluster peer status

3.2.4 设置 Node 节点的免密登录
- 在 k8s-node1 节点执行如下命令:
ssh-keygen
ssh-copy-id root@k8s-node2
ssh-copy-id root@k8s-node3

3.2.5 部署 Heketi
由于 GlusterFS 本身不提供 API 调用的方法,因此您可以安装 Heketi,通过用于 Kubernetes 调用的 RESTful API 来管理 GlusterFS 存储卷的生命周期。这样,您的 Kubernetes 集群就可以动态地配置 GlusterFS 存储卷。在此示例中将会安装 Heketi v7.0.0 。
- 在 k8s-node1 节点下载 Heketi (网络不行,点这里heketi.zip):
wget https://github.com/heketi/heketi/releases/download/v7.0.0/heketi-v7.0.0.linux.amd64.tar.gz

- 在 k8s-node1 节点解压 Heketi :
tar -zxvf heketi-v7.0.0.linux.amd64.tar.gz
cd heketi
cp heketi /usr/bin
cp heketi-cli /usr/bin

- 在 k8s-node1 节点创建 Heketi 服务文件:
vi /lib/systemd/system/heketi.service
[Unit]Description=Heketi Server[Service]Type=simpleWorkingDirectory=/var/lib/heketiExecStart=/usr/bin/heketi --config=/etc/heketi/heketi.jsonRestart=on-failureStandardOutput=syslogStandardError=syslog[Install]WantedBy=multi-user.target
- 在 k8s-node1 节点创建 Heketi 文件夹:
mkdir -p /var/lib/heketi
mkdir -p /etc/heketi

- 在 k8s-node1 节点创建 JSON 文件以配置 Heketi :
vi /etc/heketi/heketi.json
{"_port_comment": "Heketi Server Port Number","port": "8080","_use_auth": "Enable JWT authorization. Please enable for deployment","use_auth": false,"_jwt": "Private keys for access","jwt": {"_admin": "Admin has access to all APIs","admin": {"key": "123456"},"_user": "User only has access to /volumes endpoint","user": {"key": "123456"}},"_glusterfs_comment": "GlusterFS Configuration","glusterfs": {"_executor_comment": ["Execute plugin. Possible choices: mock, ssh","mock: This setting is used for testing and development."," It will not send commands to any node.","ssh: This setting will notify Heketi to ssh to the nodes."," It will need the values in sshexec to be configured.","kubernetes: Communicate with GlusterFS containers over"," Kubernetes exec api."],"executor": "ssh","_sshexec_comment": "SSH username and private key file information","sshexec": {"keyfile": "/root/.ssh/id_rsa","user": "root"},"_kubeexec_comment": "Kubernetes configuration","kubeexec": {"host" :"https://kubernetes.host:8443","cert" : "/path/to/crt.file","insecure": false,"user": "kubernetes username","password": "password for kubernetes user","namespace": "Kubernetes namespace","fstab": "Optional: Specify fstab file on node. Default is /etc/fstab"},"_db_comment": "Database file name","db": "/var/lib/heketi/heketi.db","brick_max_size_gb" : 1024,"brick_min_size_gb" : 1,"max_bricks_per_volume" : 33,"_loglevel_comment": ["Set log level. Choices are:"," none, critical, error, warning, info, debug","Default is warning"],"loglevel" : "debug"}}
在安装 GlusterFS 作为 KubeSphere 集群的存储类型时,必须提供帐户
admin及其Secret值。
- 在 k8s-node1 节点启用 Heketi :
systemctl start heketi

- 在 k8s-node1 节点检查 Heketi 的状态:
systemctl status heketi

- 在 k8s-node1 节点设置 Heketi 开机自启:
systemctl enable heketi
- 在 k8s-node1 节点为 Heketi 创建拓扑配置文件,该文件包含添加到 Heketi 的集群、节点和磁盘的信息。
vi /etc/heketi/topology.json
{"clusters": [{"nodes": [{"node": {"hostnames": {"manage": ["192.168.65.101"],"storage": ["192.168.65.101"]},"zone": 1},"devices": ["/dev/sdb"]},{"node": {"hostnames": {"manage": ["192.168.65.102"],"storage": ["192.168.65.102"]},"zone": 1},"devices": ["/dev/sdb"]},{"node": {"hostnames": {"manage": ["192.168.65.103"],"storage": ["192.168.65.103"]},"zone": 1},"devices": ["/dev/sdb"]}]}]}
- 请使用您自己的 IP 替换上述 IP 地址。
- 请在
devices一栏添加您自己的磁盘名称。

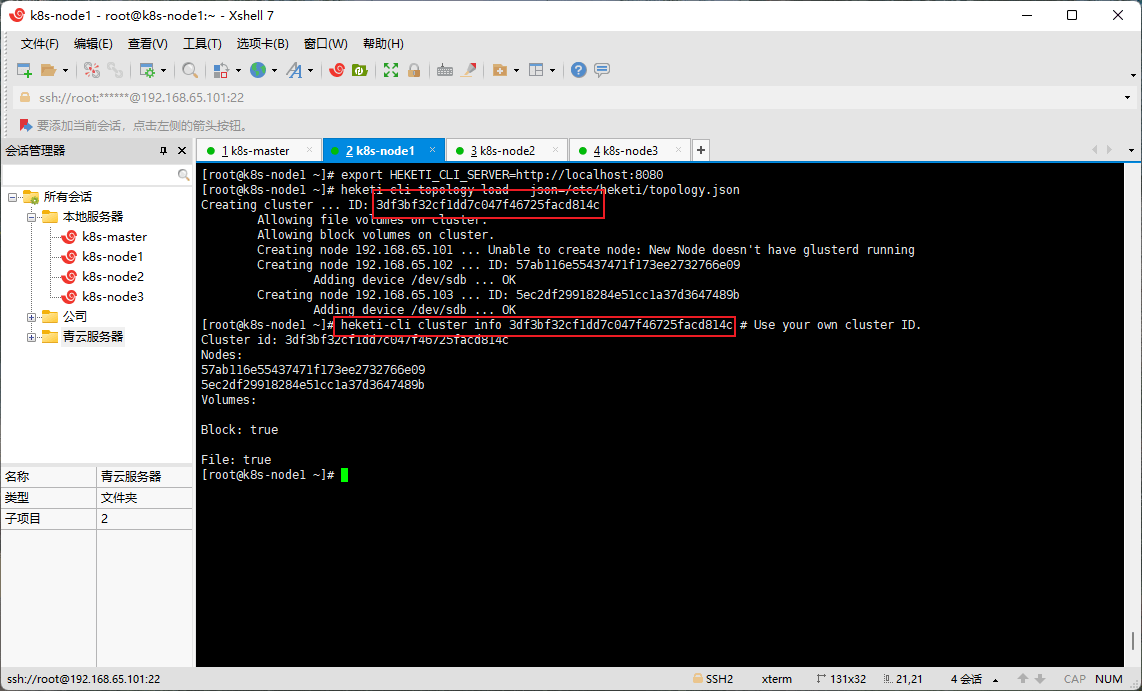
- 在 k8s-node1 节点加载 Heketi JSON 文件:
export HEKETI_CLI_SERVER=http://localhost:8080
heketi-cli topology load --json=/etc/heketi/topology.json

同时显示了集群 ID 和节点 ID。
- 在 k8s-node1 节点查看集群信息:
heketi-cli cluster info 3df3bf32cf1dd7c047f46725facd814c # Use your own cluster ID.
3.2.6 Kubernetes 使用 GlusterFS 创建 storageclass
- 在 k8s-master 节点创建 storageclass :
vi glusterfs-sc.yaml
apiVersion: v1kind: Secretmetadata:name: heketi-secretnamespace: kube-systemtype: kubernetes.io/glusterfsdata:key: "MTIzNDU2" # 请替换为您自己的密钥。Base64 编码。 echo -n "123456" | base64---apiVersion: storage.k8s.io/v1kind: StorageClassmetadata:annotations:storageclass.beta.kubernetes.io/is-default-class: "true"storageclass.kubesphere.io/supported-access-modes: '["ReadWriteOnce","ReadOnlyMany","ReadWriteMany"]'name: glusterfsparameters:clusterid: "3df3bf32cf1dd7c047f46725facd814c" #请替换为您自己的 GlusterFS 集群 ID。gidMax: "50000"gidMin: "40000"restauthenabled: "true"resturl: "http://192.168.65.101:8080" #Gluster REST 服务/Heketi 服务 URL 可按需供应 gluster 存储卷。请替换为您自己的 URL。restuser: adminsecretName: heketi-secretsecretNamespace: kube-systemvolumetype: "replicate:3" #请替换为您自己的存储卷类型。provisioner: kubernetes.io/glusterfsreclaimPolicy: DeletevolumeBindingMode: ImmediateallowVolumeExpansion: true
kubectl apply -f glusterfs-sc.yaml

第四章:安装 KuberSphere(v3.2.1)
4.1 下载核心配置文件
- 在 k8s-master 节点下载核心配置文件(网速不行,请点这里kubesphere-installer.yamlcluster-configuration.yaml):
wget https://github.com/kubesphere/ks-installer/releases/download/v3.2.1/kubesphere-installer.yaml
wget https://github.com/kubesphere/ks-installer/releases/download/v3.2.1/cluster-configuration.yaml
4.2 修改 cluster-configuration
- 在 k8s-master 节点修改 cluster-configuration.yaml 文件,指定我们需要开启的功能:
vi cluster-configuration.yaml
---apiVersion: installer.kubesphere.io/v1alpha1kind: ClusterConfigurationmetadata:name: ks-installernamespace: kubesphere-systemlabels:version: v3.2.1spec:persistence:storageClass: "" # If there is no default StorageClass in your cluster, you need to specify an existing StorageClass here.authentication:jwtSecret: "" # Keep the jwtSecret consistent with the Host Cluster. Retrieve the jwtSecret by executing "kubectl -n kubesphere-system get cm kubesphere-config -o yaml | grep -v "apiVersion" | grep jwtSecret" on the Host Cluster.local_registry: "" # Add your private registry address if it is needed.# dev_tag: "" # Add your kubesphere image tag you want to install, by default it's same as ks-install release version.etcd:monitoring: true # Enable or disable etcd monitoring dashboard installation. You have to create a Secret for etcd before you enable it.endpointIps: localhost # etcd cluster EndpointIps. It can be a bunch of IPs here.port: 2379 # etcd port.tlsEnable: truecommon:core:console:enableMultiLogin: true # Enable or disable simultaneous logins. It allows different users to log in with the same account at the same time.port: 30880type: NodePort# apiserver: # Enlarge the apiserver and controller manager's resource requests and limits for the large cluster# resources: {}# controllerManager:# resources: {}redis:enabled: truevolumeSize: 2Gi # Redis PVC size.openldap:enabled: truevolumeSize: 2Gi # openldap PVC size.minio:volumeSize: 20Gi # Minio PVC size.monitoring:# type: external # Whether to specify the external prometheus stack, and need to modify the endpoint at the next line.endpoint: http://prometheus-operated.kubesphere-monitoring-system.svc:9090 # Prometheus endpoint to get metrics data.GPUMonitoring: # Enable or disable the GPU-related metrics. If you enable this switch but have no GPU resources, Kubesphere will set it to zero.enabled: falsegpu: # Install GPUKinds. The default GPU kind is nvidia.com/gpu. Other GPU kinds can be added here according to your needs.kinds:- resourceName: "nvidia.com/gpu"resourceType: "GPU"default: truees: # Storage backend for logging, events and auditing.# master:# volumeSize: 4Gi # The volume size of Elasticsearch master nodes.# replicas: 1 # The total number of master nodes. Even numbers are not allowed.# resources: {}# data:# volumeSize: 20Gi # The volume size of Elasticsearch data nodes.# replicas: 1 # The total number of data nodes.# resources: {}logMaxAge: 7 # Log retention time in built-in Elasticsearch. It is 7 days by default.elkPrefix: logstash # The string making up index names. The index name will be formatted as ks-<elk_prefix>-log.basicAuth:enabled: falseusername: ""password: ""externalElasticsearchUrl: ""externalElasticsearchPort: ""alerting: # (CPU: 0.1 Core, Memory: 100 MiB) It enables users to customize alerting policies to send messages to receivers in time with different time intervals and alerting levels to choose from.enabled: true # Enable or disable the KubeSphere Alerting System.# thanosruler:# replicas: 1# resources: {}auditing: # Provide a security-relevant chronological set of records,recording the sequence of activities happening on the platform, initiated by different tenants.enabled: true # Enable or disable the KubeSphere Auditing Log System.# operator:# resources: {}# webhook:# resources: {}devops: # (CPU: 0.47 Core, Memory: 8.6 G) Provide an out-of-the-box CI/CD system based on Jenkins, and automated workflow tools including Source-to-Image & Binary-to-Image.enabled: true # Enable or disable the KubeSphere DevOps System.# resources: {}jenkinsMemoryLim: 2Gi # Jenkins memory limit.jenkinsMemoryReq: 1500Mi # Jenkins memory request.jenkinsVolumeSize: 8Gi # Jenkins volume size.jenkinsJavaOpts_Xms: 512m # The following three fields are JVM parameters.jenkinsJavaOpts_Xmx: 512mjenkinsJavaOpts_MaxRAM: 2gevents: # Provide a graphical web console for Kubernetes Events exporting, filtering and alerting in multi-tenant Kubernetes clusters.enabled: true # Enable or disable the KubeSphere Events System.# operator:# resources: {}# exporter:# resources: {}# ruler:# enabled: true# replicas: 2# resources: {}logging: # (CPU: 57 m, Memory: 2.76 G) Flexible logging functions are provided for log query, collection and management in a unified console. Additional log collectors can be added, such as Elasticsearch, Kafka and Fluentd.enabled: true # Enable or disable the KubeSphere Logging System.containerruntime: dockerlogsidecar:enabled: truereplicas: 2# resources: {}metrics_server: # (CPU: 56 m, Memory: 44.35 MiB) It enables HPA (Horizontal Pod Autoscaler).enabled: false # Enable or disable metrics-server.monitoring:storageClass: "" # If there is an independent StorageClass you need for Prometheus, you can specify it here. The default StorageClass is used by default.# kube_rbac_proxy:# resources: {}# kube_state_metrics:# resources: {}# prometheus:# replicas: 1 # Prometheus replicas are responsible for monitoring different segments of data source and providing high availability.# volumeSize: 20Gi # Prometheus PVC size.# resources: {}# operator:# resources: {}# adapter:# resources: {}# node_exporter:# resources: {}# alertmanager:# replicas: 1 # AlertManager Replicas.# resources: {}# notification_manager:# resources: {}# operator:# resources: {}# proxy:# resources: {}gpu: # GPU monitoring-related plug-in installation.nvidia_dcgm_exporter: # Ensure that gpu resources on your hosts can be used normally, otherwise this plug-in will not work properly.enabled: false # Check whether the labels on the GPU hosts contain "nvidia.com/gpu.present=true" to ensure that the DCGM pod is scheduled to these nodes.# resources: {}multicluster:clusterRole: none # host | member | none # You can install a solo cluster, or specify it as the Host or Member Cluster.network:networkpolicy: # Network policies allow network isolation within the same cluster, which means firewalls can be set up between certain instances (Pods).# Make sure that the CNI network plugin used by the cluster supports NetworkPolicy. There are a number of CNI network plugins that support NetworkPolicy, including Calico, Cilium, Kube-router, Romana and Weave Net.enabled: true # Enable or disable network policies.ippool: # Use Pod IP Pools to manage the Pod network address space. Pods to be created can be assigned IP addresses from a Pod IP Pool.type: none # Specify "calico" for this field if Calico is used as your CNI plugin. "none" means that Pod IP Pools are disabled.topology: # Use Service Topology to view Service-to-Service communication based on Weave Scope.type: none # Specify "weave-scope" for this field to enable Service Topology. "none" means that Service Topology is disabled.openpitrix: # An App Store that is accessible to all platform tenants. You can use it to manage apps across their entire lifecycle.store:enabled: true # Enable or disable the KubeSphere App Store.servicemesh: # (0.3 Core, 300 MiB) Provide fine-grained traffic management, observability and tracing, and visualized traffic topology.enabled: true # Base component (pilot). Enable or disable KubeSphere Service Mesh (Istio-based).kubeedge: # Add edge nodes to your cluster and deploy workloads on edge nodes.enabled: true # Enable or disable KubeEdge.cloudCore:nodeSelector: {"node-role.kubernetes.io/worker": ""}tolerations: []cloudhubPort: "10000"cloudhubQuicPort: "10001"cloudhubHttpsPort: "10002"cloudstreamPort: "10003"tunnelPort: "10004"cloudHub:advertiseAddress: # At least a public IP address or an IP address which can be accessed by edge nodes must be provided.- "" # Note that once KubeEdge is enabled, CloudCore will malfunction if the address is not provided.nodeLimit: "100"service:cloudhubNodePort: "30000"cloudhubQuicNodePort: "30001"cloudhubHttpsNodePort: "30002"cloudstreamNodePort: "30003"tunnelNodePort: "30004"edgeWatcher:nodeSelector: {"node-role.kubernetes.io/worker": ""}tolerations: []edgeWatcherAgent:nodeSelector: {"node-role.kubernetes.io/worker": ""}tolerations: []
4.3 执行安装
- 在 k8s-master 节点执行安装:
kubectl apply -f kubesphere-installer.yaml
kubectl apply -f cluster-configuration.yaml
- 在 k8s-master 节点查看安装进度:
kubectl logs -n kubesphere-system $(kubectl get pod -n kubesphere-system -l app=ks-install -o jsonpath='{.items[0].metadata.name}') -f

4.4 解决 etcd 监控证书找不到的问题
- 在 k8s-master 节点解决 etcd 监控证书找不到的问题:
kubectl -n kubesphere-monitoring-system create secret generic kube-etcd-client-certs --from-file=etcd-client-ca.crt=/etc/kubernetes/pki/etcd/ca.crt --from-file=etcd-client.crt=/etc/kubernetes/pki/apiserver-etcd-client.crt --from-file=etcd-client.key=/etc/kubernetes/pki/apiserver-etcd-client.key

若有收获,就点个赞吧
0 人点赞
