1 对象处理转换
1.1 对象转换处理
1.1.1 概述
- 在使用 SpringMVC 开发框架进行参数接收的时候,所有的请求参数都可以自动的转为 VO 类型,同时在进行 Handler 方法返回的时候也可以直接以 Restful 的形式返回 JSON 数据内容,SpringBoot 当然也支持类似的操作。
1.1.2 microboot-web 子模块
- 本次将实现一个 Message 对象的数据转换。
- 既然要进行数据的接收,那么必须先创建一个 VO 类:
package com.github.fairy.era.vo;import lombok.Data;import java.util.Date;/*** @author 许大仙* @version 1.0* @since 2022-01-05 09:32*/@Datapublic class Message {/*** 字符串参数*/private String title;/*** 日期参数*/private Date publishDate;/*** 字符串参数*/private String content;}
1.1.3 microboot 项目
- 修改 build.gradle 配置文件,在公共模块中引入 spring-boot-starter-web 的依赖。
project(':microboot-common') { // 设置子项目的配置,独享配置dependencies { // 配置子模块依赖implementation 'org.springframework.boot:spring-boot-starter-web' // 引入 SpringBoot 的 web 的依赖}}
1.1.4 microboot-common 子模块
- 既然需要进行参数之间的字符串和日期之间的转换处理,最佳的做法就是定义一个公共的 Handler 父类,这种父类一般都不建议直接使用,所以都会通过 abstract 关键字进行定义。
package com.github.fairy.era.common.web;import org.springframework.web.bind.WebDataBinder;import org.springframework.web.bind.annotation.InitBinder;import java.beans.PropertyEditorSupport;import java.time.LocalDateTime;import java.time.ZoneOffset;import java.time.format.DateTimeFormatter;import java.util.Date;/*** 定义一个公共的 Handler 类** @author 许大仙* @version 1.0* @since 2022-01-05 09:45*/public abstract class AbstractBaseHandler {private static final DateTimeFormatter df = DateTimeFormatter.ofPattern("yyyy-MM-dd HH:mm:ss");@InitBinderpublic void initBinder(WebDataBinder binder) {binder.registerCustomEditor(Date.class, new PropertyEditorSupport() {@Overridepublic void setAsText(String text) throws IllegalArgumentException {LocalDateTime localDateTime = LocalDateTime.parse(text, df);super.setValue(new Date(localDateTime.toInstant(ZoneOffset.UTC).toEpochMilli()));}});}}
1.1.5 microboot-common 子模块
- 在项目搭建的时候在 Gradle 中引入了一个 spring-boot-gradle-plugin 插件,该插件是将已有的 Gradle 任务和 SpringBoot 的相关任务进行绑定,我们现在在 microboot-common 子模块中进行项目构建的时候表示当前项目是一个 SpringBoot 项目,但是这个模块实际上并不是 SpringBoot 的模块,所以自然就无法进行构建了,此时就需要修改当前模块中的 buid.gradle 配置文件,进行任务的禁用配置。
plugins {id 'java'id 'idea'}jar {enabled = true // 允许当前的模块打包为 *.jar 文件}javadocTask {enabled = false // 不启用 javadoc 任务}javadocJar {enabled = false // 不启用 javadoc 的 *.jar 文件}bootJar {enabled = false // 不执行 SpringBoot 的打包任务}
1.1.6 microboot-web 子模块
- 此时对于 microboot 项目的 build.gradle 配置文件来说已经在 web 子模块中引入了 common 子模块,所以可以直接进行类的引用。
package com.github.fairy.era.web;import com.github.fairy.era.common.web.AbstractBaseHandler;import com.github.fairy.era.vo.Message;import lombok.extern.slf4j.Slf4j;import org.springframework.web.bind.annotation.GetMapping;import org.springframework.web.bind.annotation.RequestMapping;import org.springframework.web.bind.annotation.RestController;/*** @author 许大仙* @since 2022-01-03 07-55*/@RestController@RequestMapping("/message")@Slf4jpublic class MessageHandler extends AbstractBaseHandler {@GetMapping("/echo")public Message echo(Message message) {log.info("接收 msg 的请求参数,参数内容是 {}", message);message.setTitle("【ECHO】" + message.getTitle());message.setContent("【ECHO】" + message.getContent());return message;}}
- 此时的返回是基于 Jackson 组件完成的,在实际开发中,不建议更换此组件。
1.1.6 浏览器
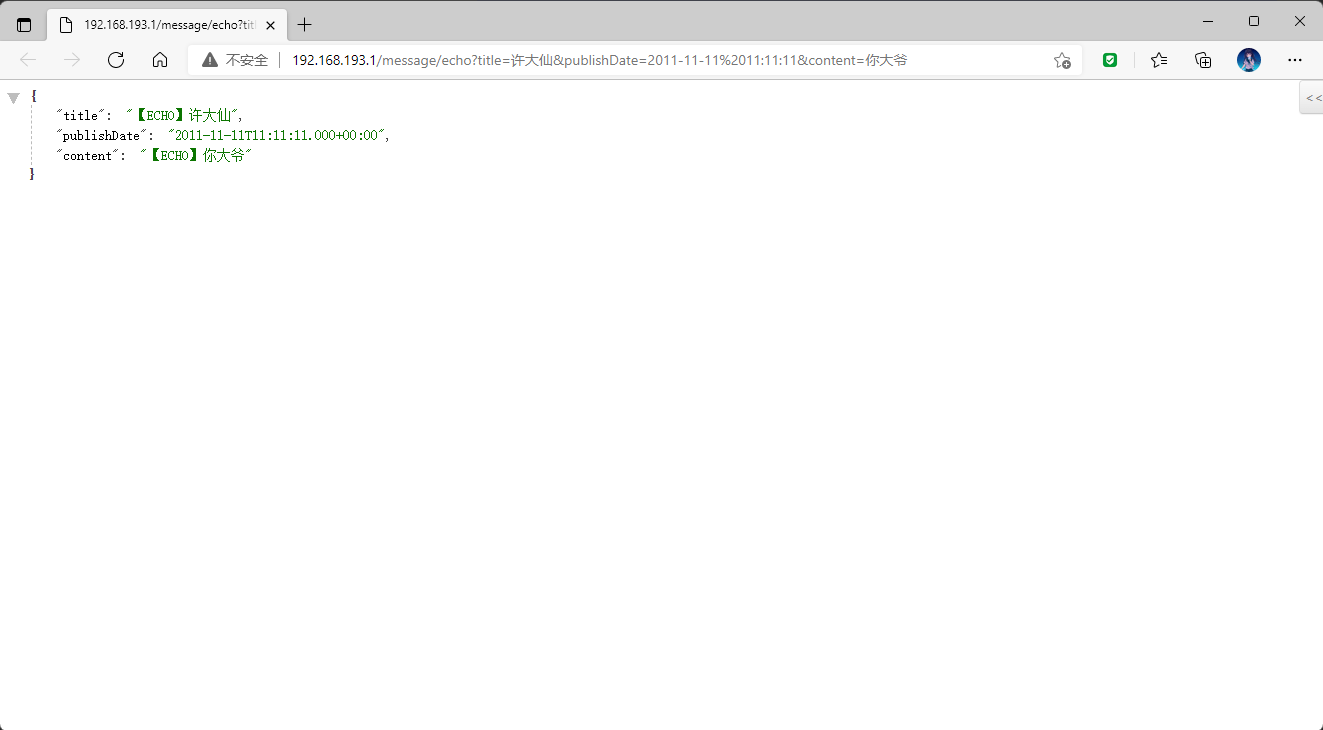
- 通过浏览器发送请求路径,并进行请求内容的查看。
- 请求如下:
http://localhost:80/message/echo?title=许大仙&publishDate=2011-11-11 11:11:11&content=你大爷
- 请求内容:
- 此时的程序就可以按照 SpringMVC 的方式进行数据和对象的转换了,同时也基于 Restful 的风格实现了数据的响应。
1.2 整合 FastJSON 组件(不推荐)
1.2.1 Maven 仓库
- 获取 FastJSON 组件的依赖:
implementation group: 'com.alibaba', name: 'fastjson', version: '1.2.79'
1.2.2 microboot 项目
- 修改 build.gradle 配置文件,在 microboot-web 子模块中添加 FastJSON 组件的依赖:
project(':microboot-web') { // 设置子项目的配置,独享配置dependencies { // 配置子模块依赖implementation(project(':microboot-common')) // 引入其他子模块implementation 'org.springframework.boot:spring-boot-starter-web' // 引入 SpringBoot 的 web 的依赖/* fastjson */implementation group: 'com.alibaba', name: 'fastjson', version: '1.2.79'}gradle.taskGraph.whenReady { // 在所有的操作准备好之后触发tasks.each { task ->if (task.name.contains('javadoc')) { // 如果发现有 javadoc 任务,就跳过task.enabled = false // 当前任务不执行}}}}
1.2.3 microboot-web 子模块
- 如果要想将当前的转换组件替换为 FastJSON 组件,必须创建一个 WebMVC 的配置类。
package com.github.fairy.era.config;import com.alibaba.fastjson.serializer.SerializerFeature;import com.alibaba.fastjson.support.config.FastJsonConfig;import com.alibaba.fastjson.support.spring.FastJsonHttpMessageConverter;import org.springframework.context.annotation.Configuration;import org.springframework.http.MediaType;import org.springframework.http.converter.HttpMessageConverter;import org.springframework.http.converter.json.MappingJackson2HttpMessageConverter;import org.springframework.web.servlet.config.annotation.WebMvcConfigurer;import java.util.ArrayList;import java.util.List;/*** @author 许大仙* @version 1.0* @since 2022-01-05 10:38*/@Configurationpublic class WebConfig implements WebMvcConfigurer {@Overridepublic void configureMessageConverters(List<HttpMessageConverter<?>> converters) {// ① 默认在 SpringBoot 里面提供的是 Jackson 组件,需要移除掉for (int i = 0; i < converters.size(); i++) {if (converters.get(i) instanceof MappingJackson2HttpMessageConverter) {converters.remove(i);}}// ② 项目之中一定需要提供有转换器,所以就可以将 FastJson 组件配置到项目中FastJsonHttpMessageConverter fastJsonHttpMessageConverter = new FastJsonHttpMessageConverter();// ③ FastJson 在进行最终消息转换的时候实际上是需要进行相关配置定义的FastJsonConfig fastJsonconfig = new FastJsonConfig();fastJsonconfig.setSerializerFeatures(// 允许 Map 的内容为 nullSerializerFeature.WriteMapNullValue,// 允许 List 集合为 null, 使用 [] 代替SerializerFeature.WriteNullListAsEmpty,// 允许 String 内容为空使用空字符串代替SerializerFeature.WriteNullStringAsEmpty,// 日期格式化输出SerializerFeature.WriteDateUseDateFormat,// 数字为空使用 0 表示SerializerFeature.WriteNullNumberAsZero,// 禁用循环引用SerializerFeature.DisableCircularReferenceDetect,SerializerFeature.PrettyFormat);// ④ 处理中文乱码问题List<MediaType> fastMediaTypes = new ArrayList<>();fastMediaTypes.add(MediaType.APPLICATION_JSON);fastJsonHttpMessageConverter.setSupportedMediaTypes(fastMediaTypes);// ⑤ 在convert中添加配置信息fastJsonHttpMessageConverter.setFastJsonConfig(fastJsonconfig);// ⑥ 将 FastJson 添加到 converters 中converters.add(fastJsonHttpMessageConverter);}}
- 给 Message 的日期属性加上
@JsonFormat注解:
package com.github.fairy.era.vo;import com.fasterxml.jackson.annotation.JsonFormat;import lombok.Data;import java.util.Date;/*** @author 许大仙* @version 1.0* @since 2022-01-05 09:32*/@Datapublic class Message {/*** 字符串参数*/private String title;/*** 日期参数*/@JsonFormat(pattern = "yyyy-MM-dd HH:mm:ss")private Date publishDate;/*** 字符串参数*/private String content;}
1.3 返回 XML 数据(不推荐)
1.3.1 概述
- 在很多的传统项目之中可能不会大量的去使用 JSON ,而是会使用传统的 XML ,尤其是一些超大型的系统(遗留项目),在这些的环境之中,SpringBoot 里面如果要以 XML 形式进行返回也是支持的。
1.3.2 Maven 仓库
- 如果想实现这样的转换,一般会使用 Jackson 组件来完成:
implementation group: 'com.fasterxml.jackson.dataformat', name: 'jackson-dataformat-xml', version: '2.13.1'
1.3.3 microboot 项目
- 修改 build.gradle 配置文件,在 microboot-web 子模块中添加相关依赖:
project(':microboot-web') { // 设置子项目的配置,独享配置dependencies { // 配置子模块依赖implementation(project(':microboot-common')) // 引入其他子模块implementation 'org.springframework.boot:spring-boot-starter-web' // 引入 SpringBoot 的 web 的依赖implementation group: 'com.fasterxml.jackson.dataformat', name: 'jackson-dataformat-xml' // jackson-dataformat-xml}gradle.taskGraph.whenReady { // 在所有的操作准备好之后触发tasks.each { task ->if (task.name.contains('javadoc')) { // 如果发现有 javadoc 任务,就跳过task.enabled = false // 当前任务不执行}}}}
1.3.4 microboot-web 子模块
- 如果要想通过 Jackson 生成 XML 数据,最重要的一点就是修改 VO 类:
package com.github.fairy.era.vo;import com.fasterxml.jackson.annotation.JsonFormat;import lombok.Data;import javax.xml.bind.annotation.XmlElement;import javax.xml.bind.annotation.XmlRootElement;import java.util.Date;/*** @author 许大仙* @version 1.0* @since 2022-01-05 09:32*/@Data@XmlRootElement // 配置 XML 的根元素public class Message {/*** 字符串参数*/@XmlElementprivate String title;/*** 日期参数*/@JsonFormat(pattern = "yyyy-MM-dd HH:mm:ss")@XmlElementprivate Date publishDate;/*** 字符串参数*/@XmlElementprivate String content;}
- 修改 Handler 方法,表明返回的是 XML :
package com.github.fairy.era.web;import com.github.fairy.era.common.web.AbstractBaseHandler;import com.github.fairy.era.vo.Message;import lombok.extern.slf4j.Slf4j;import org.springframework.http.MediaType;import org.springframework.web.bind.annotation.GetMapping;import org.springframework.web.bind.annotation.RequestMapping;import org.springframework.web.bind.annotation.RestController;/*** @author 许大仙* @since 2022-01-03 07-55*/@RestController@RequestMapping("/message")@Slf4jpublic class MessageHandler extends AbstractBaseHandler {// produces = MediaType.APPLICATION_XML_VALUE 表明返回的是 XML@GetMapping(value = "/echo", produces = MediaType.APPLICATION_XML_VALUE)public Message echo(Message message) {log.info("接收 msg 的请求参数,参数内容是 {}", message);message.setTitle("【ECHO】" + message.getTitle());message.setContent("【ECHO】" + message.getContent());return message;}}
1.3.5 浏览器
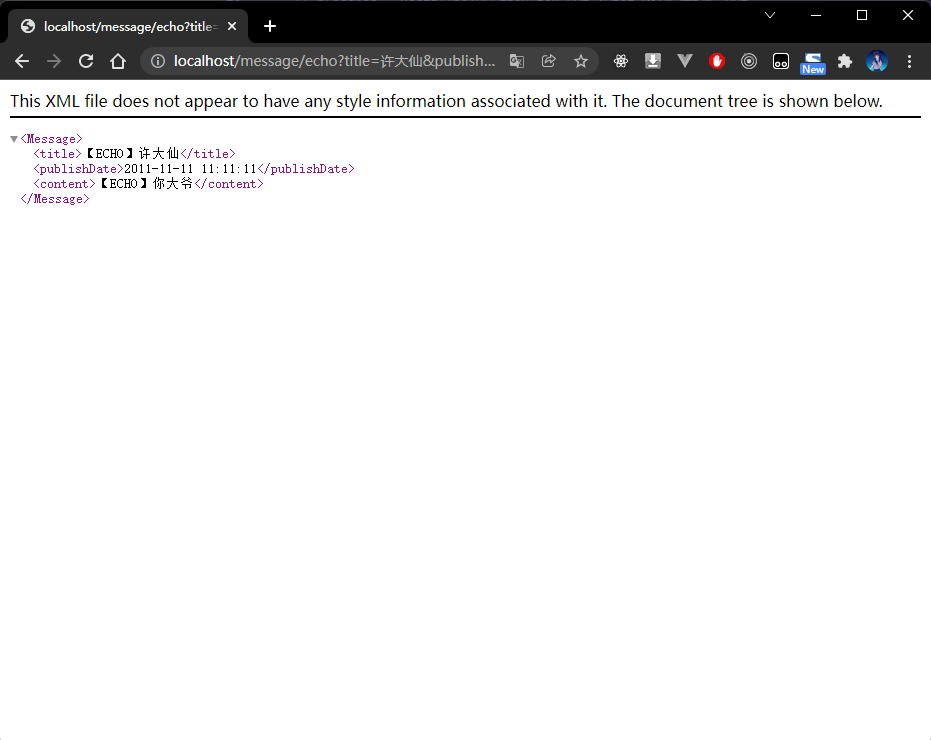
- 通过浏览器发送请求路径,并进行请求内容的查看。
- 请求如下:
http://localhost:80/message/echo?title=许大仙&publishDate=2011-11-11 11:11:11&content=你大爷
- 请求内容:
2 SpringBoot 数据响应
2.1 返回 PDF 数据
2.1.1 概述
- 到现在为止,所有返回的实际最为常见的类型就是 Restful (JSON 结构)类型,但是随着各种应用技术的不断出现以及客户方要求的不断出现,所以在实际的开发之中一个 WEB 应用程序里面除了要有基础的 Restful 返回之外,实际上也会包含各种类型文件的响应,最为常见的就是 PDF 了。
2.1.2 PDF
- PDF(Portable Document Format,可携带文档)是一种和操作系统无关的电子文件格式,可以有效支持多媒体集成信息,将文字、格式以及图像封装在一个文件中,同时也支持特长文件的存储,避免了不同的文本编辑器所造成的文本显示格式错乱的问题,在 Java 项目中 itextpdf 组件是比较常见的 PDF 创建工具。
2.1.3 Maven 仓库
- 如果想让 SpringBoot 程序以 PDF 文件格式进行响应,那么就需要采用一个专属的生成组件—— itextpdf :
implementation group: 'com.itextpdf', name: 'itextpdf', version: '5.5.13.2'
2.1.4 microboot 项目
- 修改 build.gradle 配置文件,在 microboot-web 子模块中添加相关依赖:
project(':microboot-web') { // 设置子项目的配置,独享配置dependencies { // 配置子模块依赖implementation(project(':microboot-common')) // 引入其他子模块implementation 'org.springframework.boot:spring-boot-starter-web' // 引入 SpringBoot 的 web 的依赖implementation group: 'com.itextpdf', name: 'itextpdf', version: '5.5.13.2'// PDF}gradle.taskGraph.whenReady { // 在所有的操作准备好之后触发tasks.each { task ->if (task.name.contains('javadoc')) { // 如果发现有 javadoc 任务,就跳过task.enabled = false // 当前任务不执行}}}}
2.1.5 microboot-web 子模块
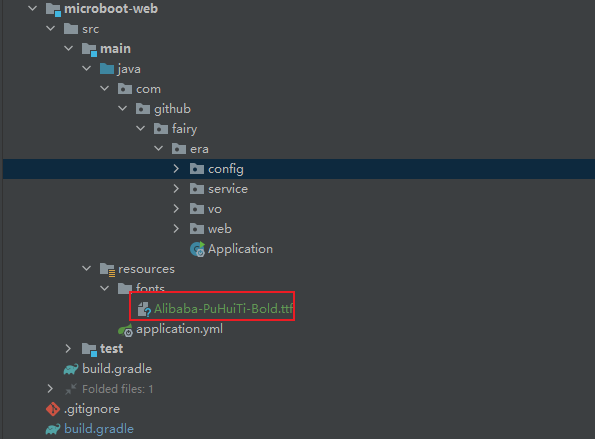
- 如果要生成 PDF 文件,那么一般都需要设置字体库,如果在 Windows 中,可以直接引入 Windows 中的字体库,但是如果现在项目迁移到 Linux 中,那么字体库可能就不一样了,所以最佳的做法就是将可能用到的 PDF 生成的字体库放在项目的资源路径 src/main/resources 路径下,在此目录中新建一个 fonts 的子目录,保存字体文件。
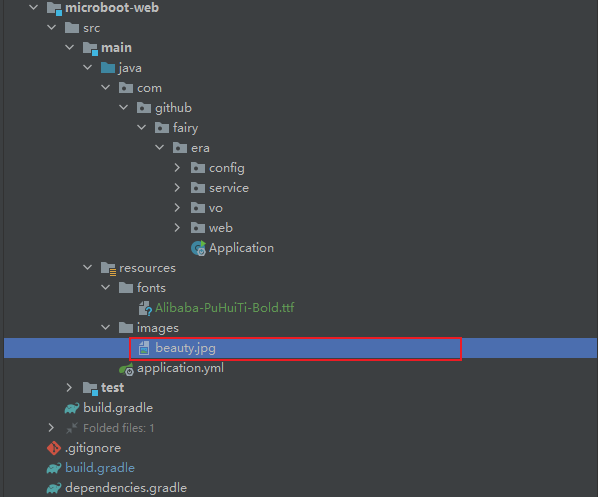
- 本次可以考虑将一个图片设置到 PDF 之中,所以这个图片也是应该保存到 src/main/resources 目录中的 images 的子目录。
- 创建一个专属 PDF 的 Handler :
package com.github.fairy.era.web;import com.itextpdf.text.*;import com.itextpdf.text.pdf.BaseFont;import com.itextpdf.text.pdf.PdfPCell;import com.itextpdf.text.pdf.PdfPTable;import com.itextpdf.text.pdf.PdfWriter;import lombok.SneakyThrows;import org.springframework.core.io.ClassPathResource;import org.springframework.core.io.Resource;import org.springframework.stereotype.Controller;import org.springframework.web.bind.annotation.GetMapping;import org.springframework.web.bind.annotation.RequestMapping;import javax.servlet.http.HttpServletResponse;/*** @author 许大仙* @version 1.0* @since 2022-01-05 15:56*/@Controller@RequestMapping("/pdf")public class PDFHandler {@GetMapping(value = "/createPDF")@SneakyThrowspublic void createPDF(HttpServletResponse response) {// 设置响应类型response.setHeader("Content-Type", "application/pdf");// 一般情况下将生产的 PDF 进行下载,所以此时需要强制性的开启下载,并且配置下载文件名称response.setHeader("Content-Disposition", "attachment;filename=test.pdf");// 下面开始使用 itextpdf 组件在内存之中形成一份生成的 PDF 文件// 设置页面大小Document document = new Document(PageSize.A4, 10, 10, 50, 20);// 获取 PDF 的输出流配置PdfWriter pdfWriter = PdfWriter.getInstance(document, response.getOutputStream());// 开始构建 PDF 的文档内容document.open();// 获取图片的资源Resource imageResource = new ClassPathResource("/images/beauty.jpg");// 通过指定的路径加载图片Image image = Image.getInstance(imageResource.getFile().getAbsolutePath());float scalePercentage = (72 / 300f) * 100.0f;image.scalePercent(scalePercentage, scalePercentage);image.setAlignment(Element.ALIGN_CENTER);// 追加图片到文档之中document.add(image);// 图片之后换三行输出文字信息document.add(new Paragraph("\n\n\n"));// 设置字体库Resource fontResource = new ClassPathResource("/fonts/Alibaba-PuHuiTi-Bold.ttf");BaseFont baseFont = BaseFont.createFont(fontResource.getFile().getAbsolutePath(), BaseFont.IDENTITY_H, BaseFont.NOT_EMBEDDED);// 定义要使用的字库Font font = new Font(baseFont);// 在 PDF 上开始绘制文本信息String[] titles = {"许大仙", "你大爷的", "牛逼"};String[] contents = {"许仙", "你大爷的", "牛逼"};// 定义表格PdfPTable table = new PdfPTable(2);for (int i = 0; i < titles.length; i++) {// 创建单元格PdfPCell cell = new PdfPCell();//设置水平居中cell.setHorizontalAlignment(Element.ALIGN_CENTER);//设置垂直居中cell.setVerticalAlignment(Element.ALIGN_MIDDLE);// 输出文字定义cell.setPhrase(new Paragraph(titles[i], font));// 追加单元格table.addCell(cell);cell = new PdfPCell();//设置水平居中cell.setHorizontalAlignment(Element.ALIGN_CENTER);//设置垂直居中cell.setVerticalAlignment(Element.ALIGN_MIDDLE);cell.setPhrase(new Paragraph(contents[i], font));// 追加单元格table.addCell(cell);}document.add(table);document.close();}}
2.2 返回 Excel 数据
2.2.1 概述
- 在当今所谓的办公自动化处理的过程之中,Excel 表格文件已经变得非常重要了,在项目的运行过程之中,会由系统保存有大量的数据,所以下载的结果一般都愿意使用
*.xls或*.xlsx文件来描述。 - 在 Java 开发领域之中有一个著名的 POI 开源组件,这个组件功能非常强大,可以专门处理处理各种 Excel 文件,在 SpringBoot 之中为了便于用户操作 Excel 文件,提供了 easypoi-spring-boot-starter 依赖库:
implementation group: 'cn.afterturn', name: 'easypoi-spring-boot-starter', version: '4.4.0'
2.2.2 microboot 项目
- 修改 build.gradle 配置文件,在 microboot-web 子模块中添加相关依赖:
project(':microboot-web') { // 设置子项目的配置,独享配置dependencies { // 配置子模块依赖implementation(project(':microboot-common')) // 引入其他子模块implementation 'org.springframework.boot:spring-boot-starter-web' // 引入 SpringBoot 的 web 的依赖implementation group: 'cn.afterturn', name: 'easypoi-spring-boot-starter', version: '4.4.0' // easypoi}gradle.taskGraph.whenReady { // 在所有的操作准备好之后触发tasks.each { task ->if (task.name.contains('javadoc')) { // 如果发现有 javadoc 任务,就跳过task.enabled = false // 当前任务不执行}}}}
2.2.3 microboot-web 子模块
- 现在如果要生成 Excel 数据,那么这个数据可能有很多种来源:大数据采集、数据库或异构平台的信息,本次将利用一个固定的数据来演示 Excel 的生成,此时就需要修改 Message 类:
package com.github.fairy.era.vo;import cn.afterturn.easypoi.excel.annotation.Excel;import com.fasterxml.jackson.annotation.JsonFormat;import lombok.Builder;import lombok.Data;import java.util.Date;/*** @author 许大仙* @version 1.0* @since 2022-01-05 09:32*/@Builder@Datapublic class Message {@Excel(name = "信息的标题", orderNum = "0", width = 30) // 生成 Excel 表格列的配置private String title;@JsonFormat(pattern = "yyyy-MM-dd HH:mm:ss")@Excel(name = "信息的发布日期", format = "yyyy-MM-dd HH:mm:ss", orderNum = "1", width = 30)private Date publishDate;@Excel(name = "信息内容", orderNum = "2", width = 30)private String content;}
- 定义 Handler 类,并结合 Message 类实现 Excel 的生成:
package com.github.fairy.era.web;import cn.afterturn.easypoi.excel.ExcelExportUtil;import cn.afterturn.easypoi.excel.entity.ExportParams;import cn.afterturn.easypoi.excel.entity.enmus.ExcelType;import com.github.fairy.era.vo.Message;import lombok.SneakyThrows;import org.apache.poi.ss.usermodel.Workbook;import org.springframework.stereotype.Controller;import org.springframework.web.bind.annotation.GetMapping;import org.springframework.web.bind.annotation.RequestMapping;import javax.servlet.http.HttpServletResponse;import java.util.ArrayList;import java.util.Date;import java.util.List;/*** @author 许大仙* @version 1.0* @since 2022-01-06 08:53*/@Controller@RequestMapping(value = "/messageExcel")public class MessageExcelHandler {@SneakyThrows@GetMapping(value = "/createExcel")public void createExcel(HttpServletResponse response) {// 设置响应类型response.setHeader("Content-Type", "application/vnd.openxmlformats-officedocument.spreadsheetml.sheet");// 一般情况下将生产的 PDF 进行下载,所以此时需要强制性的开启下载,并且配置下载文件名称response.setHeader("Content-Disposition", "attachment;filename=test.xlsx");// 随后通过一些固定数据的来生成相应的 Excel 数据List<Message> messageList = new ArrayList<>();messageList.add(Message.builder().title("许大仙").publishDate(new Date()).content("你大爷").build());messageList.add(Message.builder().title("许小仙").publishDate(new Date()).content("你小爷").build());// 生成 ExcelWorkbook workbook = ExcelExportUtil.exportExcel(new ExportParams("消息管理", "最新消息", ExcelType.XSSF), Message.class, messageList);workbook.write(response.getOutputStream());}}
2.3 返回图像流(不推荐)
2.3.1 概述
- 如果在进行前后端分离设计的时候,需要进行一些资源的加载,一般会有两种做法:
- ① 直接通过远程的文件服务器进行资源的加载操作,如:FastDFS、minio、阿里云的 OSS 等(
推荐)。 - ② 通过程序来实现加载,这样可以方便的进行验证上的控制。
- ① 直接通过远程的文件服务器进行资源的加载操作,如:FastDFS、minio、阿里云的 OSS 等(
- 程序在进行图像流返回的时候只需要将返回的类型设置为图片即可,但是如果要想进行返回处理的时候往往需需要追加一个转换的配置类,在 SpringBoot 里面最大的特点就是可以直接返回。
2.3.2 microboot-web 子模块
- 创建 ImageHandler 程序类,这个类负责返回图像:
package com.github.fairy.era.web;import lombok.SneakyThrows;import org.springframework.core.io.ClassPathResource;import org.springframework.http.MediaType;import org.springframework.web.bind.annotation.GetMapping;import org.springframework.web.bind.annotation.RequestMapping;import org.springframework.web.bind.annotation.RestController;import javax.imageio.ImageIO;import java.awt.image.BufferedImage;/*** @author 许大仙* @version 1.0* @since 2022-01-06 09:25*/@RestController@RequestMapping(value = "/image")public class ImageHandler {@GetMapping(value = "/create", produces = {MediaType.IMAGE_JPEG_VALUE, MediaType.IMAGE_PNG_VALUE, MediaType.IMAGE_GIF_VALUE})@SneakyThrowspublic BufferedImage createImage() {// 资源加载ClassPathResource resource = new ClassPathResource("/images/beauty.jpg");// 实现文件的加载return ImageIO.read(resource.getInputStream());}}
- 按照 SpringBoot 原始的处理方式,此时如果返回的是一个类对象,则会基于 Jackson 将对象的信息转换为 JSON 数据,但是既然是一个图像肯定不能够以文本的方式显示,那么就需要追加一个新的转换器。
package com.github.fairy.era.config;import org.springframework.context.annotation.Configuration;import org.springframework.http.converter.BufferedImageHttpMessageConverter;import org.springframework.http.converter.HttpMessageConverter;import org.springframework.web.servlet.config.annotation.WebMvcConfigurer;import java.util.List;/*** @author 许大仙* @version 1.0* @since 2022-01-06 09:39*/@Configurationpublic class MvcConfig implements WebMvcConfigurer {@Overridepublic void extendMessageConverters(List<HttpMessageConverter<?>> converters) {converters.add(new BufferedImageHttpMessageConverter());}}
2.4 返回视频流(不推荐)
2.4.1 概述
- 在实际的项目运行过程中,视频流也是可以通过程序的方式来实现控制的,在 SpringBoot 里面同样支持对视频流的控制。
2.4.2 microboot-web 子模块
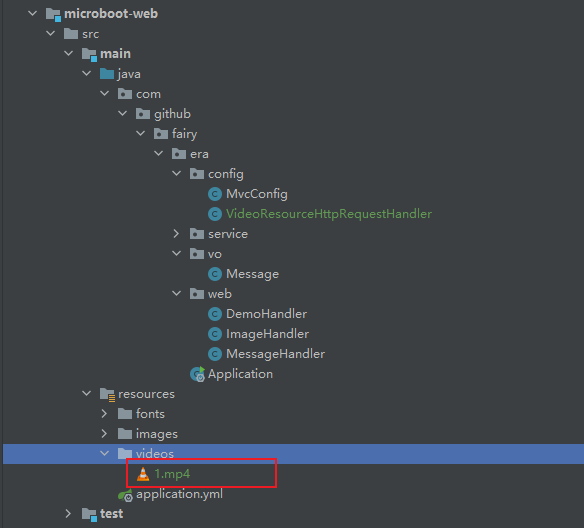
- 将视频拷贝到 src/main/resource 目录中的 videos 下:
- 如果要想进行视频流的控制,那么首先就需要提供有一个视频资源的请求处理器。
package com.github.fairy.era.config;import org.springframework.core.io.ClassPathResource;import org.springframework.core.io.Resource;import org.springframework.stereotype.Component;import org.springframework.web.servlet.resource.ResourceHttpRequestHandler;import javax.servlet.http.HttpServletRequest;import java.io.IOException;/*** @author 许大仙* @version 1.0* @since 2022-01-06 09:54*/@Componentpublic class VideoResourceHttpRequestHandler extends ResourceHttpRequestHandler {@Overrideprotected Resource getResource(HttpServletRequest request) throws IOException {return new ClassPathResource("/videos/1.mp4");}}
- 随后对该资源进行响应处理,定义一个专属的 Handler 类进行操作:
package com.github.fairy.era.web;import com.github.fairy.era.config.VideoResourceHttpRequestHandler;import lombok.NonNull;import lombok.RequiredArgsConstructor;import lombok.SneakyThrows;import org.springframework.web.bind.annotation.GetMapping;import org.springframework.web.bind.annotation.RestController;import javax.servlet.http.HttpServletRequest;import javax.servlet.http.HttpServletResponse;/*** @author 许大仙* @version 1.0* @since 2022-01-06 10:19*/@RestController@RequiredArgsConstructorpublic class VideoHandler {@NonNullprivate VideoResourceHttpRequestHandler videoResourceHttpRequestHandler;@SneakyThrows@GetMapping(value = "/createVideo")public void createVideo(HttpServletRequest request, HttpServletResponse response) {this.videoResourceHttpRequestHandler.handleRequest(request, response);}}
2.5 文件下载
2.5.1 概述
- 在之前所做的一切操作实际上都是操作一些专属的特殊的文件,比如:PDF、Excel、图像、视频等,但是在一些情况下可能只是要求用户进行文件的下载。
2.5.2 microboot-web 子模块
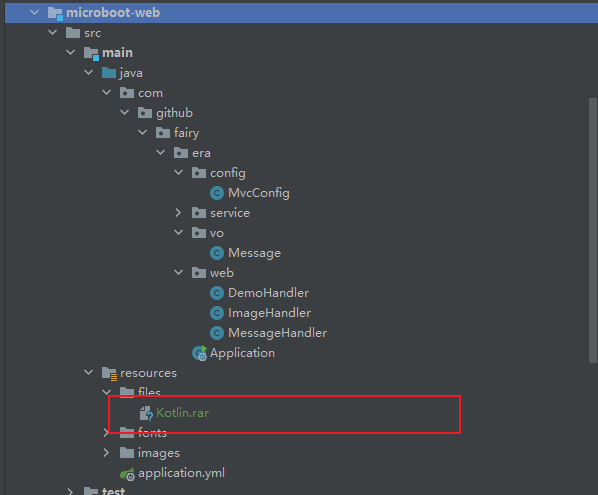
- 将本次模拟强制性下载的文件保存在 src/main/resources/files 目录中。
- 如果现在仅仅是要将文件直接进行下载操作,本质上非常的容易,只需要通过输出流完成即可。
package com.github.fairy.era.web;import lombok.SneakyThrows;import org.springframework.core.io.ClassPathResource;import org.springframework.util.FileCopyUtils;import org.springframework.web.bind.annotation.GetMapping;import org.springframework.web.bind.annotation.RestController;import javax.servlet.http.HttpServletResponse;/*** @author 许大仙* @version 1.0* @since 2022-01-06 10:34*/@RestControllerpublic class DownloadHandler {@GetMapping(value = "/download")@SneakyThrowspublic void download(HttpServletResponse response) {// 设置响应类型 强制下载response.setHeader("Content-Type", "application/force-download");// 一般情况下将生产的 PDF 进行下载,所以此时需要强制性的开启下载,并且配置下载文件名称response.setHeader("Content-Disposition", "attachment;filename=Kotlin.rar");ClassPathResource resource = new ClassPathResource("/files/Kotlin.rar");FileCopyUtils.copy(resource.getInputStream(), response.getOutputStream());}}
3 属性注入管理
3.1 属性定义和注入
3.1.1 概述
- 在 Spring开发框架为了便于 Bean 的配置支持,可以基于 properties 资源文件实现相关内容的定义,随后在程序之后基于 SPEL 表达式进行内容的配置,而现在使用到了 SpringBoot ,所以在 SpringBoot 里面也可以直接基于 application.yml 配置文件实现同样的属性定义。
- 在 Spring 框架里面如果要进行一些配置,一般都是通过
*.xml文件的方式完成的,但是在 SpringBoot里面不提倡使用 XML 配置文件的,所以所有的相关配置可以在 src/main/resource 目录中的 application.properties 或 application.yml 来实现配置,同等目录中 application.properties 的优先级高于 application.yml 。
3.1.2 microboot-web 子模块
- 在 src/main/resources 目录下新建 application.yml 配置文件,内容如下:
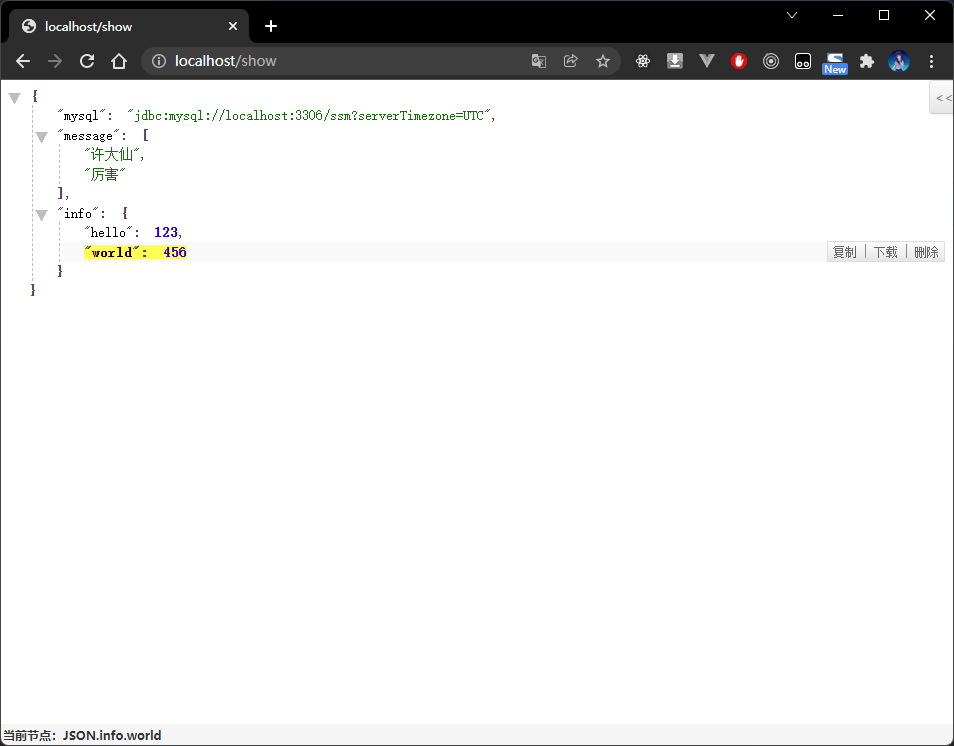
source: # 是一个自定义的 KEY 的名称mysql: jdbc:mysql://localhost:3306/ssm?serverTimezone=UTC # 自定义信息(KEY = source.mysql ,value = 内容)message: 许大仙,厉害info: '{ hello: 123,world: 456 }'
- 定义一个 SourceHandler 的处理类,通过该类实现资源的注入处理:
package com.github.fairy.era.web;import org.springframework.beans.factory.annotation.Value;import org.springframework.web.bind.annotation.GetMapping;import org.springframework.web.bind.annotation.RestController;import java.util.HashMap;import java.util.List;import java.util.Map;/*** @author 许大仙* @version 1.0* @since 2022-01-06 11:06*/@RestControllerpublic class SourceHandler {@Value("${source.mysql}")private String mysql;@Value("#{'${source.message}'.split(',')}")private List<String> message;@Value("#{${source.info}}")private Map<String, Object> info;@GetMapping("/show")public Map<String, Object> show() {Map<String, Object> maps = new HashMap<>(16);maps.put("mysql", this.mysql);maps.put("message", this.message);maps.put("info", this.info);return maps;}}
3.1.3 浏览器
- 通过浏览器来进行数据访问。
- 请求如下:
http://localhost/show
- 请求内容:
3.2 @ConfigurationProperties 注解
3.2.1 概述
- 在之前是通过 application.yml 配置所需要的资源信息,随后再利用
@Value注解进行了资源的注入处理;但是除了这样的配置模式之外,实际上也可以采用一种 application.yml 和 Bean 属性之间的自动注入操作。
3.2.2 microboot 项目
- 修改 buid.gradle 文件,在公共依赖中添加 spring-boot-configuration-processor :
subprojects { // 子模块的配置dependencies { // 公共依赖管理implementation group: 'org.springframework.boot', name: 'spring-boot-devtools' // 允许进行项目的热部署testImplementation 'org.springframework.boot:spring-boot-starter-test' //引入 SpringBoot 的 test 的依赖// lombokcompileOnly 'org.projectlombok:lombok' // 编译生效annotationProcessor 'org.projectlombok:lombok' // 注解生效testCompileOnly 'org.projectlombok:lombok' // 编译生效testAnnotationProcessor 'org.projectlombok:lombok' // 注解生效// spring-boot-configuration-processorannotationProcessor "org.springframework.boot:spring-boot-configuration-processor"}// 其余略}
3.2.3 microboot-web 子模块
- 在 application.yml 中配置一些属性内容:
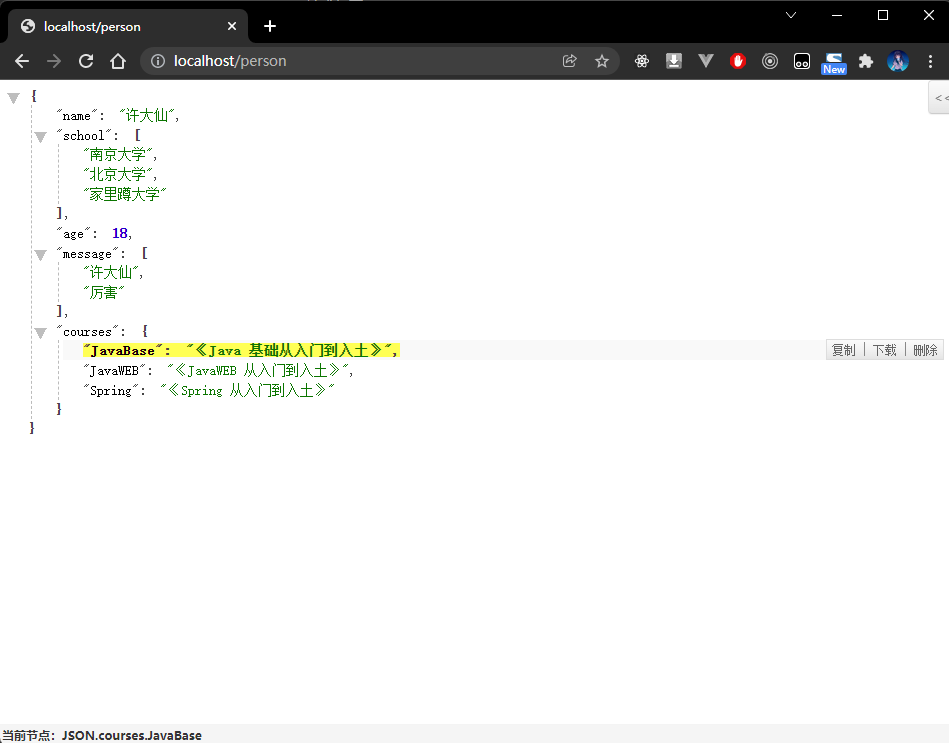
person:name: 许大仙school:- 南京大学- 北京大学- 家里蹲大学age: 18message: [ '许大仙','厉害' ]courses:JavaBase: 《Java 基础从入门到入土》JavaWEB: 《JavaWEB 从入门到入土》Spring: 《Spring 从入门到入土》
- 新建 Person 实体类,并将 application.yml 中配置的属性映射到实体类属性之中:
package com.github.fairy.era.vo;import lombok.Data;import org.springframework.boot.context.properties.ConfigurationProperties;import org.springframework.stereotype.Component;import java.util.List;import java.util.Map;/*** @author 许大仙* @version 1.0* @since 2022-01-06 13:46*/@Data@Component@ConfigurationProperties(prefix = "person")public class Person {private String name;private List<String> school;private Integer age;private List<String> message;private Map<String, String> courses;}
- 新建一个 Handler 类,注入 Person 的实例,并将 Person 的实例返回:
package com.github.fairy.era.web;import com.github.fairy.era.vo.Person;import lombok.NonNull;import lombok.RequiredArgsConstructor;import org.springframework.web.bind.annotation.GetMapping;import org.springframework.web.bind.annotation.RestController;/*** @author 许大仙* @version 1.0* @since 2022-01-06 13:51*/@RestController@RequiredArgsConstructorpublic class PersonHandler {@NonNullprivate Person person;@GetMapping(value = "/person")public Person person() {return this.person;}}
3.2.4 浏览器
- 通过浏览器来进行数据访问。
- 请求如下:
http://localhost/person
- 请求内容:
3.3 注入级联对象数据
3.3.1 概述
- 在之前进行处理的时候都是直接在 application.yml 里面配置了一些基本信息,而后要求类的属性名称和配置的属性名称要一致,随后才能实现注入的处理。
- 本次将采用一个部门和雇员的对应信息,一个部门中会存在多个雇员信息,而一个雇员属于一个部门。
3.3.2 microboot-web 子模块
- 定义 VO 类:
package com.github.fairy.era.vo;import lombok.Data;/*** @author 许大仙* @version 1.0* @since 2022-01-06 14:06*/@Datapublic class Emp {private String id;private String name;private Double salary;}
package com.github.fairy.era.vo;import lombok.Data;import org.springframework.boot.context.properties.ConfigurationProperties;import org.springframework.stereotype.Component;import java.util.List;/*** @author 许大仙* @version 1.0* @since 2022-01-06 14:04*/@Data@ConfigurationProperties(prefix = "dept")@Componentpublic class Dept {private String id;private String name;private String location;private List<Emp> emps;}
- 修改 application.yml 文件,进行内容的注入配置:
dept:id: 001name: 研发部location: 上海emps:- id: 001name: 张三salary: 5000- id: 002name: 李四salary: 6000
- 创建一个 handler 类,显示 Dept 的属性信息:
package com.github.fairy.era.web;import com.github.fairy.era.vo.Dept;import lombok.NonNull;import lombok.RequiredArgsConstructor;import org.springframework.web.bind.annotation.GetMapping;import org.springframework.web.bind.annotation.RestController;/*** @author 许大仙* @version 1.0* @since 2022-01-06 14:13*/@RestController@RequiredArgsConstructorpublic class DeptHandler {@NonNullprivate Dept dept;@GetMapping(value = "/dept")public Dept dept() {return this.dept;}}
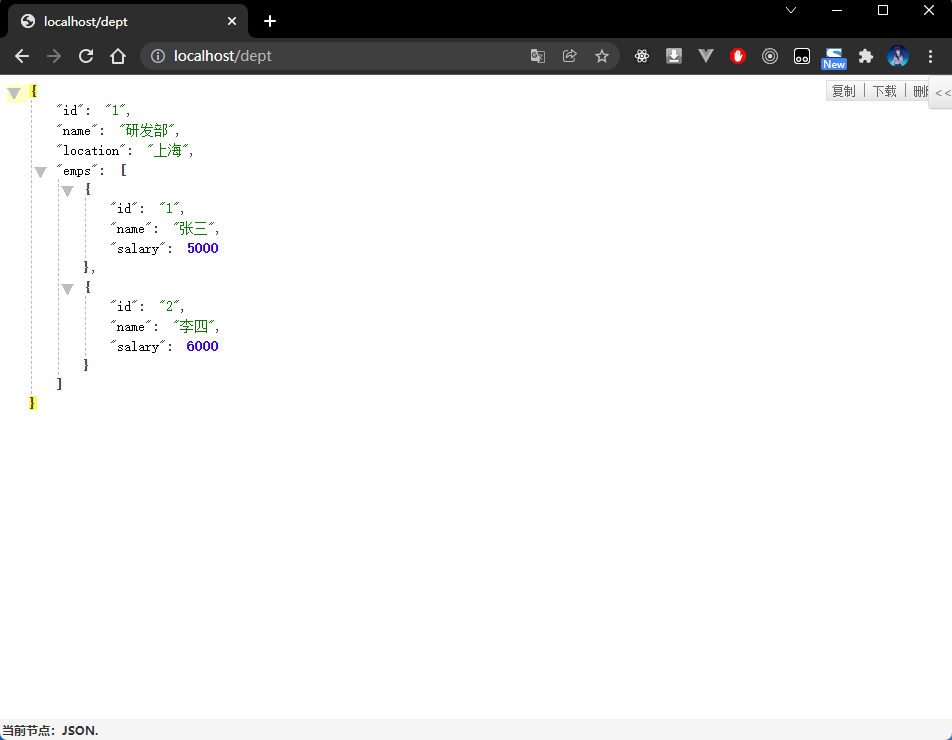
3.3.3 浏览器
- 通过浏览器来进行数据访问。
- 请求如下:
http://localhost/dept
- 请求内容:
3.4 自定义注入配置文件(不推荐)
3.4.1 概述
- 在之前如果要想进行一些类属性的配置,一般都是在 application.yml 配置文件中进行定义,但是如果将所有的配置项都定义在这里面会比较麻烦,因为整个 SpringBoot 项目里面会存在有大量的配置项。
- 所以,此时可以考虑 properties 配置文件的特点,利用资源文件来实现属性内容的定义。
3.4.2 microboot-web 子模块
- 新建 dept.properties 文件,内容如下:
dept.id=001dept.name=研发部dept.location=上海dept.emps[0].id=001dept.emps[0].name=张三dept.emps[0].salary=5000dept.emps[1].id=002dept.emps[1].name=李四dept.emps[1].salary=6000
- 定义 VO 类:
package com.github.fairy.era.vo;import lombok.Data;/*** @author 许大仙* @version 1.0* @since 2022-01-06 14:06*/@Datapublic class Emp {private String id;private String name;private Double salary;}
package com.github.fairy.era.vo;import lombok.Data;import org.springframework.boot.context.properties.ConfigurationProperties;import org.springframework.context.annotation.PropertySource;import org.springframework.stereotype.Component;import java.util.List;/*** @author 许大仙* @version 1.0* @since 2022-01-06 14:04*/@Data@PropertySource("classpath:/dept.properties")@ConfigurationProperties(prefix = "dept")@Componentpublic class Dept {private String id;private String name;private String location;private List<Emp> emps;}
- 创建一个 handler 类,显示 Dept 的属性信息:
package com.github.fairy.era.web;import com.github.fairy.era.vo.Dept;import lombok.NonNull;import lombok.RequiredArgsConstructor;import org.springframework.web.bind.annotation.GetMapping;import org.springframework.web.bind.annotation.RestController;/*** @author 许大仙* @version 1.0* @since 2022-01-06 14:13*/@RestController@RequiredArgsConstructorpublic class DeptHandler {@NonNullprivate Dept dept;@GetMapping(value = "/dept")public Dept dept() {return this.dept;}}
3.4.3 浏览器
- 通过浏览器来进行数据访问。
- 请求如下:
http://localhost/dept
- 请求内容:


若有收获,就点个赞吧
0 人点赞
