1 负载均衡概述
1.1 什么是负载均衡?
- 在搭建网站的时候,如果单节点的web服务性能和可靠性都无法达到要求;或者是在使用外网服务的时候,经常担心被人攻破,一不小心就会有打开外网端口的请求,通常这个时候加入负载均衡就能有效解决服务问题。
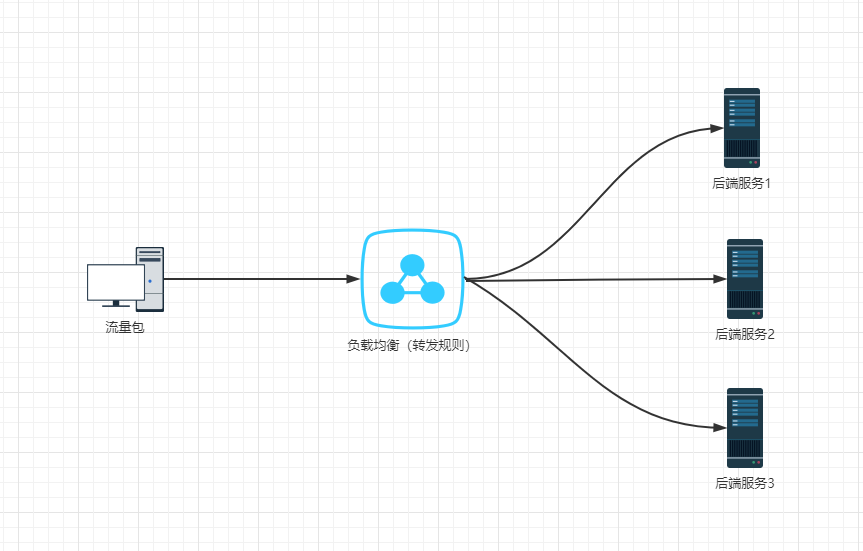
- 负载均衡是一种基础的网络服务,其原理是通过运行在前面的负载均衡服务,按照指定的负载均衡算法,将流量分配到后端服务集群上,从而为系统提供并行扩展的能力。
- 负载均衡的应用场景包括流量包、转发规则以及后端服务,由于该服务有内外网个例、健康检查等功能,能够有效提供系统的安全性和可用性。
1.2 客户端负载均衡和服务端负载均衡
1.2.1 客户端负载均衡
- 客户端会有一个服务器地址列表,在发送请求前通过负载均衡算法选择一个服务器,进行访问;即在客户端进行负载均衡算法分配。
- 典型应用:Ribbon是客户端负载均衡。
1.2.2 服务端负载均衡
- 先发送请求到负载均衡服务器或软件,然后通过负载均衡算法,在多个服务器之间选择一个进行访问;即在服务器端进行负载均衡算法分配。
- 典型应用:
 硬件:F5等。
 软件:Nginx等。
2 基于Ribbon实现负载均衡
2.1 搭建环境
- 准备两个商品微服务(端口分别是9001和9011)让其注册到Eureka集群中。
- 商品微服务9001的application.yml:
server:port: 9001 # 微服务的端口号spring:application:name: service-product # 微服务的名称datasource:url: jdbc:mysql://192.168.1.57:3306/test?useUnicode=true&characterEncoding=UTF-8&autoReconnect=true&useSSL=false&serverTimezone=GMT%2B8&allowPublicKeyRetrieval=truedriver-class-name: com.mysql.cj.jdbc.Driverusername: rootpassword: 123456jpa:generate-ddl: trueshow-sql: trueopen-in-view: truedatabase: mysql# 配置 eurekaeureka:instance:# 主机名称:服务名称修改,其实就是向eureka server中注册的实例idinstance-id: service-product:9001# 显示IP信息prefer-ip-address: trueclient:service-url: # 此处修改为 Eureka Server的集群地址defaultZone: http://eureka7001.com:7001/eureka/,http://eureka7002.com:7002/eureka/,http://eureka7003.com:7003/eureka/# 微服务info内容详细信息info:app.name: xxxcompany.name: xxxbuild.artifactId: $project.artifactId$build.version: $project.version$
- 商品微服务9011的application.yml:
server:port: 9011 # 微服务的端口号spring:application:name: service-product # 微服务的名称datasource:url: jdbc:mysql://192.168.1.57:3306/test?useUnicode=true&characterEncoding=UTF-8&autoReconnect=true&useSSL=false&serverTimezone=GMT%2B8&allowPublicKeyRetrieval=truedriver-class-name: com.mysql.cj.jdbc.Driverusername: rootpassword: 123456jpa:generate-ddl: trueshow-sql: trueopen-in-view: truedatabase: mysql# 配置 eurekaeureka:instance:# 主机名称:服务名称修改,其实就是向eureka server中注册的实例idinstance-id: service-product:9011# 显示IP信息prefer-ip-address: trueclient:service-url: # 此处修改为 Eureka Server的集群地址defaultZone: http://eureka7001.com:7001/eureka/,http://eureka7002.com:7002/eureka/,http://eureka7003.com:7003/eureka/# 微服务info内容详细信息info:app.name: xxxcompany.name: xxxbuild.artifactId: $project.artifactId$build.version: $project.version$
- 商品微服务9001和9011的ProductController.java
package com.sunxiaping.product.controller;import com.sunxiaping.product.domain.Product;import com.sunxiaping.product.service.ProductService;import org.springframework.beans.factory.annotation.Autowired;import org.springframework.beans.factory.annotation.Value;import org.springframework.web.bind.annotation.*;@RestController@RequestMapping(value = "/product")public class ProductController {@Autowiredprivate ProductService productService;@Value("${server.port}")private String port;@Value("${spring.cloud.client.ip-address}")private String ip;@PostMapping(value = "/save")public String save(@RequestBody Product product) {productService.save(product);return "新增成功";}@GetMapping(value = "/findById/{id}")public Product findById(@PathVariable(value = "id") Long id) {Product product = productService.findById(id);product.setProductName("访问的地址是:" + ip + ":" + port);return product;}}
- 订单微服务的OrderController.java
package com.sunxiaping.order.controller;import com.sunxiaping.order.domain.Product;import org.springframework.beans.factory.annotation.Autowired;import org.springframework.cloud.client.discovery.DiscoveryClient;import org.springframework.web.bind.annotation.GetMapping;import org.springframework.web.bind.annotation.PathVariable;import org.springframework.web.bind.annotation.RequestMapping;import org.springframework.web.bind.annotation.RestController;import org.springframework.web.client.RestTemplate;@RestController@RequestMapping(value = "/order")public class OrderController {@Autowiredprivate RestTemplate restTemplate;/*** SpringCloud提供的获取元数据的工具类* 调用方法获取服务的元数据*/@Autowiredprivate DiscoveryClient discoveryClient;/*** 基于Ribbon的形式调用远程的微服务** @param id* @return*/@GetMapping(value = "/buy/{id}")public Product buy(@PathVariable(value = "id") Long id) {Product product = restTemplate.getForObject("http://service-product/product/findById/" + id, Product.class);return product;}}
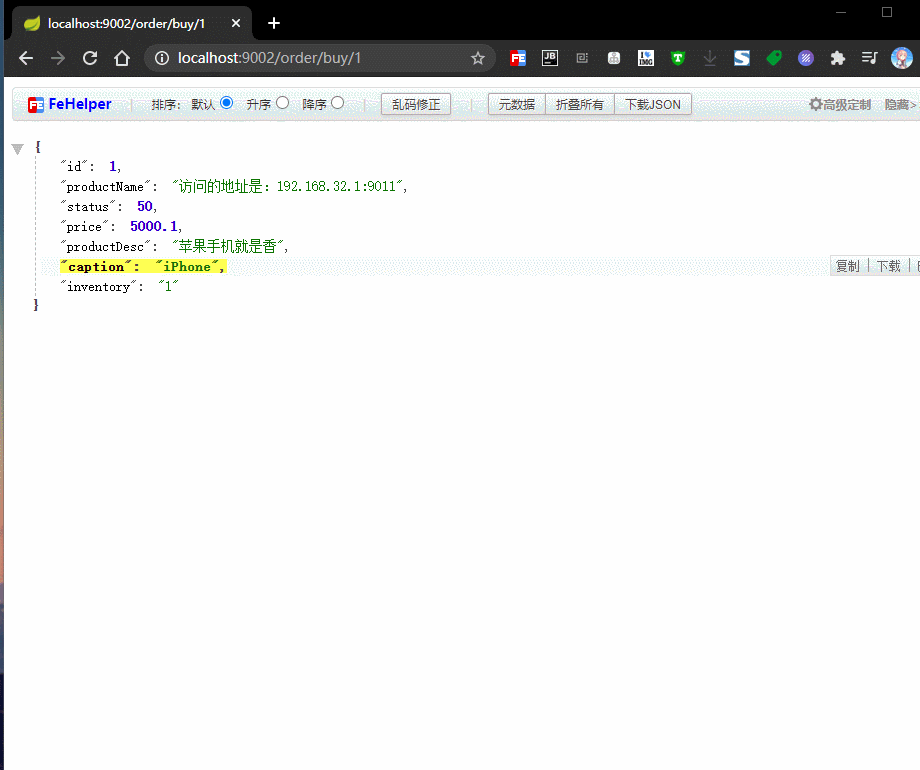
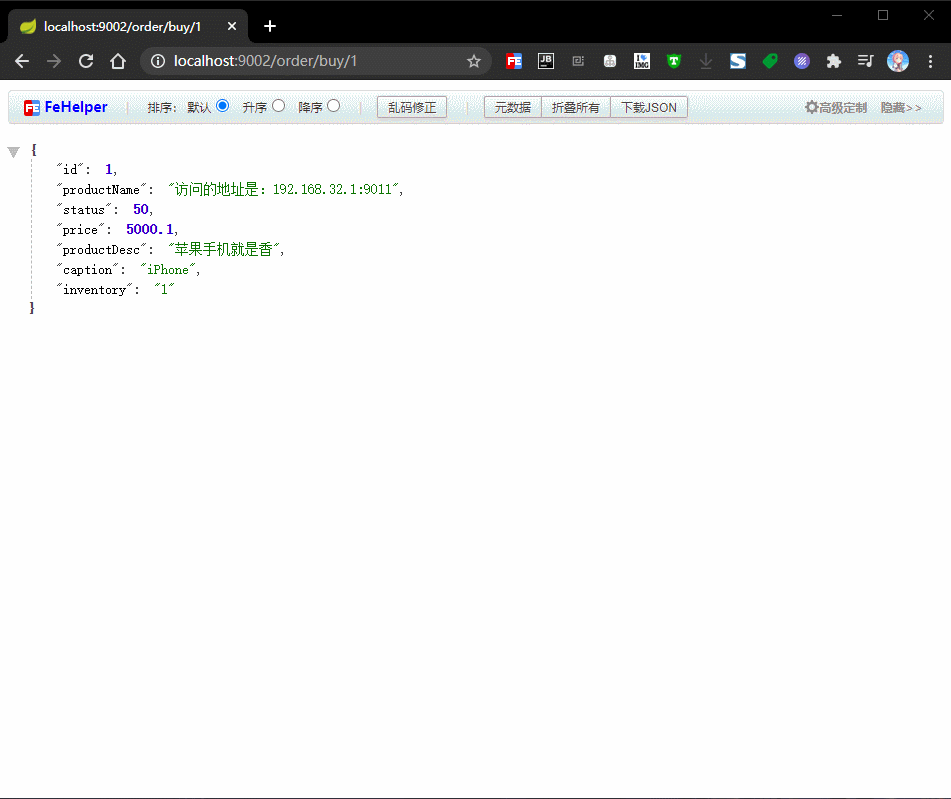
- 启动Eureka服务集群,将商品微服务启动并注册到Eureka服务集群中,然后通过http://localhost:9002/order/buy/1查看控制台效果。
2.2 Ribbon内置的负载均衡策略
2.2.1 Ribbon内置的负载均衡策略的概述
- Ribbon内置了多种负载均衡策略,内部负责复杂均衡的顶层接口为com.netflix.loadbalancer.IRule,实现方式如下:
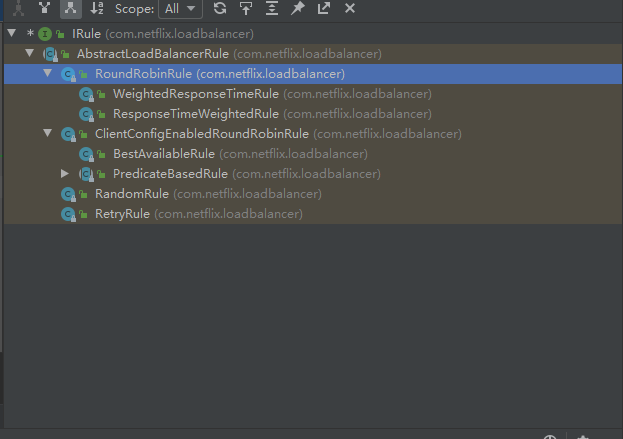
- com.netflix.loadbalancer.RoundRobinRule:以轮询的方式进行负载均衡。
- com.netflix.loadbalancer.RandomRule:随机策略。
- com.netflix.loadbalancer.RetryRule:重试策略。
- com.netflix.loadbalancer.WeightedResponseTimeRule:权重策略。会计算每个服务的权重,权重越高的被调用的可能性会越大。
- com.netflix.loadbalancer.BestAvailableRule:最佳策略。遍历所有的服务实例,过滤掉故障实例,并将请求数量最小的实例返回。
- com.netflix.loadbalancer.AvailabilityFilteringRule:可用过滤策略。过滤掉故障和请求数超过阈值的服务实例,再从剩下的实例中轮询调用。
2.2.2 Ribbon内置的负载均衡策略的使用一
- 在服务消费者的application.yml中修改负载均衡策略:
# 修改ribbon的负载均衡策略 服务名 - ribbon - NFLoadBalancerRuleClassName :负载均衡策略service-product:ribbon:NFLoadBalancerRuleClassName: com.netflix.loadbalancer.RandomRule # 修改ribbon的负载均衡策略为权重策略
- 消息者完整的application.yml:
server:port: 9002 # 微服务的端口号spring:application:name: service-order # 微服务的名称datasource:url: jdbc:mysql://192.168.1.57:3306/test?useUnicode=true&characterEncoding=UTF-8&autoReconnect=true&useSSL=false&serverTimezone=GMT%2B8&allowPublicKeyRetrieval=truedriver-class-name: com.mysql.cj.jdbc.Driverusername: rootpassword: 123456jpa:generate-ddl: trueshow-sql: trueopen-in-view: truedatabase: mysql# 配置Eurekaeureka:instance:# 实例的名称instance-id: service-order:9002# 显示IP信息prefer-ip-address: truelease-renewal-interval-in-seconds: 5 # 发送心跳续约间隔(默认30秒)lease-expiration-duration-in-seconds: 10 # Eureka Client发送心跳给Eureka Server端后,续约到期时间(默认90秒)client:healthcheck:enabled: trueservice-url: # Eureka Server的地址# defaultZone: http://localhost:9000/eureka/defaultZone: http://eureka7001.com:7001/eureka/,http://eureka7002.com:7002/eureka/# 修改ribbon的负载均衡策略 服务名 - ribbon - NFLoadBalancerRuleClassName :负载均衡策略service-product:ribbon:NFLoadBalancerRuleClassName: com.netflix.loadbalancer.RandomRule # 修改ribbon的负载均衡策略为权重策略# 微服务info内容详细信息info:app.name: xxxcompany.name: xxxbuild.artifactId: $project.artifactId$build.version: $project.version$
2.2.3 Ribbon内置的负载均衡策略的使用二
- 在启动类扫描不到的地方新建一个自定义的Rule配置类(比如启动类的包名是com.sunxiaping.order,而自定义Rule配置类的包名是com.sunxiaping.ribbon.rule)。
package com.sunxiaping.ribbon.rule;import com.netflix.loadbalancer.IRule;import com.netflix.loadbalancer.RandomRule;import org.springframework.context.annotation.Bean;import org.springframework.context.annotation.Configuration;@Configurationpublic class SelfRule {/*** 替换Ribbon内置的负载均衡策略** @return*/@Beanpublic IRule iRule() {return new RandomRule();}}
- 在启动类上标注@RibbonClient注解:
package com.sunxiaping.order;import com.sunxiaping.ribbon.rule.SelfRule;import org.springframework.boot.SpringApplication;import org.springframework.boot.autoconfigure.SpringBootApplication;import org.springframework.cloud.netflix.eureka.EnableEurekaClient;import org.springframework.cloud.netflix.ribbon.RibbonClient;@SpringBootApplication@EnableEurekaClient//在启动类上标注@RibbonClient注解,这样该微服务启动的时候就能去加载自定义的Ribbon配置类,从而使得配置生效@RibbonClient(name = "service-product",configuration = SelfRule.class)public class OrderApplication {public static void main(String[] args) {SpringApplication.run(OrderApplication.class, args);}}
2.2.4 Ribbon的策略选择
- 如果每个机器配置一样,建议不修改策略(推荐)。
- 如果部分机器配置强,则可以改为WeightedResponseTimeRule。
2.3 请求重试机制
- 在实际生产环境中,Ribbon做客户端负载均衡的时候,Ribbon默认的负载均衡算法是轮询,一旦访问到的那台微服务提供者突然宕机了,此时就会出现404的情况,这时可以使用Ribbon的请求重试机制,Ribbon的请求重试机制基于Spring的retry(Spring的重试框架)。
- 使用:
- 在微服务消费者导入spring-retry的Maven坐标:
<dependency><groupId>org.springframework.retry</groupId><artifactId>spring-retry</artifactId></dependency>
- 修改微服务消费者的application.yml:
- 修改部分:
# Ribbon的重试机制service-product:ribbon:# 修改ribbon的负载均衡策略 服务名 - ribbon - NFLoadBalancerRuleClassName :负载均衡策略# NFLoadBalancerRuleClassName: com.netflix.loadbalancer.RandomRule # 修改ribbon的负载均衡策略为权重策略# Ribbon的重试机制参数ConnectTimeout: 250 # Ribbon的连接超时时间ReadTimeout: 1000 # Ribbon的数据读取超时时间OkToRetryOnAllOperations: true # 是否对所有操作都进行重试MaxAutoRetriesNextServer: 2 # 切换实例的重试次数MaxAutoRetries: 1 # 对当前实例的重试次数
- 完整部分:
server:port: 9002 # 微服务的端口号spring:application:name: service-order # 微服务的名称datasource:url: jdbc:mysql://192.168.1.57:3306/test?useUnicode=true&characterEncoding=UTF-8&autoReconnect=true&useSSL=false&serverTimezone=GMT%2B8&allowPublicKeyRetrieval=truedriver-class-name: com.mysql.cj.jdbc.Driverusername: rootpassword: 123456jpa:generate-ddl: trueshow-sql: trueopen-in-view: truedatabase: mysql# 配置Eurekaeureka:instance:# 实例的名称instance-id: service-order:9002# 显示IP信息prefer-ip-address: truelease-renewal-interval-in-seconds: 5 # 发送心跳续约间隔(默认30秒)lease-expiration-duration-in-seconds: 10 # Eureka Client发送心跳给Eureka Server端后,续约到期时间(默认90秒)client:healthcheck:enabled: trueservice-url: # Eureka Server的地址# defaultZone: http://localhost:9000/eureka/defaultZone: http://eureka7001.com:7001/eureka/,http://eureka7002.com:7002/eureka/# Ribbon的重试机制service-product:ribbon:# 修改ribbon的负载均衡策略 服务名 - ribbon - NFLoadBalancerRuleClassName :负载均衡策略# NFLoadBalancerRuleClassName: com.netflix.loadbalancer.RandomRule # 修改ribbon的负载均衡策略为权重策略# Ribbon的重试机制参数ConnectTimeout: 250 # Ribbon的连接超时时间ReadTimeout: 1000 # Ribbon的数据读取超时时间OkToRetryOnAllOperations: true # 是否对所有操作都进行重试MaxAutoRetriesNextServer: 2 # 切换实例的重试次数MaxAutoRetries: 1 # 对当前实例的重试次数# 微服务info内容详细信息info:app.name: xxxcompany.name: xxxbuild.artifactId: $project.artifactId$build.version: $project.version$# 开启日志debuglogging:level:root: debug
3 Ribbon中负载均衡的源码分析
3.1 Ribbon中的关键组件
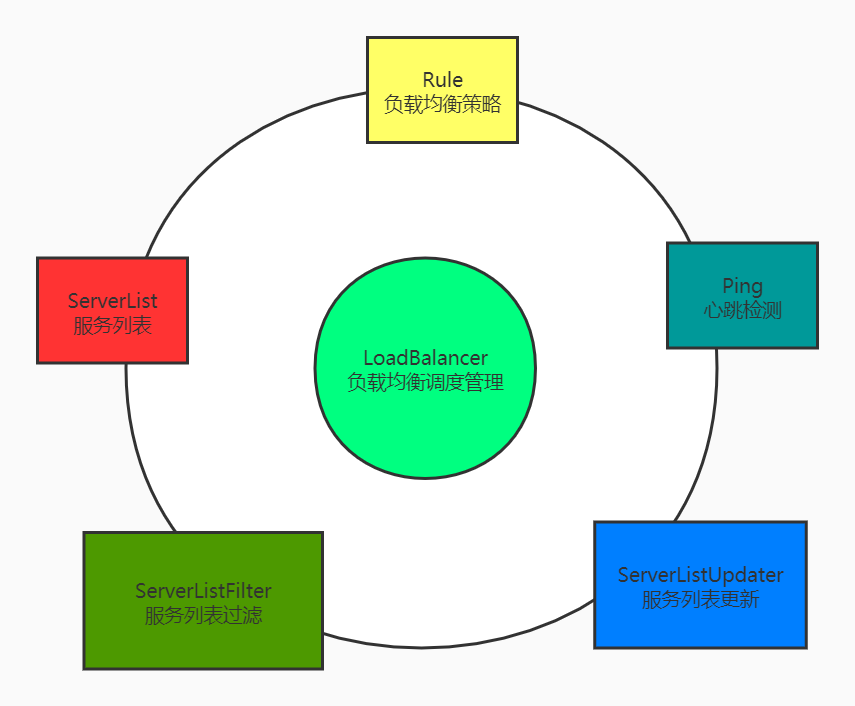
- ServerList:可以响应客户端的特定服务的服务器列表。
- ServerListFilter:可以动态获取具有所需特征的候选服务器列表的过滤器。
- ServetListUpdater:用于执行动态服务器的列表更新。
- Rule:负载均衡策略,用于确定从服务器列表返回哪个服务器。
- Ping:客户端用于快速检查服务器当时是否处于活动状态。
- LoaderBalancer:负载均衡器,负载负载均衡调度的管理。
3.2 @LoadBalanced注解
- 使用Ribbon完成客户端负载均衡往往是从一个注解开始的:
package com.sunxiaping.order.config;import org.springframework.cloud.client.loadbalancer.LoadBalanced;import org.springframework.context.annotation.Bean;import org.springframework.context.annotation.Configuration;import org.springframework.web.client.RestTemplate;@Configurationpublic class SpringConfig {@Bean@LoadBalancedpublic RestTemplate restTemplate() {return new RestTemplate();}}
- @LoadBalanced注解的源码如下:
/*** Annotation to mark a RestTemplate bean to be configured to use a LoadBalancerClient.* @author Spencer Gibb*/@Target({ ElementType.FIELD, ElementType.PARAMETER, ElementType.METHOD })@Retention(RetentionPolicy.RUNTIME)@Documented@Inherited@Qualifierpublic @interface LoadBalanced {}
- 可以知道@LoadBalanced注解就是用来给RestTemplate做标记,方便我们对RestTemplate添加一个LoadBalancerClient,以实现客户端负载均衡。
3.3 自动装配
- 根据SpringBoot中的自动装配规则可以在
spring-cloud-netflix-ribbon-2.1.0.RELEASE.jar中找到spring.factories,内容如下:
org.springframework.boot.autoconfigure.EnableAutoConfiguration=\org.springframework.cloud.netflix.ribbon.RibbonAutoConfiguration
- RibbonAutoConfiguration的部分源码如下:
@Configuration@Conditional({RibbonAutoConfiguration.RibbonClassesConditions.class})@RibbonClients@AutoConfigureAfter(name = {"org.springframework.cloud.netflix.eureka.EurekaClientAutoConfiguration"})@AutoConfigureBefore({LoadBalancerAutoConfiguration.class, AsyncLoadBalancerAutoConfiguration.class})@EnableConfigurationProperties({RibbonEagerLoadProperties.class, ServerIntrospectorProperties.class})public class RibbonAutoConfiguration {@Autowired(required = false)private List<RibbonClientSpecification> configurations = new ArrayList();@Autowiredprivate RibbonEagerLoadProperties ribbonEagerLoadProperties;public RibbonAutoConfiguration() {}//其他略}
- 可以知道RibbonAutoConfiguration引入了LoadBalancerAutoConfiguration配置类。
3.4 负载均衡调用
- LoadBalancerAutoConfiguration的源码如下:
@Configuration@ConditionalOnClass(RestTemplate.class)@ConditionalOnBean(LoadBalancerClient.class)@EnableConfigurationProperties(LoadBalancerRetryProperties.class)public class LoadBalancerAutoConfiguration {@LoadBalanced@Autowired(required = false)private List<RestTemplate> restTemplates = Collections.emptyList();@Beanpublic SmartInitializingSingleton loadBalancedRestTemplateInitializerDeprecated(final ObjectProvider<List<RestTemplateCustomizer>> restTemplateCustomizers) {return () -> restTemplateCustomizers.ifAvailable(customizers -> {for (RestTemplate restTemplate : LoadBalancerAutoConfiguration.this.restTemplates) {for (RestTemplateCustomizer customizer : customizers) {customizer.customize(restTemplate);}}});}@Autowired(required = false)private List<LoadBalancerRequestTransformer> transformers = Collections.emptyList();@Bean@ConditionalOnMissingBeanpublic LoadBalancerRequestFactory loadBalancerRequestFactory(LoadBalancerClient loadBalancerClient) {return new LoadBalancerRequestFactory(loadBalancerClient, transformers);}@Configuration@ConditionalOnMissingClass("org.springframework.retry.support.RetryTemplate")static class LoadBalancerInterceptorConfig {//①创建LoadBalancerInterceptor的Bean,用于实现对客户端请求进行拦截,以实现客户端负载均衡@Beanpublic LoadBalancerInterceptor ribbonInterceptor(LoadBalancerClient loadBalancerClient,LoadBalancerRequestFactory requestFactory) {return new LoadBalancerInterceptor(loadBalancerClient, requestFactory);}//②创建RestTemplateCustomizer的Bean,用于给RestTemplate增加LoadBalancerInterceptor烂机器。@Bean@ConditionalOnMissingBeanpublic RestTemplateCustomizer restTemplateCustomizer(final LoadBalancerInterceptor loadBalancerInterceptor) {return restTemplate -> {//③维护了一个被@LoadBalanced注解修饰的RestTemplate对象列表,并在这里进行初始化,通过调用RestTemplateCustomizer的实例来给需要客户端负载均衡的RestTemplate增加LoadBalancerInterceptor拦截器List<ClientHttpRequestInterceptor> list = new ArrayList<>(restTemplate.getInterceptors());list.add(loadBalancerInterceptor);restTemplate.setInterceptors(list);};}}@Configuration@ConditionalOnClass(RetryTemplate.class)public static class RetryAutoConfiguration {@Bean@ConditionalOnMissingBeanpublic LoadBalancedRetryFactory loadBalancedRetryFactory() {return new LoadBalancedRetryFactory() {};}}@Configuration@ConditionalOnClass(RetryTemplate.class)public static class RetryInterceptorAutoConfiguration {@Bean@ConditionalOnMissingBeanpublic RetryLoadBalancerInterceptor ribbonInterceptor(LoadBalancerClient loadBalancerClient, LoadBalancerRetryProperties properties,LoadBalancerRequestFactory requestFactory,LoadBalancedRetryFactory loadBalancedRetryFactory) {return new RetryLoadBalancerInterceptor(loadBalancerClient, properties,requestFactory, loadBalancedRetryFactory);}@Bean@ConditionalOnMissingBeanpublic RestTemplateCustomizer restTemplateCustomizer(final RetryLoadBalancerInterceptor loadBalancerInterceptor) {return restTemplate -> {List<ClientHttpRequestInterceptor> list = new ArrayList<>(restTemplate.getInterceptors());list.add(loadBalancerInterceptor);restTemplate.setInterceptors(list);};}}}
- 在该自动配置类中,主要做如下的三件事:
- 创建一个LoadBalancerInterceptor的Bean,用于实现对客户端发起请求时进行拦截,以实现客户端负载均衡。
- 创建了一个RestTemplateCustomizer的Bean,用于给RestTemplate增加LoadBalancerInterceptor拦截器。
 维护了一个被@LoadBalanced注解修改的RestTemplate对象列表,并在这里进行初始化,通过调用RestTemplateCustomizer的实例来给需要客户端负载均衡的RestTemplate增加LoadBalancerInterceptor拦截器。
- LoadBalancerInterceptor的源码如下:
public class LoadBalancerInterceptor implements ClientHttpRequestInterceptor {private LoadBalancerClient loadBalancer;private LoadBalancerRequestFactory requestFactory;public LoadBalancerInterceptor(LoadBalancerClient loadBalancer, LoadBalancerRequestFactory requestFactory) {this.loadBalancer = loadBalancer;this.requestFactory = requestFactory;}public LoadBalancerInterceptor(LoadBalancerClient loadBalancer) {// for backwards compatibilitythis(loadBalancer, new LoadBalancerRequestFactory(loadBalancer));}@Overridepublic ClientHttpResponse intercept(final HttpRequest request, final byte[] body,final ClientHttpRequestExecution execution) throws IOException {final URI originalUri = request.getURI();String serviceName = originalUri.getHost();Assert.state(serviceName != null, "Request URI does not contain a valid hostname: " + originalUri);return this.loadBalancer.execute(serviceName, requestFactory.createRequest(request, body, execution));}}
- 通过源码和之前的自动化配置类,我们可以看到在拦截器中注入了LoadBalancerClient的实现。当一个被@LoadBalanced注解修饰的RestTemplate对象向外发起HTTP请求时,会被LoadBalancerInterceptor类的intercept方法拦截。
- LoadBalancerClient是一个抽象的负载均衡接口,其实现类是RibbonLoadBalancerClient。
public class RibbonLoadBalancerClient implements LoadBalancerClient {private SpringClientFactory clientFactory;public RibbonLoadBalancerClient(SpringClientFactory clientFactory) {this.clientFactory = clientFactory;}public URI reconstructURI(ServiceInstance instance, URI original) {Assert.notNull(instance, "instance can not be null");String serviceId = instance.getServiceId();RibbonLoadBalancerContext context = this.clientFactory.getLoadBalancerContext(serviceId);URI uri;Server server;if (instance instanceof RibbonLoadBalancerClient.RibbonServer) {RibbonLoadBalancerClient.RibbonServer ribbonServer = (RibbonLoadBalancerClient.RibbonServer)instance;server = ribbonServer.getServer();uri = RibbonUtils.updateToSecureConnectionIfNeeded(original, ribbonServer);} else {server = new Server(instance.getScheme(), instance.getHost(), instance.getPort());IClientConfig clientConfig = this.clientFactory.getClientConfig(serviceId);ServerIntrospector serverIntrospector = this.serverIntrospector(serviceId);uri = RibbonUtils.updateToSecureConnectionIfNeeded(original, clientConfig, serverIntrospector, server);}return context.reconstructURIWithServer(server, uri);}//根据传入的服务id,从负载均衡中为指定的服务选择一个服务实例public ServiceInstance choose(String serviceId) {return this.choose(serviceId, (Object)null);}public ServiceInstance choose(String serviceId, Object hint) {Server server = this.getServer(this.getLoadBalancer(serviceId), hint);return server == null ? null : new RibbonLoadBalancerClient.RibbonServer(serviceId, server, this.isSecure(server, serviceId), this.serverIntrospector(serviceId).getMetadata(server));}//根据传入的服务id,指定的负责均衡器中的服务实例的执行请求public <T> T execute(String serviceId, LoadBalancerRequest<T> request) throws IOException {return this.execute(serviceId, (LoadBalancerRequest)request, (Object)null);}//根据传入的服务实例,执行请求public <T> T execute(String serviceId, LoadBalancerRequest<T> request, Object hint) throws IOException {ILoadBalancer loadBalancer = this.getLoadBalancer(serviceId);Server server = this.getServer(loadBalancer, hint);if (server == null) {throw new IllegalStateException("No instances available for " + serviceId);} else {RibbonLoadBalancerClient.RibbonServer ribbonServer = new RibbonLoadBalancerClient.RibbonServer(serviceId, server, this.isSecure(server, serviceId), this.serverIntrospector(serviceId).getMetadata(server));return this.execute(serviceId, (ServiceInstance)ribbonServer, (LoadBalancerRequest)request);}}//根据传入的服务实例,执行请求public <T> T execute(String serviceId, ServiceInstance serviceInstance, LoadBalancerRequest<T> request) throws IOException {Server server = null;if (serviceInstance instanceof RibbonLoadBalancerClient.RibbonServer) {server = ((RibbonLoadBalancerClient.RibbonServer)serviceInstance).getServer();}if (server == null) {throw new IllegalStateException("No instances available for " + serviceId);} else {RibbonLoadBalancerContext context = this.clientFactory.getLoadBalancerContext(serviceId);RibbonStatsRecorder statsRecorder = new RibbonStatsRecorder(context, server);try {T returnVal = request.apply(serviceInstance);statsRecorder.recordStats(returnVal);return returnVal;} catch (IOException var8) {statsRecorder.recordStats(var8);throw var8;} catch (Exception var9) {statsRecorder.recordStats(var9);ReflectionUtils.rethrowRuntimeException(var9);return null;}}}//略}
- 从RibbonLoadBalancerClient代码可以看出,实际负载均衡是通过ILoadBalancer来实现的。

若有收获,就点个赞吧
0 人点赞
