原文: https://howtodoinjava.com/spring-security/custom-userdetailsservice-example-for-spring-3-security/
学习在 Spring 应用程序的authentication-provider中自定义UserDetailsService实现,以获取自定义User对象,以及如何在应用程序中使用它。
Spring UserDetailsService接口
UserDetailsService 界面用于为任何给定用户查找用户名,密码和 GrantedAuthorities 。
此接口仅提供实现类需要实现的一种方法:
UserDetailsService.java
UserDetails loadUserByUsername(String username) throws UsernameNotFoundException;
这里 UserDetails 是核心用户信息的容器。 根据文档,出于安全目的,Spring Security 不会直接使用其实现。 它们只是存储用户信息,这些信息随后封装到 Authentication 对象中。 这允许将与安全无关的用户信息(例如电子邮件地址,电话号码等)存储在方便的位置。 一个非常好的示例实现可以类似于 User 类。
在此示例中,
AuthenticationProvider只需通过将UsernamePasswordAuthenticationToken中提交的密码与UserDetailsService加载的密码进行比较,即可对用户进行身份验证。
UserDetailsService实现
1)配置身份验证供应器
我正在提出基于 Spring 登录表单的安全性中编写的代码库。 在application-security.xml文件中,我将更新配置以将EmployeeDao用作自定义用户详细信息服务。
application-security.xml
< ?xml version="1.0" encoding="UTF-8"?><beans:beans xmlns="http://www.springframework.org/schema/security"xmlns:beans="http://www.springframework.org/schema/beans"xmlns:xsi="http://www.w3.org/2001/XMLSchema-instance"xsi:schemaLocation="http://www.springframework.org/schema/beanshttp://www.springframework.org/schema/beans/spring-beans-3.0.xsdhttp://www.springframework.org/schema/securityhttp://www.springframework.org/schema/security/spring-security-3.0.3.xsd"><http auto-config="true" use-expressions="true"><intercept-url pattern="/login" access="permitAll"></intercept-url><intercept-url pattern="/logout" access="permitAll"></intercept-url><intercept-url pattern="/accessdenied" access="permitAll"></intercept-url><intercept-url pattern="/**" access="hasRole('ROLE_USER')"></intercept-url><form-login login-page="/login" default-target-url="/list" authentication-failure-url="/accessdenied"></form-login><logout logout-success-url="/logout"></logout></http><authentication-manager alias="authenticationManager"><authentication-provider user-service-ref="employeeDAO" /></authentication-manager></beans:beans>
2)配置数据源
另外,完整的employee-servlet.xml文件如下所示:
employee-servlet.xml
< ?xml version="1.0" encoding="UTF-8"?><beans xmlns="http://www.springframework.org/schema/beans"xmlns:xsi="http://www.w3.org/2001/XMLSchema-instance"xmlns:aop="http://www.springframework.org/schema/aop"xmlns:context="http://www.springframework.org/schema/context"xmlns:jee="http://www.springframework.org/schema/jee"xmlns:lang="http://www.springframework.org/schema/lang"xmlns:p="http://www.springframework.org/schema/p"xmlns:tx="http://www.springframework.org/schema/tx"xmlns:util="http://www.springframework.org/schema/util"xsi:schemaLocation="http://www.springframework.org/schema/beans http://www.springframework.org/schema/beans/spring-beans.xsdhttp://www.springframework.org/schema/aop/ http://www.springframework.org/schema/aop/spring-aop.xsdhttp://www.springframework.org/schema/context/ http://www.springframework.org/schema/context/spring-context.xsdhttp://www.springframework.org/schema/jee/ http://www.springframework.org/schema/jee/spring-jee.xsdhttp://www.springframework.org/schema/lang/ http://www.springframework.org/schema/lang/spring-lang.xsdhttp://www.springframework.org/schema/tx/ http://www.springframework.org/schema/tx/spring-tx.xsdhttp://www.springframework.org/schema/util/ http://www.springframework.org/schema/util/spring-util.xsd"><context:annotation-config /><context:component-scan base-package="com.howtodoinjava.controller" /><bean id="jspViewResolver"class="org.springframework.web.servlet.view.InternalResourceViewResolver"><property name="viewClass"value="org.springframework.web.servlet.view.JstlView"></property><property name="prefix" value="/WEB-INF/view/"></property><property name="suffix" value=".jsp"></property></bean><bean id="messageSource"class="org.springframework.context.support.ReloadableResourceBundleMessageSource"><property name="basename" value="classpath:messages"></property><property name="defaultEncoding" value="UTF-8"></property></bean><bean id="propertyConfigurer"class="org.springframework.beans.factory.config.PropertyPlaceholderConfigurer"p:location="/WEB-INF/jdbc.properties"></bean><bean id="dataSource"class="org.apache.commons.dbcp.BasicDataSource" destroy-method="close"p:driverClassName="${jdbc.driverClassName}"p:url="${jdbc.databaseurl}" p:username="${jdbc.username}"p:password="${jdbc.password}"></bean><bean id="sessionFactory"class="org.springframework.orm.hibernate3.LocalSessionFactoryBean"><property name="dataSource" ref="dataSource"></property><property name="configLocation"><value>classpath:hibernate.cfg.xml</value></property><property name="configurationClass"><value>org.hibernate.cfg.AnnotationConfiguration</value></property><property name="hibernateProperties"><value>hibernate.connection.provider_class=org.hibernate.connection.C3P0ConnectionProviderhibernate.dialect=org.hibernate.dialect.SQLServer2008Dialecthibernate.default_schema=dbohibernate.show_sql=true</value></property></bean><bean id="employeeDAO" class="com.howtodoinjava.dao.EmployeeDaoImpl"></bean><bean id="employeeManager" class="com.howtodoinjava.service.EmployeeManagerImpl"></bean><tx:annotation-driven /><bean id="transactionManager"class="org.springframework.orm.hibernate3.HibernateTransactionManager"><property name="sessionFactory" ref="sessionFactory"></property></bean></beans>
3)在 Dao 中实现UserDetailsService
现在,我们必须更新EmployeeDaoImpl.java以实现UserDetailsService接口和重写方法loadUserByUsername()。
EmployeeDaoImpl.java
EmployeeDaoImpl.java
package com.howtodoinjava.dao;import java.util.List;import org.hibernate.SessionFactory;import org.springframework.beans.factory.annotation.Autowired;import org.springframework.dao.DataAccessException;import org.springframework.security.core.GrantedAuthority;import org.springframework.security.core.authority.GrantedAuthorityImpl;import org.springframework.security.core.userdetails.User;import org.springframework.security.core.userdetails.UserDetails;import org.springframework.security.core.userdetails.UserDetailsService;import org.springframework.security.core.userdetails.UsernameNotFoundException;import org.springframework.stereotype.Repository;import com.howtodoinjava.entity.EmployeeEntity;@Repositorypublic class EmployeeDaoImpl implements EmployeeDAO, UserDetailsService {@Autowiredprivate SessionFactory sessionFactory;@Overridepublic void addEmployee(EmployeeEntity employee) {this.sessionFactory.getCurrentSession().save(employee);}@SuppressWarnings("unchecked")@Overridepublic List<EmployeeEntity> getAllEmployees() {return this.sessionFactory.getCurrentSession().createQuery("from Employee").list();}@Overridepublic void deleteEmployee(Integer employeeId) {EmployeeEntity employee = (EmployeeEntity) sessionFactory.getCurrentSession().load(EmployeeEntity.class, employeeId);if (null != employee) {this.sessionFactory.getCurrentSession().delete(employee);}}@SuppressWarnings("deprecation")@Overridepublic UserDetails loadUserByUsername(String username)throws UsernameNotFoundException, DataAccessException{System.out.println("Getting access details from employee dao !!");// Ideally it should be fetched from database and populated instance of// #org.springframework.security.core.userdetails.User should be returned from this methodUserDetails user = new User(username, "password", true, true, true, true, new GrantedAuthority[]{ new GrantedAuthorityImpl("ROLE_USER") });return user;}}
在上面的 Dao 中,我使用了最少的代码来演示所涉及的类的用法,并且在企业应用程序中,应该对数据库进行适当的访问,并且应该设置用户的密码及其角色。
整个想法是用方法内部的填充值返回User实例。 如果您还有其他要求,那么您也可以自由实现UserDetails接口,并且 spring 不会阻止您使用它。
示例
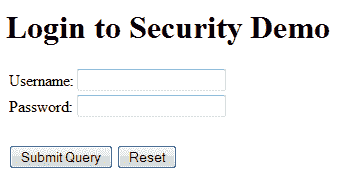
要测试该应用程序,只需在浏览器窗口中单击 URL “http://localhost:8080/Spring3HibernateIntegration”。 一个登录框将如下所示:
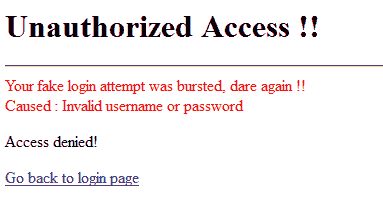
现在,使用正确的用户名和密码(即lokesh和password)登录,您可以进入应用程序,并出现员工管理屏幕。 否则,访问被拒绝的页面将显示如下:
学习愉快!


