原文: https://howtodoinjava.com/dropwizard/tutorial-and-hello-world-example/
Dropwizard 是用于快速开发 REST API 的开源 Java 框架。 Dropwizard 是一种生态系统,其中包含捆绑到单个程序包中的所有依赖项(例如,Jersey,Jackson 或 Jetty),也可以作为单独的模块添加。 如果不使用 dropwizard,最终将自己收集所有依赖项,由于各种 Java 库之间的版本不匹配,通常会导致类加载问题。 Dropwizard 为您解决了这个问题,并将稳定,成熟的库组合到一个简单,轻巧的程序包中,使您可以专注于完成工作。 让我们逐步使用来学习使用 dropwizard 构建 REST API。
Table of ContentsLibraries included inside dropwizardSetup dropwizard with mavenCreate REST Application ClassCreate REST Resource and APIsBuild Resource RepresentationsRequest ValidationVerify REST APIs
您将需要 Java8 来运行此代码中给出的示例,这些示例是使用 dropwizard 1.0.0 版开发的。
dropwizard 中包含的库
将 dropwizard 包含到项目中后,您将获得以下库添加到您的类路径中。
- Jersey – 用于构建 RESTful Web 应用。
- Jetty – Dropwizard 使用 Jetty HTTP 库将 HTTP 服务器直接嵌入到您的项目中。
- Jackson - 用于对象到 JSON 的转换。 它允许直接使用 JAXB 注解导出域模型。
- Guava – 高度优化的不可变数据结构,可加快开发速度。
- Logback 和 SLF4j – 用于高性能和灵活的日志记录。
- Hiberante 验证器 – 一个简单的声明性框架,用于验证用户输入并生成有用且对 i18n 友好的错误消息。
- Apache HTTPClient – 用于与其他 Web 服务的高层和高层交互。
- JDBI - 在 Java 中使用关系数据库的最直接方法。
- Liquidbase – 在整个开发和发布周期中,始终检查数据库模式。
- FreeMarker – 模板系统。
- Mustache – 适用于更多面向用户的应用的简单模板系统。
- Joda Time –非常完整和理智的库,用于处理日期和时间。
用 Maven 设置 dropwizard
我们的项目将基于maven-archetype-quickstart原型。 您可以使用命令提示符来创建项目,或使用 eclipse 创建简单的 Maven Java 项目。
mvn archetype:generate -DgroupId=com.howtodoinjava.demo -DartifactId=DropWizardExample-DarchetypeArtifactId=maven-archetype-quickstart -DinteractiveMode=false
生成的项目也将具有pom.xml文件。 在此处添加 dropwizard 依赖项。
<properties><dropwizard.version>1.0.0</dropwizard.version></properties><dependencies><dependency><groupId>io.dropwizard</groupId><artifactId>dropwizard-core</artifactId><version>${dropwizard.version}</version></dependency></dependencies>
这将下载所有 jar 文件并将它们添加到您的类路径中。 为了向我们的项目添加构建和程序包支持,我们将使用 maven-shade 插件,它将允许我们将我们的项目及其依赖项完全打包到一个独立的 JAR 文件中(胖/Uber JAR),可以按原样分发和执行。
完整的pom.xml文件如下所示。
<project xmlns="http://maven.apache.org/POM/4.0.0" xmlns:xsi="http://www.w3.org/2001/XMLSchema-instance"xsi:schemaLocation="http://maven.apache.org/POM/4.0.0 http://maven.apache.org/xsd/maven-4.0.0.xsd;<modelVersion>4.0.0</modelVersion><groupId>com.howtodoinjava.demo</groupId><artifactId>DropWizardExample</artifactId><version>0.0.1-SNAPSHOT</version><packaging>jar</packaging><name>DropWizardExample</name><url>http://maven.apache.org</url><properties><dropwizard.version>1.0.0</dropwizard.version><project.build.sourceEncoding>UTF-8</project.build.sourceEncoding></properties><dependencies><dependency><groupId>io.dropwizard</groupId><artifactId>dropwizard-core</artifactId><version>${dropwizard.version}</version></dependency></dependencies><build><finalName>DropWizardExample-${version}</finalName><plugins><plugin><groupId>org.apache.maven.plugins</groupId><artifactId>maven-compiler-plugin</artifactId><version>3.1</version><configuration><source>1.8</source><target>1.8</target></configuration></plugin><plugin><groupId>org.apache.maven.plugins</groupId><artifactId>maven-shade-plugin</artifactId><version>2.1</version><executions><execution><phase>package</phase><goals><goal>shade</goal></goals><configuration><transformers><transformer implementation="org.apache.maven.plugins.shade.resource.ManifestResourceTransformer"><mainClass>com.howtodoinjava.rest.App</mainClass></transformer><transformer implementation="org.apache.maven.plugins.shade.resource.ServicesResourceTransformer"></transformer></transformers></configuration></execution></executions></plugin></plugins></build></project>
创建 REST 应用类
应用类是任何 dropwizard 应用的入口点。 它需要扩展io.dropwizard.Application类并实现initialize(Bootstrap<Configuration>)和run(Configuration, Environment)方法。 他们准备应用的运行时环境。
要调用run方法,您需要具有public static void main(String[] args) {}方法,当您将应用作为 jar 文件运行时,该方法将由java -jar命令调用。
package com.howtodoinjava.rest;import io.dropwizard.Application;import io.dropwizard.Configuration;import io.dropwizard.setup.Bootstrap;import io.dropwizard.setup.Environment;import org.slf4j.Logger;import org.slf4j.LoggerFactory;import com.howtodoinjava.rest.controller.EmployeeRESTController;public class App extends Application<Configuration> {private static final Logger LOGGER = LoggerFactory.getLogger(App.class);@Overridepublic void initialize(Bootstrap<Configuration> b) {}@Overridepublic void run(Configuration c, Environment e) throws Exception {LOGGER.info("Registering REST resources");e.jersey().register(new EmployeeRESTController(e.getValidator()));}public static void main(String[] args) throws Exception {new App().run(args);}}
为了执行 JAR 文件,我们在命令中添加服务器参数,该参数启动嵌入式 HTTP 服务器(Jetty)以运行我们的服务。
java -jar target\DropWizardExample.jar server
Dropwizard 的嵌入式 Jetty 服务器将默认尝试绑定到端口 8080 和 8081 。 服务器使用端口 8080 来向应用提供传入的 HTTP 请求,而 Dropwizard 的管理界面则使用 8081 端口。
我们还导入了必要的Logger和LoggerFactory类,以构造可用于日志记录需求的Logger实例。
创建 REST 资源和 API
现在,当您添加了应用引导类后,现在可以添加包含 REST API 的 REST 资源。 在此示例中,我创建并创建了员工管理应用 - 因此它具有用于创建/更新/删除员工记录的 API。 此类将负责处理 HTTP 请求并生成 JSON 响应。
由于类路径中包含 Jersey,因此我们将使用它来构建 REST API。
package com.howtodoinjava.rest.controller;import java.net.URI;import java.net.URISyntaxException;import java.util.ArrayList;import java.util.Set;import javax.validation.ConstraintViolation;import javax.validation.Validator;import javax.ws.rs.DELETE;import javax.ws.rs.GET;import javax.ws.rs.POST;import javax.ws.rs.PUT;import javax.ws.rs.Path;import javax.ws.rs.PathParam;import javax.ws.rs.Produces;import javax.ws.rs.core.MediaType;import javax.ws.rs.core.Response;import javax.ws.rs.core.Response.Status;import com.howtodoinjava.rest.dao.EmployeeDB;import com.howtodoinjava.rest.representations.Employee;@Path("/employees")@Produces(MediaType.APPLICATION_JSON)public class EmployeeRESTController {private final Validator validator;public EmployeeRESTController(Validator validator) {this.validator = validator;}@GETpublic Response getEmployees() {return Response.ok(EmployeeDB.getEmployees()).build();}@GET@Path("/{id}")public Response getEmployeeById(@PathParam("id") Integer id) {Employee employee = EmployeeDB.getEmployee(id);if (employee != null)return Response.ok(employee).build();elsereturn Response.status(Status.NOT_FOUND).build();}@POSTpublic Response createEmployee(Employee employee) throws URISyntaxException {// validationSet<ConstraintViolation<Employee>> violations = validator.validate(employee);Employee e = EmployeeDB.getEmployee(employee.getId());if (violations.size() > 0) {ArrayList<String> validationMessages = new ArrayList<String>();for (ConstraintViolation<Employee> violation : violations) {validationMessages.add(violation.getPropertyPath().toString() + ": " + violation.getMessage());}return Response.status(Status.BAD_REQUEST).entity(validationMessages).build();}if (e != null) {EmployeeDB.updateEmployee(employee.getId(), employee);return Response.created(new URI("/employees/" + employee.getId())).build();} elsereturn Response.status(Status.NOT_FOUND).build();}@PUT@Path("/{id}")public Response updateEmployeeById(@PathParam("id") Integer id, Employee employee) {// validationSet<ConstraintViolation<Employee>> violations = validator.validate(employee);Employee e = EmployeeDB.getEmployee(employee.getId());if (violations.size() > 0) {ArrayList<String> validationMessages = new ArrayList<String>();for (ConstraintViolation<Employee> violation : violations) {validationMessages.add(violation.getPropertyPath().toString() + ": " + violation.getMessage());}return Response.status(Status.BAD_REQUEST).entity(validationMessages).build();}if (e != null) {employee.setId(id);EmployeeDB.updateEmployee(id, employee);return Response.ok(employee).build();} elsereturn Response.status(Status.NOT_FOUND).build();}@DELETE@Path("/{id}")public Response removeEmployeeById(@PathParam("id") Integer id) {Employee employee = EmployeeDB.getEmployee(id);if (employee != null) {EmployeeDB.removeEmployee(id);return Response.ok().build();} elsereturn Response.status(Status.NOT_FOUND).build();}}
为了模仿数据库,我创建了EmployeeDB类,该类将员工记录和更新存储在内存中。
package com.howtodoinjava.rest.dao;import java.util.ArrayList;import java.util.HashMap;import java.util.List;import com.howtodoinjava.rest.representations.Employee;public class EmployeeDB {public static HashMap<Integer, Employee> employees = new HashMap<>();static{employees.put(1, new Employee(1, "Lokesh", "Gupta", "India"));employees.put(2, new Employee(2, "John", "Gruber", "USA"));employees.put(3, new Employee(3, "Melcum", "Marshal", "AUS"));}public static List<Employee> getEmployees(){return new ArrayList<Employee>(employees.values());}public static Employee getEmployee(Integer id){return employees.get(id);}public static void updateEmployee(Integer id, Employee employee){employees.put(id, employee);}public static void removeEmployee(Integer id){employees.remove(id);}}
建立资源表示
表示是保存数据并序列化为 JSON 的内容。 它是 RESTful 应用的模型。 当将 Jersey 与 Jackson 结合使用时,构建资源表示形式所需的全部就是 – 遵循 Java bean 标准的简单 POJO。 Jackson 根据每个类的设置器方法及其返回类型来递归构造 JSON 字符串。
任何java.util.List类型的实例都将转换为 JSON 数组。
package com.howtodoinjava.rest.representations;import javax.validation.constraints.NotNull;import javax.validation.constraints.Pattern;import org.hibernate.validator.constraints.Length;import org.hibernate.validator.constraints.NotBlank;public class Employee {@NotNullprivate Integer id;@NotBlank @Length(min=2, max=255)private String firstName;@NotBlank @Length(min=2, max=255)private String lastName;@Pattern(regexp=".+@.+\\.[a-z]+")private String email;public Employee(){}public Employee(Integer id, String firstName, String lastName, String email) {this.id = id;this.firstName = firstName;this.lastName = lastName;this.email = email;}public Integer getId() {return id;}public void setId(Integer id) {this.id = id;}public String getFirstName() {return firstName;}public void setFirstName(String firstName) {this.firstName = firstName;}public String getLastName() {return lastName;}public void setLastName(String lastName) {this.lastName = lastName;}public String getEmail() {return email;}public void setEmail(String email) {this.email = email;}@Overridepublic String toString() {return "Emplyee [id=" + id + ", firstName=" + firstName + ", lastName="+ lastName + ", email=" + email + "]";}}
如果在某些情况下需要,可以通过将@JsonIgnore注解添加到其设置器来防止该属性成为 JSON 表示的一部分。
请求验证
接受PUT和POST请求时,您需要在请求正文中验证用户提交的实体内容。 Dropwizard 为此使用 Hiberate 验证器。 添加验证需要执行以下步骤。
@NotNullprivate Integer id;@NotBlank @Length(min=2, max=255)private String firstName;@NotBlank @Length(min=2, max=255)private String lastName;@Pattern(regexp=".+@.+\\.[a-z]+")private String email;
@Overridepublic void run(Configuration c, Environment e) throws Exception{LOGGER.info("Registering REST resources");e.jersey().register(new EmployeeRESTController(e.getValidator()));}
public class EmployeeRESTController {private final Validator validator;public EmployeeRESTController(Validator validator) {this.validator = validator;}@POSTpublic Response createEmployee(Employee employee) throws URISyntaxException{Set<ConstraintViolation<Employee>> violations = validator.validate(employee);Employee e = EmployeeDB.getEmployee(employee.getId());if (violations.size() > 0) {ArrayList<String> validationMessages = new ArrayList<String>();for (ConstraintViolation<Employee> violation : violations) {validationMessages.add(violation.getPropertyPath().toString() + ": " + violation.getMessage());}return Response.status(Status.BAD_REQUEST).entity(validationMessages).build();}//Create Employee code here}}
验证 REST API
现在,当我们创建并添加了 REST API 的验证后,让我们对其进行测试。
构建应用 uber jar 文件
> mvn clean package
在 Jetty 服务器中启动应用
> java -jar target\DropWizardExample-0.0.1-SNAPSHOT.jar server
访问 URI http://localhost:8080/employees
这将返回员工集合和相关的响应头。
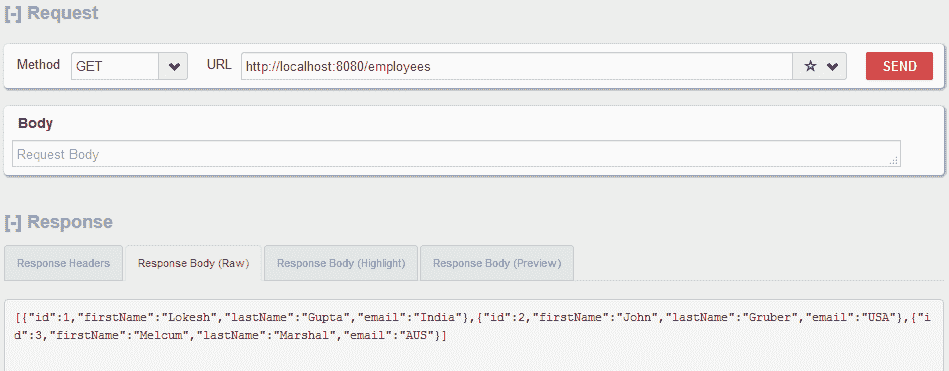
Dropwizard – GET 请求示例 – 1
访问 URI http://localhost:8080/employees/1
这将返回 ID 为 1 的员工记录。

Dropwizard – GET 请求示例 – 2
使用无效的请求数据发送 HTTP PUT http://localhost:8080/employees/1
您将收到验证消息。
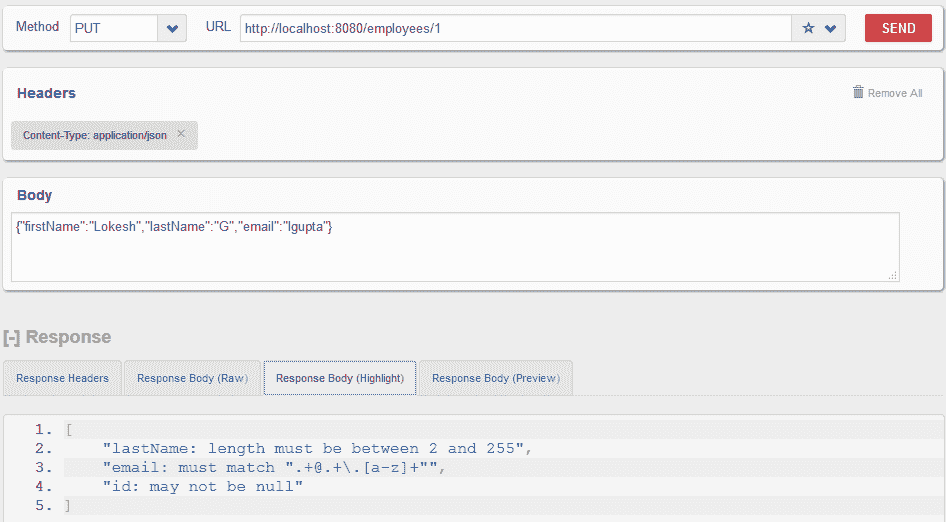
Dropwizard – 验证示例
使用正确的数据发送 HTTP PUT http://localhost:8080/employees/1
员工记录将成功更新。
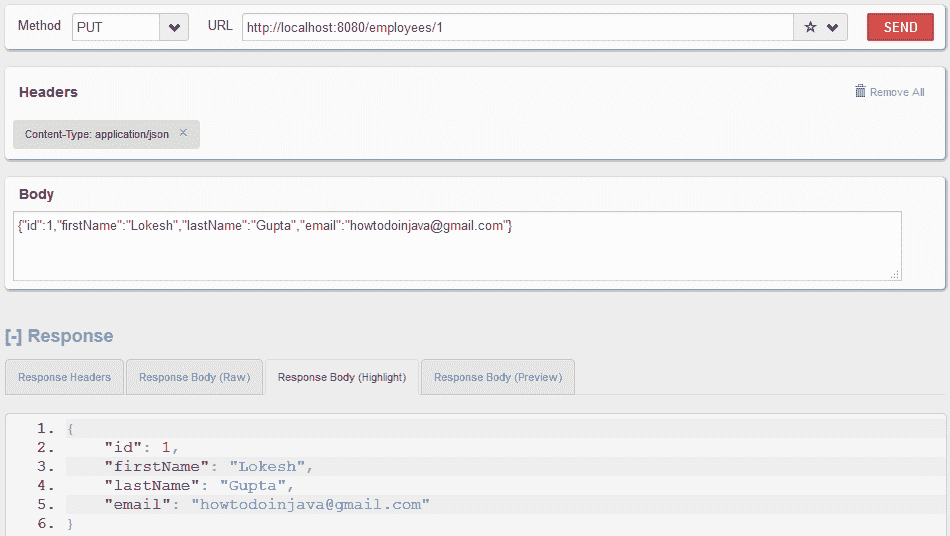
Dropwizard – PUT 请求示例
同样,您可以测试其他 API 和方案。
在评论部分让我知道您的问题。
学习愉快!

若有收获,就点个赞吧
0 人点赞
