{% raw %}
AngularJS Spring MVC Rest 示例
原文: https://howtodoinjava.com/angularjs/angularjs-http-restful-api-example/
在这个 angularjs spring mvc crud 示例中,我们将学习使用 AngularJS $http服务来调用 RESTful API(HTTP GET,PUT,POST,DELETE)操作。 此外,我们将使用 RESTFul API 的响应来刷新此示例中使用的屏幕数据。
Table of Contents1\. Overview of example2\. $http usage - for impatient3\. RESTFul APIs used in example4\. Client source code5\. How example works?
1. 示例概述
在这个 angularjs spring mvc 示例应用中,我们将构建一个用于员工管理的屏幕。 您将可以使用各种链接和按钮从此屏幕中获取/添加/编辑/删除员工。 屏幕看起来像这样:
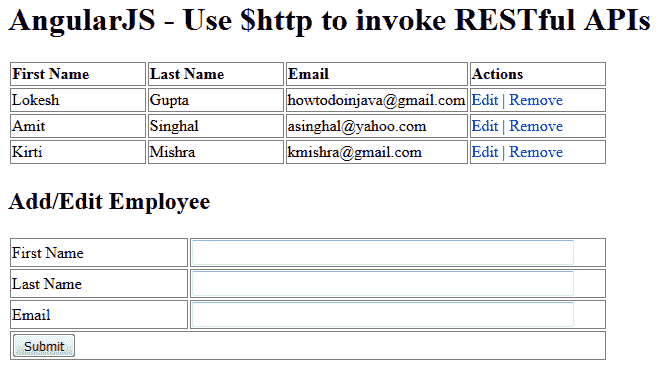
angular http 服务示例
屏幕选项非常简单。 您可以使用以下表格添加员工。 所有员工都列在上表中。 您可以通过单击该行中的“删除”链接来删除员工。 同样,单击编辑链接将在下面的表格中填充员工详细信息,您可以通过按提交按钮保存更改。
2. AngularJS $http用法 – 不耐烦
尽管我将在本教程的后面部分进行详细介绍,但是如果您急于阅读本节以了解对 REST API 的$http调用。
Angular $http可以以下方式用于调用 HTTP GET api。 在此示例中,此代码用于从服务器获取所有员工。
$http({method : 'GET',url : 'employees'}).then(function successCallback(response) {$scope.employees = response.data.employees;}, function errorCallback(response) {console.log(response.statusText);});
GET 调用上方使用相对 URL /employees。 如果当前位置为HTTP GET http://localhost:8080/myapplication,则会调用HTTP GET http://localhost:8080/myapplication/employees URL。 您也可以使用完整的应用网址,例如 “ http://localhost:8080/myapplication/employees”。 两种 URL 模式都可以使用。
默认情况下,angular 使用异步 HTTP 调用。 因此,我使用了两个函数successCallback()和errorCallback(),它们将从服务器返回响应后由 angular 调用。
Angular $http可以以下方式用于调用 HTTP POST api。 在此示例中,此代码用于将员工添加到系统中。
$http({method : "POST",url : "employees",data : angular.toJson($scope.form),headers : {'Content-Type' : 'application/json'}}).then( _success, _error );
在上面的方法调用中,我已使用angular.toJson()方法以 JSON 格式传递了请求有效负载,然后将content-type标头参数设置为application/json。
Angular $http可以以下方式用于调用 HTTP PUT api。 在此示例中,此代码用于将员工更新到系统中。
$http({method : "PUT",url : "employees/" + $scope.form.id,data : angular.toJson($scope.form),headers : {'Content-Type' : 'application/json'}}).then( _success, _error );
Angular $http可以以下方式用于调用 HTTP DETELE api。 在此示例中,此代码用于将员工删除到系统中。
$http({method : "DELETE",url : "employees/" + employee.id}).then( _success, _error );
3. 示例中使用的 Spring REST API
现在让我们看一下本示例中使用的 RESTful API。 这些是使用 Spring REST JSON 示例的源代码创建的。
package com.howtodoinjava.demo.controller;import org.springframework.http.HttpStatus;import org.springframework.http.MediaType;import org.springframework.http.ResponseEntity;import org.springframework.stereotype.Controller;import org.springframework.web.bind.annotation.PathVariable;import org.springframework.web.bind.annotation.RequestBody;import org.springframework.web.bind.annotation.RequestMapping;import org.springframework.web.bind.annotation.RequestMethod;import com.howtodoinjava.demo.model.EmployeeListVO;import com.howtodoinjava.demo.model.EmployeeVO;@Controllerpublic class EmployeeRESTController{//Local storage of employees for demo; You will use database hereprivate static EmployeeListVO employees = new EmployeeListVO();//add some employees herepublic EmployeeRESTController(){EmployeeVO empOne = new EmployeeVO(1,"Lokesh","Gupta","howtodoinjava@gmail.com");EmployeeVO empTwo = new EmployeeVO(2,"Amit","Singhal","asinghal@yahoo.com");EmployeeVO empThree = new EmployeeVO(3,"Kirti","Mishra","kmishra@gmail.com");employees.getEmployees().add(empOne);employees.getEmployees().add(empTwo);employees.getEmployees().add(empThree);}//Utility methods for getting employee by idprivate EmployeeVO _getEmployeeById(int id){for(EmployeeVO e : employees.getEmployees()){if(e.getId() == id){return e;}}return null;}/*** HTTP GET - Get all employees* */@RequestMapping(value = "/employees", produces = MediaType.APPLICATION_JSON_VALUE, method = RequestMethod.GET)public ResponseEntity<EmployeeListVO> getAllEmployeesJSON(){return new ResponseEntity<EmployeeListVO>(employees, HttpStatus.OK);}/*** HTTP POST - Create new Employee* */@RequestMapping(value = "/employees", consumes = MediaType.APPLICATION_JSON_VALUE, method = RequestMethod.POST)public ResponseEntity<String> createEmployee(@RequestBody EmployeeVO employee){employee.setId(employees.getEmployees().size() + 1);employees.getEmployees().add(employee);return new ResponseEntity<String>(HttpStatus.CREATED);}/*** HTTP PUT - Update employee* */@RequestMapping(value = "/employees/{id}", consumes = MediaType.APPLICATION_JSON_VALUE, method = RequestMethod.PUT)public ResponseEntity<EmployeeVO> updateEmployee(@PathVariable("id") int id, @RequestBody EmployeeVO employee){EmployeeVO emp = _getEmployeeById(id);if(emp != null){emp.setFirstName(employee.getFirstName());emp.setLastName(employee.getLastName());emp.setEmail(employee.getEmail());return new ResponseEntity<EmployeeVO>(emp, HttpStatus.OK);}return new ResponseEntity<EmployeeVO>(HttpStatus.NOT_FOUND);}/*** HTTP DELETE - Delete employee* */@RequestMapping(value = "/employees/{id}", method = RequestMethod.DELETE)public ResponseEntity<String> deleteEmployee(@PathVariable("id") int id){EmployeeVO employee = _getEmployeeById(id);if(employee != null){employees.getEmployees().remove(employee);return new ResponseEntity<String>(HttpStatus.OK);}return new ResponseEntity<String>(HttpStatus.NOT_FOUND);}}
4. 使用 angularjs 的 Spring MVC 视图代码
现在,让我们看看运行此示例的完整版本的客户端代码(HTML + AngularJS)。
<!doctype html><html><head><meta charset="utf-8" /><title>AngularJS - REST Demo using $http service</title><!-- Load AngularJS --><script src="http://ajax.googleapis.com/ajax/libs/angularjs/1.4.8/angular.min.js"></script><script type="text/javascript">var app = angular.module("UserManagement", []);//Controller Partapp.controller("UserManagementController", function($scope, $http) {//Initialize page with default data which is blank in this example$scope.employees = [];$scope.form = {id : -1,firstName : "",lastName : "",email : ""};//Now load the data from server_refreshPageData();//HTTP POST/PUT methods for add/edit employee$scope.submitEmployee = function() {var method = "";var url = "";if ($scope.form.id == -1) {//Id is absent so add employee - POST operationmethod = "POST";url = 'employees';} else {//If Id is present, it's edit operation - PUT operationmethod = "PUT";url = 'employees/' + $scope.form.id;}$http({method : method,url : url,data : angular.toJson($scope.form),headers : {'Content-Type' : 'application/json'}}).then( _success, _error );};//HTTP DELETE- delete employee by Id$scope.removeEmployee = function(employee) {$http({method : 'DELETE',url : 'employees/' + employee.id}).then(_success, _error);};//In case of edit employee, populate form with employee data$scope.editEmployee = function(employee) {$scope.form.firstName = employee.firstName;$scope.form.lastName = employee.lastName;$scope.form.email = employee.email;$scope.form.id = employee.id;};/* Private Methods *///HTTP GET- get all employees collectionfunction _refreshPageData() {$http({method : 'GET',url : 'employees'}).then(function successCallback(response) {$scope.employees = response.data.employees;}, function errorCallback(response) {console.log(response.statusText);});}function _success(response) {_refreshPageData();_clearForm()}function _error(response) {console.log(response.statusText);}//Clear the formfunction _clearForm() {$scope.form.firstName = "";$scope.form.lastName = "";$scope.form.email = "";$scope.form.id = -1;};});</script><style>.button {cursor: pointer;color: blue;}td,th{border: 1px solid gray;width: 25%;text-align: left;}table {width: 600px;}</style><head><body ng-app="UserManagement" ng-controller="UserManagementController"><h1>AngularJS - Use $http to invoke RESTful APIs</h1><table><tr><th>First Name</th><th>Last Name</th><th>Email</th><th>Actions</th></tr><tr ng-repeat="employee in employees"><td>{{ employee.firstName }}</td><td>{{ employee.lastName }}</td><td>{{ employee.email }}</td><td><a ng-click="editEmployee( employee )" class="button">Edit</a> | <a ng-click="removeEmployee( employee )" class="button">Remove</a></td></tr></table><h2>Add/Edit Employee</h2><form ng-submit="submitEmployee()"><table><tr><td>First Name</td><td><input type="text" ng-model="form.firstName" size="60" /></td></tr><tr><td>Last Name</td><td><input type="text" ng-model="form.lastName" size="60" /></td></tr><tr><td>Email</td><td><input type="text" ng-model="form.email" size="60" /></td></tr><tr><td colspan="2"><input type="submit" value="Submit" /></td></tr></table></form></body></html>
5. Spring MVC angularjs 示例如何工作?
尽管我添加了源代码注解以使代码易于理解,但让我们逐步了解一些要点。
参见
app.controller("UserManagementController", function($scope, $http)行。 它创建 Angular 控制器组件,并传递$http服务和$scope变量的相关性。$http用于进行 REST 调用,$scope用于与页面数据进行交互。$scope具有两个数据元素。$scope.employees引用页面中的所有员工集合,$scope.form映射到页面中的表单元素字段。加载页面后,将调用
_refreshPageData(),该调用将调用 HTTP GET api,以 JSON 格式从服务器获取所有员工数据。 检索到数据后,将使用$scope.employees = response.data.employees将其映射到$scope.employees。 该调用将自动刷新 UI,并使用员工数据填充表格。使用
ng-click="removeEmployee( employee )"将页面中的删除链接绑定到removeEmployee()函数。 该调用具有附加参数employee,该参数用于标识需要从表中删除哪个雇员(employee.id用于获取雇员 ID)。类似地,编辑链接与
ng-click="editEmployee( employee )"绑定。 在editEmployee()函数内部,我们通过下面的映射简单地使用现有员工数据填充表单文本字段。$scope.editEmployee = function(employee) {$scope.form.firstName = employee.firstName;$scope.form.lastName = employee.lastName;$scope.form.email = employee.email;$scope.form.id = employee.id;};
使用修改过的员工数据更新页面后,我们通过为表单字段分配空白值来清除表单。
function _clearForm() {$scope.form.firstName = "";$scope.form.lastName = "";$scope.form.email = "";$scope.form.id = -1;};
对于 PUT 和 POST 方法,由于代码相似,我们使用了相同的函数来避免代码重复。 我们仅根据用户操作更改
method和url参数。为了显示从服务器获取的用户集合,我们使用了
ng-repeat="employee in employees"循环。
其余的事情几乎可以自我解释。 如果您有任何疑问或疑问,请在下面给我留言。
学习愉快!
{% endraw %}

若有收获,就点个赞吧
0 人点赞
