学习创建一个 SpringBoot 应用,该应用能够连接给定的 Apache Kafka Borker 实例。 另外,从 Kafka 主题中学习产生和消费消息。
我们将遵循的步骤:
- 创建具有 Kafka 依赖项的 Spring Boot 应用
- 在
application.yaml中配置 kafka Borker 实例 - 使用
KafkaTemplate将消息发送到主题 - 使用
@KafkaListener实时收听发送到主题的消息
1. 先决条件
2. Spring Boot 应用
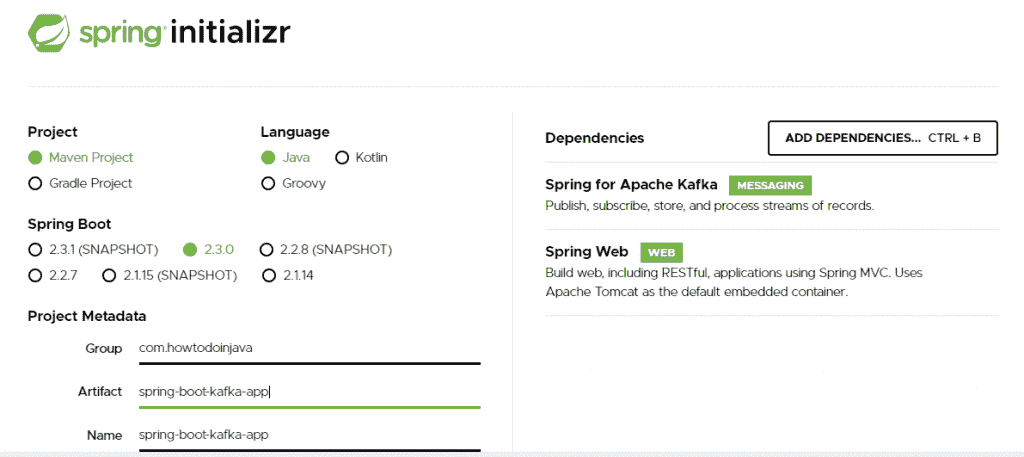
打开 spring 初始化器并创建具有以下依赖项的 spring boot 应用:
- Spring Apache Kafka
- Spring Web

创建 Spring boot kafka 应用
生成的项目在pom.xml中具有以下依赖项。
<dependencies><dependency><groupId>org.springframework.boot</groupId><artifactId>spring-boot-starter-web</artifactId></dependency><dependency><groupId>org.springframework.kafka</groupId><artifactId>spring-kafka</artifactId></dependency><dependency><groupId>org.springframework.boot</groupId><artifactId>spring-boot-starter-test</artifactId><scope>test</scope><exclusions><exclusion><groupId>org.junit.vintage</groupId><artifactId>junit-vintage-engine</artifactId></exclusion></exclusions></dependency><dependency><groupId>org.springframework.kafka</groupId><artifactId>spring-kafka-test</artifactId><scope>test</scope></dependency></dependencies>
在首选的 IDE 中导入项目。
3. 配置 Kafka Borker
在application.yaml文件中,添加 kafka Borker 地址以及与消费者和生产者相关的配置。
server:port: 9000spring:kafka:consumer:bootstrap-servers: localhost:9092group-id: group-idauto-offset-reset: earliestkey-deserializer: org.apache.kafka.common.serialization.StringDeserializervalue-deserializer: org.apache.kafka.common.serialization.StringDeserializerproducer:bootstrap-servers: localhost:9092key-deserializer: org.apache.kafka.common.serialization.StringDeserializervalue-deserializer: org.apache.kafka.common.serialization.StringDeserializer
4. KafKaProducerService和KafKaConsumerService
KafKaProducerService类使用自动连接的KafkaTemplate将消息发送到已配置的主题名称。 同样,KafKaConsumerService类使用@KafkaListener来接收来自已配置主题名称的消息。
import org.slf4j.Logger;import org.slf4j.LoggerFactory;import org.springframework.beans.factory.annotation.Autowired;import org.springframework.kafka.core.KafkaTemplate;import org.springframework.stereotype.Service;import com.howtodoinjava.kafka.demo.common.AppConstants;@Servicepublic class KafKaProducerService{private static final Logger logger =LoggerFactory.getLogger(KafKaProducerService.class);@Autowiredprivate KafkaTemplate<String, String> kafkaTemplate;public void sendMessage(String message){logger.info(String.format("Message sent -> %s", message));this.kafkaTemplate.send(AppConstants.TOPIC_NAME, message);}}
import org.slf4j.Logger;import org.slf4j.LoggerFactory;import org.springframework.kafka.annotation.KafkaListener;import org.springframework.stereotype.Service;import com.howtodoinjava.kafka.demo.common.AppConstants;@Servicepublic class KafKaConsumerService{private final Logger logger =LoggerFactory.getLogger(KafKaConsumerService.class);@KafkaListener(topics = AppConstants.TOPIC_NAME,groupId = AppConstants.GROUP_ID)public void consume(String message){logger.info(String.format("Message recieved -> %s", message));}}
public class AppConstants{public static final String TOPIC_NAME = "test";public static final String GROUP_ID = "group_id";}
5. 控制器
控制器负责使用 REST API 从用户获取消息,并将消息移交给生产者服务以将其发布到 kafka 主题。
import org.springframework.beans.factory.annotation.Autowired;import org.springframework.web.bind.annotation.PostMapping;import org.springframework.web.bind.annotation.RequestMapping;import org.springframework.web.bind.annotation.RequestParam;import org.springframework.web.bind.annotation.RestController;import com.howtodoinjava.kafka.demo.service.KafKaProducerService;@RestController@RequestMapping(value = "/kafka")public class KafkaProducerController{private final KafKaProducerService producerService;@Autowiredpublic KafkaProducerController(KafKaProducerService producerService){this.producerService = producerService;}@PostMapping(value = "/publish")public void sendMessageToKafkaTopic(@RequestParam("message") String message){this.producerService.sendMessage(message);}}
6. 测试
使用任何 REST API 测试器并将少量消息发布到查询参数"message"中的 API http://localhost:9000/kafka/publish。
留言栏:http://localhost:9000/kafka/publish?message=Alphabet
观察控制台日志:
2020-05-24 23:36:47.132 INFO 2092 --- [nio-9000-exec-4]c.h.k.demo.service.KafKaProducerService : Message sent -> Alphabet2020-05-24 23:36:47.138 INFO 2092 --- [ntainer#0-0-C-1]c.h.k.demo.service.KafKaConsumerService : Message recieved -> Alphabet
如果您已经在命令提示符下打开了 Kafka 控制台用户,那么您也会看到该消息。

Kafka 控制台消费者
7. 总结
在 spring boot kafka 教程中,我们学习了如何创建 spring boot 应用和配置 Kafka 服务器。 另外,我们通过使用KafkaTemplate发布一些消息,然后使用@KafkaListener使用这些消息来验证该应用。
学习愉快!

