原文: https://howtodoinjava.com/swagger2/swagger-spring-mvc-rest-example/
如今, REST 和微服务势头强劲。 同时,实际的 REST 规范并未建议任何标准方法来记录我们将要公开的 REST API(例如 WSDL for SOAP)。 结果,每个人都以自己的方式记录自己的 API,从而导致通用结构中的空白,所有这些都可以轻松地遵循,理解和使用。 我们需要一个通用的模式和工具。
Swagger(得到了 Google,IBM,Microsoft 等公司的支持)完成了相同工作,以填补常见文档样式的空白。 在本教程中,我们将学习使用 Swagger 来使用 swagger2 注解来生成 REST API 文档。
Table of ContentsWhat is SwaggerProject Structure and Technology StackCreate REST APIsSwagger2 ConfigurationSwagger2 AnnotationsDemo
Swagger
Swagger(现为“Open API Initiative”)是一种规范和框架,用于使用所有人都可以理解的通用语言来描述 REST API。 还有其他一些流行的框架,例如 RAML,Summation 等。但是,考虑到它的功能和在开发者社区中的接受程度,Swagger 在这一点上最受欢迎。
它提供了人类可读和机器可读的文档格式。 它同时提供 JSON 和 UI 支持。 JSON 可以用作机器可读格式,Swagger-UI用于可视化显示,人类只需浏览 api 文档即可轻松理解。
项目结构与技术栈
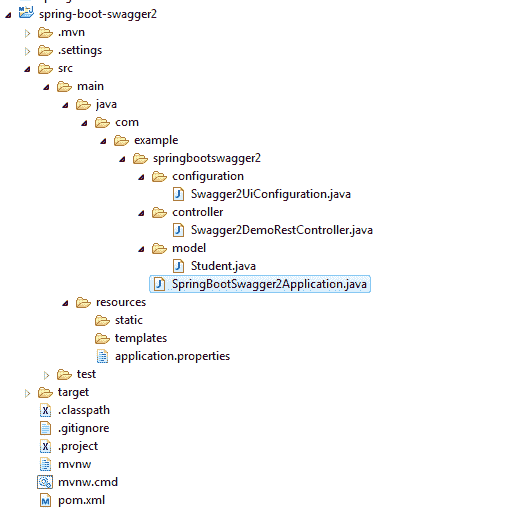
项目的文件夹结构为:

Swagger2 项目结构
在本演示中,我们将使用以下技术。
创建 REST API
我们将首先创建一些 REST API,这些 API 将用于展示 Swagger 文档功能。 我们将使用 Spring 引导样式公开剩余的 API,以缩短开发时间。
从具有 Web,Rest Repositories,Actuator 依赖项的 Spring Boot 初始化器门户创建一个 Spring Boot 项目。 给出其他 Maven GAV 坐标并下载项目。 该屏幕如下所示:

Spring Boot REST 项目生成
将项目解压缩并将其作为现有的 maven 项目导入 Eclipse。 在此步骤中,将从 maven 仓库下载所有必需的依赖项。 在此步骤中执行全新的mvn clean install,以便正确下载所有与 Spring Boot 相关的工件。打开
application.properties并添加以下属性。 这将在/swagger2-demo上下文路径中启动应用。server.contextPath=/swagger2-demo
- 添加一个 REST 控制器“
Swagger2DemoRestController”,该控制器将在“Student”实体上提供基于 REST 的基本功能。Swagger2DemoRestController.java```java package com.example.springbootswagger2.controller;
import java.util.ArrayList; import java.util.List; import java.util.stream.Collectors; import org.springframework.web.bind.annotation.PathVariable; import org.springframework.web.bind.annotation.RequestMapping; import org.springframework.web.bind.annotation.RestController; import com.example.springbootswagger2.model.Student;
@RestController public class Swagger2DemoRestController {
List<Student> students = new ArrayList<Student>();{students.add(new Student("Sajal", "IV", "India"));students.add(new Student("Lokesh", "V", "India"));students.add(new Student("Kajal", "III", "USA"));students.add(new Student("Sukesh", "VI", "USA"));}@RequestMapping(value = "/getStudents")public List<Student> getStudents() {return students;}@RequestMapping(value = "/getStudent/{name}")public Student getStudent(@PathVariable(value = "name") String name) {return students.stream().filter(x -> x.getName().equalsIgnoreCase(name)).collect(Collectors.toList()).get(0);}@RequestMapping(value = "/getStudentByCountry/{country}")public List<Student> getStudentByCountry(@PathVariable(value = "country") String country) {System.out.println("Searching Student in country : " + country);List<Student> studentsByCountry = students.stream().filter(x -> x.getCountry().equalsIgnoreCase(country)).collect(Collectors.toList());System.out.println(studentsByCountry);return studentsByCountry;}@RequestMapping(value = "/getStudentByClass/{cls}")public List<Student> getStudentByClass(@PathVariable(value = "cls") String cls) {return students.stream().filter(x -> x.getCls().equalsIgnoreCase(cls)).collect(Collectors.toList());}
}
<br />**`Student.java`**```javapackage com.example.springbootswagger2.model;public class Student {private String name;private String cls;private String country;public Student(String name, String cls, String country) {super();this.name = name;this.cls = cls;this.country = country;}public String getName() {return name;}public String getCls() {return cls;}public String getCountry() {return country;}@Overridepublic String toString() {return "Student [name=" + name + ", cls=" + cls + ", country=" + country + "]";}}
作为 Spring Boot 应用启动该应用。 测试几个 REST 端点,以检查它们是否工作正常:
http://localhost:8080/swagger2-demo/getStudentshttp://localhost:8080/swagger2-demo/getStudent/sajalhttp://localhost:8080/swagger2-demo/getStudentByCountry/indiahttp://localhost:8080/swagger2-demo/getStudentByClass/v
Swagger2 配置
我们的 REST API 已准备就绪。 现在将 swagger2 支持添加到project.ff
添加 Swagger2 Maven 依赖项
打开spring-boot-swagger2项目的pom.xml文件,并在下面添加两个与 swagger 相关的依赖项,即springfox-swagger2和springfox-swagger-ui。
<dependency><groupId>io.springfox</groupId><artifactId>springfox-swagger2</artifactId><version>2.6.1</version></dependency><dependency><groupId>io.springfox</groupId><artifactId>springfox-swagger-ui</artifactId><version>2.6.1</version></dependency>
实际上,swagger API 具有多种变体,并且维护在不同的工件中。 今天,我们将使用springfox,因为该版本可以很好地适应任何基于 spring 的配置。 我们还可以轻松地尝试其他配置,并且应该提供相同的功能-无需更改/只需稍作更改即可。
添加 Swagger2 配置
在代码库中添加以下配置。 为了帮助您理解配置,我添加了嵌入式注解。
package com.example.springbootswagger2.configuration;import org.springframework.context.annotation.Bean;import org.springframework.context.annotation.Configuration;import org.springframework.web.servlet.config.annotation.ResourceHandlerRegistry;import org.springframework.web.servlet.config.annotation.WebMvcConfigurerAdapter;import com.google.common.base.Predicates;import springfox.documentation.builders.RequestHandlerSelectors;import springfox.documentation.spi.DocumentationType;import springfox.documentation.spring.web.plugins.Docket;import springfox.documentation.swagger2.annotations.EnableSwagger2;@Configuration@EnableSwagger2public class Swagger2UiConfiguration extends WebMvcConfigurerAdapter{@Beanpublic Docket api() {// @formatter:off//Register the controllers to swagger//Also it is configuring the Swagger Docketreturn new Docket(DocumentationType.SWAGGER_2).select()// .apis(RequestHandlerSelectors.any()).apis(Predicates.not(RequestHandlerSelectors.basePackage("org.springframework.boot")))// .paths(PathSelectors.any())// .paths(PathSelectors.ant("/swagger2-demo")).build();// @formatter:on}@Overridepublic void addResourceHandlers(ResourceHandlerRegistry registry){//enabling swagger-ui part for visual documentationregistry.addResourceHandler("swagger-ui.html").addResourceLocations("classpath:/META-INF/resources/");registry.addResourceHandler("/webjars/**").addResourceLocations("classpath:/META-INF/resources/webjars/");}}
验证 Swagger2 JSON 格式文档
执行 maven 并启动服务器。 打开链接http://localhost:8080/swagger2-demo/v2/api-docs,它应该以JSON格式提供整个文档。 这并不是那么容易阅读和理解,实际上 Swagger 已经提供了将其用于其他系统中的功能,例如如今流行的 API 管理工具,它提供了 API 网关,API 缓存,API 文档等功能。
JSON 文档
验证 Swagger2 UI 文档
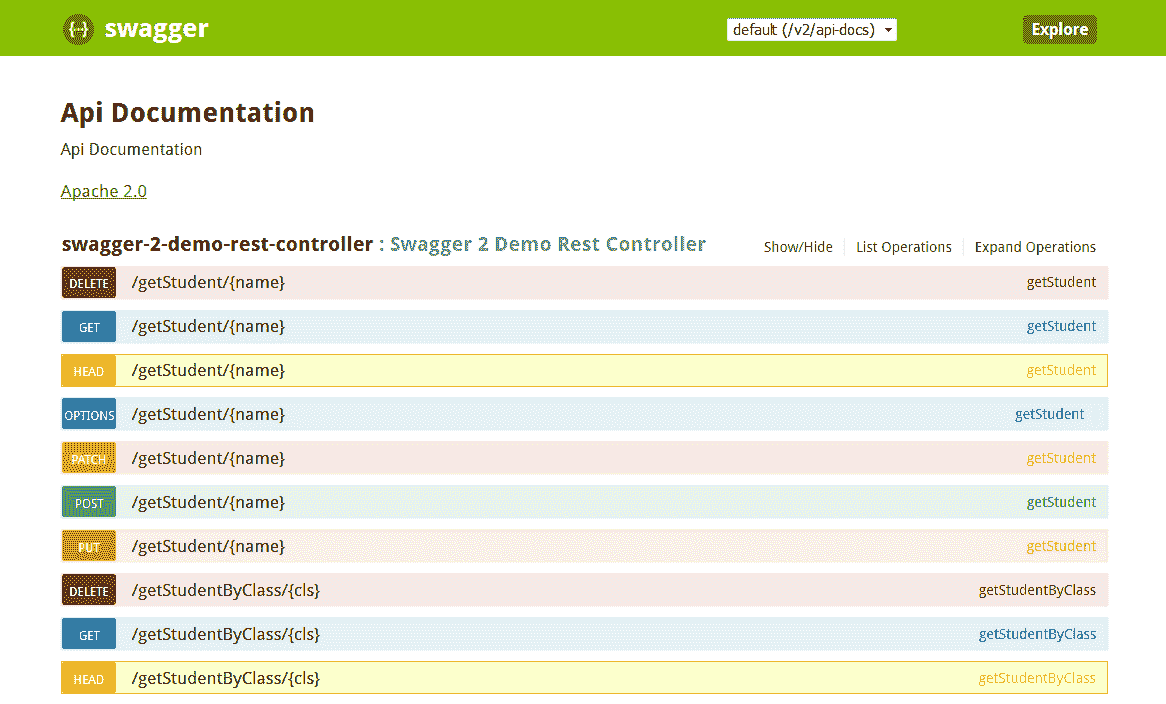
打开http://localhost:8080/swagger2-demo/swagger-ui.html在浏览器中查看 Swagger UI 文档。

Swagger2 UI 文档(无注解)
Swagger2 注解
默认生成的 API 文档很好,但是缺少详细的 API 级别信息。 Swagger 提供了一些注解,可以将这些详细信息添加到 API。 例如:
@Api– 我们可以将此注解添加到控制器,以添加有关控制器的基本信息。@Api(value = "Swagger2DemoRestController", description = "REST APIs related to Student Entity!!!!")@RestControllerpublic class Swagger2DemoRestController {...}
@ApiOperation和@ApiResponses– 我们可以将这些注解添加到控制器中的任何 rest 方法,以添加与该方法有关的基本信息。 例如: ```java @ApiOperation(value = “Get list of Students in the System “, response = Iterable.class, tags = “getStudents”) @ApiResponses(value = {@ApiResponse(code = 200, message = "Success|OK"),@ApiResponse(code = 401, message = "not authorized!"),@ApiResponse(code = 403, message = "forbidden!!!"),@ApiResponse(code = 404, message = "not found!!!") })
@RequestMapping(value = “/getStudents”)
public List
<br />在这里,我们可以将`tags`添加到方法中,以在`swagger-ui`中添加一些分组。3.`@ApiModelProperty` – 在 Model 属性中使用此注解可为该 Model 属性的 Swagger 输出添加一些描述。 例如:```java@ApiModelProperty(notes = "Name of the Student",name="name",required=true,value="test name")private String name;
添加 swagger2 注解后的控制器和模型类代码。
Swagger2DemoRestController.java
package com.example.springbootswagger2.controller;import java.util.ArrayList;import java.util.List;import java.util.stream.Collectors;import org.springframework.web.bind.annotation.PathVariable;import org.springframework.web.bind.annotation.RequestMapping;import org.springframework.web.bind.annotation.RestController;import com.example.springbootswagger2.model.Student;import io.swagger.annotations.Api;import io.swagger.annotations.ApiOperation;import io.swagger.annotations.ApiResponse;import io.swagger.annotations.ApiResponses;@Api(value = "Swagger2DemoRestController", description = "REST Apis related to Student Entity!!!!")@RestControllerpublic class Swagger2DemoRestController {List<Student> students = new ArrayList<Student>();{students.add(new Student("Sajal", "IV", "India"));students.add(new Student("Lokesh", "V", "India"));students.add(new Student("Kajal", "III", "USA"));students.add(new Student("Sukesh", "VI", "USA"));}@ApiOperation(value = "Get list of Students in the System ", response = Iterable.class, tags = "getStudents")@ApiResponses(value = {@ApiResponse(code = 200, message = "Suceess|OK"),@ApiResponse(code = 401, message = "not authorized!"),@ApiResponse(code = 403, message = "forbidden!!!"),@ApiResponse(code = 404, message = "not found!!!") })@RequestMapping(value = "/getStudents")public List<Student> getStudents() {return students;}@ApiOperation(value = "Get specific Student in the System ", response = Student.class, tags = "getStudent")@RequestMapping(value = "/getStudent/{name}")public Student getStudent(@PathVariable(value = "name") String name) {return students.stream().filter(x -> x.getName().equalsIgnoreCase(name)).collect(Collectors.toList()).get(0);}@ApiOperation(value = "Get specific Student By Country in the System ", response = Student.class, tags = "getStudentByCountry")@RequestMapping(value = "/getStudentByCountry/{country}")public List<Student> getStudentByCountry(@PathVariable(value = "country") String country) {System.out.println("Searching Student in country : " + country);List<Student> studentsByCountry = students.stream().filter(x -> x.getCountry().equalsIgnoreCase(country)).collect(Collectors.toList());System.out.println(studentsByCountry);return studentsByCountry;}// @ApiOperation(value = "Get specific Student By Class in the System ",response = Student.class,tags="getStudentByClass")@RequestMapping(value = "/getStudentByClass/{cls}")public List<Student> getStudentByClass(@PathVariable(value = "cls") String cls) {return students.stream().filter(x -> x.getCls().equalsIgnoreCase(cls)).collect(Collectors.toList());}}
Student.java
package com.example.springbootswagger2.model;import io.swagger.annotations.ApiModelProperty;public class Student{@ApiModelProperty(notes = "Name of the Student",name="name",required=true,value="test name")private String name;@ApiModelProperty(notes = "Class of the Student",name="cls",required=true,value="test class")private String cls;@ApiModelProperty(notes = "Country of the Student",name="country",required=true,value="test country")private String country;public Student(String name, String cls, String country) {super();this.name = name;this.cls = cls;this.country = country;}public String getName() {return name;}public String getCls() {return cls;}public String getCountry() {return country;}@Overridepublic String toString() {return "Student [name=" + name + ", cls=" + cls + ", country=" + country + "]";}}
演示
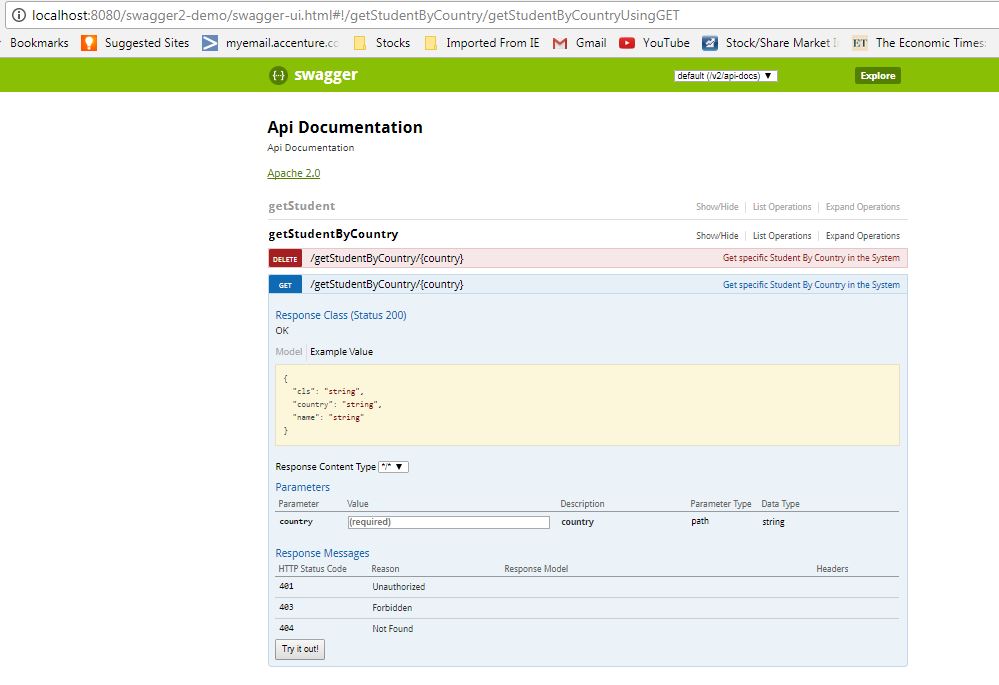
现在,在正确注解我们的 REST API 之后,我们来看一下最终输出。 打开http://localhost:8080/swagger2-demo/swagger-ui.html在浏览器中查看 Swagger ui 文档。

Swagger2 REST API 最终输出
这一切都将通过 Spring Boot 应用 swagger2 创建 REST API 文档。 将我的问题放在评论部分。
学习愉快!


