原文: https://howtodoinjava.com/vaadin/hello-world-web-application-maven/
在此示例中,我们将学习使用 maven 创建 vaadin helloworld 应用,然后在内置Jetty服务器中运行部署该应用。
使用 Maven 原型创建 vaadin 项目
在工作区中使用下面的 maven 命令创建最简单的 vaadin Web 应用。
$ mvn archetype:generate-DarchetypeGroupId=com.vaadin-DarchetypeArtifactId=vaadin-archetype-application-DarchetypeVersion=LATEST-DgroupId=com.howtodoinjava.vaadin.demo-DartifactId=VaadinExample-Dversion=1.0-Dpackaging=war
请根据需要更新-DgroupId和-DartifactId。
生成的项目结构
现在,将生成的项目作为现有的 maven 项目导入到您的 IDE(在我的情况下为 eclipse)中。
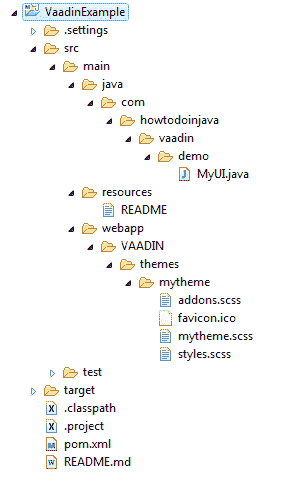
Vaadin HelloWorld 应用项目结构
生成的项目包含任何 Maven Web 应用的标准文件夹结构。
生成的文件
连同文件夹结构一起,我们将获得这些生成的文件以及 vaadin helloworld 项目。
pom.xml
<?xml version="1.0" encoding="UTF-8"?><project xmlns="http://maven.apache.org/POM/4.0.0" xmlns:xsi="http://www.w3.org/2001/XMLSchema-instance"xsi:schemaLocation="http://maven.apache.org/POM/4.0.0 http://maven.apache.org/xsd/maven-4.0.0.xsd;<modelVersion>4.0.0</modelVersion><groupId>com.howtodoinjava.vaadin.demo</groupId><artifactId>VaadinExample</artifactId><packaging>war</packaging><version>1.0</version><name>VaadinExample</name><prerequisites><maven>3</maven></prerequisites><properties><vaadin.version>7.7.0</vaadin.version><vaadin.plugin.version>7.7.0</vaadin.plugin.version><jetty.plugin.version>9.3.9.v20160517</jetty.plugin.version><project.build.sourceEncoding>UTF-8</project.build.sourceEncoding><maven.compiler.source>1.8</maven.compiler.source><maven.compiler.target>1.8</maven.compiler.target><!-- If there are no local customisations, this can also be "fetch" or "cdn" --><vaadin.widgetset.mode>local</vaadin.widgetset.mode></properties><repositories><repository><id>vaadin-addons</id><url>http://maven.vaadin.com/vaadin-addons</url></repository><repository><id>vaadin-snapshots</id><url>https://oss.sonatype.org/content/repositories/vaadin-snapshots/</url><releases><enabled>false</enabled></releases><snapshots><enabled>true</enabled></snapshots></repository></repositories><dependencyManagement><dependencies><dependency><groupId>com.vaadin</groupId><artifactId>vaadin-bom</artifactId><version>${vaadin.version}</version><type>pom</type><scope>import</scope></dependency></dependencies></dependencyManagement><dependencies><dependency><groupId>javax.servlet</groupId><artifactId>javax.servlet-api</artifactId><version>3.0.1</version><scope>provided</scope></dependency><dependency><groupId>com.vaadin</groupId><artifactId>vaadin-server</artifactId></dependency><dependency><groupId>com.vaadin</groupId><artifactId>vaadin-push</artifactId></dependency><dependency><groupId>com.vaadin</groupId><artifactId>vaadin-client-compiled</artifactId></dependency><dependency><groupId>com.vaadin</groupId><artifactId>vaadin-themes</artifactId></dependency></dependencies><build><plugins><plugin><groupId>org.apache.maven.plugins</groupId><artifactId>maven-war-plugin</artifactId><version>2.6</version><configuration><failOnMissingWebXml>false</failOnMissingWebXml><!-- Exclude an unnecessary file generated by the GWT compiler. --><packagingExcludes>WEB-INF/classes/VAADIN/widgetsets/WEB-INF/**</packagingExcludes></configuration></plugin><plugin><groupId>com.vaadin</groupId><artifactId>vaadin-maven-plugin</artifactId><version>${vaadin.plugin.version}</version><executions><execution><goals><goal>update-theme</goal><goal>update-widgetset</goal><goal>compile</goal><!-- Comment out compile-theme goal to use on-the-fly theme compilation --><goal>compile-theme</goal></goals></execution></executions></plugin><plugin><groupId>org.apache.maven.plugins</groupId><artifactId>maven-clean-plugin</artifactId><version>3.0.0</version><!-- Clean up also any pre-compiled themes --><configuration><filesets><fileset><directory>src/main/webapp/VAADIN/themes</directory><includes><include>**/styles.css</include><include>**/styles.scss.cache</include></includes></fileset></filesets></configuration></plugin><!-- The Jetty plugin allows us to easily test the development build byrunning jetty:run on the command line. --><plugin><groupId>org.eclipse.jetty</groupId><artifactId>jetty-maven-plugin</artifactId><version>${jetty.plugin.version}</version><configuration><scanIntervalSeconds>2</scanIntervalSeconds></configuration></plugin></plugins></build><profiles><profile><!-- Vaadin pre-release repositories --><id>vaadin-prerelease</id><activation><activeByDefault>false</activeByDefault></activation><repositories><repository><id>vaadin-prereleases</id><url>http://maven.vaadin.com/vaadin-prereleases</url></repository></repositories><pluginRepositories><pluginRepository><id>vaadin-prereleases</id><url>http://maven.vaadin.com/vaadin-prereleases</url></pluginRepository></pluginRepositories></profile></profiles></project>
MyUI.java
package com.howtodoinjava.vaadin.demo;import javax.servlet.annotation.WebServlet;import com.vaadin.annotations.Theme;import com.vaadin.annotations.VaadinServletConfiguration;import com.vaadin.server.VaadinRequest;import com.vaadin.server.VaadinServlet;import com.vaadin.ui.Button;import com.vaadin.ui.Label;import com.vaadin.ui.TextField;import com.vaadin.ui.UI;import com.vaadin.ui.VerticalLayout;/*** This UI is the application entry point. A UI may either represent a browser window* (or tab) or some part of a html page where a Vaadin application is embedded.* <p>* The UI is initialized using {@link #init(VaadinRequest)}. This method is intended to be* overridden to add component to the user interface and initialize non-component functionality.*/@Theme("mytheme")public class MyUI extends UI {@Overrideprotected void init(VaadinRequest vaadinRequest) {final VerticalLayout layout = new VerticalLayout();final TextField name = new TextField();name.setCaption("Type your name here:");Button button = new Button("Click Me");button.addClickListener( e -> {layout.addComponent(new Label("Thanks " + name.getValue()+ ", it works!"));});layout.addComponents(name, button);layout.setMargin(true);layout.setSpacing(true);setContent(layout);}@WebServlet(urlPatterns = "/*", name = "MyUIServlet", asyncSupported = true)@VaadinServletConfiguration(ui = MyUI.class, productionMode = false)public static class MyUIServlet extends VaadinServlet {}}
如果要使用web.xml文件,因为您的服务器不支持 servlet 3.0 规范,则可以在web.xml文件中使用此配置。
<?xml version="1.0" encoding="UTF-8"?><web-app id="WebApp_ID" version="2.4"xmlns="http://java.sun.com/xml/ns/j2ee" xmlns:xsi="http://www.w3.org/2001/XMLSchema-instance"xsi:schemaLocation="http://java.sun.com/xml/ns/j2eehttp://java.sun.com/xml/ns/j2ee/web-app_2_4.xsd"><servlet><servlet-name>myservlet</servlet-name><servlet-class>com.vaadin.server.VaadinServlet</servlet-class><init-param><param-name>UI</param-name><param-value>com.howtodoinjava.vaadin.demo.MyUI</param-value></init-param></servlet><servlet-mapping><servlet-name>myservlet</servlet-name><url-pattern>/*</url-pattern></servlet-mapping></web-app>
如果您正在使用web.xml文件,请不要忘记删除@WebServlet(urlPatterns = "/*", name = "MyUIServlet", asyncSupported = true)。
构建生成的项目
现在该构建项目,以便它可以下载所有依赖项并将其包含在项目的运行时中。
$ mvn clean install
上面的 maven 命令将下载依赖项(需要一些时间),并构建 war 文件VaadinExample-1.0.war。
运行并测试 vaadin HelloWorld 应用
现在该运行该应用了。 在命令提示符下,运行以下命令以启动随附的 Jetty 服务器。
$mvn jetty:run
这将启动内置的 Jetty 服务器,您可以通过http://localhost:8080/访问该应用。
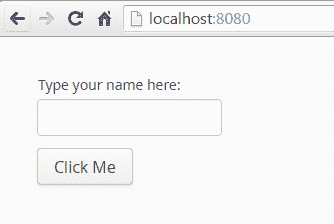
Vaadin 你好世界屏幕
现在在文本框中填写您的姓名或任何字符串,然后单击按钮。 它将在按钮下方打印消息。
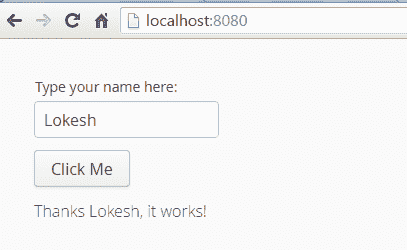
Vaadin 你好世界屏幕 - 2
学习愉快!
资源:

若有收获,就点个赞吧
0 人点赞
