MySQL 数据恢复
数据恢复的前提的做好备份,且开启 binlog,格式为 row。如果没有备份文件,那么删掉库表后就真的删掉了,lsof 中还有记录的话,有可能恢复一部分文件。但若刚好数据库没有打开这个表文件,那就只能跑路了。如果没有开启 binlog,那么恢复数据后,从备份时间点开始的数据都没了。如果 binlog 格式不为 row,那么在误操作数据后就没有办法做闪回操作,只能走备份恢复流程。
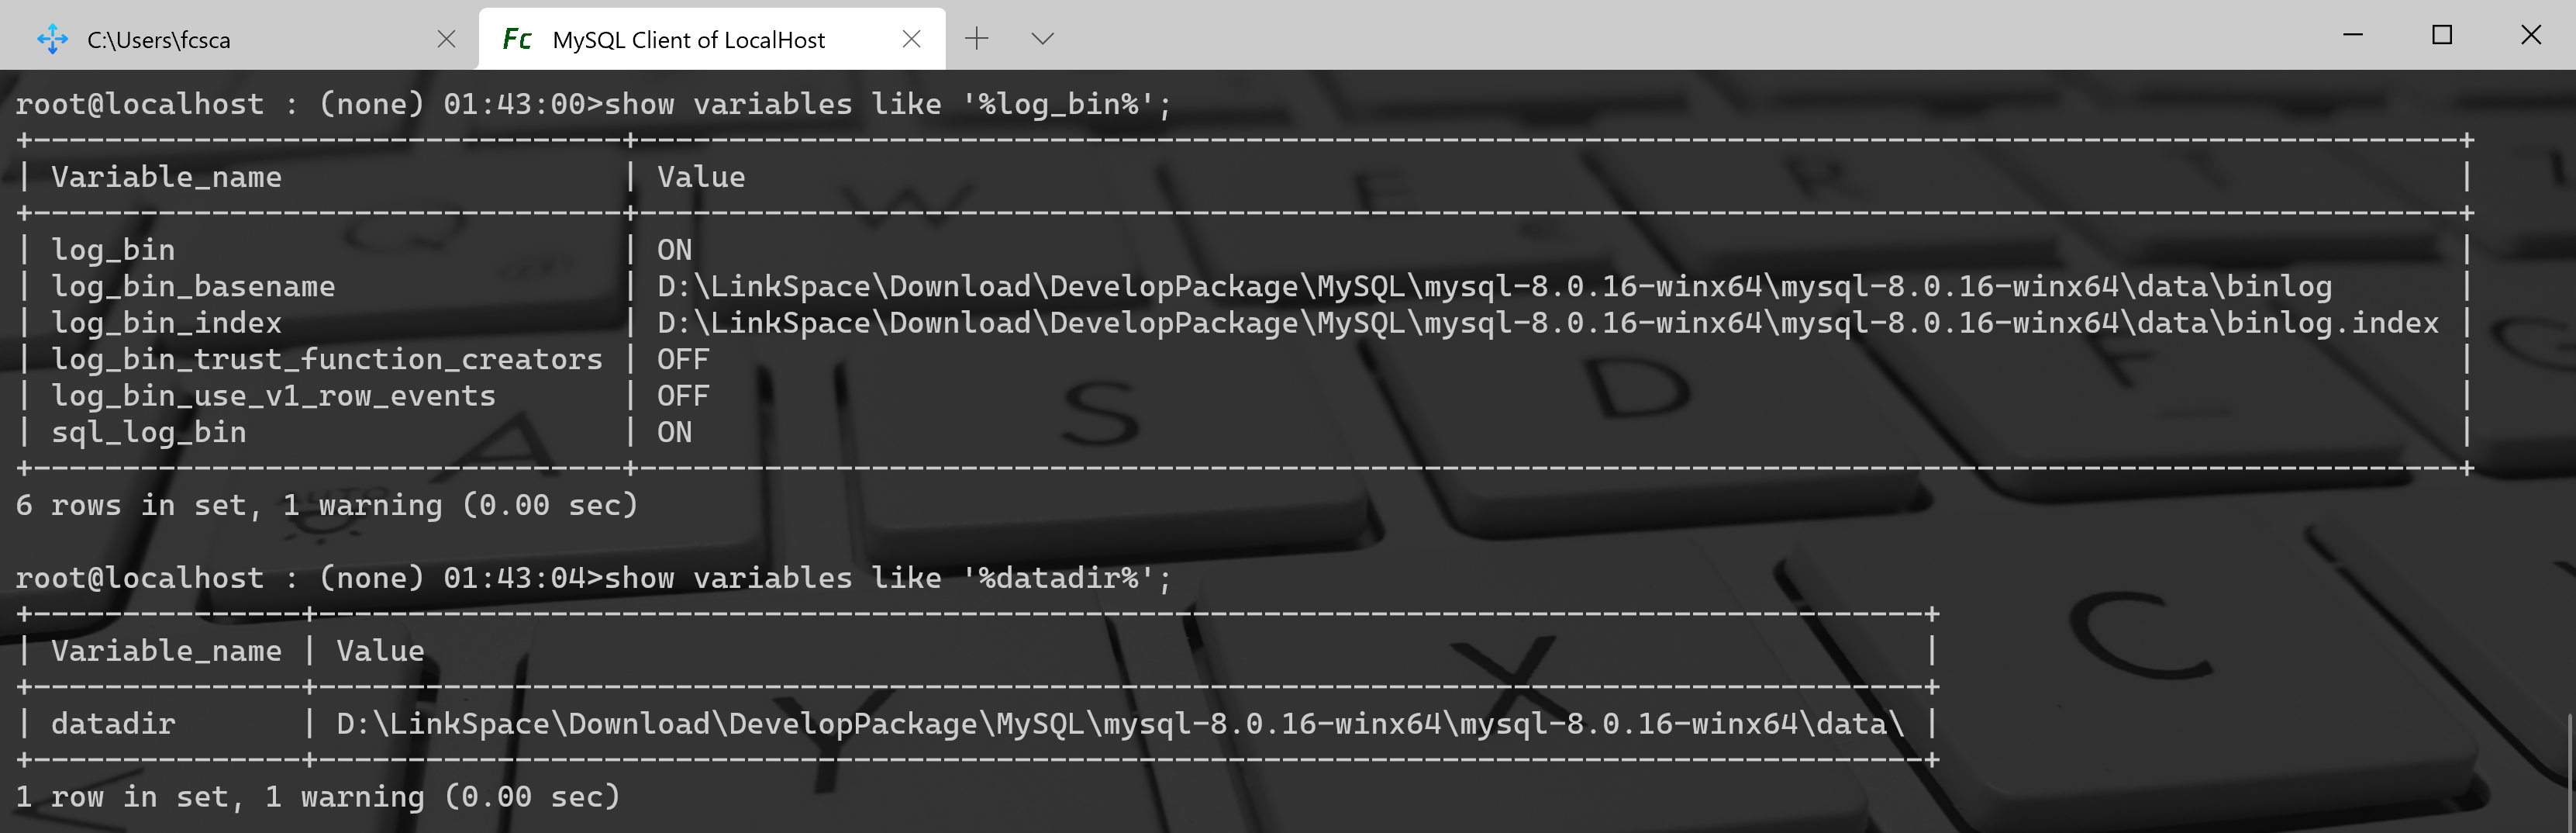
前提:查看binlog的日志是否开启
查看binlog是否开启
show variables like '%log_bin%';
查看binlog存放日志文件目录
show variables like '%datadir%';
1、借助mysqlbinlog进行恢复
这个时候可以借助MySQL自带的binlog解析工具mysqlbinlog,具体位置在MySQL安装目录**/mysql/bin/下)
通过mysqlbinlog工具命令查看数据库增删改查记录(必须切换到mysqlbinlog目录才有效)
例子1:查询2018-11-12 09:00:00到2018-11-13 20:00:00 数据库为 youxi 的操作日志,输入如下命令将数据写入到一个备用的txt文件中
mysqlbinlog --no-defaults --database=youxi --start-datetime="2018-11-12 09:00:00" --stop-datetime="2018-11-13 20:00:00" /data/mysql/mysql-bin.000015 > template_coupon_tb_product_category.txt
例子2:查询2018-11-12 09:00:00到2018-11-13 20:00:00 数据库为 youxi 的操作日志,并输出到屏幕上
mysqlbinlog --no-defaults --database=youxi --start-datetime="2018-11-12 09:00:00" --stop-datetime="2018-11-13 20:00:00" /data/mysql/mysql-bin.000015 |more
例子3:查询2018-11-12 09:00:00到2018-11-13 20:00:00 数据库为 youxi 的操作日志,并且过滤出 只包括 template_coupon_tb_product_category 表数据的操作记录 ,输入如下命令将数据写入到一个备用的txt文件中
mysqlbinlog --no-defaults --database=youxi --start-datetime="2018-11-12 09:00:00" --stop-datetime="2018-11-13 20:00:00" /data/mysql/mysql-bin.000015 | grep template_coupon_tb_product_category > template_coupon_tb_product_category.txt
mysqlbinlog 命令的语法格式:mysqlbinlog mysql-bin.0000xx | mysql -u用户名 -p密码 数据库名--------------------------------------------------------常用参数选项解释:--start-position=875 起始pos点--stop-position=954 结束pos点--start-datetime="2016-9-25 22:01:08" 起始时间点--stop-datetime="2019-9-25 22:09:46" 结束时间点--database=zyyshop 指定只恢复zyyshop数据库(一台主机上往往有多个数据库,只限本地log日志)--------------------------------------------------------不常用选项:-u --user=name 连接到远程主机的用户名-p --password[=name] 连接到远程主机的密码-h --host=name 从远程主机上获取binlog日志--read-from-remote-server 从某个MySQL服务器上读取binlog日志
利用第四步输出的sql语句或者txt文本进行语句过滤,重新插入数据或更新数据
2、直接恢复
2.1 mysqldump 备份全量恢复
使用 mysqldump 文件恢复数据非常简单,直接解压了执行:
$ gzip -d backup.sql.gz | mysql -u<user> -h<host> -P<port> -p
2.2 xtrabackup 备份全量恢复
恢复过程:
# 步骤一:解压(如果没有压缩可以忽略这一步)innobackupex --decompress <备份文件所在目录># 步骤二:应用日志innobackupex --apply-log <备份文件所在目录># 步骤三:复制备份文件到数据目录innobackupex --datadir=<MySQL数据目录> --copy-back <备份文件所在目录>
2.3 基于时间点恢复
基于时间点的恢复依赖的是 binlog 日志,需要从 binlog 中找过从备份点到恢复点的所有日志,然后应用。测试一下。
新建测试表:
fcant-3306>>show create table mytest.mytest \G;*************************** 1. row ***************************Table: mytestCreate Table:CREATE TABLE `mytest` (`id` int(11) NOT NULL AUTO_INCREMENT,`ctime` datetime DEFAULT NULL,PRIMARY KEY (`id`)) ENGINE=InnoDB DEFAULT CHARSET=utf8mb4;
每秒插入一条数据:
[mysql@mysql-test ~]$ while true; do mysql -S /tmp/mysql.sock -e 'insert into mytest.mytest(ctime)values(now())';date;sleep 1;done
备份:
[mysql@mysql-test ~]$ mysqldump --opt --single-transaction --master-data=2 --default-character-set=utf8 -S /tmp/mysql.sock -A > backup.sql
找出备份时的日志位置:
[mysql@mysql-test ~]$ head -n 25 backup.sql | grep 'CHANGE MASTER TO MASTER_LOG_FILE'-- CHANGE MASTER TO MASTER_LOG_FILE='mysql-bin.000032', MASTER_LOG_POS=39654;
假设要恢复到 2019-08-09 11:01:54 这个时间点,从 binlog 中查找从 39654 到 019-08-09 11:01:54 的日志。
[mysql@mysql-test ~]$ mysqlbinlog --start-position=39654 --stop-datetime='2019-08-09 11:01:54' /data/mysql_log/mysql_test/mysql-bin.000032 > backup_inc.sql[mysql@mysql-test-83 ~]$ tail -n 20 backup_inc.sql......### INSERT INTO `mytest`.`mytest`### SET### @1=161 /* INT meta=0 nullable=0 is_null=0 */### @2='2019-08-09 11:01:53' /* DATETIME(0) meta=0 nullable=1 is_null=0 */......
当前数据条目数:
-- 2019-08-09 11:01:54之前的数据条数fcnat-3306>>select count(*) from mytest.mytest where ctime < '2019-08-09 11:01:54';+----------+| count(*) |+----------+| 161 |+----------+1 row in set (0.00 sec)-- 所有数据条数fcnat-3306>>select count(*) from mytest.mytest;+----------+| count(*) |+----------+| 180 |+----------+1 row in set (0.00 sec)
然后执行恢复:
# 全量恢复[mysql@mysql-test ~]$ mysql -S /tmp/mysql.sock < backup.sql# 应用增量日志[mysql@mysql-test ~]$ mysql -S /tmp/mysql.sock < backup_inc.sql
检查数据:
fcnat-3306>>select count(*) from mytest.mytest;+----------+| count(*) |+----------+| 161 |+----------+1 row in set (0.00 sec)fcnat-3306>>select * from mytest.mytest order by id desc limit 5;+-----+---------------------+| id | ctime |+-----+---------------------+| 161 | 2019-08-09 11:01:53 || 160 | 2019-08-09 11:01:52 || 159 | 2019-08-09 11:01:51 || 158 | 2019-08-09 11:01:50 || 157 | 2019-08-09 11:01:49 |+-----+---------------------+5 rows in set (0.00 sec)
已经恢复到 2019-08-09 11:01:54 这个时间点。
3、恢复一个表
3.1 从 mysqldump 备份恢复一个表
假设要恢复的表是 mytest.mytest:
# 提取某个库的所有数据sed -n '/^-- Current Database: `mytest`/,/^-- Current Database:/p' backup.sql > backup_mytest.sql# 从库备份文件中提取建表语句sed -e'/./{H;$!d;}' -e 'x;/CREATE TABLE `mytest`/!d;q' backup_mytest.sql > mytest_table_create.sql# 从库备份文件中提取插入数据语句grep -i 'INSERT INTO `mytest`' backup_mytest.sql > mytest_table_insert.sql# 恢复表结构到 mytest 库mysql -u<user> -p mytest < mytest_table_create.sql# 恢复表数据到 mytest.mytest 表mysql -u<user> -p mytest < mytest_table_insert.sql
3.2 从 xtrabackup 备份恢复一个表
假设 ./backup_xtra_full 目录为解压后应用过日志的备份文件。
3.2.1 MyISAM 表
假设从备份文件中恢复表 mytest.t_myisam。从备份文件中找到 t_myisam.frm, t_myisam.MYD, t_myisam.MYI 这 3 个文件,复制到对应的数据目录中,并授权
进入 MySQL。检查表情况:
fcnat-3306>>show tables;+------------------+| Tables_in_mytest |+------------------+| mytest || t_myisam |+------------------+2 rows in set (0.00 sec)fcnat-3306>>check table t_myisam;+-----------------+-------+----------+----------+| Table | Op | Msg_type | Msg_text |+-----------------+-------+----------+----------+| mytest.t_myisam | check | status | OK |+-----------------+-------+----------+----------+1 row in set (0.00 sec)
3.2.2 Innodb 表
假设从备份文件中恢复表 mytest.t_innodb,恢复前提是设置了 innodb_file_per_table = on:
- 起一个新实例;
- 在实例上建一个和原来一模一样的表;
- 执行 alter table t_innodb discard tablespace; 删除表空间,这个操作会把 t_innodb.ibd 删除;
- 从备份文件中找到 t_innodb.ibd 这个文件,复制到对应的数据目录,并授权;
- 执行 alter table t_innodb IMPORT tablespace; 加载表空间;
- 执行 flush table t_innodb;check table t_innodb; 检查表;
- 使用 mysqldump 导出数据,然后再导入到要恢复的数据库。
注意:
- 在新实例上恢复再 dump 出来是为了避免风险,如果是测试,可以直接在原库上操作步骤 2-6;
- 只在 8.0 以前的版本有效。
4、跳过误操作SQL
跳过误操作 SQL 一般用于执行了无法闪回的操作比如 drop table\database。4.1 使用备份文件恢复跳过
4.1.1 不开启 GTID
使用备份文件恢复的步骤和基于时间点恢复的操作差不多,区别在于多一个查找 binlog 操作。举个例子,这里建立了两个表 a 和 b,每分钟插入一条数据,然后做全量备份,再删除表 b,现在要跳过这条 SQL。
删除表 b 后的数据库状态:fcnat-3306>>show tables;+------------------+| Tables_in_mytest |+------------------+| a |+------------------+1 row in set (0.00 sec)
1. 找出备份时的日志位置
[mysql@mysql-test ~]$ head -n 25 backup.sql | grep 'CHANGE MASTER TO MASTER_LOG_FILE'-- CHANGE MASTER TO MASTER_LOG_FILE='mysql-bin.000034', MASTER_LOG_POS=38414;
2. 找出执行了 drop table 语句的 pos 位置
从结果中可以看到 drop 所在语句的开始位置是 120629,结束位置是 120747。[mysql@mysql-test mysql_test]$ mysqlbinlog -vv /data/mysql_log/mysql_test/mysql-bin.000034 | grep -i -B 3 'drop table `b`';# at 120629#190818 19:48:30 server id 83 end_log_pos 120747 CRC32 0x6dd6ab2a Query thread_id=29488 exec_time=0 error_code=0SET TIMESTAMP=1566128910/*!*/;DROP TABLE `b` /* generated by server */
3. 从 binglog 中提取跳过这条语句的其他记录
# 第一条的 start-position 为备份文件的 pos 位置,stop-position 为 drop 语句的开始位置mysqlbinlog -vv --start-position=38414 --stop-position=120629 /data/mysql_log/mysql_test/mysql-bin.000034 > backup_inc_1.sql# 第二条的 start-position 为 drop 语句的结束位置mysqlbinlog -vv --start-position=120747 /data/mysql_log/mysql_test/mysql-bin.000034 > backup_inc_2.sql
4. 恢复备份文件
全量恢复后状态:[mysql@mysql-test ~]$ mysql -S /tmp/mysql.sock < backup.sql
fcnat-3306>>show tables;+------------------+| Tables_in_mytest |+------------------+| a || b |+------------------+2 rows in set (0.00 sec)fcnat-3306>>select count(*) from a;+----------+| count(*) |+----------+| 71 |+----------+1 row in set (0.00 sec)
5. 恢复增量数据
恢复后状态,可以看到已经跳过了 drop 语句:[mysql@mysql-test ~]$ mysql -S /tmp/mysql.sock < backup_inc_1.sql[mysql@mysql-test ~]$ mysql -S /tmp/mysql.sock < backup_inc_2.sql
fcnat-3306>>show tables;+------------------+| Tables_in_mytest |+------------------+| a || b |+------------------+2 rows in set (0.00 sec)fcnat-3306>>select count(*) from a;+----------+| count(*) |+----------+| 274 |+----------+1 row in set (0.00 sec)
4.1.2 开启 GTID
使用 GTID 可以直接跳过错误的 SQL:
1. 找出备份时的日志位置;
2. 找出执行了 drop table 语句的 GTID 值;
3. 导出备份时日志位置到最新的 binglog 日志;
4. 恢复备份文件;
5. 跳过这个 GTID;SET SESSION GTID_NEXT='对应的 GTID 值';BEGIN;COMMIT;SET SESSION GTID_NEXT = AUTOMATIC;
- 应用步骤 3 得到的增量 binlog 日志。
4.2 使用延迟库跳过
4.2.1 不开启 GTID
使用延迟库恢复的关键操作在于 start slave until。在测试环境搭建了两个 MySQL 节点,节点二延迟600秒,新建 a,b 两个表,每秒插入一条数据模拟业务数据插入。
当前节点二状态:localhost:3306 -> localhost:3307(delay 600)
当前节点二表:fcnat-3307>>show slave status \G;...Master_Port: 3306Connect_Retry: 60Master_Log_File: mysql-bin.000039Read_Master_Log_Pos: 15524Relay_Log_File: mysql-relay-bin.000002Relay_Log_Pos: 22845Relay_Master_Log_File: mysql-bin.000038Slave_IO_Running: YesSlave_SQL_Running: Yes...Seconds_Behind_Master: 600...
在节点一删除表 b:fcnat-3307>>show tables;+------------------+| Tables_in_mytest |+------------------+| a || b |+------------------+
接下来就是跳过这条 SQL 的操作步骤。fcnat-3306>>drop table b;Query OK, 0 rows affected (0.00 sec)fcnat-3306>>show tables;+------------------+| Tables_in_mytest |+------------------+| a |+------------------+1 row in set (0.00 sec)
1. 延迟库停止同步
stop slave;
2. 找出执行了 drop table 语句的前一句的 pos 位置
从结果中可以看到 drop 所在语句的前一句开始位置是 35134,所以同步到 35134(这个可别选错了)。[mysql@mysql-test ~]$ mysqlbinlog -vv /data/mysql_log/mysql_test/mysql-bin.000039 | grep -i -B 10 'drop table `b`';...# at 35134#190819 11:40:25 server id 83 end_log_pos 35199 CRC32 0x02771167 Anonymous_GTID last_committed=132 sequence_number=133 rbr_only=noSET @@SESSION.GTID_NEXT= 'ANONYMOUS'/*!*/;# at 35199#190819 11:40:25 server id 83 end_log_pos 35317 CRC32 0x50a018aa Query thread_id=37155 exec_time=0 error_code=0use `mytest`/*!*/;SET TIMESTAMP=1566186025/*!*/;DROP TABLE `b`; /* generated by server */
3. 延迟库同步到要跳过的 SQL 前一条
查看状态看到已经同步到对应节点:change master to master_delay=0;start slave until master_log_file='mysql-bin.000039',master_log_pos=35134;
fcant-3307>>show slave status \G;...Master_Port: 3306Connect_Retry: 60 Master_Log_File: mysql-bin.000039 Read_Master_Log_Pos: 65792... Slave_IO_Running: Yes Slave_SQL_Running: No Exec_Master_Log_Pos: 35134... Until_Log_File: mysql-bin.000039 Until_Log_Pos: 35134
4. 跳过一条 SQL 后开始同步
查看同步状态,删除表 b 的语句已经被跳过:set global sql_slave_skip_counter=1;start slave;
fcant-3307>>show slave status \G;...Slave_IO_Running: YesSlave_SQL_Running: Yes...1 row in set (0.00 sec)fcant-3307>>show tables;+------------------+| Tables_in_mytest |+------------------+| a || b |+------------------+2 rows in set (0.00 sec)
4.2.2 开启 GTID
使用 GTID 跳过的步骤会简单很多,只要执行一条和要跳过的 SQL 的 GTID 相同的事务就可以跳过了。
1. 停止同步;
2. 找出执行了 drop table 语句的 GTID;
3. 执行这个 GTID 的事务;SET SESSION GTID_NEXT='对应的 GTID 值';BEGIN; COMMIT;SET SESSION GTID_NEXT = AUTOMATIC;
- 继续同步;
5、闪回
闪回操作就是反向操作,比如执行了 delete from a where id=1,闪回就会执行对应的插入操作 insert into a (id,…) values(1,…),用于误操作数据,只对 DML 语句有效,且要求 binlog 格式设为 ROW。本章介绍两个比较好用的开源工具。5.1 binlog2sql
binlog2sql 是大众点评开源的一款用于解析 binlog 的工具,可以用于生成闪回语句,项目地址 binlog2sql。5.1.1 安装
wget https://github.com/danfengcao/binlog2sql/archive/master.zip -O binlog2sql.zipunzip binlog2sql.zipcd binlog2sql-master/# 安装依赖pip install -r requirements.txt
5.1.2 生成回滚SQL
python binlog2sql/binlog2sql.py --flashback \-h<host> -P<port> -u<user> -p'<password>' -d<dbname> -t<table_name>\--start-file='<binlog_file>' \--start-datetime='<start_time>' \--stop-datetime='<stop_time>' > ./flashback.sqlpython binlog2sql/binlog2sql.py --flashback \-h<host> -P<port> -u<user> -p'<password>' -d<dbname> -t<table_name> \--start-file='<binlog_file>' \--start-position=<start_pos> \--stop-position=<stop_pos> > ./flashback.sql
5.2 MyFlash
MyFlash 是由美团点评公司技术工程部开发维护的一个回滚 DML 操作的工具,项目链接 MyFlash。
限制:
- binlog 格式必须为 row,且 binlog_row_image=full;
- 仅支持5.6与5.7;
- 只能回滚 DML(增、删、改)。
5.2.1 安装
# 依赖(centos)yum install gcc* pkg-config glib2 libgnomeui-devel -y# 下载文件wget https://github.com/Meituan-Dianping/MyFlash/archive/master.zip -O MyFlash.zipunzip MyFlash.zipcd MyFlash-master# 编译安装gcc -w `pkg-config --cflags --libs glib-2.0` source/binlogParseGlib.c -o binary/flashbackmv binary /usr/local/MyFlashln -s /usr/local/MyFlash/flashback /usr/bin/flashback
5.2.2 使用
生成回滚语句:
执行后会生成 binlog_output_base.flashback 文件,需要用 mysqlbinlog 解析出来再使用:flashback --databaseNames=<dbname> --binlogFileNames=<binlog_file> --start-position=<start_pos> --stop-position=<stop_pos>
mysqlbinlog -vv binlog_output_base.flashback | mysql -u<user> -p

若有收获,就点个赞吧
0 人点赞
