Redis Codis
Redis 在 3.0 的时候,推出了一个集群解决方案: redis-cluster。能让开发者通过官方的方式构建Redis集群,但在之前,生产环境跑的基本是redis 2.x 版本的实例,如果需要进行集群管理,很多开发者采用的方案都是twitter的Twemproxy。
Twemproxy 本身是一个静态的分布式方案,进行扩容、缩容的时候对devops的要求很高,而且很难得做到平滑的扩容、缩容。而且没有用于集群管理的 Dashboard,这样十分不便。
为了解决这些痛点,豌豆荚开源了它们的 Codis,很感谢作者们带来了这么好的工具,不管是使用或者学习CAP相关开发,codis都是很好的参考。
Codis 官方项目地址 :https://github.com/CodisLabs/codis
codis架构
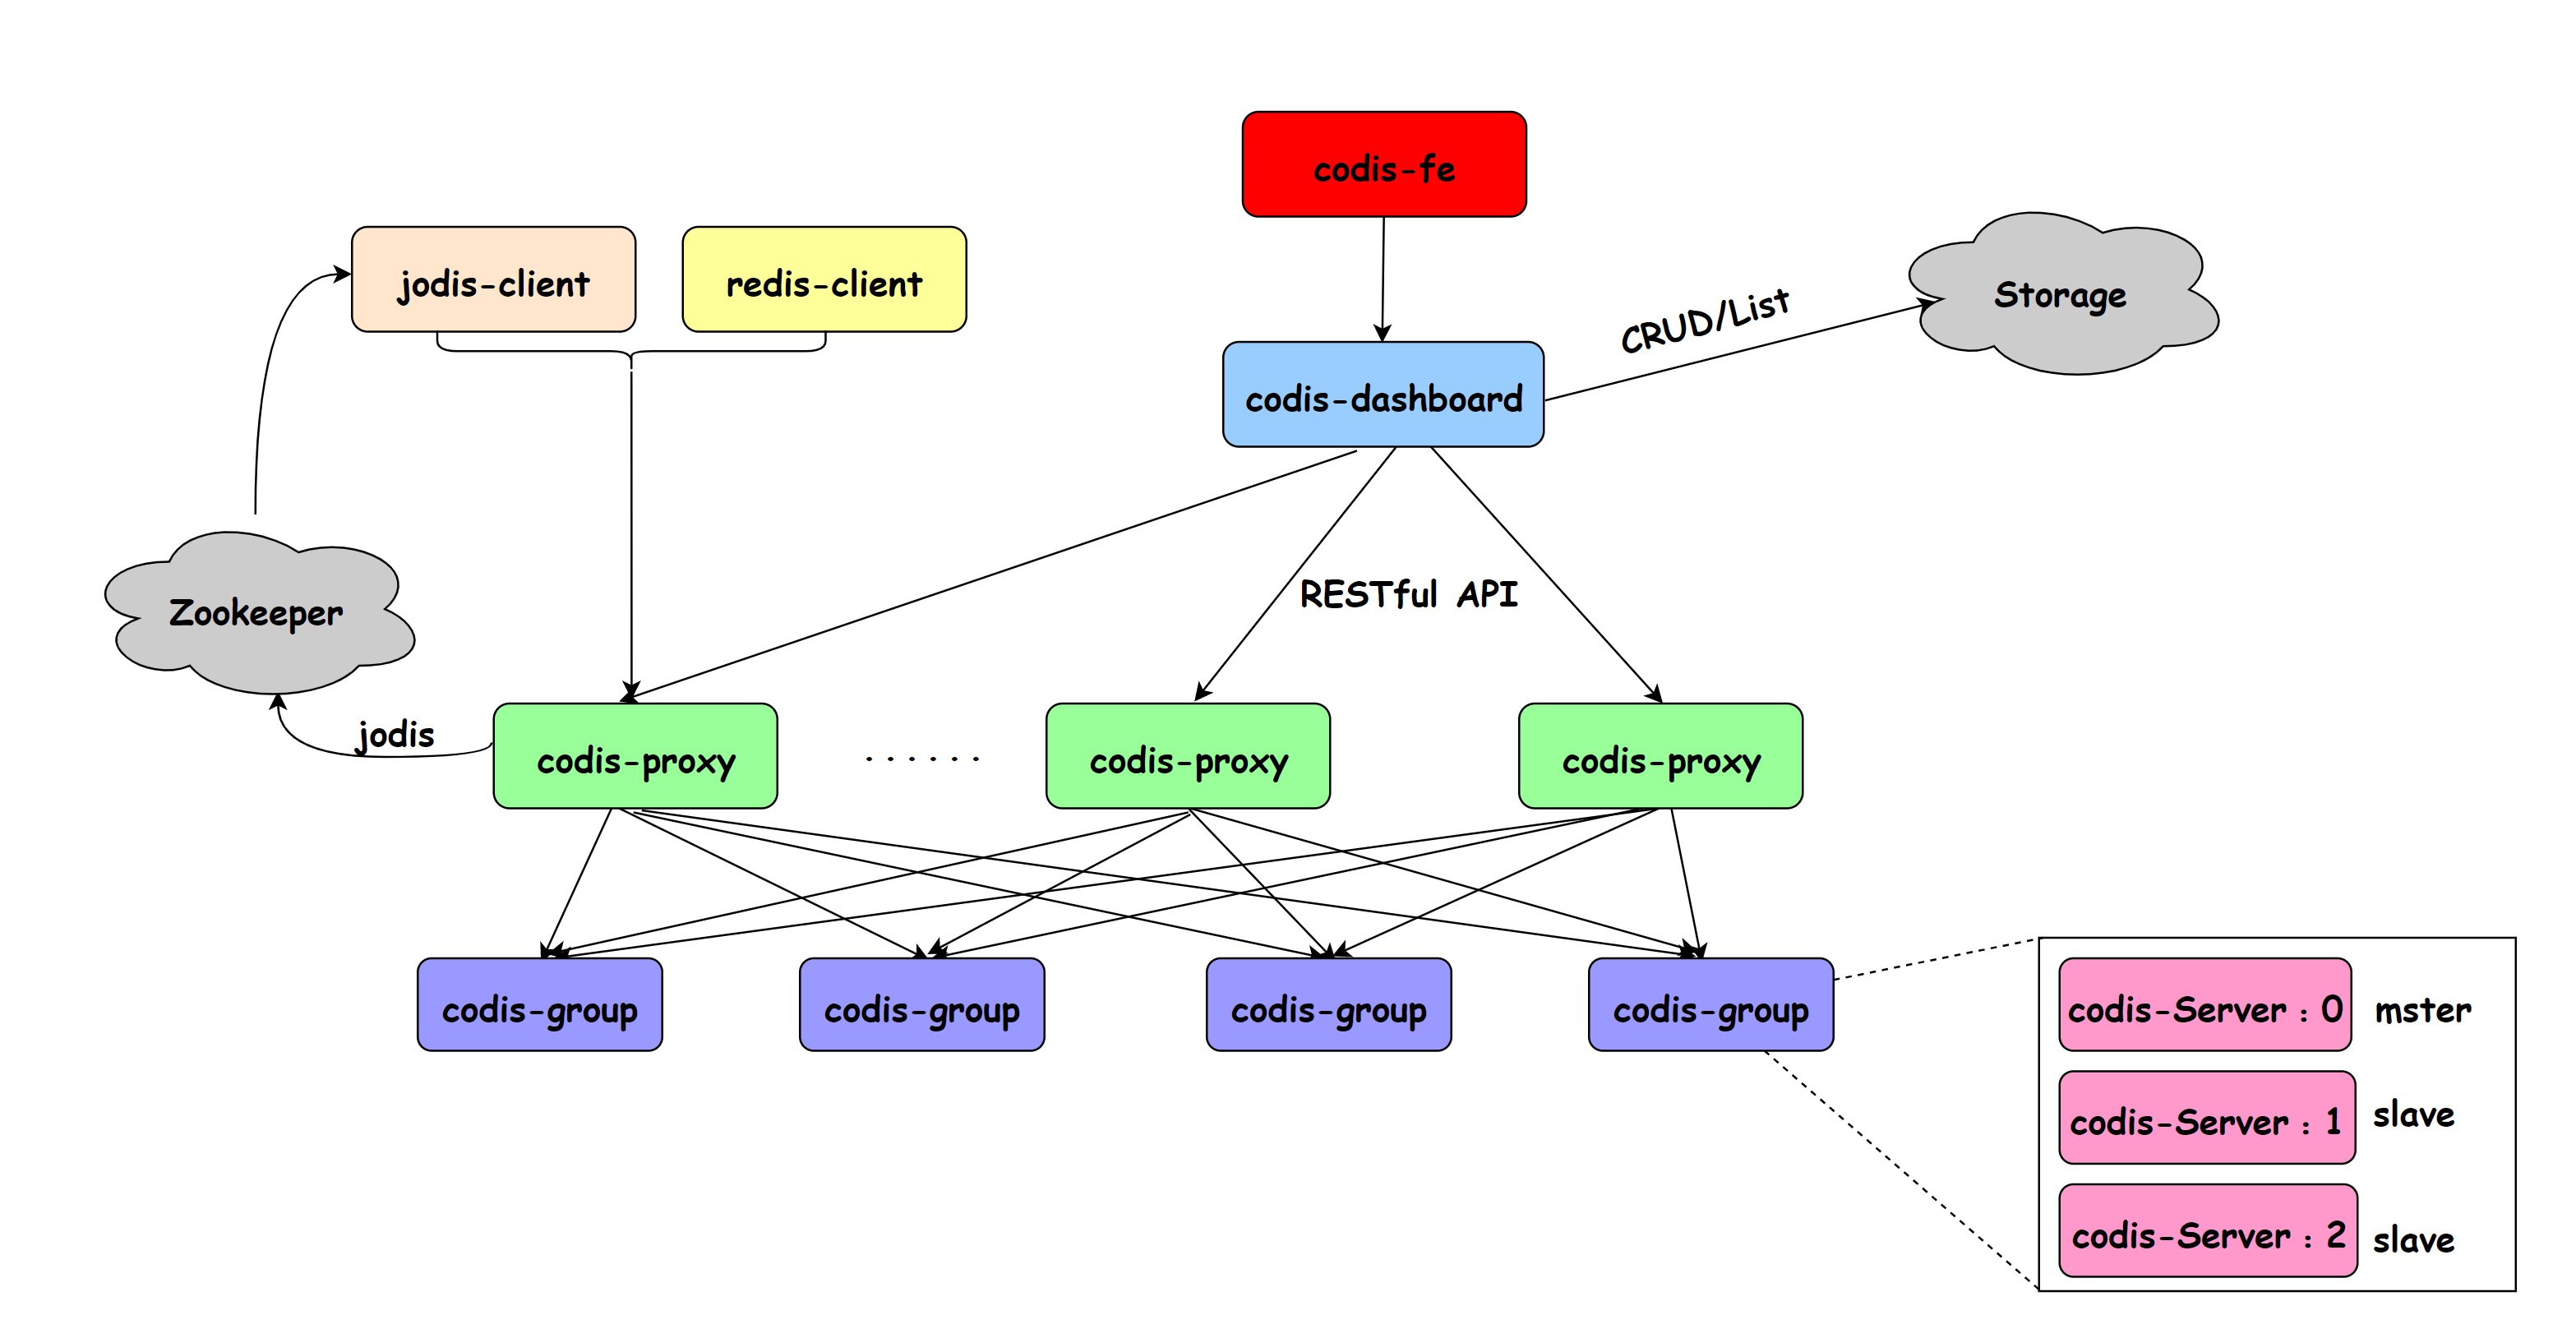
上图是codis的一个总体架构,可以得到几个关键组合件:codis-server、codis-proxy、codis-dashboard、codis-admin、 codis-fe、 cois-ha等。
- Codis Server:基于 redis-2.8.21 分支开发。增加了额外的数据结构,以支持 slot 有关的操作以及数据迁移指令。具体的修改可以参考文档 redis 的修改。
- Codis Proxy:客户端连接的 Redis 代理服务, 实现了 Redis 协议。除部分命令不支持以外(不支持的命令列表),表现的和原生的 Redis 没有区别(就像 Twemproxy)。
- 对于同一个业务集群而言,可以同时部署多个 codis-proxy 实例;
- 不同 codis-proxy 之间由 codis-dashboard 保证状态同步。
- Codis Dashboard:集群管理工具,支持 codis-proxy、codis-server 的添加、删除,以及据迁移等操作。在集群状态发生改变时,codis-dashboard 维护集群下所有 codis-proxy 的状态的一致性。
- 对于同一个业务集群而言,同一个时刻 codis-dashboard 只能有 0个或者1个;
- 所有对集群的修改都必须通过 codis-dashboard 完成。
- Codis Admin:集群管理的命令行工具。
- 可用于控制 codis-proxy、codis-dashboard 状态以及访问外部存储。
- Codis FE:集群管理界面。
- 多个集群实例共享可以共享同一个前端展示页面;
- 通过配置文件管理后端 codis-dashboard 列表,配置文件可自动更新。
- Codis HA:为集群提供高可用。
- 依赖 codis-dashboard 实例,自动抓取集群各个组件的状态;
- 会根据当前集群状态自动生成主从切换策略,并在需要时通过 codis-dashboard 完成主从切换。
- Storage:为集群状态提供外部存储。
- 提供 Namespace 概念,不同集群的会按照不同 product name 进行组织;
- 目前仅提供了 Zookeeper 和 Etcd 两种实现,但是提供了抽象的 interface 可自行扩展。
理解了上面的组件含义,对部署和维护codis很有帮助,所以在搭建环境之前,务必先认真理解上面的组件的意义。
codis及依赖环境配置
codis主要是采用golang开发,而且依赖zk或etcd进行配置管理的,所以基本的先要把go的环境先搭建起来。
1、go开发环境搭建
建议参考官方的指引:https://golang.org/doc/install
安装后,检查是否成功:
$ go versiongo version go1.7 linux/amd64
2、go编译环境设置
添加 到PATH,例如:
export GOROOT=/usr/local/goexport GOPATH=/home/apps/devgoexport GOBIN=/home/apps/devgo/binexport PATH=$PATH:$GOROOT/bin
3、安装godep
$ go get -u github.com/tools/godep
如果输入which godep 报命令command not found的错误,可以这样解决:
$ sudo cp $GOPATH/bin/godep /usr/local/bin/
4、安装codis
$ mkdir -p $GOPATH/src/github.com/CodisLabs$ cd $_ && git clone https://github.com/CodisLabs/codis.git -b release3.0
项目检出成功后,可以看到codis完整目录;由于codis的extern包含了一个redis的基础工具。所以,需要在 codis的主目录下执行make命令
$ cd $GOPATH/src/github.com/CodisLabs/codis$ makemake -j -C extern/redis-2.8.21/... ...go build -i -o bin/codis-dashboard ./cmd/dashboardgo build -i -o bin/codis-proxy ./cmd/proxygo build -i -o bin/codis-admin ./cmd/admingo build -i -o bin/codis-ha ./cmd/hago build -i -o bin/codis-fe ./cmd/fe
$ ls bin/总用量 74528drwxrwxr-x 3 apps apps 4096 10月 2 09:52 .drwxrwxr-x 12 apps apps 4096 10月 2 09:51 ..drwxrwxr-x 4 apps apps 4096 10月 2 09:52 assets-rwxrwxr-x 1 apps apps 15710271 10月 2 09:52 codis-admin-rwxrwxr-x 1 apps apps 16978383 10月 2 09:52 codis-dashboard-rwxrwxr-x 1 apps apps 15810040 10月 2 09:52 codis-fe-rwxrwxr-x 1 apps apps 8730288 10月 2 09:52 codis-ha-rwxrwxr-x 1 apps apps 10267404 10月 2 09:52 codis-proxy-rwxrwxr-x 1 apps apps 4308197 10月 2 09:52 codis-server-rwxrwxr-x 1 apps apps 2166709 10月 2 09:52 redis-benchmark-rwxrwxr-x 1 apps apps 2314614 10月 2 09:52 redis-cli-rw-rw-r-- 1 apps apps 146 10月 2 09:52 version... ...$ cat bin/versionversion = 2016-09-29 13:58:59 +0800 @29199bb81e7b0b3cdb4bd7e005c96c9fd674a6eacompile = 2016-10-02 09:52:18 +0800 by go version go1.7 linux/amd64
接下来,需要处理一下 bin/ 下的命令工具
sudo cp codis-* /usr/local/binsudo cp redis-* /usr/local/bin
5、安装etcd
由于使用etcd作为配置管理,所以需要进行etcd的安装配置,但如果喜欢zookeeper,那么可以忽略本点,自己安装zk.
$ curl -L https://github.com/coreos/etcd/releases/download/v2.3.7/etcd-v2.3.7-linux-amd64.tar.gz$ tar xzvf etcd-v2.3.7-linux-amd64.tar.gz$ cd etcd-v2.3.7-linux-amd64 && sudo cp etcd /usr/local/bin/ && cp etcdctl /usr/local/bin/
检查etcd安装是否成功
$ etcd --versionetcd Version: 2.3.7Git SHA: fd17c91Go Version: go1.6.2Go OS/Arch: linux/amd64
codis demo 运行
源码中提供了可供本地测试使用的脚本 scripts/demo.sh,该脚本会生成一个本地集群。
etcd.pid=22387codis-server-16379.pid=22388codis-server-16380.pid=22389codis-server-16381.pid=22393codis-server-16382.pid=22394codis-server-16383.pid=22395codis-server-16384.pid=22396codis-server-16385.pid=22397codis-server-16386.pid=22398proxy-11080x19000.pid=22400proxy-11081x19001.pid=22402proxy-11082x19002.pid=22405proxy-11083x19003.pid=22410dashboard.pid=22412fe.pid=22428migrate slot-[ 512, 767] to group-3migrate slot-[ 768,1023] to group-4migrate slot-[ 0, 255] to group-1migrate slot-[ 256, 511] to group-2donedone............
脚本会输出每一个进程的 PID,并将每个实例的日志会输出到 scripts/tmp 目录下;
启动后,可以通过 http://127.0.0.1:8080 来访问 codis-fe。
小结
上述已经可以快速跑一个demo版的codis,但这还不够的,还需要进一步去学习codis的开发和运维。
自定义参数与环境方式搭建
通过运行了一个名称为“codis-test”的codis的demo方案,下面尝试通过官方的相关命令组件,运行自己的自定义环境。继续选用etcd作为配置管理工具。
注意:请按照顺序逐步完成操作。
一、启动etcd
使用etcd的默认端口 2379
nohup etcd --name=codis-demo &>/home/apps/codis/log/etcd/etcd.log &
如果启动过程中,出现被锁的异常,可以清理相关历史记录:
etcdctl rm --recursive /codis3
二、启动codis-server
先启动一个单节点的server codis-server,本身就是一个redis实例, 开启一个端口为16379的server实例
nohup ./bin/codis-server --port 16379 &>/home/apps/codis/log/redis/redis-16379.log &[44886] 02 Oct 16:50:11.381 # You requested maxclients of 10000 requiring at least 10032 max file descriptors.[44886] 02 Oct 16:50:11.381 # Redis can't set maximum open files to 10032 because of OS error: Operation not permitted.[44886] 02 Oct 16:50:11.381 # Current maximum open files is 4096. maxclients has been reduced to 4064 to compensate for low ulimit. If you need higher maxclients increase 'ulimit -n'._.__.-``__ ''-.__.-`` `. `_. ''-._ Redis 2.8.21 (29199bb8/0) 64 bit.-`` .-```. ```\/ _.,_ ''-._( ' , .-` | `, ) Running in stand alone mode|`-._`-...-` __...-.``-._|'` _.-'| Port: 16379| `-._ `._ / _.-' | PID: 44886`-._ `-._ `-./ _.-' _.-'|`-._`-._ `-.__.-' _.-'_.-'|| `-._`-._ _.-'_.-' | http://redis.io`-._ `-._`-.__.-'_.-' _.-'|`-._`-._ `-.__.-' _.-'_.-'|| `-._`-._ _.-'_.-' |`-._ `-._`-.__.-'_.-' _.-'`-._ `-.__.-' _.-'`-._ _.-'`-.__.-'[44886] 02 Oct 16:50:11.385 # Server started, Redis version 2.8.21[44886] 02 Oct 16:50:11.385 # WARNING overcommit_memory is set to 0! Background save may fail under low memory condition. To fix this issue add 'vm.overcommit_memory = 1' to /etc/sysctl.conf and then reboot or run the command 'sysctl vm.overcommit_memory=1' for this to take effect.[44886] 02 Oct 16:50:11.385 # WARNING you have Transparent Huge Pages (THP) support enabled in your kernel. This will create latency and memory usage issues with Redis. To fix this issue run the command 'echo never > /sys/kernel/mm/transparent_hugepage/enabled' as root, and add it to your /etc/rc.local in order to retain the setting after a reboot. Redis must be restarted after THP is disabled.[44886] 02 Oct 16:50:11.385 # WARNING: The TCP backlog setting of 511 cannot be enforced because /proc/sys/net/core/somaxconn is set to the lower value of 128.[44886] 02 Oct 16:50:11.385 * DB loaded from disk: 0.000 seconds[44886] 02 Oct 16:50:11.385 * The server is now ready to accept connections on port 16379
三、启动dashboard
nohup ./bin/codis-dashboard --config=/home/apps/codis/dashboard.toml --log=/home/apps/codis/log/dashboard/dashboard.log --log-level=WARN &
这里使用了自定义的dashboard.toml, 它的内容如下:
################################################### ## Codis-Dashboard ## #################################################### Set Coordinator, only accept "zookeeper" & "etcd"coordinator_name = "etcd"coordinator_addr = "127.0.0.1:2379"# Set Codis Product {Name/Auth}.product_name = "codis-demo"product_auth = ""# Set bind address for admin(rpc), tcp only.admin_addr = "0.0.0.0:18080"
四、启动codis-proxy
nohup ./bin/codis-proxy --config=/home/apps/codis/proxy.toml --log=/home/apps/codis/log/proxy/proxy.log --log-level=WARN &
proxy.toml的内容如下:
product_name = "codis-demo"product_auth = ""proto_type = "tcp4"admin_addr = "0.0.0.0:11080"proxy_addr = "0.0.0.0:19000"
五、启动fe
nohup ./bin/codis-fe -d /home/apps/codis/codis.json --listen=0.0.0.0:8080 &
condis.json的内容如下:
[{"name": "codis-demo","dashboard": "127.0.0.1:18080"}]
六、配置codis-admin
上面已经启动了基本的组件,接下来需要通过codis-admin把proxy进行分组管理。
增加proxy组
./bin/codis-admin --dashboard=127.0.0.1:18080 --create-group --gid 1
添加分组
./bin/codis-admin --dashboard=127.0.0.1:18080 --group-add --gid 1 -x 127.0.0.1:16379
创建proxy
./bin/codis-admin --dashboard=127.0.0.1:18080 --create-proxy -x 127.0.0.1:11080
配置slot
./bin/codis-admin --dashboard=127.0.0.1:18080 --slot-action --interval=100./bin/codis-admin --dashboard=127.0.0.1:18080 --rebalance --confirm
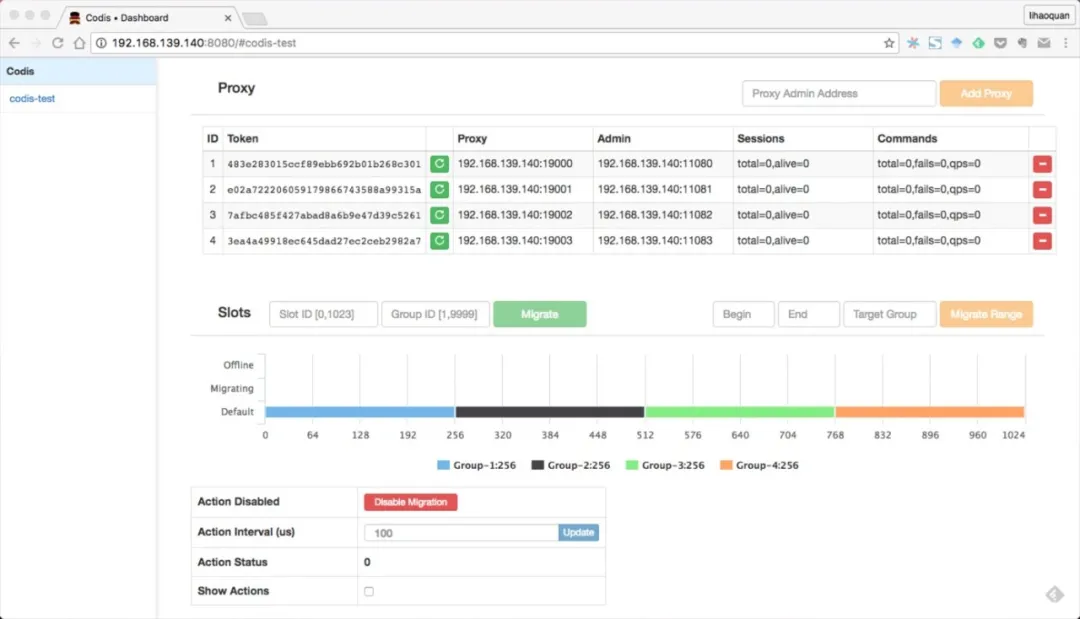
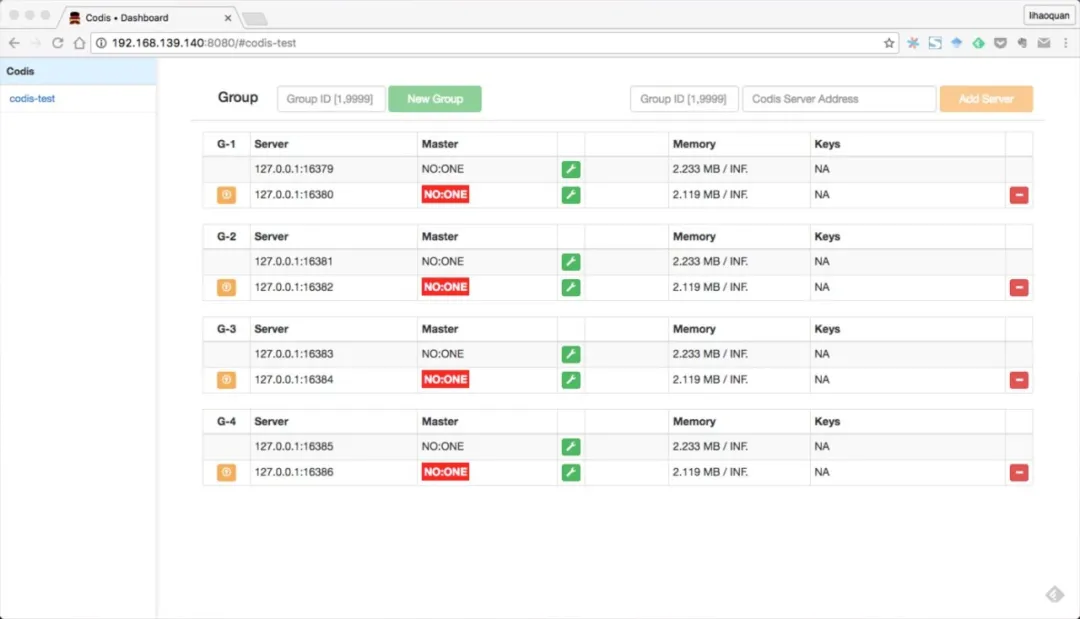
登陆管理面板,如下图: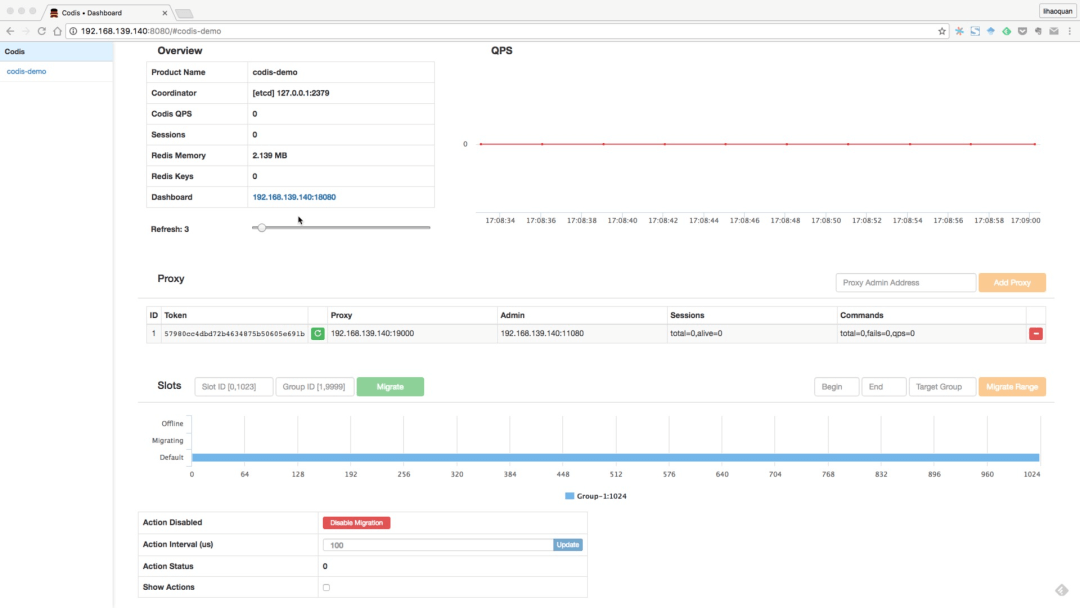

若有收获,就点个赞吧
0 人点赞
