1、Redis源码版编译依赖gcc,安装前确认gcc的环境
因为Redis高版本依赖gcc的高级版本进行编译,所以安装前进行进行编译环境的确认
如果遇到安装gcc不能在yum源找到包的问题,可参考如下
语雀内容
A.通过gcc -v命令检查gcc的安装
$ gcc -vUsing built-in specs.COLLECT_GCC=gccCOLLECT_LTO_WRAPPER=/usr/libexec/gcc/x86_64-redhat-linux/4.8.5/lto-wrapperTarget: x86_64-redhat-linuxConfigured with: ../configure --prefix=/usr --mandir=/usr/share/man --infodir=/usr/share/info --with-bugurl=http://bugzilla.redhat.com/bugzilla --enable-bootstrap --enable-shared --enable-threads=posix --enable-checking=release --with-system-zlib --enable-__cxa_atexit --disable-libunwind-exceptions --enable-gnu-unique-object --enable-linker-build-id --with-linker-hash-style=gnu --enable-languages=c,c++,objc,obj-c++,java,fortran,ada,go,lto --enable-plugin --enable-initfini-array --disable-libgcj --with-isl=/builddir/build/BUILD/gcc-4.8.5-20150702/obj-x86_64-redhat-linux/isl-install --with-cloog=/builddir/build/BUILD/gcc-4.8.5-20150702/obj-x86_64-redhat-linux/cloog-install --enable-gnu-indirect-function --with-tune=generic --with-arch_32=x86-64 --build=x86_64-redhat-linuxThread model: posixgcc version 4.8.5 20150623 (Red Hat 4.8.5-11) (GCC)

B.(未安装情况下或者gcc版本为4.8.5以下的)安装/升级gcc
①yum安装的gcc为4.8.5,版本过低编译Redis会报错

②gcc安装升级
$ yum -y install devtoolset-9-gcc devtoolset-9-gcc-c++ devtoolset-9-binutils$ gcc -v$ scl enable devtoolset-9 bash$ echo "source /opt/rh/devtoolset-9/enable" >> /etc/profile$ gcc -vUsing built-in specs.COLLECT_GCC=gccCOLLECT_LTO_WRAPPER=/opt/rh/devtoolset-9/root/usr/libexec/gcc/x86_64-redhat-linux/9/lto-wrapperTarget: x86_64-redhat-linuxConfigured with: ../configure --enable-bootstrap --enable-languages=c,c++,fortran,lto --prefix=/opt/rh/devtoolset-9/root/usr --mandir=/opt/rh/devtoolset-9/root/usr/share/man --infodir=/opt/rh/devtoolset-9/root/usr/share/info --with-bugurl=http://bugzilla.redhat.com/bugzilla --enable-shared --enable-threads=posix --enable-checking=release --enable-multilib --with-system-zlib --enable-__cxa_atexit --disable-libunwind-exceptions --enable-gnu-unique-object --enable-linker-build-id --with-gcc-major-version-only --with-linker-hash-style=gnu --with-default-libstdcxx-abi=gcc4-compatible --enable-plugin --enable-initfini-array --with-isl=/builddir/build/BUILD/gcc-9.3.1-20200408/obj-x86_64-redhat-linux/isl-install --disable-libmpx --enable-gnu-indirect-function --with-tune=generic --with-arch_32=x86-64 --build=x86_64-redhat-linuxThread model: posixgcc version 9.3.1 20200408 (Red Hat 9.3.1-2) (GCC)
2、下载安装Redis
A.下载Redis安装包
➜ ~ wget http://download.redis.io/releases/redis-6.0.5.tar.gz--2020-07-19 09:49:13-- http://download.redis.io/releases/redis-6.0.5.tar.gzResolving download.redis.io (download.redis.io)... 45.60.125.1Connecting to download.redis.io (download.redis.io)|45.60.125.1|:80... connected.HTTP request sent, awaiting response... 200 OKLength: 2217666 (2.1M) [application/octet-stream]Saving to: ‘redis-6.0.5.tar.gz’100%[==============================================================================>] 2,217,666 16.2KB/s in 2m 54s2020-07-19 09:52:07 (12.5 KB/s) - ‘redis-6.0.5.tar.gz’ saved [2217666/2217666]

B.解压Redis安装包
$ tar -zxvf redis-6.0.5.tar.gz

3、切换至Redis解压目录下进行编译
$ cd redis-6.0.5$ make

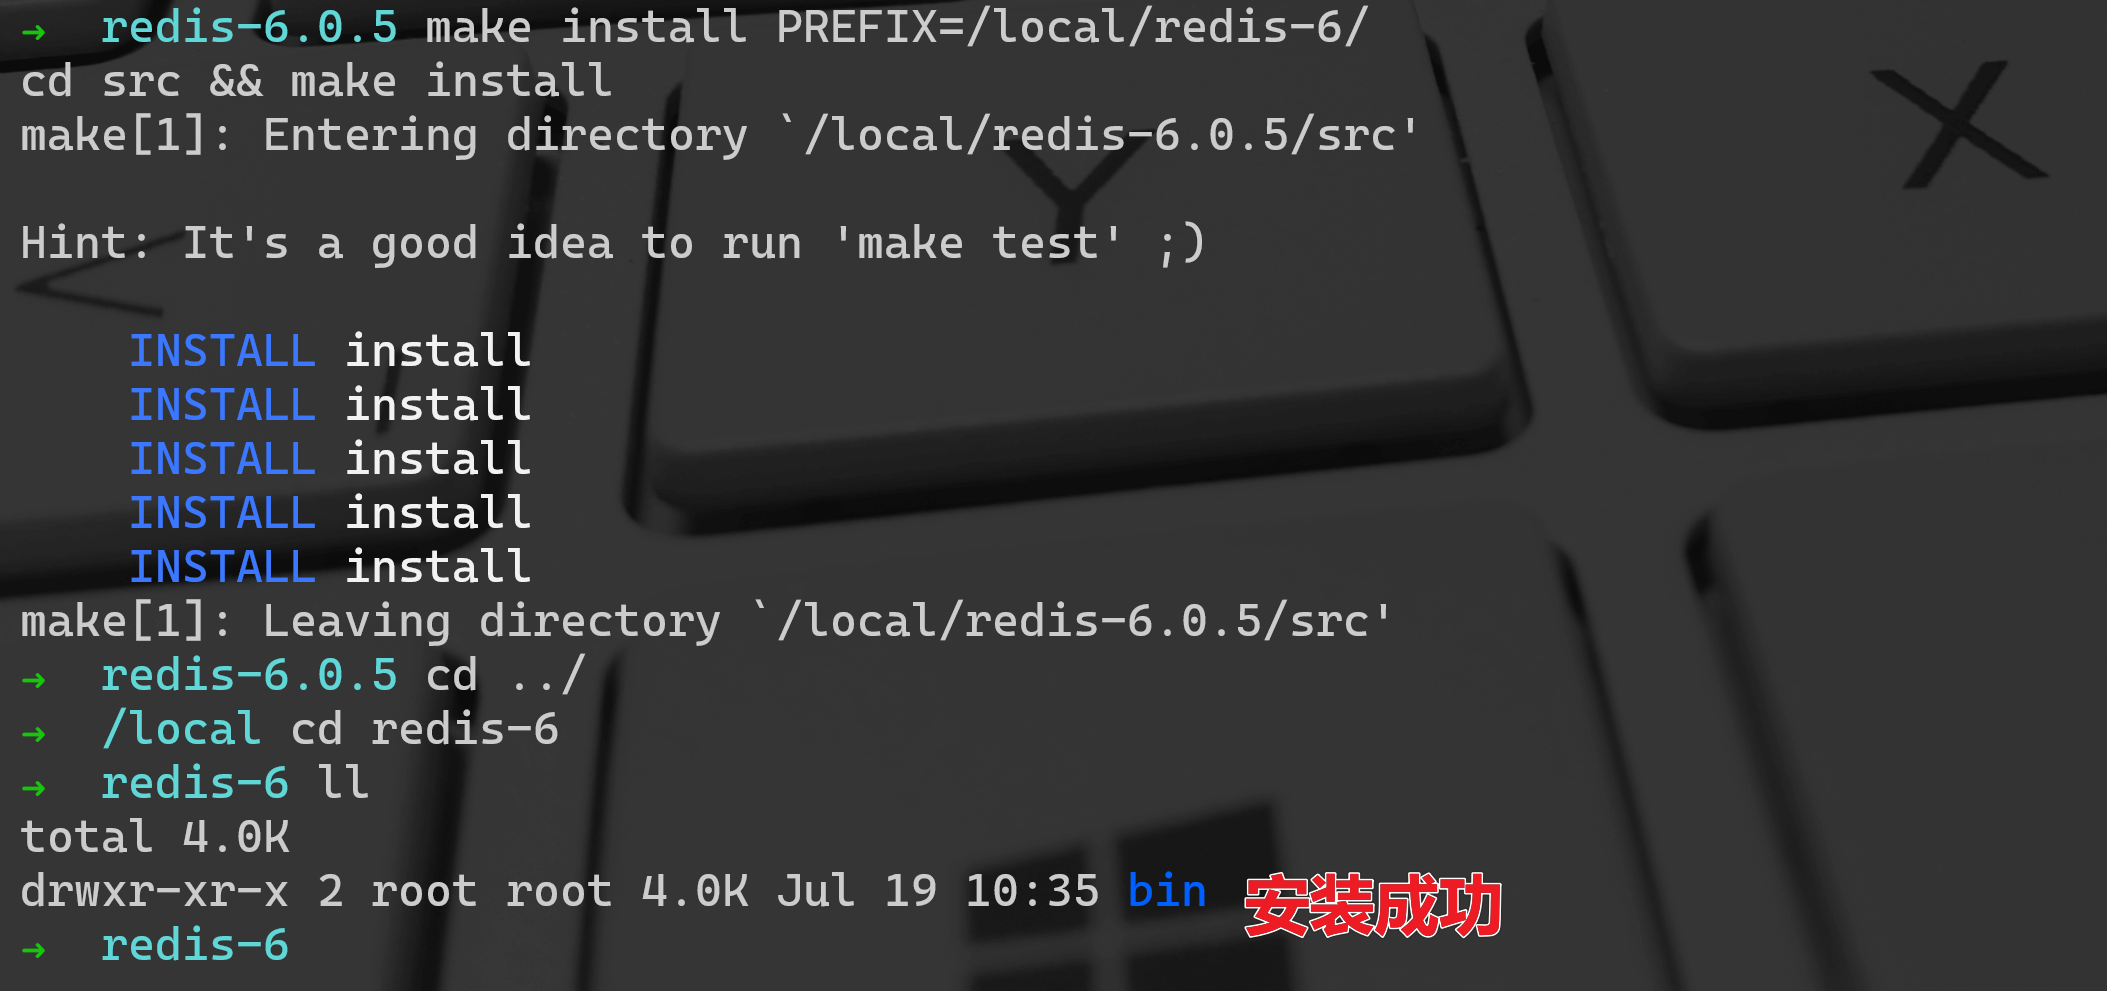
4、安装并指定安装目录
$ make install PREFIX=/local/redis-6/cd src && make installmake[1]: Entering directory `/local/redis-6.0.5/src'
5、启动Redis
A.前台启动-进入安装的bin目录下运行redis-server可执行文件
[root@iZuligp6e1dyzfZ bin]# ./redis-server14600:C 20 Jul 2020 09:35:45.287 # oO0OoO0OoO0Oo Redis is starting oO0OoO0OoO0Oo14600:C 20 Jul 2020 09:35:45.288 # Redis version=6.0.5, bits=64, commit=00000000, modified=0, pid=14600, just started14600:C 20 Jul 2020 09:35:45.288 # Warning: no config file specified, using the default config. In order to specify a config file use ./redis-server /path/to/redis.conf_.__.-``__ ''-.__.-`` `. `_. ''-._ Redis 6.0.5 (00000000/0) 64 bit.-`` .-```. ```\/ _.,_ ''-._( ' , .-` | `, ) Running in standalone mode|`-._`-...-` __...-.``-._|'` _.-'| Port: 6379| `-._ `._ / _.-' | PID: 14600`-._ `-._ `-./ _.-' _.-'|`-._`-._ `-.__.-' _.-'_.-'|| `-._`-._ _.-'_.-' | http://redis.io`-._ `-._`-.__.-'_.-' _.-'|`-._`-._ `-.__.-' _.-'_.-'|| `-._`-._ _.-'_.-' |`-._ `-._`-.__.-'_.-' _.-'`-._ `-.__.-' _.-'`-._ _.-'`-.__.-'14600:M 20 Jul 2020 09:35:45.289 # WARNING: The TCP backlog setting of 511 cannot be enforced because /proc/sys/net/core/somaxconn is set to the lower value of 128.14600:M 20 Jul 2020 09:35:45.289 # Server initialized14600:M 20 Jul 2020 09:35:45.289 # WARNING overcommit_memory is set to 0! Background save may fail under low memory condition. To fix this issue add 'vm.overcommit_memory = 1' to /etc/sysctl.conf and then reboot or run the command 'sysctl vm.overcommit_memory=1' for this to take effect.14600:M 20 Jul 2020 09:35:45.289 # WARNING you have Transparent Huge Pages (THP) support enabled in your kernel. This will create latency and memory usage issues with Redis. To fix this issue run the command 'echo never > /sys/kernel/mm/transparent_hugepage/enabled' as root, and add it to your /etc/rc.local in order to retain the setting after a reboot. Redis must be restarted after THP is disabled.14600:M 20 Jul 2020 09:35:45.289 * Ready to accept connections

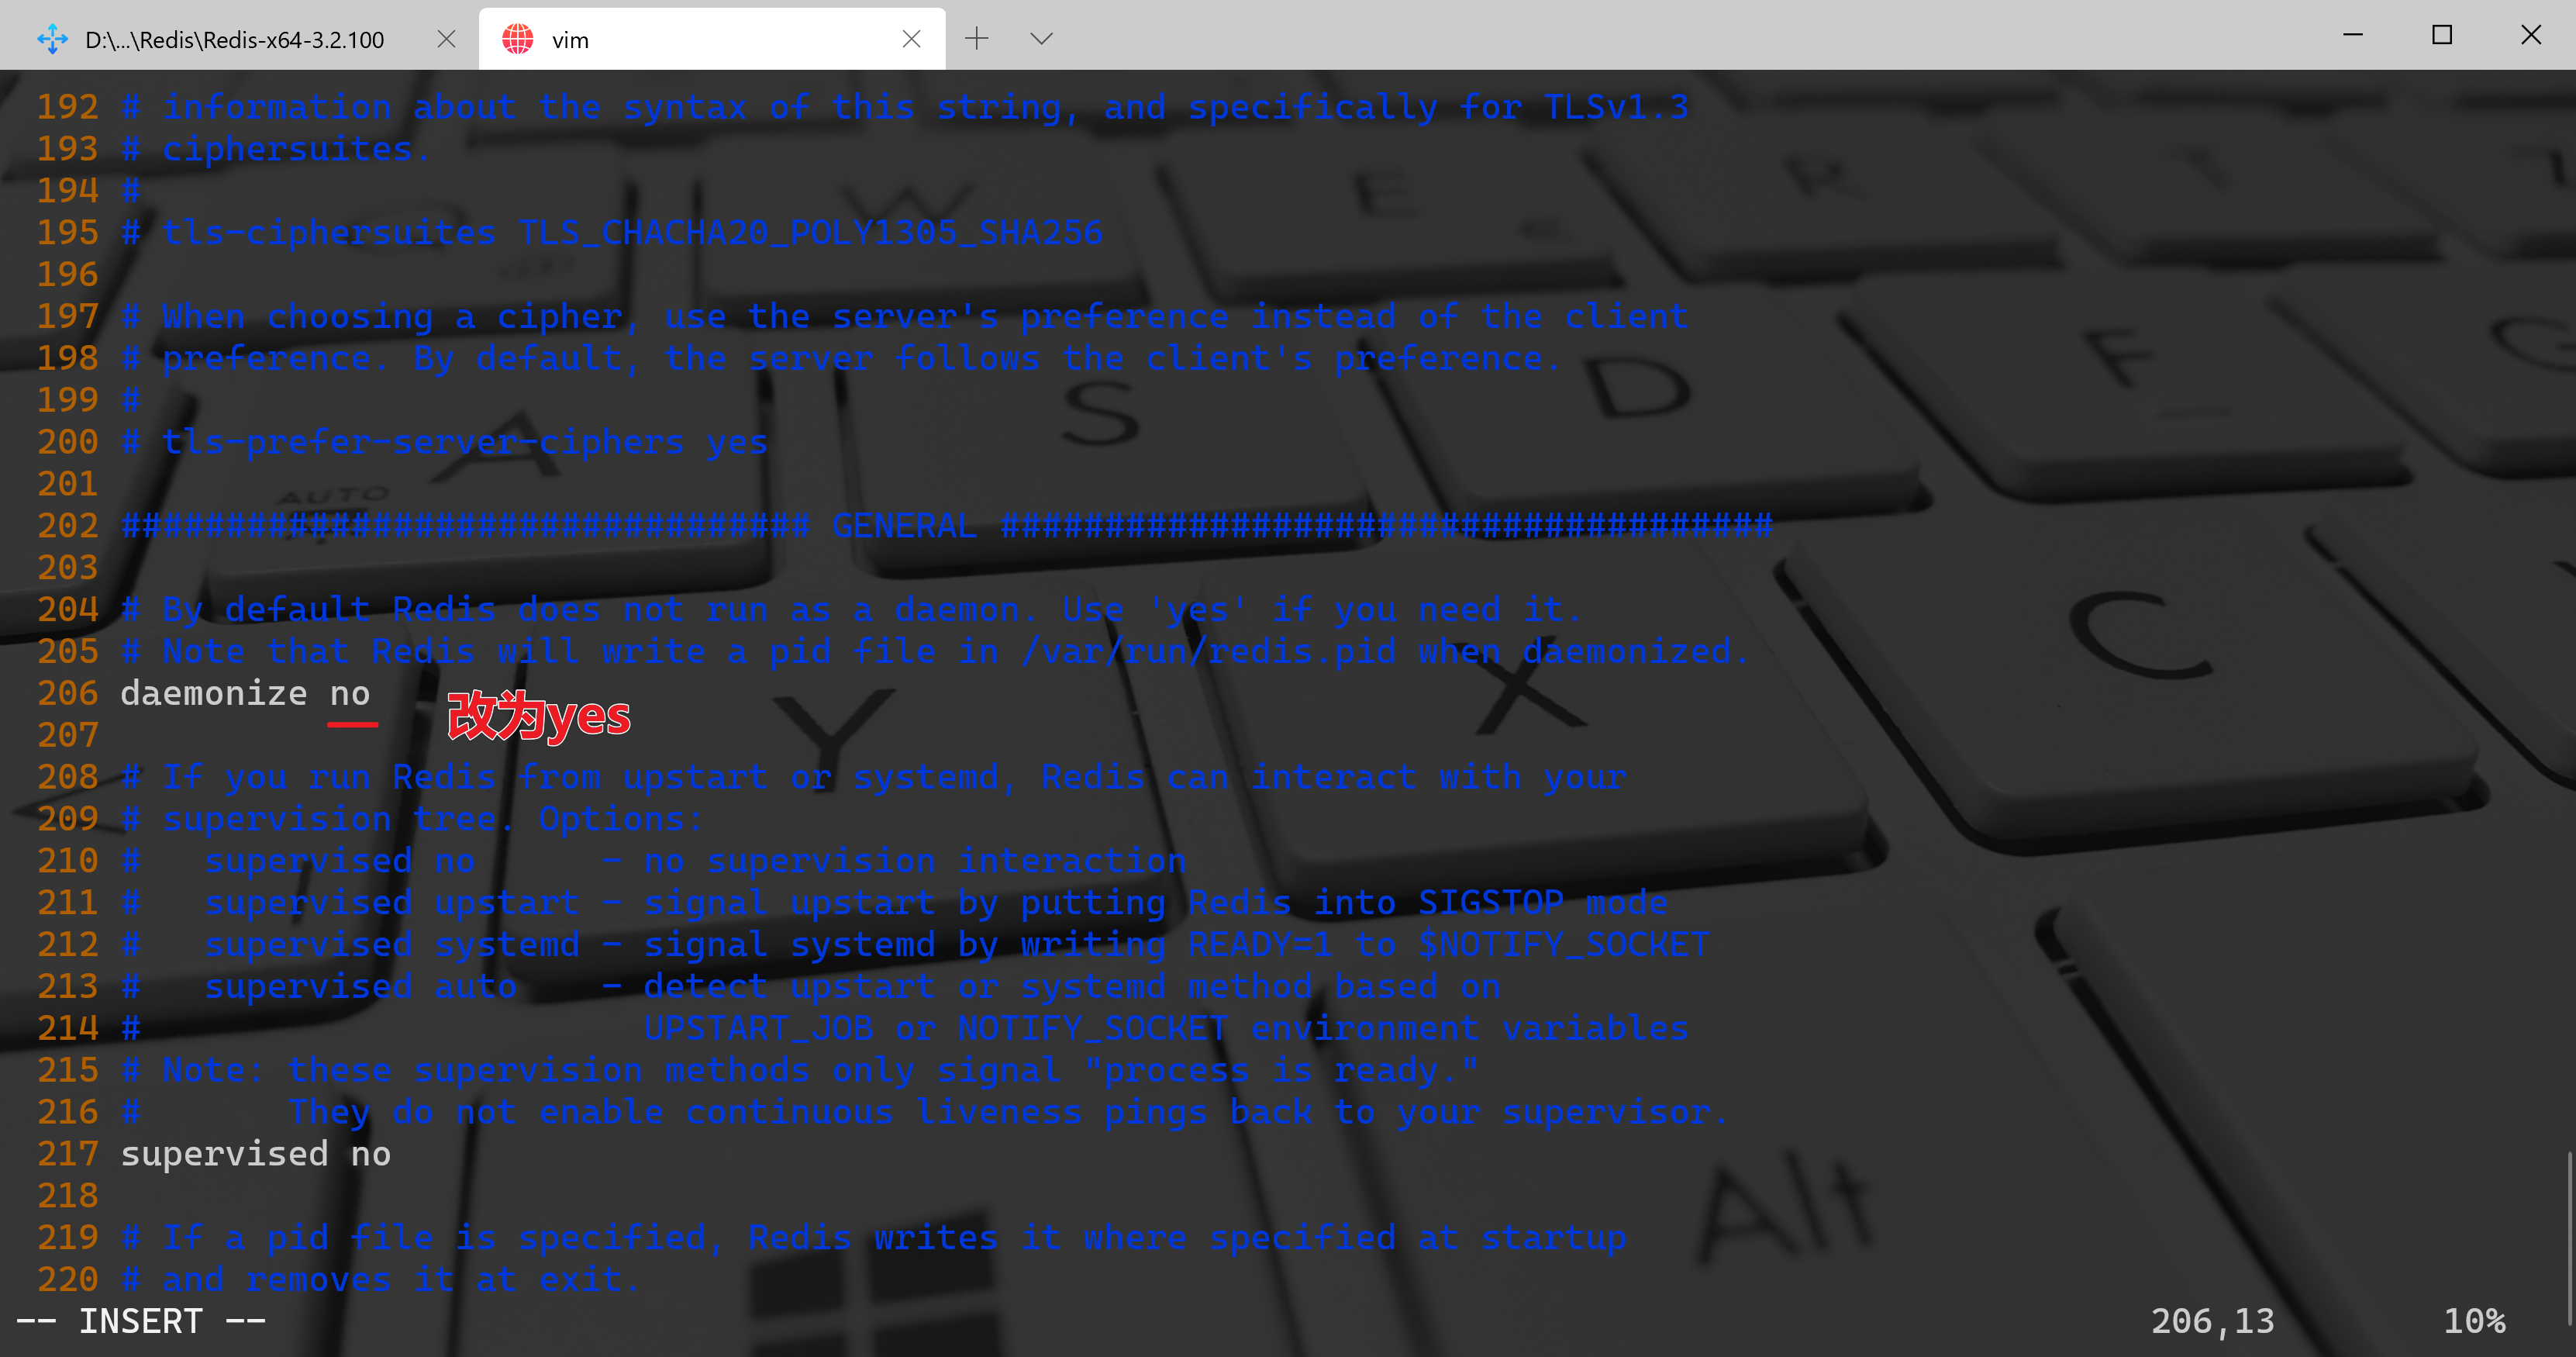
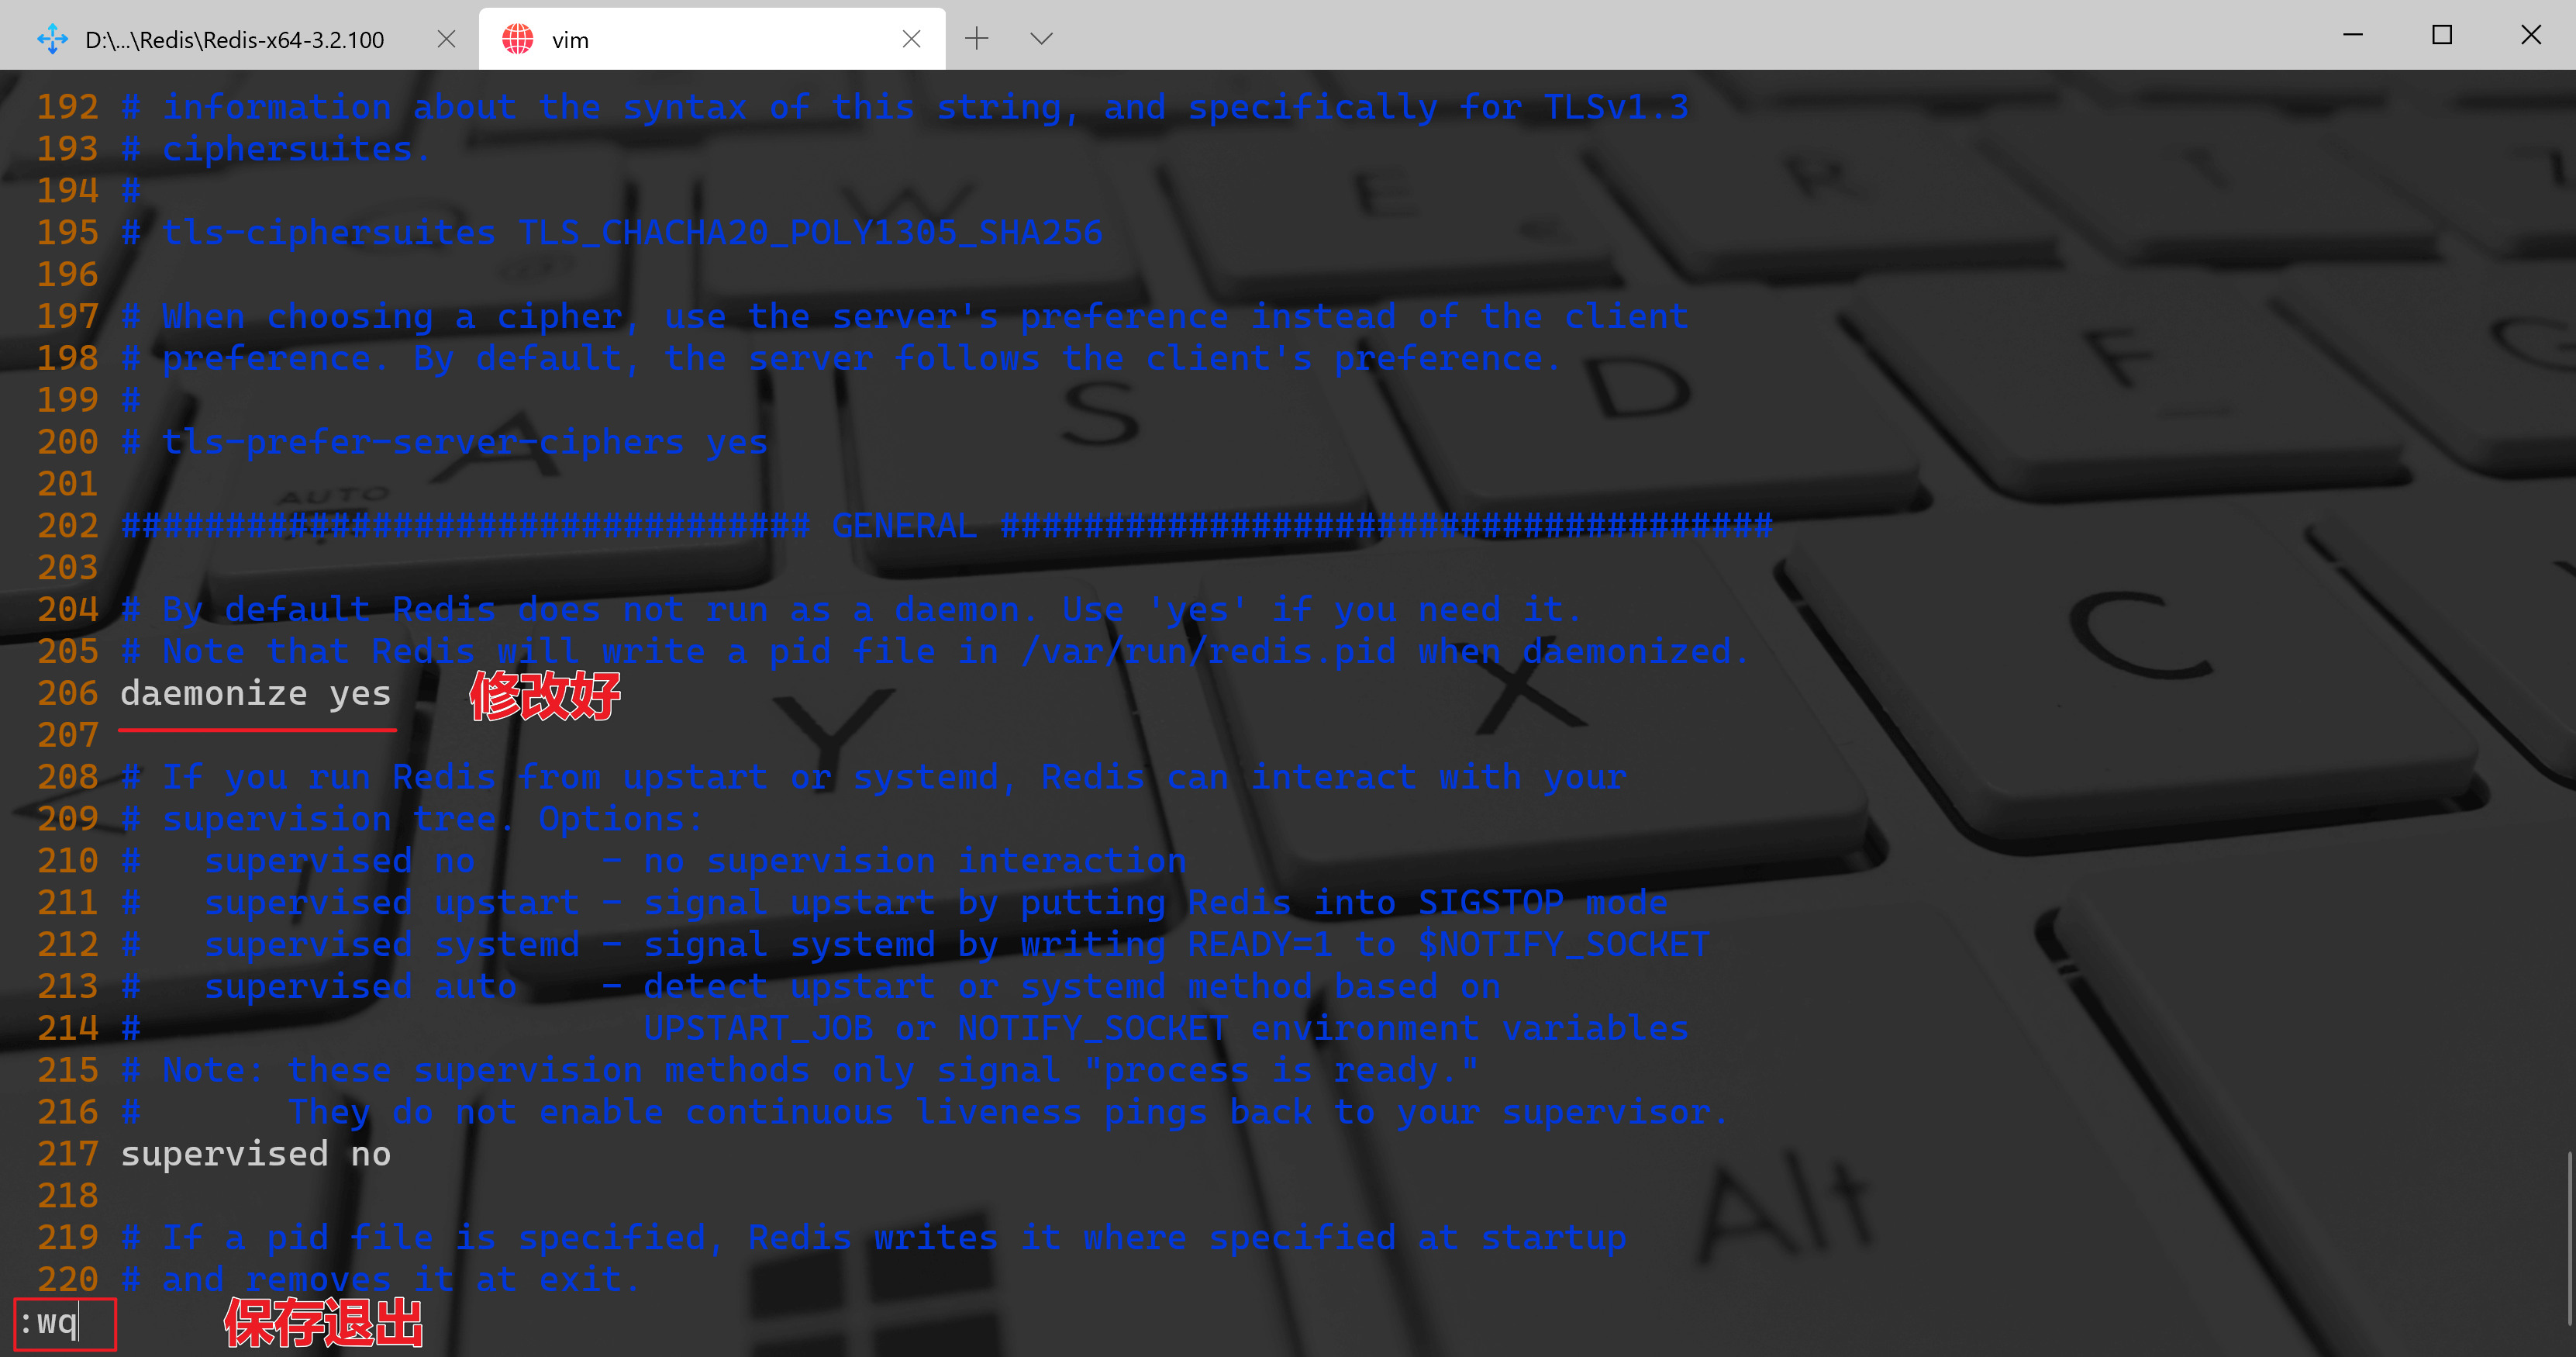
B.后台启动-从Redis源码复制配置文件redis.conf到bin目录下并修改配置文件
$ cp /local/redis-6.0.5/redis.conf /local/redis-6/bin$ vim redis.conf
[root@iZuligp6e1dyzfZ bin]# ./redis-server redis.conf16317:C 20 Jul 2020 14:16:39.063 # oO0OoO0OoO0Oo Redis is starting oO0OoO0OoO0Oo16317:C 20 Jul 2020 14:16:39.063 # Redis version=6.0.5, bits=64, commit=00000000, modified=0, pid=16317, just started16317:C 20 Jul 2020 14:16:39.063 # Configuration loaded[root@iZuligp6e1dyzfZ bin]# ./redis-cli127.0.0.1:6379> set fc 123OK127.0.0.1:6379> get fc"123"127.0.0.1:6379> exit[root@iZuligp6e1dyzfZ bin]#

6、设置开机启动
编辑redis.service文件
[root@iZuligp6e1dyzfZ bin]# pwd/local/redis-6/bin[root@iZuligp6e1dyzfZ bin]# vim /etc/systemd/system/redis.service[root@iZuligp6e1dyzfZ bin]#
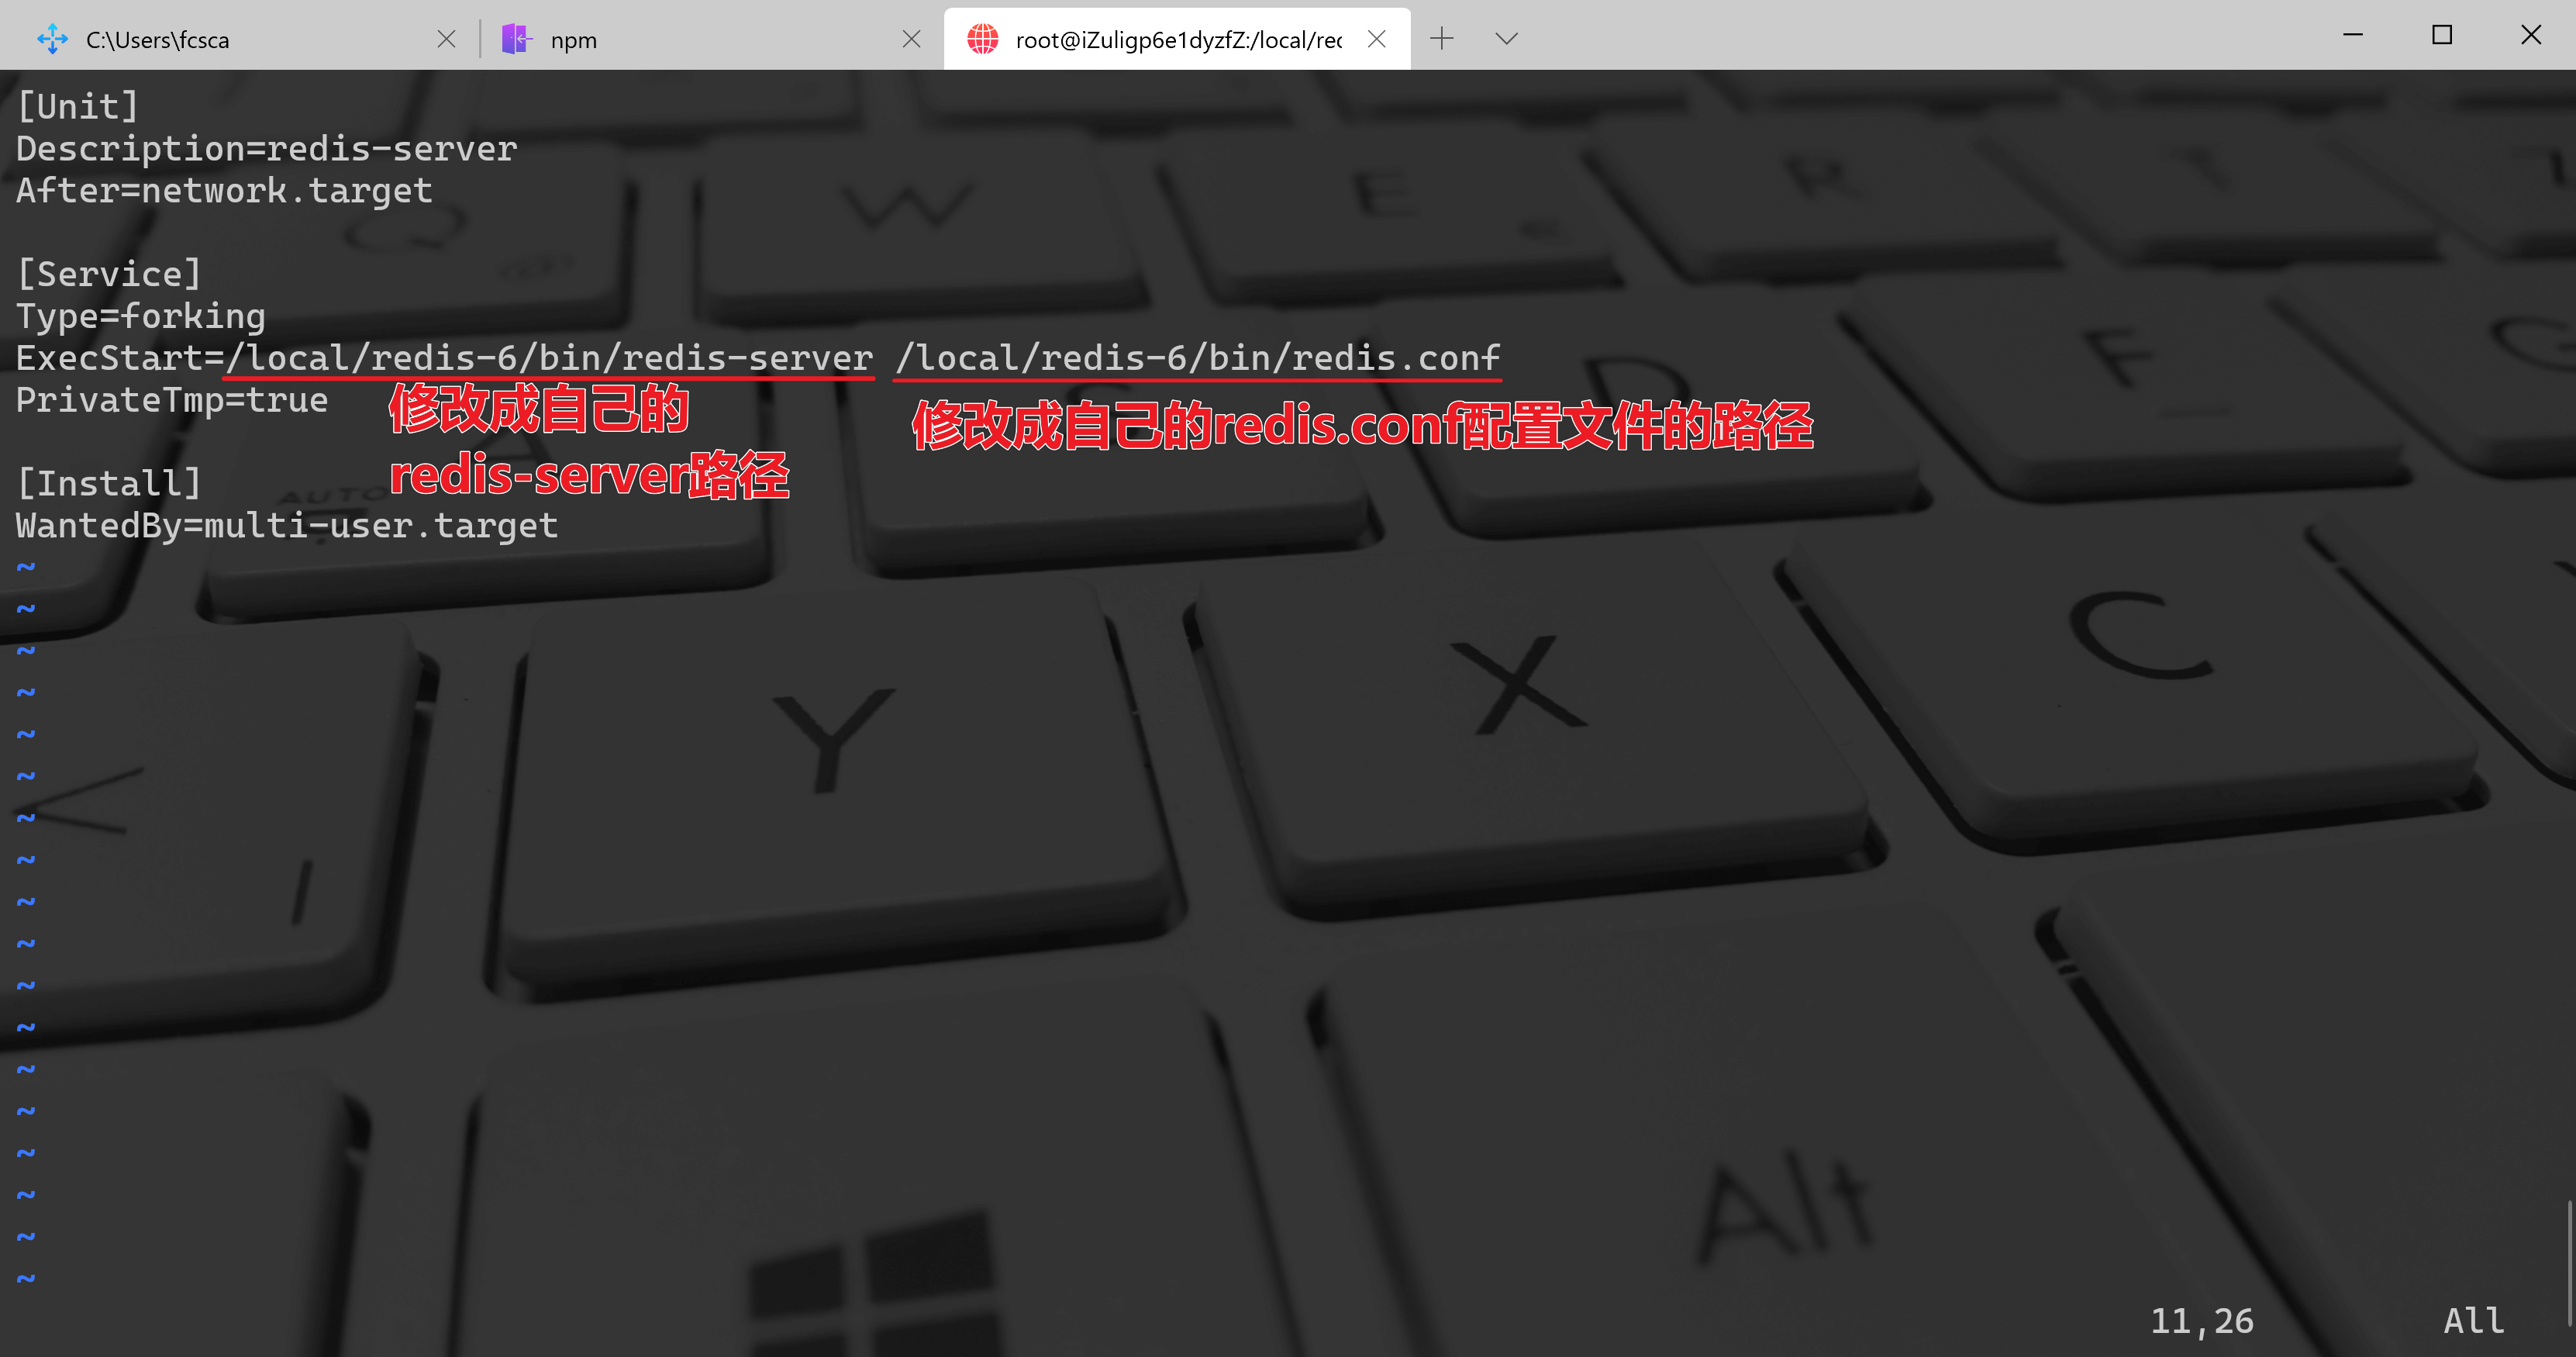
添加以下内容
[Unit]Description=redis-serverAfter=network.target[Service]Type=forkingExecStart=/local/redis-6/bin/redis-server /local/redis-6/bin/redis.confPrivateTmp=true[Install]WantedBy=multi-user.target
 :::danger
注意:ExecStart配置成自己安装的(install)目录
:::
设置开机启动
:::danger
注意:ExecStart配置成自己安装的(install)目录
:::
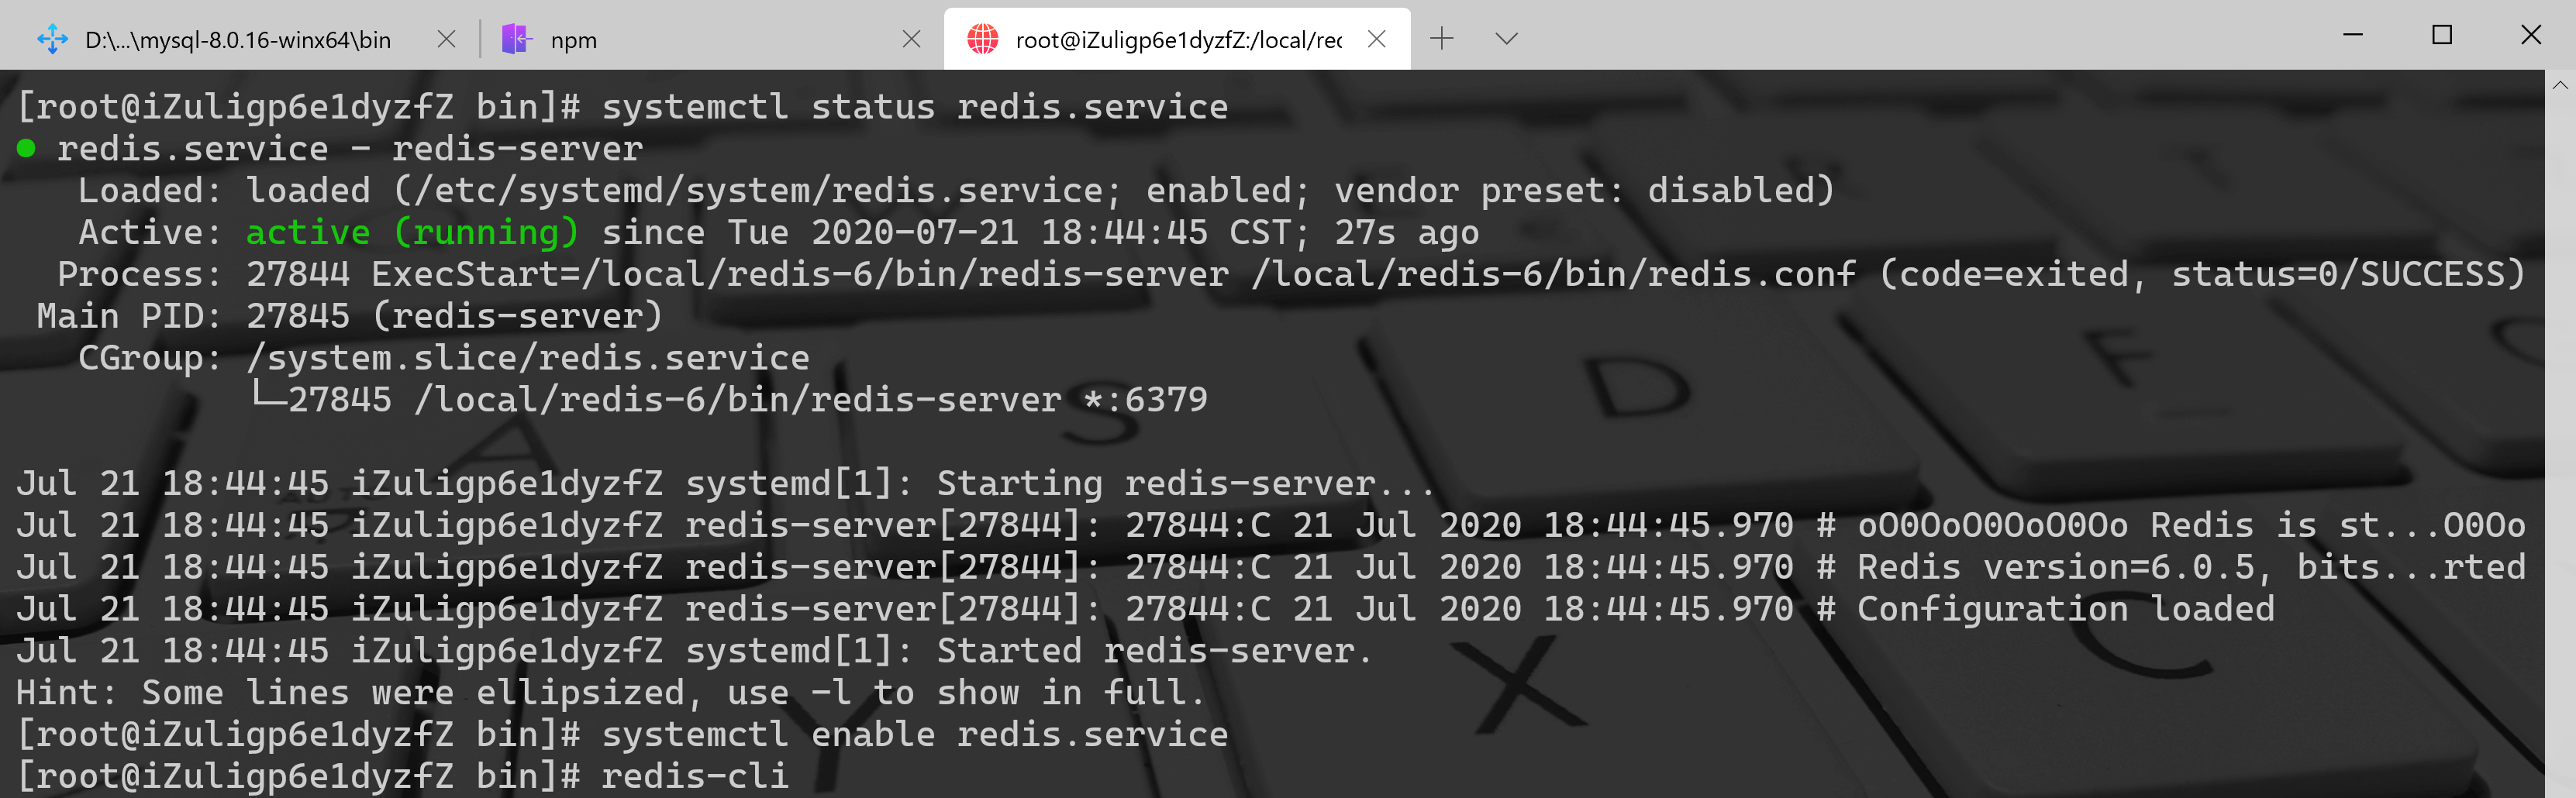
设置开机启动
$ systemctl daemon-reload$ systemctl start redis.service$ systemctl status redis.service● redis.service - redis-serverLoaded: loaded (/etc/systemd/system/redis.service; enabled; vendor preset: disabled)Active: active (running) since Tue 2020-07-21 18:44:45 CST; 27s agoProcess: 27844 ExecStart=/local/redis-6/bin/redis-server /local/redis-6/bin/redis.conf (code=exited, status=0/SUCCESS)Main PID: 27845 (redis-server)CGroup: /system.slice/redis.service└─27845 /local/redis-6/bin/redis-server *:6379Jul 21 18:44:45 iZuligp6e1dyzfZ systemd[1]: Starting redis-server...Jul 21 18:44:45 iZuligp6e1dyzfZ redis-server[27844]: 27844:C 21 Jul 2020 18:44:45.970 # oO0OoO0OoO0Oo Redis is st...O0OoJul 21 18:44:45 iZuligp6e1dyzfZ redis-server[27844]: 27844:C 21 Jul 2020 18:44:45.970 # Redis version=6.0.5, bits...rtedJul 21 18:44:45 iZuligp6e1dyzfZ redis-server[27844]: 27844:C 21 Jul 2020 18:44:45.970 # Configuration loadedJul 21 18:44:45 iZuligp6e1dyzfZ systemd[1]: Started redis-server.Hint: Some lines were ellipsized, use -l to show in full.$ systemctl enable redis.service$ ln -s /local/redis-6/bin/redis-cli /usr/bin/redis-cli$ redis-cli127.0.0.1:6379> get fc"123"127.0.0.1:6379> exit[root@iZuligp6e1dyzfZ bin]#
服务操作命令
systemctl start redis.service #启动redis服务systemctl stop redis.service #停止redis服务systemctl restart redis.service #重新启动服务systemctl status redis.service #查看服务当前状态systemctl enable redis.service #设置开机自启动systemctl disable redis.service #停止开机自启动
7、关闭Redis
A.不带密码的关闭
[root@iZuligp6e1dyzfZ bin]# redis-cli -p 6379 shutdownCould not connect to Redis at 127.0.0.1:6379: Connection refusednot connected>
A.带密码的关闭
[root@iZuligp6e1dyzfZ bin]# redis-cli -p 6379 -a [password] shutdownCould not connect to Redis at 127.0.0.1:6379: Connection refusednot connected>
8、查看Redis端口状态
[root@iZuligp6e1dyzfZ bin]# netstat -atpul | grep 6379tcp 0 0 0.0.0.0:6379 0.0.0.0:* LISTEN 27845/redis-servertcp6 0 0 [::]:6379 [::]:* LISTEN 27845/redis-server[root@iZuligp6e1dyzfZ bin]#

9、Redis部署在服务端-修改配置文件中的地址绑定和保护模式
1.注释掉地址bind部分,负责只能以特定IP访问
2.关闭守护模式,即将protected-mode的yes修改为no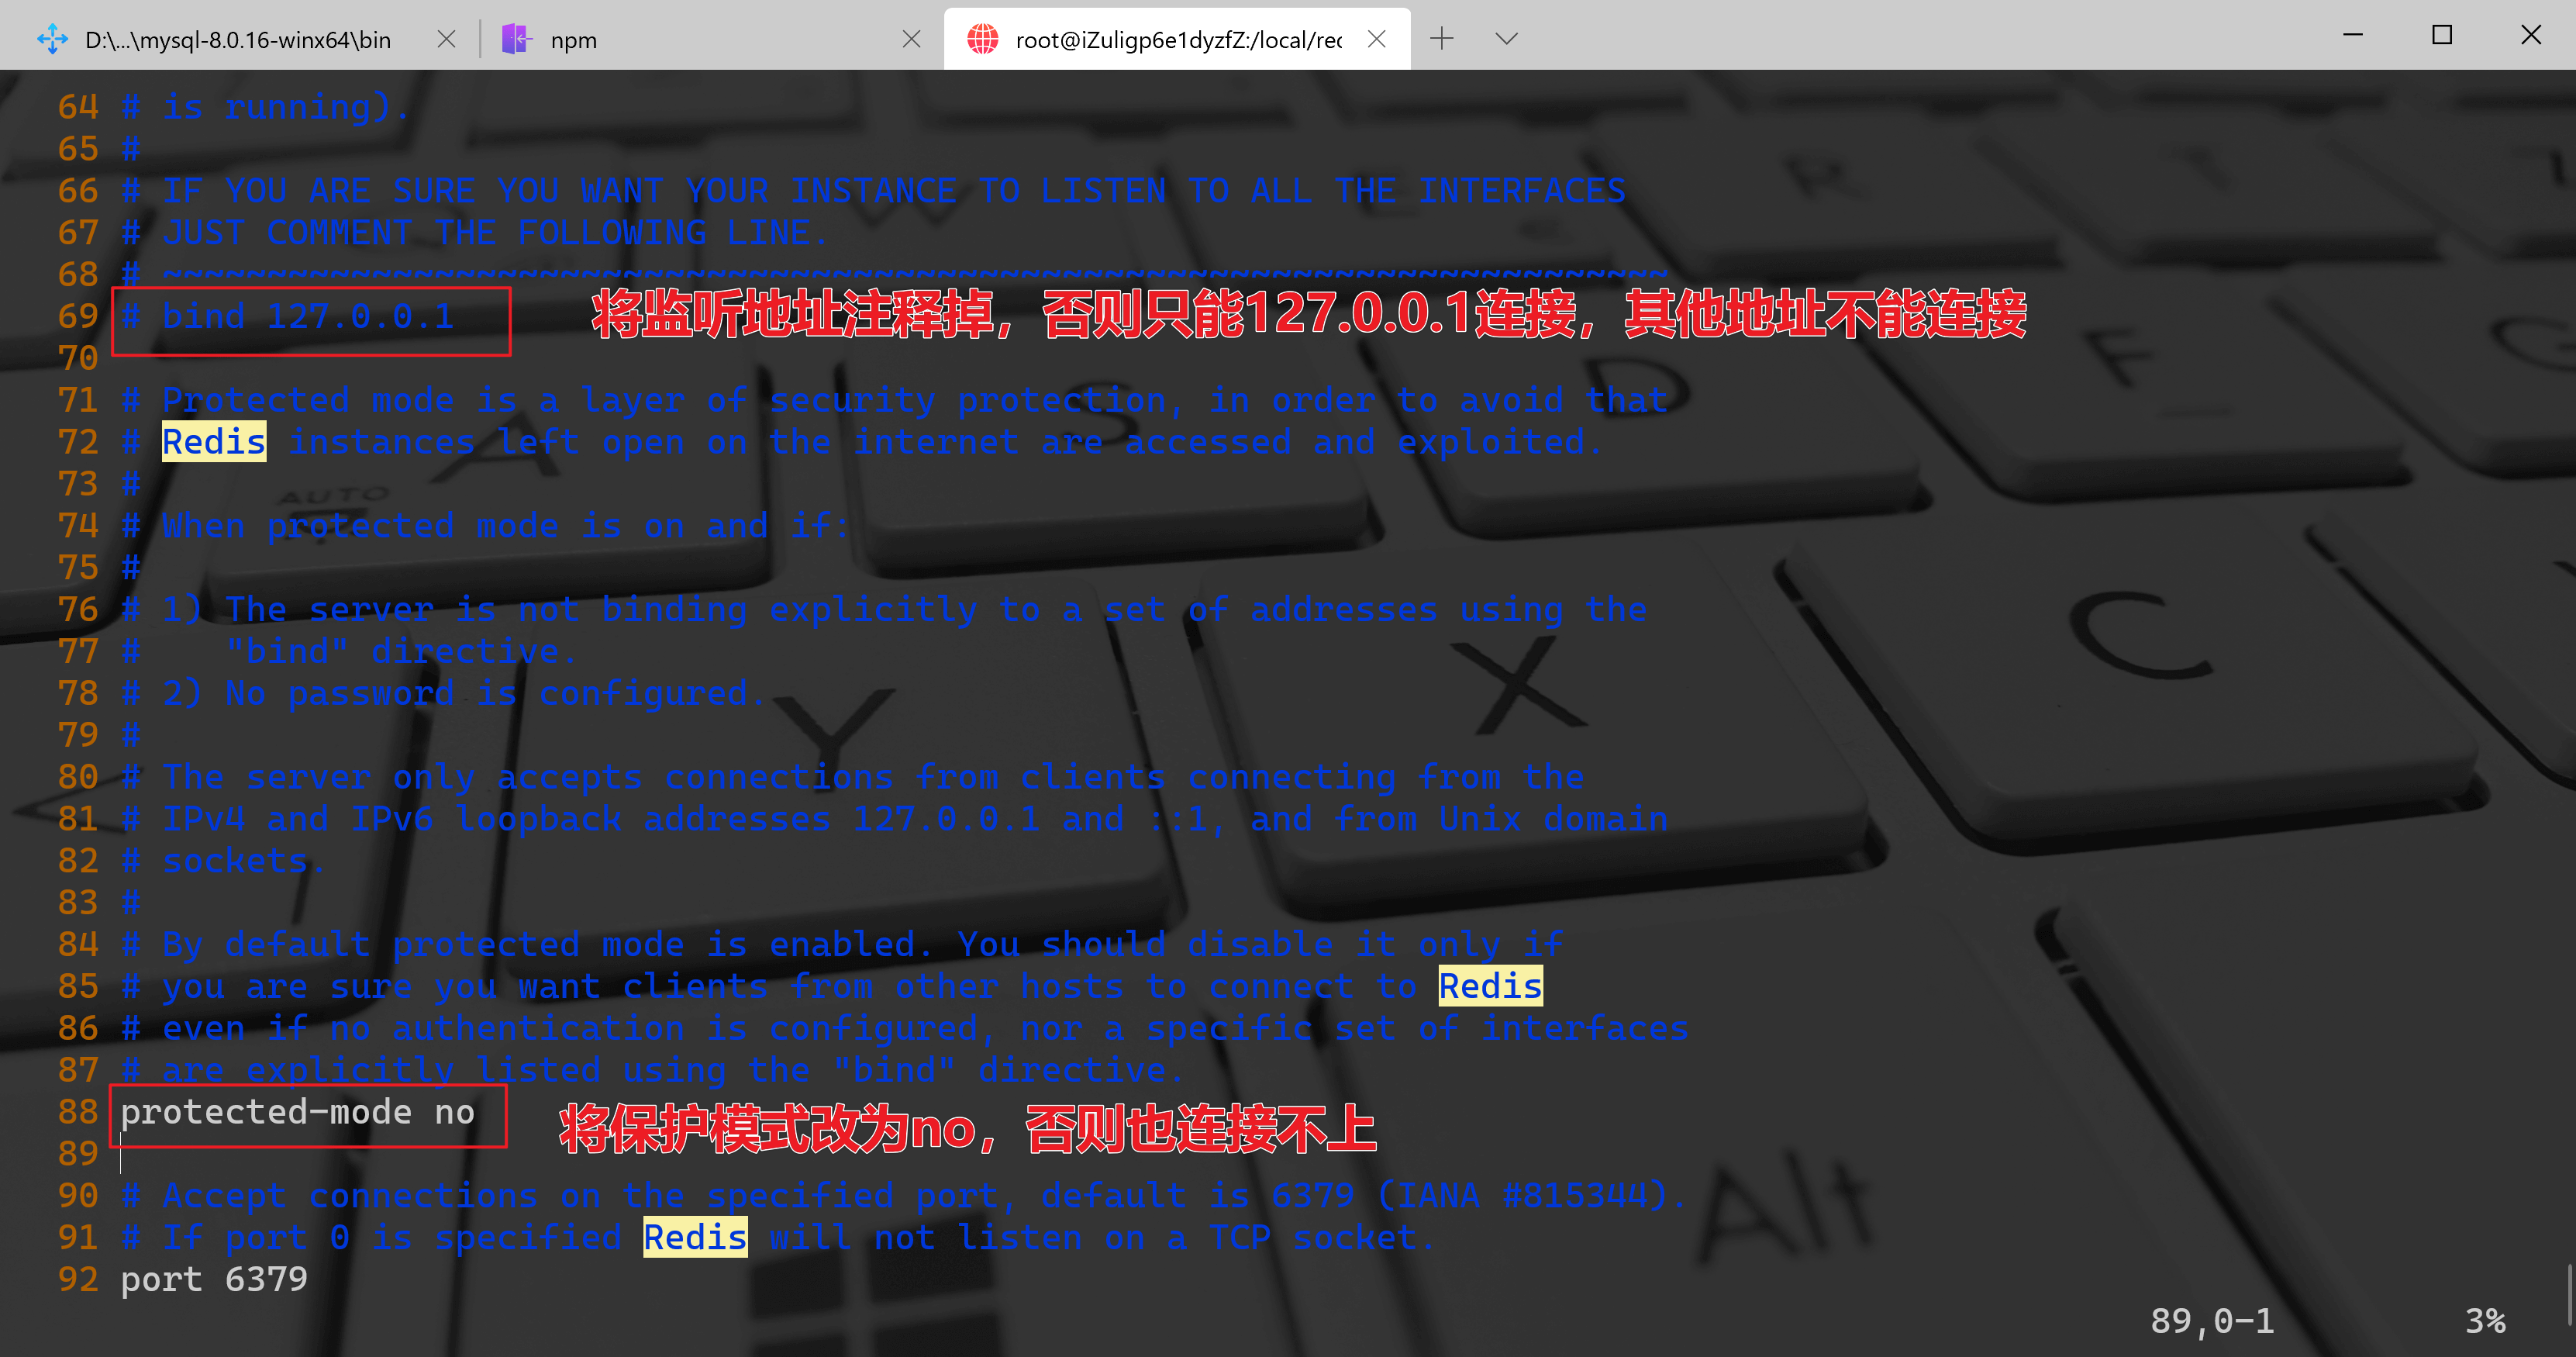

若有收获,就点个赞吧
0 人点赞
