Java HashMap
起初,存储数据最简单的数据结构是数组,数组的优点是查找速度快,缺点是删除速度特别慢。
接下来是链表数据结构,链表的优点是删除速度快,缺点是查找速度慢。
那么,有没有一种数据结构可以结合两者的优点呢?
答案是有的,这就是常说的哈希表。如下: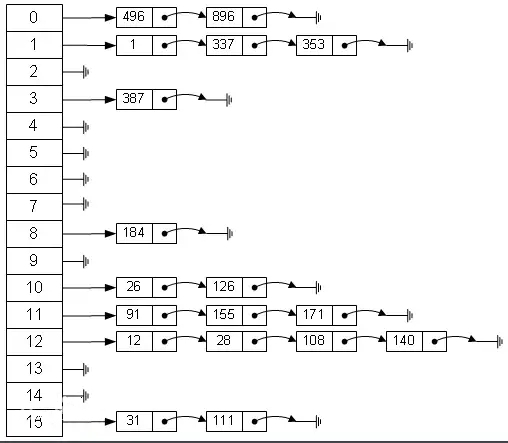
哈希表是由数组+链表组成的混合结构,在图中纵向的0~15表示一个数组,每个数组的下标都可以含有一个链表。
当使用put方法添加元素时,首先需计算出数组的索引,再将元素插入到当前数组索引对应链表的某个位置。实际上,往往插入元素的次数比较频繁,在索引为12的位置上插入过多的元素,每次都要从头遍历当前索引所对应链表,如果key相同,则替换掉原来的value值,否则直接在链表的末尾添加元素。像这种,重复的在某索引下插入元素叫做碰撞。很明显,如果碰撞次数太多,会大大的影响hashmap的性能。那么,怎么才能减少碰撞的次数呢?请继续往下看。
这里讲解HashMap的大方向主要有以下几点:
- 构造方法
- 插入元素
- 获取元素
- 遍历
(1)构造方法
【方法一】
在这个方法中,/*** Constructs an empty <tt>HashMap</tt> with the default initial capacity* (16) and the default load factor (0.75).*/public HashMap() {this.loadFactor = DEFAULT_LOAD_FACTOR; // all other fields defaulted}
DEFAULT_LOAD_FACTOR为负载系数,源码中的定义如下:
负载系数默认为0.75,这个参数和/*** The load factor used when none specified in constructor.*/static final float DEFAULT_LOAD_FACTOR = 0.75f;
HashMap的扩容有关。
另外,HashMap是有容量的,此时HashMap的默认容量是16,源码中的定义如下:/*** The default initial capacity - MUST be a power of two.*/static final int DEFAULT_INITIAL_CAPACITY = 1 << 4; // aka 16
【方法二】
这个构造方法容量可以自定义,至于负载系数采用默认值0.75。/*** Constructs an empty <tt>HashMap</tt> with the specified initial* capacity and the default load factor (0.75).** @param initialCapacity the initial capacity.* @throws IllegalArgumentException if the initial capacity is negative.*/public HashMap(int initialCapacity) {this(initialCapacity, DEFAULT_LOAD_FACTOR);}
【方法三】
这个方法可以任意指定HashMap的容量以及负载系数。容量的大小不能大于/*** Constructs an empty <tt>HashMap</tt> with the specified initial* capacity and load factor.** @param initialCapacity the initial capacity* @param loadFactor the load factor* @throws IllegalArgumentException if the initial capacity is negative* or the load factor is nonpositive*/public HashMap(int initialCapacity, float loadFactor) {if (initialCapacity < 0)throw new IllegalArgumentException("Illegal initial capacity: " +initialCapacity);if (initialCapacity > MAXIMUM_CAPACITY)initialCapacity = MAXIMUM_CAPACITY;if (loadFactor <= 0 || Float.isNaN(loadFactor))throw new IllegalArgumentException("Illegal load factor: " +loadFactor);this.loadFactor = loadFactor;this.threshold = tableSizeFor(initialCapacity);}
MAXIMUM_CAPACITY,有关MAXIMUM_CAPACITY源码中的定义代码是:
转成十进制是:/*** The maximum capacity, used if a higher value is implicitly specified* by either of the constructors with arguments.* MUST be a power of two <= 1<<30.*/static final int MAXIMUM_CAPACITY = 1 << 30;
另外,这个方法中的static final int MAXIMUM_CAPACITY = 1073741824;
tableSizeFor方法是计算当前容量的阈值,即最大容量,最大容量总是等于2的n次幂,假如HashMap的容量是9,那么数组的大小是16,2的4次幂。计算数组大小的源码如下:/*** Returns a power of two size for the given target capacity.*/static final int tableSizeFor(int cap) {int n = cap - 1;n |= n >>> 1;n |= n >>> 2;n |= n >>> 4;n |= n >>> 8;n |= n >>> 16;return (n < 0) ? 1 : (n >= MAXIMUM_CAPACITY) ? MAXIMUM_CAPACITY : n + 1;}
【方法四】
这个方法的形参就是HashMap集合,想都不用想,肯定会遍历旧集合,并一个一个添加到新的集合中。/*** Constructs a new <tt>HashMap</tt> with the same mappings as the* specified <tt>Map</tt>. The <tt>HashMap</tt> is created with* default load factor (0.75) and an initial capacity sufficient to* hold the mappings in the specified <tt>Map</tt>.** @param m the map whose mappings are to be placed in this map* @throws NullPointerException if the specified map is null*/public HashMap(Map<? extends K, ? extends V> m) {this.loadFactor = DEFAULT_LOAD_FACTOR;putMapEntries(m, false);}
putMapEntries方法的源码如下:
其中/*** Implements Map.putAll and Map constructor** @param m the map* @param evict false when initially constructing this map, else* true (relayed to method afterNodeInsertion).*/final void putMapEntries(Map<? extends K, ? extends V> m, boolean evict) {int s = m.size();if (s > 0) {if (table == null) { // pre-sizefloat ft = ((float)s / loadFactor) + 1.0F;int t = ((ft < (float)MAXIMUM_CAPACITY) ?(int)ft : MAXIMUM_CAPACITY);if (t > threshold)threshold = tableSizeFor(t);}else if (s > threshold)resize();for (Map.Entry<? extends K, ? extends V> e : m.entrySet()) {K key = e.getKey();V value = e.getValue();putVal(hash(key), key, value, false, evict);}}}
putVal方法就是插入元素。(2)插入元素
当需要添加元素时,代码实现如下:
那么,HashMap<String, String> hashMap = new HashMap<>();//添加一个元素hashMap.put("key", "value");
put方法的原理是什么呢?想要知道这个答案,必须研究下源码了。 ```java /**- Associates the specified value with the specified key in this map.
- If the map previously contained a mapping for the key, the old
- value is replaced. *
- @param key key with which the specified value is to be associated
- @param value value to be associated with the specified key
- @return the previous value associated with key, or
- null if there was no mapping for key.
- (A null return can also indicate that the map
- previously associated null with key.) */ public V put(K key, V value) { return putVal(hash(key), key, value, false, true); }
/**
- Implements Map.put and related methods *
- @param hash hash for key
- @param key the key
- @param value the value to put
- @param onlyIfAbsent if true, don’t change existing value
- @param evict if false, the table is in creation mode.
- @return previous value, or null if none
*/
final V putVal(int hash, K key, V value, boolean onlyIfAbsent,
Nodeboolean evict) {
if ((p = tab[i = (n - 1) & hash]) == null)n = (tab = resize()).length;
else {tab[i] = newNode(hash, key, value, null);
} ++modCount; if (++size > threshold)Node<K,V> e; K k;if (p.hash == hash &&((k = p.key) == key || (key != null && key.equals(k))))e = p;else if (p instanceof TreeNode)e = ((TreeNode<K,V>)p).putTreeVal(this, tab, hash, key, value);else {for (int binCount = 0; ; ++binCount) {if ((e = p.next) == null) {p.next = newNode(hash, key, value, null);if (binCount >= TREEIFY_THRESHOLD - 1) // -1 for 1sttreeifyBin(tab, hash);break;}if (e.hash == hash &&((k = e.key) == key || (key != null && key.equals(k))))break;p = e;}}if (e != null) { // existing mapping for keyV oldValue = e.value;if (!onlyIfAbsent || oldValue == null)e.value = value;afterNodeAccess(e);return oldValue;}
afterNodeInsertion(evict); return null; }resize();
在JDK1.8之前,重新计算<a name="kFBzD"></a>### 【第一步】 对Key求Hash值,然后再计算下标`putVal`的第一个参数是根据Key的`hashcode`计算一个新的`hashcode`,源码如下:```javastatic final int hash(Object key) {int h;return (key == null) ? 0 : (h = key.hashCode()) ^ (h >>> 16);}
hashcode源码是这样的
计算数组下标代码如下:final int hash(Object k) {int h = 0;if (useAltHashing) {if (k instanceof String) {return sun.misc.Hashing.stringHash32((String) k);}h = hashSeed;}//得到k的hashcode值h ^= k.hashCode();//进行计算h ^= (h >>> 20) ^ (h >>> 12);return h ^ (h >>> 7) ^ (h >>> 4);}
在JDK1.8之前的源码是:
在JDK1.8之后,计算数组下标的代码在static int indexFor(int h, int length) {return h & (length-1);}
putVal中,
n是数组的长度,tab[i = (n - 1) & hash]
hash的重新计算后的hashcode。
所以,计算数组下标的算法是:
该算法相当于index = hashcode & (length-1)
那么,问题来了,为什么不直接使用index = hashcode % length
key的hashcode?为什么JDK1.8前后会有差异?
原因只有一个:为了让Hash表更加散列,减少冲突(碰撞)次数。
如果hashcode没有重新计算,假设某对象的hashcode是3288498,那么对应的二进制是:1100100010110110110010
hashmap的长度默认为16,所以假设length = 16,hashcode & (length-1)的运算如下: ```java 1100100010110110110010 & 0000000000000000001111
0000000000000000000010
以上计算结果是十进制2,即数组下标为2。因此,发现的现象是:计算数组角标的计算,其实就是低位在计算,当前是在低4位上进行运算。<br />当数组长度为8时,在第3位计算出数组下标;<br />当数组长度为16时,在第4位计算出数组下标;<br />当数组长度为32时,在第5位计算出数组下标;<br />当数组长度为64时,在第6位计算出数组下标;<br />以此类推…:::info为了让`HashMap`的存储更加散列,即低n位更加散列,需要和高m位进行异或运算,最终得出新的`hashcode`。这就是要重新计算`hashcode`的原因。JDK1.8前后重新计算`hashcode`算法的差异是因为,JDK1.8的hash算法比JDK1.8之前的`hash`算法更能让`HashMap`的存储更加散列,避免存储空间的拥挤,减少碰撞的发生。:::<a name="bfeAs"></a>### 【第二步】 碰撞的处理Java中`HashMap`是利用“拉链法”处理`HashCode`的碰撞问题。在调用`HashMap`的`put`方法或`get`方法时,都会首先调用`hashcode`方法,去查找相关的key,当有冲突时,再调用`equals`方法。`hashMap`基于`hasing`原理,通过`put`和`get`方法存取对象。将键值对传递给`put`方法时,他调用键对象的`hashCode()`方法来计算`hashCode`,然后找到`bucket`(哈希桶)位置来存储对象。当获取对象时,通过键对象的`equals()`方法找到正确的键值对,然后返回值对象。`HashMap`使用链表来解决碰撞问题,当碰撞发生了,对象将会存储在链表的下一个节点中。hashMap在每个链表节点存储键值对对象。当两个不同的键却有相同的`hashCode`时,他们会存储在同一个`bucket`位置的链表中。<a name="t8Akz"></a>### 【第三步】 如果链表长度超过阀值( `TREEIFY THRESHOLD==8`),就把链表转成红黑树,链表长度低于6,就把红黑树转回链表```java/*** The bin count threshold for using a tree rather than list for a* bin. Bins are converted to trees when adding an element to a* bin with at least this many nodes. The value must be greater* than 2 and should be at least 8 to mesh with assumptions in* tree removal about conversion back to plain bins upon* shrinkage.*/static final int TREEIFY_THRESHOLD = 8;if (binCount >= TREEIFY_THRESHOLD - 1) // -1 for 1st//红黑树treeifyBin(tab, hash);
在JDK1.8之后,HashMap的存储引入了红黑树数据结构。
【第四步】 如果节点已经存在就替换旧值
代码如下:
if (p.hash == hash &&((k = p.key) == key || (key != null && key.equals(k))))e = p;
【第五步】 扩容
代码如下:
/*** Initializes or doubles table size. If null, allocates in* accord with initial capacity target held in field threshold.* Otherwise, because we are using power-of-two expansion, the* elements from each bin must either stay at same index, or move* with a power of two offset in the new table.** @return the table*/final Node<K,V>[] resize() {Node<K,V>[] oldTab = table;//当前容量int oldCap = (oldTab == null) ? 0 : oldTab.length;//阈值,最大容量int oldThr = threshold;//定义新容量和阈值int newCap, newThr = 0;if (oldCap > 0) {//如果当前容量>0if (oldCap >= MAXIMUM_CAPACITY) {threshold = Integer.MAX_VALUE;return oldTab;}else if ((newCap = oldCap << 1) < MAXIMUM_CAPACITY &&oldCap >= DEFAULT_INITIAL_CAPACITY)//计算新的阈值,在老阈值的基础上乘以2newThr = oldThr << 1; // double threshold}else if (oldThr > 0) // initial capacity was placed in thresholdnewCap = oldThr;else { // zero initial threshold signifies using defaultsnewCap = DEFAULT_INITIAL_CAPACITY;newThr = (int)(DEFAULT_LOAD_FACTOR * DEFAULT_INITIAL_CAPACITY);}if (newThr == 0) {float ft = (float)newCap * loadFactor;newThr = (newCap < MAXIMUM_CAPACITY && ft < (float)MAXIMUM_CAPACITY ?(int)ft : Integer.MAX_VALUE);}threshold = newThr;@SuppressWarnings({"rawtypes","unchecked"})//计算完容量和阈值之后,开始新建一个数组,扩容Node<K,V>[] newTab = (Node<K,V>[])new Node[newCap];table = newTab;if (oldTab != null) {//赋值操作for (int j = 0; j < oldCap; ++j) {Node<K,V> e;if ((e = oldTab[j]) != null) {oldTab[j] = null;if (e.next == null)newTab[e.hash & (newCap - 1)] = e;else if (e instanceof TreeNode)((TreeNode<K,V>)e).split(this, newTab, j, oldCap);else { // preserve orderNode<K,V> loHead = null, loTail = null;Node<K,V> hiHead = null, hiTail = null;Node<K,V> next;do {next = e.next;if ((e.hash & oldCap) == 0) {if (loTail == null)loHead = e;elseloTail.next = e;loTail = e;}else {if (hiTail == null)hiHead = e;elsehiTail.next = e;hiTail = e;}} while ((e = next) != null);if (loTail != null) {loTail.next = null;newTab[j] = loHead;}if (hiTail != null) {hiTail.next = null;newTab[j + oldCap] = hiHead;}}}}}return newTab;}
以上扩容相关代码是基于JDK1.8的,和JDK1.8之前存在差异。
(3)获取元素
/*** Returns the value to which the specified key is mapped,* or {@code null} if this map contains no mapping for the key.** <p>More formally, if this map contains a mapping from a key* {@code k} to a value {@code v} such that {@code (key==null ? k==null :* key.equals(k))}, then this method returns {@code v}; otherwise* it returns {@code null}. (There can be at most one such mapping.)** <p>A return value of {@code null} does not <i>necessarily</i>* indicate that the map contains no mapping for the key; it's also* possible that the map explicitly maps the key to {@code null}.* The {@link #containsKey containsKey} operation may be used to* distinguish these two cases.** @see #put(Object, Object)*/public V get(Object key) {Node<K,V> e;return (e = getNode(hash(key), key)) == null ? null : e.value;}/*** Implements Map.get and related methods** @param hash hash for key* @param key the key* @return the node, or null if none*/final Node<K,V> getNode(int hash, Object key) {Node<K,V>[] tab; Node<K,V> first, e; int n; K k;if ((tab = table) != null && (n = tab.length) > 0 &&(first = tab[(n - 1) & hash]) != null) {if (first.hash == hash && // always check first node((k = first.key) == key || (key != null && key.equals(k))))return first;if ((e = first.next) != null) {if (first instanceof TreeNode)return ((TreeNode<K,V>)first).getTreeNode(hash, key);do {if (e.hash == hash &&((k = e.key) == key || (key != null && key.equals(k))))return e;} while ((e = e.next) != null);}}return null;}
获取元素其实,没什么好讲的,但是需要知道的是,不管是插入元素还是获取元素,都是围绕节点(Node)来操作的。Node实现了Map.Entry<K,V>接口。
(4)遍历元素
【方法一】
如果只需要获取所有的key,最佳方案如下:
for (Integer key : map.keySet()) {//在for-each循环中遍历keysSystem.out.println(String.valueOf(key));}
【方法二】
如果只需要获取所有的value,最佳方案如下:
for (String value : map.values()) {//在for-each循环中遍历valueSystem.out.println(value);}
【方法三】
通过键找值遍历
for (Integer key : map.keySet()) {//在for-each循环中遍历keysString value = map.get(key);System.out.println(key+"========"+value);}
【方法四】
通过Map.entrySet遍历key和value
for (Map.Entry<Integer, String> entry : map.entrySet()) {System.out.println("key= " + entry.getKey() + " and value= " + entry.getValue());}
【方法五】
使用Iterator遍历
Iterator<Map.Entry<Integer, String>> iterator = map.entrySet().iterator();while (iterator.hasNext()) {Map.Entry<Integer, String> entry = iterator.next();System.out.println("key= " + entry.getKey() + " and value= " + entry.getValue());}
缺点:代码比起前面几个方法并不简洁。
优点:当遍历的时候,如果涉及到删除操作,建议使用Iterator的remove方法,因为如果使用foreach的话会报错。

若有收获,就点个赞吧
0 人点赞
