一、SpringBoot的starter简介
1.1 什么是starter(场景启动器)
在SpringBoot出现之前,如果使用SpringMVC来构建web项目,必须要做的几件事情如下:
- 首先项目中需要引入SpringMVC的依赖
- 在web.xml中注册SpringMVC的DispatcherServlet,并配置url映射
- 编写springmcv-servlet.xml,在其中配置SpringMVC中几个重要的组件,处理映射器(HandlerMapping)、处理适配器(HandlerAdapter)、视图解析器(ViewResolver)
- 在applicationcontext.xml文件中引入springmvc-servlet.xml文件
- …
以上这几步只是配置好了SpringMVC,如果还需要与数据库进行交互,就要在application.xml中配置数据库连接池DataSource,如果需要数据库事务,还需要配置TransactionManager…
这就是使用Spring框架开发项目带来的一些的问题:
- 依赖导入问题: 每个项目都需要来单独维护自己所依赖的jar包,在项目中使用到什么功能就需要引入什么样的依赖。手动导入依赖容易出错,且无法统一集中管理
- 配置繁琐: 在引入依赖之后需要做繁杂的配置,并且这些配置是每个项目来说都是必要的,例如web.xml配置(Listener配置、Filter配置、Servlet配置)、log4j配置、数据库连接池配置等等。这些配置重复且繁杂,在不同的项目中需要进行多次重复开发,这在很大程度上降低了开发效率
而在SpringBoot出现之后,它提供了一个强大的功能来解决上述的两个痛点,这就是SpringBoot的starters(场景启动器)。
Spring Boot通过将常用的功能场景抽取出来,做成的一系列场景启动器,这些启动器导入了实现各个功能所需要依赖的全部组件,只需要在项目中引入这些starters,相关场景的所有依赖就会全部被导入进来,并且可以抛弃繁杂的配置,仅需要通过配置文件来进行少量的配置就可以使用相应的功能。
二、SpringBoot场景启动器的原理
在导入的starter之后,SpringBoot主要完成了两件事情:
- 相关组件的自动导入
- 相关组件的自动配置
2.1 自动配置原理
2.1.1 自动配置类的获取与注入
从主程序入口来探索一下整个过程的原理:
@SpringBootApplication //标注这个类是一个springboot的应用public class CommunityApplication {public static void main(String[] args) {//将springboot应用启动SpringApplication.run(CommunityApplication.class, args);}}
@SpringBootApplication注解内部结构如下图所示: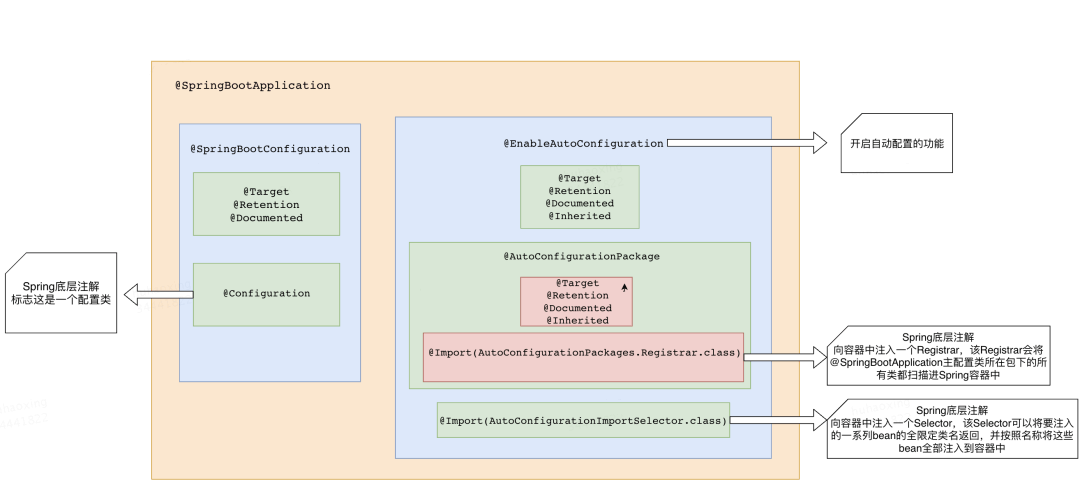
AutoConfigurationImportSelector:重点看该类中重写的selectImports方法,看下它返回的字符串数组是如何得来的: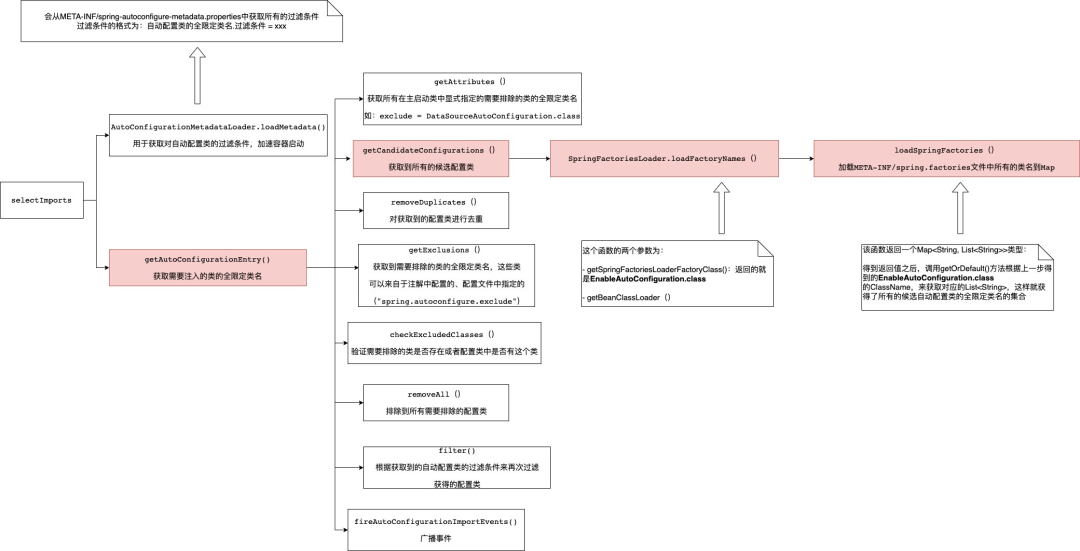
可以去到上边提到的spring.factories文件中去看一下,找到spring官方提供的spring-boot-autoconfigure包,在其下去找一下该文件:
可以看到这个就是SpringBoot官方提供的所有自动配置类的候选列表。可以在其中找到一个比较熟悉的自动配置类去看一下它内部的实现:
可以看到这些一个个的都是JavaConfig配置类,而且都通过@Bean注解向容器中注入了一些Bean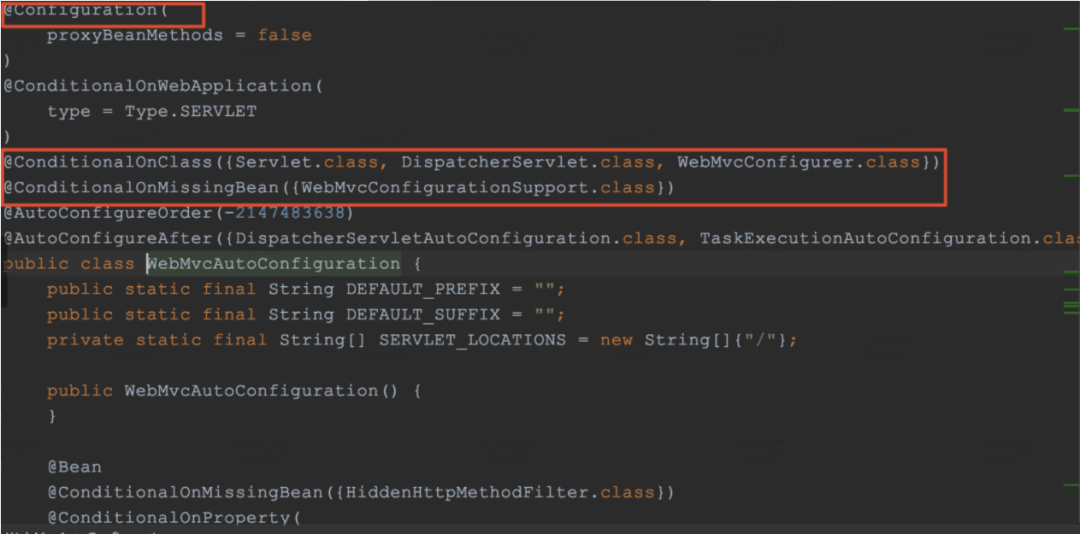
结论:
- SpringBoot在启动的时候从类路径下的META-INF/spring.factories中获取
EnableAutoConfiguration指定的所有自动配置类的全限定类名 - 将这些自动配置类导入容器,自动配置类就生效,进行自动配置工作;
- 整个J2EE的整体解决方案和自动配置都在spring-boot-autoconfigure的jar包中;
- 它会给容器中导入非常多的自动配置类 (xxxAutoConfiguration), 就是给容器中导入这个场景需要的所有组件,并配置好这些组件 ;
-
2.1.2 自动配置的过程
自动配置类被注入到容器当中后,会进行组件的自动配置和自动注入的工作,以
HttpEncodingAutoConfiguration(Http编码自动配置)为例解释这个过程:
首先看下SpringBoot中配置文件与POJO类之间映射的方法,这是进行自动配置的基础。
配置集中化管理:SpringBoot中所有可配置项都集中在一个文件中(application.yml),这个文件中的配置通过@ConfigurationProperties注解来与程序内部定义的POJO类来产生关联,这些POJO类统一命名为xxxProperties,并且这些xxxProperties类中各个属性字段都有自己的默认值,这也是SpringBoot约定大于配置理念的体现,尽可能减少用户做选择的次数,但同时又不失灵活性。只要需要,配置文件中的配置随时可以覆盖默认值。
之后,通过配合@EnableConfigurationProperties注解,就可以自动将与配置文件绑定好的这个类注入到容器中供使用。
自动配置类的工作流程: 根据限定的条件向容器中注入组件
- 使用xxxProperties对注入的组件的相关属性进行配置 ```java //表示这是一个配置类,和以前编写的配置文件一样,也可以给容器中添加组件; @Configuration
//将与配置文件绑定好的某个类注入到容器中,使其生效 //进入这个HttpProperties查看,将配置文件中对应的值和HttpProperties绑定起来; //并把HttpProperties加入到ioc容器中 @EnableConfigurationProperties(HttpProperties.class)
//Spring底层@Conditional注解 //根据不同的条件判断,如果满足指定的条件,整个配置类里面的配置就会生效; //这里的意思就是判断当前应用是否是web应用,如果是,当前配置类生效 @ConditionalOnWebApplication(type = ConditionalOnWebApplication.Type.SERVLET)
//判断系统中有没有CharacterEncodingFilter这个类,如果有配置类才生效 @ConditionalOnClass(CharacterEncodingFilter.class)
//判断配置文件中是否存在某个配置:spring.http.encoding.enabled; //matchIfMissing = true表明即使我们配置文件中不配置pring.http.encoding.enabled=true,该配置类也是默认生效的; @ConditionalOnProperty(prefix = “spring.http.encoding”, value = “enabled”, matchIfMissing = true) public class HttpEncodingAutoConfiguration {
//该类已经与配置文件绑定了private final HttpProperties.Encoding properties;//构建该自动配置类时将与配置文件绑定的配置类作为入参传递进去public HttpEncodingAutoConfiguration(HttpProperties properties) {this.properties = properties.getEncoding();}@Bean@ConditionalOnMissingBeanpublic CharacterEncodingFilter characterEncodingFilter() {CharacterEncodingFilter filter = new OrderedCharacterEncodingFilter();filter.setEncoding(this.properties.getCharset().name()); //注入bean时使用配置类中属性的值进行初始化,相当于将配置文件中的值映射到了组件的某些属性上filter.setForceRequestEncoding(this.properties.shouldForce(Type.REQUEST));filter.setForceResponseEncoding(this.properties.shouldForce(Type.RESPONSE));return filter; //注入配置好的bean}
}
一句话总结下自动配置类的工作过程 :- 首先容器会根据当前不同的条件判断,决定这个配置类是否生效!- 一但这个配置类生效;这个配置类就会给容器中添加相应组件;- 这些组件的属性是从对应的properties类中获取的,这些类里面的每一个属性又是和配置文件绑定的;- 所有在配置文件中能配置的属性都是在xxxxProperties类中封装着,配置文件可以配置什么内容,可以参照该前缀对应的属性类中的属性字段```java//从配置文件中获取指定的值和bean的属性进行绑定@ConfigurationProperties(prefix = "spring.http")public class HttpProperties {// .....}
2.2 SpringBoot自动配置使用总结
- SpringBoot启动会加载大量的自动配置类
- 首先可以看需要的功能有没有在SpringBoot默认写好的自动配置类当中;
- 再来看这个自动配置类中到底配置了哪些组件;(只要要用的组件存在在其中,就不需要再手动配置了)
- 给容器中自动配置类添加组件的时候,会从properties类中获取某些属性。只需要在配置文件中指定这些属性的值即可;
xxxxAutoConfigurartion:自动配置类;给容器中添加组件xxxxProperties:封装配置文件中相关属性;
了解完自动装配的原理后,来关注一个细节问题,自动配置类必须在一定的条件下才能生效;@Conditional派生注解(Spring注解版原生的@Conditional作用)
作用:必须是@Conditional指定的条件成立,才给容器中添加组件,配置里面的所有内容才生效;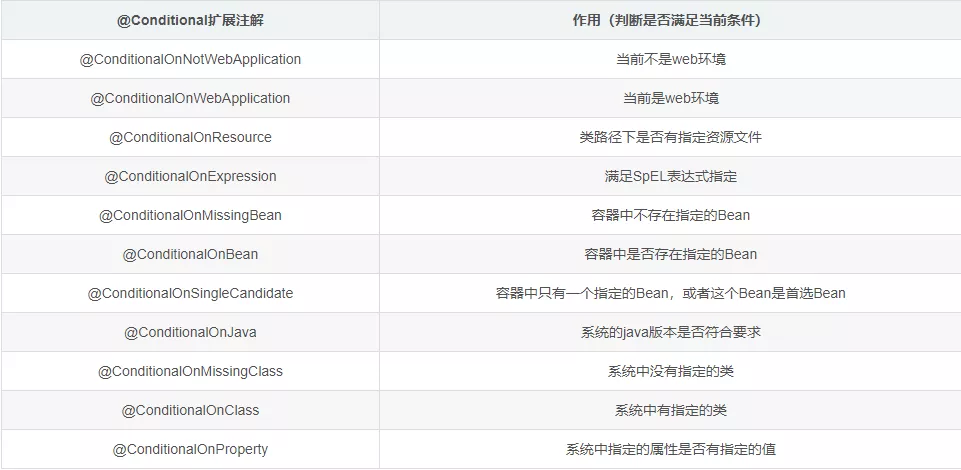
那么多的自动配置类,必须在一定的条件下才能生效;也就是说,加载了这么多的配置类,但不是所有的都生效了。
怎么知道哪些自动配置类生效?
可以通过启用 debug=true属性;来让控制台打印自动配置报告,这样就可以很方便的知道哪些自动配置类生效;
#在配置文件中开启springboot的调试类debug=true
Positive matches:(自动配置类启用的:正匹配)
Positive matches:-----------------AopAutoConfiguration matched:- @ConditionalOnClass found required classes 'org.springframework.context.annotation.EnableAspectJAutoProxy', 'org.aspectj.lang.annotation.Aspect', 'org.aspectj.lang.reflect.Advice', 'org.aspectj.weaver.AnnotatedElement' (OnClassCondition)- @ConditionalOnProperty (spring.aop.auto=true) matched (OnPropertyCondition)AopAutoConfiguration.CglibAutoProxyConfiguration matched:- @ConditionalOnProperty (spring.aop.proxy-target-class=true) matched (OnPropertyCondition)AuditAutoConfiguration#auditListener matched:- @ConditionalOnMissingBean (types: org.springframework.boot.actuate.audit.listener.AbstractAuditListener; SearchStrategy: all) did not find any beans (OnBeanCondition)AuditAutoConfiguration#authenticationAuditListener matched:- @ConditionalOnClass found required class 'org.springframework.security.authentication.event.AbstractAuthenticationEvent' (OnClassCondition)- @ConditionalOnMissingBean (types: org.springframework.boot.actuate.security.AbstractAuthenticationAuditListener; SearchStrategy: all) did not find any beans (OnBeanCondition)
Negative matches:(没有启动,没有匹配成功的自动配置类:负匹配)
Negative matches:-----------------ActiveMQAutoConfiguration:Did not match:- @ConditionalOnClass did not find required class 'javax.jms.ConnectionFactory' (OnClassCondition)AopAutoConfiguration.JdkDynamicAutoProxyConfiguration:Did not match:- @ConditionalOnProperty (spring.aop.proxy-target-class=false) did not find property 'proxy-target-class' (OnPropertyCondition)AppOpticsMetricsExportAutoConfiguration:Did not match:- @ConditionalOnClass did not find required class 'io.micrometer.appoptics.AppOpticsMeterRegistry' (OnClassCondition)ArtemisAutoConfiguration:Did not match:- @ConditionalOnClass did not find required class 'javax.jms.ConnectionFactory' (OnClassCondition)
Exclusions、Unconditional classes(排除的、没有限定条件的自动配置类):
Exclusions:-----------org.springframework.boot.autoconfigure.jdbc.DataSourceAutoConfigurationUnconditional classes:----------------------org.springframework.boot.autoconfigure.context.ConfigurationPropertiesAutoConfigurationorg.springframework.boot.actuate.autoconfigure.endpoint.jmx.JmxEndpointAutoConfigurationorg.springframework.boot.actuate.autoconfigure.health.HealthIndicatorAutoConfigurationorg.springframework.boot.actuate.autoconfigure.info.InfoContributorAutoConfiguration
三、自定义场景启动器
现在已经了解了场景启动器的概念以及其隐藏在背后的自动配置的原理,就可以自己来对SpringBoot进行功能拓展,定义自己的场景启动器。
3.1 starter的命名规范
官方命名空间
- 前缀:spring-boot-starter-
- 模式:spring-boot-starter-模块名
- 举例:spring-boot-starter-web、spring-boot-starter-jdbc
自定义命名空间
- 后缀:-spring-boot-starter
- 模式:模块-spring-boot-starter
举例:mybatis-spring-boot-starter
3.2 starter模块整体结构
通过上边的介绍,可以总结starter的整体实现逻辑主要由两个基本部分组成:
xxxAutoConfiguration:自动配置类,对某个场景下需要使用到的一些组件进行自动注入,并利用xxxProperties类来进行组件相关配置xxxProperties:某个场景下所有可配置属性的集成,在配置文件中配置可以进行属性值的覆盖 按照SpringBoot官方的定义,Starer的作用就是依赖聚合,因此直接在starter内部去进行代码实现是不符合规定的,starter应该只起到依赖导入的作用,而具体的代码实现应该去交给其他模块来实现,然后在starter中去引用该模块即可,因此整体的starter的构成应该如下图所示: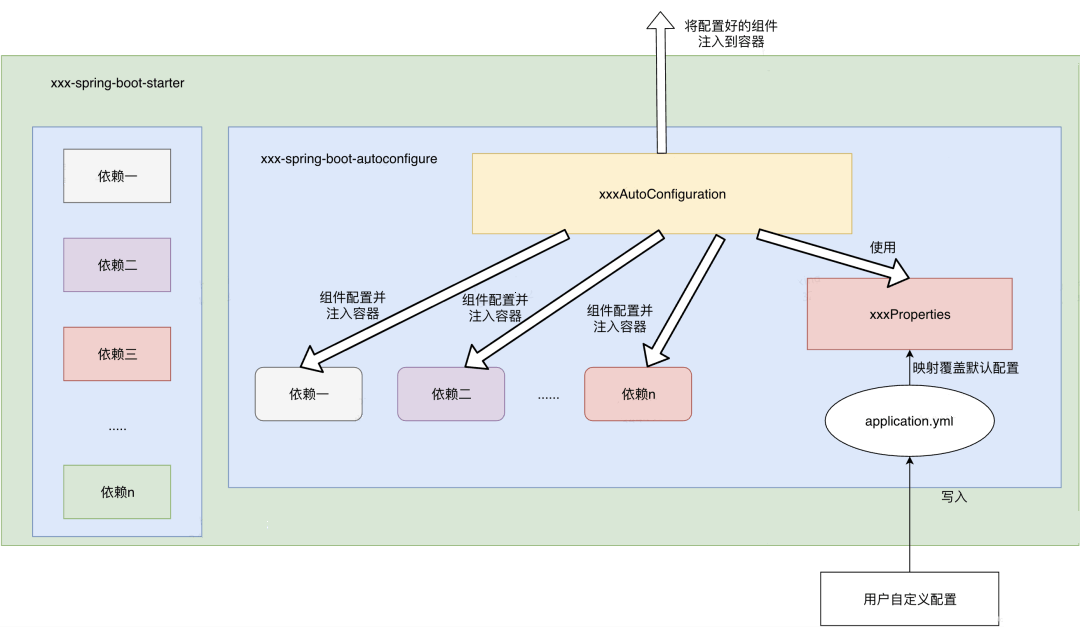
可见starter模块依赖了两部分,一部分是一些常用依赖,另一部分就是对自动配置模块的依赖,而xxxAutoConfiguration与xxxProperties的具体实现,都封装在自动配置模块中,starter实际是通过该模块来对外提供相应的功能。3.3
autoconfigure模块开发3.3.1 依赖引入
首先所有的自动配置模块都要引入两个jar包依赖:
<dependencies><dependency><groupId>org.springframework.boot</groupId><artifactId>spring-boot-autoconfigure</artifactId><!-- 包含很多与自动配置相关的注解的定义,必须要引入 --></dependency><dependency><groupId>org.springframework.boot</groupId><artifactId>spring-boot-configuration-processor</artifactId><!-- 非必须的,引入后可以在配置文件中输入自定义配置的时候有相应的提示,也可以通过其他.properties文件为相关类进行属性映射(SpringBoot默认使用application.yml)--><optional>true</optional></dependency><dependencies>
3.3.2
xxxAutoConfiguration的实现autoconfigure模块中最重要的就是自动配置类的编写,它实现组件的自动配置与自动注入。
在编写自动配置类的时候,应该要考虑向容器中注入什么组件,如何去配置它。@Configuration@ConditionalOnxxx@ConditionalOnxxx//限定自动配置类生效的一些条件@EnableConfigurationProperties(xxxProperties.class)public class xxxAutoConfiguration {@Autowiredprivate xxxProperties properties;@Beanpublic static BeanYouNeed beanYouNeed() {BeanYouNeed bean = new BeanYouNeed()bean.setField(properties.get(field));bean.setField(properties.get(field));bean.setField(properties.get(field));......}}
3.3.3
xxxProperties的实现这是跟配置文件相绑定的类,里边的属性就是可以在配置文件中配置的内容,然后通过
@ConfigurationProperties将其与配置文件绑定:@ConfigurationProperties(prefix = "your properties") //使用@ConfigurationProperties注解绑定配置文件public class xxxProperties {private boolean enabled = true;private String clientId;private String beanName;private String scanBasePackage;private String path;private String token;}
3.3.4 配置spring.factories文件
在resource目录下新建META-INF文件夹,在文件夹下新建spring.factories文件,并添加写好的
xxxAutoConfiguration类:org.springframework.boot.autoconfigure.EnableAutoConfiguration=\com.meituan.xframe.boot.mcc.autoconfigure.xxxAutoConfiguration
3.4 Starter模块开发
starter模块中只进行依赖导入,在pom文件中添加对autoconfigure模块的依赖,并添加一些其他必要的依赖项:
<dependencies>================================================================<!--添加了对autoconfigure模块的引用--><dependency><groupId>com.test.starter</groupId><artifactId>xxx-spring-boot-autoconfigure</artifactId></dependency>===============================================================<!--其他的一些必要依赖项--><dependency><groupId>commons-collections</groupId><artifactId>commons-collections</artifactId></dependency></dependencies>
这两个模块都开发完成之后,通过
mvn install命令或者deploy命令将包发布到本地或者中央仓库,即可直接在其他项目中引用自定义的starter模块了

若有收获,就点个赞吧
0 人点赞
