第一步:配置多数据源
首先,在 SpringBoot 中配置两个数据源,其中第二个数据源是ro-datasource:
spring:datasource:jdbc-url: jdbc:mysql://localhost/testusername: rwpassword: rw_passworddriver-class-name: com.mysql.jdbc.Driverhikari:pool-name: HikariCPauto-commit: false...ro-datasource:jdbc-url: jdbc:mysql://localhost/testusername: ropassword: ro_passworddriver-class-name: com.mysql.jdbc.Driverhikari:pool-name: HikariCPauto-commit: false...
在开发环境下,没有必要配置主从数据库。只需要给数据库设置两个用户,一个rw具有读写权限,一个ro只有 SELECT 权限,这样就模拟了生产环境下对主从数据库的读写分离。
在 SpringBoot 的配置代码中,初始化两个数据源:
@SpringBootApplicationpublic class MySpringBootApplication {/*** Master data source.*/@Bean("masterDataSource")@ConfigurationProperties(prefix = "spring.datasource")DataSource masterDataSource() {logger.info("create master datasource...");return DataSourceBuilder.create().build();}/*** Slave (read only) data source.*/@Bean("slaveDataSource")@ConfigurationProperties(prefix = "spring.ro-datasource")DataSource slaveDataSource() {logger.info("create slave datasource...");return DataSourceBuilder.create().build();}...}
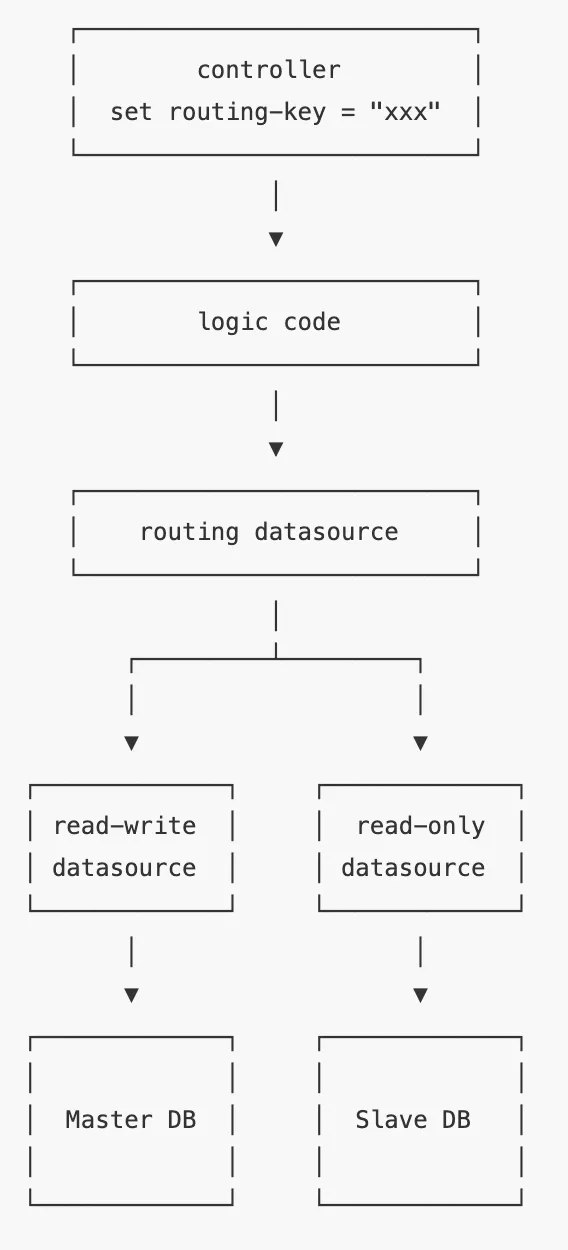
第二步:编写 RoutingDataSource
然后,用 Spring 内置的 RoutingDataSource,把两个真实的数据源代理为一个动态数据源:
public class RoutingDataSource extends AbstractRoutingDataSource {@Overrideprotected Object determineCurrentLookupKey() {return "masterDataSource";}}对这个RoutingDataSource,需要在 SpringBoot 中配置好并设置为主数据源:@SpringBootApplicationpublic class MySpringBootApplication {@Bean@PrimaryDataSource primaryDataSource(@Autowired @Qualifier("masterDataSource") DataSource masterDataSource,@Autowired @Qualifier("slaveDataSource") DataSource slaveDataSource) {logger.info("create routing datasource...");Map<Object, Object> map = new HashMap<>();map.put("masterDataSource", masterDataSource);map.put("slaveDataSource", slaveDataSource);RoutingDataSource routing = new RoutingDataSource();routing.setTargetDataSources(map);routing.setDefaultTargetDataSource(masterDataSource);return routing;}...}
现在,RoutingDataSource 配置好了,但是,路由的选择是写死的,即永远返回"masterDataSource",
现在问题来了:如何存储动态选择的 key 以及在哪设置 key?
在 Servlet 的线程模型中,使用 ThreadLocal 存储 key 最合适,因此,编写一个 RoutingDataSourceContext,来设置并动态存储 key:
public class RoutingDataSourceContext implements AutoCloseable {// holds data source key in thread local:static final ThreadLocal<String> threadLocalDataSourceKey = new ThreadLocal<>();public static String getDataSourceRoutingKey() {String key = threadLocalDataSourceKey.get();return key == null ? "masterDataSource" : key;}public RoutingDataSourceContext(String key) {threadLocalDataSourceKey.set(key);}public void close() {threadLocalDataSourceKey.remove();}}
然后,修改 RoutingDataSource,获取 key 的代码如下:
public class RoutingDataSource extends AbstractRoutingDataSource {protected Object determineCurrentLookupKey() {return RoutingDataSourceContext.getDataSourceRoutingKey();}}
这样,在某个地方,例如一个 Controller 的方法内部,就可以动态设置 DataSource 的 Key:
@Controllerpublic class MyController {@Get("/")public String index() {String key = "slaveDataSource";try (RoutingDataSourceContext ctx = new RoutingDataSourceContext(key)) {// TODO:return "html... www.liaoxuefeng.com";}}}
到此为止,已经成功实现了数据库的动态路由访问。
这个方法是可行的,但是,需要读从数据库的地方,就需要加上一大段try (RoutingDataSourceContext ctx = ...) {}代码,使用起来十分不便。有没有方法可以简化呢?
有!
仔细想想,Spring 提供的声明式事务管理,就只需要一个@Transactional()注解,放在某个 Java 方法上,这个方法就自动具有了事务。
也可以编写一个类似的@RoutingWith("slaveDataSource")注解,放到某个 Controller 的方法上,这个方法内部就自动选择了对应的数据源。代码看起来应该像这样:
@Controllerpublic class MyController {@Get("/")@RoutingWith("slaveDataSource")public String index() {return "html... www.liaoxuefeng.com";}}
这样,完全不修改应用程序的逻辑,只在必要的地方加上注解,自动实现动态数据源切换,这个方法是最简单的。
想要在应用程序中少写代码,就得多做一点底层工作:必须使用类似 Spring 实现声明式事务的机制,即用 AOP 实现动态数据源切换。
实现这个功能也非常简单,编写一个RoutingAspect,利用 AspectJ 实现一个Around拦截:
@Aspect@Componentpublic class RoutingAspect {@Around("@annotation(routingWith)")public Object routingWithDataSource(ProceedingJoinPoint joinPoint, RoutingWith routingWith) throws Throwable {String key = routingWith.value();try (RoutingDataSourceContext ctx = new RoutingDataSourceContext(key)) {return joinPoint.proceed();}}}
注意方法的第二个参数RoutingWith是 Spring 传入的注解实例,根据注解的value()获取配置的 key。编译前需要添加一个 Maven 依赖:
<dependency><groupId>org.springframework.boot</groupId><artifactId>spring-boot-starter-aop</artifactId></dependency>
到此为止,就实现了用注解动态选择数据源的功能。最后一步重构是用字符串常量替换散落在各处的"masterDataSource"和"slaveDataSource"。
使用限制
受 Servlet 线程模型的局限,动态数据源不能在一个请求内设定后再修改,也就是@RoutingWith不能嵌套。此外,@RoutingWith和@Transactional混用时,要设定 AOP 的优先级。
本文代码需要 SpringBoot 支持,JDK 1.8 编译并打开-parameters编译参数。

若有收获,就点个赞吧
0 人点赞
