为什么需要网关?
传统的单体架构中只有一个服务开放给客户端调用,但是微服务架构中是将一个系统拆分成多个微服务,那么作为客户端如何去调用这些微服务呢?如果没有网关的存在,只能在本地记录每个微服务的调用地址。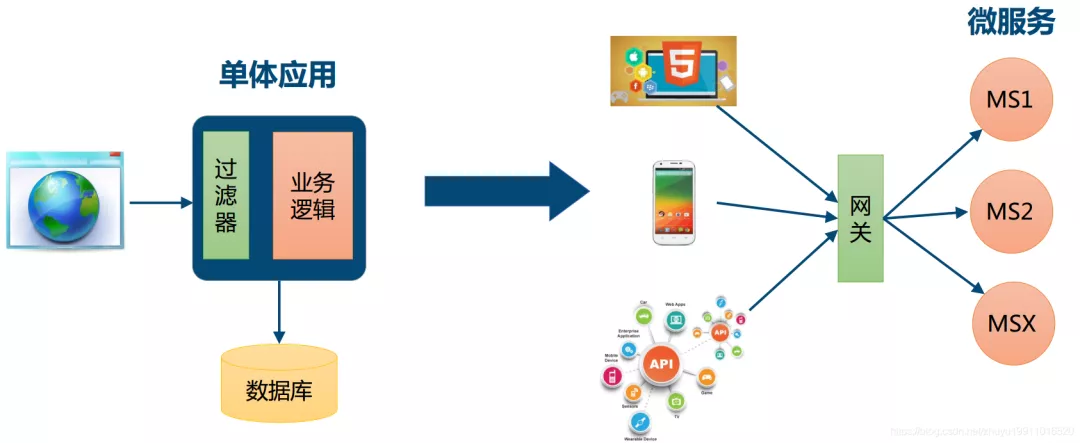
无网关的微服务架构往往存在以下问题:
- 客户端多次请求不同的微服务,增加客户端代码或配置编写的复杂性。
- 认证复杂,每个服务都需要独立认证。
- 存在跨域请求,在一定场景下处理相对复杂。
网关的基本功能?
网关是所有微服务的门户,路由转发仅仅是最基本的功能,除此之外还有其他的一些功能,比如:认证、鉴权、熔断、限流、日志监控等等………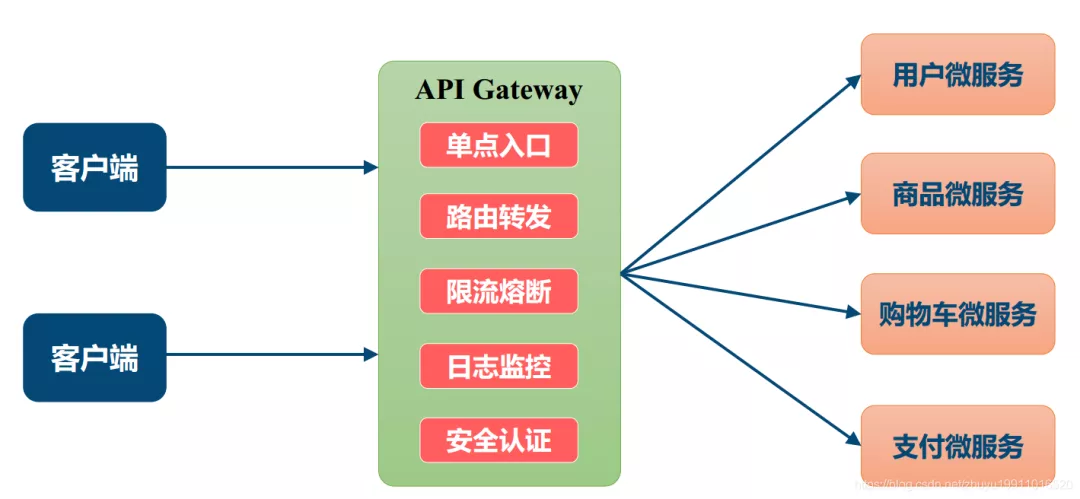
为什么选择Spring cloud Gateway?
在1.x版本中都是采用的Zuul网关;但在2.x版本中,zuul的升级一直跳票,Spring Cloud最后自己研发了一个网关替代Zuul,那就是Spring Cloud Gateway。
肯定选择亲儿子Spring Cloud Gateway,它的很多思想都是借鉴zuul,所谓青出于蓝而胜于蓝,功能和性能肯定是优于zuul,不然Spring Cloud 为嘛要发布它?
重要的一点原因: :::tips Spring Cloud Gateway 基于Spring Boot 2.x、Spring WebFlux和[Project Reactor构建。 ::: 对于Spring Boot 的整合方便兼容性以及性能方面不必担心。Spring Cloud Gateway几个必知的术语?
- 路由(route):gateway的基本构建模块。它由ID、目标URI、断言集合和过滤器集合组成。如果聚合断言结果为真,则匹配到该路由。
- 断言(Predicate ):参照Java8的新特性Predicate,允许开发人员匹配HTTP请求中的任何内容,比如头或参数。
过滤器(filter):可以在返回请求之前或之后修改请求和响应的内容。
网关如何搭建?
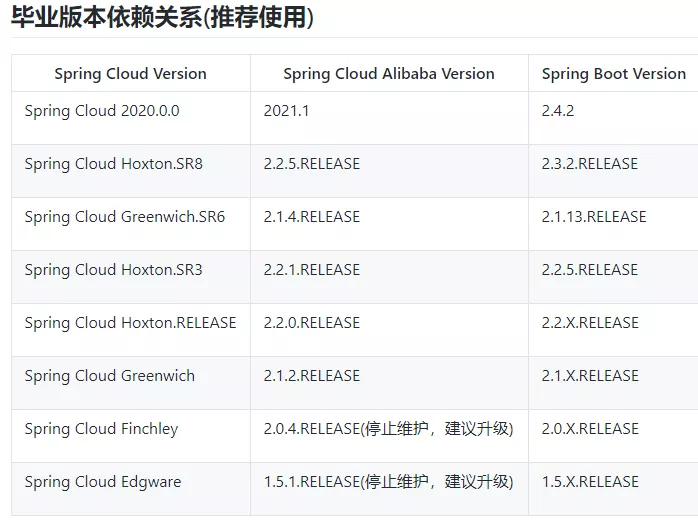
为什么要放这张图?
一定要按照上图中的版本进行适配,否则会出现意想不到的BUG,添加如下依赖:<!--gateway--><dependency><groupId>org.springframework.cloud</groupId><artifactId>spring-cloud-starter-gateway</artifactId></dependency>
注意:一定要去掉spring-boot-starter-web依赖,否则启动报错

好了,项目搭建完成,其实就添加这么一个依赖,关于详细的配置下文介绍。什么是Predict(断言)?
Predicate来自于java8的接口。Predicate接受一个输入参数,返回一个布尔值结果。该接口包含多种默认方法来将Predicate组合成其他复杂的逻辑(比如:与,或,非)。
可以用于接口请求参数校验、判断新老数据是否有变化需要进行更新操作。
Spring Cloud Gateway内置了许多Predict,这些Predict的源码在org.springframework.cloud.gateway.handler.predicate包中,有兴趣可以阅读一下。内置的一些断言如下图: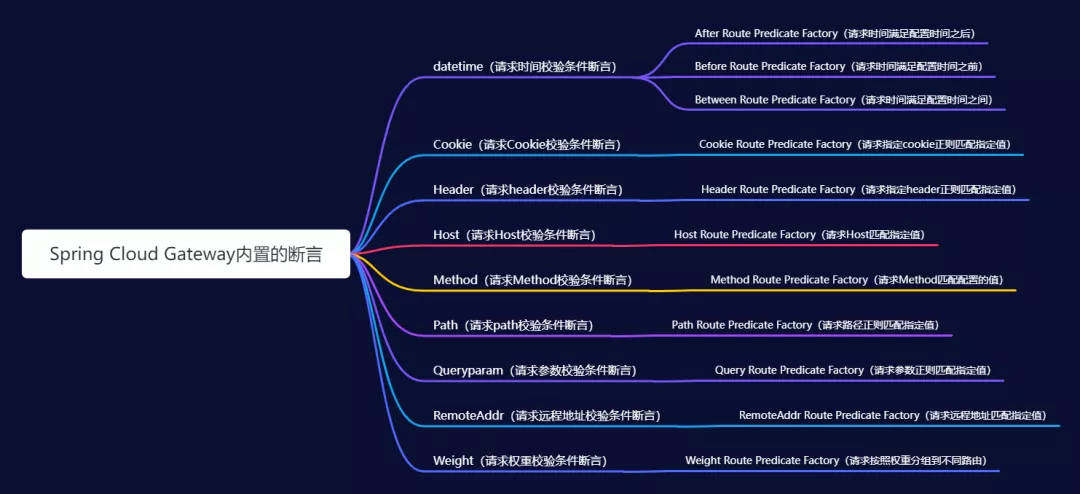
内置的断言
以上11种断言这里就不再介绍如何配置了,官方文档写的很清楚。
官方文档:https://docs.spring.io/spring-cloud-gateway/docs/2.2.9.RELEASE/reference/html/
下面就以最后一种权重断言为例介绍一下如何配置。配置如下:spring:cloud:gateway:## 路由routes:## id只要唯一即可,名称任意- id: gateway-provider_1uri: http://localhost:9024## 配置断言predicates:## Path Route Predicate Factory断言,满足/gateway/provider/**这个请求路径的都会被路由到http://localhost:9024这个uri中- Path=/gateway/provider/**## Weight Route Predicate Factory,同一分组按照权重进行分配流量,这里分配了80%## 第一个group1是分组名,第二个参数是权重- Weight=group1, 8## id必须唯一- id: gateway-provider_2## 路由转发的uriuri: http://localhost:9025## 配置断言predicates:## Path Route Predicate Factory断言,满足/gateway/provider/**这个请求路径的都会被路由到http://localhost:9024这个uri中- Path=/gateway/provider/**## Weight Route Predicate Factory,同一分组按照权重进行分配流量,这里分配了20%## 第一个group1是分组名,第二个参数是权重- Weight=group1, 2
routes下就是配置的路由策略,各个组件如下:
id:路由的唯一id,名称任意uri:路由转发的uripredicates:断言配置,可以配置多个
Spring Cloud Gateway中的断言命名都是有规范的,格式:xxxRoutePredicateFactory。
比如权重的断言:WeightRoutePredicateFactory,那么配置时直接取前面的Weight。
默认的路由转发如果路由到了两个,则是的按照配置先后顺序转发,上面都配置了路径:Path=/gateway/provider/**,如果没有配置权重,则肯定是转发到http://localhost:9024。
但是既然配置配置了权重并且相同的分组,则按照权重比例进行分配流量。
什么是过滤器?
过滤器这个概念很熟悉,在Spring mvc 就接触过,Gateway的过滤器的作用以及生命周期都是类似的。
Gateway的生命周期:
- PRE:这种过滤器在请求被路由之前调用。可利用这种过滤器实现身份验证、在集群中选择 请求的微服务、记录调试信息等。
- POST:这种过滤器在路由到微服务以后执行。这种过滤器可用来为响应添加标准的HTTP Header、收集统计信息和指标、将响应从微服务发送给客户端等。
Gateway 的Filter从作用范围可分为两种:
GatewayFilter:应用到单个路由或者一个分组的路由上(需要在配置文件中配置)。GlobalFilter:应用到所有的路由上(无需配置,全局生效)GatewayFilter(局部过滤器)Spring Cloud Gateway中内置了许多的局部过滤器,如下图:
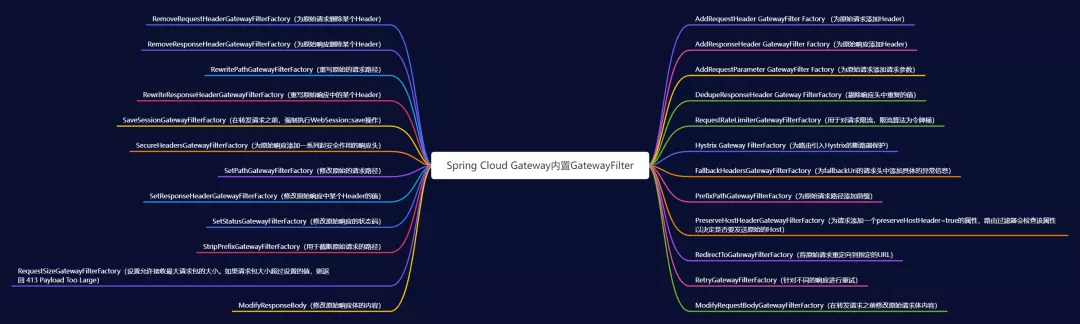
局部过滤器需要在指定路由配置才能生效,默认是不生效的。
以AddResponseHeaderGatewayFilterFactory这个过滤器为例,为原始响应添加Header,配置如下:spring:cloud:gateway:## 路由routes:## id只要唯一即可,名称任意- id: gateway-provider_1uri: http://localhost:9024## 配置断言predicates:## Path Route Predicate Factory断言,满足/gateway/provider/**这个请求路径的都会被路由到http://localhost:9024这个uri中- Path=/gateway/provider/**## 配置过滤器(局部)filters:- AddResponseHeader=X-Response-Foo, Bar
浏览器请求,发现响应头中已经有了
X-Response-Foo=Bar这个键值对,如下图:
注意:过滤器的名称只需要写前缀,过滤器命名必须是xxxGatewayFilterFactory(包括自定义)。
更多过滤器的配置可以看官方文档:https://docs.spring.io/spring-cloud-gateway/docs/2.2.9.RELEASE/reference/html/#gatewayfilter-factories
虽说内置的过滤器能够解决很多场景,但是难免还是有些特殊需求需要定制一个过滤器,下面就来介绍一下如何自定义局部过滤器。
场景:模拟一个授权验证的过程,如果请求头或者请求参数中携带token则放行,否则直接拦截返回401,代码如下:/*** 名称必须是xxxGatewayFilterFactory形式* todo:模拟授权的验证,具体逻辑根据业务完善*/@Component@Slf4jpublic class AuthorizeGatewayFilterFactory extends AbstractGatewayFilterFactory<AuthorizeGatewayFilterFactory.Config> {private static final String AUTHORIZE_TOKEN = "token";//构造函数,加载Configpublic AuthorizeGatewayFilterFactory() {//固定写法super(AuthorizeGatewayFilterFactory.Config.class);log.info("Loaded GatewayFilterFactory [Authorize]");}//读取配置文件中的参数 赋值到 配置类中@Overridepublic List<String> shortcutFieldOrder() {//Config.enabledreturn Arrays.asList("enabled");}@Overridepublic GatewayFilter apply(AuthorizeGatewayFilterFactory.Config config) {return (exchange, chain) -> {//判断是否开启授权验证if (!config.isEnabled()) {return chain.filter(exchange);}ServerHttpRequest request = exchange.getRequest();HttpHeaders headers = request.getHeaders();//从请求头中获取tokenString token = headers.getFirst(AUTHORIZE_TOKEN);if (token == null) {//从请求头参数中获取tokentoken = request.getQueryParams().getFirst(AUTHORIZE_TOKEN);}ServerHttpResponse response = exchange.getResponse();//如果token为空,直接返回401,未授权if (StringUtils.isEmpty(token)) {response.setStatusCode(HttpStatus.UNAUTHORIZED);//处理完成,直接拦截,不再进行下去return response.setComplete();}/*** todo chain.filter(exchange) 之前的都是过滤器的前置处理** chain.filter().then(* 过滤器的后置处理...........* )*///授权正常,继续下一个过滤器链的调用return chain.filter(exchange);};}@Data@AllArgsConstructor@NoArgsConstructorpublic static class Config {// 控制是否开启认证private boolean enabled;}}
局部过滤器需要在路由中配置才能生效,配置如下:
spring:cloud:gateway:## 路由routes:## id只要唯一即可,名称任意- id: gateway-provider_1uri: http://localhost:9024## 配置断言predicates:## Path Route Predicate Factory断言,满足/gateway/provider/**这个请求路径的都会被路由到http://localhost:9024这个uri中- Path=/gateway/provider/**## 配置过滤器(局部)filters:- AddResponseHeader=X-Response-Foo, Bar## AuthorizeGatewayFilterFactory自定义过滤器配置,值为true需要验证授权,false不需要- Authorize=true
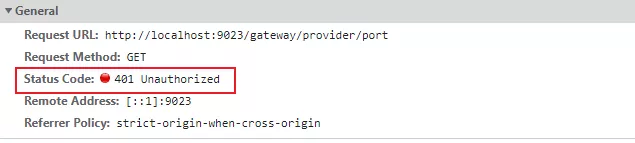
此时直接访问:http://localhost:9023/gateway/provider/port,不携带token,返回如下图:
请求参数带上token:http://localhost:9023/gateway/provider/port?token=abcdcdecd-ddcdeicd12,成功返回,如下图: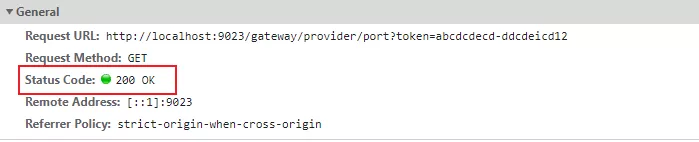
上述的AuthorizeGatewayFilterFactory只是涉及到了过滤器的前置处理,后置处理是在chain.filter().then()中的then()方法中完成的,具体可以看下项目源码中的TimeGatewayFilterFactory,代码就不再贴出来了,如下图:
GlobalFilter(全局过滤器)全局过滤器应用到全部路由上,无需开发者配置,Spring Cloud Gateway也内置了一些全局过滤器,如下图:
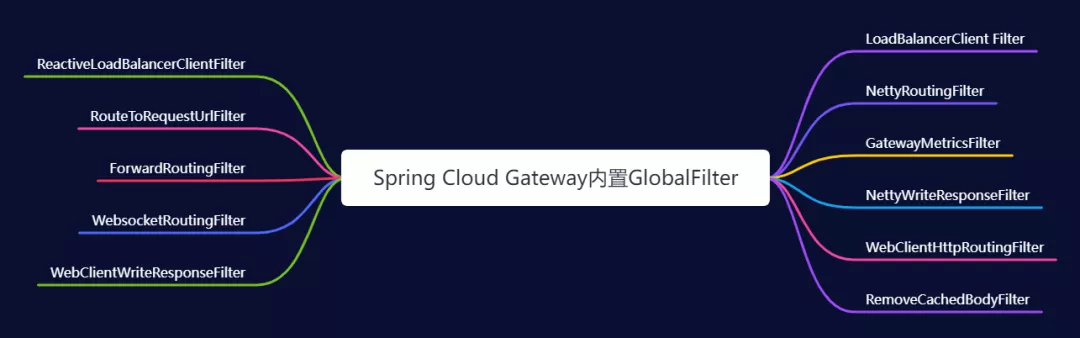
GlobalFilter的功能其实和GatewayFilter是相同的,只是GlobalFilter的作用域是所有的路由配置,而不是绑定在指定的路由配置上。多个GlobalFilter可以通过@Order或者getOrder()方法指定每个GlobalFilter的执行顺序,order值越小,GlobalFilter执行的优先级越高。
注意,由于过滤器有pre和post两种类型,pre类型过滤器如果order值越小,那么它就应该在pre过滤器链的顶层,post类型过滤器如果order值越小,那么它就应该在pre过滤器链的底层。示意图如下: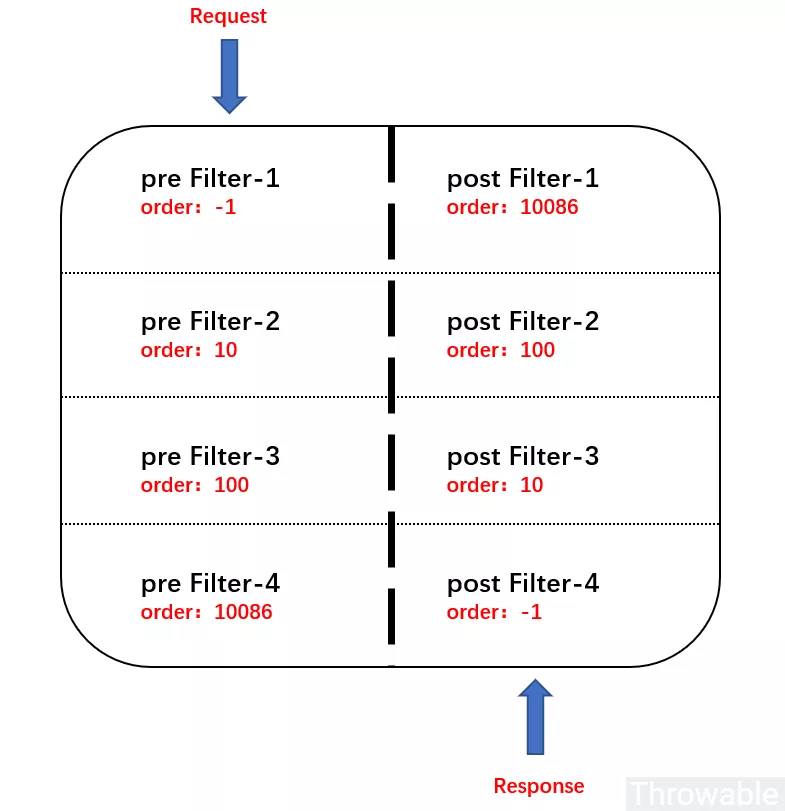
当然除了内置的全局过滤器,实际工作中还需要定制过滤器,下面来介绍一下如何自定义。
场景:模拟Nginx的Access Log 功能,记录每次请求的相关信息。代码如下:/*** 实现GlobalFilter*/@Slf4j@Component@Order(value = Integer.MIN_VALUE)public class AccessLogGlobalFilter implements GlobalFilter {@Overridepublic Mono<Void> filter(ServerWebExchange exchange, GatewayFilterChain chain) {//filter的前置处理ServerHttpRequest request = exchange.getRequest();String path = request.getPath().pathWithinApplication().value();InetSocketAddress remoteAddress = request.getRemoteAddress();return chain//继续调用filter.filter(exchange)//filter的后置处理.then(Mono.fromRunnable(() -> {ServerHttpResponse response = exchange.getResponse();HttpStatus statusCode = response.getStatusCode();log.info("请求路径:{},远程IP地址:{},响应码:{}", path, remoteAddress, statusCode);}));}}
好了,全局过滤器不必在路由上配置,注入到IOC容器中即可全局生效。
此时发出一个请求,控制台打印信息如下:
请求路径:/gateway/provider/port,远程IP地址:/0:0:0:0:0:0:0:1:64114,响应码:200 OK如何集成注册中心?
上述demo中并没有集成注册中心,每次路由配置都是指定固定的服务uri,如下图:
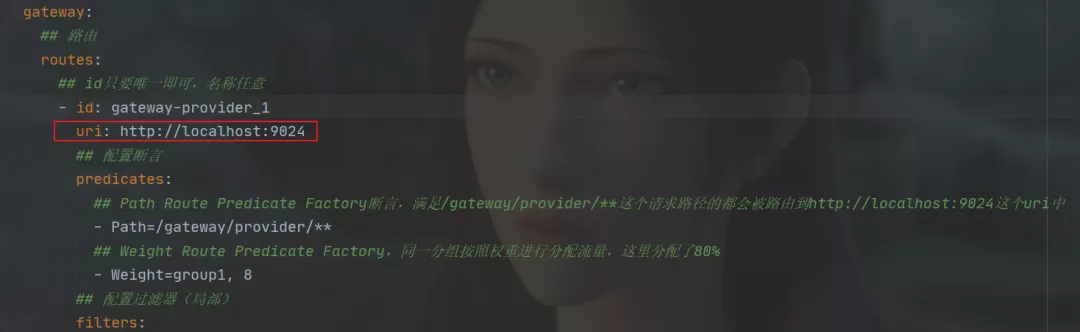
这样做有什么坏处呢?服务的IP的地址一旦修改了,路由配置中的uri必须修改
- 服务集群中无法实现负载均衡
此时就需要集成的注册中心,使得网关能够从注册中心自动获取uri(负载均衡)。
这里的注册中心当然选择Nacos。
pom文件中新增Nacos依赖,如下:
<!--nacos注册中心--><dependency><groupId>com.alibaba.cloud</groupId><artifactId>spring-cloud-starter-alibaba-nacos-discovery</artifactId></dependency>
启动类上开启注册中心功能,如下图: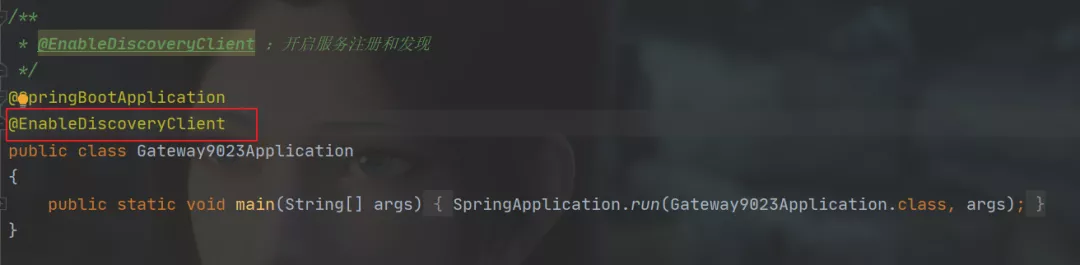
配置文件中指定nacos注册中心的地址:
spring:application:## 指定服务名称,在nacos中的名字name: cloud-gatewaycloud:nacos:discovery:# nacos的服务地址,nacos-server中IP地址:端口号server-addr: 127.0.0.1:8848
路由配置中唯一不同的就是路由的uri,格式:lb://service-name,这是固定写法:
- lb:固定格式,指的是从nacos中按照名称获取微服务,并遵循负载均衡策略
- service-name:nacos注册中心的服务名称,这里并不是IP地址形式的
集成Nacos注册中心完整的配置demo如下:
spring:application:## 指定服务名称,在nacos中的名字name: cloud-gatewaycloud:nacos:discovery:# nacos的服务地址,nacos-server中IP地址:端口号server-addr: 127.0.0.1:8848gateway:## 路由routes:## id只要唯一即可,名称任意- id: gateway-provider_1## 使用了lb形式,从注册中心负载均衡的获取uriuri: lb://gateway-provider## 配置断言predicates:## Path Route Predicate Factory断言,满足/gateway/provider/**这个请求路径的都会被路由到http://localhost:9024这个uri中- Path=/gateway/provider/**## 配置过滤器(局部)filters:- AddResponseHeader=X-Response-Foo, Bar
为什么指定了lb就可以开启负载均衡,前面说过全局过滤器LoadBalancerClientFilter就是负责路由寻址和负载均衡的,可以看到如下源码: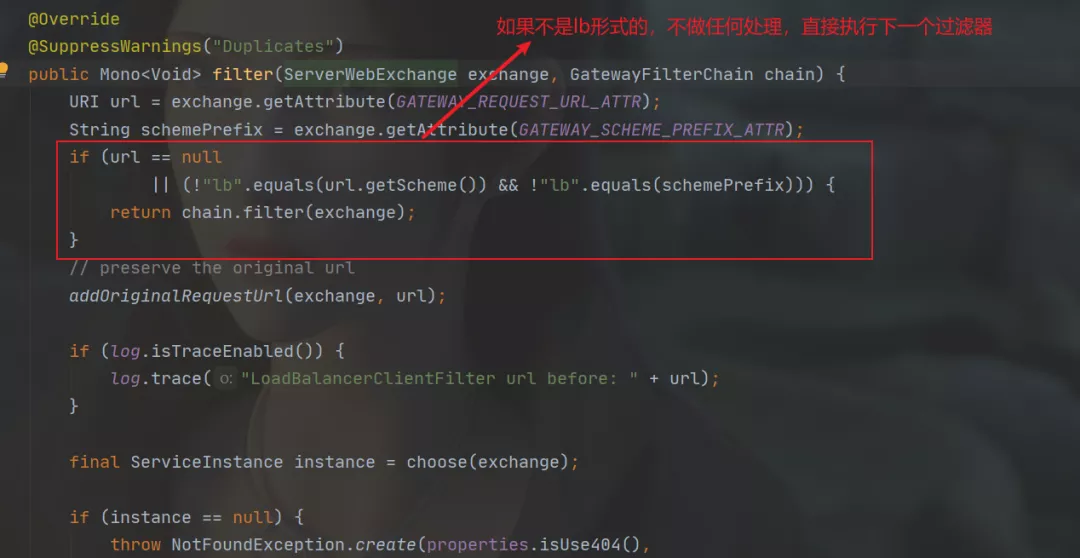
如何实现动态路由?
上述例子都是将网关的一系列配置写到项目的配置文件中,一旦路由发生改变必须要重新项目,这样维护成本很高。
其实可以将网关的配置存放到配置中心中,这样由配置中心统一管理,一旦路由发生改变,只需要在配置中心修改,这样便能达到一处修改,多出生效的目的。
这里当然要使用Nacos作为配置中心了,添加依赖如下:
<!-- nacos配置中心的依赖--><dependency><groupId>com.alibaba.cloud</groupId><artifactId>spring-cloud-starter-alibaba-nacos-config</artifactId></dependency>
在bootstrap.yml文件中指定Nacos作为配置中心的一些相关配置:
spring:application:## 指定服务名称,在nacos中的名字name: cloud-gatewaycloud:nacos:## todo 此处作为演示,仅仅配置了后缀,其他分组,命名空间根据需要自己配置config:server-addr: 127.0.0.1:8848## 指定文件后缀未yamlfile-extension: yaml
在nacos中的public命名空间中创建dataId为cloud-gateway.yaml的配置(未指定环境),配置内容如下: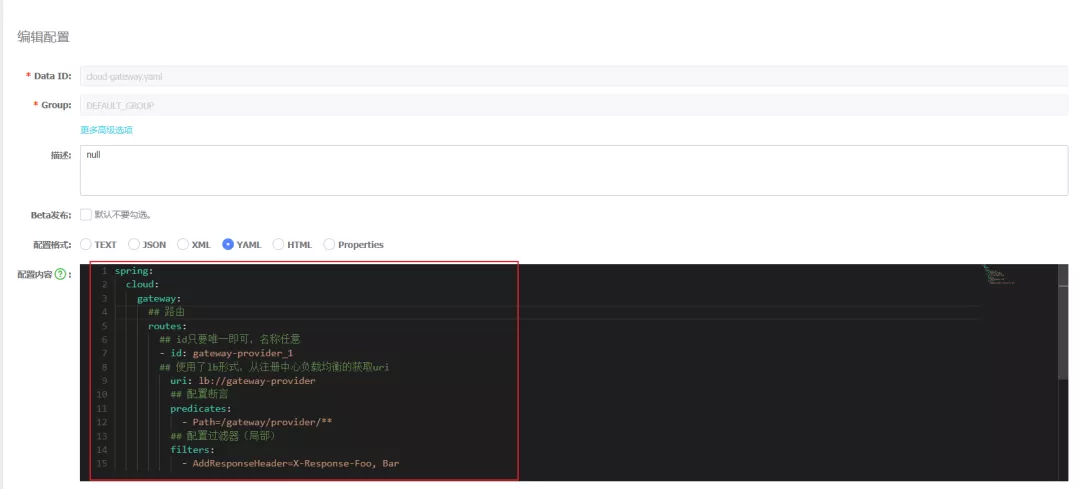
到这里已经配置完成了。
如何自定义全局异常处理?
通过前面的测试可以看到一个现象:一旦路由的微服务下线或者失联了,Spring Cloud Gateway直接返回了一个错误页面,如下图: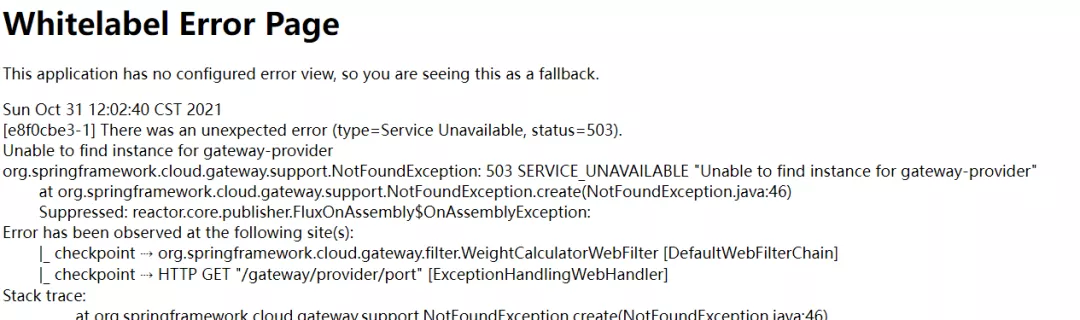
显然这种异常信息不友好,前后端分离架构中必须定制返回的异常信息。
传统的Spring Boot 服务中都是使用@ControllerAdvice来包装全局异常处理的,但是由于服务下线,请求并没有到达。
因此必须在网关中也要定制一层全局异常处理,这样才能更加友好的和客户端交互。
Spring Cloud Gateway提供了多种全局处理的方式,这里只介绍其中一种方式,实现还算比较优雅。
直接创建一个类GlobalErrorExceptionHandler,实现ErrorWebExceptionHandler,重写其中的handle方法,代码如下:
/*** 用于网关的全局异常处理* @Order(-1):优先级一定要比ResponseStatusExceptionHandler低*/@Slf4j@Order(-1)@Component@RequiredArgsConstructorpublic class GlobalErrorExceptionHandler implements ErrorWebExceptionHandler {private final ObjectMapper objectMapper;@SuppressWarnings({"rawtypes", "unchecked", "NullableProblems"})@Overridepublic Mono<Void> handle(ServerWebExchange exchange, Throwable ex) {ServerHttpResponse response = exchange.getResponse();if (response.isCommitted()) {return Mono.error(ex);}// JOSN格式返回response.getHeaders().setContentType(MediaType.APPLICATION_JSON);if (ex instanceof ResponseStatusException) {response.setStatusCode(((ResponseStatusException) ex).getStatus());}return response.writeWith(Mono.fromSupplier(() -> {DataBufferFactory bufferFactory = response.bufferFactory();try {//todo 返回响应结果,根据业务需求,自己定制CommonResponse resultMsg = new CommonResponse("500",ex.getMessage(),null);return bufferFactory.wrap(objectMapper.writeValueAsBytes(resultMsg));}catch (JsonProcessingException e) {log.error("Error writing response", ex);return bufferFactory.wrap(new byte[0]);}}));}}
全局异常处理已经定制完成了,测试一下,此时正常返回JSON数据了,如下图:
JSON的样式根据架构需要自己定制。
总结
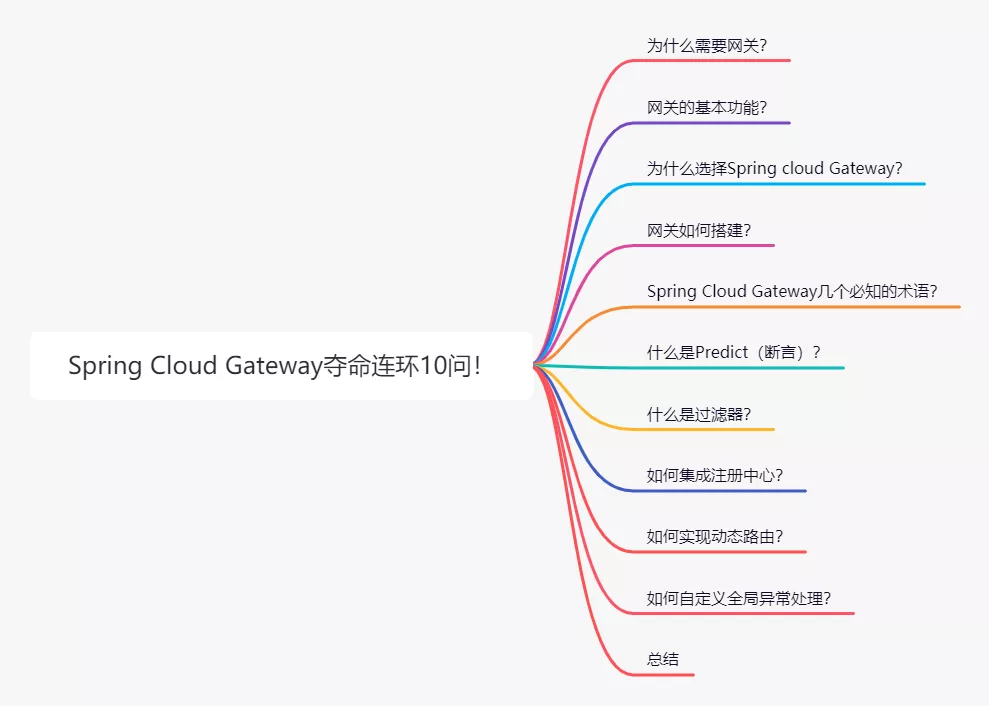
Spring Cloud Gateway主要介绍了以下几个知识点:
- 为什么需要网关?网关的基本功能
- 如何从零搭建一个微服务网关
- Predict(断言)的概念
- 过滤器的概念、Spring Cloud Gateway内置的过滤器以及如何自定义
- 如何集成Nacos注册中心并且实现负载均衡
- 如何集成Nacos实现动态路由,达到一处修改,多出生效的作用
- 全局异常的处理

若有收获,就点个赞吧
0 人点赞
