前言
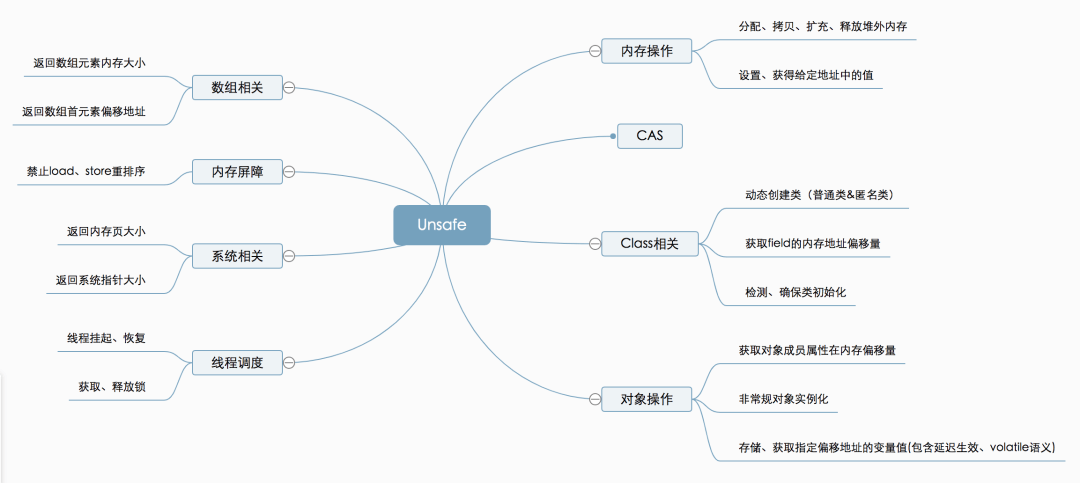
sun.misc.Unsafe 是 JDK 原生提供的一个工具类,包含了很多在 Java 语言看来很 cool 的操作,例如内存分配与回收、CAS 操作、类实例化、内存屏障等。正如其命名一样,由于其可以直接操作内存,执行底层系统调用,其提供的操作也是比较危险的。Unsafe 在扩展 Java 语言表达能力、便于在更高层(Java层)代码里实现原本要在更低层(C层)实现的核心库功能上起到了很大的作用。
从 JDK9 开始,Java 模块化设计的限制,使得非标准库的模块都无法访问到 sun.misc.Unsafe。但在 JDK8 中,仍然可以直接操作 Unsafe。
使用 Unsafe
Unsafe 被设计的初衷,并不是希望被一般开发者调用,所以不能通过 new 或者工厂方法去实例化 Unsafe 对象,通常可以采用反射的方法获取到 Unsafe 实例:
public static final Unsafe unsafe = getUnsafe();static sun.misc.Unsafe getUnsafe() {try {Field field = Unsafe.class.getDeclaredField("theUnsafe");field.setAccessible(true);return (Unsafe) field.get(null);} catch (Exception e) {throw new RuntimeException(e);}}
功能概览
内存分配&存取
Java 其实也可以像 C++ 那样直接操作内存,借助 Unsafe 就可以。先来看一个 ByteBuffer 的示例,将会开辟一个 16 字节的内存空间,先后写入并读取 4 个 int 类型的数据。
public static void testByteBuffer() {ByteBuffer directBuffer = ByteBuffer.allocateDirect(16);directBuffer.putInt(1);directBuffer.putInt(2);directBuffer.putInt(3);directBuffer.putInt(4);directBuffer.flip();System.out.println(directBuffer.getInt());System.out.println(directBuffer.getInt());System.out.println(directBuffer.getInt());System.out.println(directBuffer.getInt());}
熟悉 nio 操作的同学对上面的示例应该不会感到陌生,这是很基础也是很标准的内存使用方式。那换做是 Unsafe 怎么实现同样的效果的?
public static void testUnsafe0() {Unsafe unsafe = Util.unsafe;long address = unsafe.allocateMemory(16);unsafe.putInt(address, 1);unsafe.putInt(address + 4, 2);unsafe.putInt(address + 8, 3);unsafe.putInt(address + 12, 4);System.out.println(unsafe.getInt(address));System.out.println(unsafe.getInt(address + 4));System.out.println(unsafe.getInt(address + 8));System.out.println(unsafe.getInt(address + 12));}
两段代码输出结果一致:
1234
下面针对使用到的 Unsafe 的 API,逐个介绍:
public native long allocateMemory(long var1);
这个 native 方法分配的是堆外内存,返回的 long 类型数值,便是内存的首地址,可以作为 Unsafe 其他 API 的入参。如果见过 DirectByteBuffer 的源码,会发现其实它内部就是使用 Unsafe 封装的。说到 DirectByteBuffer,这里额外提一句,ByteBuffer.allocateDirect 分配的堆外内存会受到 -XX:MaxDirectMemorySize 的限制,而 Unsafe 分配的堆外内存则不会受到限制,当然啦,也不会受到 -Xmx 的限制。
看到另外两个 API putInt 和 getInt ,应当会意识到,肯定会有其他字节操作的 API,例如 putByte/putShort/putLong,当然 put 和 get 也是成对出现的。这一系列 API 里面也有注意点,建议需要成对的使用,否则可能会因为字节序问题,导致解析失败。可以看下面的例子:
public static void testUnsafe1() {ByteBuffer directBuffer = ByteBuffer.allocateDirect(4);long directBufferAddress = ((DirectBuffer)directBuffer).address();System.out.println("Unsafe.putInt(1)");Util.unsafe.putInt(directBufferAddress, 1);System.out.println("Unsafe.getInt() == " + Util.unsafe.getInt(directBufferAddress));directBuffer.position(0);directBuffer.limit(4);System.out.println("ByteBuffer.getInt() == " + directBuffer.getInt());directBuffer.position(0);directBuffer.limit(4);System.out.println("ByteBuffer.getInt() reverseBytes == " + Integer.reverseBytes(directBuffer.getInt()));}
输出如下:
Unsafe.putInt(1)Unsafe.getInt() == 1ByteBuffer.getInt() == 16777216ByteBuffer.getInt() reverseBytes == 1
可以发现当使用 Unsafe 进行 putInt,再使用 ByteBuffer 进行 getInt,结果会不符合预期,需要对结果进行字节序变化之后,才恢复正确。这其实是因为,ByteBuffer 内部判断了当前操作系统的字节序,对于 int 这种多字节的数据类型,测试机器使用大端序存储,而 Unsafe 默认以小短序存储导致。如果拿捏不准,建议配套使用写入和读取 API,以避免字节序问题。
内存复制
内存复制在实际应用场景中还是很常见的需求,例如堆内内存写入磁盘时,需要先复制到堆外内存,再例如做内存聚合时,需要缓冲一部分数据,也会涉及到内存复制。当然也可以通过 ByteBuffer 或者 set/get 去进行操作,但肯定不如 native 方法来的高效。Unsafe 提供了内存拷贝的 native 方法,可以实现堆内到堆内、堆外到堆外、堆外和堆内互相拷贝,总之就是哪儿到哪儿都可以拷贝。
public native void copyMemory(Object src, long offset, Object dst ,long dstOffset, long size);
对于堆内内存来说,可以直接给 src 传入对象数组的首地址,并且指定 offset 为对应数组类型的偏移量,可以通过 arrayBaseOffset 方法获取堆内内存存储对象的偏移量
public native int arrayBaseOffset(Class<?> var1);
例如获取 byte[] 的固定偏移量可以这样操作:unsafe.arrayBaseOffset(byte[].class)
对于堆外内存来说,会更加直观一点,dst 设为 null,dstOffset 设置为 Unsafe 获取的内存地址即可。
堆内内存复制到堆外内存的示例代码:
public static void unsafeCopyMemory() {ByteBuffer heapBuffer = ByteBuffer.allocate(4);ByteBuffer directBuffer = ByteBuffer.allocateDirect(4);heapBuffer.putInt(1234);long address = ((DirectBuffer)directBuffer).address();Util.unsafe.copyMemory(heapBuffer.array(), 16, null, address, 4);directBuffer.position(0);directBuffer.limit(4);System.out.println(directBuffer.getInt());}
在实际应用中,大多数 ByteBuffer 相关的源码在涉及到内存复制时,都使用了 copyMemory 方法。
非常规实例化对象
在 JDK9 模块化之前,如果不希望将一些类开放给其他用户使用,或者避免被随意实例化(单例模式),通常有两个常见做法
案例一:私有化构造器
public class PrivateConstructorFoo {private PrivateConstructorFoo() {System.out.println("constructor method is invoked");}public void hello() {System.out.println("hello world");}}
如果希望实例化该对象,第一时间想到的可能是反射创建
public static void reflectConstruction() {PrivateConstructorFoo privateConstructorFoo = PrivateConstructorFoo.class.newInstance();privateConstructorFoo.hello();}
不出所料,获得了一个异常
java.lang.IllegalAccessException: Class io.openmessaging.Main can not access a member of class moe.cnkirito.PrivateConstructorFoo with modifiers "private"
稍作调整,调用构造器创建实例
public static void reflectConstruction2() {Constructor<PrivateConstructorFoo> constructor = PrivateConstructorFoo.class.getDeclaredConstructor();constructor.setAccessible(true);PrivateConstructorFoo privateConstructorFoo = constructor.newInstance();privateConstructorFoo.hello();}
it works!输出如下:
constructor method is invokedhello world
当然,Unsafe 也提供了 allocateInstance 方法
public native Object allocateInstance(Class<?> var1) throws InstantiationException;
也可以实现实例化,而且更为直观
public static void allocateInstance() throws InstantiationException {PrivateConstructorFoo privateConstructorFoo = (PrivateConstructorFoo) Util.unsafe.allocateInstance(PrivateConstructorFoo.class);privateConstructorFoo.hello();}
同样 works!输出如下:
hello world
注意这里有一个细节,allocateInstance 没有触发构造方法。
案例二:package level 实例
package moe.cnkirito;class PackageFoo {public void hello() {System.out.println("hello world");}}
注意,这里定义了一个 package 级别可访问的对象 PackageFoo,只有 moe.cnkirito 包下的类可以访问。
同样先尝试使用反射
package com.bellamm;public static void reflectConstruction() {Class<?> aClass = Class.forName("moe.cnkirito.PackageFoo");aClass.newInstance();}
得到了意料之中的报错:
java.lang.IllegalAccessException: Class io.openmessaging.Main can not access a member of class moe.cnkirito.PackageFoo with modifiers ""
再试试 Unsafe 呢?
package com.bellamm;public static void allocateInstance() throws Exception{Class<?> fooClass = Class.forName("moe.cnkirito.PackageFoo");Object foo = Util.unsafe.allocateInstance(fooClass);Method helloMethod = fooClass.getDeclaredMethod("hello");helloMethod.setAccessible(true);helloMethod.invoke(foo);}
由于在 com.bellamm 包下,甚至无法在编译期定义 PackageFoo 类,只能通过反射机制在运行时,获取 moe.cnkirito.PackageFoo 的方法,配合 Unsafe 实例化,最终实现调用,成功输出 hello world。
花了这么大的篇幅进行实验来说明了两种限制案例,以及 Unsafe 的解决方案,还需要有实际的应用场景佐证 Unsafe#allocateInstance 的价值。简单列举两个场景:
- 序列化框架在使用反射无法创建对象时,可以尝试使用 Unsafe 创建,作为兜底逻辑。
- 获取包级别保护的类,再借助于反射机制,可以魔改一些源码实现或者调用一些
native方法,此法慎用,不建议在生产使用。
示例代码:动态修改堆外内存限制,覆盖 JVM 启动参数:-XX:MaxDirectMemorySize
private void hackMaxDirectMemorySize() {try {Field directMemoryField = VM.class.getDeclaredField("directMemory");directMemoryField.setAccessible(true);directMemoryField.set(new VM(), 8L * 1024 * 1024 * 1024);Object bits = Util.unsafe.allocateInstance(Class.forName("java.nio.Bits"));Field maxMemory = bits.getClass().getDeclaredField("maxMemory");maxMemory.setAccessible(true);maxMemory.set(bits, 8L * 1024 * 1024 * 1024);} catch (Exception e) {throw new RuntimeException(e);}System.out.println(VM.maxDirectMemory());}

若有收获,就点个赞吧
0 人点赞
