一、使用NIO完成网络通信的三个核心
1.通道(Channel)
负责连接
java.nio.channels.Channel 接口:
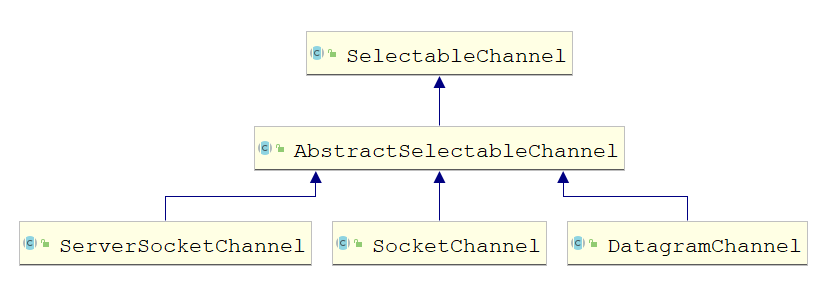
|—SelectableChannel
|—SocketChannel
|—SeverSocketChannel
|—DatagramChannel
|--Pipe.SinkChannel<br /> |--Pipe.SourceChannel
2.缓冲区(Buffer)
3.选择器(Selector)
A.选择器的定义
- 选择器Selector是SelectableChannel对象的多路复用器。Selector可以同时监控多个SelectableChannel的IO状况,也就是说,使用Selector可以使一个单独的线程管理多个Channel。Selector是非阻塞IO的核心。
- SelectableChannel的结构如下
B.选择器的应用
创建Selector:通过调用
Selector.open()方法创建一个Selector// 创建选择器Selector selector = Selector.open();
向选择器注册通道:
SelectableChannel.register(Selector sel, int ops)// 1.获取通道ServerSocketChannel serverSocketChannel = ServerSocketChannel.open();// 2.切换非阻塞模式serverSocketChannel.configureBlocking(false);// 3.绑定连接serverSocketChannel.bind(new InetSocketAddress(9999));// 4.获取选择器Selector selector = Selector.open();// 5.将通道注册到选择器上,并且指定“监听接收事件”serverSocketChannel.register(selector, SelectionKey.OP_ACCEPT);
当调用
register(Selector sel, int ops)将通道注册选择器时,选择器对通道的监听事件,需要通过第二个参数ops指定。- 可以监听的事件类型(可使用SelectionKey的四个常量表示)
- 读:
SelectionKey.OP_READ (1) - 写:
SelcetionKey.OP_WRITE (4) - 连接:
SelectionKey.OP_CONNECT (8) - 接收:
SelectionKey.OP_ACCEPT (16)
- 读:
若注册不止一个监听事件,则可以使用“位或”操作符连接
int interestSet = SelectionKey.OP_READ | SelectionKey.OP_WRITE;
SelectionKey:表示SelectableChannel和Selector之间的注册关系。每次向选择器注册通道时就会选择一个事件(选择键)。选择键包含两个表示为整数值的操作集。操作集的每一位都表示改键的通道所支持的一类可选择操作。 | 返回值 方法名 | 描述 | | —- | —- | | int interestOps() | 获取感兴趣事件集合 | | int readyOps() | 获取通道已经准备就绪的操作的集合 | | SelectableChannel channel() | 获取注册通道 | | Selector selector() | 返回选择器 | | boolean isReadable() | 检测 Channel 中读事件是否就绪 | | boolean isWritable() | 检测 Channel 中写事件是否就绪 | | boolean isConnectable() | 检测 Channel 中连接是否就绪 | | boolean isAcceptable() | 检测 Channel 中接收是否就绪 |
A.阻塞式NIO示例
①、文件从客户端发送至服务端
@Testpublic void clientTest() throws IOException {// 1.获取通道SocketChannel socketChannel = SocketChannel.open(new InetSocketAddress("127.0.0.1", 9898));FileChannel fileChannel = FileChannel.open(Paths.get("1.jpg"), StandardOpenOption.READ);// 2.分配指定大小的缓冲区ByteBuffer byteBuffer = ByteBuffer.allocate(1024);// 3.读取本地文件,并发送到服务端while (fileChannel.read(byteBuffer) != -1) {byteBuffer.flip();socketChannel.write(byteBuffer);byteBuffer.clear();}// 4.关闭通道fileChannel.close();socketChannel.close();}@Testpublic void serverTest() throws IOException {// 1.获取通道ServerSocketChannel serverSocketChannel = ServerSocketChannel.open();FileChannel fileChannel = FileChannel.open(Paths.get("2.jpg"), StandardOpenOption.WRITE, StandardOpenOption.CREATE);// 2.绑定连接serverSocketChannel.bind(new InetSocketAddress(9898));// 3.获取客户端连接的通道SocketChannel socketChannel = serverSocketChannel.accept();// 4.分配指定大小的缓冲区ByteBuffer byteBuffer = ByteBuffer.allocate(1024);// 5.接收客户端的数据,并保存到本地while (socketChannel.read(byteBuffer) != -1) {byteBuffer.flip();fileChannel.write(byteBuffer);byteBuffer.clear();}// 6.关闭通道socketChannel.close();fileChannel.close();serverSocketChannel.close();}
②、文件从服务端发送至客户端并返回接收信息
@Testpublic void clientSendImageReceiveMessageTest() throws IOException {SocketChannel socketChannel = SocketChannel.open(new InetSocketAddress("127.0.0.1", 9889));FileChannel fileChannel = FileChannel.open(Paths.get("2.jpg"), StandardOpenOption.READ);ByteBuffer byteBuffer = ByteBuffer.allocate(1024);while (fileChannel.read(byteBuffer) != -1) {byteBuffer.flip();socketChannel.write(byteBuffer);byteBuffer.clear();}// 告诉客户端已发送结束,否则服务端一直在等待以至于发生服务端接收阻塞socketChannel.shutdownOutput();// 接收服务端的反馈int length = 0;while ((length = socketChannel.read(byteBuffer)) != -1) {byteBuffer.flip();System.out.println(new String(byteBuffer.array(), 0, length));byteBuffer.clear();}fileChannel.close();socketChannel.close();}@Testpublic void serverReceiveImageTest() throws IOException {ServerSocketChannel serverSocketChannel = ServerSocketChannel.open();FileChannel fileChannel = FileChannel.open(Paths.get("3.jpg"), StandardOpenOption.WRITE, StandardOpenOption.CREATE);serverSocketChannel.bind(new InetSocketAddress(9889));SocketChannel socketChannel = serverSocketChannel.accept();ByteBuffer byteBuffer = ByteBuffer.allocate(1024);while (socketChannel.read(byteBuffer) != -1) {byteBuffer.flip();fileChannel.write(byteBuffer);byteBuffer.clear();}// 发送反馈给客户端byteBuffer.put("服务端接收数据成功".getBytes());byteBuffer.flip();socketChannel.write(byteBuffer);socketChannel.close();fileChannel.close();serverSocketChannel.close();}
B.非阻塞式NIO示例
①非阻塞式NIO实现聊天室
// 非阻塞式实现聊天室@Testpublic void clientTest() throws IOException {// 1.获取通道SocketChannel socketChannel = SocketChannel.open(new InetSocketAddress("127.0.0.1", 9999));// 2.切换非阻塞模式socketChannel.configureBlocking(false);// 3.分配指定大小的缓冲区ByteBuffer byteBuffer = ByteBuffer.allocate(1024);// 4.发送数据给服务端Scanner scanner = new Scanner(System.in);while (scanner.hasNext()) {String input = scanner.next();byteBuffer.put((LocalDateTime.now().toString() + "发送内容:" + input).getBytes());byteBuffer.flip();socketChannel.write(byteBuffer);byteBuffer.clear();}// 5.关闭通道socketChannel.close();}@Testpublic void serverTest() throws IOException {// 1.获取通道ServerSocketChannel serverSocketChannel = ServerSocketChannel.open();// 2.切换非阻塞模式serverSocketChannel.configureBlocking(false);// 3.绑定连接serverSocketChannel.bind(new InetSocketAddress(9999));// 4.获取选择器Selector selector = Selector.open();// 5.将通道注册到选择器上,并且指定“监听接收事件”serverSocketChannel.register(selector, SelectionKey.OP_ACCEPT);// 6.轮询式获取选择器中所有注册的“选择键(已就绪的监听事件)”while (selector.select() > 0) {// 7.获取当前选择器中所有注册的“选择键(已就绪的监听事件)”Iterator<SelectionKey> selectionKeyIterator = selector.selectedKeys().iterator();while (selectionKeyIterator.hasNext()) {// 8.获取准备就绪的事件SelectionKey selectionKey = selectionKeyIterator.next();// 9.判断具体是什么事件准备就绪if (selectionKey.isAcceptable()) {// 10.若“接收就绪”,获取客户端连接SocketChannel socketChannel = serverSocketChannel.accept();// 11.切换非阻塞模式socketChannel.configureBlocking(false);// 12.将该通道注册到选择器上socketChannel.register(selector, SelectionKey.OP_READ);} else if (selectionKey.isReadable()) {// 13.获取当前选择器上“读就绪”状态的通道SocketChannel socketChannel = (SocketChannel) selectionKey.channel();// 14.读取数据ByteBuffer byteBuffer = ByteBuffer.allocate(1024);int len = 0;while (((len = socketChannel.read(byteBuffer)) > 0)) {byteBuffer.flip();System.out.println(new String(byteBuffer.array(), 0, len));byteBuffer.clear();}}// 15.取消选择键selectionKeyselectionKeyIterator.remove();}}}


