@Autowired使用
构造函数注入
public Class Outer {private Inner inner;@Autowiredpublic Outer(Inner inner) {this.inner = inner;}}
属性注入
public Class Outer {@Autowiredprivate Inner inner;}
方法注入
public Class Outer {private Inner inner;public Inner getInner() {return inner;}@Autowiredpublic void setInner(Inner inner) {this.inner = inner;}}
目前绝大部分的代码都使用第2、第3种。第1种在bean实例化时完成,而第2、第3种的实现原理都是一样的,在属性填充时完成。这里将介绍第二第三种的是实现原理
在开始之前,如果自己设计@Autowired,应该怎么实现?做法还是比较简单的
- 通过反射查找bean的class下所有注解了
**@Autowired**的字段和方法 获取到字段,通过
**getBean**(字段)获取到对应bean,然后再通过反射调用field的set将bean注入@Autowired源码分析AutowiredAnnotationBeanPostProcessor类
该类是@Autowired的具体实现类,先预览一下类方法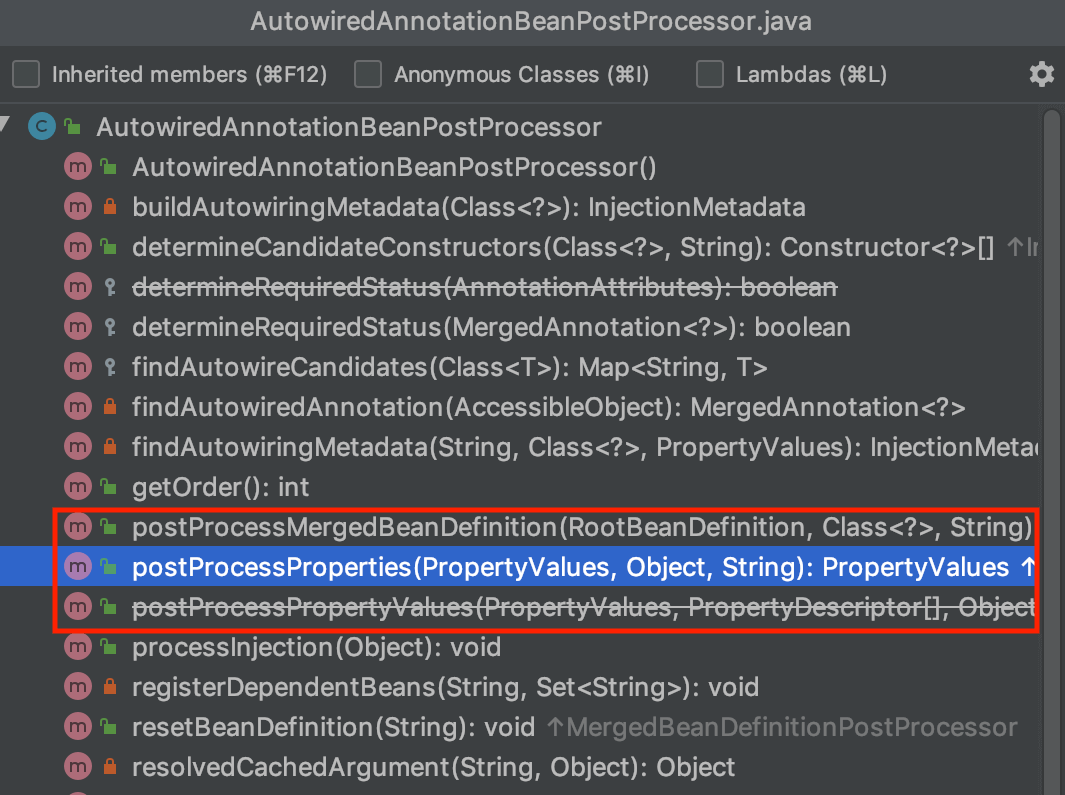
发现实际有机会介入bean的创建操作只有可能是后置处理器,用于后置处理的有3个方法,其中一个过时不用,分别是postProcessMergedBeanDefinition、postProcessProperties后置处理,再看一下这2个方法的具体代码public class AutowiredAnnotationBeanPostProcessor extends InstantiationAwareBeanPostProcessorAdapterimplements MergedBeanDefinitionPostProcessor, PriorityOrdered, BeanFactoryAware {...@Overridepublic void postProcessMergedBeanDefinition(RootBeanDefinition beanDefinition, Class<?> beanType, String beanName) {// 1. 寻找bean中所有被@Autowired注释的属性,并将属性封装成InjectedElement类型InjectionMetadata metadata = findAutowiringMetadata(beanName, beanType, null);metadata.checkConfigMembers(beanDefinition);}...@Overridepublic PropertyValues postProcessProperties(PropertyValues pvs, Object bean, String beanName) {// 1. 寻找通过@Autowired注解的属性或者方法InjectionMetadata metadata = findAutowiringMetadata(beanName, bean.getClass(), pvs);try {// 2. 注入metadata.inject(bean, beanName, pvs);} catch (BeanCreationException ex) {throw ex;} catch (Throwable ex) {throw new BeanCreationException(beanName, "Injection of autowired dependencies failed", ex);}return pvs;}...}
跟猜想是一样的,首先先找出所有注解了
@Autowired的属性或者方法,然后进行注入,当然postProcessMergedBeanDefinition后置处理器的调用肯定是在postProcessProperties之前的,这里回顾一下spring bean的创建过程。
2个处理器已用黄色标出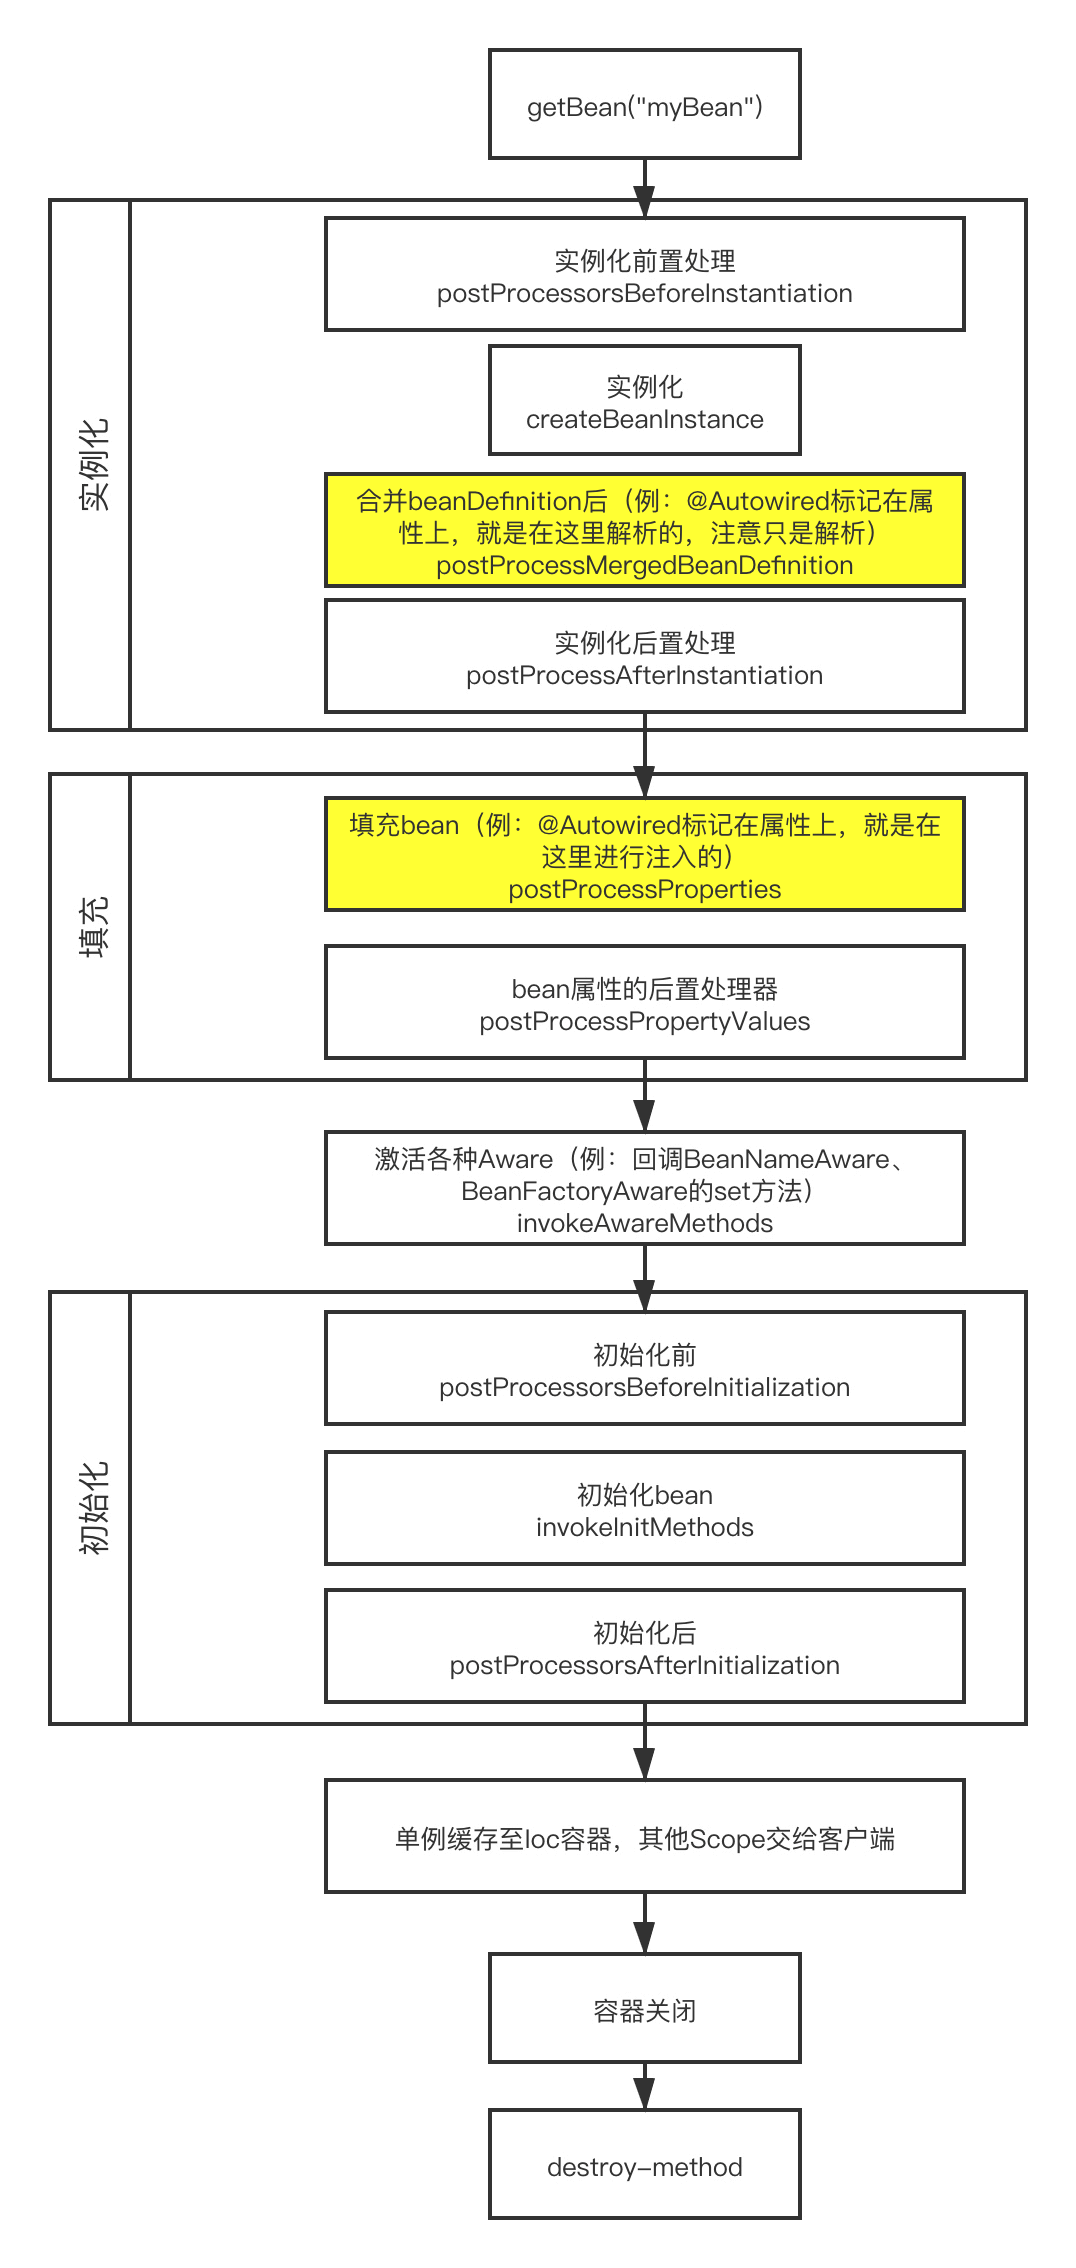
1、查找所有
@Autowired```java // 寻找bean中所有被@Autowired注释的属性,并将属性封装成InjectedElement类型 InjectionMetadata metadata = findAutowiringMetadata(beanName, beanType, null);
private InjectionMetadata findAutowiringMetadata(String beanName, Class<?> clazz, @Nullable PropertyValues pvs) { // Fall back to class name as cache key, for backwards compatibility with custom callers. // 获取缓存的key值,一般以beanName做key String cacheKey = (StringUtils.hasLength(beanName) ? beanName : clazz.getName()); // Quick check on the concurrent map first, with minimal locking. // 从缓存中获取metadata InjectionMetadata metadata = this.injectionMetadataCache.get(cacheKey); // 检测metadata是否需要更新 if (InjectionMetadata.needsRefresh(metadata, clazz)) { synchronized (this.injectionMetadataCache) { metadata = this.injectionMetadataCache.get(cacheKey); if (InjectionMetadata.needsRefresh(metadata, clazz)) { if (metadata != null) { metadata.clear(pvs); } // 通过clazz类,查找所有@Autowired的属性或者方法,并封装成InjectionMetadata类型 metadata = buildAutowiringMetadata(clazz); // 将metadata加入缓存 this.injectionMetadataCache.put(cacheKey, metadata); } } } return metadata; }
可以看到spring依然在用缓存的方式提高性能,继续跟踪核心代码`buildAutowiringMetadata(clazz)````javaprivate InjectionMetadata buildAutowiringMetadata(final Class<?> clazz) {// 查看clazz是否有Autowired注解if (!AnnotationUtils.isCandidateClass(clazz, this.autowiredAnnotationTypes)) {return InjectionMetadata.EMPTY;}// 这里需要注意AutowiredFieldElement,AutowiredMethodElement均继承了InjectionMetadata.InjectedElement// 因此这个列表是可以保存注解的属性和被注解的方法的List<InjectionMetadata.InjectedElement> elements = new ArrayList<>();Class<?> targetClass = clazz;// 1. 通过do while循环,递归的往直接继承的父类寻找@Autowireddo {final List<InjectionMetadata.InjectedElement> currElements = new ArrayList<>();// 2. 通过反射,获取所有属性,doWithLocalFields则是循环的对每个属性应用以下匿名方法ReflectionUtils.doWithLocalFields(targetClass, field -> {// 判断当前field属性是否含有@Autowired的注解MergedAnnotation<?> ann = findAutowiredAnnotation(field);if (ann != null) {// 返回该属性在类中的修饰符,如果等于static常量,则抛出异常,@Autowired不允许注解在静态属性上if (Modifier.isStatic(field.getModifiers())) {if (logger.isInfoEnabled()) {logger.info("Autowired annotation is not supported on static fields: " + field);}return;}// @Autowired有required属性,获取required的值,默认为trueboolean required = determineRequiredStatus(ann);// 3. 将field封装成InjectedElement,并添加到集合中,这里用的是AutowiredFieldElementcurrElements.add(new AutowiredFieldElement(field, required));}});// 4. @Autowired可以注解在方法上ReflectionUtils.doWithLocalMethods(targetClass, method -> {Method bridgedMethod = BridgeMethodResolver.findBridgedMethod(method);if (!BridgeMethodResolver.isVisibilityBridgeMethodPair(method, bridgedMethod)) {return;}MergedAnnotation<?> ann = findAutowiredAnnotation(bridgedMethod);if (ann != null && method.equals(ClassUtils.getMostSpecificMethod(method, clazz))) {if (Modifier.isStatic(method.getModifiers())) {if (logger.isInfoEnabled()) {logger.info("Autowired annotation is not supported on static methods: " + method);}return;}if (method.getParameterCount() == 0) {if (logger.isInfoEnabled()) {logger.info("Autowired annotation should only be used on methods with parameters: " +method);}}boolean required = determineRequiredStatus(ann);PropertyDescriptor pd = BeanUtils.findPropertyForMethod(bridgedMethod, clazz);// 5. 将方法封装成InjectedElement,并添加到集合中,这里用的是AutowiredMethodElementcurrElements.add(new AutowiredMethodElement(method, required, pd));}});elements.addAll(0, currElements);// 返回直接继承的父类targetClass = targetClass.getSuperclass();}// 如果父类不为空则需要把父类的@Autowired属性或方法也找出while (targetClass != null && targetClass != Object.class);// 6. new InjectionMetadata(clazz, elements),将找到的所有的待注入属性或方法生成metadata返回return InjectionMetadata.forElements(elements, clazz);}
- 外层
**do … while …**的循环被用于递归的查找父类的**@Autowired**属性或方法 - 通过反射的方式获取到所有属性并循环验证每一个属性是否被
**@Autowired**注解 - 将查找到包含
**@Autowired**注解的filed封装成**AutowiredFieldElement**,加入到列表中 - 循环查找在方法上的注解
- 将找到的方法封装成
**AutowiredMethodElement**,并加入列表
这里需要特别强调一点,InjectedElement被AutowiredFieldElement、AutowiredMethodElement所继承,他们都有各自的inject函数,实现各自的注入。因此改ArrayList elements是拥有2种类型的属性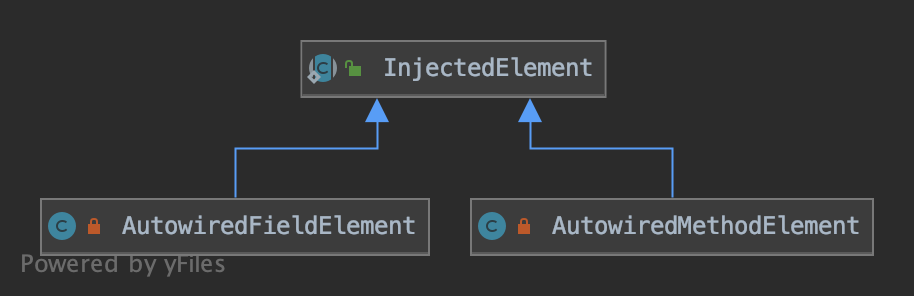
public void inject(Object target, @Nullable String beanName, @Nullable PropertyValues pvs) throws Throwable {
// 获取所有需要被注入的元素
Collection
利用for循环,遍历刚刚查到到的elements列表,进行注入。<br />在上面有特别提醒,这里的element有可能是`AutowiredFieldElement`类型、或`AutowiredMethodElement`类型。各自代表`@Autowired`注解在属性上、以及注解在方法上的2种不同元素。因此他们调用的`element.inject(target, beanName, pvs);`也是不一样的<a name="n00T1"></a>#### 2.1 字段注入(`AutowiredFieldElement`)```javaprivate class AutowiredFieldElement extends InjectionMetadata.InjectedElement {@Overrideprotected void inject(Object bean, @Nullable String beanName, @Nullable PropertyValues pvs) throws Throwable {Field field = (Field) this.member;Object value;if (this.cached) {value = resolvedCachedArgument(beanName, this.cachedFieldValue);}else {// 专门用于注入的包装类,包装构造函数参数,方法参数或字段DependencyDescriptor desc = new DependencyDescriptor(field, this.required);// 设置classdesc.setContainingClass(bean.getClass());// 需要被自动注入的beanNames,这里只有可能 = 1,方法注入时才有可能为多个Set<String> autowiredBeanNames = new LinkedHashSet<>(1);Assert.state(beanFactory != null, "No BeanFactory available");TypeConverter typeConverter = beanFactory.getTypeConverter();// 获取类型转换器try {// 通过beanFactory获取属性对应的值,比如需要调用getBean("b")获取依赖的属性单例,并且通过自动转型转为需要的类型value = beanFactory.resolveDependency(desc, beanName, autowiredBeanNames, typeConverter);}catch (BeansException ex) {throw new UnsatisfiedDependencyException(null, beanName, new InjectionPoint(field), ex);}synchronized (this) {if (!this.cached) {if (value != null || this.required) {this.cachedFieldValue = desc;// 注册依赖,registerDependentBeans(beanName, autowiredBeanNames);// 因为是属性注入,因此这里只有可能等于1if (autowiredBeanNames.size() == 1) {String autowiredBeanName = autowiredBeanNames.iterator().next();if (beanFactory.containsBean(autowiredBeanName) &&beanFactory.isTypeMatch(autowiredBeanName, field.getType())) {// 缓存当前valuethis.cachedFieldValue = new ShortcutDependencyDescriptor(desc, autowiredBeanName, field.getType());}}}else {this.cachedFieldValue = null;}this.cached = true;}}}if (value != null) {// 通过反射,将value值设置到bean中ReflectionUtils.makeAccessible(field);field.set(bean, value);}}}
上方大部分的工作都在做待注入bean的获取以及类型的转换,如果深究下去可以再把spring Ioc讲一遍,但是核心还是getBean(字段)获取到对应bean…这里就关心核心的语句,就是这2句
if (value != null) {// 通过反射,将value值设置到bean中ReflectionUtils.makeAccessible(field);field.set(bean, value);}
spring通过反射的方式,调用field的set进行属性的注入
2.2 方法注入(AutowiredMethodElement)
private class AutowiredMethodElement extends InjectionMetadata.InjectedElement {@Overrideprotected void inject(Object bean, @Nullable String beanName, @Nullable PropertyValues pvs) throws Throwable {if (checkPropertySkipping(pvs)) {return;}// @Autowired标注在方法上Method method = (Method) this.member;Object[] arguments;if (this.cached) {// Shortcut for avoiding synchronization...// 有缓存arguments = resolveCachedArguments(beanName);}else {// 没缓存,直接获取方法上所有的参数int argumentCount = method.getParameterCount();arguments = new Object[argumentCount];DependencyDescriptor[] descriptors = new DependencyDescriptor[argumentCount];Set<String> autowiredBeans = new LinkedHashSet<>(argumentCount);Assert.state(beanFactory != null, "No BeanFactory available");TypeConverter typeConverter = beanFactory.getTypeConverter();// 循环所有参数for (int i = 0; i < arguments.length; i++) {MethodParameter methodParam = new MethodParameter(method, i);DependencyDescriptor currDesc = new DependencyDescriptor(methodParam, this.required);currDesc.setContainingClass(bean.getClass());descriptors[i] = currDesc;try {// 通过beanFactory,获取代注入的bean,并进行类型转换Object arg = beanFactory.resolveDependency(currDesc, beanName, autowiredBeans, typeConverter);if (arg == null && !this.required) {arguments = null;break;}arguments[i] = arg;}catch (BeansException ex) {throw new UnsatisfiedDependencyException(null, beanName, new InjectionPoint(methodParam), ex);}}synchronized (this) {if (!this.cached) {if (arguments != null) {DependencyDescriptor[] cachedMethodArguments = Arrays.copyOf(descriptors, arguments.length);// 注册依赖registerDependentBeans(beanName, autowiredBeans);// 如果自动注入的个数 = 参数个数,则缓存if (autowiredBeans.size() == argumentCount) {Iterator<String> it = autowiredBeans.iterator();Class<?>[] paramTypes = method.getParameterTypes();for (int i = 0; i < paramTypes.length; i++) {String autowiredBeanName = it.next();if (beanFactory.containsBean(autowiredBeanName) &&beanFactory.isTypeMatch(autowiredBeanName, paramTypes[i])) {// 缓存cachedMethodArguments[i] = new ShortcutDependencyDescriptor(descriptors[i], autowiredBeanName, paramTypes[i]);}}}// 缓存方法this.cachedMethodArguments = cachedMethodArguments;}else {this.cachedMethodArguments = null;}this.cached = true;}}}if (arguments != null) {try {// 反射调用注入方法,将获取到的所有bean作为参数ReflectionUtils.makeAccessible(method);method.invoke(bean, arguments);}catch (InvocationTargetException ex) {throw ex.getTargetException();}}}}
这里与属性注入最大的区别在于,@Autowired注解在方法上,方法可以拥有多个参数,因此这里需要通过循环将一个个获取,而获取bean的方式于上面一样,本质都是通过getBean获取。
而核心语句还是2句
// 反射调用注入方法,将获取到的所有bean作为参数ReflectionUtils.makeAccessible(method);method.invoke(bean, arguments);
与属性注入不同的是,当@Autowired注解在方法上,例如注解在setter方法上,则只需要直接调用该setter方法将参数数组传入即可以,即使用invoke触发方法,具体属性赋值的过程在setter方法中由用户自行编写。

若有收获,就点个赞吧
0 人点赞
