Java Mybatis
批量插入功能是日常工作中比较常见的业务功能之一,对 3 种实现方法做一个性能测试,以及相应的原理分析。
先来简单说一下 3 种批量插入功能分别是:
— 创建数据库
SET NAMES utf8mb4;
SET FOREIGN_KEY_CHECKS = 0;
DROP DATABASE IF EXISTS testdb;
CREATE DATABASE testdb;
USE testdb;
— 创建 user 表
DROP TABLE IF EXISTS user;
CREATE TABLE user (
id int(11) NOT NULL AUTO_INCREMENT,
name varchar(255) CHARACTER SET utf8mb4 COLLATE utf8mb4_bin NULL DEFAULT NULL,
password varchar(255) CHARACTER SET utf8mb4 COLLATE utf8mb4_bin NULL DEFAULT NULL,
createtime datetime NULL DEFAULT CURRENT_TIMESTAMP,
PRIMARY KEY (id) USING BTREE
) ENGINE = InnoDB AUTO_INCREMENT = 6 CHARACTER SET = utf8mb4 COLLATE = utf8mb4_bin ROW_FORMAT = Dynamic;
— 添加测试数据
INSERT INTO user VALUES (1, ‘赵云’, ‘123456’, ‘2021-09-10 18:11:16’);
INSERT INTO user VALUES (2, ‘张飞’, ‘123456’, ‘2021-09-10 18:11:28’);
INSERT INTO user VALUES (3, ‘关羽’, ‘123456’, ‘2021-09-10 18:11:34’);
INSERT INTO user VALUES (4, ‘刘备’, ‘123456’, ‘2021-09-10 18:11:41’);
INSERT INTO user VALUES (5, ‘曹操’, ‘123456’, ‘2021-09-10 18:12:02’);
SET FOREIGN_KEY_CHECKS = 1;
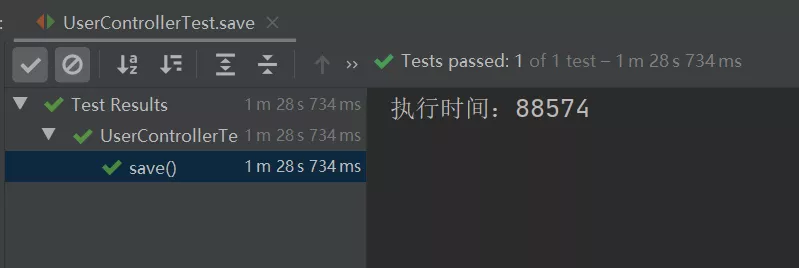
数据库的最终效果如下:<br />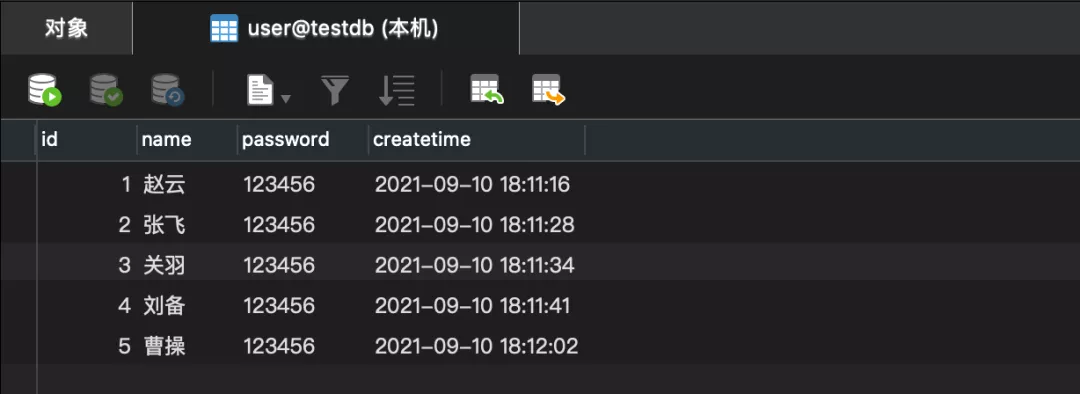<a name="Iyrsj"></a>## 1、循环单次插入接下来将使用 Spring Boot 项目,批量插入 10W 条数据来分别测试各个方法的执行时间。<br />循环单次插入的(测试)核心代码如下:```javaimport com.example.demo.model.User;import com.example.demo.service.impl.UserServiceImpl;import org.junit.jupiter.api.Test;import org.springframework.beans.factory.annotation.Autowired;import org.springframework.boot.test.context.SpringBootTest;@SpringBootTestclass UserControllerTest {// 最大循环次数private static final int MAXCOUNT = 100000;@Autowiredprivate UserServiceImpl userService;/*** 循环单次插入*/@Testvoid save() {long stime = System.currentTimeMillis(); // 统计开始时间for (int i = 0; i < MAXCOUNT; i++) {User user = new User();user.setName("test:" + i);user.setPassword("123456");userService.save(user);}long etime = System.currentTimeMillis(); // 统计结束时间System.out.println("执行时间:" + (etime - stime));}}
2、MP 批量插入
MP 批量插入功能核心实现类有三个:UserController(控制器)、UserServiceImpl(业务逻辑实现类)、UserMapper(数据库映射类),它们的调用流程如下: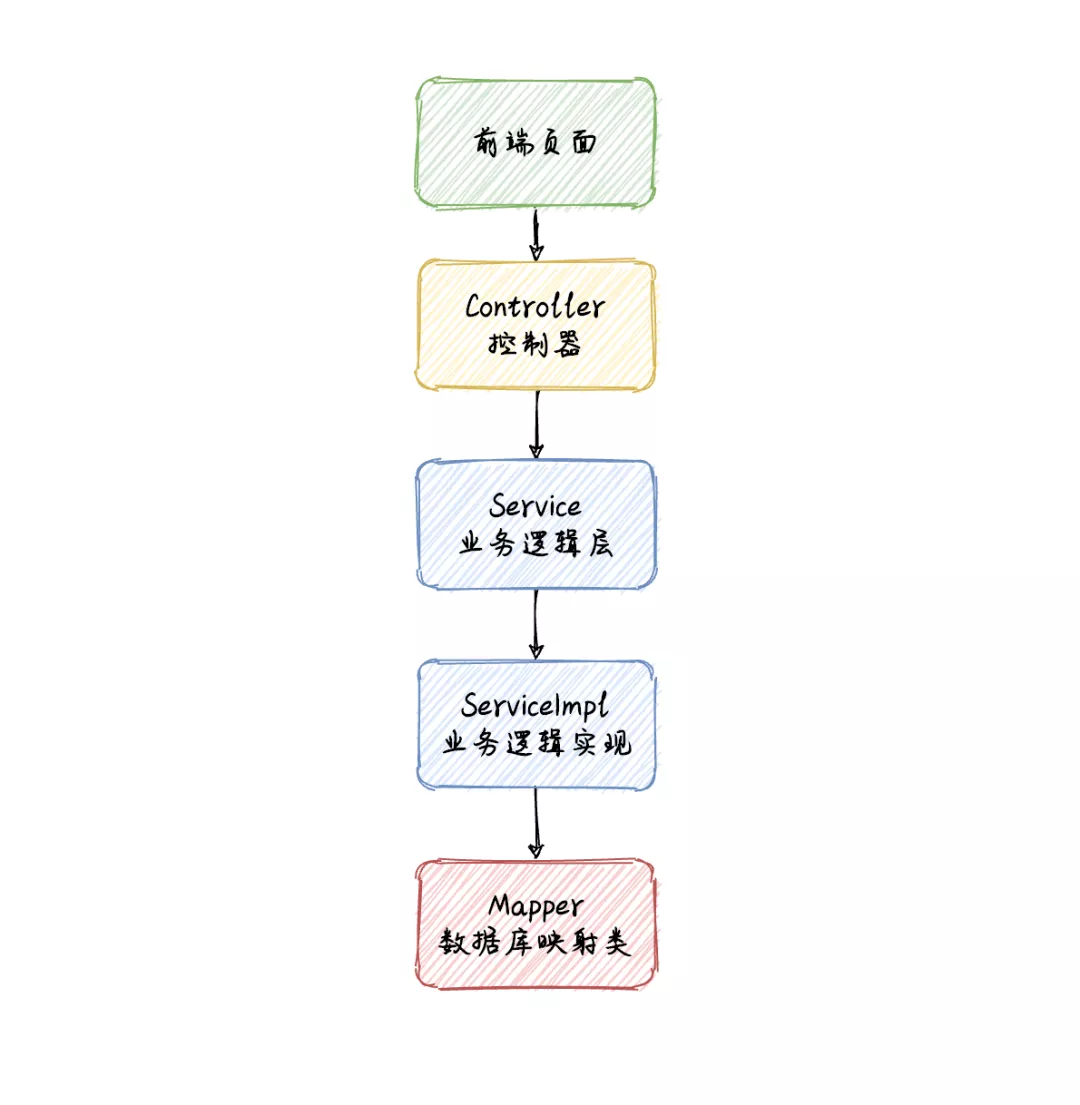 注意此方法实现需要先添加 MP 框架,打开 pom.xml 文件添加如下内容:
<dependency><groupId>com.baomidou</groupId><artifactId>mybatis-plus-boot-starter</artifactId><version>mybatis-plus-latest-version</version></dependency>
注意:mybatis-plus-latest-version 表示 MP 框架的最新版本号,可访问 https://mvnrepository.com/artifact/com.baomidou/mybatis-plus-boot-starter 查询最新版本号,但在使用的时候记得一定要将上面的 “mybatis-plus-latest-version”替换成换成具体的版本号,如 3.4.3 才能正常的引入框架。
更多 MP 框架的介绍请移步它的官网:https://baomidou.com/guide/
① 控制器实现
import com.example.demo.model.User;import com.example.demo.service.impl.UserServiceImpl;import org.springframework.beans.factory.annotation.Autowired;import org.springframework.web.bind.annotation.RequestMapping;import org.springframework.web.bind.annotation.RestController;import java.util.ArrayList;import java.util.List;@RestController@RequestMapping("/u")public class UserController {@Autowiredprivate UserServiceImpl userService;/*** 批量插入(自定义)*/@RequestMapping("/mysavebatch")public boolean mySaveBatch(){List<User> list = new ArrayList<>();// 待添加(用户)数据for (int i = 0; i < 1000; i++) {User user = new User();user.setName("test:"+i);user.setPassword("123456");list.add(user);}return userService.saveBatchCustom(list);}}
② 业务逻辑层实现
import com.baomidou.mybatisplus.extension.service.impl.ServiceImpl;import com.example.demo.mapper.UserMapper;import com.example.demo.model.User;import com.example.demo.service.UserService;import org.springframework.beans.factory.annotation.Autowired;import org.springframework.stereotype.Service;import java.util.List;@Servicepublic class UserServiceImpl extends ServiceImpl<UserMapper,User>implements UserService {@Autowiredprivate UserMapper userMapper;public boolean saveBatchCustom(List<User> list){return userMapper.saveBatchCustom(list);}}
③ 数据持久层实现
import com.baomidou.mybatisplus.core.mapper.BaseMapper;import com.example.demo.model.User;import org.apache.ibatis.annotations.Mapper;import java.util.List;@Mapperpublic interface UserMapper extends BaseMapper<User>{boolean saveBatchCustom(List<User> list);}
经过以上代码实现,就可以使用 MP 来实现数据的批量插入功能了,但除了具体的实现代码之外,还要知道每种方法的执行效率,所以接下来编写 MP 的测试代码。
MP 性能测试
import com.example.demo.model.User;import com.example.demo.service.impl.UserServiceImpl;import org.junit.jupiter.api.Test;import org.springframework.beans.factory.annotation.Autowired;import org.springframework.boot.test.context.SpringBootTest;import java.util.ArrayList;import java.util.List;@SpringBootTestclass UserControllerTest {// 最大循环次数private static final int MAXCOUNT = 100000;@Autowiredprivate UserServiceImpl userService;/*** MP 批量插入*/@Testvoid saveBatch() {long stime = System.currentTimeMillis(); // 统计开始时间List<User> list = new ArrayList<>();for (int i = 0; i < MAXCOUNT; i++) {User user = new User();user.setName("test:" + i);user.setPassword("123456");list.add(user);}// MP 批量插入userService.saveBatch(list);long etime = System.currentTimeMillis(); // 统计结束时间System.out.println("执行时间:" + (etime - stime));}}
以上程序的执行总共花费了 6088 毫秒,如下图所示: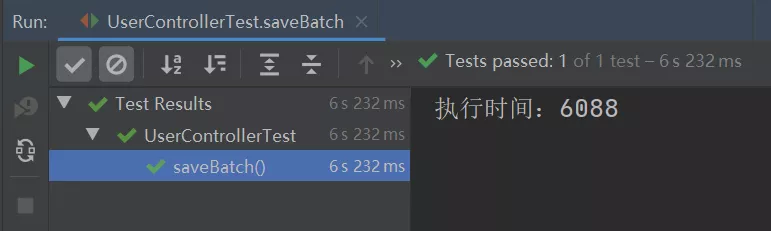 从上述结果可知,使用 MP 的批量插入功能(插入数据 10W 条),它的性能比循环单次插入的性能提升了 14.5 倍。
MP 源码分析
从 MP 和循环单次插入的执行时间可以看出,使用 MP 并不是像有些朋友认为的那样,还是循环单次执行的,为了更清楚的说明此问题,查看了 MP 的源码。
MP 的核心实现代码是 saveBatch 方法,此方法的源码如下: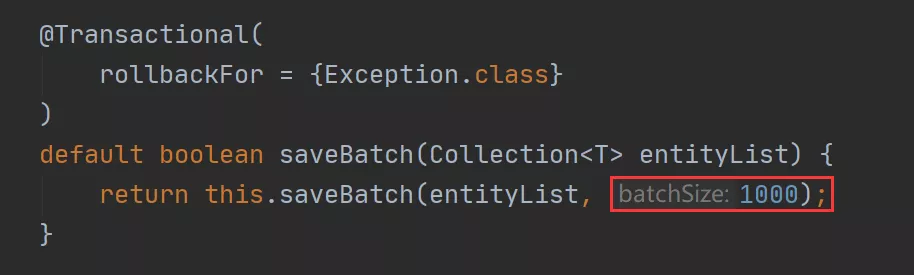 继续跟进 saveBatch 的重载方法:
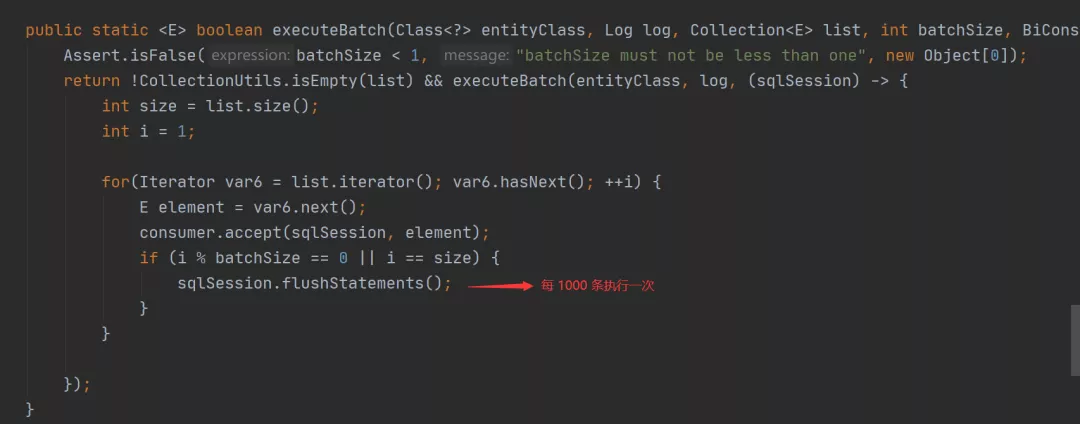 从上述源码可以看出,MP 是将要执行的数据分成 N 份,每份 1000 条,每满 1000 条就会执行一次批量插入,所以它的性能要比循环单次插入的性能高很多。
那为什么要分批执行,而不是一次执行?别着急,当看了第 3 种实现方法之后就明白了。
3、原生批量插入
原生批量插入方法是依靠 MyBatis 中的 foreach 标签,将数据拼接成一条原生的 insert 语句一次性执行的,核心实现代码如下。
① 业务逻辑层扩展
在 UserServiceImpl 添加 saveBatchByNative 方法,实现代码如下:
import com.baomidou.mybatisplus.extension.service.impl.ServiceImpl;import com.example.demo.mapper.UserMapper;import com.example.demo.model.User;import com.example.demo.service.UserService;import org.springframework.beans.factory.annotation.Autowired;import org.springframework.stereotype.Service;import java.util.List;@Servicepublic class UserServiceImpl extends ServiceImpl<UserMapper, User>implements UserService {@Autowiredprivate UserMapper userMapper;public boolean saveBatchByNative(List<User> list) {return userMapper.saveBatchByNative(list);}}
② 数据持久层扩展
在 UserMapper 添加 saveBatchByNative 方法,实现代码如下:
import com.baomidou.mybatisplus.core.mapper.BaseMapper;import com.example.demo.model.User;import org.apache.ibatis.annotations.Mapper;import java.util.List;@Mapperpublic interface UserMapper extends BaseMapper<User> {boolean saveBatchByNative(List<User> list);}
③ 添加 UserMapper.xml
创建 UserMapper.xml 文件,使用 foreach 标签拼接 SQL,具体实现代码如下:
<?xml version="1.0" encoding="UTF-8"?><!DOCTYPE mapper PUBLIC "-//mybatis.org//DTD Mapper 3.0//EN" "http://mybatis.org/dtd/mybatis-3-mapper.dtd"><mapper namespace="com.example.demo.mapper.UserMapper"><insert id="saveBatchByNative">INSERT INTO `USER`(`NAME`,`PASSWORD`) VALUES<foreach collection="list" separator="," item="item">(#{item.name},#{item.password})</foreach></insert></mapper>
经过以上步骤,原生的批量插入功能就实现的差不多了,接下来使用单元测试来查看一下此方法的执行效率。
原生批量插入性能测试
import com.example.demo.model.User;import com.example.demo.service.impl.UserServiceImpl;import org.junit.jupiter.api.Test;import org.springframework.beans.factory.annotation.Autowired;import org.springframework.boot.test.context.SpringBootTest;import java.util.ArrayList;import java.util.List;@SpringBootTestclass UserControllerTest {// 最大循环次数private static final int MAXCOUNT = 100000;@Autowiredprivate UserServiceImpl userService;/*** 原生自己拼接 SQL,批量插入*/@Testvoid saveBatchByNative() {long stime = System.currentTimeMillis(); // 统计开始时间List<User> list = new ArrayList<>();for (int i = 0; i < MAXCOUNT; i++) {User user = new User();user.setName("test:" + i);user.setPassword("123456");list.add(user);}// 批量插入userService.saveBatchByNative(list);long etime = System.currentTimeMillis(); // 统计结束时间System.out.println("执行时间:" + (etime - stime));}}
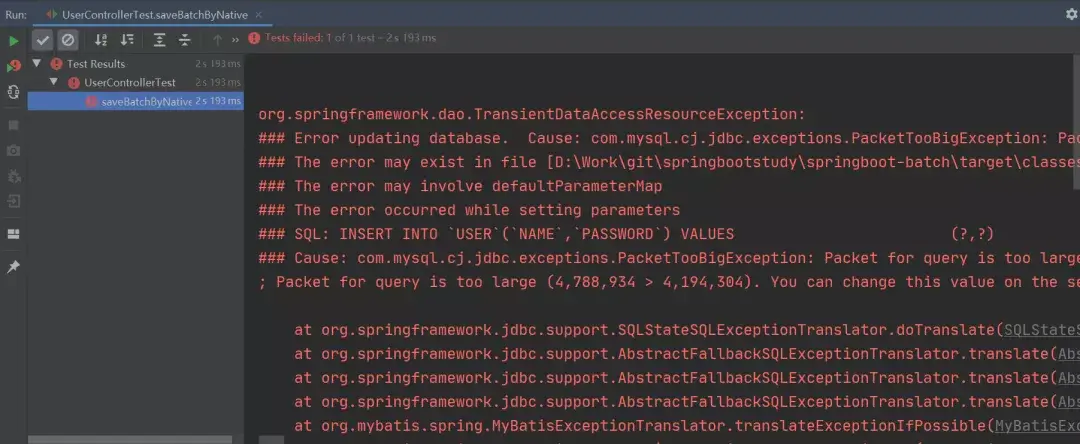 程序的执行竟然报错了。
缺点分析
从上述报错信息可以看出,当使用原生方法将 10W 条数据拼接成一个 SQL 执行时,由于拼接的 SQL 过大(4.56M)从而导致程序执行报错,因为默认情况下 MySQL 可以执行的最大 SQL(大小)为 4M,所以程序就报错了。
这就是原生批量插入方法的缺点,也是为什么 MP 需要分批执行的原因,就是为了防止程序在执行时,因为触发了数据库的最大执行 SQL 而导致程序执行报错。
解决方案
当然也可以通过设置 MySQL 的最大执行 SQL 来解决报错的问题,设置命令如下:
-- 设置最大执行 SQL 为 10Mset global max_allowed_packet=10*1024*1024;
如下图所示: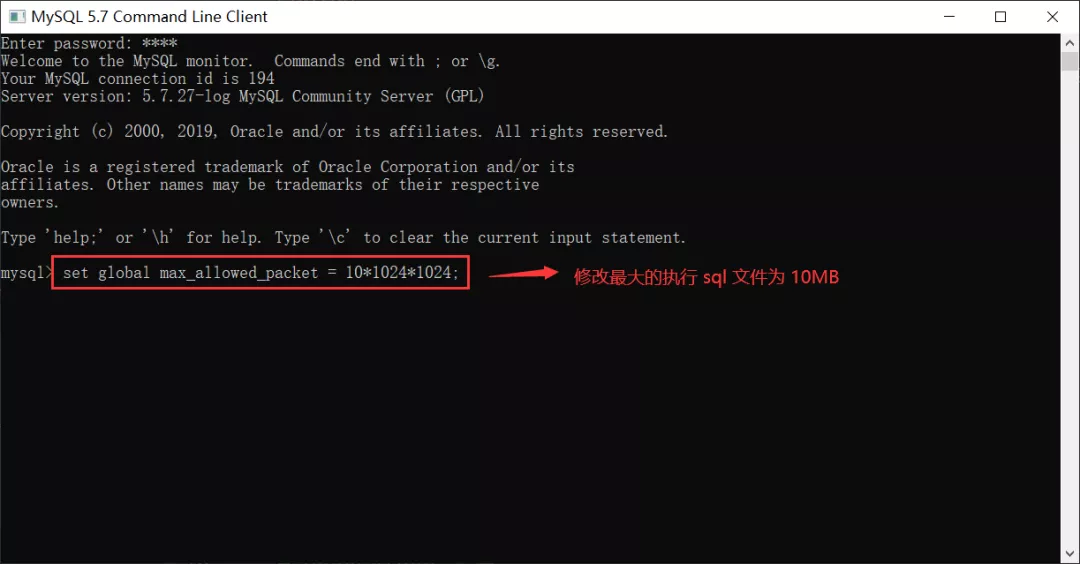 :::tips
注意:以上命令需要在 MySQL 连接的客户端中执行。
:::
但以上解决方案仍是治标不治本,因为无法预测程序中最大的执行 SQL 到底有多大,那么最普世的方法就是分配执行批量插入的方法了(也就是像 MP 实现的那样)。
:::tips
注意:以上命令需要在 MySQL 连接的客户端中执行。
:::
但以上解决方案仍是治标不治本,因为无法预测程序中最大的执行 SQL 到底有多大,那么最普世的方法就是分配执行批量插入的方法了(也就是像 MP 实现的那样)。
当 MySQL 的最大执行 SQL 设置为 10M 之后,运行以上单元测试代码,执行的结果如下: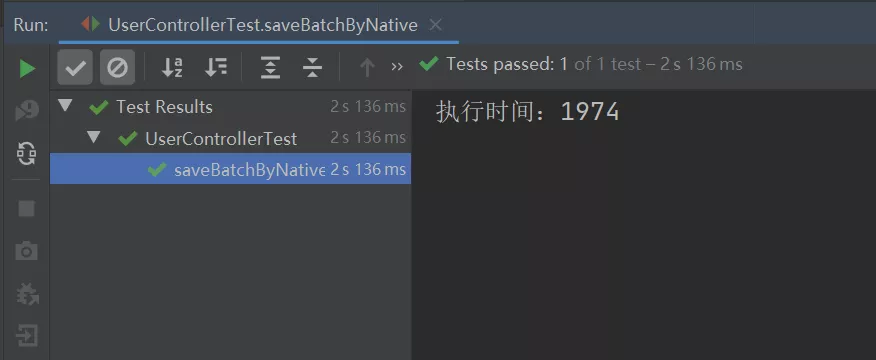
总结
介绍了 MyBatis 批量插入的 3 种方法,其中循环单次插入的性能最低,也是最不可取的;使用 MyBatis 拼接原生 SQL 一次性插入的方法性能最高,但此方法可能会导致程序执行报错(触发了数据库最大执行 SQL 大小的限制),所以综合以上情况,可以考虑使用 MP 的批量插入功能。

若有收获,就点个赞吧
0 人点赞
