一、@Conditional的强大之处
在项目开发中是否会遇到过这些问题:
- 某个功能需要根据项目中有没有某个jar判断是否开启该功能。
- 某个bean的实例化需要先判断另一个bean有没有实例化,再判断是否实例化自己。
- 某个功能是否开启,在配置文件中有个参数可以对它进行控制。
问题1可以用@ConditionalOnClass@ConditionalOnClass注解解决,代码如下:
如果项目中存在B类,则会实例化A类。如果不存在B类,则不会实例化A类。public class A {}public class B {}@ConditionalOnClass(B.class)@Configurationpublic class TestConfiguration {@Beanpublic A a() {return new A();}}
有人可能会问:不是判断有没有某个jar吗?怎么现在判断某个类了?直接判断有没有该jar下的某个关键类更简单。
这个注解有个升级版的应用场景:比如common工程中写了一个发消息的工具类mqTemplate,业务工程引用了common工程,只需再引入消息中间件,比如rocketmq的jar包,就能开启mqTemplate的功能。而如果有另一个业务工程,通用引用了common工程,如果不需要发消息的功能,不引入rocketmq的jar包即可。
@ConditionalOnBean
问题2可以通过@ConditionalOnBean注解解决,代码如下:
@Configurationpublic class TestConfiguration {@Beanpublic B b() {return new B();}@ConditionalOnBean(name="b")@Beanpublic A a() {return new A();}}
@ConditionalOnProperty
问题3可以通过@ConditionalOnProperty注解解决,代码如下:
@ConditionalOnProperty(prefix = "demo",name="enable", havingValue = "true",matchIfMissing=true )@Configurationpublic class TestConfiguration {@Beanpublic A a() {return new A();}}
在applicationContext.properties文件中配置参数:
demo.enable=false
各参数含义:
- prefix 表示参数名的前缀,这里是demo
- name 表示参数名
- havingValue 表示指定的值,参数中配置的值需要跟指定的值比较是否相等,相等才满足条件
- matchIfMissing 表示是否允许缺省配置。
这个功能可以作为开关,相比EnableXXX注解的开关更优雅,因为它可以通过参数配置是否开启,而EnableXXX注解的开关需要在代码中硬编码开启或关闭。
其他的Conditional注解
当然,Spring用得比较多的Conditional注解还有:ConditionalOnMissingClass、ConditionalOnMissingBean、ConditionalOnWebApplication等。
下面用一张图整体认识一下@Conditional家族。
自定义Conditional
SpringBoot自带的Conditional系列已经可以满足绝大多数的需求了。但如果有比较特殊的场景,也可以自定义自定义Conditional。
第一步,自定义注解:
@Conditional(MyCondition.class)@Retention(RetentionPolicy.RUNTIME)@Target({ElementType.TYPE, ElementType.METHOD})@Documentedpublic @interface MyConditionOnProperty {String name() default "";String havingValue() default "";}
第二步,实现Condition接口:
public class MyCondition implements Condition {@Overridepublic boolean matches(ConditionContext context, AnnotatedTypeMetadata metadata) {System.out.println("实现自定义逻辑");return false;}}
第三步,使用@MyConditionOnProperty注解。
Conditional的奥秘就藏在ConfigurationClassParser类的processConfigurationClass方法中: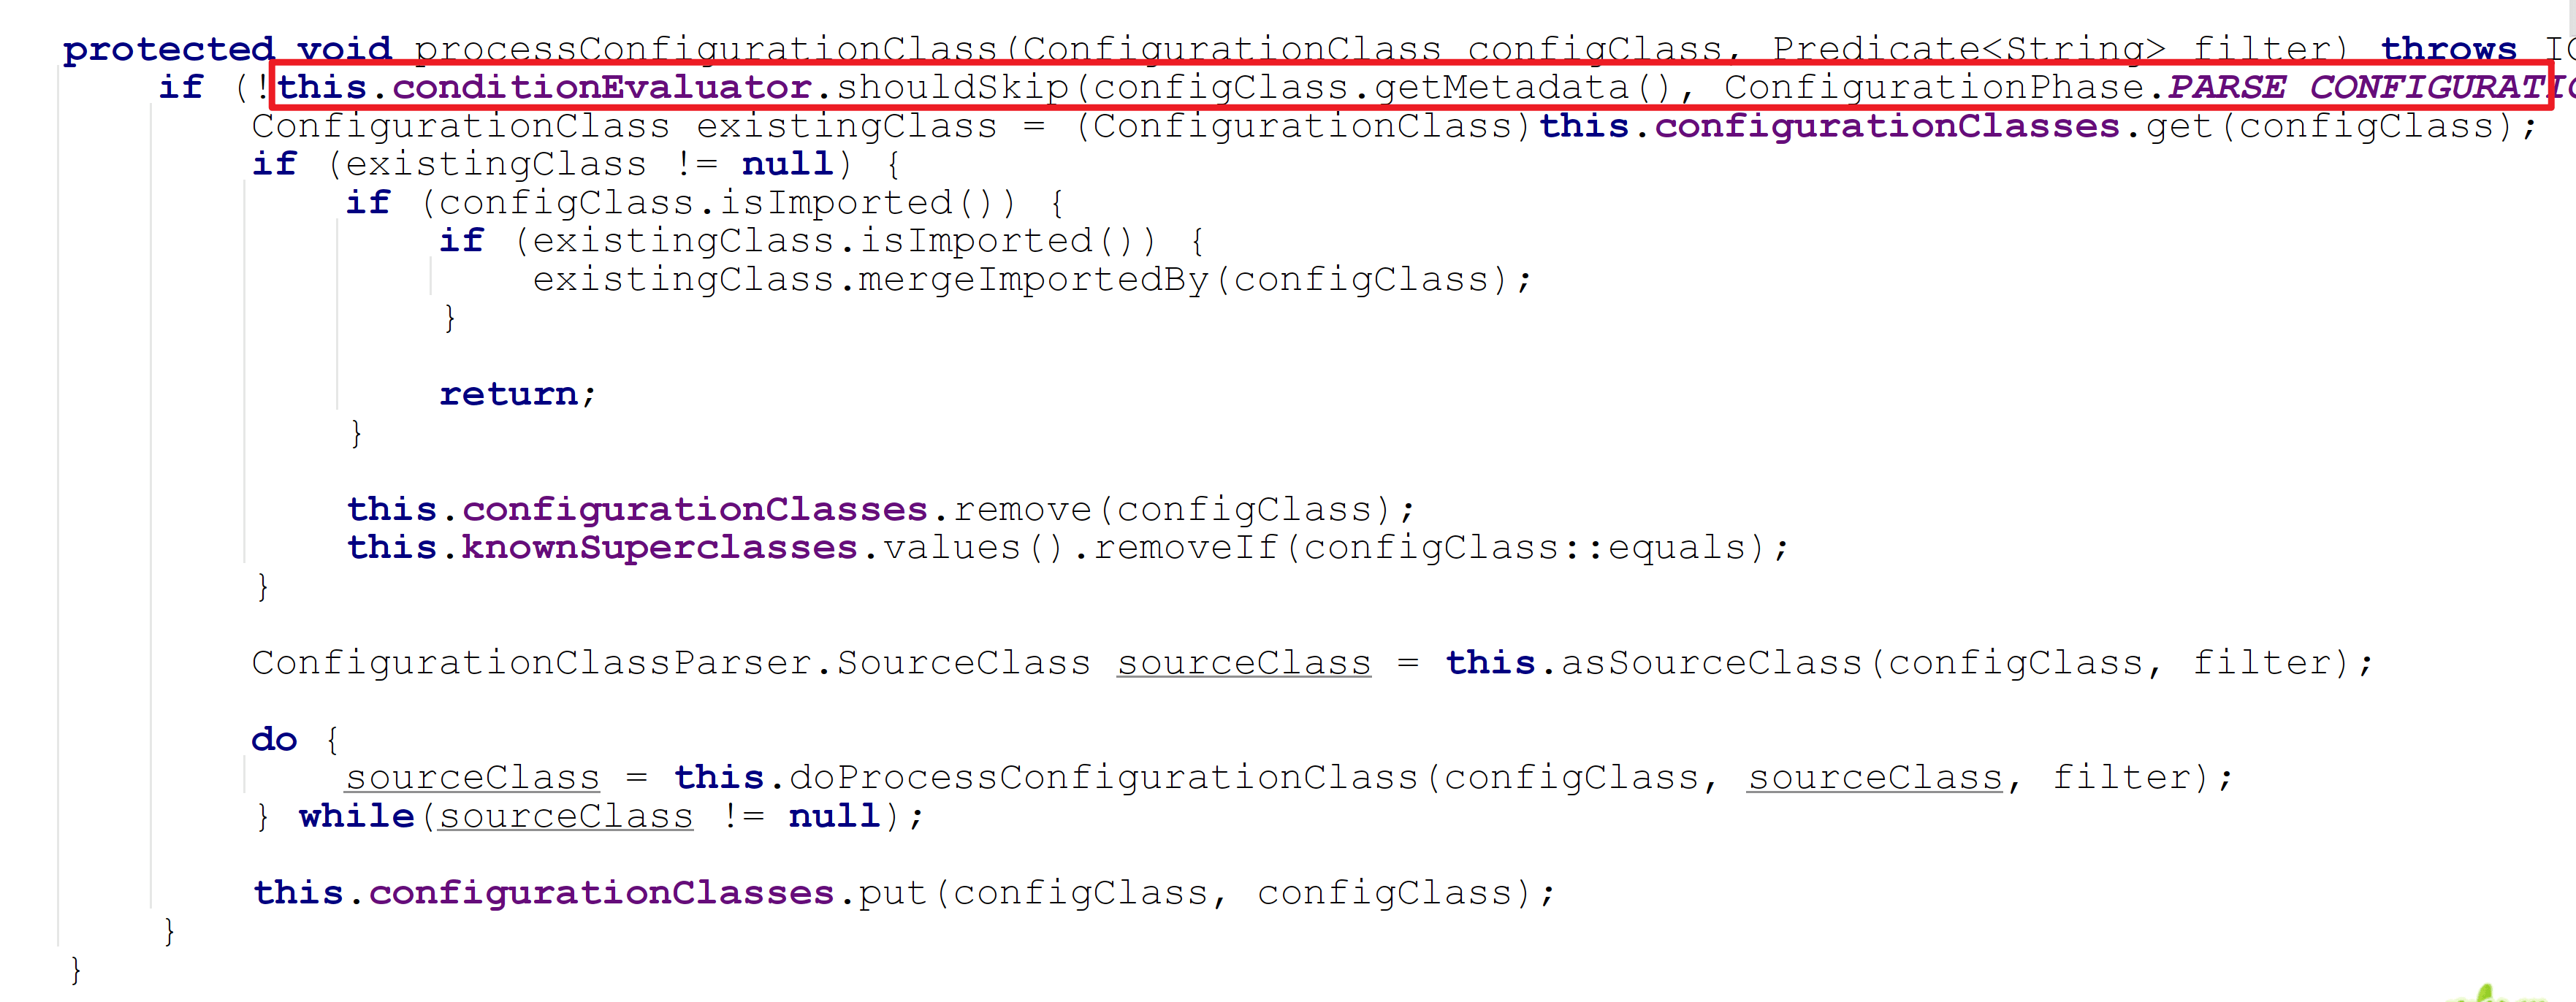
这个方法逻辑不复杂: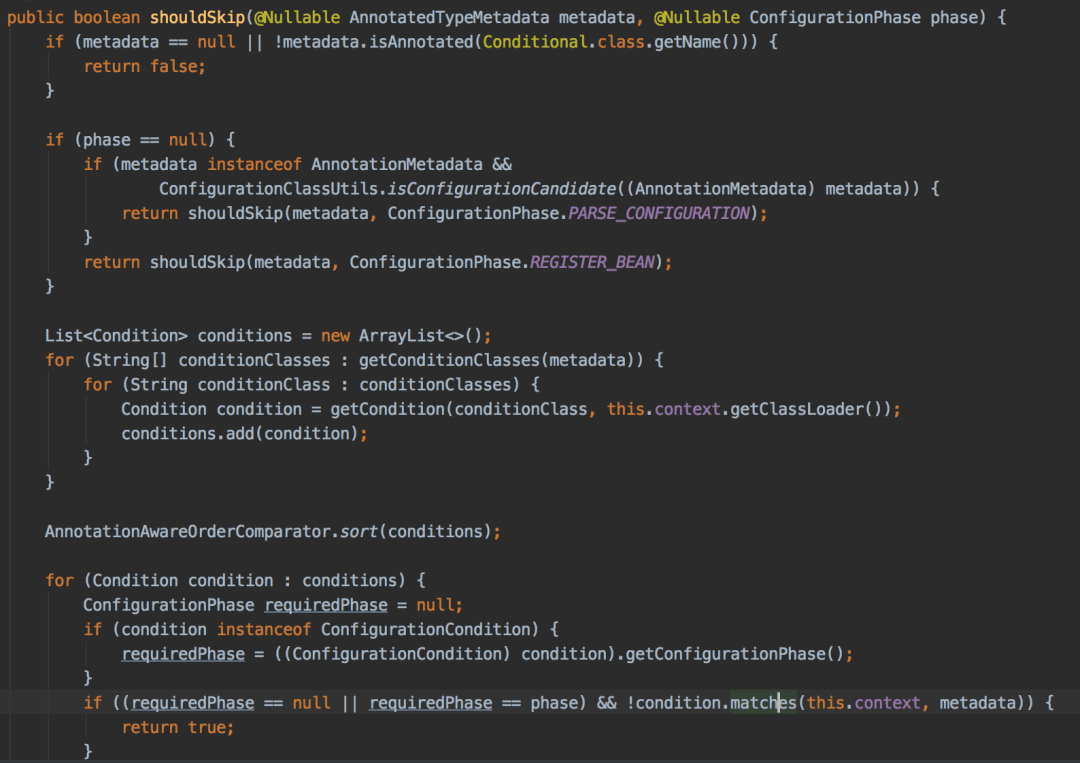
- 先判断有没有使用
@Conditional注解,如果没有直接返回false - 收集
condition到集合中 - 按
order排序该集合 - 遍历该集合,循环调用
condition的matchs方法。二.
有时需要在某个配置类中引入另外一些类,被引入的类也加到Spring容器中。这时可以使用@Import@Import注解完成这个功能。
如果看过它的源码会发现,引入的类支持三种不同类型。
但是最好将普通类和@Configuration注解的配置类分开讲解,所以列了四种不同类型: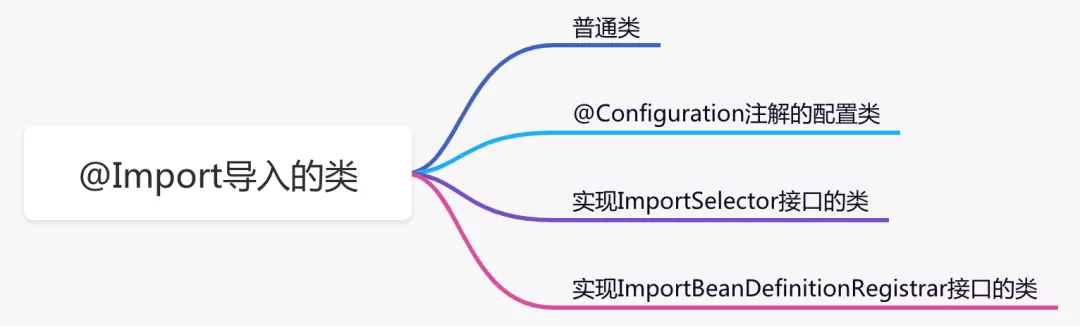
普通类
这种引入方式是最简单的,被引入的类会被实例化bean对象。
通过public class A {}@Import(A.class)@Configurationpublic class TestConfiguration {}
@Import注解引入A类,Spring就能自动实例化A对象,然后在需要使用的地方通过@Autowired注解注入即可:
不用加@Autowiredprivate A a;
@Bean注解也能实例化bean。
这种引入方式是最复杂的,因为@Configuration注解的配置类@Configuration注解还支持多种组合注解,比如:
@Import@ImportResource@PropertySource等。public class A {}public class B {}@Import(B.class)@Configurationpublic class AConfiguration {@Beanpublic A a() {return new A();}}@Import(AConfiguration.class)@Configurationpublic class TestConfiguration {}
通过
@Import注解引入@Configuration注解的配置类,会把该配置类相关@Import、@ImportResource、@PropertySource等注解引入的类进行递归,一次性全部引入。实现
ImportSelector接口的类这种引入方式需要实现
ImportSelector接口:public class AImportSelector implements ImportSelector {private static final String CLASS_NAME = "com.sue.cache.service.test13.A";public String[] selectImports(AnnotationMetadata importingClassMetadata) {return new String[]{CLASS_NAME};}}@Import(AImportSelector.class)@Configurationpublic class TestConfiguration {}
这种方式的好处是
selectImports方法返回的是数组,意味着可以同时引入多个类,还是非常方便的。实现
ImportBeanDefinitionRegistrar接口的类这种引入方式需要实现
ImportBeanDefinitionRegistrar接口:public class AImportBeanDefinitionRegistrar implements ImportBeanDefinitionRegistrar {@Overridepublic void registerBeanDefinitions(AnnotationMetadata importingClassMetadata, BeanDefinitionRegistry registry) {RootBeanDefinition rootBeanDefinition = new RootBeanDefinition(A.class);registry.registerBeanDefinition("a", rootBeanDefinition);}}@Import(AImportBeanDefinitionRegistrar.class)@Configurationpublic class TestConfiguration {}
这种方式是最灵活的,能在
registerBeanDefinitions方法中获取到BeanDefinitionRegistry容器注册对象,可以手动控制BeanDefinition的创建和注册。
当然@import注解非常人性化,还支持同时引入多种不同类型的类。@Import({B.class,AImportBeanDefinitionRegistrar.class})@Configurationpublic class TestConfiguration {}
这四种引入类的方式各有千秋,总结如下:
- 普通类,用于创建没有特殊要求的bean实例。
@Configuration注解的配置类,用于层层嵌套引入的场景。- 实现
ImportSelector接口的类,用于一次性引入多个类的场景,或者可以根据不同的配置决定引入不同类的场景。 - 实现
ImportBeanDefinitionRegistrar接口的类,主要用于可以手动控制BeanDefinition的创建和注册的场景,它的方法中可以获取BeanDefinitionRegistry注册容器对象。
在ConfigurationClassParser类的processImports方法中可以看到这三种方式的处理逻辑: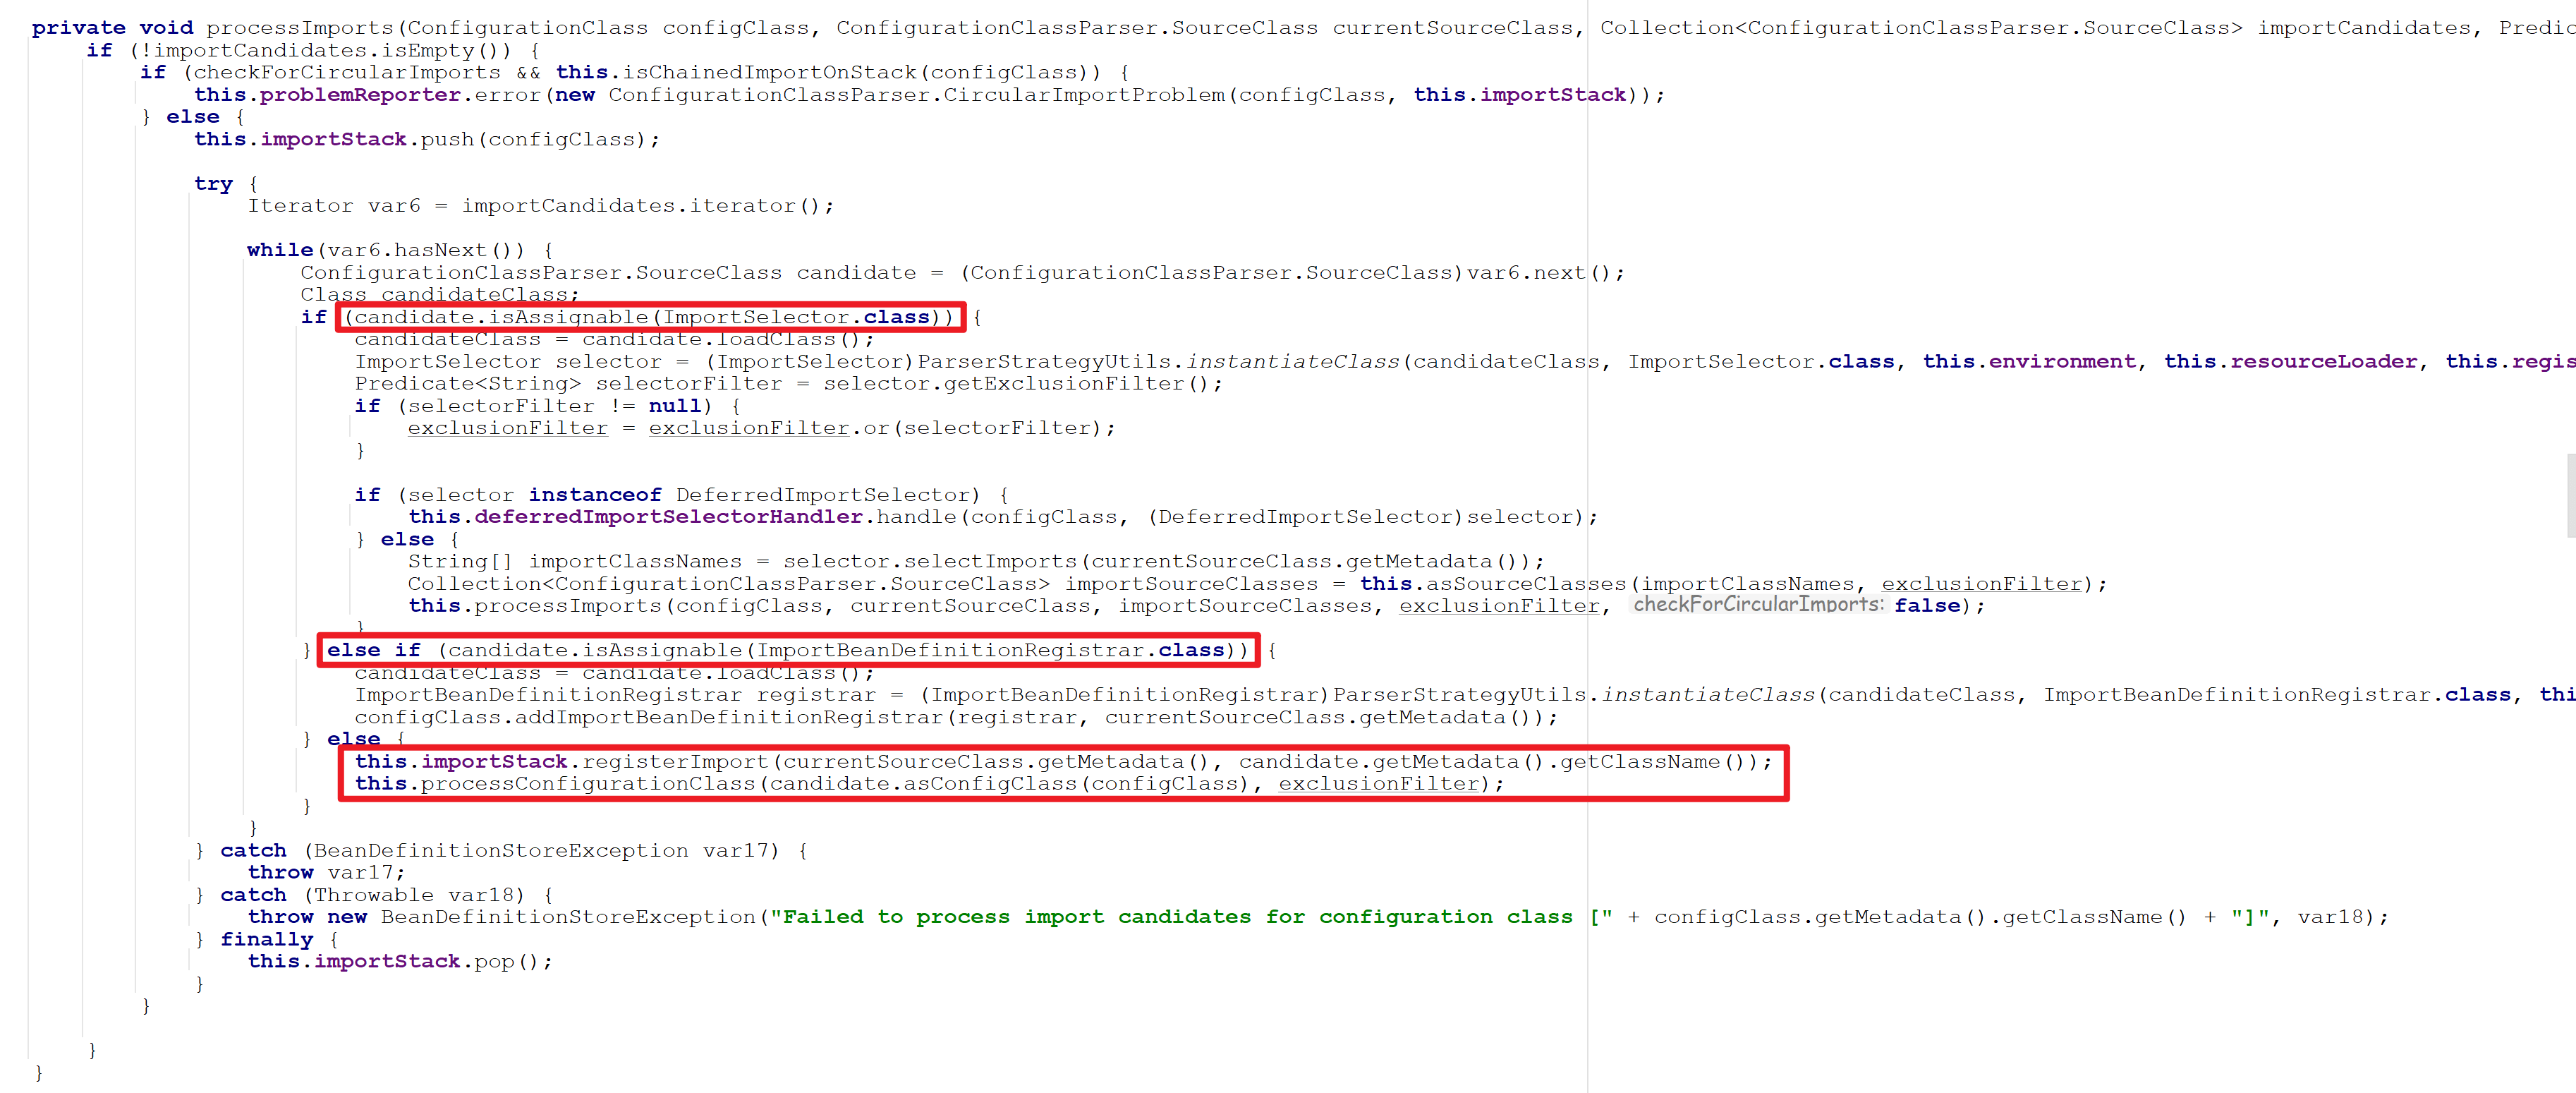
最后的else方法其实包含了:普通类和@Configuration注解的配置类两种不同的处理逻辑。
三、@ConfigurationProperties赋值
在项目中使用配置参数是非常常见的场景,比如在配置线程池的时候,需要在applicationContext.propeties文件中定义如下配置:
thread.pool.corePoolSize=5thread.pool.maxPoolSize=10thread.pool.queueCapacity=200thread.pool.keepAliveSeconds=30
方法一:通过@Value注解读取这些配置。
public class ThreadPoolConfig {@Value("${thread.pool.corePoolSize:5}")private int corePoolSize;@Value("${thread.pool.maxPoolSize:10}")private int maxPoolSize;@Value("${thread.pool.queueCapacity:200}")private int queueCapacity;@Value("${thread.pool.keepAliveSeconds:30}")private int keepAliveSeconds;@Value("${thread.pool.threadNamePrefix:ASYNC_}")private String threadNamePrefix;@Beanpublic Executor threadPoolExecutor() {ThreadPoolTaskExecutor executor = new ThreadPoolTaskExecutor();executor.setCorePoolSize(corePoolSize);executor.setMaxPoolSize(maxPoolSize);executor.setQueueCapacity(queueCapacity);executor.setKeepAliveSeconds(keepAliveSeconds);executor.setThreadNamePrefix(threadNamePrefix);executor.setRejectedExecutionHandler(new ThreadPoolExecutor.CallerRunsPolicy());executor.initialize();return executor;}}
这种方式使用起来非常简单,但建议在使用时都加上:,因为:后面跟的是默认值,比如:@Value("${thread.pool.corePoolSize:5}"),定义的默认核心线程数是5。
假如有这样的场景:business工程下定义了这个ThreadPoolConfig类,api工程引用了business工程,同时job工程也引用了business工程,而ThreadPoolConfig类只想在api工程中使用。这时,如果不配置默认值,job工程启动的时候可能会报错。
如果参数少还好,多的话,需要给每一个参数都加上@Value注解,是不是有点麻烦?
此外,还有一个问题,@Value注解定义的参数看起来有点分散,不容易辨别哪些参数是一组的。
这时,@ConfigurationProperties就派上用场了,它是SpringBoot中新加的注解。
第一步,先定义ThreadPoolProperties类
@Data@Component@ConfigurationProperties("thread.pool")public class ThreadPoolProperties {private int corePoolSize;private int maxPoolSize;private int queueCapacity;private int keepAliveSeconds;private String threadNamePrefix;}
第二步,使用ThreadPoolProperties类
@Configurationpublic class ThreadPoolConfig {@Autowiredprivate ThreadPoolProperties threadPoolProperties;@Beanpublic Executor threadPoolExecutor() {ThreadPoolTaskExecutor executor = new ThreadPoolTaskExecutor();executor.setCorePoolSize(threadPoolProperties.getCorePoolSize());executor.setMaxPoolSize(threadPoolProperties.getMaxPoolSize());executor.setQueueCapacity(threadPoolProperties.getQueueCapacity());executor.setKeepAliveSeconds(threadPoolProperties.getKeepAliveSeconds());executor.setThreadNamePrefix(threadPoolProperties.getThreadNamePrefix());executor.setRejectedExecutionHandler(new ThreadPoolExecutor.CallerRunsPolicy());executor.initialize();return executor;}}
使用@ConfigurationProperties注解,可以将thread.pool开头的参数直接赋值到ThreadPoolProperties类的同名参数中,这样省去了像@Value注解那样一个个手动去对应的过程。
这种方式显然要方便很多,只需编写xxxProperties类,Spring会自动装配参数。此外,不同系列的参数可以定义不同的xxxProperties类,也便于管理,推荐优先使用这种方式。
它的底层是通过:ConfigurationPropertiesBindingPostProcessor类实现的,该类实现了BeanPostProcessor接口,在postProcessBeforeInitialization方法中解析@ConfigurationProperties注解,并且绑定数据到相应的对象上。
绑定是通过Binder类的bindObject方法完成的:
以上这段代码会递归绑定数据,主要考虑了三种情况:
bindAggregate绑定集合类bindBean绑定对象bindProperty绑定参数 前面两种情况最终也会调用到bindProperty方法。
「此外,友情提醒一下:」
使用@ConfigurationProperties注解有些场景有问题,比如:在apollo中修改了某个参数,正常情况可以动态更新到@ConfigurationProperties注解定义的xxxProperties类的对象中,但是如果出现比较复杂的对象,比如:
private Map<String, Map<String,String>> urls;
可能动态更新不了。这时候该怎么办呢?
答案是使用ApolloConfigChangeListener监听器自己处理:
@ConditionalOnClass(com.ctrip.framework.apollo.spring.annotation.EnableApolloConfig.class)public class ApolloConfigurationAutoRefresh implements ApplicationContextAware {private ApplicationContext applicationContext;@Overridepublic void setApplicationContext(ApplicationContext applicationContext) throws BeansException {this.applicationContext = applicationContext;}@ApolloConfigChangeListenerprivate void onChange(ConfigChangeEvent changeEvent{refreshConfig(changeEvent.changedKeys());}private void refreshConfig(Set<String> changedKeys){System.out.println("将变更的参数更新到相应的对象中");}}
四、Spring事务避坑
声明式事务
大多数情况下,在开发过程中使用更多的可能是声明式事务,即使用@Transactional注解定义的事务,因为它用起来更简单,方便。
只需在需要执行的事务方法上,加上@Transactional注解就能自动开启事务:
@Servicepublic class UserService {@Autowiredprivate UserMapper userMapper;@Transactionalpublic void add(UserModel userModel) {userMapper.insertUser(userModel);}}
这种声明式事务之所以能生效,是因为它的底层使用了AOP,创建了代理对象,调用TransactionInterceptor拦截器实现事务的功能。
Spring事务有个特别的地方:它获取的数据库连接放在
ThreadLocal中的,也就是说同一个线程中从始至终都能获取同一个数据库连接,可以保证同一个线程中多次数据库操作在同一个事务中执行。
正常情况下是没有问题的,但是如果使用不当,事务会失效,主要原因如下: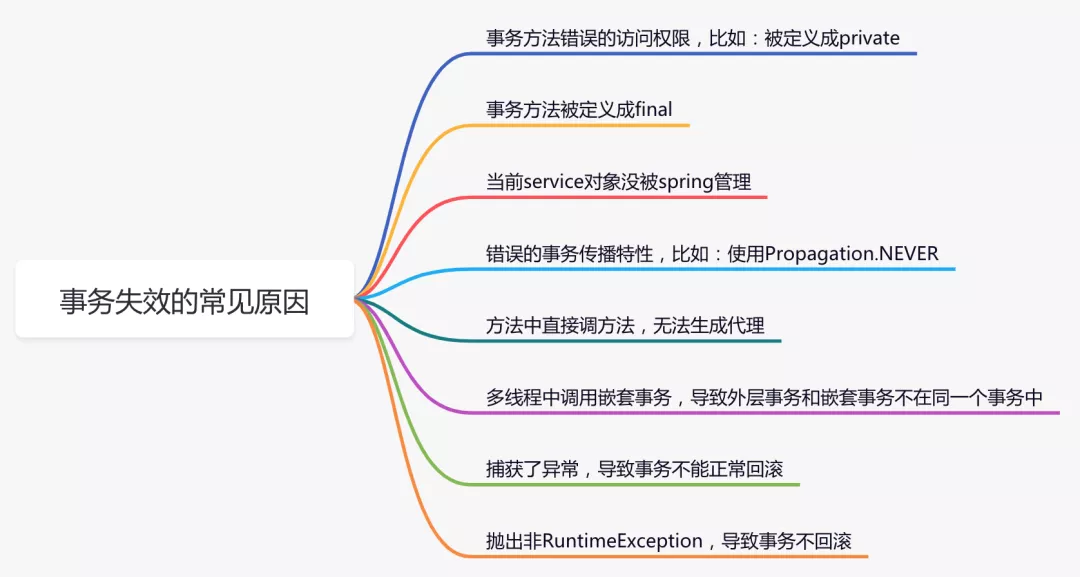
除了上述列举的问题之外,由于@Transactional注解最小粒度是要被定义在方法上,如果有多层的事务方法调用,可能会造成大事务问题。
所以,建议在实际工作中少用@Transactional注解开启事务。
编程式事务
一般情况下编程式事务可以通过TransactionTemplate类开启事务功能。SpringBoot已经默认实例化好这个对象了,能直接在项目中使用。
@Servicepublic class UserService {@Autowiredprivate TransactionTemplate transactionTemplate;...public void save(final User user) {transactionTemplate.execute((status) => {doSameThing...return Boolean.TRUE;})}}
使用TransactionTemplate的编程式事务能避免很多事务失效的问题,但是对大事务问题,不一定能够解决,只是说相对于使用@Transactional注解要好些。
五、跨域问题的解决方案
关于跨域问题,前后端的解决方案还是挺多的,Spring的解决方案,目前有三种: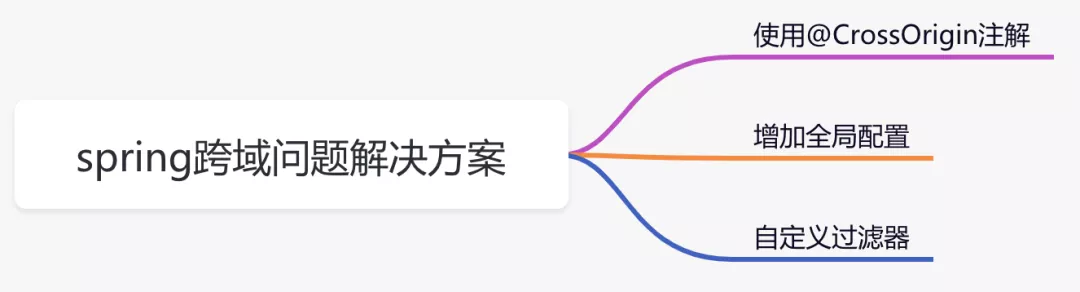
1. 使用@CrossOrigin注解
@RequestMapping("/user")@RestControllerpublic class UserController {@CrossOrigin(origins = "http://localhost:8016")@RequestMapping("/getUser")public String getUser(@RequestParam("name") String name) {System.out.println("name:" + name);return "success";}}
该方案需要在跨域访问的接口上加@CrossOrigin注解,访问规则可以通过注解中的参数控制,控制粒度更细。如果需要跨域访问的接口数量较少,可以使用该方案。
2. 增加全局配置
@Configurationpublic class WebConfig implements WebMvcConfigurer {@Overridepublic void addCorsMappings(CorsRegistry registry) {registry.addMapping("/**").allowedOrigins("*").allowedMethods("GET", "POST").allowCredentials(true).maxAge(3600).allowedHeaders("*");}}
该方案需要实现WebMvcConfigurer接口,重写addCorsMappings方法,在该方法中定义跨域访问的规则。这是一个全局的配置,可以应用于所有接口。
3. 自定义过滤器
@WebFilter("corsFilter")@Configurationpublic class CorsFilter implements Filter {@Overridepublic void init(FilterConfig filterConfig) throws ServletException {}@Overridepublic void doFilter(ServletRequest request, ServletResponse response, FilterChain chain) throws IOException, ServletException {HttpServletResponse httpServletResponse = (HttpServletResponse) response;httpServletResponse.setHeader("Access-Control-Allow-Origin", "*");httpServletResponse.setHeader("Access-Control-Allow-Methods", "POST, GET");httpServletResponse.setHeader("Access-Control-Max-Age", "3600");httpServletResponse.setHeader("Access-Control-Allow-Headers", "x-requested-with");chain.doFilter(request, response);}@Overridepublic void destroy() {}}
该方案通过在请求的header中增加Access-Control-Allow-Origin等参数解决跨域问题。
使用@CrossOrigin注解 和 实现WebMvcConfigurer接口的方案,Spring在底层最终都会调用到DefaultCorsProcessor类的handleInternal方法: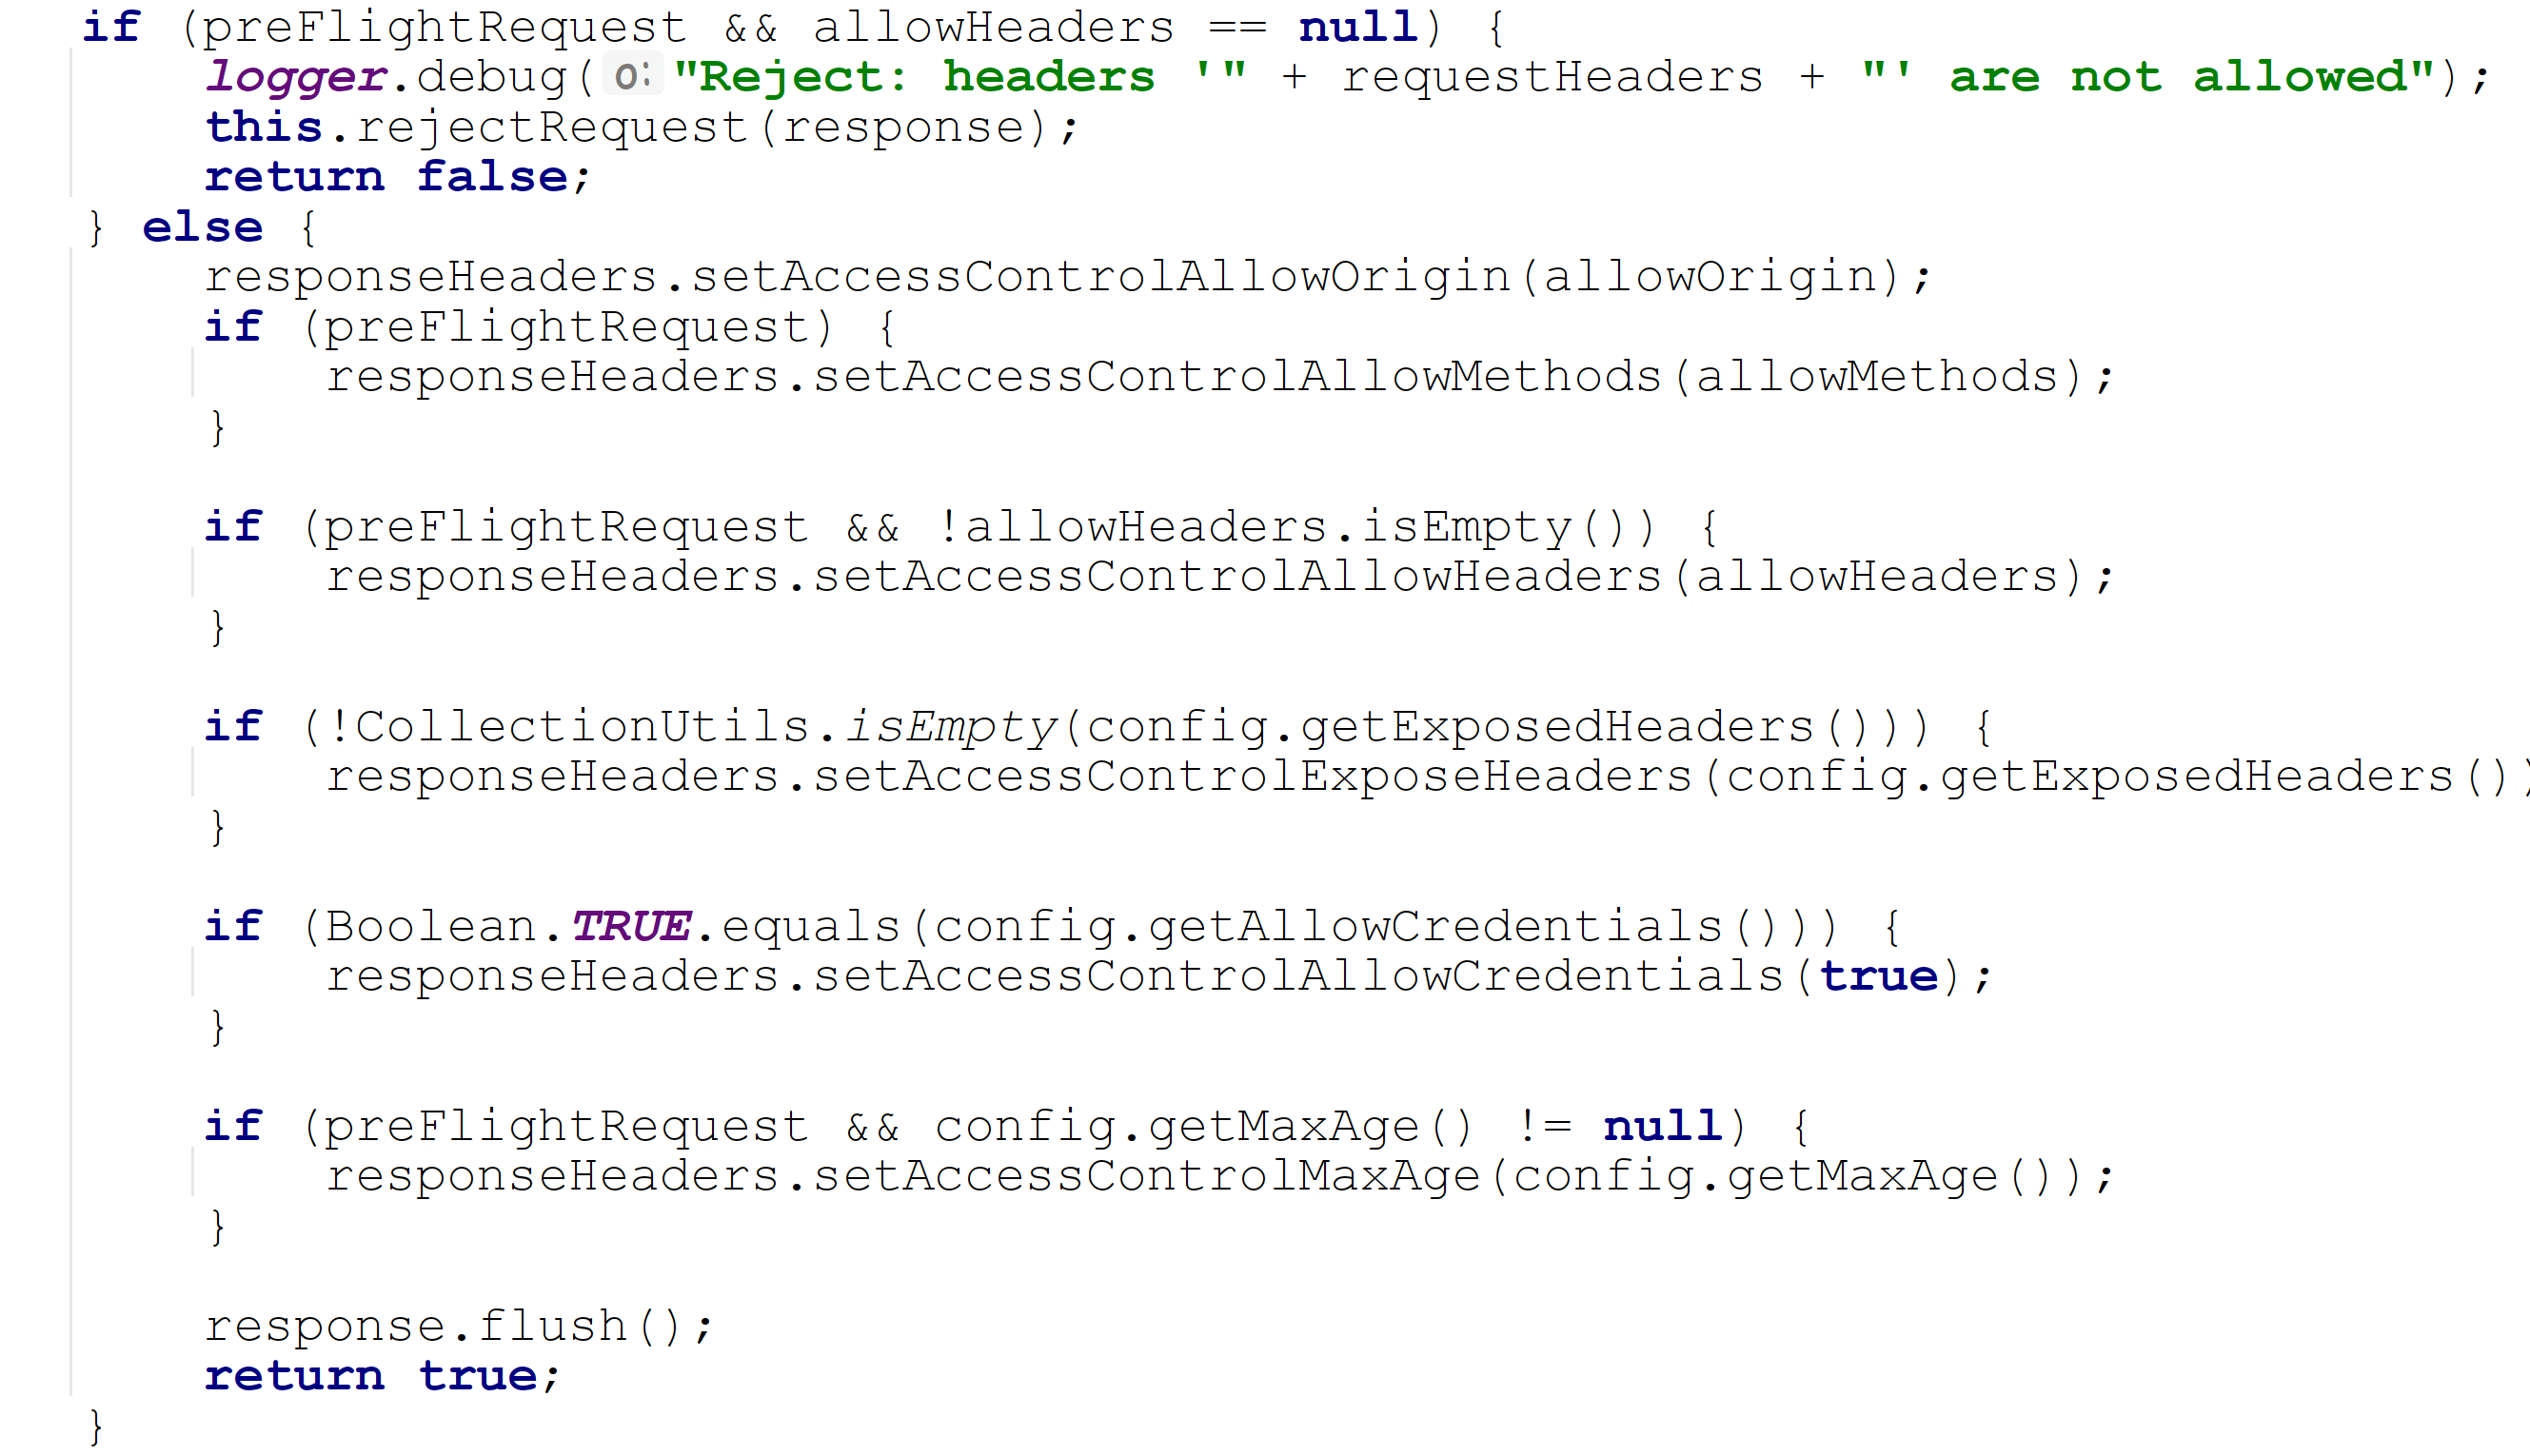
最终三种方案殊途同归,都会往header中添加跨域需要参数,只是实现形式不一样而已。
六、自定义starter
以前在没有使用starter时,在项目中需要引入新功能,步骤一般是这样的:
- 在maven仓库找该功能所需jar包
- 在maven仓库找该jar所依赖的其他jar包
- 配置新功能所需参数
以上这种方式会带来三个问题:
- 如果依赖包较多,找起来很麻烦,容易找错,而且要花很多时间。
- 各依赖包之间可能会存在版本兼容性问题,项目引入这些jar包后,可能没法正常启动。
- 如果有些参数没有配好,启动服务也会报错,没有默认配置。
「为了解决这些问题,springboot的starter机制应运而生」。
starter机制带来这些好处:
- 它能启动相应的默认配置。
- 它能够管理所需依赖,摆脱了需要到处找依赖 和 兼容性问题的困扰。
- 自动发现机制,将spring.factories文件中配置的类,自动注入到spring容器中。
- 遵循“约定大于配置”的理念。
在业务工程中只需引入starter包,就能使用它的功能。
下面用一张图,总结starter的几个要素: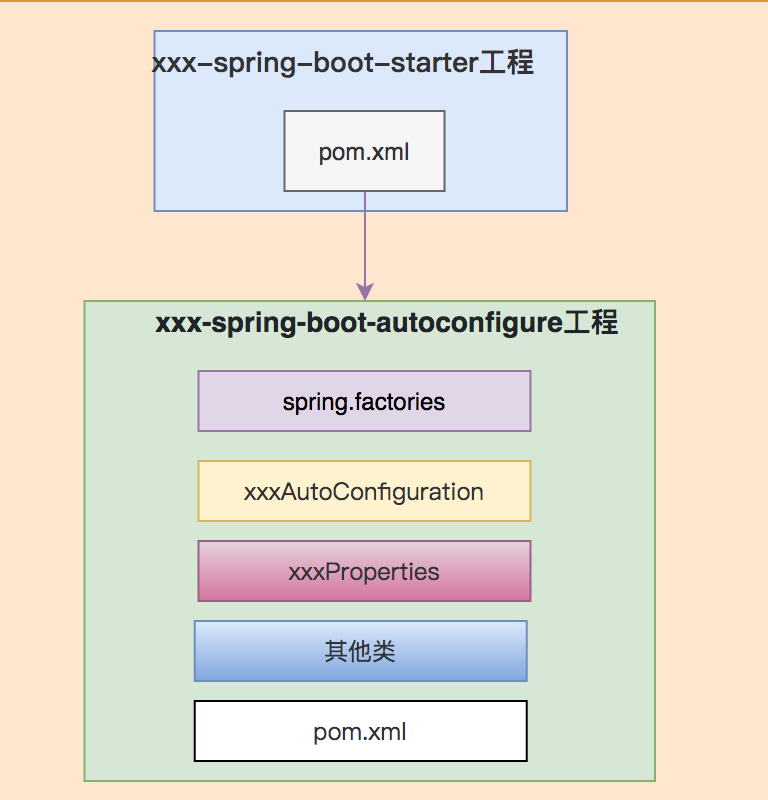
自定义starter。
第一步,创建id-generate-starter工程: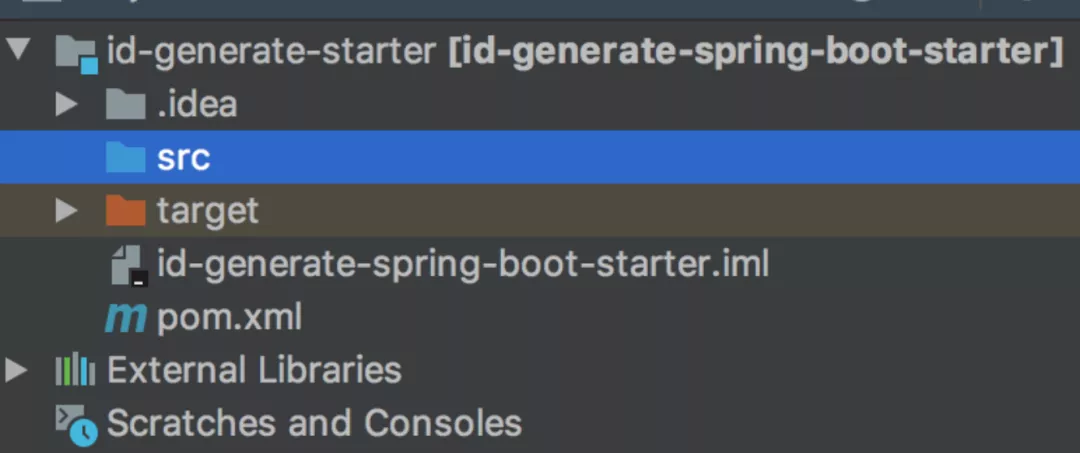 其中的pom.xml配置如下:
<?xml version="1.0" encoding="UTF-8"?><project xmlns="http://maven.apache.org/POM/4.0.0" xmlns:xsi="http://www.w3.org/2001/XMLSchema-instance" xsi:schemaLocation="http://maven.apache.org/POM/4.0.0 http://maven.apache.org/xsd/maven-4.0.0.xsd"><modelVersion>4.0.0</modelVersion><version>1.3.1</version><groupId>com.sue</groupId><artifactId>id-generate-spring-boot-starter</artifactId><name>id-generate-spring-boot-starter</name><dependencies><dependency><groupId>com.sue</groupId><artifactId>id-generate-spring-boot-autoconfigure</artifactId><version>1.3.1</version></dependency></dependencies></project>
第二步,创建id-generate-spring-boot-autoconfigure工程: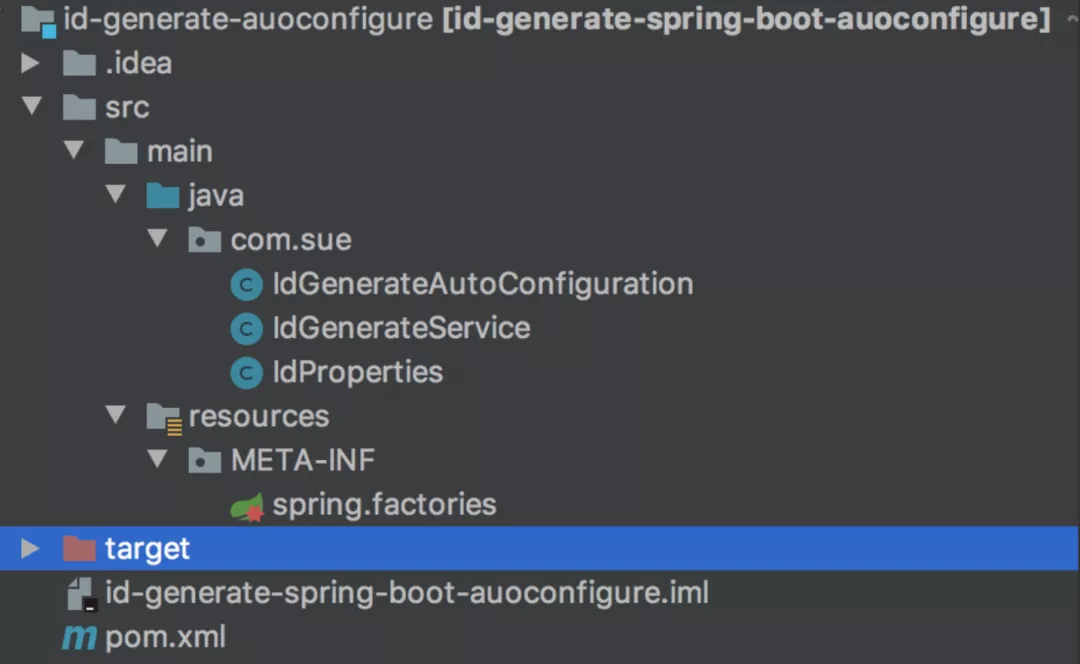 该项目当中包含:
- pom.xml
- spring.factories
- IdGenerateAutoConfiguration
- IdGenerateService
IdProperties pom.xml配置如下:
<?xml version="1.0" encoding="UTF-8"?><project xmlns="http://maven.apache.org/POM/4.0.0" xmlns:xsi="http://www.w3.org/2001/XMLSchema-instance" xsi:schemaLocation="http://maven.apache.org/POM/4.0.0 http://maven.apache.org/xsd/maven-4.0.0.xsd"><parent><groupId>org.springframework.boot</groupId><artifactId>spring-boot-starter-parent</artifactId><version>2.0.4.RELEASE</version></parent><modelVersion>4.0.0</modelVersion><version>1.3.1</version><groupId>com.sue</groupId><artifactId>id-generate-spring-boot-autoconfigure</artifactId><name>id-generate-spring-boot-autoconfigure</name><dependencies><dependency><groupId>org.springframework.boot</groupId><artifactId>spring-boot-starter</artifactId></dependency><dependency><groupId>org.springframework.boot</groupId><artifactId>spring-boot-autoconfigure</artifactId></dependency><dependency><groupId>org.springframework.boot</groupId><artifactId>spring-boot-configuration-processor</artifactId><optional>true</optional></dependency></dependencies><build><plugins><plugin><groupId>org.apache.maven.plugins</groupId><artifactId>maven-compiler-plugin</artifactId><configuration><source>1.8</source><target>1.8</target></configuration></plugin></plugins></build></project>
spring.factories配置如下:
org.springframework.boot.autoconfigure.EnableAutoConfiguration=com.sue.IdGenerateAutoConfiguration
IdGenerateAutoConfiguration类:
@ConditionalOnClass(IdProperties.class)@EnableConfigurationProperties(IdProperties.class)@Configurationpublic class IdGenerateAutoConfiguration {@Autowiredprivate IdProperties properties;@Beanpublic IdGenerateService idGenerateService() {return new IdGenerateService(properties.getWorkId());}}
IdGenerateService类:
public class IdGenerateService {private Long workId;public IdGenerateService(Long workId) {this.workId = workId;}public Long generate() {return new Random().nextInt(100) + this.workId;}}
IdProperties类:
@ConfigurationProperties(prefix = IdProperties.PREFIX)public class IdProperties {public static final String PREFIX = "sue";private Long workId;public Long getWorkId() {return workId;}public void setWorkId(Long workId) {this.workId = workId;}}
这样在业务项目中引入相关依赖:
<dependency><groupId>com.sue</groupId><artifactId>id-generate-spring-boot-starter</artifactId><version>1.3.1</version></dependency>
就能使用注入使用IdGenerateService的功能了
@Autowiredprivate IdGenerateService idGenerateService;
七、项目启动时的附加功能
有时候需要在项目启动时定制化一些附加功能,比如:加载一些系统参数、完成初始化、预热本地缓存等,该怎么办呢?
SpringBoot提供了:CommandLineRunner
- ApplicationRunner
这两个接口可以实现以上需求。
它们的用法还是挺简单的,以ApplicationRunner接口为例:
@Componentpublic class TestRunner implements ApplicationRunner {@Autowiredprivate LoadDataService loadDataService;public void run(ApplicationArguments args) throws Exception {loadDataService.load();}}
实现ApplicationRunner接口,重写run方法,在该方法中实现自己定制化需求。
如果项目中有多个类实现了ApplicationRunner接口,他们的执行顺序要怎么指定呢?
答案是使用@Order(n)注解,n的值越小越先执行。当然也可以通过@Priority注解指定顺序。
SpringBoot项目启动时主要流程是这样的: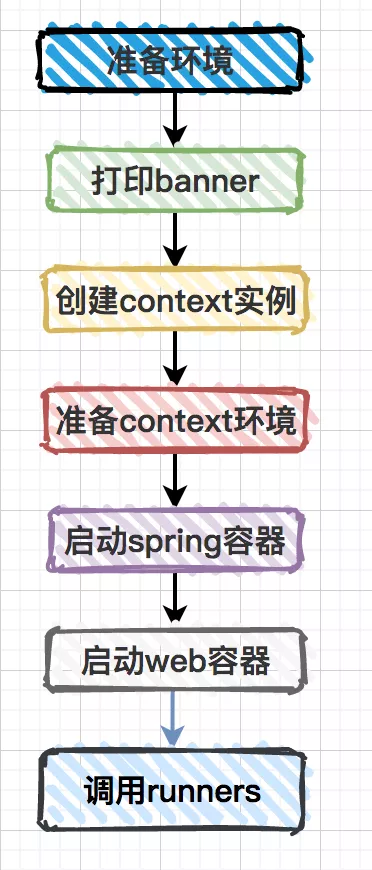
在SpringApplication类的callRunners方法中,可以看到这两个接口的具体调用: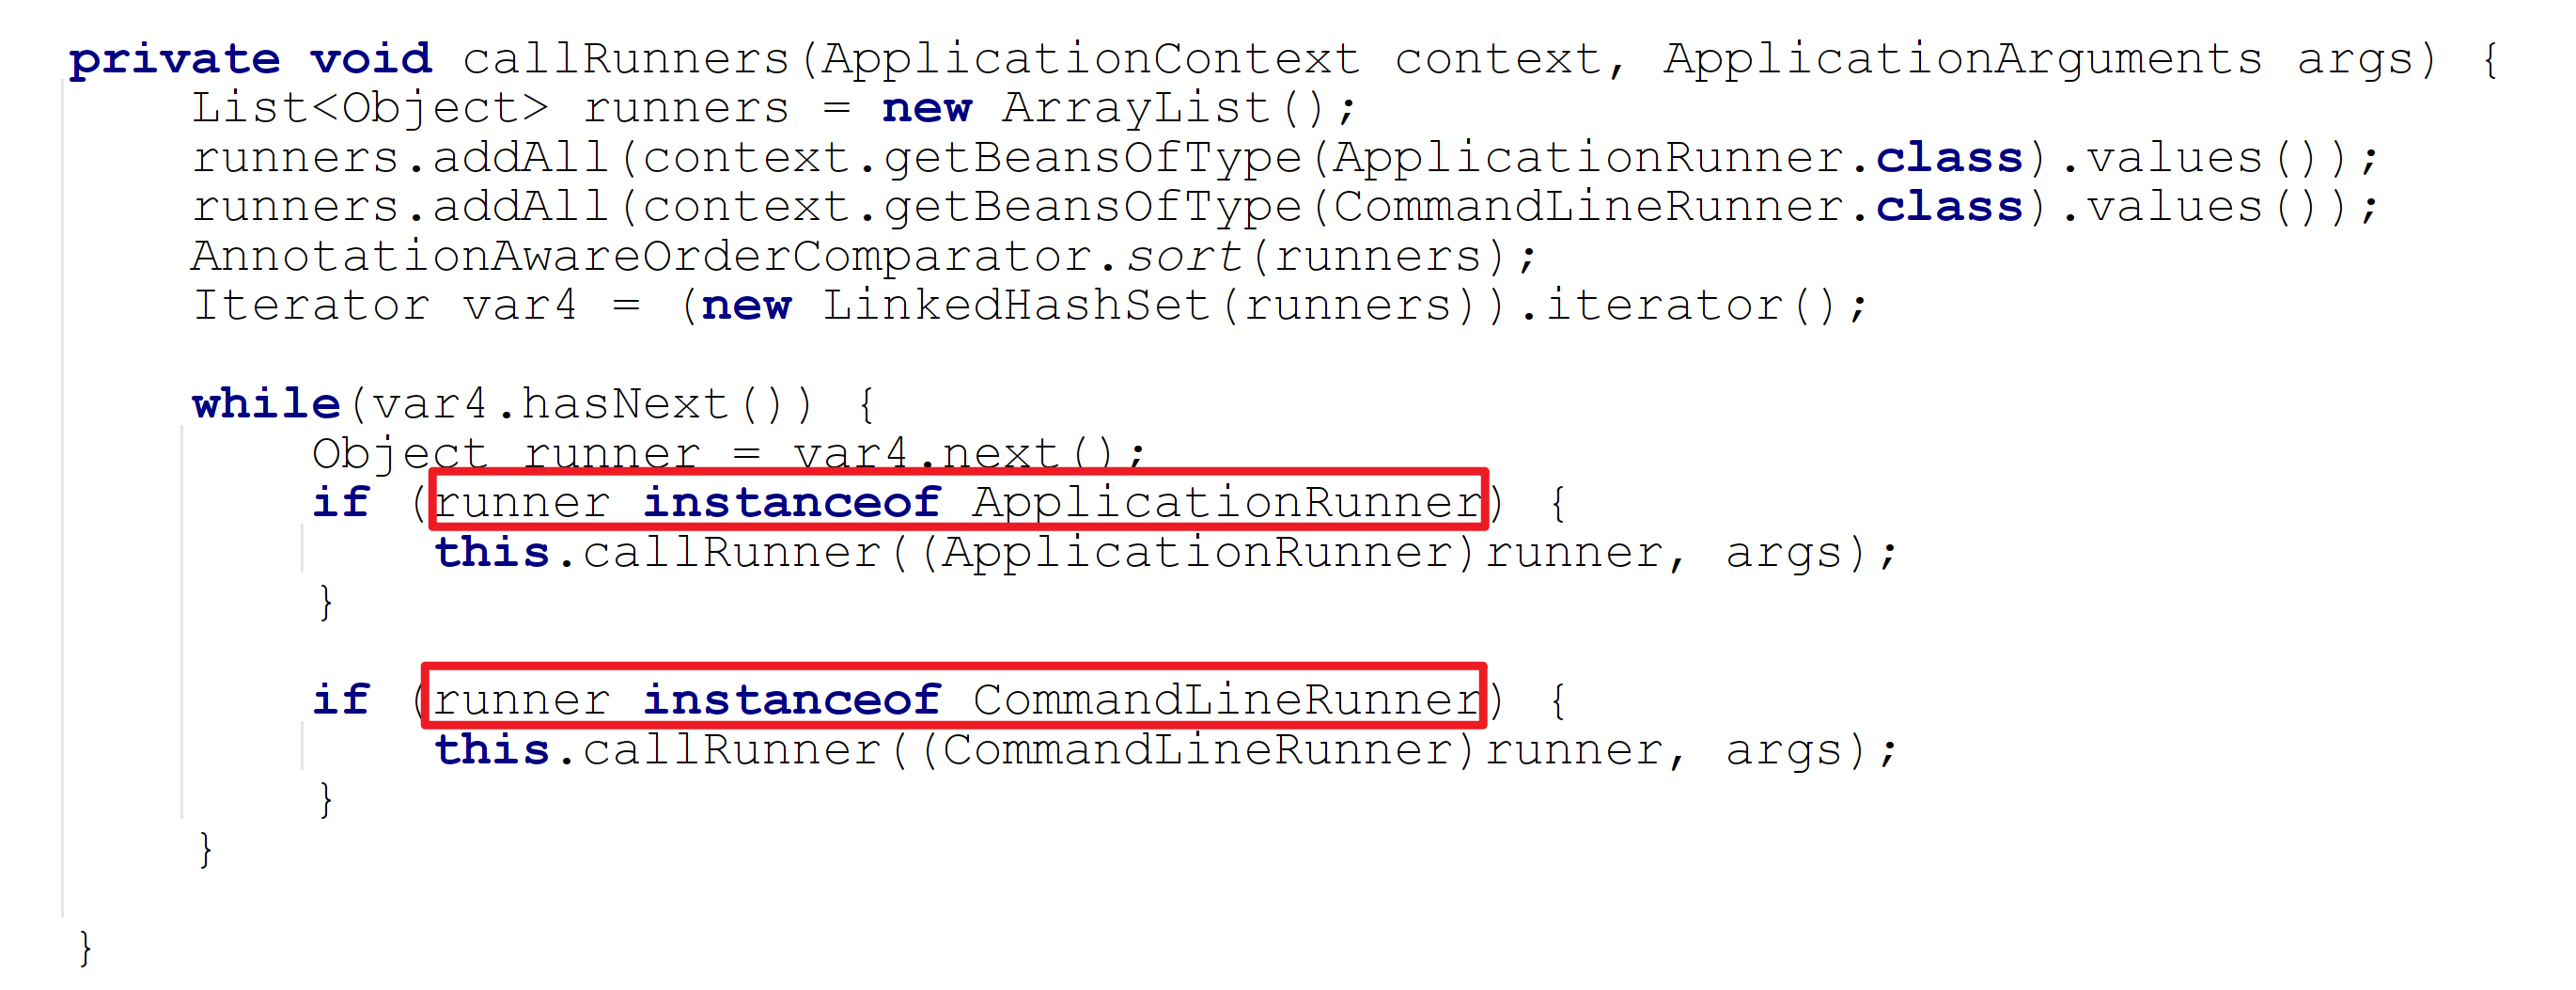
这两个接口的区别
CommandLineRunner接口中run方法的参数为String数组ApplicationRunner中run方法的参数为ApplicationArguments,该参数包含了String数组参数和一些可选参数。

若有收获,就点个赞吧
0 人点赞
