- Windows
- ">
- Configure time to synchronize automatically with Internet time synchronization servers.">Configure time to synchronize automatically with Internet time synchronization servers.
- Configure automatic synchronization with the local time synchronization server.">Configure automatic synchronization with the local time synchronization server.
- Linux
Ensure that the host time is synchronized with the network time. This example is for reference only; please configure according to the specific circumstances of the standby disaster recovery host.
Windows
Example OS: Windows Server 2012 R2
Configure using the Windows time tools.
Click on the Windows icon on the desktop > Open Control Panel > Select “Date and Time” for configuration.

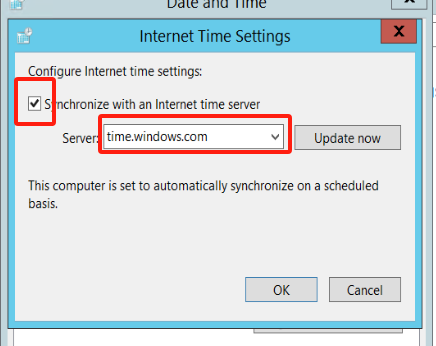
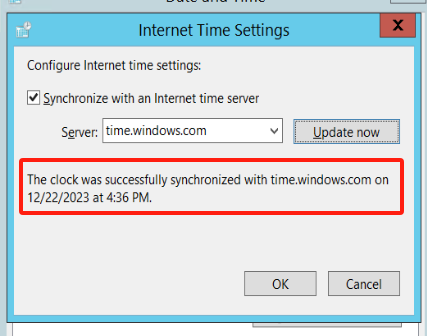
Configure time to synchronize automatically with Internet time synchronization servers.
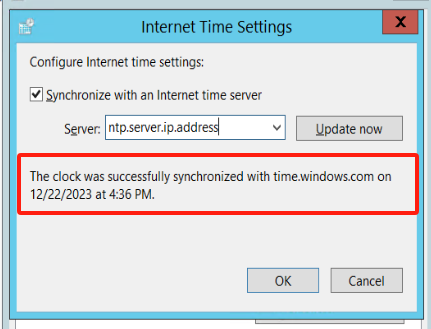
In the “Date and Time” tab, click on “Internet Time”,Click on “Change settings.”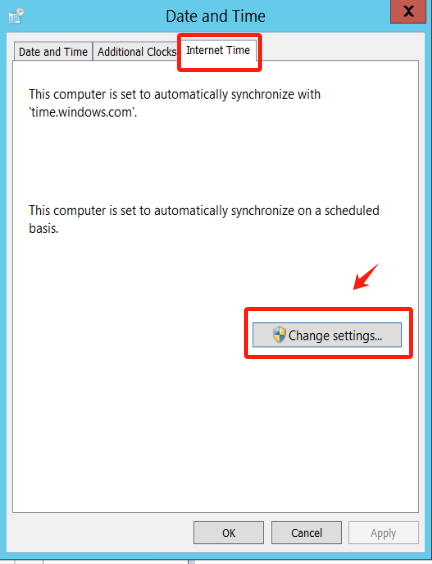
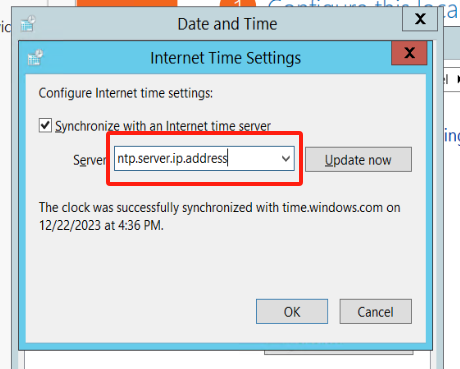
Configure automatic synchronization with the local time synchronization server.
If your host is in an intranet environment, you need to configure the address to be your local time synchronization server address.:::tips
The:::
Linux
Example OS: CentOS Linux release 7.5
Install NTP
[root@node ~]# yum install -y ntp
Start the NTP service
[root@node ~]# systemctl start ntpd[root@node ~]# systemctl enable ntpdCreated symlink from /etc/systemd/system/multi-user.target.wants/ntpd.service to /usr/lib/systemd/system/ntpd.service.
View NTP service status
[root@node ~]# systemctl status ntpd● ntpd.service - Network Time ServiceLoaded: loaded (/usr/lib/systemd/system/ntpd.service; enabled; vendor preset: disabled)Active: active (running) since Thu 2022-08-04 08:00:47 CST; 7h leftMain PID: 20746 (ntpd)Tasks: 1Memory: 768.0KCGroup: /system.slice/ntpd.service└─20746 /usr/sbin/ntpd -u ntp:ntp -gAug 04 08:00:47 node ntpd[20746]: Listen normally on 6 lo ::1 UDP 123Aug 04 08:00:47 node ntpd[20746]: Listen normally on 7 ens33 fe80::8a83:7297:7cb8:9934 UDP 123Aug 04 08:00:47 node ntpd[20746]: Listening on routing socket on fd #24 for interface updatesAug 04 08:00:47 node systemd[1]: Started Network Time Service.Aug 04 08:00:47 node ntpd[20746]: 0.0.0.0 c016 06 restartAug 04 08:00:47 node ntpd[20746]: 0.0.0.0 c012 02 freq_set kernel 0.000 PPMAug 04 08:00:47 node ntpd[20746]: 0.0.0.0 c011 01 freq_not_setAug 04 08:00:56 node ntpd[20746]: 0.0.0.0 c61c 0c clock_step -28798.353463 sAug 04 00:00:57 node ntpd[20746]: 0.0.0.0 c614 04 freq_modeAug 04 00:00:58 node ntpd[20746]: 0.0.0.0 c618 08 no_sys_peer
Modify the ntp.conf file
Please make sure to replace time.example.com with the actual NTP server address you want to use. This command will directly save the file after modification, so ensure that your configuration changes are error-free before executing.
# Comment out lines starting with 'server'.# Add new NTP server addresses at the end of the file.[root@localhost ~]# sudo sed -i -e '/^server/ s/^server/#&/' -e '$ a server time.example.com iburst' /etc/ntp.conf
Restart the service
[root@node ~]# systemctl restart ntpd
Check synchronization status
[root@node ~]# ntpq -premote refid st t when poll reach delay offset jitter==============================================================================203.107.6.88 100.107.25.114 2 u 2 64 1 30.975 149.499 0.393

若有收获,就点个赞吧
0 人点赞
