课件
缓存 - redis
这里操作环境为商品服务模块,虚拟机初始化时已安装 Redis。
添加 redis 依赖
<!-- redis --><dependency><groupId>org.springframework.boot</groupId><artifactId>spring-boot-starter-data-redis</artifactId></dependency>
配置
spring:redis:host: 192.168.163.131port: 6379
给业务中加入缓存
这里使用依赖中自带的 StringRedisTemplate 来操作 Redis。这里存储的值为转化成 JSON 字符串的对象信息。
@AutowiredStringRedisTemplate redisTemplate;@Overridepublic Map<String, List<Catalogs2Vo>> getCatalogJson() {// 1.从缓存中读取分类信息String catalogJSON = redisTemplate.opsForValue().get("catalogJSON");if (StringUtils.isEmpty(catalogJSON)) {// 2. 缓存中没有,查询数据库Map<String, List<Catalogs2Vo>> catalogJsonFromDB = getCatalogJsonFromDB();// 3. 查询到的数据存放到缓存中,将对象转成 JSON 存储redisTemplate.opsForValue().set("catalogJSON", JSON.toJSONString(catalogJsonFromDB));return catalogJsonFromDB;}return JSON.parseObject(catalogJSON, new TypeReference<Map<String, List<Catalogs2Vo>>>(){});}/*** 加缓存前,只读取数据库的操作** @return*/public Map<String, List<Catalogs2Vo>> getCatalogJsonFromDB() {System.out.println("查询了数据库");// 性能优化:将数据库的多次查询变为一次List<CategoryEntity> selectList = this.baseMapper.selectList(null);//1、查出所有分类//1、1)查出所有一级分类List<CategoryEntity> level1Categories = getParentCid(selectList, 0L);//封装数据Map<String, List<Catalogs2Vo>> parentCid = level1Categories.stream().collect(Collectors.toMap(k -> k.getCatId().toString(), v -> {//1、每一个的一级分类,查到这个一级分类的二级分类List<CategoryEntity> categoryEntities = getParentCid(selectList, v.getCatId());//2、封装上面的结果List<Catalogs2Vo> catalogs2Vos = null;if (categoryEntities != null) {catalogs2Vos = categoryEntities.stream().map(l2 -> {Catalogs2Vo catalogs2Vo = new Catalogs2Vo(v.getCatId().toString(), null, l2.getCatId().toString(), l2.getName().toString());//1、找当前二级分类的三级分类封装成voList<CategoryEntity> level3Catelog = getParentCid(selectList, l2.getCatId());if (level3Catelog != null) {List<Catalogs2Vo.Category3Vo> category3Vos = level3Catelog.stream().map(l3 -> {//2、封装成指定格式Catalogs2Vo.Category3Vo category3Vo = new Catalogs2Vo.Category3Vo(l2.getCatId().toString(), l3.getCatId().toString(), l3.getName());return category3Vo;}).collect(Collectors.toList());catalogs2Vo.setCatalog3List(category3Vos);}return catalogs2Vo;}).collect(Collectors.toList());}return catalogs2Vos;}));return parentCid;}
堆外内存溢出异常:
这里可能会产生堆外内存溢出异常:OutOfDirectMemoryError。
下面进行分析:
- SpringBoot 2.0 以后默认使用 lettuce 作为操作 redis 的客户端,它使用 netty 进行网络通信;
- lettuce 的 bug 导致 netty 堆外内存溢出;
- netty 如果没有指定堆外内存,默认使用 -Xmx 参数指定的内存;
- 可以通过 -Dio.netty.maxDirectMemory 进行设置;
解决方案:不能只使用 -Dio.netty.maxDirectMemory 去调大堆外内存,这样只会延缓异常出现的时间。
- 升级 lettuce 客户端,或使用 jedis 客户端
<!-- redis --><dependency><groupId>org.springframework.boot</groupId><artifactId>spring-boot-starter-data-redis</artifactId><exclusions><exclusion><groupId>io.lettuce</groupId><artifactId>lettuce-core</artifactId></exclusion></exclusions></dependency><dependency><groupId>redis.clients</groupId><artifactId>jedis</artifactId></dependency>
高并发下缓存失效问题
缓存穿透
缓存穿透是指 查询一个一定不存在的数据,由于缓存是不命中,将去查询数据库,但是数据库也无此记录,我们没有将这次查询的 null 写入缓存,这将导致这个不存在的数据每次请求都要到存储层去查询,失去了缓存的意义。
在流量大时,可能 DB 就挂掉了,要是有人利用不存在的 key 频繁攻击我们的应用,这就是漏洞。
解决方法:缓存空结果、并且设置短的过期时间。缓存雪崩
缓存雪崩是指在我们设置缓存时采用了相同的过期时间,导致缓存在某一时刻同时失效,请求全部转发到 DB,DB 瞬时压力过重雪崩。
解决方法:原有的失效时间基础上增加一个随机值,比如 1-5 分钟随机,这样每一个缓存的过期时间的重复率就会降低,就很难引发集体失效的事件。缓存击穿
对于一些设置了过期时间的 key,如果这些 key 可能会在某些时间点被超高并发地访问,是一种非常“热点”的数据。
这个时候,需要考虑一个问题:如果这个 key 在大量请求同时进来前正好失效,那么所有对这个 key 的数据查询都落到 db,我们称为缓存击穿。
解决方法:加锁。大量并发只让一个人去查,其他人等待,查到之后释放锁,其他人获取到锁,先查缓存,就会有数据,不用去查数据库。
分布式锁
本地锁只能锁住当前服务的进程,每一个单独的服务都会有一个进程读取数据库,不能达到只读取依次数据库的效果,所以需要分布式锁。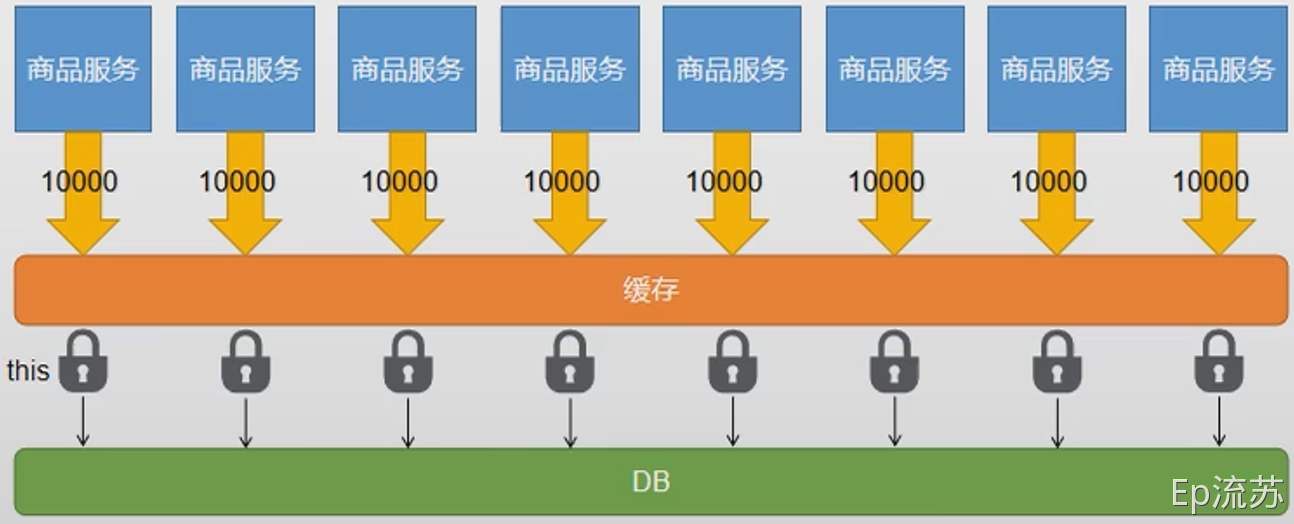
使用 Redis 作为分布式锁
redis 中有一个 SETNX 命令,该命令会向 redis 中保存一条数据,如果不存在则保存成功,存在则返回失败。
我们约定保存成功即为加锁成功,之后加锁成功的线程才能执行真正的业务操作。
/*** 从数据库查询并封装数据::分布式锁** @return*/public Map<String, List<Catalogs2Vo>> getCatalogJsonFromDbWithRedisLock() {//1、占分布式锁。去redis占坑 设置过期时间必须和加锁是同步的,保证原子性(避免死锁)String uuid = UUID.randomUUID().toString();Boolean lock = redisTemplate.opsForValue().setIfAbsent("lock", uuid, 300, TimeUnit.SECONDS);if (lock) {System.out.println("获取分布式锁成功...");Map<String, List<Catalogs2Vo>> dataFromDb = null;try {//加锁成功...执行业务dataFromDb = getCatalogJsonFromDB();} finally {// lua 脚本解锁String script = "if redis.call('get', KEYS[1]) == ARGV[1] then return redis.call('del', KEYS[1]) else return 0 end";// 删除锁redisTemplate.execute(new DefaultRedisScript<>(script, Long.class), Collections.singletonList("lock"), uuid);}//先去redis查询下保证当前的锁是自己的//获取值对比,对比成功删除=原子性 lua脚本解锁// String lockValue = stringRedisTemplate.opsForValue().get("lock");// if (uuid.equals(lockValue)) {// //删除我自己的锁// stringRedisTemplate.delete("lock");// }return dataFromDb;} else {System.out.println("获取分布式锁失败...等待重试...");//加锁失败...重试机制//休眠一百毫秒try {TimeUnit.MILLISECONDS.sleep(100);} catch (InterruptedException e) {e.printStackTrace();}return getCatalogJsonFromDbWithRedisLock(); //自旋的方式}}
Redisson 作为分布式锁
官方文档:https://github.com/redisson/redisson/wiki
引入依赖
<dependency><groupId>org.redisson</groupId><artifactId>redisson</artifactId><version>3.11.1</version></dependency>
配置 redisson
@Configurationpublic class MyRedissonConfig {/*** 所有对 Redisson 的使用都是通过 RedissonClient** @return* @throws IOException*/@Bean(destroyMethod = "shutdown")public RedissonClient redisson() throws IOException {// 1、创建配置Config config = new Config();// Redis url should start with redis:// or rediss://config.useSingleServer().setAddress("redis://192.168.163.131:6379");// 2、根据 Config 创建出 RedissonClient 实例return Redisson.create(config);}}
使用 ```java // 1. 获取一把锁 Rlock lock = redisson.getLock(“my-lock”);
// 2. 加锁, 阻塞式等待 lock.lock(); try { System.out.println(“加锁成功,执行业务…”); } catch (Exception e) { } finally { // 3. 解锁 假设解锁代码没有运行,Redisson 会出现死锁吗?(不会) lock.unlock(); }
- 锁的自动续期,如果业务时间很长,运行期间自动给锁续期 30 s,不用担心业务时间过长,锁自动过期被删掉;- 加锁的业务只要运行完成,就不会给当前锁续期,即使不手动续期,默认也会在 30 s 后解锁;修改代码```java/*** 缓存里的数据如何和数据库的数据保持一致??* 缓存数据一致性* 1)、双写模式* 2)、失效模式** @return*/public Map<String, List<Catalogs2Vo>> getCatalogJsonFromDbWithRedissonLock() {//1、占分布式锁。去redis占坑//(锁的粒度,越细越快:具体缓存的是某个数据,11号商品) product-11-lock//RLock catalogJsonLock = redissonClient.getLock("catalogJson-lock");//创建读锁RReadWriteLock readWriteLock = redissonClient.getReadWriteLock("catalogJson-lock");RLock rLock = readWriteLock.readLock();Map<String, List<Catalogs2Vo>> dataFromDb = null;try {rLock.lock();//加锁成功...执行业务dataFromDb = getCatalogJsonFromDB();} finally {rLock.unlock();}return dataFromDb;}
缓存 - SpringCache
引入依赖
<dependency><groupId>org.springframework.boot</groupId><artifactId>spring-boot-starter-cache</artifactId></dependency>
添加配置
自动配置了:
- CacheAutoConfiguration 会导入 RedisCacheConfiguration;
- 会自动装配缓存管理器 RedisCacheManager;
手动配置:
spring.cache.type=redis#spring.cache.cache-names=qq,毫秒为单位spring.cache.redis.time-to-live=3600000#如果指定了前缀就用我们指定的前缀,如果没有就默认使用缓存的名字作为前缀#spring.cache.redis.key-prefix=CACHE_spring.cache.redis.use-key-prefix=true#是否缓存空值,防止缓存穿透spring.cache.redis.cache-null-values=true
@EnableConfigurationProperties(CacheProperties.class)@Configuration@EnableCachingpublic class MyCacheConfig {/*** 配置文件的配置没有用上* 1. 原来和配置文件绑定的配置类为:@ConfigurationProperties(prefix = "spring.cache")* public class CacheProperties* <p>* 2. 要让他生效,要加上 @EnableConfigurationProperties(CacheProperties.class)*/@Beanpublic RedisCacheConfiguration redisCacheConfiguration(CacheProperties cacheProperties) {RedisCacheConfiguration config = RedisCacheConfiguration.defaultCacheConfig();// config = config.entryTtl();config = config.serializeKeysWith(RedisSerializationContext.SerializationPair.fromSerializer(new StringRedisSerializer()));config = config.serializeValuesWith(RedisSerializationContext.SerializationPair.fromSerializer(new GenericJackson2JsonRedisSerializer()));CacheProperties.Redis redisProperties = cacheProperties.getRedis();//将配置文件中所有的配置都生效if (redisProperties.getTimeToLive() != null) {config = config.entryTtl(redisProperties.getTimeToLive());}if (redisProperties.getKeyPrefix() != null) {config = config.prefixKeysWith(redisProperties.getKeyPrefix());}if (!redisProperties.isCacheNullValues()) {config = config.disableCachingNullValues();}if (!redisProperties.isUseKeyPrefix()) {config = config.disableKeyPrefix();}return config;}}
常用注解
- @Cacheable :触发将数据保存到缓存的操作;
- @CacheEvict : 触发将数据从缓存删除的操作;
- @CachePut :不影响方法执行更新缓存;
- @Cacheing:组合以上多个操作;
- @CacheConfig:在类级别共享缓存的相同配置;
业务实现
/*** 1、每一个需要缓存的数据我们都来指定要放到那个名字的缓存。【缓存的分区(按照业务类型分)】* 2、@Cacheable 代表当前方法的结果需要缓存,如果缓存中有,方法都不用调用,如果缓存中没有,会调用方法。最后将方法的结果放入缓存* 3、默认行为* 3.1 如果缓存中有,方法不再调用* 3.2 key是默认生成的:缓存的名字::SimpleKey::[](自动生成key值)* 3.3 缓存的value值,默认使用jdk序列化机制,将序列化的数据存到redis中* 3.4 默认时间是 -1:** 自定义操作:key的生成* 1. 指定生成缓存的key:key属性指定,接收一个 SpEl* 2. 指定缓存的数据的存活时间:配置文档中修改存活时间 ttl* 3. 将数据保存为json格式: 自定义配置类 MyCacheManager* <p>* 4、Spring-Cache的不足之处:* 1)、读模式* 缓存穿透:查询一个null数据。解决方案:缓存空数据* 缓存击穿:大量并发进来同时查询一个正好过期的数据。解决方案:加锁 ? 默认是无加锁的;使用sync = true来解决击穿问题* 缓存雪崩:大量的key同时过期。解决:加随机时间。加上过期时间* 2)、写模式:(缓存与数据库一致)* 1)、读写加锁。* 2)、引入Canal,感知到MySQL的更新去更新Redis* 3)、读多写多,直接去数据库查询就行* <p>* 总结:* 常规数据(读多写少,即时性,一致性要求不高的数据,完全可以使用Spring-Cache):写模式(只要缓存的数据有过期时间就足够了)* 特殊数据:特殊设计* <p>* 原理:* CacheManager(RedisCacheManager)->Cache(RedisCache)->Cache负责缓存的读写** @return*/@Cacheable(value = {"category"}, key = "#root.method.name", sync = true)@Overridepublic List<CategoryEntity> getLevel1Categories() {System.out.println("get Level 1 Categories........");long l = System.currentTimeMillis();List<CategoryEntity> categoryEntities = this.baseMapper.selectList(new QueryWrapper<CategoryEntity>().eq("parent_cid", 0));System.out.println("消耗时间:" + (System.currentTimeMillis() - l));return categoryEntities;}

若有收获,就点个赞吧
0 人点赞
