- 前言
- GitLab安装配置管理
- Ansible安装配置管理
- https://stackoverflow.com/questions/40355611/python-3-4-installation-error-1-oserror-errno-22-invalid-argument">make && make altinstall
遇到错误:make: * [altinstall] Error 1
解决:yum install zlib-devel bzip2-devel sqlite sqlite-devel openssl-devel
https://stackoverflow.com/questions/40355611/python-3-4-installation-error-1-oserror-errno-22-invalid-argument - ssh root@47.98.198.241
- su - deploy
- 加载py3.6虚拟环境
- source .py3-a2.5-env/bin/activate
- 同时加载ansible2.5版本
- source /home/deploy/.py3-a2.5-env/ansible/hacking/env-setup -q
- 验证加载效果
- ansible-playbook —version
- 编写playbook框架
- mkdir playbook
- cd /playbook
- mkdir inventory
- mkdir roles
- cd inventory
- vi testenv
- cd roles
- mkdir testbox
- cd testbox
- mkdir tasks
- cd tasks
- vi main.yml
- cd ../../..
- pwd
- vi deploy.yml
- 查看树形文件夹
# tree .
(.py3-a2.5-env) [deploy@iZbp1hovekdxocyqhdwshnZ xj_aml]$ tree .
.
├── deploy.yml
├── inventory
│ └── testenv
└── roles
└── testbox
└── tasks
└── main.yml - 创建目标主机DNS主机记录
- 切换deploy用户,创建ssl秘钥认证
- 测试目标主机
- 在目标主机创建文件或目标,并赋予其系统权限
- name: create a file
file: ‘path=/root/foo.txt state=touch mode=0755 owner=foo group=foo’ - 实现Ansible服务端到目标主机的文件传送
-name:create a file
copy: ‘remote_src=no src=roles/testbox/file/foo.sh
dest=/root/foo.sh mode=0644 force=yes’
-name:使用一个文件
copy:
remote_src=no:声明将原Ansible主机端的文件传送到目标主机当中
src:声明源文件为该路径的文件夹
dest:将原地址的foo.sh传送到目标foo.sh
mode:给予创建的文件赋予权限
force:定义copy任务,强制执行 - 获取远程文件状态信息
- name: chenk if foo.sh exists
stat: ‘path=/root/foo.sh’
register: script_stat
name:定义任务名称foo.sh是否存在
stat:声明任务模块调用的是stat
path:定义当前需要去获取的文件路径
register:将获取到文件信息传送到script_stat - 打印语句到Ansible执行输出
- debug: msg=”foo.sh exists”
when: script_stat.stat.exists
debug:定义debug模块输出的语句内容为foo.sh exists
when:
如果foo.sh存在就是Ansible打印输出信息,不存在就不打印 - 用来执行linux目标主机命令行
-name:run the script
command: “sh /rootfoo.sh” - 用来实现Ansible服务端到目标主机的jinja2模块传送
- name:write the nginx config file
template:src=roles/testbox/templates/nginx.conf.j2
dest=/ect/nginx/nginx.conf
name:定义一个任务名称编写nginx配置文件
template:声明语句调用的是template模块
src:定义原模板文件在/roles../ nginx.conf.j2
dest:目标目录,将src文件传送到/ect/…/ nginx.conf重命名为nginx.conf - 调用目标主机系统包管理工具(yum,apt)进行安装
- name:ensure nginx is at the latest version
yum:pkg=nginx state=latest —————>CenOS&RedHat系统 - 管理目标主机系统服务
- name:start nginx service
service:name=nginx state=started - ">编辑testbox主任务文件
# vi roles/testbox/tasks/main.yml
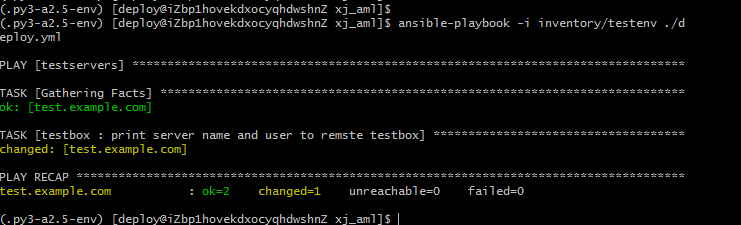
- 测试编写的file模块任务,执行deploy.yml是否成功
# ansible-playbook -i inventory/testenv ./deploy.yml - ">已经创建ok的文件

- jenkins安装配置管理
- 配置deploy用户的java环境变量(172.16.87.85未配置deploy环境变量)
- mysql安装(Cenos7)
- ">配置sonarqube目标conf下的sonar.properties
$ vim sonarqube/conf/sonar.properties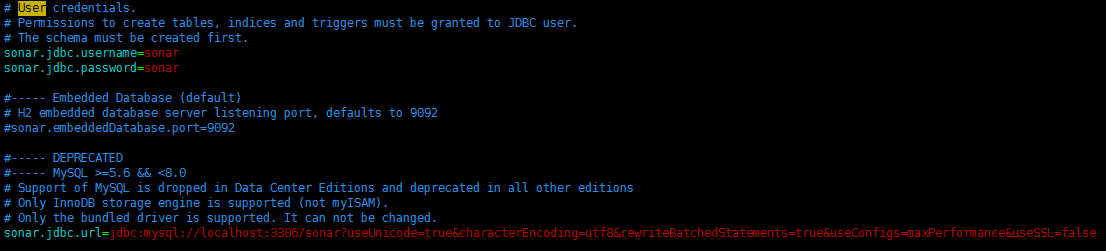
- 配置wrapper.conf文件
$ vim sonarqube/conf/sonar.properties
wrapper.java.command=/usr/java/jdk1.8.0_77/bin/java - 创建sonar数据库
# mysql -u sonar -p
Enter password:
mysql> CREATE DATABASE sonar CHARACTER SET utf8 COLLATE utf8_general_ci;
mysql> CREATE USER ‘sonar’ IDENTIFIED BY ‘sonar’;
mysql> GRANT ALL ON sonar. TO ‘sonar’@’%’ IDENTIFIED BY ‘sonar’;
mysql> GRANT ALL ON sonar. TO ‘sonar’@’localhost’ IDENTIFIED BY ‘sonar’;
mysql> FLUSH PRIVILEGES;- http://172.16.87.85:9000
##http://172.16.87.85:9000/about">启动启动sonar
# su - sonar
# ./bin/linux-x86-64/sonar.sh start
# tail -200f ./logs/sonar.log
##访问http://172.16.87.85:9000
##http://172.16.87.85:9000/about
- http://172.16.87.85:9000
- mysql查看sonar数据库信息状态
mysql> show databases
mysql> use sonar;
mysql> show tables; - 配置sonarqube-7.4启动脚本
- 配置sonar-scanner-3.2环境变量
- http://mirrors.tuna.tsinghua.edu.cn/apache/maven/maven-3/3.6.0/binaries/apache-maven-3.6.0-bin.zip
# unzip apache-maven-3.6.0-bin.zip
验证maven版本:# ./apache-maven-3.6.0/bin/mvn -version">安装apache-maven
下载:wget http://mirrors.tuna.tsinghua.edu.cn/apache/maven/maven-3/3.6.0/binaries/apache-maven-3.6.0-bin.zip
# unzip apache-maven-3.6.0-bin.zip
验证maven版本:# ./apache-maven-3.6.0/bin/mvn -version - 在项目的根目录中创建配置文件:sonar -project.properties
- 从项目基目录运行以下命令以启动分析:
1.手动执行分析(在项目根目标中操作)
# /opt/apache-maven-3.5.4/bin/mvn clean package
- http://mirrors.tuna.tsinghua.edu.cn/apache/maven/maven-3/3.6.0/binaries/apache-maven-3.6.0-bin.zip
- https://blog.csdn.net/aya19880214/article/details/41958445">FindBugs配置
https://blog.csdn.net/aya19880214/article/details/41958445 - jenkins使用
- 问题归纳
- git config —global http.sslverify false
前言
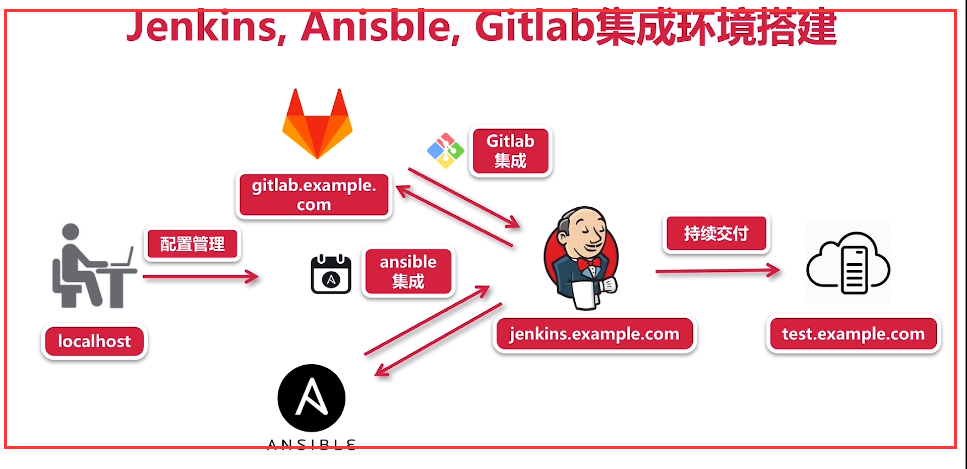
这篇文章跟大家介绍Jenkins+Ansible+GitLab持续交付平台搭建,作者振宁。
过程大概这这样的:Jenkins首先从Gitlab去抓取我们写好的具体产品的playbook, 并使用virtualenv下的Ansible相关命令, 保证我们在一个clean的环境下使用stable version去批量部署我们的产品到远程client。
jenkins和ansible安装一个机器,gitlab单独安装。
GitLab安装配置管理
GitLab安装配置
1.关闭firewalld防火墙
# systemctl stop firewalld# systemctl disable firewalld
2.关闭SELINUX并重启系统,关闭强制访问安全策略
# vi /etc/sysconfig/selinux…SELINUX=disabled...# reboot
安装Omnibus Gitlab-ce package
- 安装Gitlab组件
# yum -y install curl policycoreutils openssh-server openssh-cilents postfix
2.配置yum下载仓库
# curl -sS https://packages.gitlab.com/install/repositories/gitlab/gitlab-ce/script.rpm.sh | sudo bash
3.启动postfix邮件服务
# systemctl start postfix && systemctl enable postfixor# systemctl start postfix# systemctl enable postfix
4.安装gitlab-ce社区版本
# yum -y install gitlab-ce
Omnibus Gitlab相关配置初始化并完成安装
1.证书创建与配置加载
# mkdir –p /etc/gitlab/ssl# openssl genrsa -out "/etc/gitlab/ssl/gitlab.example.com.key" 2048# openssl req -new -key "/etc/gitlab/ssl/gitlab.example.com.key" -out "/etc/gitlab/ssl/gitlab.example.com.csr"....Country Name (2 letter code) [XX]:cnState or Province Name (full name) []:bjLocality Name (eg, city) [Default City]:bjOrganization Name (eg, company) [Default Company Ltd]:Organizational Unit Name (eg, section) []:Common Name (eg, your name or your server's hostname) []:gitlab.example.comEmail Address []:admin@example.comPlease enter the following 'extra' attributesto be sent with your certificate requestA challenge password []:123456An optional company name []:
查看是否创建成功私有秘钥和ssl证书
#ll –a-rw-r--r-- 1 root root 1074 Sep 24 13:33 gitlab.example.com.csr-rw-r--r-- 1 root root 1675 Sep 24 13:29 gitlab.example.com.key
利用ssl证书和私有秘钥创建天使证书
# openssl x509 -req -days 365 -in "/etc/gitlab/ssl/gitlab.example.com.csr" -signkey "/etc/gitlab/ssl/gitlab.example.com.key" -out "/etc/gitlab/ssl/gitlab.example.com.crt"

#ll –atotal 12-rw-r--r-- 1 root root 1281 Sep 24 13:42 gitlab.example.com.crt-rw-r--r-- 1 root root 1074 Sep 24 13:33 gitlab.example.com.csr-rw-r--r-- 1 root root 1675 Sep 24 13:29 gitlab.example.com.key
创建pem证书
# openssl dhparam -out /etc/gitlab/ssl/dhparams.pem 2048
更改当前目录证书权限
# chmod 600 *# lltotal 16-rw------- 1 root root 424 Sep 24 13:48 dhparams.pem-rw------- 1 root root 1281 Sep 24 13:42 gitlab.example.com.crt-rw------- 1 root root 1074 Sep 24 13:33 gitlab.example.com.csr-rw------- 1 root root 1675 Sep 24 13:29 gitlab.example.com.key
编辑gitlab配置文件,将所有生成的证书配置到gitlab配置文件中
# vi /etc/gitlab/gitlab.rb....external_url 'https://gitlab.example.com'....nginx['redirect_http_to_https'] = true....# ['ssl_certificate'] = "/etc/gitlab/ssl/gitlab.example.com.crt"# nginx['ssl_certificate_key'] = "/etc/gitlab/ssl/gitlab.example.com.key"...# nginx['ssl_dhparam'] = /etc/gitlab.ssl/dhparams.pem # Path to dhparams.pem, eg. /etc/gitlab/ssl/dhparams.pem
初始化gitlab服务相关配置
# gitlab-ctl reconfigure..........初始化成功Chef Client finished, 435/620 resources updated in 04 minutes 07 secondsgitlab Reconfigured!
2.Nginx ssl代理服务配置
找到gitlab代理工具nginx更改gitlab下http配置文件
# vi /var/opt/gitlab/nginx/conf/gitlab-http.conf# server_nameserver {listen *:80;server_name gitlab.example.com;rewrite ^(.*)$ https://$host$1 permanent;
使nginx配置文件生效
# gitlab-ctl restart
47.98.198.241ip重定向到gitlab.example.com域名
windows: C:\Windows\System32\drivers\etc\hosts47.98.198.241 gitlab.example.com
Gitlab服务器启动关闭
初始化配置
# gitlab-ctl reconfigure
gitlab日志
# /var/log/gitlab/unicorn
3.初始化Gitlab相关服务并完成安装
GitLab汉化:http://www.cnblogs.com/straycats/p/7707359.html
##关闭Gitlab服务# gitlab-ctl restart# gitlab-ctl stop# gitlab-ctl start##重新配置GitLab# gitlab-ctl reconfigure##下载最新的汉化包# git clone https://gitlab.com/xhang/gitlab.git#下载老版本汉化版如果是要下载老版本的汉化包,需要加上老版本的分支,比如今天已经是10.0.4,我依旧想下载10.0.2,可以运行下面的语# git clone https://gitlab.com/xhang/gitlab.git -b v10.0.2-zh
GitLab使用
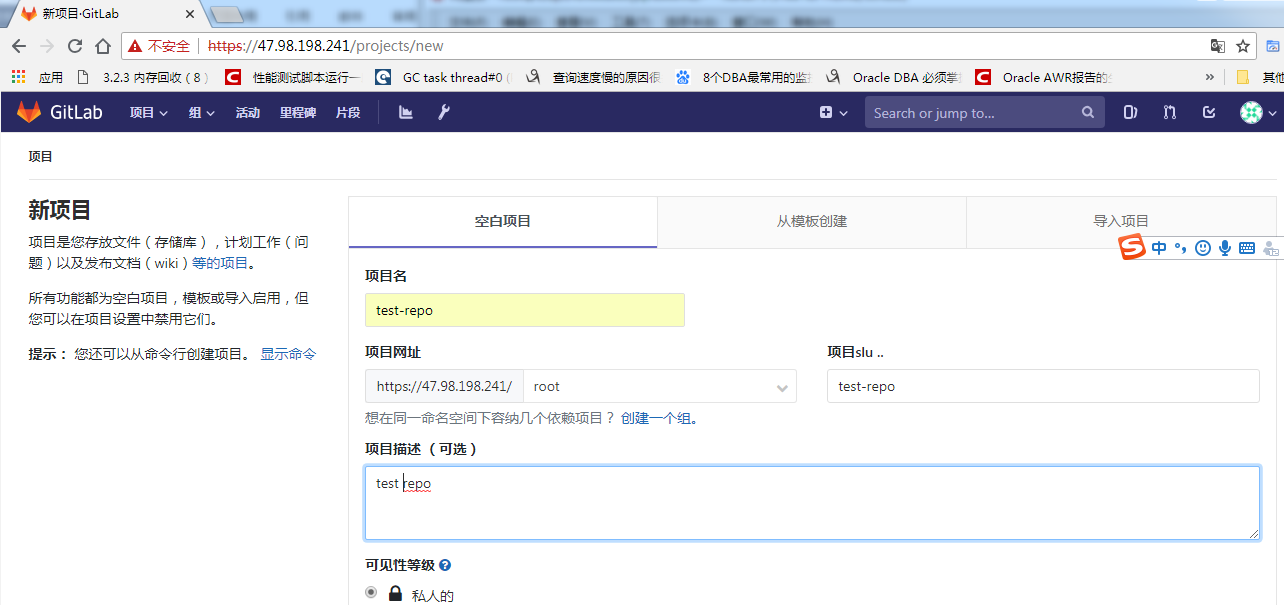
1.创建一个新项目
https://gitlab.example.com/root/xj_aml.git
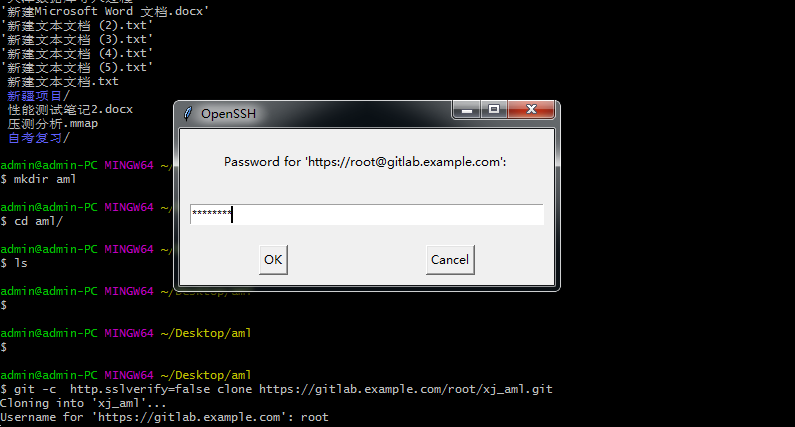
2.创建克隆仓库到本地
# git -c http.sslverify=false clone https://gitlab.example.com/root/xj_aml.git
3.在仓库项目创建\提交代码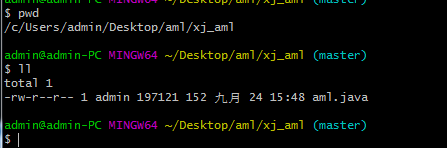
# git add .# git commit -m "First commit"###添加本地全局邮箱和用户名#########git config --global user.email "admin@example.com"#git config --global user.uame "admin"###添加本地全局邮箱和用户名######### git -c http.sslverify=false clone https://gitlab.example.com/root/xj_aml.git# git add .# git commit -m "First commit"# git -c http.sslverify=false push origin master###删除gitlab某个文件# git pull origin master 将远程仓库里面的项目拉下来# dir 查看有哪些文件夹# git rm -r --cached portal/ 删除portal文件夹# git commit -m '删除' 提交,添加操作说明# git push -u origin master 将本次更改更新到github项目上去
遇到错误:error: failed to push some refs to ‘https://gitlab.example.com/root/xj_aml.git‘
原因分析:引起该错误的原因是目录中没有文件,空目录是不能提交上去的
解决办法:https://blog.csdn.net/s164828378/article/details/52425208
错误:fatal: not a git repository (or any of the parent directories): .git
解决方法 git init
错误$ git -c http.sslverify=false push origin master
fatal: ‘origin’ does not appear to be a git repository
fatal: Could not read from remote repository.
解决:
git remote add origin git@github.com:djqiang(github帐号名)/gitdemo(项目名).git
git remote add origin git@github.com:admin/test-repo.git
https://www.jianshu.com/p/feb3a14c24ef
解决git clone 解决Permission Denied (publickey)问题
https://blog.csdn.net/sxg0205/article/details/81412921
https://blog.csdn.net/sxg0205/article/details/81412921
错误:fatal: bad numeric config value ‘fales’ for ‘http.sslverify’: invalid unit
解决:删除本地克隆的文件及文件夹,从新克隆,或者关闭Git安全认证git config —global http.sslVerify false
502超时错误:https://gitlab.com/gitlab-org/gitlab-ce/issues/30095
http://fztree.iteye.com/blog/2240927
https://blog.csdn.net/bisal/article/details/60355056
warning: You appear to have cloned an empty repository.
或者
fatal: destination path ‘.’ already exists and is not an empty directory.
解决方法:
ls -a
rm .git/ -rf
再运行一遍git clone
git fatal: destination path ‘**’ already exists and is not an empty directory.解决
fatal: Unable to create ‘C:/Users/admin/Desktop/report2/.git/index.lock’: File exists.
解决:rm -f ./.git/index.lock orwindows del .git\index.lock
failed to push some refs to git
解决:https://blog.csdn.net/xsf50717/article/details/48947437
#查看gitlab本地配置# git config --list##查看Git用户名和邮箱# git config user.name# git config user.email##修改自己的用户名和邮箱地址:# git config --global user.name "xxx"# git config --global user.email "xxx"git remote add origin ssh@//gitlab.example.com/root/test-repo.git
GitLab应用场景
GitLab强大之处,强大的分布式
后台管理:可以针对不同项目,不同用户,订制不同的访问策略
开发人员视角:代码快速发布和审核,每一个项目下个个小组都会维护自己的代码分支,当这个分支多次在不同环境下部署测试成功之后,我们会提交一下master主分支合并的申请,等待项目领导去审核,决定是否去审核合并
权限:
不同的项目不同人员不同的权限
Ansible安装配置管理
Ansible优势和应用场景
Ansible:开源部署工具
开发语言:Python
特点:ssh协议通讯,全平台,无需编译,模块化部署管理
作用:推送playbook进行远程节点快速部署
优势:
轻量级无客户端(Agentless)
开源免费,学习成本低,快速上手
使用playbook作用核心配置架构,统一脚本格式,批量化部署
完善的模块化扩展,支持目前主流的开发场景
强大的稳定性和兼容性
Ansible安装配置
- Ansible的两种安装模式(cenOS7)
1.yum包管理安装
# yum –y install ansible
2.Git源码码安装(推荐)
Ansible2.5+Python3.6安装步骤:
1)预先安装py3.6
# wget https://www.python.org/ftp/python/3.6.5/Python-3.6.5.tar.xz#指定目录编译# tar xvf Python-3.6.5.tar.xz#cd /Python-3.6.5# ./configure --prefix=/usr/local --with-ensurepip=install --enable-shared LDFLAGS="-Wl,-rpath /usr/local/lib"
遇到错误:configure: error: no acceptable C compiler found in $PATH
解决:yum install -y gcc
make && make altinstall
遇到错误:make: * [altinstall] Error 1
解决:yum install zlib-devel bzip2-devel sqlite sqlite-devel openssl-devel
https://stackoverflow.com/questions/40355611/python-3-4-installation-error-1-oserror-errno-22-invalid-argument
2)安装virtualenv
#查看pip路径# which pip3.6/usr/local/bin/pip3.6#给usr/local/bin/pip3.6做软连接# ln -s /usr/local/bin/pip3.6 /usr/local/bin/pip# pip install virtualenv
3)创建ansible账号并安装py3.6版本和virtualenv实例
# useradd deploy# su - deploy# virtualenv -p /usr/local/bin/python3.6 .py3-a2.5-env
4)git源代码安装Ansible2.5
#查看deploy用户是否安装git# su - deploy$ which git/usr/bin/git#使用root用户安装git依赖包# yum -y install git nss curl#deploy git安装完成后(使用root)# cd /home/deploy/.py3-a.2.5-env# git clone https://github.com/ansible/ansible.git
5)加载py3.6 virtualenv环境
# source /home/deploy/.py3-a2.5-env/bin/activate
6)安装Ansible依赖包
#安装paramiko pyYAML jinja2依赖包# pip install paramiko pyYAML jinja2#进入ansible目录下将ansible源代码切换到2.5版本# cd .py3-a2.5-env/ansible# git checkout stable-2.5
7)在py3.6虚拟环境下加载ansible2.5
# source /home/deploy/.py3-a2.5-env/ansible/hacking/env-setup -q
8)验证ansible2.5
# ansible --version
到此ansible2.5版本已经成功的在py3.6虚拟环境下完成安装;
CentOS6.7下Ansible部署:http://www.showerlee.com/archives/1649
Ansible中文权威指南:http://www.ansible.com.cn/index.html
https://blog.csdn.net/wating_jx/article/details/71084592
Ansible常用模块操作和编写规范
- playbook框架与格式
Test playbook 文件结构清单:
inventory/ ——>server详细清单目录
testenv/ ——>具体清单与变量声明文件
roles/ ——>roles任务列表
testbox/
tasks/
main.yml ——>testbox主任务文件
deploy.yml ——>playbook任务入口文件
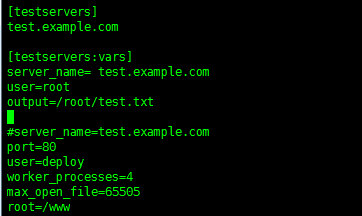
- 详细目录testenv
[testservers] ——>server组列表
test.example.com ——>目标部署服务器主机名
[testservers:vars] ——>server组列表参数
server_name= test.example.com
user=root ——>目标主机key/value参数
output=/root/test.txt
- 主任务文件main.yml
- 任务入口文件deploy.yml
加载py3.6虚拟环境
source .py3-a2.5-env/bin/activate
同时加载ansible2.5版本
source /home/deploy/.py3-a2.5-env/ansible/hacking/env-setup -q
验证加载效果
ansible-playbook —version
编写playbook框架
mkdir playbook
cd /playbook
mkdir inventory
mkdir roles
cd inventory
vi testenv
[testservers] report.example.com
[testservers:vars]server_name= report.example.comuser=rootoutput=/root/test.txt
cd roles
mkdir testbox
cd testbox
mkdir tasks
cd tasks
vi main.yml
- name: print server name and user to remste testbox shell: “echo ‘Currently {{ user }} is logining {{ server_name }}’ > {{ output }}”
cd ../../..
pwd
/home/deploy/playbook
vi deploy.yml
- hosts: “testservers”
gather_facts: true
remote_user: root
roles:
- testbox ```
查看树形文件夹
# tree .
(.py3-a2.5-env) [deploy@iZbp1hovekdxocyqhdwshnZ xj_aml]$ tree .
.
├── deploy.yml
├── inventory
│ └── testenv
└── roles
└── testbox
└── tasks
└── main.yml
4 directories, 3 files
创建目标主机DNS主机记录
# su - root# vi /etc/hosts172.16.87.102 report.example.com
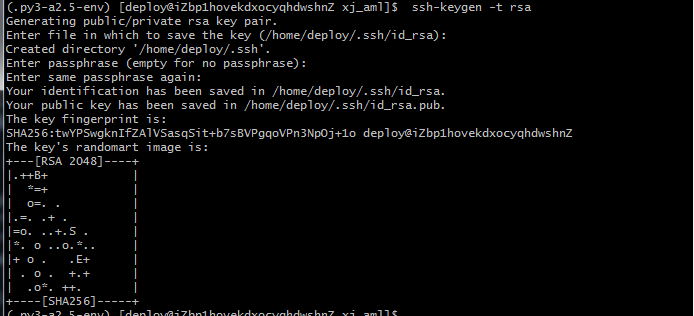
切换deploy用户,创建ssl秘钥认证
# ssh-keygen -t rsa
#指定deploy用户公钥# ssh-copy-id -i /home/deploy/.ssh/id_rsa root@report.example.com(test.example.com是ansible本机DNS)# ansible-playbook -i inventory/testenv ./deploy.yml (命令手动敲) 在/home/deploy/playboo目录下执行
遇到错误:bad permissions: ignore key: /home/deploy/.ssh/id_rsa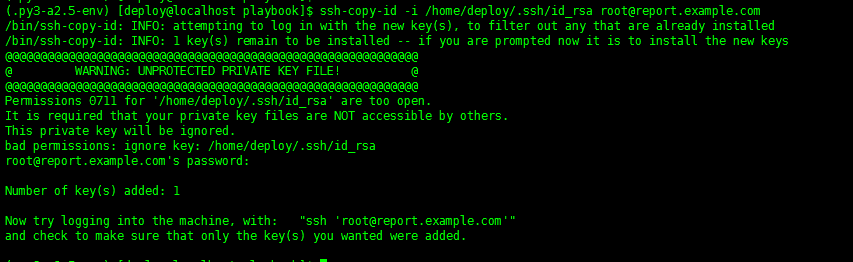
解决:
chmod 755 ~/.ssh/chmod 600 ~/.ssh/id_rsa ~/.ssh/id_rsa.pubchmod 644 ~/.ssh/known_hosts
测试目标主机
# ssh root@report.example.com[root@localhost ~]# ls -l .ssh/总用量 4-rw-------. 1 root root 410 11月 7 15:51 authorized_key
Ansible playbooks常用模块介绍
File模块
在目标主机创建文件或目标,并赋予其系统权限
- name: create a file
file: ‘path=/root/foo.txt state=touch mode=0755 owner=foo group=foo’
-name:创建一个文件
file:声明调用的是一个file模块
path:定义需要在目标主机上创建一个root/ foo.txt
state=touch:定义我们创建一个文件
mode:给予创建的文件赋予权限
owner:文件的属组为foo用户
group:文件的属组为foo属组
Copy模块
实现Ansible服务端到目标主机的文件传送
-name:create a file
copy: ‘remote_src=no src=roles/testbox/file/foo.sh
dest=/root/foo.sh mode=0644 force=yes’
-name:使用一个文件
copy:
remote_src=no:声明将原Ansible主机端的文件传送到目标主机当中
src:声明源文件为该路径的文件夹
dest:将原地址的foo.sh传送到目标foo.sh
mode:给予创建的文件赋予权限
force:定义copy任务,强制执行
Stat模块
获取远程文件状态信息
- name: chenk if foo.sh exists
stat: ‘path=/root/foo.sh’
register: script_stat
name:定义任务名称foo.sh是否存在
stat:声明任务模块调用的是stat
path:定义当前需要去获取的文件路径
register:将获取到文件信息传送到script_stat
Debug模块
打印语句到Ansible执行输出
- debug: msg=”foo.sh exists”
when: script_stat.stat.exists
debug:定义debug模块输出的语句内容为foo.sh exists
when:
如果foo.sh存在就是Ansible打印输出信息,不存在就不打印
Command/Shell模块
用来执行linux目标主机命令行
-name:run the script
command: “sh /rootfoo.sh”
-name:run the script (推荐)
shell: “echo ‘test’ > /root/test.txt “
Command/Shell编写可参考:http://zhangyongbo.iteye.com/blog/2428777
Template模块
用来实现Ansible服务端到目标主机的jinja2模块传送
- name:write the nginx config file
template:src=roles/testbox/templates/nginx.conf.j2
dest=/ect/nginx/nginx.conf
name:定义一个任务名称编写nginx配置文件
template:声明语句调用的是template模块
src:定义原模板文件在/roles../ nginx.conf.j2
dest:目标目录,将src文件传送到/ect/…/ nginx.conf重命名为nginx.conf
Packaging模块
调用目标主机系统包管理工具(yum,apt)进行安装
- name:ensure nginx is at the latest version
yum:pkg=nginx state=latest —————>CenOS&RedHat系统
- name:ensure nginx is at the latest version
apt:pkg=nginx state=latest —————>Debian&Ubuntu系统
Service模块
管理目标主机系统服务
- name:start nginx service
service:name=nginx state=started
编写完成的Ansible Playbooks模块
Ansible playbooks常用模块案例操作
1.使用Git Bash
$ ssh root@47.98.198.241# su - deploy#启动py3.6的环境# source .py3-a2.5-env/bin/activate#加载Ansible2.5版本# source .py3-a2.5-env/ansible/hacking/env-setup#检查是否加载py3.6环境以及在该py3.6环境下加载了ansible-playbook 2.5# ansible-playbook --version

2.ssh登录到目标主机
# ssh root@47.98.198.241#创建用户,完成目标主机预配置工作# useradd foo# mkdir /etc/nginx# rpm -Uvh http://nginx.org/packages/centos/7/noarch/RPMS/nginx-release-centos-7-0.el7.ngx.noarch.rpm# exit
3.切换Ansible用户下
编辑testbox主任务文件
# vi roles/testbox/tasks/main.yml
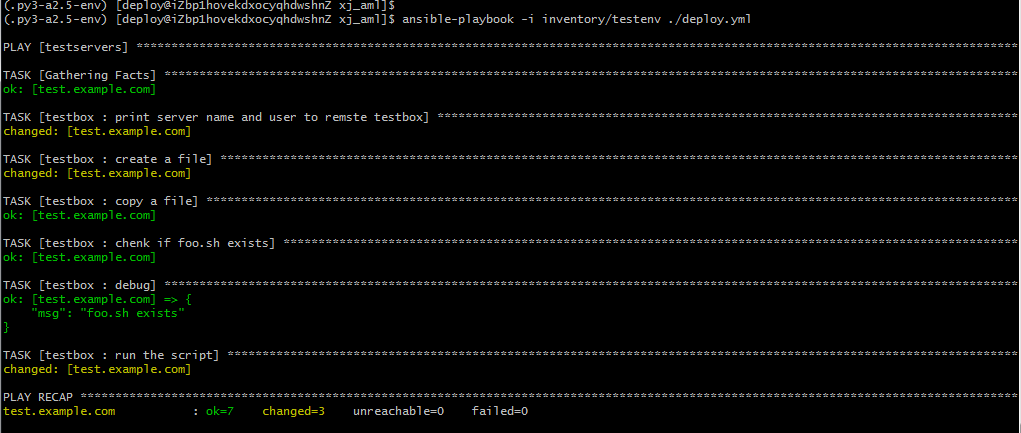
测试编写的file模块任务,执行deploy.yml是否成功
# ansible-playbook -i inventory/testenv ./deploy.yml
运到错误:
解决办法是有
还有这个错误:
解决办法:该目标主机没有foo用户,选择赋予其他用户权限和组
#测试成功Ansible playbooks常用的模块介绍
已经创建ok的文件
3.创建copy模块
#使用deploy用户创建# mkdir roles/testbox/files#编辑foo.sh并写入测试脚本# vi roles/testbox/files/foo.shecho 'this is test script'#测试ok的返回结果
4.添加Stat模块任务
#添加stat模块和debug模块# vi roles/testbox/tasks/main.yml- name: chenk if foo.sh existsstat: 'path=/root/foo.sh'register: script_stat- debug: msg="foo.sh exists"when: script_stat.stat.exists#测试是否成功# ansible-playbook -i inventory/testenv ./deploy.yml
5.添加Stat模块任
#添加command模块远程执行主机# vi roles/testbox/tasks/main.yml- name: run the scriptcommand: "sh /root/foo.sh"#测试是否成功# ansible-playbook -i inventory/testenv ./deploy.yml
6.添加一个Template模块任
#编辑inventory/testenv文件添加参数值server_name=test.example.comport=80user=deployworker_processes=4max_open_file=65505root=/www
创建templates目录文件
# mkdir roles/testbox/templates# vi roles/testbox/templates/nginx.conf.j2# vi roles/testbox/tasks/main.yml# ansible-playbook -i hosts site.yml
jenkins安装配置管理
jenkins使用安装配置
jenkins:开源持续集成工具
开发语言:java
功能:提供了软件开发的持续集成服务
特点:支持主流软件配置管理,配合实现软件配置管理,持续集成功能
jenkins安装前准备工作(cenOS7)
1.下载yum仓库源
# wget -O /etc/yum.repos.d/jenkins.repo https://pkg.jenkins.io/redhat-stable/jenkins.repo# rpm --import https://pkg.jenkins.io/redhat-stable/jenkins.io.key
2.配置java版本8.0或8.0以上
#下载jdk# http://www.oracle.com#配置java环境变量# vi ~/.bashrcexport JAVA_HOME=/usr/java/jdk1.8.0_77export PATH=$JAVA_HOME/bin:$PATHexport CLASSPATH=.:$JAVA_HOME/lib/dt.jar:$JAVA_HOME/lib/tools.jar# source ~/.bashrc# java -version#切换deploy用户,给deploy用户配置java环境变量# vi ~/.bashrcexport JAVA_HOME=/usr/java/jdk1.8.0_77...# source ~/.bashrc# java -version
3.关闭系统防火墙
# systemctl stop firewalld# systemctl disable firewalld
4.关闭SELINUX并重启系统,关闭强制访问安全策略
# vi /etc/sysconfig/selinux…SELINUX=disabled...#reboot
jenkins安装与初始化配置
1.yum源安装jenkins最新版本
# yum -y install jenkins
2.创建jenkins系统用户
# useradd deploy
3.更改jenkins启动用户与端口
# vi /etc/sysconfig/jenkins....JENKINS_USER=deployJENKINS_PORT=8080..
4.启动jenkins
#编辑/etc/rc.d/init.d/jenkins添加java路径# vi /etc/rc.d/init.d/jenkins# Search usable Java as /usr/bin/java might not point to minimal version required by Jenkins.candidates=".../usr/java/jdk1.8.0_77/bin/java
# systemctl start jenkins# systemctl stop jenkins# systemctl status jenkins#启动jenkins# java -jar jenkins
jenkins job的介绍(Freestyle job 和 Pineline job)
jenkins job构建
jenkins是由若干个job任务结构
Freestyle job
1.需要在页面添加模块配置项与参数完成配置
2.每个job仅能实现一个开发功能
3.无法将配置代码化,不利于job配置迁移与版本控制
4.逻辑相对简单,无需额外学习成本
Pineline job
1.匹配持续集成与持续交付的管道(持续集成简称CI,是一种我们软件开发过程中的周期实现,我们通过将我们的代码仓库与jenkins集成使我们开发人员每次代码提交都能够在我们的jenkins上自动任务的build构建,这样子就能帮助我们开发团队第一时间发现问题与解决问题;持续集成简称CD,是在持续集成的基础上,可以将我们构建好的软件版本通过jenkins的自动化测试部署等多个程序持续安全快速的交付到用户手中)
2.所有模块,参数配置都可以体现为一个pipeline脚本
3.jenkins可以编写定义多个stage构建一个管理工作集
4.所有配置代码化,方便job配置迁移与版本控制
5.需要pipeline脚本语法基础
最后Freestyle和 Pineline最大的任务不同,Freestyle方便配置,不易于项目管理维护,Pineline方面项目管理,但相对需要一定的学习成本;
jenkins job
jenkins job
jenkins job构建配置环境准备(cenOS7)
1.配置jenkins server本地GitLab DNS
#远程登录jenkins服务端
# ssh root@172.16.89
# vi /etc/hosts
172.16.87.88 gitlab.example.com
2.安装git client,curl工具依赖
# yum install -y git curl
3.关闭系统Git http.sslVerify安全认证
# git config —system http.sslVerify false
4.添加jenkins后台Git client user与email注册
# 系统管理—>系统设置—>Git plugin(user/email)
5.添加jenkins后台Git Credential凭据
# 凭据—>jenkins—>全局凭据—>添加凭据(GitLab仓库用户@密码)
jenkins freestyle job构建配置
1.创建一个freestyle project任务
# 新建任务—>选择一个自由风格任务
2.编辑描述信息
#~~~
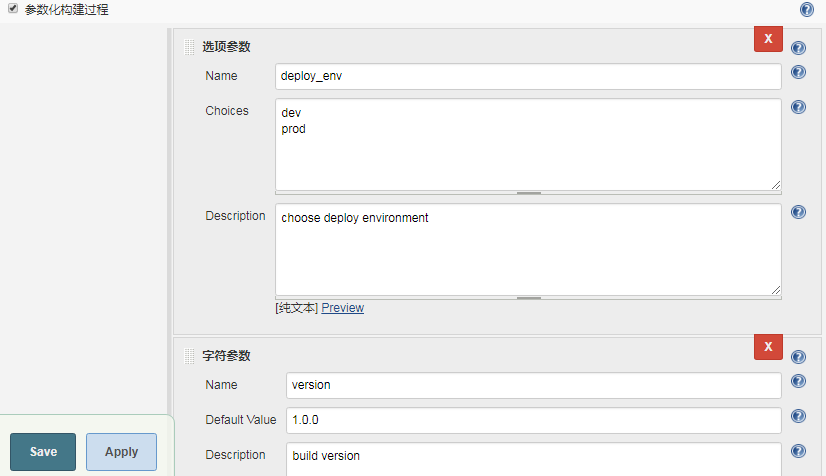
3.参数配置
选项参数:
name:deploy_env
Choices:dev、prod
Description:Test
文本参数:
Name:version
Default Value:1.0.0
4.源代码管理(将GitLab代码克隆到jenkins本地)
#添加Source Code Management
# Repository URL:https://gitlab.example.com/root/xj_aml.git
Credentials:选择已添加的凭证
5.Build配置
# shell执行脚本#!/bin/shexport PATH="/bin:/sbin:/usr/bin:/usr/sbin:/usr/local/bin:/usr/local/sbin"# Print env variableecho "[INFO] Print env variable"echo "Current deployment envrionment is $deploy_env" >> test.propertiesecho "THe build is $version" >> test.propertiesecho "[INFO] Done.."# Check test propertiesecho "[INFO] Check test properties"if [ -s test.properties ]thencat test.propertiesecho "[]INFO] Done.."elseecho "test.properties is empty"fiecho "[INFO] Build fini shed.."
pipeline job
jenkins pipeline job编写规范
pipeline基础架构:
1.所有代码包裹在pipeline{}层内
2.stage{}层用来包含该pipeline所有stage子层
3.stage{}层用来包含具体我们需要编写任务的steps{}子层
pipeline{agent anyenvironment{host=’test.example.com’user=‘deploy’}stages{stage(‘build’){steps{sh “cat $hostecho $deploy}}}}
agent区域:
1.agent定义pipeline在哪里运行,可以使用any,node或具体的jenkins node主机名等。
例:如果我们要指定在node1上执行,可以写成:agent{node{label ‘node1’}}
environment区域:
1.”变量名称=变量值”定义我们的环境变量
2.可以定义全局环境变量,应用所有的stages任务
pipeline{agent anyenvironment{PATH=”/bin:/sbin:/usr/bin”}stages{stage(‘build’){environment {JAVA_HOME=”/usr/lib/jre”}steps{sh “cat $host”echo $deploy}}}}
script区域(可选)
pipeline{agent anystages{stage('build'){steps{echo "HelloWord "script{def servers = ['node1','node2']For (int i=0; I<server.size();++i){echo "testing ${server[i] server"}}}}}}
常用steps区域
1.echo:打印输出
2.sh:调用linux系统shell命令
3.git url:调用git模块进行git相关操作
pipeline{agent anyenvironment{user = 'deploy '}stages{stages('build '){steps{echo $deploysh "cat 'HelloWorld ' "git url:"https://root@gitlab.exmaple.com/root/test.git "}}}}
1.创建一个test.pipeline project流水线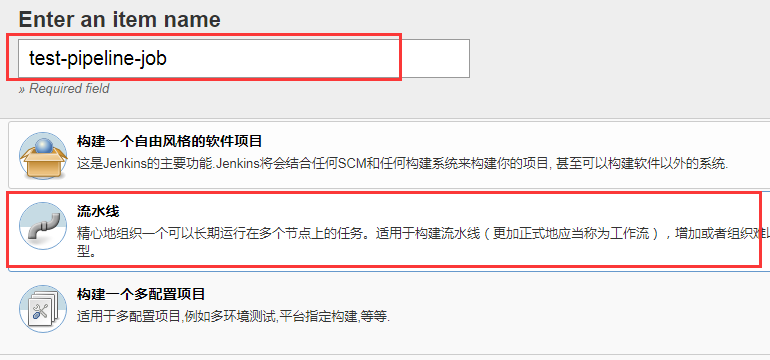
2.添加描述信息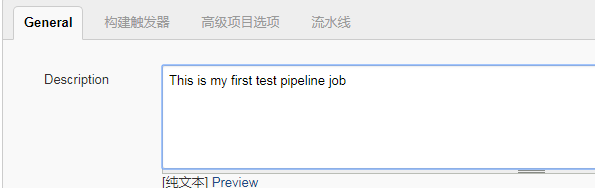
3.pipeline脚本配置
#!groovypipeline {agent {node {label 'master'}}environment {PATH="/bin:/sbin:/usr/bin:/usr/sbin:/usr/local/bin"}parameters {choice(choices: 'dev\nprod',description: 'choose deploy environment',name: 'deploy_env')string (name: 'version', defaultValue: '1.0.0', description: 'build version')}stages {stage("Checkout test repo") {steps{sh 'git config --global http.sslVerify false'dir ("${env.WORKSPACE}") {git branch: 'master', credentialsId:"6a9471fb-16dd-4c90-8b68-9ab6879ad8a2", url: 'https://172.16.87.88/root/test-repo.git'}}}stage("Print env variable") {steps {dir ("${env.WORKSPACE}") {sh """echo "[INFO] Print env variable"echo "Current deployment environment is $deploy_env" >> test.propertiesecho "The build is $version" >> test.propertiesecho "[INFO] Done...""""}}}stage("Check test properties") {steps{dir ("${env.WORKSPACE}") {sh """echo "[INFO] Check test properties"if [ -s test.properties ]thencat test.propertiesecho "[INFO] Done..."elseecho "test.properties is empty"fi"""echo "[INFO] Build finished..."}}}}}
jenkins shell集成
1.创建一个自由风格的项目
2.Build 执行shell
##获取jenkins当前系统信息,并输出打印#!/bin/shchmod -R +x /home/deploy/user ='whoami'if [ $user == 'deploy' ]thenecho "hello,my name is $user"elseecho "sorry,i am not $user"fiip addrcat /etc/system-releasefree -mdf -hpy_cmd='which python'$py_cmd --version
jenkins Git和Maven集成
jenkins内部Git插件可以将GitLab,GitHup克隆到jenkins本地,准备好代码构建的工作
##Git集成案例
1.新建一个自由风格软件项目
2.job编辑页面:
代码管理选择Git,输入仓库项目地址,用户名/密码
##Maven集成
1.下载Maven:wget http://mirrors.hust.edu.cn/apache/maven/maven-3/3.5.4/binaries/apache-maven-3.5.4-bin.tar.gz
2.解压tar -zxvf apache-maven-3.5.4-bin.tar.gz -C /opt/
3.进入bin目录apache-maven-3.5.4/bin
4. ./mvn —version
##Maven安装成功
5.jenkins配置Maven工作
1)新建一个自由风格软件项目
2)job编辑页面:
代码管理选择Git,输入仓库项目地址,用户名/密码
增加构建步骤,选择调用顶层Maven目标
Maven目标:package
6.配置jenkins,java&Maven全局环境变量
1)系统设置—>全局工具配置
新增jdk,配置java_home
新增Maven,配置Maven安装路径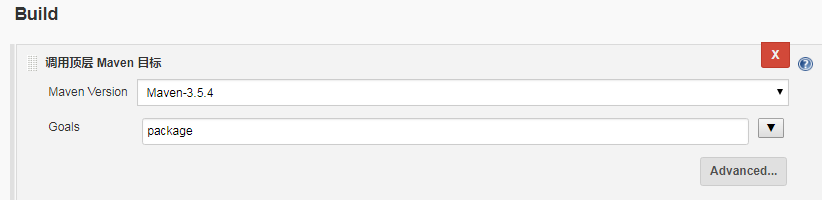
##Ant配置
1.下载 wget http://mirrors.tuna.tsinghua.edu.cn/apache//ant/binaries/apache-ant-1.9.13-bin.tar.gz
解压tar -zxvf apache-ant-1.10.5-bin.zip
进入bin目录执行./ant -version
2.改变目录权限
chown -R weblogic apahce-ant-1.9.2
chmod -R +x apahce-ant-1.9.2
3.修改配置文件
vi /etc/profile
###20180608 set Ant enviroment
export ANT_HOME=/usr/apache-ant-1.9.2
export PATH=$PATH:$ANT_HOME/bin
source /etc/proifle 立刻将配置生效
ant -version 测试ant是否生效
4.配置deploy环境变量
1)进入home目录:
ls –la 查看隐藏.bash_profile文件
2)新增weblogic环境变量:
vim .bash_profile
#set Ant enviroment
export ANT_HOME=/usr/apache-ant-1.9.2
export PATH=$PATH:$ANT_HOME/bin
3)source /home/weblogic/.bash_profile立刻将配置生效
ant -version 测试ant是否生效
jenkins Ansible集成
前提条件
# ssh root@172.16.87.88# su - deploy#加载py3.6虚拟环境# source .py3-a2.5-env/bin/activate#同时加载ansible2.5版本# source /home/deploy/.py3-a2.5-env/ansible/hacking/env-setup -q# ssh root@test.example.com(配置目标主机ansible秘钥认证)查看2.4章ansible playbooks模块操作和编写##查看本机ip,认证成功说明秘钥配置ok# ip addr
shell脚本
#!/bin/sh声明脚本时shellset +xsu - deploysource /home/deploy/.py3-a2.5-env/bin/activatesource /home/deploy/.py3-a2.5-env/ansible/hacking/env-setup -qcd /home/deployansible --versionansible-playbook --versioncat testserversansible -i testservers testserves -m command -a "ip addr"set -x
Jenkins,ansible,gitlab三剑客
Freestyle job案例
三剑客环境搭建
搭建平台
# ssh root@172.16.87.89# su - deploy$ source /home/deploy/.py3-a2.5-env/bin/activate###加载py3虚拟环境$ source /home/deploy/.py3-a2.5-env/ansible/hacking/env-setup -q##验证ansible是否已经加载成功$ ansible --version
到此三剑客平台已经就绪
##创建freetyle-job工程
#描述:This is my frist nginx job
#参数化构建过程
选择参数:
名称:deploy_env
选择:dev&test&prod
文本参数:
名称:branch
默认值:master
源代码管理:GitLab项目仓库url/仓库密码
编写playbook脚本实现静态网页远程部署
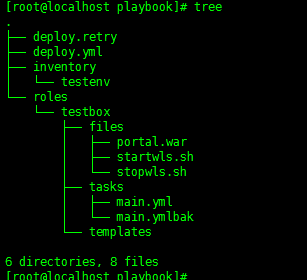
编写playbooks脚本
nginx_playbooks/ ——->脚本目标
├── deploy.retry
├── deploy.yml —->主入口文件
├── inventory ——>详细目标
│ ├── dev
│ └── prod
└── roles ——>主任务文件
└── nginx
├── files
│ ├── health_check.sh
│ └── index.html
├── tasks
│ └── main.yml —->ansible-playbook主任务文件
└── templates
└── nginx.conf.j2
6 directories, 8 files
将playbook部署脚本提交到Gitllab仓库
##将GitLab仓库代码克隆到本地# git -c http.sslverify=false clone https://gitlab.example.com/root/ansible-playbooks.git##上传代码# git add .##提交,注释提交内容# git commit -m "First commit"# git -c http.sslverify=false push origin master 或git push origin master
Freestyle任务构建和自动化部署
shell脚本
#!/bin/shset +xsource /home/deploy/.py3-a2.5-env/bin/activatesource /home/deploy/.py3-a2.5-env/ansible/hacking/env-setup -qcd $WORKSPACE/nginx_playbooksansible --versionansible-playbook --versionansible-playbook -i inventory/$deploy_env ./deploy.yml -e project=nginx -e branch=$branch -e env=$deploy_env
jenkins pipeline job案例
###pipeline job实现:nginx+mysql+php+WordPress自动化部署交付
预先搭建环境:
1.三剑客平台初始化环境构建
2.编写ansible playbook脚本实现WordPress远程部署工作
3.将WordPress源码与playbook部署脚本提交到GitLab仓库
4.编写pipeline job脚本实现jenkins流水线持续交付流程
5.jenkins集成ansible与GitLab实现WordPress的自动化部署
##ssh链接jenkins后台服务器# ssh root@172.16.87.89# su -deploy$ source /home/deploy/.py3-a2.5-env/bin/activate###加载py3虚拟环境$ source /home/deploy/.py3-a2.5-env/ansible/hacking/env-setup -q##验证ansible是否已经加载成功$ ansible --version##验证ansible环境是否免秘钥远程登录目标服务器# ssh root@report.example.com(目标服务器DNS)##编写ansible playbook脚本##打开Git Bash在本地编写脚本###为了避免克隆或者推送GitLab仓库时报证书错误,关闭Git安全认证### git config --global http.sslverify fales# git -c http.sslverify=false clone https://gitlab.example.com/root/ansible-playbooks.git# cd ansible-playbooks/# cp -a nginx_playbooks/ wordpress_playbooks# 编写本地wordpressss_playbooks脚本
wls案例
##Freestyle job+GitLab+ansible+weblogic
1.环境准备
GitLab代码仓库托管服务器172.16.87.88(本地DNSgitlab.example.com)
ansible+jenkins持续构建集成服务器172.16.87.89
weblogic服务器:172.16.87.105
2.创建一个自由风格流水线job,命名项目名称规则
项目名称:report
参数化构建过程:
选项参数名称deploy_env
选项:dev、test、prod
文本参数名称:branch
默认值master
源码托管Git
项目仓库Url地址https://gitlab.example.com/root/report2.git
构建:Maven
执行shell:
#!/bin/shset +x#su - deploysource /home/deploy/.py3-a2.5-env/bin/activatesource /home/deploy/.py3-a2.5-env/ansible/hacking/env-setup -qcd /home/deployansible --versionansible-playbook --versioncd playbook#cp /home/deploy/.jenkins/workspace/report2.0/portal/target/portal.war roles/testbox/files/ansible-playbook -i inventory/testenv ./deploy.yml
jenkins启动停止脚本
#!/bin/bashDEPLOY_UID=1000java -jar /opt/jenkins.war >> $log_path/home/deploy/apache.log 2>&1 &if [ "$UID" -eq "${DEPLOY_UID}" ]thenecho "Message: deploy jenkins has started. "echoelseechoecho "Message: You are not the weblogic user, execute the command with deploy user."echofi
#!/bin/bashDEPLOY_UID=1000ps -aux | grep jenkins | grep java |awk '{print $2}'|xargs kill >> $log_path/home/deploy/apache.logif [ "$UID" -eq "${DEPLOY_UID}" ]thenecho "Message: The log file apache.log does not exis"echoelseechoecho "Message: You are not the weblogic user, execute the command with deploy user."echofi
3.Ansib脚本编写
- name: print server name and user to remste testboxshell: "echo 'Currently {{ user }} is logining {{ server_name }}' > {{ output }}"#- name: create a file# file: 'path=/root/foo.txt state=touch mode=0755 owner=root group=root'#- name: "kill掉weblogic"# shell: "ps -ef | grep weblogic | grep -v grep | awk '{print $2}' |xargs kill -9"- name: "删除老版本的war&文件"shell: "rm -rf {{ war_file }}/123.txt"- name: copy a filecopy: 'remote_src=no src=roles/testbox/files/portal.war dest={{ war_file }}/portal.war mode=0644 force=yes'#- name: start weblogic service# shell: "nohup {{ service }}/startWebLogic.sh &"- name: "查看weblogic请求判断 weblogic service starts"shell: echo $(ps -ef | grep weblogic | wc -l)register: 'weblogic_stat'- debug: msg="weblogic_stat"when: weblogic_stat.stdout |int >= 2- name: copy a filecopy: 'remote_src=no src=roles/testbox/files/stopwls.sh dest=/root/stopwls.sh mode=0777 force=yes'- name: "source profile && 卸载应用"shell: "source /etc/profile && sh /root/stopwls.sh"- name: "source profile && 装载应用"shell: "source /etc/profile && sh /root/startwls.sh"#- name: "卸载部署应用"# script: 'sh /home/wls.sh'# register: script_stat#- debug: msg="foo.sh exists"# when: script_stat.stat.exists#- name: run the script# command: "sh /root/foo.sh"
[testservers]report.example.com[testservers:vars]server_name= report.example.comuser=rootoutput=/root/weblogic_state.txtservice=/home/weblogic/Middleware/Oracle_Home/user_projects/domains/base_domain/binwar_file=/root#server_name=report.example.comport=80user=deployworker_processes=4max_open_file=65505root=/www
jenkins与SonarQube平台代码扫描
SonarQube安装
SonarQube安装
1.环境准备
sonarQube 下载地址https://www.sonarqube.org/downloads/(官网最新版本下载特别慢,可选择其他版本下载)
sonarQube Scanners 下载地址https://docs.sonarqube.org/display/SCAN/Analyzing+with+SonarQube+Scanner
安装jdk1.8(根据官网信息,需要用到jdk1.8,如果你的环境已经配置了JAVA_HOME是jdk1.7可以手动指定sonar的运行jdk为1.8)
安装mysql,可以是远程连接(注:mysql版本需要是5.6+)
2.安装
指定jdk1.8(如果系统环境变量已经是1.8忽略此步)
下载好sonarQube后,解压打开conf目录,修改 wrapper.conf
##jdk配置# tar -zxvf jdk-8u77-linux-x64.tar.gz -C /usr/java/#配置root用户java环境变量# vi ~/.bashrcexport JAVA_HOME=/usr/java/jdk1.8.0_77export PATH=$JAVA_HOME/bin:$PATHexport CLASSPATH=.:$JAVA_HOME/lib/dt.jar:$JAVA_HOME/lib/tools.jar##使环境变量立即生效# source ~/.bashrc##解压sonarqube-7.4.zip# unzip sonarqube-7.4.zip##创建用户启动es# adduser deploy# chown -R deploy:deploy sonarqube
配置deploy用户的java环境变量(172.16.87.85未配置deploy环境变量)
# vi ~/.bashrc###set sonar java ###export JAVA_HOME=/usr/java/jdk1.8.0_77export PATH=$JAVA_HOME/bin:$PATHexport CLASSPATH=.:$JAVA_HOME/lib/dt.jar:$JAVA_HOME/lib/tools.jar# source ~/.bashrc
mysql安装(Cenos7)
##下载并安装MySQL官方的 Yum Repository# wget -i -c http://dev.mysql.com/get/mysql57-community-release-el7-10.noarch.rpm##yum 安装Yum Repository# yum -y install mysql57-community-release-el7-10.noarch.rpm##安装mysql服务器# yum -y install mysql-community-server
mysql数据库设置
##启动mysql# systemctl start mysqld.service#查看mysql运行状态# systemctl status mysqld.service##在log中查看root密码#grep "password" /var/log/mysqld.log##登录mysql> mysql -uroot -p##修改mysql密码mysql> ALTER USER 'root'@'localhost' IDENTIFIED BY '123456';(注修改不成功的话,查看grep "password" /var/log/mysqld.log按照那里面密码修改)mysql> ALTER USER 'root'@'localhost' IDENTIFIED BY '.+i=ikbkb8aU';##查看mysql初始化密码规则mysql> set global validate_password_policy=0;mysql> set global validate_password_length=1;###最后卸载删除Yum Repository,避免以后每次操作yum的自动更新# yum -y remove mysql57-community-release-el7-10.noarch
3.SonarQube配置
###mysql 添加sonar用户
sonarQube配置mysql,修改/conf/sonar.properties
重启服务,观察日志
配置sonarqube目标conf下的sonar.properties
$ vim sonarqube/conf/sonar.properties
配置wrapper.conf文件
$ vim sonarqube/conf/sonar.properties
wrapper.java.command=/usr/java/jdk1.8.0_77/bin/java
创建sonar数据库
# mysql -u sonar -p
Enter password:
mysql> CREATE DATABASE sonar CHARACTER SET utf8 COLLATE utf8_general_ci;
mysql> CREATE USER ‘sonar’ IDENTIFIED BY ‘sonar’;
mysql> GRANT ALL ON sonar. TO ‘sonar’@’%’ IDENTIFIED BY ‘sonar’;
mysql> GRANT ALL ON sonar. TO ‘sonar’@’localhost’ IDENTIFIED BY ‘sonar’;
mysql> FLUSH PRIVILEGES;
启动启动sonar
# su - sonar
# ./bin/linux-x86-64/sonar.sh start
# tail -200f ./logs/sonar.log
##访问http://172.16.87.85:9000
##http://172.16.87.85:9000/about
mysql查看sonar数据库信息状态
mysql> show databases
mysql> use sonar;
mysql> show tables;
配置sonarqube-7.4启动脚本
#!/bin/bashDEPLOY_UID=1001./sonarqube-7.4//bin/linux-x86-64/sonar.sh start >> $log_path/home/deploy/sonar.log 2>&1 &if [ "$UID" -eq "${DEPLOY_UID}" ]thenecho "Message: deploy SonarQube has started. "echoelseechoecho "Message: You are not the deploy user, execute the command with deploy user."echofi
- SonarQube汉化
下载sonar-l10n-zh-plugin-1.21.jar 放在/opt/sonarqube/extensions/plugins目标下,重新启动sonarqube(注意jar包组权限)
或者是在SonarQube平台安装中文插件—->配置—>Plugins—>搜索—>chinese
https://blog.csdn.net/qq_21816375/article/details/80787993
Sonar-scanner扫描器安装配置
(root用户配置其他用户执行须配置java环境变量)
Sonar通过扫描器进行代码质量分析,即扫描器的具体工作就是扫描代码:
###解压sonar-scanner-3.2.0.1227-linux# su - root# cd /opt# 编辑/conf下的sonar-scanner.properties文件# cd /opt/sonar-scanner-3.2.0.1227-linux/conf# grep "^[a-Z]" sonar-scanner.propertiessonar.host.url=http://localhost:9000sonar.sourceEncoding=UTF-8sonar.jdbc.url=jdbc:mysql://localhost:3306/sonar?useUnicode=true&characterEncoding=utf8onar.jdbc.username=sonarsonar.jdbc.password=sonarsonar.login=adminsonar.password=admin
配置sonar-scanner-3.2环境变量
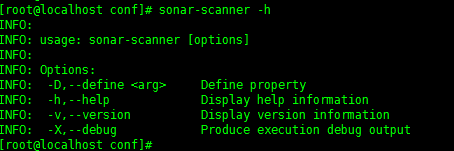
# vi ~/.bashrc###set sonar-scanner###export SONAR_RUNNER_HOME=/opt/sonar-scanner-3.2.0.1227-linuxexport PATH=$SONAR_RUNNER_HOME/bin:$PATHexport SONAR_SCANNER_OPTS="-Xms512m -Xmx2048m"# source ~/.bashrc##测试sonar-scanner环境变量# sonar-scanner -h
安装apache-maven
下载:wget http://mirrors.tuna.tsinghua.edu.cn/apache/maven/maven-3/3.6.0/binaries/apache-maven-3.6.0-bin.zip
# unzip apache-maven-3.6.0-bin.zip
验证maven版本:# ./apache-maven-3.6.0/bin/mvn -version
在项目的根目录中创建配置文件:sonar -project.properties
sonar.projectKey=report(项目的唯一标识,类似主键自定义)sonar.projectVersion=1.0.0(项目的版本)sonar.sources=.sonar.projectName=report(项目名称)sonar.ce.workCount=1sonar.language=java(项目编码)sonar.source=src(项目路径)sonar.java.binaries=/opt/report/report/src,/opt/report/portal/src,/opt/report/krm-sso/src,/opt/report/krm-common/srcsonar.sourceEncoding=UTF-8sonar.ce.javaOpts=-Xms=512 -Xmx=2048 -XX:+HeapDumpOnOutOfMenonyError
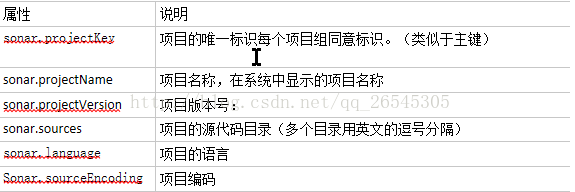
# must be unique in a given SonarQube instancesonar.projectKey=report# this is the name and version displayed in the SonarQube UI. Was mandatory prior to SonarQube 6.1.#sonar.projectName=My project #项目名称sonar.projectVersion=1.0.0# Path is relative to the sonar-project.properties file. Replace "\" by "/" on Windows.# This property is optional if sonar.modules is set.sonar.sources=.# Encoding of the source code. Default is default system encoding#sonar.sourceEncoding=UTF-8# Encoding of the source code. Default is default is defasonar.ce.javaOpts= -Xmx=2560 -Xms=853 -XX:+HeapDumpOnOutOfMenonyErrorsonar.projectName=reportsonar.ce.workCount=1sonar.language=javasonar.source=srcsonar.java.binaries=/opt/report/report/src,/opt/report/portal/src,/opt/report/krm-sso/src,/opt/report/krm-common/srcsonar.sourceEncoding=UTF-8sonar.ce.javaOpts=-Xms=512 -Xmx=2048 -XX:+HeapDumpOnOutOfMenonyError##suona Qpu 的服务器##代码扫描 suona sigai 特
SonarQube代码扫描
从项目基目录运行以下命令以启动分析:
1.手动执行分析(在项目根目标中操作)
# /opt/apache-maven-3.5.4/bin/mvn clean package
2.cd 进入report到项目根目标(在项目文件中操作)
# sonar-scanner
Java堆空间错误或java.lang.OutOfMemoryError故障:通过SONAR_SCANNER_OPTS环境变量增加内存:
https://docs.sonarqube.org/display/SCAN/Analyzing+with+SonarQube+Scanner
export SONAR_SCANNER_OPTS=”-Xmx512m”
FindBugs配置
https://blog.csdn.net/aya19880214/article/details/41958445
SonarQube扫描小案例
https://github.com/SonarSource/sonar-scanning-examples
https://blog.csdn.net/aya19880214/article/details/41958445
平台集成
https://docs.sonarqube.org/display/SCAN/Analyzing+with+SonarQube+Scanner+for+Jenkins
SonarQube扫描规则自定义
jenkins使用
1.jenkins插件下载:
http://updates.jenkins.io/update-center.json
https://mirrors.tuna.tsinghua.edu.cn/jenkins/updates/update-center.json
2.jenkins中文字符设置
首先下载插件:Locale plugin
配置如下:jienkins->【系统管理】->【系统设置】->【Locale】,输入:zh_CN,这里还有很多语言,比如:en_US等都是国际化标志;
问题归纳
GitLab
- 关闭Git ssh安全认证
git config —global http.sslverify false
- Could not resolve host
stderr: fatal: unable to access ‘https://gitlab.example.com/root/ansible-playbooks.git/‘: Could not resolve host: gitlab.example.com; Name or service not known
在jenkins主机hosts文件添加目标DNS地址
Ansible
[deploy@localhost .ssh]$ ssh-copy-id -i /home/deploy/.ssh/id_rsa root@report.example.com/bin/ssh-copy-id: INFO: attempting to log in with the new key(s), to filter out any that are already installed/bin/ssh-copy-id: ERROR: @@@@@@@@@@@@@@@@@@@@@@@@@@@@@@@@@@@@@@@@@@@@@@@@@@@@@@@@@@@ERROR: @ WARNING: POSSIBLE DNS SPOOFING DETECTED! @ERROR: @@@@@@@@@@@@@@@@@@@@@@@@@@@@@@@@@@@@@@@@@@@@@@@@@@@@@@@@@@@ERROR: The RSA host key for report.example.com has changed,ERROR: and the key for the corresponding IP address 172.16.87.105ERROR: is unknown. This could either mean thatERROR: DNS SPOOFING is happening or the IP address for the hostERROR: and its host key have changed at the same time.ERROR: @@@@@@@@@@@@@@@@@@@@@@@@@@@@@@@@@@@@@@@@@@@@@@@@@@@@@@@@@@@ERROR: @ WARNING: REMOTE HOST IDENTIFICATION HAS CHANGED! @ERROR: @@@@@@@@@@@@@@@@@@@@@@@@@@@@@@@@@@@@@@@@@@@@@@@@@@@@@@@@@@@ERROR: IT IS POSSIBLE THAT SOMEONE IS DOING SOMETHING NASTY!ERROR: Someone could be eavesdropping on you right now (man-in-the-middle attack)!ERROR: It is also possible that a host key has just been changed.ERROR: The fingerprint for the RSA key sent by the remote host isERROR: 38:9e:83:75:a8:d2:87:f1:d4:be:df:61:ab:47:3e:5f.ERROR: Please contact your system administrator.ERROR: Add correct host key in /home/deploy/.ssh/known_hosts to get rid of this message.ERROR: Offending ECDSA key in /home/deploy/.ssh/known_hosts:7ERROR: RSA host key for report.example.com has changed and you have requested strict checking.ERROR: Host key verification failed.
解决:
就是吧~/.ssh/known_hosts,里面源于 ioschina的那行删除,重新验证即可;
ssh-copy-id -i /home/deploy/.ssh/id_rsa root@report.example.com
jenkins
- jenkins获取GitLab链接不到仓库源码地址
 Failed to connect to repository : Command “git ls-remote -h https://gitlab.example.com/root/test-repo.git HEAD” returned status code 128:
解决:
把https://gitlab.example.com/root/test-repo.git 换行真实ip地址
- jenkins构建报java.io.IOException: error=2, 没有那个文件或目录Caused: java.io.IOException: Cannot run program “” (in directory “/home/deploy/.jenkins/workspace/ansible-freestyle-job”): error=2, 没有那个文件或目录
解决:
$ /bin/sh shell脚本包含空格
- chown failed: failed to look up user deploy
解决:
目标主机没有deploy用户、{{ root }}这个变量应该在配置文件里面的配的deploy因为linux下安装的所有APP都不推荐用root用户启动,所以创建一个普通用户deploy启动
解决:
chmod -R 700 ~/.ssh/

若有收获,就点个赞吧
0 人点赞
