- 1. JMM
- 2. CAS
- 3. 集合
- 4. 锁
- 5. 阻塞工具类
- 6. 阻塞理论和实践
- 7. 线程池
- 8.JVM
- Found one Java-level deadlock:
- Java stack information for the threads listed above:
- 10. JVM盘点家底查看修改变更值
- 11. 堆内存初始大小快速复习
- 12. 常用基础参数栈内存Xss讲解
- 13. 常用基础参数元空间MetaspaceSize讲解
- 14. 常用基础参数PrintGCDetails回收前后对比讲解
- 15. 常用基础参数SurvivorRatio讲解
- 16. 常用基础参数NewRatio讲解
- 17. 常用基础参数MaxTenuringThreshold讲解
- 9. 引用
- 10. GCRoots和四大引用小总结
- 11. JVM常见错误
- 12. 垃圾收集器
1. JMM
1. volatile是什么
volatile是JVM提供的轻量级的同步机制
- 保证可见性
- 不保证原子性
- 禁止指令重排(保证有序性)
2. JMM内存模型之可见性
JMM(Java内存模型Java Memory Model,简称JMM)本身是一种抽象的概念并不真实存在,它描述的是一组规则或规范,通过这组规范定义了程序中各个变量(包括实例字段,静态字段和构成数组对象的元素)的访问方式。
JMM关于同步的规定:
- 线程解锁前,必须把共享变量的值刷新回主内存
- 线程加锁前,必须读取主内存的最新值到自己的工作内存
- 加锁解锁是同一把锁
由于JVM运行程序的实体是线程,而每个线程创建时JVM都会为其创建一个工作内存(有些地方称为栈空间),工作内存是每个线程的私有数据区域,而Java内存模型中规定所有变量都存储在主内存,主内存是共享内存区域,所有线程都可以访问,但线程对变量的操作(读取赋值等)必须在工作内存中进行,首先要将变量从主内存拷贝的自己的工作内存空间,然后对变量进行操作,操作完成后再将变量写回主内存,不能直接操作主内存中的变量,各个线程中的工作内存中存储着主内存中的变量副本拷贝,因此不同的线程间无法访问对方的工作内存,线程间的通信(传值)必须通过主内存来完成,其简要访问过程如下图: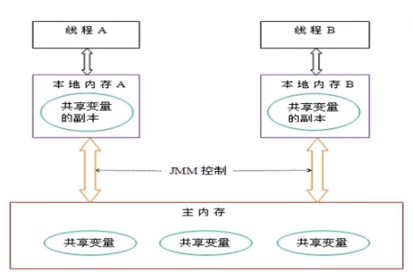
可见性
通过前面对JMM的介绍,我们知道各个线程对主内存中共享变量的操作都是各个线程各自拷贝到自己的工作内存进行操作后再写回到主内存中的。
这就可能存在一个线程AAA修改了共享变量X的值但还未写回主内存时,另外一个线程BBB又对主内存中同一个共享变量X进行操作,但此时A线程工作内存中共享变量x对线程B来说并不可见,这种工作内存与主内存同步延迟现象就造成了可见性问题
3. 可见性的代码验证说明
import java.util.concurrent.TimeUnit;/*** 假设是主物理内存*/class MyData {//volatile int number = 0;int number = 0;public void addTo60() {this.number = 60;}}/*** 验证volatile的可见性* 1. 假设int number = 0, number变量之前没有添加volatile关键字修饰*/public class VolatileDemo {public static void main(String args []) {// 资源类MyData myData = new MyData();// AAA线程 实现了Runnable接口的,lambda表达式new Thread(() -> {System.out.println(Thread.currentThread().getName() + "\t come in");// 线程睡眠3秒,假设在进行运算try {TimeUnit.SECONDS.sleep(3);} catch (InterruptedException e) {e.printStackTrace();}// 修改number的值myData.addTo60();// 输出修改后的值System.out.println(Thread.currentThread().getName() + "\t update number value:" + myData.number);}, "AAA").start();// main线程就一直在这里等待循环,直到number的值不等于零while(myData.number == 0) {}// 按道理这个值是不可能打印出来的,因为主线程运行的时候,number的值为0,所以一直在循环// 如果能输出这句话,说明AAA线程在睡眠3秒后,更新的number的值,重新写入到主内存,并被main线程感知到了System.out.println(Thread.currentThread().getName() + "\t mission is over");}}
由于没有volatile修饰MyData类的成员变量number,main线程将会卡在while(myData.number == 0) {},不能正常结束。若想正确结束,用volatile修饰MyData类的成员变量number吧。
volatile类比
没有volatile修饰变量效果,相当于A同学拷贝了老师同一课件,A同学对课件进一步的总结归纳,形成自己的课件,这就与老师的课件不同了。
有volatile修饰变量效果,相当于A同学拷贝了老师同一课件,A同学对课件进一步的总结归纳,形成自己的课件,并且与老师分享,老师认可A同学修改后的课件,并用它来作下一届的课件。
4. volatile不保证原子性
原子性指的是什么意思?
不可分割,完整性,也即某个线程正在做某个具体业务时,中间不可以被加塞或者被分割。需要整体完整要么同时成功,要么同时失败。
volatile不保证原子性案例演示:
class MyData2 {/*** volatile 修饰的关键字,是为了增加 主线程和线程之间的可见性,只要有一个线程修改了内存中的值,其它线程也能马上感知*/volatile int number = 0;public void addPlusPlus() {number ++;}}public class VolatileAtomicityDemo {public static void main(String[] args) {MyData2 myData = new MyData2();// 创建10个线程,线程里面进行1000次循环for (int i = 0; i < 20; i++) {new Thread(() -> {// 里面for (int j = 0; j < 1000; j++) {myData.addPlusPlus();}}, String.valueOf(i)).start();}// 需要等待上面20个线程都计算完成后,在用main线程取得最终的结果值// 这里判断线程数是否大于2,为什么是2?因为默认是有两个线程的,一个main线程,一个gc线程while(Thread.activeCount() > 2) {// yield表示不执行Thread.yield();}// 查看最终的值// 假设volatile保证原子性,那么输出的值应该为: 20 * 1000 = 20000System.out.println(Thread.currentThread().getName() + "\t finally number value: " + myData.number);}}
5. volatile不保证原子性理论解释
number++在多线程下是非线程安全的。
我们可以将代码编译成字节码,可看出number++被编译成3条指令。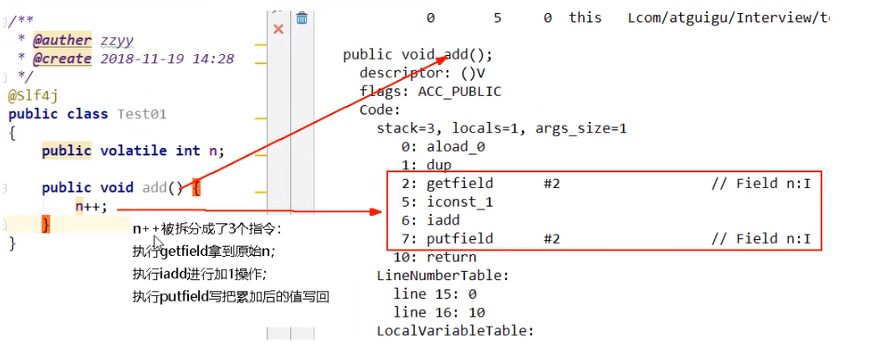
假设我们没有加 synchronized那么第一步就可能存在着,三个线程同时通过getfield命令,拿到主存中的 n值,然后三个线程,各自在自己的工作内存中进行加1操作,但他们并发进行 iadd 命令的时候,因为只能一个进行写,所以其它操作会被挂起,假设1线程,先进行了写操作,在写完后,volatile的可见性,应该需要告诉其它两个线程,主内存的值已经被修改了,但是因为太快了,其它两个线程,陆续执行 iadd命令,进行写入操作,这就造成了其他线程没有接受到主内存n的改变,从而覆盖了原来的值,出现写丢失,这样也就让最终的结果少于20000。
6. volatile不保证原子性问题解决
可加synchronized解决,但它是重量级同步机制,性能上有所顾虑。
如何不加synchronized解决number++在多线程下是非线程安全的问题?使用AtomicInteger。
import java.util.concurrent.atomic.AtomicInteger;class MyData2 {/*** volatile 修饰的关键字,是为了增加 主线程和线程之间的可见性,只要有一个线程修改了内存中的值,其它线程也能马上感知*/volatile int number = 0;AtomicInteger number2 = new AtomicInteger();public void addPlusPlus() {number ++;}public void addPlusPlus2() {number2.getAndIncrement();}}public class VolatileAtomicityDemo {public static void main(String[] args) {MyData2 myData = new MyData2();// 创建10个线程,线程里面进行1000次循环for (int i = 0; i < 20; i++) {new Thread(() -> {// 里面for (int j = 0; j < 1000; j++) {myData.addPlusPlus();myData.addPlusPlus2();}}, String.valueOf(i)).start();}// 需要等待上面20个线程都计算完成后,在用main线程取得最终的结果值// 这里判断线程数是否大于2,为什么是2?因为默认是有两个线程的,一个main线程,一个gc线程while(Thread.activeCount() > 2) {// yield表示不执行Thread.yield();}// 查看最终的值// 假设volatile保证原子性,那么输出的值应该为: 20 * 1000 = 20000System.out.println(Thread.currentThread().getName() + "\t finally number value: " + myData.number);System.out.println(Thread.currentThread().getName() + "\t finally number2 value: " + myData.number2);}}
输出结果为:
main finally number value: 18766main finally number2 value: 20000
7. volatile指令重排案例 1
计算机在执行程序时,为了提高性能,编译器和处理器的常常会对指令做重排,一般分以下3种:
单线程环境里面确保程序最终执行结果和代码顺序执行的结果一致。
处理器在进行重排序时必须要考虑指令之间的 数据依赖性
多线程环境中线程交替执行,由于编译器优化重排的存在,两个线程中使用的变量能否保证一致性是无法确定的,结果无法预测。
重排案例1
public void mySort{int x = 11;//语句1int y = 12;//语句2× = × + 5;//语句3y = x * x;//语句4}
可重排序列:
- 1234
- 2134
- 1324
重排案例2
int a,b,x,y = 0
| 线程1 | 线程2 |
|---|---|
| x = a; | y = b; |
| b = 1; | a = 2; |
| x = 0; y = 0 |
如果编译器对这段程序代码执行重排优化后,可能出现下列情况:
| 线程1 | 线程2 |
|---|---|
| b = 1; | a = 2; |
| x = a; | y = b; |
| x = 2; y = 1 |
这也就说明在多线程环境下,由于编译器优化重排的存在,两个线程中使用的变量能否保证一致性是无法确定的。
8.volatile指令重排案例 2
观察以下程序:
public class ReSortSeqDemo{int a = 0;boolean flag = false;public void method01(){a = 1;//语句1flag = true;//语句2}public void method02(){if(flag){a = a + 5; //语句3}System.out.println("retValue: " + a);//可能是6或1或5或0}}
多线程环境中线程交替执行method01()和method02(),由于编译器优化重排的存在,两个线程中使用的变量能否保证一致性是无法确定的,结果无法预测。
禁止指令重排小总结
volatile实现禁止指令重排优化,从而避免多线程环境下程序出现乱序执行的现象
先了解一个概念,内存屏障(Memory Barrier)又称内存栅栏,是一个CPU指令,它的作用有两个:
- 保证特定操作的执行顺序,
- 保证某些变量的内存可见性(利用该特性实现volatile的内存可见性)。
由于编译器和处理器都能执行指令重排优化。如果在指令间插入一条Memory Barrier则会告诉编译器和CPU,不管什么指令都不能和这条Memory Barrier指令重排序,也就是说通过插入内存屏障禁止在内存屏障前后的指令执行重排序优化。内存屏障另外一个作用是强制刷出各种CPU的缓存数据,因此任何CPU上的线程都能读取到这些数据的最新版本。
对volatile变量进行写操作时,会在写操作后加入一条store屏障指令,将工作内存中的共享变量值刷新回到主内存。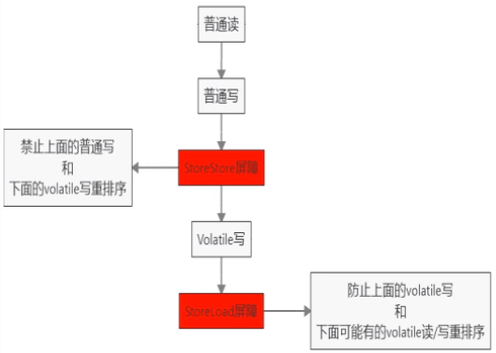
对Volatile变量进行读操作时,会在读操作前加入一条load屏障指令,从主内存中读取共享变量。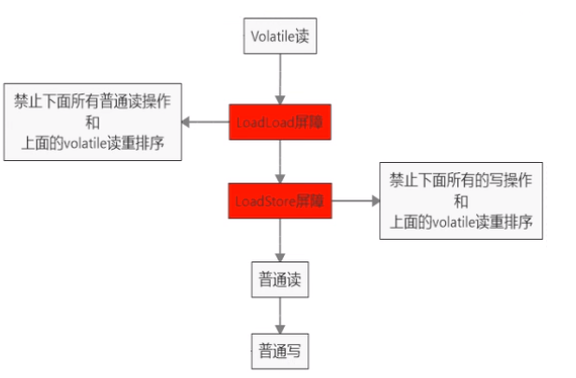
线性安全性获得保证
- 工作内存与主内存同步延迟现象导致的可见性问题 - 可以使用synchronized或volatile关键字解决,它们都可以使一个线程修改后的变量立即对其他线程可见。
- 对于指令重排导致的可见性问题和有序性问题 - 可以利用volatile关键字解决,因为volatile的另外一个作用就是禁止重排序优化。
9. 单例模式在多线程环境下可能存在安全问题
懒汉单例模式
public class SingletonDemo {private static SingletonDemo instance = null;private SingletonDemo () {System.out.println(Thread.currentThread().getName() + "\t 我是构造方法SingletonDemo");}public static SingletonDemo getInstance() {if(instance == null) {instance = new SingletonDemo();}return instance;}public static void main(String[] args) {// 这里的 == 是比较内存地址System.out.println(SingletonDemo.getInstance() == SingletonDemo.getInstance());System.out.println(SingletonDemo.getInstance() == SingletonDemo.getInstance());System.out.println(SingletonDemo.getInstance() == SingletonDemo.getInstance());System.out.println(SingletonDemo.getInstance() == SingletonDemo.getInstance());}}
输出结果:
main 我是构造方法singletonDemotruetruetruetrue
但是,在多线程环境运行上述代码,能保证单例吗?
public class SingletonDemo {private static SingletonDemo instance = null;private SingletonDemo () {System.out.println(Thread.currentThread().getName() + "\t 我是构造方法SingletonDemo");}public static SingletonDemo getInstance() {if(instance == null) {instance = new SingletonDemo();}return instance;}public static void main(String[] args) {for (int i = 0; i < 10; i++) {new Thread(() -> {SingletonDemo.getInstance();}, String.valueOf(i)).start();}}}
输出结果:
4 我是构造方法SingletonDemo2 我是构造方法SingletonDemo5 我是构造方法SingletonDemo6 我是构造方法SingletonDemo0 我是构造方法SingletonDemo3 我是构造方法SingletonDemo1 我是构造方法SingletonDemo
显然不能保证单例。
解决方法之一:用synchronized修饰方法getInstance(),但它属重量级同步机制,使用时慎重。
public synchronized static SingletonDemo getInstance() {if(instance == null) {instance = new SingletonDemo();}return instance;}
10. 单例模式volatile分析
解决方法之二:DCL(Double Check Lock双端检锁机制)
public class SingletonDemo{private SingletonDemo(){}private volatile static SingletonDemo instance = null;public static SingletonDemo getInstance() {if(instance == null) {synchronized(SingletonDemo.class){if(instance == null){instance = new SingletonDemo();}}}return instance;}}
DCL中volatile解析
原因在于某一个线程执行到第一次检测,读取到的instance不为null时,instance的引用对象可能没有完成初始化。instance = new SingletonDemo();可以分为以下3步完成(伪代码):
memory = allocate(); //1.分配对象内存空间instance(memory); //2.初始化对象instance = memory; //3.设置instance指向刚分配的内存地址,此时instance != null
步骤2和步骤3不存在数据依赖关系,而且无论重排前还是重排后程序的执行结果在单线程中并没有改变,因此这种重排优化是允许的。
memory = allocate(); //1.分配对象内存空间instance = memory;//3.设置instance指向刚分配的内存地址,此时instance! =null,但是对象还没有初始化完成!instance(memory);//2.初始化对象
但是指令重排只会保证串行语义的执行的一致性(单线程),但并不会关心多线程间的语义一致性。
所以当一条线程访问instance不为null时,由于instance实例未必已初始化完成,也就造成了线程安全问题。
2. CAS
1. CAS是什么
比较并交换
Compare And Set
示例程序
public class CASDemo{public static void main(string[] args){AtomicInteger atomicInteger = new AtomicInteger(5);// mian do thing. . . . ..System.out.println(atomicInteger.compareAndSet(5, 2019)+"\t current data: "+atomicInteger.get());System.out.println(atomicInteger.compareAndset(5, 1024)+"\t current data: "+atomicInteger.get());}}
输出结果为
true 2019false 2019
2. CAS底层原理-上
Cas底层原理?如果知道,谈谈你对UnSafe的理解
atomiclnteger.getAndIncrement();源码
public class AtomicInteger extends Number implements java.io.Serializable {private static final long serialVersionUID = 6214790243416807050L;// setup to use Unsafe.compareAndSwapInt for updatesprivate static final Unsafe unsafe = Unsafe.getUnsafe();private static final long valueOffset;static {try {valueOffset = unsafe.objectFieldOffset(AtomicInteger.class.getDeclaredField("value"));} catch (Exception ex) { throw new Error(ex); }}private volatile int value;/*** Creates a new AtomicInteger with the given initial value.** @param initialValue the initial value*/public AtomicInteger(int initialValue) {value = initialValue;}/*** Creates a new AtomicInteger with initial value {@code 0}.*/public AtomicInteger() {}.../*** Atomically increments by one the current value.** @return the previous value*/public final int getAndIncrement() {return unsafe.getAndAddInt(this, valueOffset, 1);}...}
UnSafe
1 Unsafe
是CAS的核心类,由于Java方法无法直接访问底层系统,需要通过本地(native)方法来访问,Unsafe相当于一个后门,基于该类可以直接操作特定内存的数据。Unsafe类存在于sun.misc包中,其内部方法操作可以像C的指针一样直接操作内存,因为Java中CAS操作的执行依赖于Unsafe类的方法。
注意Unsafe类中的所有方法都是native修饰的,也就是说Unsafe类中的方法都直接调用操作系统底层资源执行相应任务。
2 变量valueOffset,表示该变量值在内存中的偏移地址,因为Unsafe就是根据内存偏移地址获取数据的。
3 变量value用volatile修饰,保证了多线程之间的内存可见性。
CAS是什么
CAS的全称为Compare-And-Swap,它是一条CPU并发原语。
它的功能是判断内存某个位置的值是否为预期值,如果是则更改为新的值,这个过程是原子的。
CAS并发原语体现在JAVA语言中就是sun.misc.Unsafe类中的各个方法。调用UnSafe类中的CAS方法,JVM会帮我们实现出CAS汇编指令。这是一种完全依赖于硬件的功能,通过它实现了原子操作。再次强调,由于CAS是一种系统原语,原语属于操作系统用语范畴,是由若干条指令组成的,用于完成某个功能的一个过程,并且原语的执行必须是连续的,在执行过程中不允许被中断,也就是说CAS是一条CPU的原子指令,不会造成所谓的数据不一致问题。(原子性)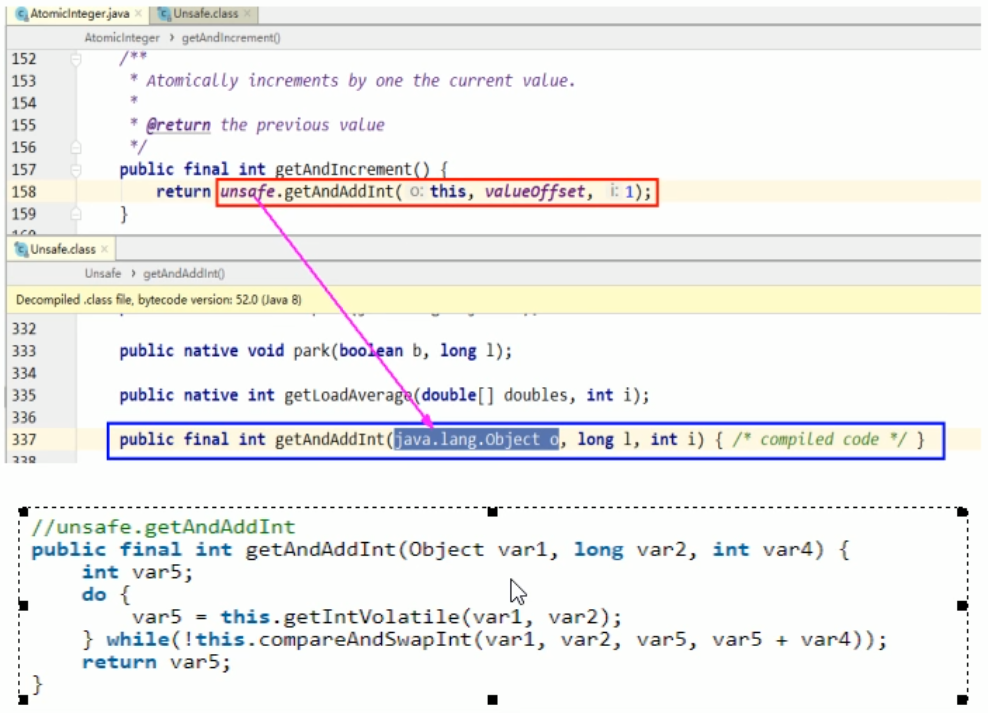
3. CAS底层原理-下
继续上一节
UnSafe.getAndAddInt()源码解释:
- var1 AtomicInteger对象本身。
- var2 该对象值得引用地址。
- var4 需要变动的数量。
- var5是用过var1,var2找出的主内存中真实的值。
- 用该对象当前的值与var5比较:
- 如果相同,更新var5+var4并且返回true,
- 如果不同,继续取值然后再比较,直到更新完成。
假设线程A和线程B两个线程同时执行getAndAddInt操作(分别跑在不同CPU上) :
- Atomiclnteger里面的value原始值为3,即主内存中Atomiclnteger的value为3,根据JMM模型,线程A和线程B各自持有一份值为3的value的副本分别到各自的工作内存。
- 线程A通过getIntVolatile(var1, var2)拿到value值3,这时线程A被挂起。
- 线程B也通过getintVolatile(var1, var2)方法获取到value值3,此时刚好线程B没有被挂起并执行compareAndSwapInt方法比较内存值也为3,成功修改内存值为4,线程B打完收工,一切OK。
- 这时线程A恢复,执行compareAndSwapInt方法比较,发现自己手里的值数字3和主内存的值数字4不一致,说明该值己经被其它线程抢先一步修改过了,那A线程本次修改失败,只能重新读取重新来一遍了。
- 线程A重新获取value值,因为变量value被volatile修饰,所以其它线程对它的修改,线程A总是能够看到,线程A继续执行compareAndSwaplnt进行比较替换,直到成功。
底层汇编
Unsafe类中的compareAndSwapInt,是一个本地方法,该方法的实现位于unsafe.cpp中。 ```java UNSAFE_ENTRY(jboolean, Unsafe_CompareAndSwapInt(JNIEnv env, jobject unsafe, jobject obj, jlong offset, jint e, jint x) UnsafeWrapper(“Unsafe_CompareAndSwaplnt”); oop p = JNlHandles::resolve(obj); jint addr = (jint *)index_oop_from_field_offset_long(p, offset); return (jint)(Atomic::cmpxchg(x, addr, e))== e; UNSAFE_END //先想办法拿到变量value在内存中的地址。 //通过Atomic::cmpxchg实现比较替换,其中参数x是即将更新的值,参数e是原内存的值。
<a name="IFcB1"></a>### 小结CAS指令<br />CAS有3个操作数,内存值V,旧的预期值A,要修改的更新值B。<br />当且仅当预期值A和内存值V相同时,将内存值V修改为B,否则什么都不做。<a name="RXNgX"></a>## 4. CAS缺点**循环时间长开销很大**```java// ursafe.getAndAddIntpublic final int getAndAddInt(Object var1, long var2, int var4){int var5;do {var5 = this.getIntVolatile(var1, var2);}while(!this.compareAndSwapInt(varl, var2, var5,var5 + var4));return var5;}
我们可以看到getAndAddInt方法执行时,有个do while,如果CAS失败,会一直进行尝试。如果CAS长时间一直不成功,可能会给CPU带来很大的开销。
只能保证一个共享变量的原子操作
当对一个共享变量执行操作时,我们可以使用循环CAS的方式来保证原子操作,但是,对多个共享变量操作时,循环CAS就无法保证操作的原子性,这个时候就可以用锁来保证原子性。
引出来ABA问题
5. ABA问题
ABA问题怎么产生的
CAS会导致“ABA问题”。
CAS算法实现一个重要前提需要取出内存中某时刻的数据并在当下时刻比较并替换,那么在这个时间差类会导致数据的变化。
比如说一个线程one从内存位置V中取出A,这时候另一个线程two也从内存中取出A,并且线程two进行了一些操作将值变成了B,然后线程two又将V位置的数据变成A,这时候线程one进行CAS操作发现内存中仍然是A,然后线程one操作成功。
尽管线程one的CAS操作成功,但是不代表这个过程就是没有问题的。
6. AtomicReference原子引用
import java.util.concurrent.atomic.AtomicReference;class User{String userName;int age;public User(String userName, int age) {this.userName = userName;this.age = age;}@Overridepublic String toString() {return String.format("User [userName=%s, age=%s]", userName, age);}}public class AtomicReferenceDemo {public static void main(String[] args){User z3 = new User( "z3",22);User li4 = new User("li4" ,25);AtomicReference<User> atomicReference = new AtomicReference<>();atomicReference.set(z3);System.out.println(atomicReference.compareAndSet(z3, li4)+"\t"+atomicReference.get().toString());System.out.println(atomicReference.compareAndSet(z3, li4)+"\t"+atomicReference.get().toString());}}
输出结果
true User [userName=li4, age=25]false User [userName=li4, age=25]
7. AtomicStampedReference版本号原子引用
原子引用 + 新增一种机制,那就是修改版本号(类似时间戳),它用来解决ABA问题。
8. ABA问题的解决
ABA问题程序演示及解决方法演示:
import java.util.concurrent.TimeUnit;import java.util.concurrent.atomic.AtomicReference;import java.util.concurrent.atomic.AtomicStampedReference;public class ABADemo {/*** 普通的原子引用包装类*/static AtomicReference<Integer> atomicReference = new AtomicReference<>(100);// 传递两个值,一个是初始值,一个是初始版本号static AtomicStampedReference<Integer> atomicStampedReference = new AtomicStampedReference<>(100, 1);public static void main(String[] args) {System.out.println("============以下是ABA问题的产生==========");new Thread(() -> {// 把100 改成 101 然后在改成100,也就是ABAatomicReference.compareAndSet(100, 101);atomicReference.compareAndSet(101, 100);}, "t1").start();new Thread(() -> {try {// 睡眠一秒,保证t1线程,完成了ABA操作TimeUnit.SECONDS.sleep(1);} catch (InterruptedException e) {e.printStackTrace();}// 把100 改成 101 然后在改成100,也就是ABASystem.out.println(atomicReference.compareAndSet(100, 2019) + "\t" + atomicReference.get());}, "t2").start();/try {TimeUnit.SECONDS.sleep(2);} catch (Exception e) {e.printStackTrace();}/System.out.println("============以下是ABA问题的解决==========");new Thread(() -> {// 获取版本号int stamp = atomicStampedReference.getStamp();System.out.println(Thread.currentThread().getName() + "\t 第一次版本号" + stamp);// 暂停t3一秒钟try {TimeUnit.SECONDS.sleep(1);} catch (InterruptedException e) {e.printStackTrace();}// 传入4个值,期望值,更新值,期望版本号,更新版本号atomicStampedReference.compareAndSet(100, 101, atomicStampedReference.getStamp(),atomicStampedReference.getStamp() + 1);System.out.println(Thread.currentThread().getName() + "\t 第二次版本号" + atomicStampedReference.getStamp());atomicStampedReference.compareAndSet(101, 100, atomicStampedReference.getStamp(),atomicStampedReference.getStamp() + 1);System.out.println(Thread.currentThread().getName() + "\t 第三次版本号" + atomicStampedReference.getStamp());}, "t3").start();new Thread(() -> {// 获取版本号int stamp = atomicStampedReference.getStamp();System.out.println(Thread.currentThread().getName() + "\t 第一次版本号" + stamp);// 暂停t4 3秒钟,保证t3线程也进行一次ABA问题try {TimeUnit.SECONDS.sleep(3);} catch (InterruptedException e) {e.printStackTrace();}boolean result = atomicStampedReference.compareAndSet(100, 2019, stamp, stamp + 1);System.out.println(Thread.currentThread().getName() + "\t 修改成功否:" + result + "\t 当前最新实际版本号:"+ atomicStampedReference.getStamp());System.out.println(Thread.currentThread().getName() + "\t 当前实际最新值" + atomicStampedReference.getReference());}, "t4").start();}}
输出结果
============以下是ABA问题的产生==========true 2019============以下是ABA问题的解决==========t3 第一次版本号1t4 第一次版本号1t3 第二次版本号2t3 第三次版本号3t4 修改成功否:false 当前最新实际版本号:3t4 当前实际最新值100
3. 集合
1. 集合类不安全之并发修改异常
import java.util.ArrayList;import java.util.Collections;import java.util.List;import java.util.UUID;import java.util.Vector;public class ArrayListNotSafeDemo {public static void main(String[] args) {List<String> list = new ArrayList<>();//List<String> list = new Vector<>();//List<String> list = Collections.synchronizedList(new ArrayList<>());for (int i = 0; i < 30; i++) {new Thread(() -> {list.add(UUID.randomUUID().toString().substring(0, 8));System.out.println(list);}, String.valueOf(i)).start();}}}
上述程序会抛java.util.ConcurrentModificationException
解决方法之一:Vector
解决方法之二:Collections.synchronizedList()
2. 集合类不安全之写时复制
上一节程序导致抛java.util.ConcurrentModificationException的原因解析
先观察下抛错打印栈堆信息:
java.util.ConcurrentModificationExceptionat java.util.ArrayList$Itr.checkForComodification(ArrayList.java:909)at java.util.ArrayList$Itr.next(ArrayList.java:859)at java.util.AbstractCollection.toString(AbstractCollection.java:461)at java.lang.String.valueOf(String.java:2994)at java.io.PrintStream.println(PrintStream.java:821)at com.lun.collection.ArrayListNotSafeDemo.lambda$0(ArrayListNotSafeDemo.java:20)at java.lang.Thread.run(Thread.java:748)
可看出toString(),Itr.next(),Itr.checkForComodification()后抛出异常,那么看看它们next(),checkForComodification()源码:
public class ArrayList<E> extends AbstractList<E>implements List<E>, RandomAccess, Cloneable, java.io.Serializable{...private class Itr implements Iterator<E> {int cursor; // index of next element to returnint lastRet = -1; // index of last element returned; -1 if no suchint expectedModCount = modCount;//modCount在AbstractList类声明Itr() {}...@SuppressWarnings("unchecked")public E next() {checkForComodification();...}final void checkForComodification() {if (modCount != expectedModCount)throw new ConcurrentModificationException();//<---异常在此抛出}}public boolean add(E e) {ensureCapacityInternal(size + 1); // Increments modCount!!elementData[size++] = e;return true;}private void ensureCapacityInternal(int minCapacity) {ensureExplicitCapacity(calculateCapacity(elementData, minCapacity));}private void ensureExplicitCapacity(int minCapacity) {modCount++;//添加时,修改了modCount的值// overflow-conscious codeif (minCapacity - elementData.length > 0)grow(minCapacity);}...}
public abstract class AbstractList<E> extends AbstractCollection<E> implements List<E> {...protected transient int modCount = 0;...}
modCount具体详细说明如下:
The number of times this list has been structurally modified. Structural modifications are those that change the size of the list, or otherwise perturb it in such a fashion that iterations in progress may yield incorrect results. This field is used by the iterator and list iterator implementation returned by the iterator and listIterator methods. If the value of this field changes unexpectedly, the iterator (or list iterator) will throw a ConcurrentModificationException in response to the next, remove, previous, set or add operations. This provides fail-fast behavior, rather than non-deterministic behavior in the face of concurrent modification during iteration. link
综上所述,假设线程A将通过迭代器next()获取下一元素时,从而将其打印出来。但之前,其他某线程添加新元素至list,结构发生了改变,modCount自增。当线程A运行到checkForComodification(),expectedModCount是modCount之前自增的值,判定modCount != expectedModCount为真,继而抛出ConcurrentModificationException。
解决方法之三:CopyOnWriteArrayList(推荐)
public class CopyOnWriteArrayList<E>implements List<E>, RandomAccess, Cloneable, java.io.Serializable {/** The array, accessed only via getArray/setArray. */private transient volatile Object[] array;final Object[] getArray() {return array;}final void setArray(Object[] a) {array = a;}...public boolean add(E e) {final ReentrantLock lock = this.lock;lock.lock();try {Object[] elements = getArray();int len = elements.length;Object[] newElements = Arrays.copyOf(elements, len + 1);newElements[len] = e;setArray(newElements);return true;} finally {lock.unlock();}}...public String toString() {return Arrays.toString(getArray());}...}
CopyOnWrite容器即写时复制的容器。待一个容器添加元素的时候,不直接往当前容器Object[]添加,而是先将当前容器Object[]进行copy,复制出一个新的容器Object[] newELements,然后新的容器Object[ ] newELements里添加元素,添加完元素之后,再将原容器的引用指向新的容器setArray (newELements)。
这样做的好处是可以对CopyOnWrite容器进行并发的读,而不需要加锁(区别于Vector和Collections.synchronizedList()),因为当前容器不会添加任何元素。所以CopyOnWrite容器也是一种读写分离的思想,读和写不同的容器。
3. 集合类不安全之Set
HashSet也是非线性安全的。(HashSet内部是包装了一个HashMap的)
import java.util.Collections;import java.util.HashSet;import java.util.Set;import java.util.UUID;import java.util.concurrent.CopyOnWriteArraySet;public class SetNotSafeDemo {public static void main(String[] args) {Set<String> set = new HashSet<>();//Set<String> set = Collections.synchronizedSet(new HashSet<>());//Set<String> set = new CopyOnWriteArraySet<String>();for (int i = 0; i < 30; i++) {new Thread(() -> {set.add(UUID.randomUUID().toString().substring(0, 8));System.out.println(set);}, String.valueOf(i)).start();}}}
解决方法:
- Collections.synchronizedSet(new HashSet<>())
- CopyOnWriteArraySet<>()(推荐)
CopyOnWriteArraySet源码一览:
public class CopyOnWriteArraySet<E> extends AbstractSet<E>implements java.io.Serializable {private static final long serialVersionUID = 5457747651344034263L;private final CopyOnWriteArrayList<E> al;/*** Creates an empty set.*/public CopyOnWriteArraySet() {al = new CopyOnWriteArrayList<E>();}public CopyOnWriteArraySet(Collection<? extends E> c) {if (c.getClass() == CopyOnWriteArraySet.class) {@SuppressWarnings("unchecked") CopyOnWriteArraySet<E> cc =(CopyOnWriteArraySet<E>)c;al = new CopyOnWriteArrayList<E>(cc.al);}else {al = new CopyOnWriteArrayList<E>();al.addAllAbsent(c);}}//可看出CopyOnWriteArraySet包装了一个CopyOnWriteArrayList...public boolean add(E e) {return al.addIfAbsent(e);}public boolean addIfAbsent(E e) {Object[] snapshot = getArray();return indexOf(e, snapshot, 0, snapshot.length) >= 0 ? false :addIfAbsent(e, snapshot);}//暴力查找private static int indexOf(Object o, Object[] elements,int index, int fence) {if (o == null) {for (int i = index; i < fence; i++)if (elements[i] == null)return i;} else {for (int i = index; i < fence; i++)if (o.equals(elements[i]))return i;}return -1;}private boolean addIfAbsent(E e, Object[] snapshot) {final ReentrantLock lock = this.lock;lock.lock();try {Object[] current = getArray();int len = current.length;if (snapshot != current) {//还要检查多一次元素存在性,生怕别的线程已经插入了// Optimize for lost race to another addXXX operationint common = Math.min(snapshot.length, len);for (int i = 0; i < common; i++)if (current[i] != snapshot[i] && eq(e, current[i]))return false;if (indexOf(e, current, common, len) >= 0)return false;}Object[] newElements = Arrays.copyOf(current, len + 1);newElements[len] = e;setArray(newElements);return true;} finally {lock.unlock();}}...}
4. 集合类不安全之Map
import java.util.Collections;import java.util.HashMap;import java.util.Hashtable;import java.util.Map;import java.util.UUID;import java.util.concurrent.ConcurrentHashMap;public class MapNotSafeDemo {public static void main(String[] args) {Map<String, String> map = new HashMap<>();// Map<String, String> map = Collections.synchronizedMap(new HashMap<>());// Map<String, String> map = new ConcurrentHashMap<>();// Map<String, String> map = new Hashtable<>();for (int i = 0; i < 30; i++) {new Thread(() -> {map.put(Thread.currentThread().getName(), UUID.randomUUID().toString().substring(0, 8));System.out.println(map);}, String.valueOf(i)).start();}}}
解决方法:
- HashTable
- Collections.synchronizedMap(new HashMap<>())
-
5. TransferValue醒脑小练习
Java的参数传递是值传递,不是引用传递。
下面程序体验下上一句的含义: ```java class Person { private Integer id; private String personName;public Person(String personName) {
this.personName = personName;
}
public Integer getId() {
return id;
}
public void setId(Integer id) {
this.id = id;
}
public String getPersonName() {
return personName;
}
public void setPersonName(String personName) {
this.personName = personName;
} }
public class TransferValueDemo { public void changeValue1(int age) { age = 30; }
public void changeValue2(Person person) {person.setPersonName("XXXX");}public void changeValue3(String str) {str = "XXX";}public static void main(String[] args) {TransferValueDemo test = new TransferValueDemo();// 定义基本数据类型int age = 20;test.changeValue1(age);System.out.println("age ----" + age);// 实例化person类Person person = new Person("abc");test.changeValue2(person);System.out.println("personName-----" + person.getPersonName());// StringString str = "abc";test.changeValue3(str);System.out.println("string-----" + str);}
}
输出结果:```javaage ----20personName-----XXXXstring-----abc
4. 锁
1. java锁之公平和非公平锁
是什么
- 公平锁―是指多个线程按照申请锁的顺序来获取锁,类似排队打饭,先来后到。
- 非公平锁是指多个线程获取锁的顺序并不是按照申请锁的顺序,有可能后中请的线程比先中请的线程优先获取锁。在高并发的情况下,有可能会造成优先级反转或者饥饿现象
并发包中ReentrantLock的创建可以指定构造函数的boolean类型来得到公平锁或非公平锁,默认是非公平锁。
The constructor for this class accepts an optional fairness parameter. When set true, under contention, locks favor granting access to the longest-waiting thread. Otherwise this lock does not guarantee any particular access order. Programs using fair locks accessed by many threads may display lower overall throughput (i.e., are slower; often much slower) than those using the default setting, but have smaller variances in times to obtain locks and guarantee lack of starvation. Note however, that fairness of locks does not guarantee fairness of thread scheduling. Thus, one of many threads using a fair lock may obtain it multiple times in succession while other active threads are not progressing and not currently holding the lock. Also note that the untimed tryLock() method does not honor the fairness setting. It will succeed if the lock is available even if other threads are waiting. 此类的构造函数接受可选的公平性参数。当设置为true时,在争用下,锁有利于向等待时间最长的线程授予访问权限。否则,此锁不保证任何特定的访问顺序。与使用默认设置的程序相比,使用由许多线程访问的公平锁的程序可能显示出较低的总体吞吐量(即,较慢;通常要慢得多),但是在获得锁和保证没有饥饿的时间上差异较小。 但是请注意,锁的公平性并不能保证线程调度的公平性。因此,使用公平锁的多个线程中的一个线程可以连续多次获得公平锁,而其他活动线程则没有进行并且当前没有持有该锁。还要注意,不计时的 tryLock()方法不支持公平性设置。如果锁可用,即使其他线程正在等待,它也会成功。 link
reentrant
英 [riːˈɛntrənt] 美 [ˌriˈɛntrənt]
a. 可重入;可重入的;重入;可再入的;重进入
两者区别
关于两者区别:
- 公平锁
- Threads acquire a fair lock in the order in which they requested it.
- 公平锁就是很公平,在并发环境中,每个线程在获取锁时会先查看此锁维护的等待队列,如果为空,或者当前线程是等待队列的第一个,就占有锁,否则就会加入到等待队列中,以后会按照FIFO的规则从队列中取到自己。
- 非公平锁
- a nonfair lock permits barging: threads requesting a lock can jump ahead of the queue of waiting threads if the lockhappens to be available when it is requested.
- 非公平锁比较粗鲁,上来就直接尝试占有锁,如果尝试失败,就再采用类似公平锁那种方式。
题外话
Java ReentrantLock而言,通过构造函数指定该锁是否是公平锁,默认是非公平锁。
非公平锁的优点在于吞吐量比公平锁大。
对于Synchronized而言,也是一种非公平锁
2. java锁之可重入锁和递归锁理论知识
可重入锁(也叫做递归锁)
指的是同一线程外层函数获得锁之后,内层递归函数仍然能获取该锁的代码,在同一个线程在外层方法获取锁的时候,在进入内层方法会自动获取锁。
也即是说,线程可以进入任何一个它已经拥有的锁所同步着的代码块。
ReentrantLock/synchronized就是一个典型的可重入锁。
可重入锁最大的作用是避免死锁。
3. java锁之可重入锁和递归锁代码验证
Synchronized可入锁演示程序
class Phone {public synchronized void sendSMS() throws Exception{System.out.println(Thread.currentThread().getName() + "\t invoked sendSMS()");// 在同步方法中,调用另外一个同步方法sendEmail();}public synchronized void sendEmail() throws Exception{System.out.println(Thread.currentThread().getId() + "\t invoked sendEmail()");}}public class SynchronizedReentrantLockDemo {public static void main(String[] args) {Phone phone = new Phone();// 两个线程操作资源列new Thread(() -> {try {phone.sendSMS();} catch (Exception e) {e.printStackTrace();}}, "t1").start();new Thread(() -> {try {phone.sendSMS();} catch (Exception e) {e.printStackTrace();}}, "t2").start();}}
输出结果:
t1 invoked sendSMS()11 invoked sendEmail()t2 invoked sendSMS()12 invoked sendEmail()
ReentrantLock可重入锁演示程序
import java.util.concurrent.locks.Lock;import java.util.concurrent.locks.ReentrantLock;class Phone2 implements Runnable{Lock lock = new ReentrantLock();/*** set进去的时候,就加锁,调用set方法的时候,能否访问另外一个加锁的set方法*/public void getLock() {lock.lock();try {System.out.println(Thread.currentThread().getName() + "\t get Lock");setLock();} finally {lock.unlock();}}public void setLock() {lock.lock();try {System.out.println(Thread.currentThread().getName() + "\t set Lock");} finally {lock.unlock();}}@Overridepublic void run() {getLock();}}public class ReentrantLockDemo {public static void main(String[] args) {Phone2 phone = new Phone2();/*** 因为Phone实现了Runnable接口*/Thread t3 = new Thread(phone, "t3");Thread t4 = new Thread(phone, "t4");t3.start();t4.start();}}
输出结果
t3 get Lockt3 set Lockt4 get Lockt4 set Lock
4. java锁之自旋锁理论知识
自旋锁(Spin Lock)
是指尝试获取锁的线程不会立即阻塞,而是采用循环的方式去尝试获取锁,这样的好处是减少线程上下文切换的消耗,缺点是循环会消耗CPU
提到了互斥同步对性能最大的影响阻塞的实现,挂起线程和恢复线程的操作都需要转入内核态完成,这些操作给系统的并发性能带来了很大的压力。同时,虚拟机的开发团队也注意到在许多应用上,共享数据的锁定状态只会持续很短的一段时间,为了这段时间去挂起和恢复线程并不值得。如果物理机器有一个以上的处理器,能让两个或以上的线程同时并行执行,我们就可以让后面请求锁的那个线程 “稍等一下”,但不放弃处理器的执行时间,看看持有锁的线程是否很快就会释放锁。为了让线程等待,我们只需让线程执行一个忙循环(自旋),这项技术就是所谓的自旋锁。《深入理解JVM.2nd》Page 398
5. java锁之自旋锁代码验证
import java.util.concurrent.TimeUnit;import java.util.concurrent.atomic.AtomicReference;public class SpinLockDemo {// 现在的泛型装的是Thread,原子引用线程AtomicReference<Thread> atomicReference = new AtomicReference<>();public void myLock() {// 获取当前进来的线程Thread thread = Thread.currentThread();System.out.println(Thread.currentThread().getName() + "\t come in ");// 开始自旋,期望值是null,更新值是当前线程,如果是null,则更新为当前线程,否者自旋while(!atomicReference.compareAndSet(null, thread)) {//摸鱼}}public void myUnLock() {// 获取当前进来的线程Thread thread = Thread.currentThread();// 自己用完了后,把atomicReference变成nullatomicReference.compareAndSet(thread, null);System.out.println(Thread.currentThread().getName() + "\t invoked myUnlock()");}public static void main(String[] args) {SpinLockDemo spinLockDemo = new SpinLockDemo();// 启动t1线程,开始操作new Thread(() -> {// 开始占有锁spinLockDemo.myLock();try {TimeUnit.SECONDS.sleep(5);} catch (InterruptedException e) {e.printStackTrace();}// 开始释放锁spinLockDemo.myUnLock();}, "t1").start();// 让main线程暂停1秒,使得t1线程,先执行try {TimeUnit.SECONDS.sleep(1);} catch (InterruptedException e) {e.printStackTrace();}// 1秒后,启动t2线程,开始占用这个锁new Thread(() -> {// 开始占有锁spinLockDemo.myLock();// 开始释放锁spinLockDemo.myUnLock();}, "t2").start();}}
输出结果
t1 come int2 come int1 invoked myUnlock()t2 invoked myUnlock()
6. java锁之读写锁理论知识
独占锁
指该锁一次只能被一个线程所持有。对ReentrantLock和Synchronized而言都是独占锁
共享锁
指该锁可被多个线程所持有。
多个线程同时读一个资源类没有任何问题,所以为了满足并发量,读取共享资源应该可以同时进行。但是,如果有一个线程想去写共享资源来,就不应该再有其它线程可以对该资源进行读或写。
对ReentrantReadWriteLock其读锁是共享锁,其写锁是独占锁。
读锁的共享锁可保证并发读是非常高效的,读写,写读,写写的过程是互斥的。
7. java锁之读写锁代码验证
实现一个读写缓存的操作,假设开始没有加锁的时候,会出现什么情况
import java.util.HashMap;import java.util.Map;import java.util.concurrent.TimeUnit;class MyCache {private volatile Map<String, Object> map = new HashMap<>();public void put(String key, Object value) {System.out.println(Thread.currentThread().getName() + "\t 正在写入:" + key);try {// 模拟网络拥堵,延迟0.3秒TimeUnit.MILLISECONDS.sleep(300);} catch (InterruptedException e) {e.printStackTrace();}map.put(key, value);System.out.println(Thread.currentThread().getName() + "\t 写入完成");}public void get(String key) {System.out.println(Thread.currentThread().getName() + "\t 正在读取:");try {// 模拟网络拥堵,延迟0.3秒TimeUnit.MILLISECONDS.sleep(300);} catch (InterruptedException e) {e.printStackTrace();}Object value = map.get(key);System.out.println(Thread.currentThread().getName() + "\t 读取完成:" + value);}}public class ReadWriteWithoutLockDemo {public static void main(String[] args) {MyCache myCache = new MyCache();// 线程操作资源类,5个线程写for (int i = 0; i < 5; i++) {final int tempInt = i;new Thread(() -> {myCache.put(tempInt + "", tempInt + "");}, String.valueOf(i)).start();}// 线程操作资源类, 5个线程读for (int i = 0; i < 5; i++) {final int tempInt = i;new Thread(() -> {myCache.get(tempInt + "");}, String.valueOf(i)).start();}}}
输出结果:
0 正在写入:01 正在写入:13 正在写入:32 正在写入:24 正在写入:40 正在读取:1 正在读取:2 正在读取:4 正在读取:3 正在读取:1 写入完成4 写入完成0 写入完成2 写入完成3 写入完成3 读取完成:30 读取完成:02 读取完成:21 读取完成:null4 读取完成:null
看到有些线程读取到null,可用ReentrantReadWriteLock解决
package com.lun.concurrency;import java.util.HashMap;import java.util.Map;import java.util.concurrent.TimeUnit;import java.util.concurrent.locks.ReentrantReadWriteLock;class MyCache2 {private volatile Map<String, Object> map = new HashMap<>();private ReentrantReadWriteLock rwLock = new ReentrantReadWriteLock();public void put(String key, Object value) {// 创建一个写锁rwLock.writeLock().lock();try {System.out.println(Thread.currentThread().getName() + "\t 正在写入:" + key);try {// 模拟网络拥堵,延迟0.3秒TimeUnit.MILLISECONDS.sleep(300);} catch (InterruptedException e) {e.printStackTrace();}map.put(key, value);System.out.println(Thread.currentThread().getName() + "\t 写入完成");} catch (Exception e) {e.printStackTrace();} finally {// 写锁 释放rwLock.writeLock().unlock();}}public void get(String key) {// 读锁rwLock.readLock().lock();try {System.out.println(Thread.currentThread().getName() + "\t 正在读取:");try {// 模拟网络拥堵,延迟0.3秒TimeUnit.MILLISECONDS.sleep(300);} catch (InterruptedException e) {e.printStackTrace();}Object value = map.get(key);System.out.println(Thread.currentThread().getName() + "\t 读取完成:" + value);} catch (Exception e) {e.printStackTrace();} finally {// 读锁释放rwLock.readLock().unlock();}}public void clean() {map.clear();}}public class ReadWriteWithLockDemo {public static void main(String[] args) {MyCache2 myCache = new MyCache2();// 线程操作资源类,5个线程写for (int i = 1; i <= 5; i++) {// lambda表达式内部必须是finalfinal int tempInt = i;new Thread(() -> {myCache.put(tempInt + "", tempInt + "");}, String.valueOf(i)).start();}// 线程操作资源类, 5个线程读for (int i = 1; i <= 5; i++) {// lambda表达式内部必须是finalfinal int tempInt = i;new Thread(() -> {myCache.get(tempInt + "");}, String.valueOf(i)).start();}}}
输出结果:
1 正在写入:11 写入完成2 正在写入:22 写入完成3 正在写入:33 写入完成5 正在写入:55 写入完成4 正在写入:44 写入完成2 正在读取:3 正在读取:1 正在读取:5 正在读取:4 正在读取:3 读取完成:32 读取完成:21 读取完成:15 读取完成:54 读取完成:4
5. 阻塞工具类
1. CountDownLatch
让一线程阻塞直到另一些线程完成一系列操作才被唤醒。
CountDownLatch主要有两个方法(await(),countDown())。
当一个或多个线程调用await()时,调用线程会被阻塞。其它线程调用countDown()会将计数器减1(调用countDown方法的线程不会阻塞),当计数器的值变为零时,因调用await方法被阻塞的线程会被唤醒,继续执行。
latch
英 [lætʃ] 美 [lætʃ]
n. 门闩;插销;碰锁;弹簧锁
v. 用插销插上;用碰锁锁上
案例1 countDownLatch
假设一个自习室里有7个人,其中有一个是班长,班长的主要职责就是在其它6个同学走了后,关灯,锁教室门,然后走人,因此班长是需要最后一个走的,那么有什么方法能够控制班长这个线程是最后一个执行,而其它线程是随机执行的
import java.util.concurrent.CountDownLatch;public class CountDownLatchDemo {public static void main(String[] args) throws InterruptedException {// 计数器CountDownLatch countDownLatch = new CountDownLatch(6);for (int i = 0; i <= 6; i++) {new Thread(() -> {System.out.println(Thread.currentThread().getName() + "\t 上完自习,离开教室");countDownLatch.countDown();}, String.valueOf(i)).start();}countDownLatch.await();System.out.println(Thread.currentThread().getName() + "\t 班长最后关门");}}
输出结果:
0 上完自习,离开教室6 上完自习,离开教室4 上完自习,离开教室5 上完自习,离开教室3 上完自习,离开教室1 上完自习,离开教室2 上完自习,离开教室main 班长最后关门
案例2 枚举 + CountDownLatch
温习枚举
程序演示秦国统一六国
import java.util.Objects;public enum CountryEnum {ONE(1, "齐"), TWO(2, "楚"), THREE(3, "燕"), FOUR(4, "赵"), FIVE(5, "魏"), SIX(6, "韩");private Integer retcode;private String retMessage;CountryEnum(Integer retcode, String retMessage) {this.retcode = retcode;this.retMessage = retMessage;}public static CountryEnum forEach_countryEnum(int index) {CountryEnum[] myArray = CountryEnum.values();for(CountryEnum ce : myArray) {if(Objects.equals(index, ce.getRetcode())) {return ce;}}return null;}public Integer getRetcode() {return retcode;}public void setRetcode(Integer retcode) {this.retcode = retcode;}public String getRetMessage() {return retMessage;}public void setRetMessage(String retMessage) {this.retMessage = retMessage;}}
import java.util.concurrent.CountDownLatch;public class UnifySixCountriesDemo {public static void main(String[] args) throws InterruptedException {// 计数器CountDownLatch countDownLatch = new CountDownLatch(6);for (int i = 1; i <= 6; i++) {new Thread(() -> {System.out.println(Thread.currentThread().getName() + "国被灭了!");countDownLatch.countDown();}, CountryEnum.forEach_countryEnum(i).getRetMessage()).start();}countDownLatch.await();System.out.println(Thread.currentThread().getName() + " 秦国统一中原。");}}
输出结果:
齐国被灭了!燕国被灭了!楚国被灭了!魏国被灭了!韩国被灭了!赵国被灭了!main 秦国统一中原。
2. CyclicBarrier
CyclicBarrier的字面意思就是可循环(Cyclic)使用的屏障(Barrier)。它要求做的事情是,让一组线程到达一个屏障(也可以叫同步点)时被阻塞,直到最后一个线程到达屏障时,屏障才会开门,所有被屏障拦截的线程才会继续干活,线程进入屏障通过CyclicBarrier的await方法。
CyclicBarrier与CountDownLatch的区别:CyclicBarrier可重复多次,而CountDownLatch只能是一次。
案例1 CyclicBarrier
程序演示集齐7个龙珠,召唤神龙
import java.util.concurrent.BrokenBarrierException;import java.util.concurrent.CyclicBarrier;public class SummonTheDragonDemo {public static void main(String[] args) {/*** 定义一个循环屏障,参数1:需要累加的值,参数2 需要执行的方法*/CyclicBarrier cyclicBarrier = new CyclicBarrier(7, () -> {System.out.println("召唤神龙");});for (int i = 1; i <= 7; i++) {final Integer tempInt = i;new Thread(() -> {System.out.println(Thread.currentThread().getName() + "\t 收集到 第" + tempInt + "颗龙珠");try {// 先到的被阻塞,等全部线程完成后,才能执行方法cyclicBarrier.await();} catch (InterruptedException e) {e.printStackTrace();} catch (BrokenBarrierException e) {e.printStackTrace();}}, String.valueOf(i)).start();}}}
输出结果:
2 收集到 第2颗龙珠6 收集到 第6颗龙珠1 收集到 第1颗龙珠7 收集到 第7颗龙珠5 收集到 第5颗龙珠4 收集到 第4颗龙珠3 收集到 第3颗龙珠召唤神龙
案例2 来自《Java编程思想》的例子
来自《Java编程思想》的例子,展现CyclicBarrier的可循环性:
import java.util.concurrent.*;import java.util.*;class Horse implements Runnable {private static int counter = 0;private final int id = counter++;private int strides = 0;private static Random rand = new Random(47);private static CyclicBarrier barrier;public Horse(CyclicBarrier b) {barrier = b;}public synchronized int getStrides() {return strides;}public void run() {try {while (!Thread.interrupted()) {//没有中断,就不断循环synchronized (this) {//模拟马单位时间的移动距离strides += rand.nextInt(3); // Produces 0, 1 or 2}barrier.await();//<---等待其他马到齐到循环屏障}} catch (InterruptedException e) {// A legitimate way to exit} catch (BrokenBarrierException e) {// This one we want to know aboutthrow new RuntimeException(e);}}public String toString() {return "Horse " + id + " ";}public String tracks() {StringBuilder s = new StringBuilder();for (int i = 0; i < getStrides(); i++)s.append("*");s.append(id);return s.toString();}}public class HorseRace {static final int FINISH_LINE = 75;private List<Horse> horses = new ArrayList<Horse>();private ExecutorService exec = Executors.newCachedThreadPool();private CyclicBarrier barrier;public HorseRace(int nHorses, final int pause) {//初始化循环屏障barrier = new CyclicBarrier(nHorses, new Runnable() {// 循环多次执行的任务public void run() {// The fence on the racetrackStringBuilder s = new StringBuilder();for (int i = 0; i < FINISH_LINE; i++)s.append("=");System.out.println(s);//打印马移动距离for (Horse horse : horses)System.out.println(horse.tracks());//判断有没有马到终点了for (Horse horse : horses)if (horse.getStrides() >= FINISH_LINE) {System.out.println(horse + "won!");exec.shutdownNow();// 有只马跑赢了,所有任务都结束了return;}try {TimeUnit.MILLISECONDS.sleep(pause);} catch (InterruptedException e) {System.out.println("barrier-action sleep interrupted");}}});// 开跑!for (int i = 0; i < nHorses; i++) {Horse horse = new Horse(barrier);horses.add(horse);exec.execute(horse);}}public static void main(String[] args) {int nHorses = 7;int pause = 200;new HorseRace(nHorses, pause);}}
输出结果:
...省略一些...===========================================================================**********************************************************0************************************************************1******************************************************2***********************************************************************3*************************************************************************4*****************************************************************5*****************************************************************6===========================================================================**********************************************************0************************************************************1*******************************************************2***********************************************************************3**************************************************************************4*****************************************************************5*******************************************************************6===========================================================================***********************************************************0*************************************************************1*******************************************************2***********************************************************************3****************************************************************************4*******************************************************************5********************************************************************6Horse 4 won!
3. Semaphore
信号量主要用于两个目的,一个是用于多个共享资源的互斥使用,另一个用于并发线程数的控制。
semaphore
英 [ˈseməfɔː®] 美 [ˈseməfɔːr]
n. 信号标;旗语
v. 打旗语;(用其他类似的信号系统)发信号
正常的锁(concurrency.locks或synchronized锁)在任何时刻都只允许一个任务访问一项资源,而 Semaphore允许n个任务同时访问这个资源。
案例1
模拟一个抢车位的场景,假设一共有6个车,3个停车位
import java.util.concurrent.Semaphore;import java.util.concurrent.TimeUnit;public class SemaphoreDemo {public static void main(String[] args) {/*** 初始化一个信号量为3,默认是false 非公平锁, 模拟3个停车位*/Semaphore semaphore = new Semaphore(3, false);// 模拟6部车for (int i = 0; i < 6; i++) {new Thread(() -> {try {// 代表一辆车,已经占用了该车位semaphore.acquire(); // 抢占System.out.println(Thread.currentThread().getName() + "\t 抢到车位");// 每个车停3秒try {TimeUnit.SECONDS.sleep(3);} catch (InterruptedException e) {e.printStackTrace();}System.out.println(Thread.currentThread().getName() + "\t 离开车位");} catch (InterruptedException e) {e.printStackTrace();} finally {// 释放停车位semaphore.release();}}, String.valueOf(i)).start();}}}
输出结果:
1 抢到车位2 抢到车位0 抢到车位0 离开车位2 离开车位1 离开车位5 抢到车位4 抢到车位3 抢到车位5 离开车位4 离开车位3 离开车位
6. 阻塞理论和实践
1. 阻塞队列理论
- 阻塞队列有没有好的一面
- 不得不阻塞,你如何管理
2. 阻塞队列接口结构和实现类
阻塞队列,顾名思义,首先它是一个队列,而一个阻塞队列在数据结构中所起的作用大致如下图所示: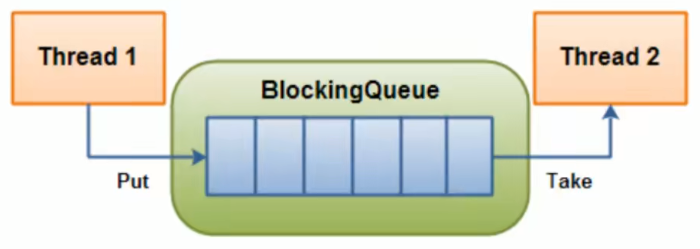
线程1往阻塞队列中添加元素,而线程2从阻塞队列中移除元素。
当阻塞队列是空时,从队列中获取元素的操作将会被阻塞。
当阻塞队列是满时,往队列里添加元素的操作将会被阻塞。
试图从空的阻塞队列中获取元素的线程将会被阻塞,直到其他的线程往空的队列插入新的元素。
同样试图往已满的阻塞队列中添加新元素的线程同样也会被阻塞,直到其他的线程从列中移除一个或者多个元素或者完全清空队列后使队列重新变得空闲起来并后续新增
为什么用?有什么好处?
在多线程领域:所谓阻塞,在某些情况下余挂起线程(即阻塞),一旦条件满足,被挂起的线程又会自动被唤醒
为什么需要BlockingQueue
好处是我们不需要关心什么时候需要阻塞线程,什么时候需要唤醒线程,因为这一切BlockingQueue都给你一手包办了
在Concurrent包发布以前,在多线程环境下,我们每个程序员都必须去自己控制这些细节,尤其还要兼顾效率和线程安全,而这会给我们的程序带来不小的复杂度。
架构介绍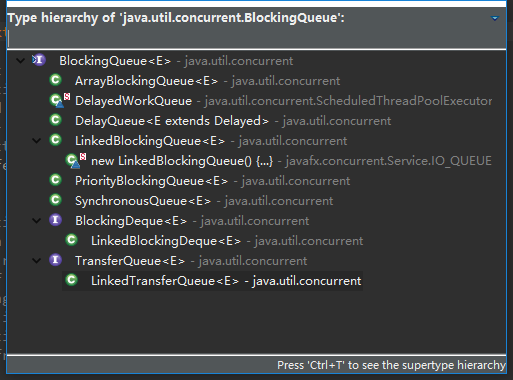
种类分析:
- ArrayBlockingQueue:由数组结构组成的有界阻塞队列。
- LinkedBlockingQueue:由链表结构组成的有界(但大小默认值为Integer.MAX_VALUE)阻塞队列。
- PriorityBlockingQueue:支持优先级排序的无界阻塞队列。
- DelayQueue:使用优先级队列实现妁延迟无界阻塞队列。
- SynchronousQueue:不存储元素的阻塞队列。
- LinkedTransferQueue:由链表结构绒成的无界阻塞队列。
- LinkedBlockingDeque:由链表结构组成的双向阻塞队列。
BlockingQueue的核心方法
| 方法类型 | 抛出异常 | 特殊值 | 阻塞 | 超时 | | —- | —- | —- | —- | —- | | 插入 | add(e) | offer(e) | put(e) | offer(e,time,unit) | | 移除 | remove() | poll() | take() | poll(time,unit) | | 检查 | element() | peek() | 不可用 | 不可用 |
| 性质 | 说明 |
|---|---|
| 抛出异常 | 当阻塞队列满时:在往队列中add插入元素会抛出 IIIegalStateException:Queue full 当阻塞队列空时:再往队列中remove移除元素,会抛出NoSuchException |
| 特殊性 | 插入方法,成功true,失败false 移除方法:成功返回出队列元素,队列没有就返回空 |
| 一直阻塞 | 当阻塞队列满时,生产者继续往队列里put元素,队列会一直阻塞生产线程直到put数据or响应中断退出。 当阻塞队列空时,消费者线程试图从队列里take元素,队列会一直阻塞消费者线程直到队列可用。 |
| 超时退出 | 当阻塞队列满时,队里会阻塞生产者线程一定时间,超过限时后生产者线程会退出 |
3. 阻塞队列api之抛出异常组
import java.util.concurrent.ArrayBlockingQueue;import java.util.concurrent.BlockingQueue;public class BlockingQueueExceptionDemo {public static void main(String[] args) {BlockingQueue<String> blockingQueue = new ArrayBlockingQueue<>(3);System.out.println(blockingQueue.add("a"));System.out.println(blockingQueue.add("b"));System.out.println(blockingQueue.add("c"));try {//抛出 java.lang.IllegalStateException: Queue fullSystem.out.println(blockingQueue.add("XXX"));} catch (Exception e) {System.err.println(e);}System.out.println(blockingQueue.element());///System.out.println(blockingQueue.remove());System.out.println(blockingQueue.remove());System.out.println(blockingQueue.remove());try {//抛出 java.util.NoSuchElementExceptionSystem.out.println(blockingQueue.remove());} catch (Exception e) {System.err.println(e);}try {//element()相当于peek(),但element()会抛NoSuchElementExceptionSystem.out.println(blockingQueue.element());} catch (Exception e) {System.err.println(e);}}}
输出结果:
truetruetrueajava.lang.IllegalStateException: Queue fullabcjava.util.NoSuchElementExceptionjava.util.NoSuchElementException
4. 阻塞队列api之返回布尔值组
import java.util.concurrent.ArrayBlockingQueue;import java.util.concurrent.BlockingQueue;public class BlockingQueueBooleanDemo {public static void main(String[] args) {BlockingQueue<String> blockingQueue = new ArrayBlockingQueue<>(3);System.out.println(blockingQueue.offer("a"));System.out.println(blockingQueue.offer("b"));System.out.println(blockingQueue.offer("c"));System.out.println(blockingQueue.offer("d"));System.out.println(blockingQueue.poll());System.out.println(blockingQueue.poll());System.out.println(blockingQueue.poll());System.out.println(blockingQueue.poll());}}
输出结果:
truetruetruefalseabcnull
5. 阻塞队列api之阻塞和超时控制
队列阻塞演示
import java.util.concurrent.ArrayBlockingQueue;import java.util.concurrent.BlockingQueue;import java.util.concurrent.TimeUnit;public class BlockingQueueBlockedDemo {public static void main(String[] args) throws InterruptedException {BlockingQueue<String> blockingQueue = new ArrayBlockingQueue<>(3);new Thread(()->{try {blockingQueue.put("a");blockingQueue.put("b");blockingQueue.put("c");blockingQueue.put("c");//将会阻塞,直到主线程take()System.out.println("it was blocked.");} catch (InterruptedException e) {e.printStackTrace();}}).start();TimeUnit.SECONDS.sleep(2);try {blockingQueue.take();blockingQueue.take();blockingQueue.take();blockingQueue.take();System.out.println("Blocking...");blockingQueue.take();//将会阻塞} catch (InterruptedException e) {e.printStackTrace();}}}
阻塞超时放弃演示
import java.util.concurrent.ArrayBlockingQueue;import java.util.concurrent.BlockingQueue;import java.util.concurrent.TimeUnit;public class BlockingQueueTimeoutDemo {public static void main(String[] args) throws InterruptedException {BlockingQueue<String> blockingQueue = new ArrayBlockingQueue<>(3);System.out.println("Offer.");System.out.println(blockingQueue.offer("a", 2L, TimeUnit.SECONDS));System.out.println(blockingQueue.offer("b", 2L, TimeUnit.SECONDS));System.out.println(blockingQueue.offer("c", 2L, TimeUnit.SECONDS));System.out.println(blockingQueue.offer("d", 2L, TimeUnit.SECONDS));System.out.println("Poll.");System.out.println(blockingQueue.poll(2L, TimeUnit.SECONDS));System.out.println(blockingQueue.poll(2L, TimeUnit.SECONDS));System.out.println(blockingQueue.poll(2L, TimeUnit.SECONDS));System.out.println(blockingQueue.poll(2L, TimeUnit.SECONDS));}}
输出结果:
Offer.truetruetruefalsePoll.abcnull
6. 阻塞队列之同步SynchronousQueue队列
SynchronousQueue没有容量。
与其他BlockingQueue不同,SynchronousQueue是一个不存储元素的BlockingQueue。
每一个put操作必须要等待一个take操作,否则不能继续添加元素,反之亦然。
A blocking queue in which each insert operation must wait for a corresponding remove operation by another thread, and vice versa. A synchronous queue does not have any internal capacity, not even a capacity of one.
- You cannot peek at a synchronous queue because an element is only present when you try to remove it;
- You cannot insert an element (using any method) unless another thread is trying to remove it;
- You cannot iterate as there is nothing to iterate.
The head of the queue is the element that the first queued inserting thread is trying to add to the queue; if there is no such queued thread then no element is available for removal and poll() will return null. For purposes of other Collection methods (for example contains), a SynchronousQueue acts as an empty collection. This queue does not permit null elements. link
import java.util.concurrent.BlockingQueue;import java.util.concurrent.SynchronousQueue;import java.util.concurrent.TimeUnit;public class SynchronousQueueDemo {public static void main(String[] args) {BlockingQueue<String> blockingQueue = new SynchronousQueue<>();new Thread(() -> {try {System.out.println(Thread.currentThread().getName() + "\t put A ");blockingQueue.put("A");System.out.println(Thread.currentThread().getName() + "\t put B ");blockingQueue.put("B");System.out.println(Thread.currentThread().getName() + "\t put C ");blockingQueue.put("C");} catch (InterruptedException e) {e.printStackTrace();}}, "t1").start();new Thread(() -> {try {try {TimeUnit.SECONDS.sleep(5);} catch (InterruptedException e) {e.printStackTrace();}blockingQueue.take();System.out.println(Thread.currentThread().getName() + "\t take A ");try {TimeUnit.SECONDS.sleep(5);} catch (InterruptedException e) {e.printStackTrace();}blockingQueue.take();System.out.println(Thread.currentThread().getName() + "\t take B ");try {TimeUnit.SECONDS.sleep(5);} catch (InterruptedException e) {e.printStackTrace();}blockingQueue.take();System.out.println(Thread.currentThread().getName() + "\t take C ");} catch (InterruptedException e) {e.printStackTrace();}}, "t2").start();}}
7. 线程通信之生产者消费者传统版
阻塞队列用在哪里?
- 生产者消费者模式
- 传统版(synchronized, wait, notify)
- 阻塞队列版(lock, await, signal)
- 线程池
- 消息中间件
实现一个简单的生产者消费者模式
```java import java.util.concurrent.locks.Condition; import java.util.concurrent.locks.Lock; import java.util.concurrent.locks.ReentrantLock;
class ShareData {
private int number = 0;private Lock lock = new ReentrantLock();private Condition condition = lock.newCondition();public void increment() throws Exception{// 同步代码块,加锁lock.lock();try {// 判断while(number != 0) {// 等待不能生产condition.await();}// 干活number++;System.out.println(Thread.currentThread().getName() + "\t " + number);// 通知 唤醒condition.signalAll();} catch (Exception e) {e.printStackTrace();} finally {lock.unlock();}}public void decrement() throws Exception{// 同步代码块,加锁lock.lock();try {// 判断while(number == 0) {// 等待不能消费condition.await();}// 干活number--;System.out.println(Thread.currentThread().getName() + "\t " + number);// 通知 唤醒condition.signalAll();} catch (Exception e) {e.printStackTrace();} finally {lock.unlock();}}
}
public class TraditionalProducerConsumerDemo {
public static void main(String[] args) {ShareData shareData = new ShareData();// t1线程,生产new Thread(() -> {for (int i = 0; i < 5; i++) {try {shareData.increment();} catch (Exception e) {e.printStackTrace();}}}, "t1").start();// t2线程,消费new Thread(() -> {for (int i = 0; i < 5; i++) {try {shareData.decrement();} catch (Exception e) {e.printStackTrace();}}}, "t2").start();}
}
输出结果:```javat1 1t2 0t1 1t2 0t1 1t2 0t1 1t2 0t1 1t2 0t1 1t2 0t1 1t2 0t1 1t2 0t1 1t2 0t1 1t2 0
注意,increment()和decrement()内的
// 判断while(number != 0) {// 等待不能生产condition.await();}
不能用
// 判断if(number != 0) {// 等待不能生产condition.await();}
8. Synchronized和Lock有什么区别
- synchronized属于JVM层面,属于java的关键字
- monitorenter(底层是通过monitor对象来完成,其实wait/notify等方法也依赖于monitor对象 只能在同步块或者方法中才能调用 wait/ notify等方法)
- Lock是具体类(java.util.concurrent.locks.Lock)是api层面的锁
- 使用方法:
- synchronized:不需要用户去手动释放锁,当synchronized代码执行后,系统会自动让线程释放对锁的占用。
- ReentrantLock:则需要用户去手动释放锁,若没有主动释放锁,就有可能出现死锁的现象,需要lock() 和 unlock() 配置try catch语句来完成
- 等待是否中断
- synchronized:不可中断,除非抛出异常或者正常运行完成。
- ReentrantLock:可中断,可以设置超时方法
- 设置超时方法,trylock(long timeout, TimeUnit unit)
- lockInterrupible() 放代码块中,调用interrupt() 方法可以中断
- 加锁是否公平
- synchronized:非公平锁
- ReentrantLock:默认非公平锁,构造函数可以传递boolean值,true为公平锁,false为非公平锁
- 锁绑定多个条件Condition
- synchronized:没有,要么随机,要么全部唤醒
- ReentrantLock:用来实现分组唤醒需要唤醒的线程,可以精确唤醒,而不是像synchronized那样,要么随机,要么全部唤醒
9. 锁绑定多个条件Condition
实现场景
多线程之间按顺序调用,实现 A-> B -> C 三个线程启动,要求如下:
AA打印5次,BB打印10次,CC打印15次
紧接着
AA打印5次,BB打印10次,CC打印15次
…
来10轮
import java.util.concurrent.locks.Condition;import java.util.concurrent.locks.Lock;import java.util.concurrent.locks.ReentrantLock;class ShareResource {// A 1 B 2 c 3private int number = 1;// 创建一个重入锁private Lock lock = new ReentrantLock();// 这三个相当于备用钥匙private Condition condition1 = lock.newCondition();private Condition condition2 = lock.newCondition();private Condition condition3 = lock.newCondition();public void print5() {lock.lock();try {// 判断while(number != 1) {// 不等于1,需要等待condition1.await();}// 干活for (int i = 0; i < 5; i++) {System.out.println(Thread.currentThread().getName() + "\t " + number + "\t" + i);}// 唤醒 (干完活后,需要通知B线程执行)number = 2;// 通知2号去干活了condition2.signal();} catch (Exception e) {e.printStackTrace();} finally {lock.unlock();}}public void print10() {lock.lock();try {// 判断while(number != 2) {// 不等于1,需要等待condition2.await();}// 干活for (int i = 0; i < 10; i++) {System.out.println(Thread.currentThread().getName() + "\t " + number + "\t" + i);}// 唤醒 (干完活后,需要通知C线程执行)number = 3;// 通知2号去干活了condition3.signal();} catch (Exception e) {e.printStackTrace();} finally {lock.unlock();}}public void print15() {lock.lock();try {// 判断while(number != 3) {// 不等于1,需要等待condition3.await();}// 干活for (int i = 0; i < 15; i++) {System.out.println(Thread.currentThread().getName() + "\t " + number + "\t" + i);}// 唤醒 (干完活后,需要通知C线程执行)number = 1;// 通知1号去干活了condition1.signal();} catch (Exception e) {e.printStackTrace();} finally {lock.unlock();}}}public class SynchronizedAndReentrantLockDemo {public static void main(String[] args) {ShareResource shareResource = new ShareResource();int num = 10;new Thread(() -> {for (int i = 0; i < num; i++) {shareResource.print5();}}, "A").start();new Thread(() -> {for (int i = 0; i < num; i++) {shareResource.print10();}}, "B").start();new Thread(() -> {for (int i = 0; i < num; i++) {shareResource.print15();}}, "C").start();}}
输出结果:
...A 1 0A 1 1A 1 2A 1 3A 1 4B 2 0B 2 1B 2 2B 2 3B 2 4B 2 5B 2 6B 2 7B 2 8B 2 9C 3 0C 3 1C 3 2C 3 3C 3 4C 3 5C 3 6C 3 7C 3 8C 3 9C 3 10C 3 11C 3 12C 3 13C 3 14A 1 0A 1 1A 1 2A 1 3A 1 4B 2 0B 2 1B 2 2B 2 3B 2 4B 2 5B 2 6B 2 7B 2 8B 2 9C 3 0C 3 1C 3 2C 3 3C 3 4C 3 5C 3 6C 3 7C 3 8C 3 9C 3 10C 3 11C 3 12C 3 13C 3 14
10. 线程通信之生产者消费者阻塞队列版
import java.util.concurrent.ArrayBlockingQueue;import java.util.concurrent.BlockingQueue;import java.util.concurrent.TimeUnit;import java.util.concurrent.atomic.AtomicInteger;class MyResource {// 默认开启,进行生产消费// 这里用到了volatile是为了保持数据的可见性,也就是当TLAG修改时,要马上通知其它线程进行修改private volatile boolean FLAG = true;// 使用原子包装类,而不用number++private AtomicInteger atomicInteger = new AtomicInteger();// 这里不能为了满足条件,而实例化一个具体的SynchronousBlockingQueueBlockingQueue<String> blockingQueue = null;// 而应该采用依赖注入里面的,构造注入方法传入public MyResource(BlockingQueue<String> blockingQueue) {this.blockingQueue = blockingQueue;// 查询出传入的class是什么System.out.println(blockingQueue.getClass().getName());}public void myProducer() throws Exception{String data = null;boolean retValue;// 多线程环境的判断,一定要使用while进行,防止出现虚假唤醒// 当FLAG为true的时候,开始生产while(FLAG) {data = atomicInteger.incrementAndGet() + "";// 2秒存入1个dataretValue = blockingQueue.offer(data, 2L, TimeUnit.SECONDS);if(retValue) {System.out.println(Thread.currentThread().getName() + "\t 插入队列:" + data + "成功" );} else {System.out.println(Thread.currentThread().getName() + "\t 插入队列:" + data + "失败" );}try {TimeUnit.SECONDS.sleep(1);} catch (InterruptedException e) {e.printStackTrace();}}System.out.println(Thread.currentThread().getName() + "\t 停止生产,表示FLAG=false,生产介绍");}public void myConsumer() throws Exception{String retValue;// 多线程环境的判断,一定要使用while进行,防止出现虚假唤醒// 当FLAG为true的时候,开始生产while(FLAG) {// 2秒存入1个dataretValue = blockingQueue.poll(2L, TimeUnit.SECONDS);if(retValue != null && retValue != "") {System.out.println(Thread.currentThread().getName() + "\t 消费队列:" + retValue + "成功" );} else {FLAG = false;System.out.println(Thread.currentThread().getName() + "\t 消费失败,队列中已为空,退出" );// 退出消费队列return;}}}/*** 停止生产的判断*/public void stop() {this.FLAG = false;}}public class ProducerConsumerWithBlockingQueueDemo {public static void main(String[] args) {// 传入具体的实现类, ArrayBlockingQueueMyResource myResource = new MyResource(new ArrayBlockingQueue<String>(10));new Thread(() -> {System.out.println(Thread.currentThread().getName() + "\t 生产线程启动\n\n");try {myResource.myProducer();System.out.println("\n");} catch (Exception e) {e.printStackTrace();}}, "producer").start();new Thread(() -> {System.out.println(Thread.currentThread().getName() + "\t 消费线程启动");try {myResource.myConsumer();} catch (Exception e) {e.printStackTrace();}}, "consumer").start();// 5秒后,停止生产和消费try {TimeUnit.SECONDS.sleep(5);} catch (InterruptedException e) {e.printStackTrace();}System.out.println("\n\n5秒中后,生产和消费线程停止,线程结束");myResource.stop();}}
输出结果:
java.util.concurrent.ArrayBlockingQueueproducer 生产线程启动consumer 消费线程启动producer 插入队列:1成功consumer 消费队列:1成功producer 插入队列:2成功consumer 消费队列:2成功producer 插入队列:3成功consumer 消费队列:3成功producer 插入队列:4成功consumer 消费队列:4成功producer 插入队列:5成功consumer 消费队列:5成功5秒中后,生产和消费线程停止,线程结束producer 停止生产,表示FLAG=false,生产介绍consumer 消费失败,队列中已为空,退出
11. Callable接口
Callable接口,是一种让线程执行完成后,能够返回结果的。
import java.util.concurrent.Callable;import java.util.concurrent.ExecutionException;import java.util.concurrent.FutureTask;import java.util.concurrent.TimeUnit;class MyThread implements Callable<Integer> {@Overridepublic Integer call() throws Exception {System.out.println(Thread.currentThread().getName() + " come in Callable");TimeUnit.SECONDS.sleep(2);return 1024;}}public class CallableDemo {public static void main(String[] args) throws InterruptedException, ExecutionException {FutureTask<Integer> futureTask = new FutureTask<>(new MyThread());new Thread(futureTask, "A").start();new Thread(futureTask, "B").start();//多个线程执行 一个FutureTask的时候,只会计算一次// 输出FutureTask的返回值System.out.println("result FutureTask " + futureTask.get());}}
7. 线程池
1. 线程池使用及优势
线程池做的工作主要是控制运行的线程的数量,处理过程中将任务放入队列,然后在线程创建后启动这些任务,如果线程数量超过了最大数量超出数量的线程排队等候,等其它线程执行完毕,再从队列中取出任务来执行。
它的主要特点为:线程复用,控制最大并发数,管理线程。
优点:
- 降低资源消耗。通过重复利用己创建的线程降低线程创建和销毁造成的消耗。
- 提高响应速度。当任务到达时,任务可以不需要的等到线程创建就能立即执行。
- 提高线程的可管理性。线程是稀缺资源,如果无限制的创建,不仅会消耗系统资源,还会降低系统的稳定性,使用线程池可以进行统一的分配,调优和监控。
2. 线程池3个常用方式
Java中的线程池是通过Executor框架实现的,该框架中用到了Executor,Executors,ExecutorService,ThreadPoolExecutor这几个类。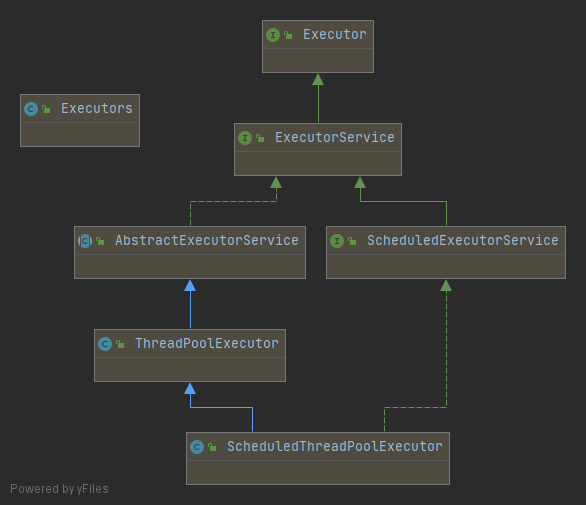
了解
- Executors.newScheduledThreadPool()
- Executors.newWorkStealingPool(int) - Java8新增,使用目前机器上可用的处理器作为它的并行级别
重点
Executors.newSingleThreadExecutor()
主要特点如下public static ExecutorService newSingleThreadExecutor() {return new FinalizableDelegatedExecutorService(new ThreadPoolExecutor(1, 1,0L, TimeUnit.MILLISECONDS,new LinkedBlockingQueue<Runnable>()));}
- 创建一个单线程化的线程池,它只会用唯一的工作线程来执行任务,保证所有任务按照指定顺序执行。
- newSingleThreadExecutor将corePoolSize和maximumPoolSize都设置为1,它使用的LinkedBlockingQueue。
Executors.newFixedThreadPool(int)
public static ExecutorService newFixedThreadPool(int nThreads) {return new ThreadPoolExecutor(nThreads, nThreads,0L, TimeUnit.MILLISECONDS,new LinkedBlockingQueue<Runnable>());}
主要特点如下:
- 创建一个定长线程池,可控制线程最大并发数,超出的线程会在队列中等待。
- newFixedThreadPool创建的线程池corePoolSize和maximumPoolSize值是相等的,它使用的LinkedBlockingQueue。
Executors.newCachedThreadPool()
public static ExecutorService newCachedThreadPool() {return new ThreadPoolExecutor(0, Integer.MAX_VALUE,60L, TimeUnit.SECONDS,new SynchronousQueue<Runnable>());}
主要特点如下:
- 创建一个可缓存线程池,如果线程池长度超过处理需要,可灵活回收空闲线程,若无可回收,则新建线程。
- newCachedThreadPool将corePoolSize设置为0,将maximumPoolSize设置为Integer.MAX_VALUE,使用的SynchronousQueue,也就是说来了任务就创建线程运行,当线程空闲超过60秒,就销毁线程。 ```java import java.util.concurrent.ExecutorService; import java.util.concurrent.Executors;
public class ThreadPoolDemo { public static void main(String[] args) {
// 一池5个处理线程(用池化技术,一定要记得关闭)
// ExecutorService threadPool = Executors.newFixedThreadPool(5);
// 创建一个只有一个线程的线程池
// ExecutorService threadPool = Executors.newSingleThreadExecutor();
// 创建一个拥有N个线程的线程池,根据调度创建合适的线程ExecutorService threadPool = Executors.newCachedThreadPool();// 模拟10个用户来办理业务,每个用户就是一个来自外部请求线程try {// 循环十次,模拟业务办理,让5个线程处理这10个请求for (int i = 0; i < 10; i++) {final int tempInt = i;threadPool.execute(() -> {System.out.println(Thread.currentThread().getName() + "\t 给用户:" + tempInt + " 办理业务");});}} catch (Exception e) {e.printStackTrace();} finally {threadPool.shutdown();}}
}
输出结果:```javapool-1-thread-1 给用户:0 办理业务pool-1-thread-6 给用户:5 办理业务pool-1-thread-5 给用户:4 办理业务pool-1-thread-2 给用户:1 办理业务pool-1-thread-4 给用户:3 办理业务pool-1-thread-3 给用户:2 办理业务pool-1-thread-10 给用户:9 办理业务pool-1-thread-9 给用户:8 办理业务pool-1-thread-8 给用户:7 办理业务pool-1-thread-7 给用户:6 办理业务
3. 线程池7大参数入门简介
public class ThreadPoolExecutor extends AbstractExecutorService {...public ThreadPoolExecutor(int corePoolSize,int maximumPoolSize,long keepAliveTime,TimeUnit unit,BlockingQueue<Runnable> workQueue,ThreadFactory threadFactory,RejectedExecutionHandler handler) {if (corePoolSize < 0 ||maximumPoolSize <= 0 ||maximumPoolSize < corePoolSize ||keepAliveTime < 0)throw new IllegalArgumentException();if (workQueue == null || threadFactory == null || handler == null)throw new NullPointerException();this.acc = System.getSecurityManager() == null ?null :AccessController.getContext();this.corePoolSize = corePoolSize;this.maximumPoolSize = maximumPoolSize;this.workQueue = workQueue;this.keepAliveTime = unit.toNanos(keepAliveTime);this.threadFactory = threadFactory;this.handler = handler;}...}
4. 线程池7大参数深入介绍
- corePoolSize:线程池中的常驻核心线程数
- 在创建了线程池后,当有请求任务来之后,就会安排池中的线程去执行请求任务,近似理解为今日当值线程。
- 当线程池中的线程数目达到corePoolSize后,就会把到达的任务放到缓存队列当中。
- maximumPoolSize:线程池能够容纳同时执行的最大线程数,此值必须大于等于1
- keepAliveTime:多余的空闲线程的存活时间。
- 当前线程池数量超过corePoolSize时,当空闲时间达到keepAliveTime值时,多余空闲线程会被销毁直到只剩下corePoolSize个线程为止
- unit:keepAliveTime的单位。
- workQueue:任务队列,被提交但尚未被执行的任务。
- threadFactory:表示生成线程池中工作线程的线程工厂,用于创建线程一般用默认的即可。
- handler:拒绝策略,表示当队列满了并且工作线程大于等于线程池的最大线程数( maximumPoolSize)。
5. 线程池底层工作原理
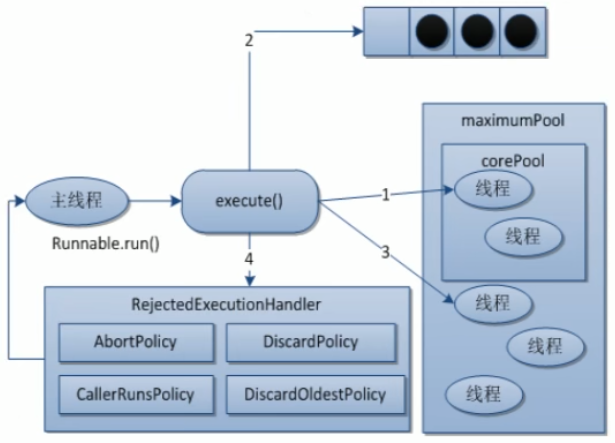
- 在创建了线程池后,等待提交过来的任务请求。
- 当调用execute()方法添加一个请求任务时,线程池会做如下判断:
- 如果正在运行的线程数量小于corePoolSize,那么马上创建线程运行这个任务;
- 如果正在运行的线程数量大于或等于corePoolSize,那么将这个任务放入队列;
- 如果这时候队列满了且正在运行的线程数量还小于maximumPoolSize,那么还是要创建非核心线程立刻运行这个任务;
- 如果队列满了且正在运行的线程数量大于或等于maximumPoolSize,那么线程池会启动饱和拒绝策略来执行。
- 当一个线程完成任务时,它会从队列中取下一个任务来执行。
- 当一个线程无事可做超过一定的时间(keepAliveTime)时,线程池会判断:
- 如果当前运行的线程数大于corePoolSize,那么这个线程就被停掉,所以线程池的所有任务完成后它最终会收缩到corePoolSize的大小。
6. 线程池的4种拒绝策略理论简介
等待队列也已经排满了,再也塞不下新任务了同时,线程池中的max线程也达到了,无法继续为新任务服务。
这时候我们就需要拒绝策略机制合理的处理这个问题。
JDK拒绝策略:
- AbortPolicy(默认):直接抛出 RejectedExecutionException异常阻止系统正常运知。
- CallerRunsPolicy:”调用者运行”一种调节机制,该策略既不会抛弃任务,也不会抛出异常,而是将某些任务回退到调用者,从而降低新任务的流量。
- DiscardOldestPolicy:抛弃队列中等待最久的任务,然后把当前任务加入队列中尝试再次提交当前任务。
- DiscardPolicy:直接丢弃任务,不予任何处理也不抛出异常。如果允许任务丢失,这是最好的一种方案。
以上内置拒绝策略均实现了RejectedExecutionHandler接口。
7. 线程池实际中使用哪一个
(超级大坑警告)你在工作中单一的/固定数的/可变的三种创建线程池的方法,你用那个多?
答案是一个都不用,我们生产上只能使用自定义的
Executors 中JDK已经给你提供了,为什么不用?
3.【强制】线程资源必须通过线程池提供,不允许在应用中自行显式创建线程。 说明:线程池的好处是减少在创建和销毁线程上所消耗的时间以及系统资源的开销,解决资源不足的问题。 如果不使用线程池,有可能造成系统创建大量同类线程而导致消耗完内存或者“过度切换”的问题。 4.【强制】线程池不允许使用 Executors 去创建,而是通过 ThreadPoolExecutor 的方式,这样的处理方式让写的同学更加明确线程池的运行规则,规避资源耗尽的风险。 说明:Executors 返回的线程池对象的弊端如下: 1) FixedThreadPool 和 SingleThreadPool: 允许的请求队列长度为 Integer.MAX_VALUE,可能会堆积大量的请求,从而导致 OOM。 2) CachedThreadPool: 允许的创建线程数量为 Integer.MAX_VALUE,可能会创建大量的线程,从而导致 OOM。 阿里巴巴《Java 开发手册》
8. 线程池的手写改造和拒绝策略
import java.util.concurrent.ExecutorService;import java.util.concurrent.Executors;import java.util.concurrent.LinkedBlockingQueue;import java.util.concurrent.RejectedExecutionHandler;import java.util.concurrent.ThreadPoolExecutor;import java.util.concurrent.TimeUnit;public class MyThreadPoolExecutorDemo {public static void doSomething(ExecutorService executorService, int numOfRequest) {try {System.out.println(((ThreadPoolExecutor)executorService).getRejectedExecutionHandler().getClass() + ":");TimeUnit.SECONDS.sleep(1);for (int i = 0; i < numOfRequest; i++) {final int tempInt = i;executorService.execute(() -> {System.out.println(Thread.currentThread().getName() + "\t 给用户:" + tempInt + " 办理业务");});}TimeUnit.SECONDS.sleep(1);System.out.println("\n\n");} catch (Exception e) {System.err.println(e);} finally {executorService.shutdown();}}public static ExecutorService newMyThreadPoolExecutor(int corePoolSize,int maximumPoolSize, int blockingQueueSize, RejectedExecutionHandler handler){return new ThreadPoolExecutor(corePoolSize,maximumPoolSize,1,//keepAliveTimeTimeUnit.SECONDS,new LinkedBlockingQueue<>(blockingQueueSize),Executors.defaultThreadFactory(),handler);}public static void main(String[] args) {doSomething(newMyThreadPoolExecutor(2, 5, 3, new ThreadPoolExecutor.AbortPolicy()), 10);doSomething(newMyThreadPoolExecutor(2, 5, 3, new ThreadPoolExecutor.CallerRunsPolicy()), 20);doSomething(newMyThreadPoolExecutor(2, 5, 3, new ThreadPoolExecutor.DiscardOldestPolicy()), 10);doSomething(newMyThreadPoolExecutor(2, 5, 3, new ThreadPoolExecutor.DiscardPolicy()), 10);}}
输出结果:
class java.util.concurrent.ThreadPoolExecutor$AbortPolicy:pool-1-thread-1 给用户:0 办理业务pool-1-thread-3 给用户:5 办理业务java.util.concurrent.RejectedExecutionException: Task com.lun.concurrency.MyThreadPoolExecutorDemo$$Lambda$1/303563356@eed1f14 rejected from java.util.concurrent.ThreadPoolExecutor@7229724f[Running, pool size = 5, active threads = 0, queued tasks = 0, completed tasks = 8]pool-1-thread-2 给用户:1 办理业务pool-1-thread-5 给用户:7 办理业务pool-1-thread-3 给用户:3 办理业务pool-1-thread-4 给用户:6 办理业务pool-1-thread-1 给用户:2 办理业务pool-1-thread-2 给用户:4 办理业务class java.util.concurrent.ThreadPoolExecutor$CallerRunsPolicy:pool-2-thread-1 给用户:0 办理业务pool-2-thread-2 给用户:1 办理业务pool-2-thread-1 给用户:2 办理业务pool-2-thread-3 给用户:5 办理业务pool-2-thread-3 给用户:7 办理业务pool-2-thread-3 给用户:9 办理业务pool-2-thread-4 给用户:6 办理业务pool-2-thread-2 给用户:3 办理业务pool-2-thread-5 给用户:8 办理业务main 给用户:10 办理业务pool-2-thread-1 给用户:4 办理业务pool-2-thread-3 给用户:11 办理业务pool-2-thread-4 给用户:13 办理业务main 给用户:14 办理业务pool-2-thread-1 给用户:12 办理业务pool-2-thread-5 给用户:15 办理业务pool-2-thread-2 给用户:17 办理业务main 给用户:18 办理业务pool-2-thread-3 给用户:16 办理业务pool-2-thread-4 给用户:19 办理业务class java.util.concurrent.ThreadPoolExecutor$DiscardOldestPolicy:pool-3-thread-1 给用户:0 办理业务pool-3-thread-2 给用户:1 办理业务pool-3-thread-1 给用户:2 办理业务pool-3-thread-2 给用户:3 办理业务pool-3-thread-3 给用户:5 办理业务pool-3-thread-5 给用户:8 办理业务pool-3-thread-2 给用户:7 办理业务pool-3-thread-4 给用户:6 办理业务pool-3-thread-1 给用户:4 办理业务pool-3-thread-3 给用户:9 办理业务class java.util.concurrent.ThreadPoolExecutor$DiscardPolicy:pool-4-thread-1 给用户:0 办理业务pool-4-thread-2 给用户:1 办理业务pool-4-thread-1 给用户:2 办理业务pool-4-thread-2 给用户:3 办理业务pool-4-thread-3 给用户:5 办理业务pool-4-thread-3 给用户:9 办理业务pool-4-thread-1 给用户:4 办理业务pool-4-thread-5 给用户:8 办理业务pool-4-thread-4 给用户:6 办理业务pool-4-thread-2 给用户:7 办理业务
9. 线程池配置合理线程数
CPU密集型
CPU密集的意思是该任务需要大量的运算,而没有阻塞,CPU一直全速运行。
CPU密集任务只有在真正的多核CPU上才可能得到加速(通过多线程),
而在单核CPU上,无论你开几个模拟的多线程该任务都不可能得到加速,因为CPU总的运算能力就那些。
CPU密集型任务配置尽可能少的线程数量:
一般公式:(CPU核数+1)个线程的线程池
lO密集型
由于IO密集型任务线程并不是一直在执行任务,则应配置尽可能多的线程,如CPU核数 * 2。
IO密集型,即该任务需要大量的IO,即大量的阻塞。
在单线程上运行IO密集型的任务会导致浪费大量的CPU运算能力浪费在等待。
所以在IO密集型任务中使用多线程可以大大的加速程序运行,即使在单核CPU上,这种加速主要就是利用了被浪费掉的阻塞时间。
IO密集型时,大部分线程都阻塞,故需要多配置线程数:
参考公式:CPU核数/ (1-阻塞系数)
阻塞系数在0.8~0.9之间
比如8核CPU:8/(1-0.9)=80个线程数
8.JVM
1. 死锁编码及定位分析
是什么
死锁是指两个或两个以上的进程在执行过程中,因争夺资源而造成的一种互相等待的现象,若无外力干涉那它们都将无法推进下去,如果系统资源充足,进程的资源请求都能够碍到满足,死锁出现的可能性就很低,否则就会因争夺有限的资源而陷入死锁。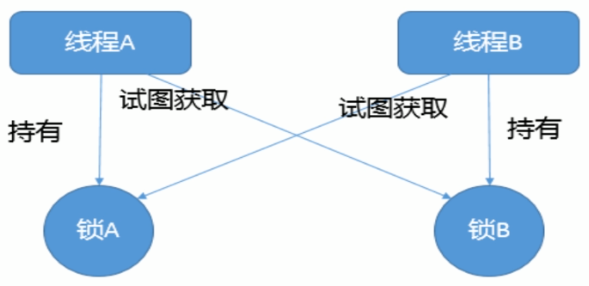
产生死锁主要原因
- 互斥条件,线程使用的资源至少有一个不能共享的。
- 至少有一个线程必须持有一个资源且正在等待获取一个当前被别的线程持有的资源。
- 资源不能被抢占。
- 循环等待。
如何解决死锁问题
破坏发生死锁的四个条件其中之一即可。
产生死锁的代码(根据发生死锁的四个条件): ```java package com.lun.concurrency;
import java.util.concurrent.TimeUnit;
class MyTask implements Runnable{
private Object resourceA, resourceB;public MyTask(Object resourceA, Object resourceB) {this.resourceA = resourceA;this.resourceB = resourceB;}@Overridepublic void run() {synchronized (resourceA) {System.out.println(String.format("%s 自己持有%s,尝试持有%s",//Thread.currentThread().getName(), resourceA, resourceB));try {TimeUnit.SECONDS.sleep(2);} catch (InterruptedException e) {e.printStackTrace();}synchronized (resourceB) {System.out.println(String.format("%s 同时持有%s,%s",//Thread.currentThread().getName(), resourceA, resourceB));}}}
}
public class DeadLockDemo { public static void main(String[] args) { Object resourceA = new Object(); Object resourceB = new Object();
new Thread(new MyTask(resourceA, resourceB),"Thread A").start();new Thread(new MyTask(resourceB, resourceA),"Thread B").start();}
}
输出结果:```javaThread A 自己持有java.lang.Object@59d8d77,尝试持有java.lang.Object@7a15e6e6Thread B 自己持有java.lang.Object@7a15e6e6,尝试持有java.lang.Object@59d8d77
查看是否死锁工具
- jps命令定位进程号
- jstack找到死锁查看 ```java C:\Users\abc>jps -l 11968 com.lun.concurrency.DeadLockDemo 6100 jdk.jcmd/sun.tools.jps.Jps 6204 Eclipse
C:\Users\abc>jstack 11968 2021-03-09 02:42:46 Full thread dump Java HotSpot(TM) 64-Bit Server VM (25.251-b08 mixed mode):
“DestroyJavaVM” #13 prio=5 os_prio=0 tid=0x00000000004de800 nid=0x2524 waiting on condition [0 x0000000000000000] java.lang.Thread.State: RUNNABLE
“Thread B” #12 prio=5 os_prio=0 tid=0x000000001e0a5800 nid=0x6bc waiting for monitor entry [0x 000000001efae000] java.lang.Thread.State: BLOCKED (on object monitor) at com.lun.concurrency.MyTask.run(DeadLockDemo.java:27)
- waiting to lock <0x000000076b431d80> (a java.lang.Object)- locked <0x000000076b431d90> (a java.lang.Object)at java.lang.Thread.run(Thread.java:748)
“Thread A” #11 prio=5 os_prio=0 tid=0x000000001e0a4800 nid=0x650 waiting for monitor entry [0x 000000001eeae000] java.lang.Thread.State: BLOCKED (on object monitor) at com.lun.concurrency.MyTask.run(DeadLockDemo.java:27)
- waiting to lock <0x000000076b431d90> (a java.lang.Object)- locked <0x000000076b431d80> (a java.lang.Object)at java.lang.Thread.run(Thread.java:748)
“Service Thread” #10 daemon prio=9 os_prio=0 tid=0x000000001e034000 nid=0x2fb8 runnable [0x000 0000000000000] java.lang.Thread.State: RUNNABLE
“C1 CompilerThread3” #9 daemon prio=9 os_prio=2 tid=0x000000001dffa000 nid=0x26e8 waiting on c ondition [0x0000000000000000] java.lang.Thread.State: RUNNABLE
“C2 CompilerThread2” #8 daemon prio=9 os_prio=2 tid=0x000000001dff6000 nid=0x484 waiting on co ndition [0x0000000000000000] java.lang.Thread.State: RUNNABLE
“C2 CompilerThread1” #7 daemon prio=9 os_prio=2 tid=0x000000001dfe0800 nid=0x35c8 waiting on c ondition [0x0000000000000000] java.lang.Thread.State: RUNNABLE
“C2 CompilerThread0” #6 daemon prio=9 os_prio=2 tid=0x000000001dfde800 nid=0x3b7c waiting on c ondition [0x0000000000000000] java.lang.Thread.State: RUNNABLE
“Attach Listener” #5 daemon prio=5 os_prio=2 tid=0x000000001dfdd000 nid=0x3834 waiting on cond ition [0x0000000000000000] java.lang.Thread.State: RUNNABLE
“Signal Dispatcher” #4 daemon prio=9 os_prio=2 tid=0x000000001dfdb000 nid=0x214 runnable [0x00 00000000000000] java.lang.Thread.State: RUNNABLE
“Finalizer” #3 daemon prio=8 os_prio=1 tid=0x000000001df70800 nid=0x2650 in Object.wait() [0x0 00000001e54f000] java.lang.Thread.State: WAITING (on object monitor) at java.lang.Object.wait(Native Method)
- waiting on <0x000000076b388ee0> (a java.lang.ref.ReferenceQueue$Lock)at java.lang.ref.ReferenceQueue.remove(ReferenceQueue.java:144)- locked <0x000000076b388ee0> (a java.lang.ref.ReferenceQueue$Lock)at java.lang.ref.ReferenceQueue.remove(ReferenceQueue.java:165)at java.lang.ref.Finalizer$FinalizerThread.run(Finalizer.java:216)
“Reference Handler” #2 daemon prio=10 os_prio=2 tid=0x000000001c17d000 nid=0x1680 in Object.wa it() [0x000000001e44f000] java.lang.Thread.State: WAITING (on object monitor) at java.lang.Object.wait(Native Method)
- waiting on <0x000000076b386c00> (a java.lang.ref.Reference$Lock)at java.lang.Object.wait(Object.java:502)at java.lang.ref.Reference.tryHandlePending(Reference.java:191)- locked <0x000000076b386c00> (a java.lang.ref.Reference$Lock)at java.lang.ref.Reference$ReferenceHandler.run(Reference.java:153)
“VM Thread” os_prio=2 tid=0x000000001c178000 nid=0x3958 runnable
“GC task thread#0 (ParallelGC)” os_prio=0 tid=0x0000000002667800 nid=0xd3c runnable
“GC task thread#1 (ParallelGC)” os_prio=0 tid=0x0000000002669000 nid=0x297c runnable
“GC task thread#2 (ParallelGC)” os_prio=0 tid=0x000000000266a800 nid=0x2fd0 runnable
“GC task thread#3 (ParallelGC)” os_prio=0 tid=0x000000000266c000 nid=0x1c90 runnable
“GC task thread#4 (ParallelGC)” os_prio=0 tid=0x000000000266f800 nid=0x3614 runnable
“GC task thread#5 (ParallelGC)” os_prio=0 tid=0x0000000002670800 nid=0x298c runnable
“GC task thread#6 (ParallelGC)” os_prio=0 tid=0x0000000002674000 nid=0x2b40 runnable
“GC task thread#7 (ParallelGC)” os_prio=0 tid=0x0000000002675000 nid=0x25f4 runnable
“VM Periodic Task Thread” os_prio=2 tid=0x000000001e097000 nid=0xd54 waiting on condition
JNI global references: 5
Found one Java-level deadlock:
“Thread B”: waiting to lock monitor 0x000000001e105dc8 (object 0x000000076b431d80, a java.lang.Object), which is held by “Thread A” “Thread A”: waiting to lock monitor 0x000000001c181828 (object 0x000000076b431d90, a java.lang.Object), which is held by “Thread B”
Java stack information for the threads listed above:
“Thread B”: at com.lun.concurrency.MyTask.run(DeadLockDemo.java:27)
- waiting to lock <0x000000076b431d80> (a java.lang.Object)- locked <0x000000076b431d90> (a java.lang.Object)at java.lang.Thread.run(Thread.java:748)
“Thread A”: at com.lun.concurrency.MyTask.run(DeadLockDemo.java:27)
- waiting to lock <0x000000076b431d90> (a java.lang.Object)- locked <0x000000076b431d80> (a java.lang.Object)at java.lang.Thread.run(Thread.java:748)
Found 1 deadlock.
C:\Users\abc>
<a name="y2zyv"></a>## 2. JVMGC下半场技术加强说明和前提知识要求(暂无)略<a name="MzgNv"></a>## 3. JVMGC快速回顾复习串讲<a name="wC3KQ"></a>### JVM内存结构<a name="RzLZl"></a>### JVM体系概述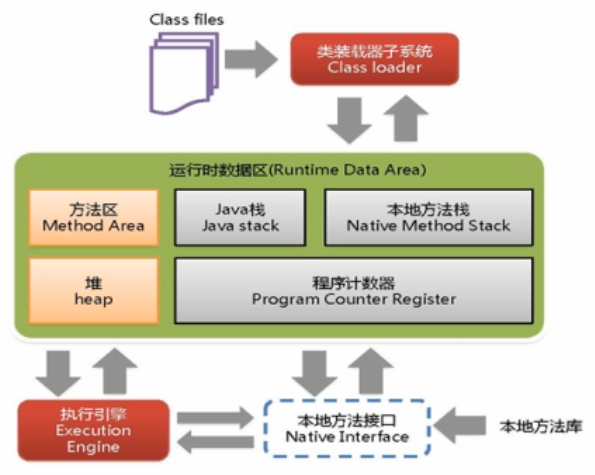<a name="RRCCV"></a>### Java8以后的JVM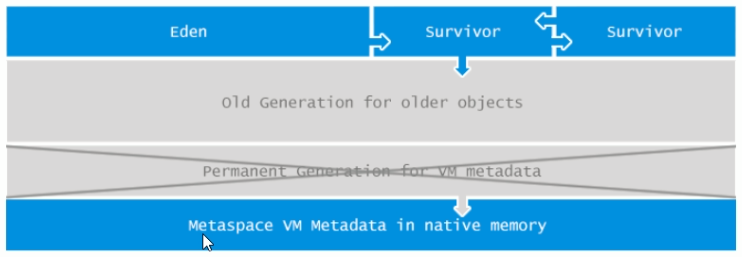<br /><br /><a name="K4LW5"></a>### 常见的垃圾回收算法<a name="JBgJu"></a>#### 1. 引用计数<a name="QP2ge"></a>#### 2. 复制Java堆从GC的角度还可以细分为: 新生代(Eden 区、From Survivor 区和To Survivor 区)和老年代。<br /><br />MinorGC的过程(复制->清空->互换):1. Eden、SurvivorFrom复制到SurvivorTo,年龄+11. 首先,当Eden区满的时候会触发第一次GC,把还活着的对象拷贝到SurvivorFrom区,当Eden区再次触发GC的时候会扫描Eden区和From区域,对这两个区域进行垃圾回收,经过这次回收后还存活的对象,则直接复制到To区域(如果有对象的年龄已经达到了老年的标准,则赋值到老年代区),同时把这些对象的年龄+1。2. 清空eden-SurvivorErom1. 然后,清空Eden和Survivor From中的对象,也即复制之后有交换,谁空谁是To。3. Survivor To和 Survivor From互换1. 最后,Survivor To和Survivor From互换,原SurvivorTo成为下一次GC时的Survivor From区。部分对象会在From和To区域中复制来复制去,如此交换15次(由ⅣM参数MaxTenuringThreshold决定,这个参数默认是15),最终如果还是存活,就存入到老年代。<a name="gvK9X"></a>#### 3. 标记清除算法分成标记和清除两个阶段,先标记出要回收的对象,然后统一回收这些对象。<br /><a name="gzB5N"></a>#### 4. 标记整理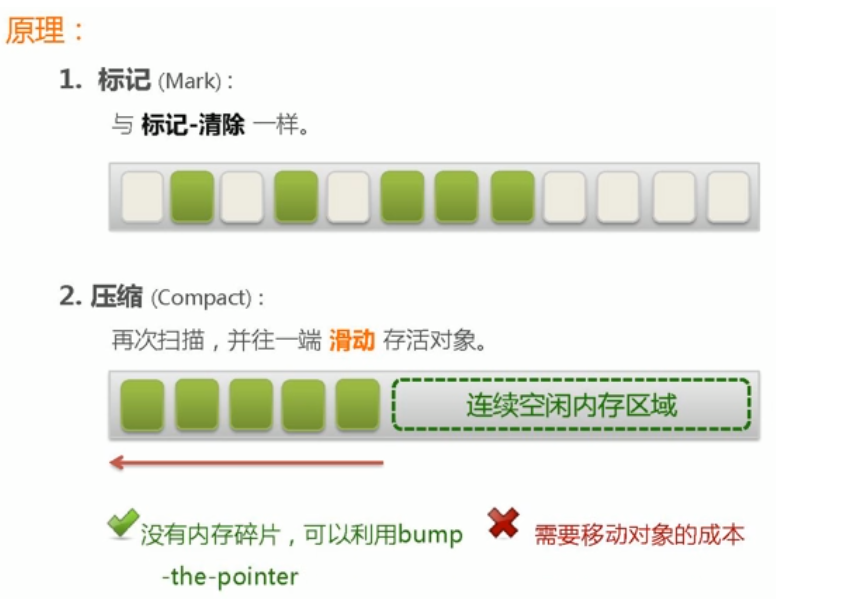<a name="Fi7N8"></a>## 4. 谈谈你对GCRoots的理解<a name="eauw9"></a>### 什么是垃圾?简单的说就是内存中已经不再被使用到的空间就是垃圾。<br />要进行垃圾回收,如何判断一个对象是否可以被回收?- 引用计数法- 枚举根节点做可达性分析(根搜索路径)<a name="AylTG"></a>### 引用计数法Java 中,引用和对象是有关联的。如果要操作对象则必须用引用进行。<br />因此,很显然一个简单的办法是通过引用计数来判断一个对象是否可以回收。简单说,给对象中添加一个引用计数器,<br />每当有一个地方引用它,计数器值加1,<br />每当有一个引用失效时,计数器值减1。<br />任何时刻计数器值为零的对象就是不可能再被使用的,那么这个对象就是可回收对象。<br />那为什么主流的Java虚拟机里面都没有选用这种算法呢?其中最主要的原因是它很难解决对象之间相互循环引用的问题。<br />该算法存在但目前无人用了,解决不掉循环引用的问题,了解即可。<br />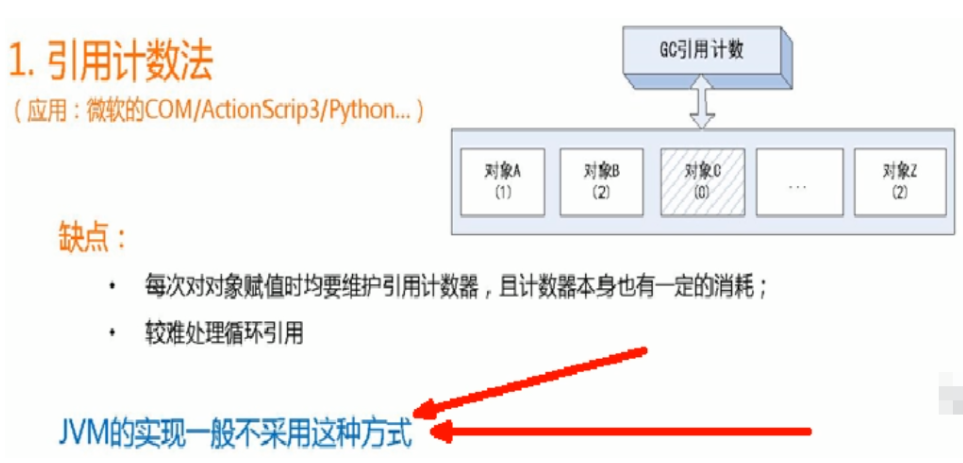<a name="GQq7Z"></a>### 枚举根节点做可达性分析(根搜索路径)为了解决引用计数法的循环引用问题,Java使用了可达性分析的方法。<br />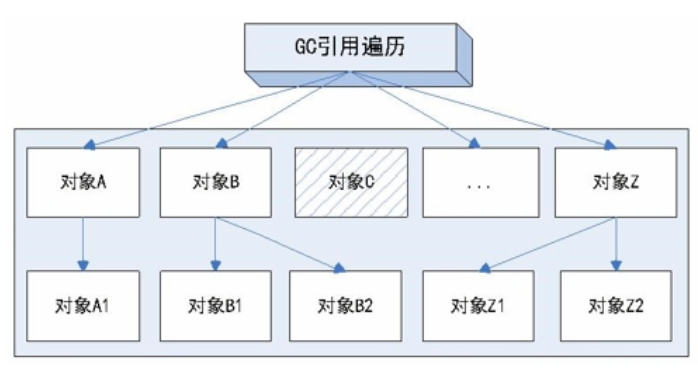<br />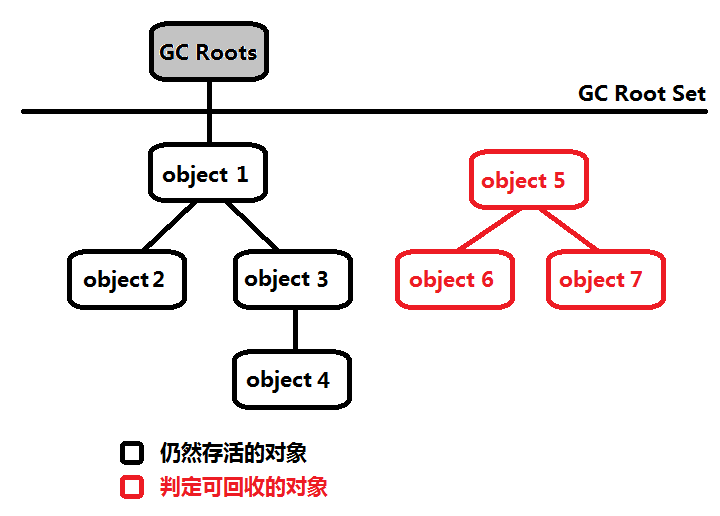<br />所谓“GC roots”或者说tracing GC的“根集合”就是一组必须活跃的引用。<br />基本思路就是通过一系列名为”GC Roots”的对象作为起始点,从这个被称为GC Roots的对象开始向下搜索,如果一个对象到GC Roots没有任何引用链相连时,则说明此对象不可用。也即给定一个集合的引用作为根出发,通过引用关系遍历对象图,能被遍历到的(可到达的)对象就被判定为存活;没有被遍历到的就自然被判定为死亡。Java中可以作为GC Roots的对象- 虚拟机栈(栈帧中的局部变量区,也叫做局部变量表)中引用的对象。- 方法区中的类静态属性引用的对象。- 方法区中常量引用的对象。- 本地方法栈中JNI(Native方法)引用的对象。<a name="lW4GQ"></a>## 5. JVM的标配参数和X参数[官方文档](https://docs.oracle.com/javase/8/docs/technotes/tools/windows/java.html)<br />JVM的参数类型:- 标配参数- -version java -version- -help- X参数(了解)- -Xint:解释执行- -Xcomp:第一次使用就编译成本地代码- -Xmixed:混合模式- XX参数(下一节)<a name="EF53L"></a>## 6. JVM的XX参数之布尔类型公式:-XX:+ 或者 - 某个属性值(+表示开启,-表示关闭)<br />如何查看一个正在运行中的java程序,它的某个jvm参数是否开启?具体值是多少?1. jps -l 查看一个正在运行中的java程序,得到Java程序号。1. jinfo -flag PrintGCDetails (Java程序号 )查看它的某个jvm参数(如PrintGCDetails )是否开启。1. jinfo -flags (Java程序号 )查看它的所有jvm参数Case<br />是否打印GC收集细节- -XX:-PrintGCDetails- -XX:+PrintGCDetails是否使用串行垃圾回收器- -XX:-UseSerialGC- -XX:+UserSerialGC<a name="e4Ycj"></a>## 7. JVM的XX参数之设值类型公式:-XX:属性key=属性值value<br />Case- -XX:MetaspaceSize=128m- -XX:MaxTenuringThreshold=15<a name="vBP57"></a>## 8. JVM的XX参数之XmsXmx坑题<a name="NANKL"></a>### 两个经典参数- -Xms等价于-XX:InitialHeapSize,初始大小内存,默认物理内存1/64- -Xmx等价于-XX:MaxHeapSize,最大分配内存,默认为物理内存1/4<a name="N6YBt"></a>## 9. JVM盘点家底查看初始默认值<a name="vizhp"></a>### 查看初始默认参数值-XX:+PrintFlagsInitial<br />公式:java -XX:+PrintFlagsInitial```javaC:\Users\abc>java -XX:+PrintFlagsInitial[Global flags]int ActiveProcessorCount = -1 {product} {default}uintx AdaptiveSizeDecrementScaleFactor = 4 {product} {default}uintx AdaptiveSizeMajorGCDecayTimeScale = 10 {product} {default}uintx AdaptiveSizePolicyCollectionCostMargin = 50 {product} {default}uintx AdaptiveSizePolicyInitializingSteps = 20 {product} {default}uintx AdaptiveSizePolicyOutputInterval = 0 {product} {default}uintx AdaptiveSizePolicyWeight = 10 {product} {default}...
查看修改更新参数值
-XX:+PrintFlagsFinal
公式:java -XX:+PrintFlagsFinal
C:\Users\abc>java -XX:+PrintFlagsFinal...size_t HeapBaseMinAddress = 2147483648 {pd product} {default}bool HeapDumpAfterFullGC = false {manageable} {default}bool HeapDumpBeforeFullGC = false {manageable} {default}bool HeapDumpOnOutOfMemoryError = false {manageable} {default}ccstr HeapDumpPath = {manageable} {default}uintx HeapFirstMaximumCompactionCount = 3 {product} {default}uintx HeapMaximumCompactionInterval = 20 {product} {default}uintx HeapSearchSteps = 3 {product} {default}size_t HeapSizePerGCThread = 43620760 {product} {default}bool IgnoreEmptyClassPaths = false {product} {default}bool IgnoreUnrecognizedVMOptions = false {product} {default}uintx IncreaseFirstTierCompileThresholdAt = 50 {product} {default}bool IncrementalInline = true {C2 product} {default}size_t InitialBootClassLoaderMetaspaceSize = 4194304 {product} {default}uintx InitialCodeCacheSize = 2555904 {pd product} {default}size_t InitialHeapSize := 268435456 {product} {ergonomic}...
=表示默认,:=表示修改过的。
10. JVM盘点家底查看修改变更值
PrintFlagsFinal举例,运行java命令的同时打印出参数
java -XX:+PrintFlagsFinal -XX:MetaspaceSize=512m HelloWorld
...size_t MetaspaceSize := 536870912 {pd product} {default}...
打印命令行参数
-XX:+PrintCommandLineFlags
C:\Users\abc>java -XX:+PrintCommandLineFlags -version-XX:ConcGCThreads=2 -XX:G1ConcRefinementThreads=8 -XX:GCDrainStackTargetSize=64 -XX:InitialHeapSize=266613056 -XX:MarkStackSize=4194304 -XX:MaxHeapSize=4265808896 -XX:MinHeapSize=6815736 -XX:+PrintCommandLineFlags -XX:ReservedCodeCacheSize=251658240 -XX:+SegmentedCodeCache -XX:+UseCompressedClassPointers -XX:+UseCompressedOops -XX:+UseG1GC -XX:-UseLargePagesIndividualAllocationopenjdk version "15.0.1" 2020-10-20OpenJDK Runtime Environment (build 15.0.1+9-18)OpenJDK 64-Bit Server VM (build 15.0.1+9-18, mixed mode)
11. 堆内存初始大小快速复习
JDK 1.8之后将最初的永久代取消了,由元空间取代。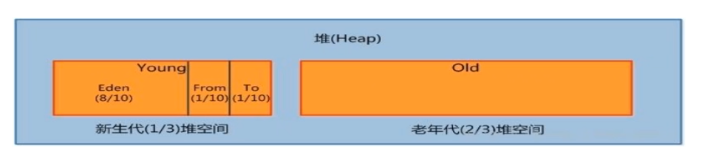
在Java8中,永久代已经被移除,被一个称为元空间的区域所取代。元空间的本质和永久代类似。
元空间(Java8)与永久代(Java7)之间最大的区别在于:永久带使用的JVM的堆内存,但是Java8以后的元空间并不在虚拟机中而是使用本机物理内存。
因此,默认情况下,元空间的大小仅受本地内存限制。类的元数据放入native memory,字符串池和类的静态变量放入java堆中,这样可以加载多少类的元数据就不再由MaxPermSize控制,而由系统的实际可用空间来控制。
public class JVMMemorySizeDemo {public static void main(String[] args) throws InterruptedException {// 返回Java虚拟机中内存的总量long totalMemory = Runtime.getRuntime().totalMemory();// 返回Java虚拟机中试图使用的最大内存量long maxMemory = Runtime.getRuntime().maxMemory();System.out.println(String.format("TOTAL_MEMORY(-Xms): %d B, %.2f MB.", totalMemory, totalMemory / 1024.0 / 1024));System.out.println(String.format("MAX_MEMORY(-Xmx): %d B, %.2f MB.", maxMemory, maxMemory / 1024.0 / 1024));}}
输出结果:
TOTAL_MEMORY(-Xms): 257425408 B, 245.50 MB.MAX_MEMORY(-Xmx): 3793747968 B, 3618.00 MB.
12. 常用基础参数栈内存Xss讲解
设置单个线程栈的大小,一般默认为512k~1024K
等价于-XX:ThreadStackSize
-XX:ThreadStackSize=size Sets the thread stack size (in bytes). Append the letter k or K to indicate kilobytes, m or M to indicate megabytes, g or G to indicate gigabytes. The default value depends on virtual memory. The following examples show how to set the thread stack size to 1024 KB in different units:
-XX:ThreadStackSize=1m-XX:ThreadStackSize=1024k-XX:ThreadStackSize=1048576
This option is equivalent to -Xss. 官方文档
13. 常用基础参数元空间MetaspaceSize讲解
-Xmn:设置年轻代大小
-XX:MetaspaceSize 设置元空间大小
元空间的本质和永久代类似,都是对JVM规范中方法区的实现。不过元空间与永久代之间最大的区别在于:元空间并不在虚拟机中,而是使用本地内存。因此,默认情况下,元空间的大小仅受本地内存限制
典型设置案例
-Xms128m -Xmx4096m -Xss1024k -XX:MetaspaceSize=512m -XX:+PrintCommandLineFlags -XX:+PrintGCDetails-XX:+UseSerialGC
[
](https://blog.csdn.net/u011863024/article/details/114684428)
14. 常用基础参数PrintGCDetails回收前后对比讲解
-XX:+PrintGCDetails 输出详细GC收集日志信息
设置参数 -Xms10m -Xmx10m -XX:+PrintGCDetails 运行以下程序
import java.util.concurrent.TimeUnit;public class PrintGCDetailsDemo {public static void main(String[] args) throws InterruptedException {byte[] byteArray = new byte[10 * 1024 * 1024];TimeUnit.SECONDS.sleep(Integer.MAX_VALUE);}}
输出结果:
[GC (Allocation Failure) [PSYoungGen: 778K->480K(2560K)] 778K->608K(9728K), 0.0029909 secs] [Times: user=0.00 sys=0.00, real=0.00 secs][GC (Allocation Failure) [PSYoungGen: 480K->480K(2560K)] 608K->616K(9728K), 0.0007890 secs] [Times: user=0.00 sys=0.00, real=0.00 secs][Full GC (Allocation Failure) [PSYoungGen: 480K->0K(2560K)] [ParOldGen: 136K->518K(7168K)] 616K->518K(9728K), [Metaspace: 2644K->2644K(1056768K)], 0.0058272 secs] [Times: user=0.00 sys=0.00, real=0.01 secs][GC (Allocation Failure) [PSYoungGen: 0K->0K(2560K)] 518K->518K(9728K), 0.0002924 secs] [Times: user=0.00 sys=0.00, real=0.00 secs][Full GC (Allocation Failure) [PSYoungGen: 0K->0K(2560K)] [ParOldGen: 518K->506K(7168K)] 518K->506K(9728K), [Metaspace: 2644K->2644K(1056768K)], 0.0056906 secs] [Times: user=0.01 sys=0.00, real=0.01 secs]Exception in thread "main" java.lang.OutOfMemoryError: Java heap spaceat com.lun.jvm.PrintGCDetailsDemo.main(PrintGCDetailsDemo.java:9)HeapPSYoungGen total 2560K, used 61K [0x00000000ffd00000, 0x0000000100000000, 0x0000000100000000)eden space 2048K, 3% used [0x00000000ffd00000,0x00000000ffd0f748,0x00000000fff00000)from space 512K, 0% used [0x00000000fff00000,0x00000000fff00000,0x00000000fff80000)to space 512K, 0% used [0x00000000fff80000,0x00000000fff80000,0x0000000100000000)ParOldGen total 7168K, used 506K [0x00000000ff600000, 0x00000000ffd00000, 0x00000000ffd00000)object space 7168K, 7% used [0x00000000ff600000,0x00000000ff67ea58,0x00000000ffd00000)Metaspace used 2676K, capacity 4486K, committed 4864K, reserved 1056768Kclass space used 285K, capacity 386K, committed 512K, reserved 1048576K
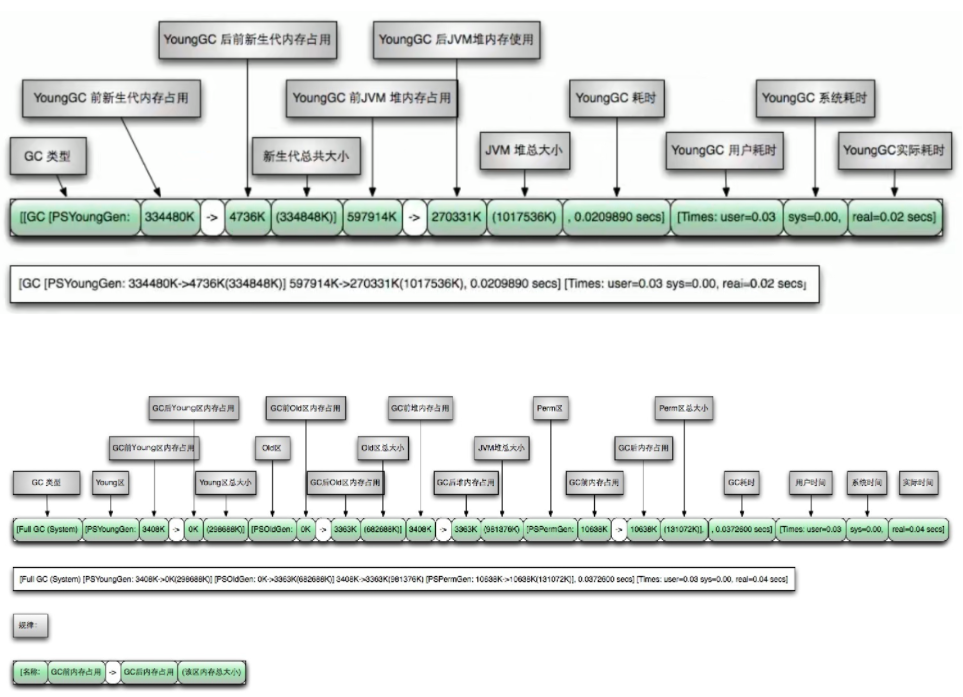
15. 常用基础参数SurvivorRatio讲解
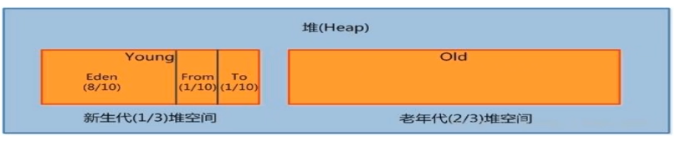
调节新生代中 eden 和 S0、S1的空间比例,默认为 -XX:SuriviorRatio=8,Eden:S0:S1 = 8:1:1
假如设置成 -XX:SurvivorRatio=4,则为 Eden:S0:S1 = 4:1:1
SurvivorRatio值就是设置eden区的比例占多少,S0和S1相同。
ratio
英 [ˈreɪʃiəʊ] 美 [ˈreɪʃioʊ]
n. 比率;比例
16. 常用基础参数NewRatio讲解
配置年轻代new 和老年代old 在堆结构的占比
默认:-XX:NewRatio=2 新生代占1,老年代2,年轻代占整个堆的1/3
-XX:NewRatio=4:新生代占1,老年代占4,年轻代占整个堆的1/5,
NewRadio值就是设置老年代的占比,剩下的1个新生代。
新生代特别小,会造成频繁的进行GC收集。
[
](https://blog.csdn.net/u011863024/article/details/114684428)
17. 常用基础参数MaxTenuringThreshold讲解
晋升到老年代的对象年龄。
SurvivorTo和SurvivorFrom互换,原SurvivorTo成为下一次GC时的SurvivorFrom区,部分对象会在From和To区域中复制来复制去,如此交换15次(由JVM参数MaxTenuringThreshold决定,这个参数默认为15),最终如果还是存活,就存入老年代。
这里就是调整这个次数的,默认是15,并且设置的值 在 0~15之间。
-XX:MaxTenuringThreshold=0:设置垃圾最大年龄。如果设置为0的话,则年轻对象不经过Survivor区,直接进入老年代。对于年老代比较多的应用,可以提高效率。如果将此值设置为一个较大的值,则年轻代对象会在Survivor区进行多次复制,这样可以增加对象再年轻代的存活时间,增加在年轻代即被回收的概念。
tenure 英 [ˈtenjə®] 美 [ˈtenjər] n. 任期;占有 vt. 授予…终身职位
threshold
英 [ˈθreʃhəʊld] 美 [ˈθreʃhoʊld]
n. 门槛;门口;阈;界;起始点;开端;起点;入门
9. 引用
1. 强引用Reference
Reference类以及继承派生的类
java.lang.ref.Reference 为 软(soft)引用、弱(weak)引用、虚(phantom)引用的父类。
因为Reference对象和垃圾回收密切配合实现,该类可能不能被直接子类化。
可以理解为Reference的直接子类都是由jvm定制化处理的,因此在代码中直接继承于Reference类型没有任何作用。但可以继承jvm定制的Reference的子类。
例如:Cleaner 继承了 PhantomReference
public class Cleaner extends PhantomReference<Object>
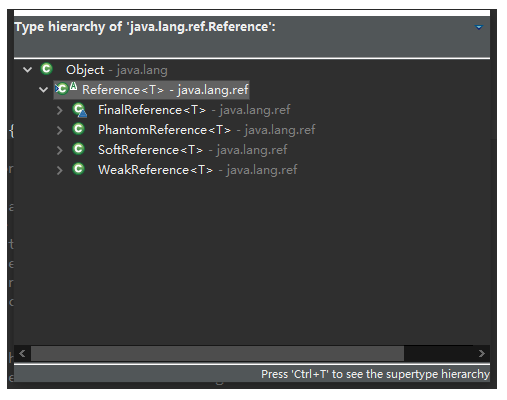
当内存不足,JVM开始垃圾回收,对于强引用的对象,就算是出现了OOM也不会对该对象进行回收,死都不收。
// 这样定义的默认就是强应用Object obj1 = new Object();
强引用是我们最常见的普通对象引用,只要还有强引用指向一个对象,就能表明对象还“活着”,垃圾收集器不会碰这种对象。在Java中最常见的就是强引用,把一个对象赋给一个引用变量,这个引用变量就是一个强引用。当一个对象被强引用变量引用时,它处于可达状态,它是不可能被垃圾回收机制回收的,即使该对象以后永远都不会被用到JVM也不会回收。因此强引用是造成Java内存泄漏的主要原因之一。
对于一个普通的对象,如果没有其他的引用关系,只要超过了引用的作用域或者显式地将相应(强)引用赋值为 null一般认为就是可以被垃圾收集的了(当然具体回收时机还是要看垃圾收集策略)。
构造函数
其内部提供2个构造函数,一个带queue,一个不带queue。其中queue的意义在于,我们可以在外部对这个queue进行监控。即如果有对象即将被回收,那么相应的reference对象就会被放到这个queue里。我们拿到reference,就可以再作一些事务。
而如果不带的话,就只有不断地轮询reference对象,通过判断里面的get是否返回null( phantomReference对象不能这样作,其get始终返回null,因此它只有带queue的构造函数 )。这两种方法均有相应的使用场景,取决于实际的应用。如weakHashMap中就选择去查询queue的数据,来判定是否有对象将被回收。而ThreadLocalMap,则采用判断get()是否为null来作处理。
/* -- Constructors -- */Reference(T referent) {this(referent, null);}Reference(T referent, ReferenceQueue<? super T> queue) {this.referent = referent;this.queue = (queue == null) ? ReferenceQueue.NULL : queue;}
如果我们在创建一个引用对象时,指定了ReferenceQueue,那么当引用对象指向的对象达到合适的状态(根据引用类型不同而不同)时,GC 会把引用对象本身添加到这个队列中,方便我们处理它,因为“引用对象指向的对象 GC 会自动清理,但是引用对象本身也是对象(是对象就占用一定资源),所以需要我们自己清理。”
Reference链表结构内部主要的成员有
① pending 和 discovered
/* List of References waiting to be enqueued. The collector adds* References to this list, while the Reference-handler thread removes* them. This list is protected by the above lock object. The* list uses the discovered field to link its elements.*/private static Reference<Object> pending = null;/* When active: next element in a discovered reference list maintained by GC (or this if last)* pending: next element in the pending list (or null if last)* otherwise: NULL*/transient private Reference<T> discovered; /* used by VM */
可以理解为jvm在gc时会将要处理的对象放到这个静态字段上面。同时,另一个字段discovered:表示要处理的对象的下一个对象。即可以理解要处理的对象也是一个链表,通过discovered进行排队,这边只需要不停地拿到pending,然后再通过discovered不断地拿到下一个对象赋值给pending即可,直到取到了最有一个。因为这个pending对象,两个线程都可能访问,因此需要加锁处理。
if (pending != null) {r = pending;// 'instanceof' might throw OutOfMemoryError sometimes// so do this before un-linking 'r' from the 'pending' chain...c = r instanceof Cleaner ? (Cleaner) r : null;// unlink 'r' from 'pending' chainpending = r.discovered;r.discovered = null;
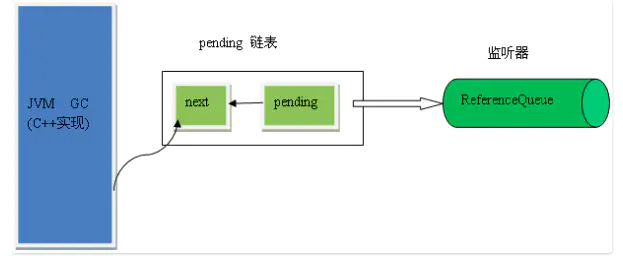
② referent
private T referent; / Treated specially by GC /
👆referent字段由GC特别处理
referent:表示其引用的对象,即我们在构造的时候需要被包装在其中的对象。对象即将被回收的定义:此对象除了被reference引用之外没有其它引用了( 并非确实没有被引用,而是gcRoot可达性不可达,以避免循环引用的问题 )。如果一旦被回收,则会直接置为null,而外部程序可通过引用对象本身( 而不是referent,这里是reference#get() )了解到回收行为的产生( PhntomReference除外 )。
③ next
/* When active: NULL* pending: this* Enqueued: next reference in queue (or this if last)* Inactive: this*/@SuppressWarnings("rawtypes")Reference next;
next:即描述当前引用节点所存储的下一个即将被处理的节点。但next仅在放到queue中才会有意义( 因为,只有在enqueue的时候,会将next设置为下一个要处理的Reference对象 )。为了描述相应的状态值,在放到队列当中后,其queue就不会再引用这个队列了。而是引用一个特殊的ENQUEUED。因为已经放到队列当中,并且不会再次放到队列当中。
④ discovered
/* When active: next element in a discovered reference list maintained by GC (or this if last)* pending: next element in the pending list (or null if last)* otherwise: NULL*/transient private Reference<T> discovered; /* used by VM */
👆被VM使用
discovered:当处于active状态时:discoverd reference的下一个元素是由GC操纵的( 如果是最后一个了则为this );当处于pending状态:discovered为pending集合中的下一个元素( 如果是最后一个了则为null );其他状态:discovered为null
⑤ lock
static private class Lock { }private static Lock lock = new Lock();
lock:在垃圾收集中用于同步的对象。收集器必须获取该锁在每次收集周期开始时。因此这是至关重要的:任何持有该锁的代码应该尽快完成,不分配新对象,并且避免调用用户代码。
⑥ pending
/* List of References waiting to be enqueued. The collector adds* References to this list, while the Reference-handler thread removes* them. This list is protected by the above lock object. The* list uses the discovered field to link its elements.*/private static Reference<Object> pending = null;
pending:等待被入队的引用列表。收集器会添加引用到这个列表,直到Reference-handler线程移除了它们。这个列表被上面的lock对象保护。这个列表使用discovered字段来连接它自己的元素( 即pending的下一个元素就是discovered对象 )。
⑦ queue
volatile ReferenceQueue<? super T> queue;
queue:是对象即将被回收时所要通知的队列。当对象即被回收时,整个reference对象( 而不是被回收的对象 )会被放到queue里面,然后外部程序即可通过监控这个queue拿到相应的数据了。
这里的queue( 即,ReferenceQueue对象 )名义上是一个队列,但实际内部并非有实际的存储结构,它的存储是依赖于内部节点之间的关系来表达。可以理解为queue是一个类似于链表的结构,这里的节点其实就是reference本身。可以理解为queue为一个链表的容器,其自己仅存储当前的head节点,而后面的节点由每个reference节点自己通过next来保持即可。
- Reference 实例( 即Reference中的真是引用对象referent )的4中可能的内部状态值
Queue的另一个作用是可以区分不同状态的Reference。Reference有4种状态,不同状态的reference其queue也不同:- Active:新创建的引用对象都是这个状态,在 GC 检测到引用对象已经到达合适的reachability时,GC 会根据引用对象是否在创建时制定ReferenceQueue参数进行状态转移,如果指定了,那么转移到Pending,如果没指定,转移到Inactive。
- Pending:pending-Reference列表中的引用都是这个状态,它们等着被内部线程ReferenceHandler处理入队(会调用ReferenceQueue.enqueue方法)。没有注册的实例不会进入这个状态。
- Enqueued:相应的对象已经为待回收,并且相应的引用对象已经放到queue当中了。准备由外部线程来询问queue获取相应的数据。调用ReferenceQueue.enqueued方法后的Reference处于这个状态中。当Reference实例从它的ReferenceQueue移除后,它将成为Inactive。没有注册的实例不会进入这个状态。
- Inactive:即此对象已经由外部从queue中获取到,并且已经处理掉了。即意味着此引用对象可以被回收,并且对内部封装的对象也可以被回收掉了( 实际的回收运行取决于clear动作是否被调用 )。可以理解为进入到此状态的肯定是应该被回收掉的。一旦一个Reference实例变为了Inactive,它的状态将不会再改变。
jvm并不需要定义状态值来判断相应引用的状态处于哪个状态,只需要通过计算next和queue即可进行判断。
- Active:queue为创建一个Reference对象时传入的ReferenceQueue对象;如果ReferenceQueue对象为空或者没有传入ReferenceQueue对象,则为ReferenceQueue.NULL;next==null;
- Pending:queue为初始化时传入ReferenceQueue对象;next==this(由jvm设置);
- Enqueue:当queue!=null && queue != ENQUEUED 时;设置queue为ENQUEUED;next为下一个要处理的reference对象,或者若为最后一个了next==this;
Inactive:queue = ReferenceQueue.NULL; next = this.
通过这个组合,收集器只需要检测next属性为了决定是否一个Reference实例需要特殊的处理:如果next==null,则实例是active;如果next!=null,为了确保并发收集器能够发现active的Reference对象,而不会影响可能将enqueue()方法应用于这些对象的应用程序线程,收集器应通过discovered字段链接发现的对象。discovered字段也用于链接pending列表中的引用对象。
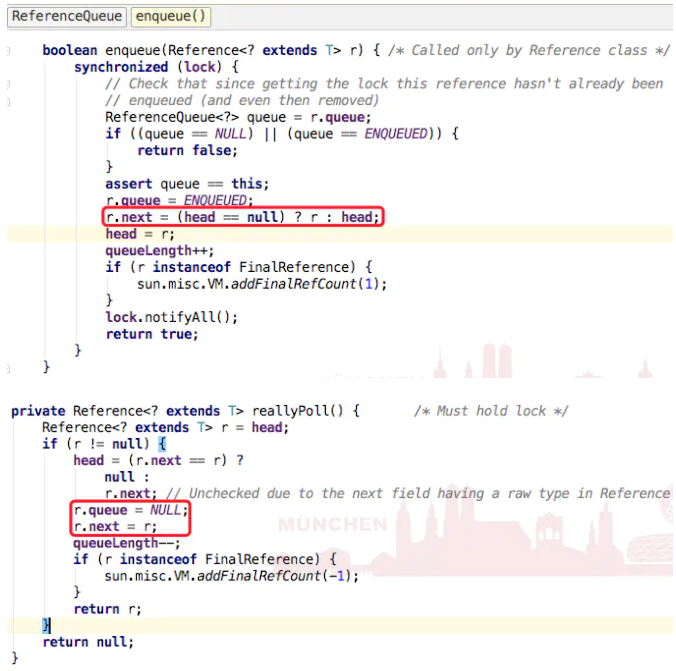
👆外部从queue中获取ReferenceWeakReference对象进入到queue之后,相应的referent为null。
- SoftReference对象,如果对象在内存足够时,不会进入到queue,自然相应的referent不会为null。如果需要被处理( 内存不够或其它策略 ),则置相应的referent为null,然后进入到queue。通过debug发现,SoftReference是pending状态时,referent就已经是null了,说明此事referent已经被GC回收了。
- FinalReference对象,因为需要调用其finalize对象,因此其reference即使入queue,其referent也不会为null,即不会clear掉。
- PhantomReference对象,因为本身get实现为返回null。因此clear的作用不是很大。因为不管enqueue还是没有,都不会清除掉。
Q:👆如果PhantomReference对象不管enqueue还是没有,都不会清除掉reference对象,那么怎么办?这个reference对象不就一直存在这了??而且JVM是会直接通过字段操作清除相应引用的,那么是不是JVM已经释放了系统底层资源,但java代码中该引用还未置null??
A:不会的,虽然PhantomReference有时候不会调用clear,如Cleaner对象 。但Cleaner的clean()方法只调用了remove(this),这样当clean()执行完后,Cleaner就是一个无引用指向的对象了,也就是可被GC回收的对象。
active ——> pending :Reference#tryHandlePending
pending ——> enqueue :ReferenceQueue#enqueue
enqueue ——> inactive :Reference#clear
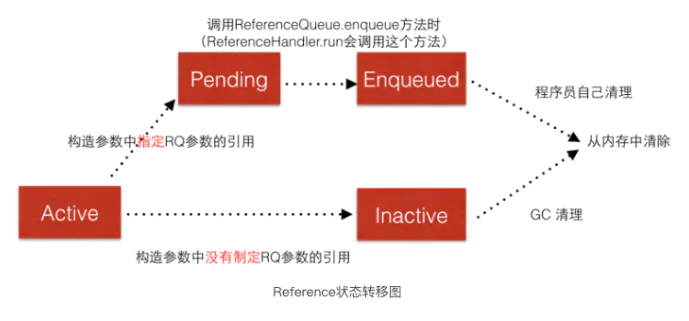
重要方法
① clear()
/*** Clears this reference object. Invoking this method will not cause this* object to be enqueued.** <p> This method is invoked only by Java code; when the garbage collector* clears references it does so directly, without invoking this method.*/public void clear() {this.referent = null;}
调用此方法不会导致此对象入队。此方法仅由Java代码调用;当垃圾收集器清除引用时,它直接执行,而不调用此方法。
clear的语义就是将referent置null。
清除引用对象所引用的原对象,这样通过get()方法就不能再访问到原对象了( PhantomReference除外 )。从相应的设计思路来说,既然都进入到queue对象里面,就表示相应的对象需要被回收了,因为没有再访问原对象的必要。此方法不会由JVM调用,而JVM是直接通过字段操作清除相应的引用,其具体实现与当前方法相一致。
② ReferenceHandler线程
static {ThreadGroup tg = Thread.currentThread().getThreadGroup();for (ThreadGroup tgn = tg;tgn != null;tg = tgn, tgn = tg.getParent());Thread handler = new ReferenceHandler(tg, "Reference Handler");/* If there were a special system-only priority greater than* MAX_PRIORITY, it would be used here*/handler.setPriority(Thread.MAX_PRIORITY);handler.setDaemon(true);handler.start();// provide access in SharedSecretsSharedSecrets.setJavaLangRefAccess(new JavaLangRefAccess() {@Overridepublic boolean tryHandlePendingReference() {return tryHandlePending(false);}});}
其优先级最高,可以理解为需要不断地处理引用对象。
private static class ReferenceHandler extends Thread {private static void ensureClassInitialized(Class<?> clazz) {try {Class.forName(clazz.getName(), true, clazz.getClassLoader());} catch (ClassNotFoundException e) {throw (Error) new NoClassDefFoundError(e.getMessage()).initCause(e);}}static {// pre-load and initialize InterruptedException and Cleaner classes// so that we don't get into trouble later in the run loop if there's// memory shortage while loading/initializing them lazily.ensureClassInitialized(InterruptedException.class);ensureClassInitialized(Cleaner.class);}ReferenceHandler(ThreadGroup g, String name) {super(g, name);}public void run() {while (true) {tryHandlePending(true);}}}
③ tryHandlePending()
/*** Try handle pending {@link Reference} if there is one.<p>* Return {@code true} as a hint that there might be another* {@link Reference} pending or {@code false} when there are no more pending* {@link Reference}s at the moment and the program can do some other* useful work instead of looping.** @param waitForNotify if {@code true} and there was no pending* {@link Reference}, wait until notified from VM* or interrupted; if {@code false}, return immediately* when there is no pending {@link Reference}.* @return {@code true} if there was a {@link Reference} pending and it* was processed, or we waited for notification and either got it* or thread was interrupted before being notified;* {@code false} otherwise.*/static boolean tryHandlePending(boolean waitForNotify) {Reference<Object> r;Cleaner c;try {synchronized (lock) {if (pending != null) {r = pending;// 'instanceof' might throw OutOfMemoryError sometimes// so do this before un-linking 'r' from the 'pending' chain...c = r instanceof Cleaner ? (Cleaner) r : null;// unlink 'r' from 'pending' chainpending = r.discovered;r.discovered = null;} else {// The waiting on the lock may cause an OutOfMemoryError// because it may try to allocate exception objects.if (waitForNotify) {lock.wait();}// retry if waitedreturn waitForNotify;}}} catch (OutOfMemoryError x) {// Give other threads CPU time so they hopefully drop some live references// and GC reclaims some space.// Also prevent CPU intensive spinning in case 'r instanceof Cleaner' above// persistently throws OOME for some time...Thread.yield();// retryreturn true;} catch (InterruptedException x) {// retryreturn true;}// Fast path for cleanersif (c != null) {c.clean();return true;}ReferenceQueue<? super Object> q = r.queue;if (q != ReferenceQueue.NULL) q.enqueue(r);return true;}
这个线程在Reference类的static构造块中启动,并且被设置为高优先级和daemon状态。此线程要做的事情,是不断的检查pending 是否为null,如果pending不为null,则将pending进行enqueue,否则线程进入wait状态。
由此可见,pending是由jvm来赋值的,当Reference内部的referent对象的可达状态改变时,jvm会将Reference对象放入pending链表。并且这里enqueue的队列是我们在初始化( 构造函数 )Reference对象时传进来的queue,如果传入了null( 实际使用的是ReferenceQueue.NULL ),则ReferenceHandler则不进行enqueue操作,所以只有非RefernceQueue.NULL的queue才会将Reference进行enqueue。
ReferenceQueue是作为 JVM GC与上层Reference对象管理之间的一个消息传递方式,它使得我们可以对所监听的对象引用可达发生变化时做一些处理
2. 软引用SoftReference
软引用是一种相对强引用弱化了一些的引用,需要用java.lang.ref.SoftReference类来实现,可以让对象豁免一些垃圾收集。
对于只有软引用的对象来说,
- 当系统内存充足时它不会被回收,
- 当系统内存不足时它会被回收。
软引用通常用在对内存敏感的程序中,比如高速缓存就有用到软引用,内存够用的时候就保留,不够用就回收!
当内存充足的时候,软引用不用回收
public class SoftReferenceDemo {/*** 内存够用的时候* -XX:+PrintGCDetails*/public static void softRefMemoryEnough() {// 创建一个强应用Object o1 = new Object();// 创建一个软引用SoftReference<Object> softReference = new SoftReference<>(o1);System.out.println(o1);System.out.println(softReference.get());o1 = null;// 手动GCSystem.gc();System.out.println(o1);System.out.println(softReference.get());}/*** JVM配置,故意产生大对象并配置小的内存,让它的内存不够用了导致OOM,看软引用的回收情况* -Xms5m -Xmx5m -XX:+PrintGCDetails*/public static void softRefMemoryNoEnough() {System.out.println("========================");// 创建一个强应用Object o1 = new Object();// 创建一个软引用SoftReference<Object> softReference = new SoftReference<>(o1);System.out.println(o1);System.out.println(softReference.get());o1 = null;// 模拟OOM自动GCtry {// 创建30M的大对象byte[] bytes = new byte[30 * 1024 * 1024];} catch (Exception e) {e.printStackTrace();} finally {System.out.println(o1);System.out.println(softReference.get());}}public static void main(String[] args) {softRefMemoryEnough();//softRefMemoryNoEnough();}}
内存充足输出结果
java.lang.Object@15db9742java.lang.Object@15db9742[GC (System.gc()) [PSYoungGen: 2621K->728K(76288K)] 2621K->736K(251392K), 0.0011732 secs] [Times: user=0.00 sys=0.00, real=0.00 secs][Full GC (System.gc()) [PSYoungGen: 728K->0K(76288K)] [ParOldGen: 8K->519K(175104K)] 736K->519K(251392K), [Metaspace: 2646K->2646K(1056768K)], 0.0048782 secs] [Times: user=0.00 sys=0.00, real=0.00 secs]nulljava.lang.Object@15db9742HeapPSYoungGen total 76288K, used 1966K [0x000000076b380000, 0x0000000770880000, 0x00000007c0000000)eden space 65536K, 3% used [0x000000076b380000,0x000000076b56ba70,0x000000076f380000)from space 10752K, 0% used [0x000000076f380000,0x000000076f380000,0x000000076fe00000)to space 10752K, 0% used [0x000000076fe00000,0x000000076fe00000,0x0000000770880000)ParOldGen total 175104K, used 519K [0x00000006c1a00000, 0x00000006cc500000, 0x000000076b380000)object space 175104K, 0% used [0x00000006c1a00000,0x00000006c1a81e88,0x00000006cc500000)Metaspace used 2653K, capacity 4486K, committed 4864K, reserved 1056768Kclass space used 282K, capacity 386K, committed 512K, reserved 1048576K
内存不充足,软引用关联对象会被回收
========================java.lang.Object@15db9742java.lang.Object@15db9742[GC (Allocation Failure) [PSYoungGen: 756K->496K(1536K)] 756K->600K(5632K), 0.0009017 secs] [Times: user=0.00 sys=0.00, real=0.00 secs][GC (Allocation Failure) [PSYoungGen: 496K->480K(1536K)] 600K->624K(5632K), 0.0006772 secs] [Times: user=0.00 sys=0.00, real=0.00 secs][Full GC (Allocation Failure) [PSYoungGen: 480K->0K(1536K)] [ParOldGen: 144K->519K(4096K)] 624K->519K(5632K), [Metaspace: 2646K->2646K(1056768K)], 0.0055489 secs] [Times: user=0.00 sys=0.00, real=0.01 secs][GC (Allocation Failure) [PSYoungGen: 0K->0K(1536K)] 519K->519K(5632K), 0.0002674 secs] [Times: user=0.00 sys=0.00, real=0.00 secs][Full GC (Allocation Failure) [PSYoungGen: 0K->0K(1536K)] [ParOldGen: 519K->507K(4096K)] 519K->507K(5632K), [Metaspace: 2646K->2646K(1056768K)], 0.0052951 secs] [Times: user=0.11 sys=0.00, real=0.01 secs]nullnullException in thread "main" java.lang.OutOfMemoryError: Java heap spaceat com.lun.jvm.SoftReferenceDemo.softRefMemoryNotEnough(SoftReferenceDemo.java:44)at com.lun.jvm.SoftReferenceDemo.main(SoftReferenceDemo.java:58)HeapPSYoungGen total 1536K, used 30K [0x00000000ffe00000, 0x0000000100000000, 0x0000000100000000)eden space 1024K, 2% used [0x00000000ffe00000,0x00000000ffe07ac8,0x00000000fff00000)from space 512K, 0% used [0x00000000fff00000,0x00000000fff00000,0x00000000fff80000)to space 512K, 0% used [0x00000000fff80000,0x00000000fff80000,0x0000000100000000)ParOldGen total 4096K, used 507K [0x00000000ffa00000, 0x00000000ffe00000, 0x00000000ffe00000)object space 4096K, 12% used [0x00000000ffa00000,0x00000000ffa7edd0,0x00000000ffe00000)Metaspace used 2678K, capacity 4486K, committed 4864K, reserved 1056768Kclass space used 285K, capacity 386K, committed 512K, reserved 1048576K
回收后,内存依然不足的话,还是会抛异常。
3. 弱引用WeakReference
弱引用需要用java.lang.ref.WeakReference类来实现,它比软引用的生存期更短,
对于只有弱引用的对象来说,只要垃圾回收机制一运行不管JVM的内存空间是否足够,都会回收该对象占用的内存。
import java.lang.ref.WeakReference;public class WeakReferenceDemo {public static void main(String[] args) {Object o1 = new Object();WeakReference<Object> weakReference = new WeakReference<>(o1);System.out.println(o1);System.out.println(weakReference.get());o1 = null;System.gc();System.out.println(o1);System.out.println(weakReference.get());}}
输出结果:
java.lang.Object@15db9742java.lang.Object@15db9742nullnull
4. 软引用和弱引用的适用场景
场景:假如有一个应用需要读取大量的本地图片
- 如果每次读取图片都从硬盘读取则会严重影响性能
- 如果一次性全部加载到内存中,又可能造成内存溢出
此时使用软引用可以解决这个问题。
设计思路:使用HashMap来保存图片的路径和相应图片对象关联的软引用之间的映射关系,在内存不足时,JVM会自动回收这些缓存图片对象所占的空间,从而有效地避免了OOM的问题
Map<String, SoftReference<String>> imageCache = new HashMap<String, SoftReference<Bitmap>>();
5. WeakHashMap案例演示和解析
详细 https://www.yuque.com/alibas/zcgitz/atdx7w
Hash table based implementation of the Map interface, with weak keys. An entry in a WeakHashMap will automatically be removed when its key is no longer in ordinary use. More precisely, the presence of a mapping for a given key will not prevent the key from being discarded by the garbage collector, that is, made finalizable, finalized, and then reclaimed. When a key has been discarded its entry is effectively removed from the map, so this class behaves somewhat differently from other Map implementations. link
import java.util.HashMap;import java.util.Map;import java.util.WeakHashMap;public class WeakHashMapDemo {public static void main(String[] args) {myHashMap();System.out.println("==========");myWeakHashMap();}private static void myHashMap() {Map<Integer, String> map = new HashMap<>();Integer key = new Integer(1);String value = "HashMap";map.put(key, value);System.out.println(map);key = null;System.gc();System.out.println(map);}private static void myWeakHashMap() {Map<Integer, String> map = new WeakHashMap<>();Integer key = new Integer(1);String value = "WeakHashMap";map.put(key, value);System.out.println(map);key = null;System.gc();System.out.println(map);}}
输出结果:
{1=HashMap}{1=HashMap}=========={1=WeakHashMap}{}
6. 虚引用简介
虚引用需要java.lang.ref.PhantomReference类来实现。
顾名思义,就是形同虚设,与其他几种引用都不同,虚引用并不会决定对象的生命周期。
如果一个对象仅持有虚引用,那么它就和没有任何引用一样,在任何时候都可能被垃圾回收器回收,它不能单独使用也不能通过它访问对象,虚引用必须和引用队列(ReferenceQueue)联合使用。
虚引用的主要作用是跟踪对象被垃圾回收的状态。仅仅是提供了一种确保对象被finalize以后,做某些事情的机制。
PhantomReference的gei方法总是返回null,因此无法访问对应的引用对象。其意义在于说明一个对象已经进入finalization阶段,可以被gc回收,用来实现比fihalization机制更灵活的回收操作。
换句话说,设置虚引用关联的唯一目的,就是在这个对象被收集器回收的时候收到一个系统通知或者后续添加进一步的处理。Java技术允许使用finalize()方法在垃圾收集器将对象从内存中清除出去之前做必要的清理工作。
7. ReferenceQueue引用队列介
详细 https://www.yuque.com/alibas/zcgitz/atdx7w
Reference queues, to which registered reference objects are appended by the garbage collector after the appropriate reachability changes are detected. link
回收前需要被引用的,用队列保存下。
import java.lang.ref.ReferenceQueue;import java.lang.ref.WeakReference;import java.util.concurrent.TimeUnit;public class ReferenceQueueDemo {public static void main(String[] args) {Object o1 = new Object();// 创建引用队列ReferenceQueue<Object> referenceQueue = new ReferenceQueue<>();// 创建一个弱引用WeakReference<Object> weakReference = new WeakReference<>(o1, referenceQueue);System.out.println(o1);System.out.println(weakReference.get());// 取队列中的内容System.out.println(referenceQueue.poll());System.out.println("==================");o1 = null;System.gc();System.out.println("执行GC操作");try {TimeUnit.SECONDS.sleep(2);} catch (InterruptedException e) {e.printStackTrace();}System.out.println(o1);System.out.println(weakReference.get());// 取队列中的内容System.out.println(referenceQueue.poll());}}
输出结果:
java.lang.Object@15db9742java.lang.Object@15db9742null==================执行GC操作nullnulljava.lang.ref.WeakReference@6d06d69c
8. 虚引用PhantomReference
Java提供了4种引用类型,在垃圾回收的时候,都有自己各自的特点。
ReferenceQueue是用来配合引用工作的,没有ReferenceQueue一样可以运行。
创建引用的时候可以指定关联的队列,当Gc释放对象内存的时候,会将引用加入到引用队列,如果程序发现某个虚引用已经被加入到引用队列,那么就可以在所引用的对象的内存被回收之前采取必要的行动这相当于是一种通知机制。
当关联的引用队列中有数据的时候,意味着引用指向的堆内存中的对象被回收。通过这种方式,JVM允许我们在对象被销毁后,做一些我们自己想做的事情。
import java.lang.ref.PhantomReference;import java.lang.ref.ReferenceQueue;public class PhantomReferenceDemo {public static void main(String[] args) throws InterruptedException {Object o1 = new Object();ReferenceQueue<Object> referenceQueue = new ReferenceQueue<>();PhantomReference<Object> phantomReference = new PhantomReference<>(o1, referenceQueue);System.out.println(o1);System.out.println(phantomReference.get());System.out.println(referenceQueue.poll());System.out.println("==================");o1 = null;System.gc();Thread.sleep(500) ;System.out.println(o1);System.out.println(phantomReference.get());System.out.println(referenceQueue.poll());}}
输出结果:
java.lang.Object@15db9742nullnull==================nullnulljava.lang.ref.PhantomReference@6d06d69c
10. GCRoots和四大引用小总结
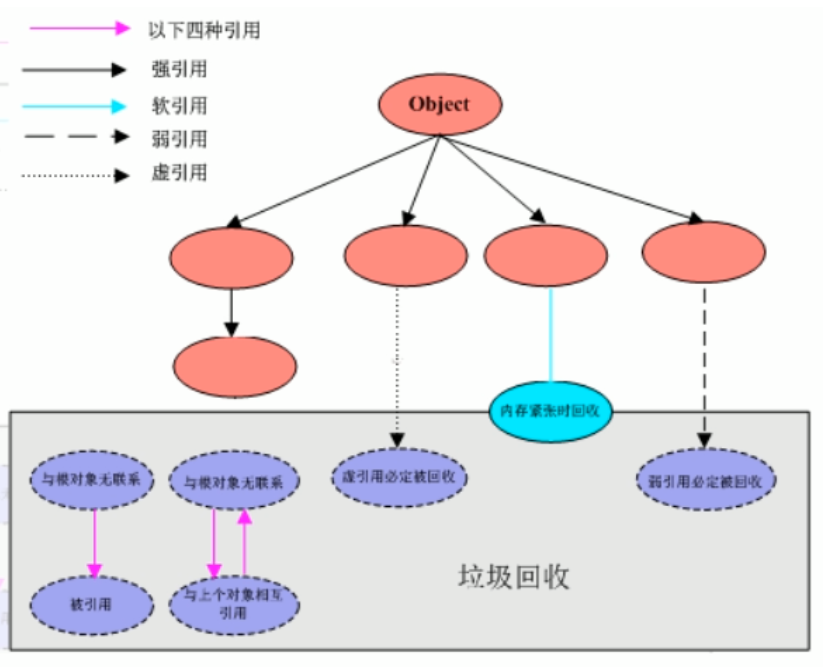
11. JVM常见错误
1. SOFE之StackOverflowError
JVM中常见的两种错误
StackoverFlowError
- java.lang.StackOverflowError
OutofMemoryError
- java.lang.OutOfMemoryError:java heap space
- java.lang.OutOfMemoryError:GC overhead limit exceeeded
- java.lang.OutOfMemoryError:Direct buffer memory
- java.lang.OutOfMemoryError:unable to create new native thread
- java.lang.OutOfMemoryError:Metaspace
[
](https://blog.csdn.net/u011863024/article/details/114684428)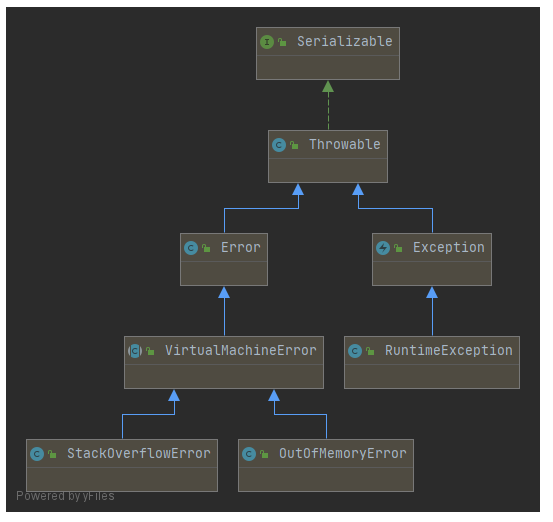
StackOverflowError的展现
public class StackOverflowErrorDemo {public static void main(String[] args) {main(args);}}
输出结果:
Exception in thread "main" java.lang.StackOverflowErrorat com.lun.jvm.StackOverflowErrorDemo.main(StackOverflowErrorDemo.java:6)at com.lun.jvm.StackOverflowErrorDemo.main(StackOverflowErrorDemo.java:6)at com.lun.jvm.StackOverflowErrorDemo.main(StackOverflowErrorDemo.java:6)...
2. OOM之Java heap space
public class OOMEJavaHeapSpaceDemo {/**** -Xms10m -Xmx10m** @param args*/public static void main(String[] args) {byte[] array = new byte[80 * 1024 * 1024];}}
输出结果:
Exception in thread "main" java.lang.OutOfMemoryError: Java heap spaceat com.lun.jvm.OOMEJavaHeapSpaceDemo.main(OOMEJavaHeapSpaceDemo.java:6)
3. OOM之GC overhead limit exceeded
GC overhead limit exceeded 超出GC开销限制
GC回收时间过长时会抛出OutOfMemroyError。过长的定义是,超过98%的时间用来做GC并且回收了不到2%的堆内存,连续多次GC 都只回收了不到2%的极端情况下才会抛出。
假如不抛出GC overhead limit错误会发生什么情况呢?那就是GC清理的这么点内存很快会再次填满,迫使cc再次执行。这样就形成恶性循环,CPU使用率一直是100%,而Gc却没有任何成果。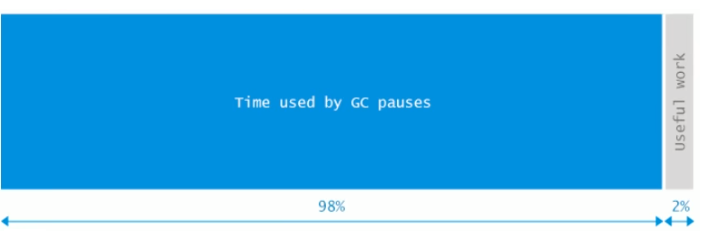
import java.util.ArrayList;import java.util.List;public class OOMEGCOverheadLimitExceededDemo {/**** -Xms10m -Xmx10m -XX:MaxDirectMemorySize=5m** @param args*/public static void main(String[] args) {int i = 0;List<String> list = new ArrayList<>();try {while(true) {list.add(String.valueOf(++i).intern());}} catch (Exception e) {System.out.println("***************i:" + i);e.printStackTrace();throw e;}}}
输出结果
[GC (Allocation Failure) [PSYoungGen: 2048K->498K(2560K)] 2048K->1658K(9728K), 0.0033090 secs] [Times: user=0.00 sys=0.00, real=0.00 secs][GC (Allocation Failure) [PSYoungGen: 2323K->489K(2560K)] 3483K->3305K(9728K), 0.0020911 secs] [Times: user=0.00 sys=0.00, real=0.00 secs][GC (Allocation Failure) [PSYoungGen: 2537K->496K(2560K)] 5353K->4864K(9728K), 0.0025591 secs] [Times: user=0.00 sys=0.00, real=0.00 secs][GC (Allocation Failure) [PSYoungGen: 2410K->512K(2560K)] 6779K->6872K(9728K), 0.0058689 secs] [Times: user=0.09 sys=0.00, real=0.01 secs][Full GC (Ergonomics) [PSYoungGen: 512K->0K(2560K)] [ParOldGen: 6360K->6694K(7168K)] 6872K->6694K(9728K), [Metaspace: 2651K->2651K(1056768K)], 0.0894928 secs] [Times: user=0.42 sys=0.00, real=0.09 secs][Full GC (Ergonomics) [PSYoungGen: 2048K->1421K(2560K)] [ParOldGen: 6694K->6902K(7168K)] 8742K->8324K(9728K), [Metaspace: 2651K->2651K(1056768K)], 0.0514932 secs] [Times: user=0.34 sys=0.00, real=0.05 secs][Full GC (Ergonomics) [PSYoungGen: 2048K->2047K(2560K)] [ParOldGen: 6902K->6902K(7168K)] 8950K->8950K(9728K), [Metaspace: 2651K->2651K(1056768K)], 0.0381615 secs] [Times: user=0.13 sys=0.00, real=0.04 secs]...省略89行...[Full GC (Ergonomics) [PSYoungGen: 2047K->2047K(2560K)] [ParOldGen: 7044K->7044K(7168K)] 9092K->9092K(9728K), [Metaspace: 2651K->2651K(1056768K)], 0.0360935 secs] [Times: user=0.25 sys=0.00, real=0.04 secs][Full GC (Ergonomics) [PSYoungGen: 2047K->2047K(2560K)] [ParOldGen: 7046K->7046K(7168K)] 9094K->9094K(9728K), [Metaspace: 2651K->2651K(1056768K)], 0.0360458 secs] [Times: user=0.38 sys=0.00, real=0.04 secs][Full GC (Ergonomics) [PSYoungGen: 2047K->2047K(2560K)] [ParOldGen: 7048K->7048K(7168K)] 9096K->9096K(9728K), [Metaspace: 2651K->2651K(1056768K)], 0.0353033 secs] [Times: user=0.11 sys=0.00, real=0.04 secs]***************i:147041[Full GC (Ergonomics) [PSYoungGen: 2047K->2047K(2560K)] [ParOldGen: 7050K->7048K(7168K)] 9098K->9096K(9728K), [Metaspace: 2670K->2670K(1056768K)], 0.0371397 secs] [Times: user=0.22 sys=0.00, real=0.04 secs]java.lang.OutOfMemoryError: GC overhead limit exceeded[Full GC (Ergonomics) at java.lang.Integer.toString(Integer.java:401)[PSYoungGen: 2047K->2047K(2560K)] [ParOldGen: 7051K->7050K(7168K)] 9099K->9097K(9728K), [Metaspace: 2676K->2676K(1056768K)], 0.0434184 secs] [Times: user=0.38 sys=0.00, real=0.04 secs]at java.lang.String.valueOf(String.java:3099)at com.lun.jvm.OOMEGCOverheadLimitExceededDemo.main(OOMEGCOverheadLimitExceededDemo.java:19)Exception in thread "main" java.lang.OutOfMemoryError: GC overhead limit exceeded[Full GC (Ergonomics) [PSYoungGen: 2047K->0K(2560K)] [ParOldGen: 7054K->513K(7168K)] 9102K->513K(9728K), [Metaspace: 2677K->2677K(1056768K)], 0.0056578 secs] [Times: user=0.11 sys=0.00, real=0.01 secs]at java.lang.Integer.toString(Integer.java:401)at java.lang.String.valueOf(String.java:3099)at com.lun.jvm.OOMEGCOverheadLimitExceededDemo.main(OOMEGCOverheadLimitExceededDemo.java:19)HeapPSYoungGen total 2560K, used 46K [0x00000000ffd00000, 0x0000000100000000, 0x0000000100000000)eden space 2048K, 2% used [0x00000000ffd00000,0x00000000ffd0bb90,0x00000000fff00000)from space 512K, 0% used [0x00000000fff80000,0x00000000fff80000,0x0000000100000000)to space 512K, 0% used [0x00000000fff00000,0x00000000fff00000,0x00000000fff80000)ParOldGen total 7168K, used 513K [0x00000000ff600000, 0x00000000ffd00000, 0x00000000ffd00000)object space 7168K, 7% used [0x00000000ff600000,0x00000000ff6807f0,0x00000000ffd00000)Metaspace used 2683K, capacity 4486K, committed 4864K, reserved 1056768Kclass space used 285K, capacity 386K, committed 512K, reserved 1048576K
4. OOM之Direct buffer memory
导致原因
写NIO程序经常使用ByteBuffer来读取或者写入数据,这是一种基于通道(Channel)与缓冲区(Buffer)的IO方式,它可以使用Native函数库直接分配堆外内存,然后通过一个存储在Java堆里面的DirectByteBuffer对象作为这块内存的引用进行操作。这样能在一些场景中显著提高性能,因为避兔了在Java堆和Native堆中来回复制数据。
- ByteBuffer.allocate(capability) 第一种方式是分配VM堆内存,属于GC管辖范围,由于需要拷贝所以速度相对较慢。
- ByteBuffer.allocateDirect(capability) 第二种方式是分配OS本地内存,不属于GC管辖范围,由于不需要内存拷贝所以速度相对较快。
但如果不断分配本地内存,堆内存很少使用,那么JV就不需要执行GC,DirectByteBuffer对象们就不会被回收,这时候堆内存充足,但本地内存可能已经使用光了,再次尝试分配本地内存就会出现OutOfMemoryError,那程序就直接崩溃了。
import java.nio.ByteBuffer;import java.util.concurrent.TimeUnit;public class OOMEDirectBufferMemoryDemo {/*** -Xms5m -Xmx5m -XX:+PrintGCDetails -XX:MaxDirectMemorySize=5m** @param args* @throws InterruptedException*/public static void main(String[] args) throws InterruptedException {System.out.println(String.format("配置的maxDirectMemory: %.2f MB",//sun.misc.VM.maxDirectMemory() / 1024.0 / 1024));TimeUnit.SECONDS.sleep(3);ByteBuffer bb = ByteBuffer.allocateDirect(6 * 1024 * 1024);}}
输出结果:
[GC (Allocation Failure) [PSYoungGen: 1024K->504K(1536K)] 1024K->772K(5632K), 0.0014568 secs] [Times: user=0.09 sys=0.00, real=0.00 secs]配置的maxDirectMemory: 5.00 MB[GC (System.gc()) [PSYoungGen: 622K->504K(1536K)] 890K->820K(5632K), 0.0009753 secs] [Times: user=0.00 sys=0.00, real=0.00 secs][Full GC (System.gc()) [PSYoungGen: 504K->0K(1536K)] [ParOldGen: 316K->725K(4096K)] 820K->725K(5632K), [Metaspace: 3477K->3477K(1056768K)], 0.0072268 secs] [Times: user=0.00 sys=0.00, real=0.01 secs]Exception in thread "main" HeapPSYoungGen total 1536K, used 40K [0x00000000ffe00000, 0x0000000100000000, 0x0000000100000000)eden space 1024K, 4% used [0x00000000ffe00000,0x00000000ffe0a3e0,0x00000000fff00000)from space 512K, 0% used [0x00000000fff80000,0x00000000fff80000,0x0000000100000000)to space 512K, 0% used [0x00000000fff00000,0x00000000fff00000,0x00000000fff80000)ParOldGen total 4096K, used 725K [0x00000000ffa00000, 0x00000000ffe00000, 0x00000000ffe00000)object space 4096K, 17% used [0x00000000ffa00000,0x00000000ffab5660,0x00000000ffe00000)Metaspace used 3508K, capacity 4566K, committed 4864K, reserved 1056768Kclass space used 391K, capacity 394K, committed 512K, reserved 1048576Kjava.lang.OutOfMemoryError: Direct buffer memoryat java.nio.Bits.reserveMemory(Bits.java:694)at java.nio.DirectByteBuffer.<init>(DirectByteBuffer.java:123)at java.nio.ByteBuffer.allocateDirect(ByteBuffer.java:311)at com.lun.jvm.OOMEDirectBufferMemoryDemo.main(OOMEDirectBufferMemoryDemo.java:20)
5. OOM之unable to create new native thread故障演示
不能够创建更多的新的线程了,也就是说创建线程的上限达到了
高并发请求服务器时,经常会出现异常java.lang.OutOfMemoryError:unable to create new native thread,准确说该native thread异常与对应的平台有关
导致原因
- 应用创建了太多线程,一个应用进程创建多个线程,超过系统承载极限
服务器并不允许你的应用程序创建这么多线程,linux系统默认运行单个进程可以创建的线程为1024个,如果应用创建超过这个数量,就会报 java.lang.OutOfMemoryError:unable to create new native thread
解决方法
想办法降低你应用程序创建线程的数量,分析应用是否真的需要创建这么多线程,如果不是,改代码将线程数降到最低
- 对于有的应用,确实需要创建很多线程,远超过linux系统默认1024个线程限制,可以通过修改Linux服务器配置,扩大linux默认限制
上面程序在Linux OS(CentOS)运行,会出现下列的错误,线程数大概在900多个public class OOMEUnableCreateNewThreadDemo {public static void main(String[] args) {for (int i = 0; ; i++) {System.out.println("************** i = " + i);new Thread(() -> {try {TimeUnit.SECONDS.sleep(Integer.MAX_VALUE);} catch (InterruptedException e) {e.printStackTrace();}}, String.valueOf(i)).start();}}}
Exception in thread "main" java.lang.OutOfMemoryError: unable to cerate new native thread
6. OOM之unable to create new native thread上限调整
非root用户登录Linux系统(CentOS)测试
服务器级别调参调优
查看系统线程限制数目
修改系统线程限制数目ulimit -u
打开后发现除了root,其他账户都限制在1024个vim /etc/security/limits.d/90-nproc.conf
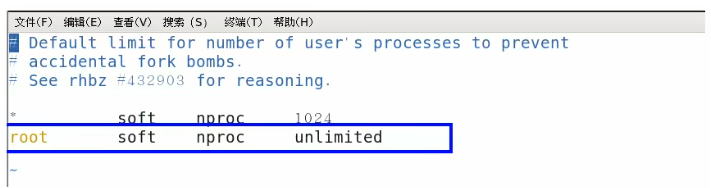
假如我们想要张三这个用卢运行,希望他生成的线程多一些,我们可以如下配置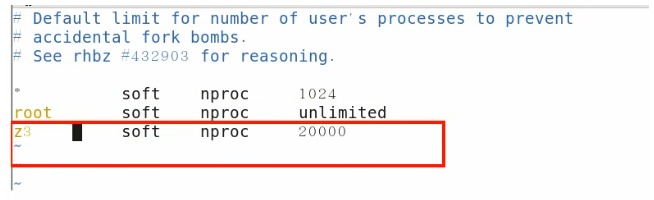
7. OOM之Metaspace
使用java -XX:+PrintFlagsInitial命令查看本机的初始化参数,-XX:MetaspaceSize为21810376B(大约20.8M)
Java 8及之后的版本使用Metaspace来替代永久代。
Metaspace是方法区在Hotspot 中的实现,它与持久代最大的区别在于:Metaspace并不在虚拟机内存中而是使用本地内存也即在Java8中, classe metadata(the virtual machines internal presentation of Java class),被存储在叫做Metaspace native memory。
永久代(Java8后被原空向Metaspace取代了)存放了以下信息:
- 虚拟机加载的类信息
- 常量池
- 静态变量
- 即时编译后的代码
模拟Metaspace空间溢出,我们借助CGLib直接操作字节码运行时不断生成类往元空间灌,类占据的空间总是会超过Metaspace指定的空间大小的。
首先添加CGLib依赖
<!-- https://mvnrepository.com/artifact/cglib/cglib --><dependency><groupId>cglib</groupId><artifactId>cglib</artifactId><version>3.2.10</version></dependency>
import java.lang.reflect.Method;import net.sf.cglib.proxy.Enhancer;import net.sf.cglib.proxy.MethodInterceptor;import net.sf.cglib.proxy.MethodProxy;public class OOMEMetaspaceDemo {// 静态类static class OOMObject {}/*** -XX:MetaspaceSize=10m -XX:MaxMetaspaceSize=10m** @param args*/public static void main(final String[] args) {// 模拟计数多少次以后发生异常int i =0;try {while (true) {i++;// 使用Spring的动态字节码技术Enhancer enhancer = new Enhancer();enhancer.setSuperclass(OOMObject.class);enhancer.setUseCache(false);enhancer.setCallback(new MethodInterceptor() {@Overridepublic Object intercept(Object o, Method method, Object[] objects, MethodProxy methodProxy) throws Throwable {return methodProxy.invokeSuper(o, args);}});enhancer.create();}} catch (Throwable e) {System.out.println("发生异常的次数:" + i);e.printStackTrace();} finally {}}}
输出结果
发生异常的次数:569java.lang.OutOfMemoryError: Metaspaceat net.sf.cglib.core.AbstractClassGenerator.generate(AbstractClassGenerator.java:348)at net.sf.cglib.proxy.Enhancer.generate(Enhancer.java:492)at net.sf.cglib.core.AbstractClassGenerator$ClassLoaderData.get(AbstractClassGenerator.java:117)at net.sf.cglib.core.AbstractClassGenerator.create(AbstractClassGenerator.java:294)at net.sf.cglib.proxy.Enhancer.createHelper(Enhancer.java:480)at net.sf.cglib.proxy.Enhancer.create(Enhancer.java:305)at com.lun.jvm.OOMEMetaspaceDemo.main(OOMEMetaspaceDemo.java:37)
12. 垃圾收集器
1. 垃圾收集器回收种类
GC算法(引用计数/复制/标清/标整)是内存回收的方法论,垃圾收集器就是算法落地实现。
因为目前为止还没有完美的收集器出现,更加没有万能的收集器,只是针对具体应用最合适的收集器,进行分代收集
4种主要垃圾收集器
- Serial
- Parallel
- CMS
- G1
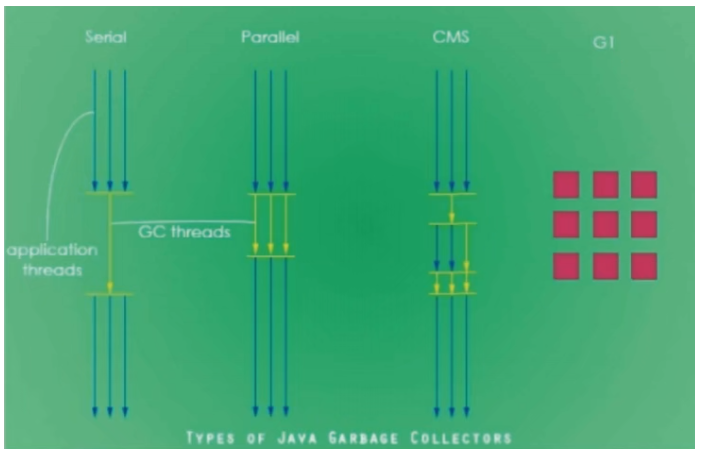
2. 串行并行并发G1四大垃圾回收方式
- 串行垃级回收器(Serial) - 它为单线程环境设计且值使用一个线程进行垃圾收集,会暂停所有的用户线程,只有当垃圾回收完成时,才会重新唤醒主线程继续执行。所以不适合服务器环境。
- 并行垃圾回收器(Parallel) - 多个垃圾收集线程并行工作,此时用户线程也是阻塞的,适用于科学计算 / 大数据处理等弱交互场景,也就是说Serial 和 Parallel其实是类似的,不过是多了几个线程进行垃圾收集,但是主线程都会被暂停,但是并行垃圾收集器处理时间,肯定比串行的垃圾收集器要更短。
- 并发垃圾回收器(CMS) - 用户线程和垃圾收集线程同时执行(不一定是并行,可能是交替执行),不需要停顿用户线程,互联网公司都在使用,适用于响应时间有要求的场景。
- G1垃圾回收器 - G1垃圾回收器将堆内存分割成不同的区域然后并发的对其进行垃圾回收。
- ZGC(Java 11的,了解)
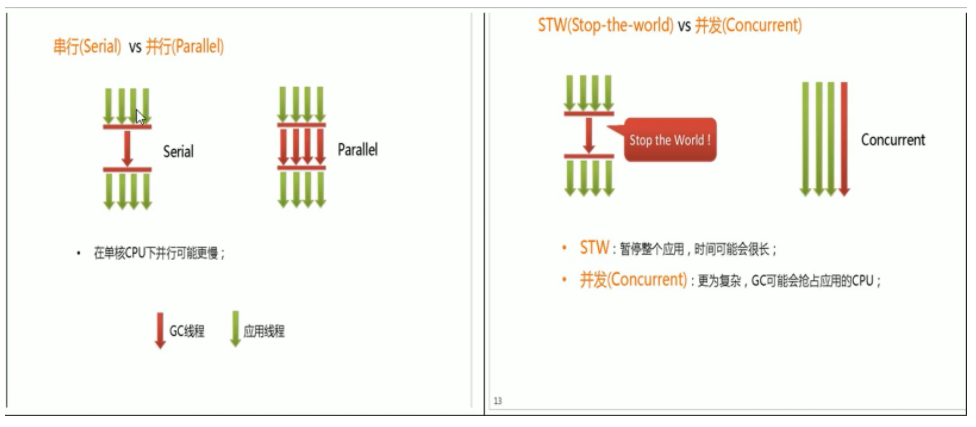
3. 如何查看默认的垃圾收集器
java -XX:+PrintCommandLineFlags -version
输出结果
C:\Users\abc>java -XX:+PrintCommandLineFlags -version-XX:InitialHeapSize=266613056 -XX:MaxHeapSize=4265808896 -XX:+PrintCommandLineFlags -XX:+UseCompressedClassPointers -XX:+UseCompressedOops -XX:-UseLargePagesIndividualAllocation -XX:+UseParallelGCjava version "1.8.0_251"Java(TM) SE Runtime Environment (build 1.8.0_251-b08)Java HotSpot(TM) 64-Bit Server VM (build 25.251-b08, mixed mode)
从结果看到-XX:+UseParallelGC,也就是说默认的垃圾收集器是并行垃圾回收器。
或者
jps -l
得出Java程序号
jinfo -flags (Java程序号)
4. JVM默认的垃圾收集器有哪些
Java中一共有7大垃圾收集器
- 年轻代GC
- UserSerialGC:串行垃圾收集器
- UserParallelGC:并行垃圾收集器
- UseParNewGC:年轻代的并行垃圾回收器
- 老年代GC
- UserSerialOldGC:串行老年代垃圾收集器(已经被移除)
- UseParallelOldGC:老年代的并行垃圾回收器
- UseConcMarkSweepGC:(CMS)并发标记清除
老嫩通吃
串行GC(Serial)/(Serial Copying)
- 并行GC(ParNew)
- 并行回收GC(Parallel)/(Parallel Scavenge)
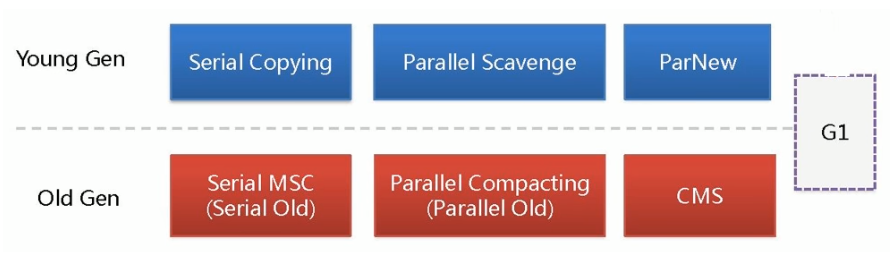
[
](https://blog.csdn.net/u011863024/article/details/114684428)
6. GC之约定参数说明
- DefNew:Default New Generation
- Tenured:Old
- ParNew:Parallel New Generation
- PSYoungGen:Parallel Scavenge
- ParOldGen:Parallel Old Generation
Server/Client模式分别是什么意思?
- 使用范围:一般使用Server模式,Client模式基本不会使用
- 操作系统
- 32位的Window操作系统,不论硬件如何都默认使用Client的JVM模式
- 32位的其它操作系统,2G内存同时有2个cpu以上用Server模式,低于该配置还是Client模式
- 64位只有Server模式
C:\Users\abc>java -versionjava version "1.8.0_251"Java(TM) SE Runtime Environment (build 1.8.0_251-b08)Java HotSpot(TM) 64-Bit Server VM (build 25.251-b08, mixed mode)
7. GC之Serial收集器
serial
英 [ˈsɪəriəl] 美 [ˈsɪriəl]
n. 电视连续剧;广播连续剧;杂志连载小说
adj. 顺序排列的;排成系列的;连续的;多次的;以连续剧形式播出的;连载的
一句话:一个单线程的收集器,在进行垃圾收集时候,必须暂停其他所有的工作线程直到它收集结束。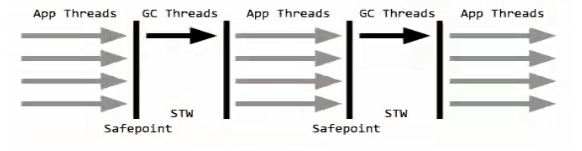
STW: Stop The World
串行收集器是最古老,最稳定以及效率高的收集器,只使用一个线程去回收但其在进行垃圾收集过程中可能会产生较长的停顿(Stop-The-World”状态)。虽然在收集垃圾过程中需要暂停所有其他的工作线程,但是它简单高效,对于限定单个CPU环境来说,没有线程交互的开销可以获得最高的单线程垃圾收集效率,因此Serial垃圾收集器依然是java虚拟机运行在Client模式下默认的新生代垃圾收集器。
对应JVM参数是:-XX:+UseSerialGC
开启后会使用:Serial(Young区用) + Serial Old(Old区用)的收集器组合
表示:新生代、老年代都会使用串行回收收集器,新生代使用复制算法,老年代使用标记-整理算法
public class GCDemo {public static void main(String[] args) throws InterruptedException {Random rand = new Random(System.nanoTime());try {String str = "Hello, World";while(true) {str += str + rand.nextInt(Integer.MAX_VALUE) + rand.nextInt(Integer.MAX_VALUE);}}catch (Throwable e) {e.printStackTrace();}}}
VM参数:(启用UseSerialGC)
-Xms10m -Xmx10m -XX:+PrintGCDetails -XX:+PrintCommandLineFlags -XX:+UseSerialGC
输出结果:
-XX:InitialHeapSize=10485760 -XX:MaxHeapSize=10485760 -XX:+PrintCommandLineFlags -XX:+PrintGCDetails -XX:+UseCompressedClassPointers -XX:+UseCompressedOops -XX:-UseLargePagesIndividualAllocation -XX:+UseSerialGC[GC (Allocation Failure) [DefNew: 2346K->320K(3072K), 0.0012956 secs] 2346K->1030K(9920K), 0.0013536 secs] [Times: user=0.00 sys=0.00, real=0.00 secs][GC (Allocation Failure) [DefNew: 2888K->0K(3072K), 0.0013692 secs] 3598K->2539K(9920K), 0.0014059 secs] [Times: user=0.02 sys=0.00, real=0.00 secs][GC (Allocation Failure) [DefNew: 2065K->0K(3072K), 0.0011613 secs] 4604K->4550K(9920K), 0.0011946 secs] [Times: user=0.00 sys=0.00, real=0.00 secs][GC (Allocation Failure) [DefNew: 2056K->0K(3072K), 0.0010394 secs] 6606K->6562K(9920K), 0.0010808 secs] [Times: user=0.00 sys=0.00, real=0.00 secs][GC (Allocation Failure) [DefNew: 2011K->2011K(3072K), 0.0000124 secs][Tenured: 6562K->2537K(6848K), 0.0021691 secs] 8574K->2537K(9920K), [Metaspace: 2658K->2658K(1056768K)], 0.0024399 secs] [Times: user=0.00 sys=0.00, real=0.00 secs][GC (Allocation Failure) [DefNew: 2059K->2059K(3072K), 0.0000291 secs][Tenured: 6561K->6561K(6848K), 0.0012330 secs] 8620K->6561K(9920K), [Metaspace: 2658K->2658K(1056768K)], 0.0012888 secs] [Times: user=0.00 sys=0.00, real=0.00 secs][Full GC (Allocation Failure) [Tenured: 6561K->6547K(6848K), 0.0017784 secs] 6561K->6547K(9920K), [Metaspace: 2658K->2658K(1056768K)], 0.0018111 secs] [Times: user=0.00 sys=0.00, real=0.00 secs]java.lang.OutOfMemoryError: Java heap spaceat java.util.Arrays.copyOfRange(Arrays.java:3664)at java.lang.String.<init>(String.java:207)at java.lang.StringBuilder.toString(StringBuilder.java:407)at com.lun.jvm.GCDemo.main(GCDemo.java:23)Heapdef new generation total 3072K, used 105K [0x00000000ff600000, 0x00000000ff950000, 0x00000000ff950000)eden space 2752K, 3% used [0x00000000ff600000, 0x00000000ff61a7c8, 0x00000000ff8b0000)from space 320K, 0% used [0x00000000ff8b0000, 0x00000000ff8b0000, 0x00000000ff900000)to space 320K, 0% used [0x00000000ff900000, 0x00000000ff900000, 0x00000000ff950000)tenured generation total 6848K, used 6547K [0x00000000ff950000, 0x0000000100000000, 0x0000000100000000)the space 6848K, 95% used [0x00000000ff950000, 0x00000000fffb4c30, 0x00000000fffb4e00, 0x0000000100000000)Metaspace used 2689K, capacity 4486K, committed 4864K, reserved 1056768Kclass space used 286K, capacity 386K, committed 512K, reserved 1048576K
- DefNew:Default New Generation
- Tenured:Old
8. GC之ParNew收集器
一句话:使用多线程进行垃圾回收,在垃圾收集时,会Stop-The-World暂停其他所有的工作线程直到它收集结束。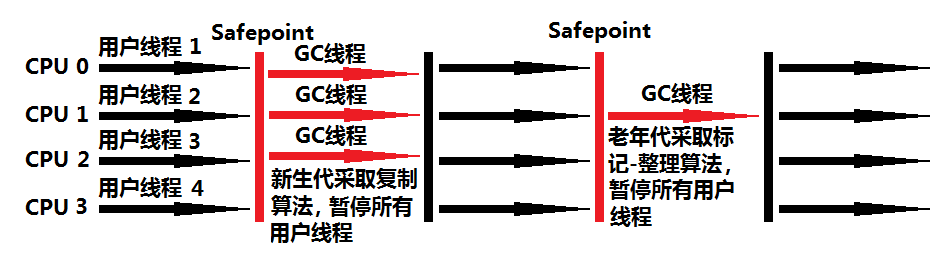
ParNew收集器其实就是Serial收集器新生代的并行多线程版本,最常见的应用场景是配合老年代的CMS GC工作,其余的行为和Seria收集器完全一样,ParNew垃圾收集器在垃圾收集过程中同样也要暂停所有其他的工作线程。它是很多Java虚拟机运行在Server模式下新生代的默认垃圾收集器。
常用对应JVM参数:-XX:+UseParNewGC启用ParNew收集器,只影响新生代的收集,不影响老年代。
开启上述参数后,会使用:ParNew(Young区)+ Serial Old的收集器组合,新生代使用复制算法,老年代采用标记-整理算法
但是,ParNew+Tenured这样的搭配,Java8已经不再被推荐
Java HotSpot™64-Bit Server VM warning: Using the ParNew young collector with the Serial old collector is deprecated and will likely be removed in a future release.
备注:-XX:ParallelGCThreads限制线程数量,默认开启和CPU数目相同的线程数。
复用上一节的GCDemo
VM参数:
-Xms10m -Xmx10m -XX:+PrintGCDetails -XX:+PrintCommandLineFlags -XX:+UseParNewGC
输出结果:
-XX:InitialHeapSize=10485760 -XX:MaxHeapSize=10485760 -XX:+PrintCommandLineFlags -XX:+PrintGCDetails -XX:+UseCompressedClassPointers -XX:+UseCompressedOops -XX:-UseLargePagesIndividualAllocation -XX:+UseParNewGC[GC (Allocation Failure) [ParNew: 2702K->320K(3072K), 0.0007029 secs] 2702K->1272K(9920K), 0.0007396 secs] [Times: user=0.02 sys=0.00, real=0.00 secs][GC (Allocation Failure) [ParNew: 2292K->37K(3072K), 0.0010829 secs] 3244K->2774K(9920K), 0.0011000 secs] [Times: user=0.00 sys=0.00, real=0.00 secs][GC (Allocation Failure) [ParNew: 2005K->9K(3072K), 0.0008401 secs] 4742K->5624K(9920K), 0.0008605 secs] [Times: user=0.00 sys=0.00, real=0.00 secs][GC (Allocation Failure) [ParNew: 1974K->1974K(3072K), 0.0000136 secs][Tenured: 5615K->3404K(6848K), 0.0021646 secs] 7589K->3404K(9920K), [Metaspace: 2658K->2658K(1056768K)], 0.0022520 secs] [Times: user=0.00 sys=0.00, real=0.00 secs][GC (Allocation Failure) [ParNew: 1918K->2K(3072K), 0.0008094 secs] 5322K->5324K(9920K), 0.0008273 secs] [Times: user=0.00 sys=0.00, real=0.00 secs][GC (Allocation Failure) [ParNew: 1970K->1970K(3072K), 0.0000282 secs][Tenured: 5322K->4363K(6848K), 0.0018652 secs] 7292K->4363K(9920K), [Metaspace: 2658K->2658K(1056768K)], 0.0019205 secs] [Times: user=0.00 sys=0.00, real=0.00 secs][Full GC (Allocation Failure) [Tenured: 4363K->4348K(6848K), 0.0023131 secs] 4363K->4348K(9920K), [Metaspace: 2658K->2658K(1056768K)], 0.0023358 secs] [Times: user=0.00 sys=0.00, real=0.00 secs]java.lang.OutOfMemoryError: Java heap spaceat java.util.Arrays.copyOf(Arrays.java:3332)at java.lang.AbstractStringBuilder.ensureCapacityInternal(AbstractStringBuilder.java:124)at java.lang.AbstractStringBuilder.append(AbstractStringBuilder.java:448)at java.lang.StringBuilder.append(StringBuilder.java:136)at com.lun.jvm.GCDemo.main(GCDemo.java:22)Heappar new generation total 3072K, used 106K [0x00000000ff600000, 0x00000000ff950000, 0x00000000ff950000)eden space 2752K, 3% used [0x00000000ff600000, 0x00000000ff61a938, 0x00000000ff8b0000)from space 320K, 0% used [0x00000000ff8b0000, 0x00000000ff8b0000, 0x00000000ff900000)to space 320K, 0% used [0x00000000ff900000, 0x00000000ff900000, 0x00000000ff950000)tenured generation total 6848K, used 4348K [0x00000000ff950000, 0x0000000100000000, 0x0000000100000000)the space 6848K, 63% used [0x00000000ff950000, 0x00000000ffd8f3a0, 0x00000000ffd8f400, 0x0000000100000000)Metaspace used 2689K, capacity 4486K, committed 4864K, reserved 1056768Kclass space used 286K, capacity 386K, committed 512K, reserved 1048576KJava HotSpot(TM) 64-Bit Server VM warning: Using the ParNew young collector with the Serial old collector is deprecated and will likely be removed in a future release
9. GC之Parallel收集器
Parallel / Parallel Scavenge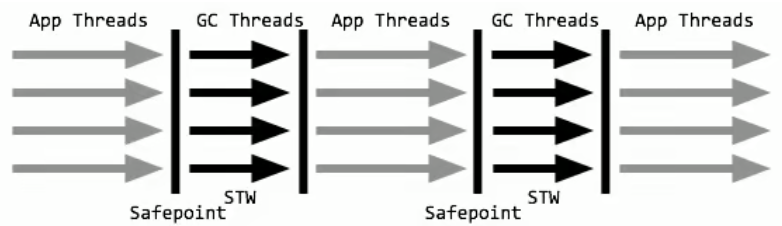
Parallel Scavenge收集器类似ParNew也是一个新生代垃圾收集器,使用复制算法,也是一个并行的多线程的垃圾收集器,俗称吞吐量优先收集器。一句话:串行收集器在新生代和老年代的并行化。
它重点关注的是:
可控制的吞吐量(Thoughput=运行用户代码时间(运行用户代码时间+垃圾收集时间),也即比如程序运行100分钟,垃圾收集时间1分钟,吞吐量就是99% )。高吞吐量意味着高效利用CPU的时间,它多用于在后台运算而不需要太多交互的任务。
自适应调节策略也是ParallelScavenge收集器与ParNew收集器的一个重要区别。(自适应调节策略:虚拟机会根据当前系统的运行情况收集性能监控信息,动态调整这些参数以提供最合适的停顿时间(-XX:MaxGCPauseMillis)或最大的吞吐量。
常用JVM参数:-XX:+UseParallelGC或-XX:+UseParallelOldGC(可互相激活)使用Parallel Scanvenge收集器。
开启该参数后:新生代使用复制算法,老年代使用标记-整理算法。
多说一句:-XX:ParallelGCThreads=数字N 表示启动多少个GC线程
- cpu>8 N= 5/8
- cpu<8 N=实际个数
复用上一节GCDemo
VM参数:
-Xms10m -Xmx10m -XX:+PrintGCDetails -XX:+PrintCommandLineFlags -XX:+UseParallelGC
输出结果:
-XX:InitialHeapSize=10485760 -XX:MaxHeapSize=10485760 -XX:+PrintCommandLineFlags -XX:+PrintGCDetails -XX:+UseCompressedClassPointers -XX:+UseCompressedOops -XX:-UseLargePagesIndividualAllocation -XX:+UseParallelGC[GC (Allocation Failure) [PSYoungGen: 2009K->503K(2560K)] 2009K->803K(9728K), 0.7943182 secs] [Times: user=0.00 sys=0.00, real=0.79 secs][GC (Allocation Failure) [PSYoungGen: 2272K->432K(2560K)] 2572K->2214K(9728K), 0.0020218 secs] [Times: user=0.00 sys=0.00, real=0.00 secs][GC (Allocation Failure) [PSYoungGen: 2448K->352K(2560K)] 4230K->3122K(9728K), 0.0017173 secs] [Times: user=0.11 sys=0.02, real=0.00 secs][Full GC (Ergonomics) [PSYoungGen: 1380K->0K(2560K)] [ParOldGen: 6722K->2502K(7168K)] 8102K->2502K(9728K), [Metaspace: 2657K->2657K(1056768K)], 0.0039763 secs] [Times: user=0.00 sys=0.00, real=0.00 secs][Full GC (Ergonomics) [PSYoungGen: 2016K->0K(2560K)] [ParOldGen: 6454K->6454K(7168K)] 8471K->6454K(9728K), [Metaspace: 2658K->2658K(1056768K)], 0.0049598 secs] [Times: user=0.00 sys=0.00, real=0.00 secs][GC (Allocation Failure) [PSYoungGen: 0K->0K(2560K)] 6454K->6454K(9728K), 0.0008614 secs] [Times: user=0.00 sys=0.00, real=0.00 secs][Full GC (Allocation Failure) [PSYoungGen: 0K->0K(2560K)] [ParOldGen: 6454K->6440K(7168K)] 6454K->6440K(9728K), [Metaspace: 2658K->2658K(1056768K)], 0.0055542 secs] [Times: user=0.00 sys=0.00, real=0.01 secs]java.lang.OutOfMemoryError: Java heap spaceat java.util.Arrays.copyOfRange(Arrays.java:3664)at java.lang.String.<init>(String.java:207)at java.lang.StringBuilder.toString(StringBuilder.java:407)at com.lun.jvm.GCDemo.main(GCDemo.java:22)HeapPSYoungGen total 2560K, used 82K [0x00000000ffd00000, 0x0000000100000000, 0x0000000100000000)eden space 2048K, 4% used [0x00000000ffd00000,0x00000000ffd14810,0x00000000fff00000)from space 512K, 0% used [0x00000000fff80000,0x00000000fff80000,0x0000000100000000)to space 512K, 0% used [0x00000000fff00000,0x00000000fff00000,0x00000000fff80000)ParOldGen total 7168K, used 6440K [0x00000000ff600000, 0x00000000ffd00000, 0x00000000ffd00000)object space 7168K, 89% used [0x00000000ff600000,0x00000000ffc4a1c8,0x00000000ffd00000)Metaspace used 2689K, capacity 4486K, committed 4864K, reserved 1056768Kclass space used 286K, capacity 386K, committed 512K, reserved 1048576K
10. GC之ParallelOld收集器
Parallel Old收集器是Parallel Scavenge的老年代版本,使用多线程的标记-整理算法,Parallel Old收集器在JDK1.6才开始提供。
在JDK1.6之前,新生代使用ParallelScavenge收集器只能搭配年老代的Serial Old收集器,只能保证新生代的吞吐量优先,无法保证整体的吞吐量。在JDK1.6之前(Parallel Scavenge + Serial Old )
Parallel Old 正是为了在年老代同样提供吞吐量优先的垃圾收集器,如果系统对吞吐量要求比较高,JDK1.8后可以优先考虑新生代Parallel Scavenge和年老代Parallel Old收集器的搭配策略。在JDK1.8及后〈Parallel Scavenge + Parallel Old )
JVM常用参数:-XX:+UseParallelOldGC使用Parallel Old收集器,设置该参数后,新生代Parallel+老年代Parallel Old。
复用上一节GCDemo
VM参数:
-Xms10m -Xmx10m -XX:+PrintGCDetails -XX:+PrintCommandLineFlags -XX:+UseParallelOldGC
输出结果:
-XX:InitialHeapSize=10485760 -XX:MaxHeapSize=10485760 -XX:+PrintCommandLineFlags -XX:+PrintGCDetails -XX:+UseCompressedClassPointers -XX:+UseCompressedOops -XX:-UseLargePagesIndividualAllocation -XX:+UseParallelOldGC[GC (Allocation Failure) [PSYoungGen: 1979K->480K(2560K)] 1979K->848K(9728K), 0.0007724 secs] [Times: user=0.00 sys=0.00, real=0.00 secs][GC (Allocation Failure) [PSYoungGen: 2205K->480K(2560K)] 2574K->2317K(9728K), 0.0008700 secs] [Times: user=0.02 sys=0.00, real=0.00 secs][GC (Allocation Failure) [PSYoungGen: 2446K->496K(2560K)] 4284K->3312K(9728K), 0.0010374 secs] [Times: user=0.00 sys=0.00, real=0.00 secs][Full GC (Ergonomics) [PSYoungGen: 1499K->0K(2560K)] [ParOldGen: 6669K->2451K(7168K)] 8168K->2451K(9728K), [Metaspace: 2658K->2658K(1056768K)], 0.0043327 secs] [Times: user=0.00 sys=0.00, real=0.00 secs][Full GC (Ergonomics) [PSYoungGen: 1966K->0K(2560K)] [ParOldGen: 6304K->6304K(7168K)] 8270K->6304K(9728K), [Metaspace: 2658K->2658K(1056768K)], 0.0021269 secs] [Times: user=0.00 sys=0.00, real=0.00 secs][GC (Allocation Failure) [PSYoungGen: 0K->0K(2560K)] 6304K->6304K(9728K), 0.0004841 secs] [Times: user=0.00 sys=0.00, real=0.00 secs][Full GC (Allocation Failure) [PSYoungGen: 0K->0K(2560K)] [ParOldGen: 6304K->6290K(7168K)] 6304K->6290K(9728K), [Metaspace: 2658K->2658K(1056768K)], 0.0058149 secs] [Times: user=0.11 sys=0.00, real=0.01 secs]java.lang.OutOfMemoryError: Java heap spaceat java.util.Arrays.copyOfRange(Arrays.java:3664)at java.lang.String.<init>(String.java:207)at java.lang.StringBuilder.toString(StringBuilder.java:407)at com.lun.jvm.GCDemo.main(GCDemo.java:22)HeapPSYoungGen total 2560K, used 81K [0x00000000ffd00000, 0x0000000100000000, 0x0000000100000000)eden space 2048K, 3% used [0x00000000ffd00000,0x00000000ffd14768,0x00000000fff00000)from space 512K, 0% used [0x00000000fff80000,0x00000000fff80000,0x0000000100000000)to space 512K, 0% used [0x00000000fff00000,0x00000000fff00000,0x00000000fff80000)ParOldGen total 7168K, used 6290K [0x00000000ff600000, 0x00000000ffd00000, 0x00000000ffd00000)object space 7168K, 87% used [0x00000000ff600000,0x00000000ffc24b70,0x00000000ffd00000)Metaspace used 2689K, capacity 4486K, committed 4864K, reserved 1056768Kclass space used 286K, capacity 386K, committed 512K, reserved 1048576K
11. GC之CMS收集器
CMS收集器(Concurrent Mark Sweep:并发标记清除)是一种以获取最短回收停顿时间为目标的收集器。
适合应用在互联网站或者B/S系统的服务器上,这类应用尤其重视服务器的响应速度,希望系统停顿时间最短。
CMS非常适合地内存大、CPU核数多的服务器端应用,也是G1出现之前大型应用的首选收集器。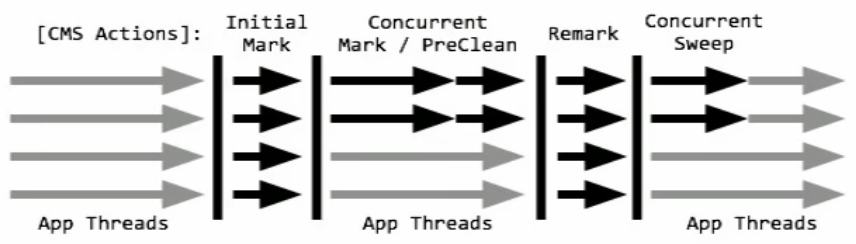
Concurrent Mark Sweep并发标记清除,并发收集低停顿,并发指的是与用户线程一起执行
开启该收集器的JVM参数:-XX:+UseConcMarkSweepGC开启该参数后会自动将-XX:+UseParNewGC打开。
开启该参数后,使用ParNew(Young区用)+ CMS(Old区用)+ Serial Old的收集器组合,Serial Old将作为CMS出错的后备收集器。
4步过程:
- 初始标记(CMS initial mark) - 只是标记一下GC Roots能直接关联的对象,速度很快,仍然需要暂停所有的工作线程。
- 并发标记(CMS concurrent mark)和用户线程一起 - 进行GC Roots跟踪的过程,和用户线程一起工作,不需要暂停工作线程。主要标记过程,标记全部对象。
- 重新标记(CMS remark)- 为了修正在并发标记期间,因用户程序继续运行而导致标记产生变动的那一部分对象的标记记录,仍然需要暂停所有的工作线程。由于并发标记时,用户线程依然运行,因此在正式清理前,再做修正。
- 并发清除(CMS concurrent sweep) - 清除GCRoots不可达对象,和用户线程一起工作,不需要暂停工作线程。基于标记结果,直接清理对象,由于耗时最长的并发标记和并发清除过程中,垃圾收集线程可以和用户现在一起并发工作,所以总体上来看CMS 收集器的内存回收和用户线程是一起并发地执行。
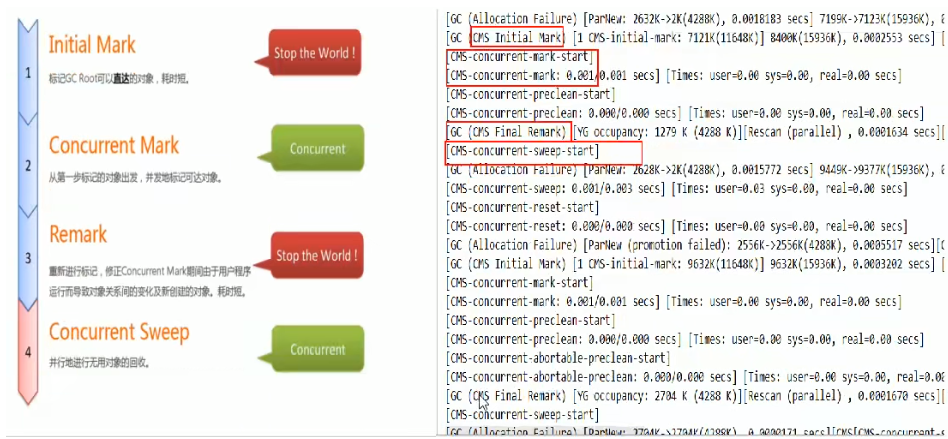
优点:并发收集低停顿。
缺点:并发执行,对CPU资源压力大,采用的标记清除算法会导致大量碎片。
由于并发进行,CMS在收集与应用线程会同时会增加对堆内存的占用,也就是说,CMS必须要在老年代堆内存用尽之前完成垃圾回收,否则CMS回收失败时,将触发担保机制,串行老年代收集器将会以STW的方式进行一次GC,从而造成较大停顿时间。
标记清除算法无法整理空间碎片,老年代空间会随着应用时长被逐步耗尽,最后将不得不通过担保机制对堆内存进行压缩。CMS也提供了参数-XX:CMSFullGCsBeForeCompaction(默认O,即每次都进行内存整理)来指定多少次CMS收集之后,进行一次压缩的Full GC。
复用上一节GCDemo
VM参数:
-Xms10m -Xmx10m -XX:+PrintGCDetails -XX:+PrintCommandLineFlags -XX:+UseConcMarkSweepGC
输出结果:
-XX:InitialHeapSize=10485760 -XX:MaxHeapSize=10485760 -XX:MaxNewSize=3497984 -XX:MaxTenuringThreshold=6 -XX:NewSize=3497984 -XX:OldPLABSize=16 -XX:OldSize=6987776 -XX:+PrintCommandLineFlags -XX:+PrintGCDetails -XX:+UseCompressedClassPointers -XX:+UseCompressedOops -XX:+UseConcMarkSweepGC -XX:-UseLargePagesIndividualAllocation -XX:+UseParNewGC[GC (Allocation Failure) [ParNew: 2274K->319K(3072K), 0.0016975 secs] 2274K->1043K(9920K), 0.0017458 secs] [Times: user=0.03 sys=0.00, real=0.00 secs][GC (Allocation Failure) [ParNew: 2844K->8K(3072K), 0.0010921 secs] 3568K->2287K(9920K), 0.0011138 secs] [Times: user=0.00 sys=0.00, real=0.00 secs][GC (Allocation Failure) [ParNew: 2040K->2K(3072K), 0.0037625 secs] 4318K->4257K(9920K), 0.0037843 secs] [Times: user=0.00 sys=0.00, real=0.00 secs][GC (CMS Initial Mark) [1 CMS-initial-mark: 4255K(6848K)] 6235K(9920K), 0.0003380 secs] [Times: user=0.00 sys=0.00, real=0.00 secs][CMS-concurrent-mark-start][GC (Allocation Failure) [ParNew: 2024K->2K(3072K), 0.0013295 secs] 6279K->6235K(9920K), 0.0013596 secs] [Times: user=0.00 sys=0.00, real=0.00 secs][GC (Allocation Failure) [ParNew: 1979K->1979K(3072K), 0.0000116 secs][CMS[CMS-concurrent-mark: 0.001/0.003 secs] [Times: user=0.00 sys=0.00, real=0.00 secs](concurrent mode failure): 6233K->2508K(6848K), 0.0031737 secs] 8212K->2508K(9920K), [Metaspace: 2657K->2657K(1056768K)], 0.0032232 secs] [Times: user=0.00 sys=0.00, real=0.00 secs][GC (Allocation Failure) [ParNew: 2025K->2025K(3072K), 0.0000154 secs][CMS: 6462K->6461K(6848K), 0.0020534 secs] 8488K->6461K(9920K), [Metaspace: 2658K->2658K(1056768K)], 0.0021033 secs] [Times: user=0.01 sys=0.00, real=0.00 secs][Full GC (Allocation Failure) [CMS: 6461K->6448K(6848K), 0.0020383 secs] 6461K->6448K(9920K), [Metaspace: 2658K->2658K(1056768K)], 0.0020757 secs] [Times: user=0.00 sys=0.00, real=0.00 secs][GC (CMS Initial Mark) [1 CMS-initial-mark: 6448K(6848K)] 6448K(9920K), 0.0001419 secs] [Times: user=0.00 sys=0.00, real=0.00 secs][CMS-concurrent-mark-start][CMS-concurrent-mark: 0.001/0.001 secs] [Times: user=0.00 sys=0.00, real=0.00 secs][CMS-concurrent-preclean-start][CMS-concurrent-preclean: 0.000/0.000 secs] [Times: user=0.00 sys=0.00, real=0.00 secs][GC (CMS Final Remark) [YG occupancy: 50 K (3072 K)][Rescan (parallel) , 0.0002648 secs][weak refs processing, 0.0000173 secs][class unloading, 0.0002671 secs][scrub symbol table, 0.0004290 secs][scrub string table, 0.0001593 secs][1 CMS-remark: 6448K(6848K)] 6499K(9920K), 0.0012107 secs] [Times: user=0.00 sys=0.00, real=0.00 secs][CMS-concurrent-sweep-start]java.lang.OutOfMemoryError: Java heap space[CMS-concurrent-sweep: 0.000/0.000 secs] [Times: user=0.00 sys=0.00, real=0.00 secs][CMS-concurrent-reset-start][CMS-concurrent-reset: 0.000/0.000 secs] [Times: user=0.00 sys=0.00, real=0.00 secs]at java.util.Arrays.copyOfRange(Arrays.java:3664)at java.lang.String.<init>(String.java:207)at java.lang.StringBuilder.toString(StringBuilder.java:407)at com.lun.jvm.GCDemo.main(GCDemo.java:22)Heappar new generation total 3072K, used 106K [0x00000000ff600000, 0x00000000ff950000, 0x00000000ff950000)eden space 2752K, 3% used [0x00000000ff600000, 0x00000000ff61a820, 0x00000000ff8b0000)from space 320K, 0% used [0x00000000ff8b0000, 0x00000000ff8b0000, 0x00000000ff900000)to space 320K, 0% used [0x00000000ff900000, 0x00000000ff900000, 0x00000000ff950000)concurrent mark-sweep generation total 6848K, used 6447K [0x00000000ff950000, 0x0000000100000000, 0x0000000100000000)Metaspace used 2689K, capacity 4486K, committed 4864K, reserved 1056768Kclass space used 286K, capacity 386K, committed 512K, reserved 1048576K
12. GC之SerialOld收集器
Serial Old是Serial垃圾收集器老年代版本,它同样是个单线程的收集器,使用标记-整理算法,这个收集器也主要是运行在 Client默认的java虚拟机默认的年老代垃圾收集器。
在Server模式下,主要有两个用途(了解,版本已经到8及以后):
- 在JDK1.5之前版本中与新生代的Parallel Scavenge 收集器搭配使用。(Parallel Scavenge + Serial Old )
- 作为老年代版中使用CMS收集器的后备垃圾收集方案。
复用上一节GCDemo
VM参数:
-Xms10m -Xmx10m -XX:+PrintGCDetails -XX:+PrintCommandLineFlags -XX:+UseSerialOldGC
输出结果:
Unrecognized VM option 'UseSerialOldGC'Did you mean '(+/-)UseSerialGC'?
在Java8中,-XX:+UseSerialOldGC不起作用。
13. GC之如何选择垃圾收集器
组合的选择
- 单CPU或者小内存,单机程序
- -XX:+UseSerialGC
- 多CPU,需要最大的吞吐量,如后台计算型应用
- -XX:+UseParallelGC(这两个相互激活)
- -XX:+UseParallelOldGC
- 多CPU,追求低停顿时间,需要快速响应如互联网应用
- -XX:+UseConcMarkSweepGC
- -XX:+ParNewGC
| 参数 | 新生代垃圾收集器 | 新生代算法 | 老年代垃圾收集器 | 老年代算法 |
| —- | —- | —- | —- | —- |
| -XX:+UseSerialGC | SerialGC | 复制 | SerialOldGC | 标记整理 |
| -XX:+UseParNewGC | ParNew | 复制 | SerialOldGC | 标记整理 |
| -XX:+UseParallelGC | Parallel [Scavenge] | 复制 | Parallel Old | 标记整理 |
| -XX:+UseConcMarkSweepGC | ParNew | 复制 | CMS + Serial Old的收集器组合,Serial Old作为CMS出错的后备收集器 | 标记清除 |
| -XX:+UseG1GC | G1整体上采用标记整理算法 | 局部复制 |
|
|
14. GC之G1收集器
复用上一节GCDemo
VM参数:
-Xms10m -Xmx10m -XX:+PrintGCDetails -XX:+PrintCommandLineFlags -XX:+UseG1GC
输出结果:
-XX:InitialHeapSize=10485760 -XX:MaxHeapSize=10485760 -XX:+PrintCommandLineFlags -XX:+PrintGCDetails -XX:+UseCompressedClassPointers -XX:+UseCompressedOops -XX:+UseG1GC -XX:-UseLargePagesIndividualAllocation[GC pause (G1 Humongous Allocation) (young) (initial-mark), 0.0015787 secs][Parallel Time: 0.8 ms, GC Workers: 8][GC Worker Start (ms): Min: 106.4, Avg: 106.5, Max: 106.5, Diff: 0.1][Ext Root Scanning (ms): Min: 0.2, Avg: 0.3, Max: 0.5, Diff: 0.4, Sum: 2.2][Update RS (ms): Min: 0.0, Avg: 0.0, Max: 0.0, Diff: 0.0, Sum: 0.0][Processed Buffers: Min: 0, Avg: 0.0, Max: 0, Diff: 0, Sum: 0][Scan RS (ms): Min: 0.0, Avg: 0.0, Max: 0.0, Diff: 0.0, Sum: 0.0][Code Root Scanning (ms): Min: 0.0, Avg: 0.0, Max: 0.0, Diff: 0.0, Sum: 0.0][Object Copy (ms): Min: 0.0, Avg: 0.3, Max: 0.3, Diff: 0.3, Sum: 2.1][Termination (ms): Min: 0.0, Avg: 0.0, Max: 0.1, Diff: 0.1, Sum: 0.4][Termination Attempts: Min: 1, Avg: 5.3, Max: 10, Diff: 9, Sum: 42][GC Worker Other (ms): Min: 0.0, Avg: 0.0, Max: 0.1, Diff: 0.0, Sum: 0.3][GC Worker Total (ms): Min: 0.6, Avg: 0.6, Max: 0.7, Diff: 0.1, Sum: 4.9][GC Worker End (ms): Min: 107.1, Avg: 107.1, Max: 107.1, Diff: 0.0][Code Root Fixup: 0.0 ms][Code Root Purge: 0.0 ms][Clear CT: 0.3 ms][Other: 0.5 ms][Choose CSet: 0.0 ms][Ref Proc: 0.2 ms][Ref Enq: 0.0 ms][Redirty Cards: 0.3 ms][Humongous Register: 0.0 ms][Humongous Reclaim: 0.0 ms][Free CSet: 0.0 ms][Eden: 4096.0K(4096.0K)->0.0B(4096.0K) Survivors: 0.0B->1024.0K Heap: 7073.4K(10.0M)->2724.8K(10.0M)][Times: user=0.02 sys=0.02, real=0.00 secs][GC concurrent-root-region-scan-start][GC concurrent-root-region-scan-end, 0.0004957 secs][GC concurrent-mark-start][GC concurrent-mark-end, 0.0001071 secs][GC remark [Finalize Marking, 0.0001876 secs] [GC ref-proc, 0.0002450 secs] [Unloading, 0.0003675 secs], 0.0011690 secs][Times: user=0.00 sys=0.00, real=0.00 secs][GC cleanup 4725K->4725K(10M), 0.0004907 secs][Times: user=0.00 sys=0.00, real=0.00 secs][GC pause (G1 Humongous Allocation) (young), 0.0009748 secs][Parallel Time: 0.6 ms, GC Workers: 8][GC Worker Start (ms): Min: 111.8, Avg: 111.9, Max: 112.2, Diff: 0.5][Ext Root Scanning (ms): Min: 0.0, Avg: 0.1, Max: 0.2, Diff: 0.2, Sum: 0.8][Update RS (ms): Min: 0.0, Avg: 0.0, Max: 0.0, Diff: 0.0, Sum: 0.0][Processed Buffers: Min: 0, Avg: 0.0, Max: 0, Diff: 0, Sum: 0][Scan RS (ms): Min: 0.0, Avg: 0.0, Max: 0.0, Diff: 0.0, Sum: 0.0][Code Root Scanning (ms): Min: 0.0, Avg: 0.0, Max: 0.0, Diff: 0.0, Sum: 0.0][Object Copy (ms): Min: 0.0, Avg: 0.2, Max: 0.3, Diff: 0.3, Sum: 1.7][Termination (ms): Min: 0.0, Avg: 0.0, Max: 0.0, Diff: 0.0, Sum: 0.2][Termination Attempts: Min: 1, Avg: 3.3, Max: 5, Diff: 4, Sum: 26][GC Worker Other (ms): Min: 0.1, Avg: 0.1, Max: 0.1, Diff: 0.0, Sum: 0.8][GC Worker Total (ms): Min: 0.1, Avg: 0.5, Max: 0.6, Diff: 0.5, Sum: 3.6][GC Worker End (ms): Min: 112.3, Avg: 112.3, Max: 112.4, Diff: 0.0][Code Root Fixup: 0.0 ms][Code Root Purge: 0.0 ms][Clear CT: 0.1 ms][Other: 0.2 ms][Choose CSet: 0.0 ms][Ref Proc: 0.1 ms][Ref Enq: 0.0 ms][Redirty Cards: 0.1 ms][Humongous Register: 0.0 ms][Humongous Reclaim: 0.0 ms][Free CSet: 0.0 ms][Eden: 1024.0K(4096.0K)->0.0B(4096.0K) Survivors: 1024.0K->1024.0K Heap: 6808.1K(10.0M)->2595.2K(10.0M)][Times: user=0.00 sys=0.00, real=0.00 secs][GC pause (G1 Humongous Allocation) (young) (initial-mark), 0.0006211 secs][Parallel Time: 0.2 ms, GC Workers: 8][GC Worker Start (ms): Min: 113.3, Avg: 113.3, Max: 113.4, Diff: 0.1][Ext Root Scanning (ms): Min: 0.0, Avg: 0.1, Max: 0.2, Diff: 0.2, Sum: 1.0][Update RS (ms): Min: 0.0, Avg: 0.0, Max: 0.0, Diff: 0.0, Sum: 0.0][Processed Buffers: Min: 0, Avg: 0.1, Max: 1, Diff: 1, Sum: 1][Scan RS (ms): Min: 0.0, Avg: 0.0, Max: 0.0, Diff: 0.0, Sum: 0.0][Code Root Scanning (ms): Min: 0.0, Avg: 0.0, Max: 0.0, Diff: 0.0, Sum: 0.0][Object Copy (ms): Min: 0.0, Avg: 0.0, Max: 0.0, Diff: 0.0, Sum: 0.0][Termination (ms): Min: 0.0, Avg: 0.0, Max: 0.1, Diff: 0.1, Sum: 0.3][Termination Attempts: Min: 1, Avg: 1.0, Max: 1, Diff: 0, Sum: 8][GC Worker Other (ms): Min: 0.0, Avg: 0.0, Max: 0.0, Diff: 0.0, Sum: 0.0][GC Worker Total (ms): Min: 0.1, Avg: 0.2, Max: 0.2, Diff: 0.1, Sum: 1.4][GC Worker End (ms): Min: 113.5, Avg: 113.5, Max: 113.5, Diff: 0.0][Code Root Fixup: 0.0 ms][Code Root Purge: 0.0 ms][Clear CT: 0.1 ms][Other: 0.3 ms][Choose CSet: 0.0 ms][Ref Proc: 0.1 ms][Ref Enq: 0.0 ms][Redirty Cards: 0.1 ms][Humongous Register: 0.0 ms][Humongous Reclaim: 0.0 ms][Free CSet: 0.0 ms][Eden: 0.0B(4096.0K)->0.0B(2048.0K) Survivors: 1024.0K->1024.0K Heap: 4595.9K(10.0M)->4557.3K(10.0M)][Times: user=0.00 sys=0.00, real=0.00 secs][GC concurrent-root-region-scan-start][GC pause (G1 Humongous Allocation) (young)[GC concurrent-root-region-scan-end, 0.0001112 secs][GC concurrent-mark-start], 0.0006422 secs][Root Region Scan Waiting: 0.0 ms][Parallel Time: 0.2 ms, GC Workers: 8][GC Worker Start (ms): Min: 114.2, Avg: 114.3, Max: 114.4, Diff: 0.2][Ext Root Scanning (ms): Min: 0.0, Avg: 0.1, Max: 0.1, Diff: 0.1, Sum: 0.7][Update RS (ms): Min: 0.0, Avg: 0.0, Max: 0.0, Diff: 0.0, Sum: 0.0][Processed Buffers: Min: 0, Avg: 0.1, Max: 1, Diff: 1, Sum: 1][Scan RS (ms): Min: 0.0, Avg: 0.0, Max: 0.0, Diff: 0.0, Sum: 0.0][Code Root Scanning (ms): Min: 0.0, Avg: 0.0, Max: 0.0, Diff: 0.0, Sum: 0.0][Object Copy (ms): Min: 0.0, Avg: 0.0, Max: 0.0, Diff: 0.0, Sum: 0.0][Termination (ms): Min: 0.0, Avg: 0.0, Max: 0.0, Diff: 0.0, Sum: 0.1][Termination Attempts: Min: 1, Avg: 1.0, Max: 1, Diff: 0, Sum: 8][GC Worker Other (ms): Min: 0.0, Avg: 0.0, Max: 0.0, Diff: 0.0, Sum: 0.0][GC Worker Total (ms): Min: 0.0, Avg: 0.1, Max: 0.2, Diff: 0.2, Sum: 0.9][GC Worker End (ms): Min: 114.4, Avg: 114.4, Max: 114.4, Diff: 0.0][Code Root Fixup: 0.0 ms][Code Root Purge: 0.0 ms][Clear CT: 0.1 ms][Other: 0.3 ms][Choose CSet: 0.0 ms][Ref Proc: 0.1 ms][Ref Enq: 0.0 ms][Redirty Cards: 0.1 ms][Humongous Register: 0.0 ms][Humongous Reclaim: 0.0 ms][Free CSet: 0.0 ms][Eden: 0.0B(2048.0K)->0.0B(2048.0K) Survivors: 1024.0K->1024.0K Heap: 4557.3K(10.0M)->4547.6K(10.0M)][Times: user=0.00 sys=0.00, real=0.00 secs][Full GC (Allocation Failure) 4547K->4527K(10M), 0.0023437 secs][Eden: 0.0B(2048.0K)->0.0B(3072.0K) Survivors: 1024.0K->0.0B Heap: 4547.6K(10.0M)->4527.6K(10.0M)], [Metaspace: 2658K->2658K(1056768K)][Times: user=0.00 sys=0.00, real=0.00 secs][Full GC (Allocation Failure) 4527K->4513K(10M), 0.0021281 secs][Eden: 0.0B(3072.0K)->0.0B(3072.0K) Survivors: 0.0B->0.0B Heap: 4527.6K(10.0M)->4514.0K(10.0M)], [Metaspace: 2658K->2658K(1056768K)][Times: user=0.00 sys=0.00, real=0.00 secs][GC concurrent-mark-abort]java.lang.OutOfMemoryError: Java heap spaceat java.util.Arrays.copyOf(Arrays.java:3332)at java.lang.AbstractStringBuilder.ensureCapacityInternal(AbstractStringBuilder.java:124)at java.lang.AbstractStringBuilder.append(AbstractStringBuilder.java:448)at java.lang.StringBuilder.append(StringBuilder.java:136)at com.lun.jvm.GCDemo.main(GCDemo.java:22)Heapgarbage-first heap total 10240K, used 4513K [0x00000000ff600000, 0x00000000ff700050, 0x0000000100000000)region size 1024K, 1 young (1024K), 0 survivors (0K)Metaspace used 2689K, capacity 4486K, committed 4864K, reserved 1056768Kclass space used 286K, capacity 386K, committed 512K, reserved 1048576K
以前收集器特点
- 年轻代和老年代是各自独立且连续的内存块;
- 年轻代收集使用单eden+s0+s1进行复机算法;
- 老年代收集必须扫描整个老年代区域;
-
G1是什么
G1 (Garbage-First)收集器,是一款面向服务端应用的收集器:
The Garbage-First (G1) collector is a server-style garbage collector, targeted for multi-processor machines with large memories. It meets garbage collection(GC) pause time goals with a high probability, while achieving high throughput. The G1 garbage
collector is fully supported in Oracle JDK 7 update 4 and later releases. The G1 collectoris designed for applications that: Can operate concurrently with applications threads like the CMS collector.
- Compact free space without lengthy GC induced pause times.
- Need more predictable GC pause durations.
- Do not want to sacrifice a lot of throughput performance.
- Do not require a much larger Java heap.
从官网的描述中,我们知道G1是一种服务器端的垃圾收集器,应用在多处理器和大容量内存环境中,在实现高吞吐量的同时,尽可能的满足垃圾收集暂停时间的要求。另外,它还具有以下特性:
像CMS收集器一样,能与应用程序线程并发执行。
整理空闲空间更快。
需要更多的时间来预测GC停顿时间。
不希望牺牲大量的吞吐性能。
不需要更大的Java Heap。
G1收集器的设计目标是取代CMS收集器,它同CMS相比,在以下方面表现的更出色:
G1是一个有整理内存过程的垃圾收集器,不会产生很多内存碎片。
G1的Stop The World(STW)更可控,G1在停顿时间上添加了预测机制,用户可以指定期望停顿时间。
CMS垃圾收集器虽然减少了暂停应用程序的运行时间,但是它还是存在着内存碎片问题。于是,为了去除内存碎片问题,同时又保留CMS垃圾收集器低暂停时间的优点,JAVA7发布了一个新的垃圾收集器-G1垃圾收集器。
G1是在2012年才在jdk1.7u4中可用。oracle官方计划在JDK9中将G1变成默认的垃圾收集器以替代CMS。它是一款面向服务端应用的收集器,主要应用在多CPU和大内存服务器环境下,极大的减少垃圾收集的停顿时间,全面提升服务器的性能,逐步替换java8以前的CMS收集器。
主要改变是Eden,Survivor和Tenured等内存区域不再是连续的了,而是变成了一个个大小一样的region ,每个region从1M到32M不等。一个region有可能属于Eden,Survivor或者Tenured内存区域。
特点
- G1能充分利用多CPU、多核环境硬件优势,尽量缩短STW。
- G1整体上采用标记-整理算法,局部是通过复制算法,不会产生内存碎片。
- 宏观上看G1之中不再区分年轻代和老年代。把内存划分成多个独立的子区域(Region),可以近似理解为一个围棋的棋盘。
- G1收集器里面讲整个的内存区都混合在一起了,但其本身依然在小范围内要进行年轻代和老年代的区分,保留了新生代和老年代,但它们不再是物理隔离的,而是一部分Region的集合且不需要Region是连续的,也就是说依然会采用不同的GC方式来处理不同的区域。
- G1虽然也是分代收集器,但整个内存分区不存在物理上的年轻代与老年代的区别,也不需要完全独立的survivor(to space)堆做复制准备。G1只有逻辑上的分代概念,或者说每个分区都可能随G1的运行在不同代之间前后切换。
[
](https://blog.csdn.net/u011863024/article/details/114684428)
15. GC之G1底层原理
Region区域化垃圾收集器 - 最大好处是化整为零,避免全内存扫描,只需要按照区域来进行扫描即可。
区域化内存划片Region,整体编为了一些列不连续的内存区域,避免了全内存区的GC操作。
核心思想是将整个堆内存区域分成大小相同的子区域(Region),在JVM启动时会自动设置这些子区域的大小,在堆的使用上,G1并不要求对象的存储一定是物理上连续的只要逻辑上连续即可,每个分区也不会固定地为某个代服务,可以按需在年轻代和老年代之间切换。启动时可以通过参数-XX:G1HeapRegionSize=n可指定分区大小(1MB~32MB,且必须是2的幂),默认将整堆划分为2048个分区。
大小范围在1MB~32MB,最多能设置2048个区域,也即能够支持的最大内存为:32MB∗2048=65536MB=64G内存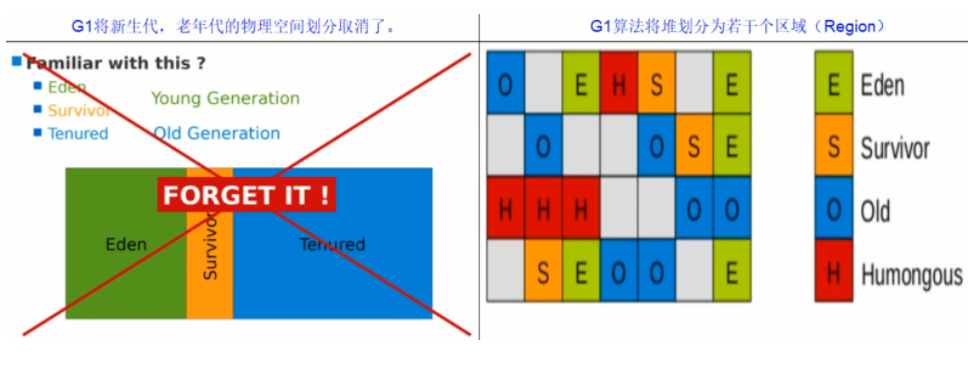
humongous
英 [hjuːˈmʌŋɡəs] 美 [hjuːˈmʌŋɡəs]
adj. 巨大的;庞大的
G1算法将堆划分为若干个区域(Region),它仍然属于分代收集器。
这些Region的一部分包含新生代,新生代的垃圾收集依然采用暂停所有应用线程的方式,将存活对象拷贝到老年代或者Survivor空间。
这些Region的一部分包含老年代,G1收集器通过将对象从一个区域复制到另外一个区域,完成了清理工作。这就意味着,在正常的处理过程中,G1完成了堆的压缩(至少是部分堆的压缩),这样也就不会有CMS内存碎片问题的存在了。
在G1中,还有一种特殊的区域,叫Humongous区域。
如果一个对象占用的空间超过了分区容量50%以上,G1收集器就认为这是一个巨型对象。这些巨型对象默认直接会被分配在年老代,但是如果它是一个短期存在的巨型对象,就会对垃圾收集器造成负面影响。
为了解决这个问题,G1划分了一个Humongous区,它用来专门存放巨型对象。如果一个H区装不下一个巨型对象,那么G1会寻找连续的H分区来存储。为了能找到连续的H区,有时候不得不启动Full GC。
回收步骤
G1收集器下的Young GC
针对Eden区进行收集,Eden区耗尽后会被触发,主要是小区域收集+形成连续的内存块,避免内存碎片
- Eden区的数据移动到Survivor区,假如出现Survivor区空间不够,Eden区数据会部会晋升到Old区。
- Survivor区的数据移动到新的Survivor区,部会数据晋升到Old区。
- 最后Eden区收拾干净了,GC结束,用户的应用程序继续执行。
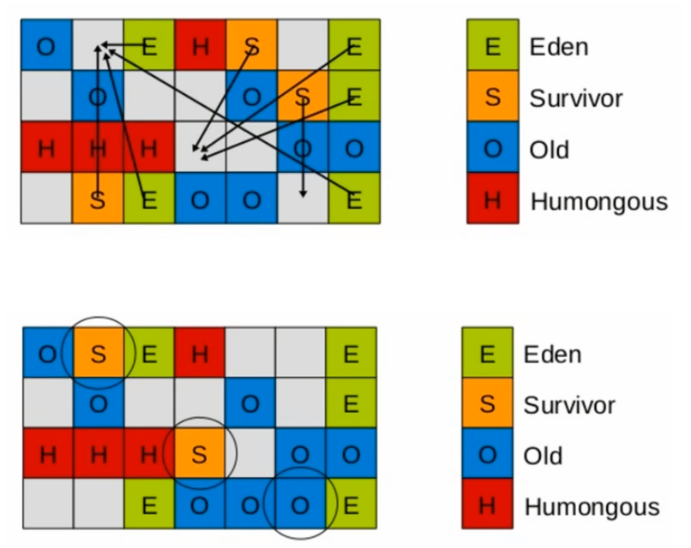
4步过程:
- 初始标记:只标记GC Roots能直接关联到的对象
- 并发标记:进行GC Roots Tracing的过程
- 最终标记:修正并发标记期间,因程序运行导致标记发生变化的那一部分对象
- 筛选回收:根据时间来进行价值最大化的回收
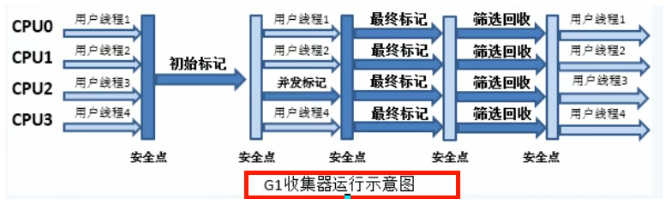
16. GC之G1参数配置及和CMS的比较
- -XX:+UseG1GC
- -XX:G1HeapRegionSize=n:设置的G1区域的大小。值是2的幂,范围是1MB到32MB。目标是根据最小的Java堆大小划分出约2048个区域。
- -XX:MaxGCPauseMillis=n:最大GC停顿时间,这是个软目标,JVM将尽可能(但不保证)停顿小于这个时间。
- -XX:InitiatingHeapOccupancyPercent=n:堆占用了多少的时候就触发GC,默认为45。
- -XX:ConcGCThreads=n:并发GC使用的线程数。
- -XX:G1ReservePercent=n:设置作为空闲空间的预留内存百分比,以降低目标空间溢出的风险,默认值是10%。
开发人员仅仅需要声明以下参数即可:
三步归纳:开始G1+设置最大内存+设置最大停顿时间
- -XX:+UseG1GC
- -Xmx32g
- -XX:MaxGCPauseMillis=100
-XX:MaxGCPauseMillis=n:最大GC停顿时间单位毫秒,这是个软目标,JVM将尽可能(但不保证)停顿小于这个时间
G1和CMS比较
- G1不会产生内碎片
- 是可以精准控制停顿。该收集器是把整个堆(新生代、老年代)划分成多个固定大小的区域,每次根据允许停顿的时间去收集垃圾最多的区域。
[
](https://blog.csdn.net/u011863024/article/details/114684428)
17. JVMGC结合SpringBoot微服务优化简介
- IDEA开发微服务工程。
- Maven进行clean package。
- 要求微服务启动的时候,同时配置我们的JVM/GC的调优参数。
- 公式:java -server jvm的各种参数 -jar 第1步上面的jar/war包名。
参考
https://blog.csdn.net/u011863024/article/details/114684428 Reference 详解 https://www.jianshu.com/p/f86d3a43eec5
[
](https://blog.csdn.net/u011863024/article/details/114684428)

若有收获,就点个赞吧
0 人点赞
