5.1 Fragment是什么
①一种可以嵌入在Activity当中的UI片段,能够让程序更加合理和充分地利用大屏幕的空间,因而在平板上应用得非常广泛。
②Fragment虽然是个全新的概念,但它和Activity存在众多相似之处,同样都能包含布局,同样都有自己的生命周期。
③可以将Fragment理解成一个迷你型的Activity,虽然这个迷你型的Activity可能和普通的Activity是一样大的。
比如在手机上设置一个新闻页面: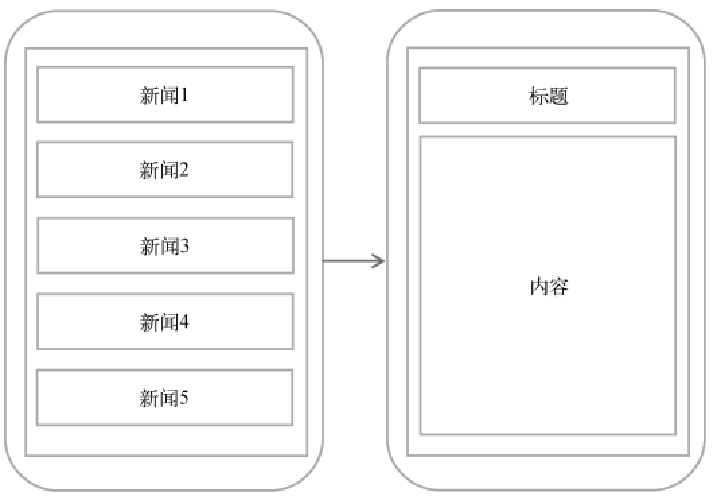
由于手机屏幕有限,所以只能通过新闻的标题栏进入新闻的主要内容。
如果是在平板上面,由于平板空间较大,所以上面两个页面也可以放置在一个页面上: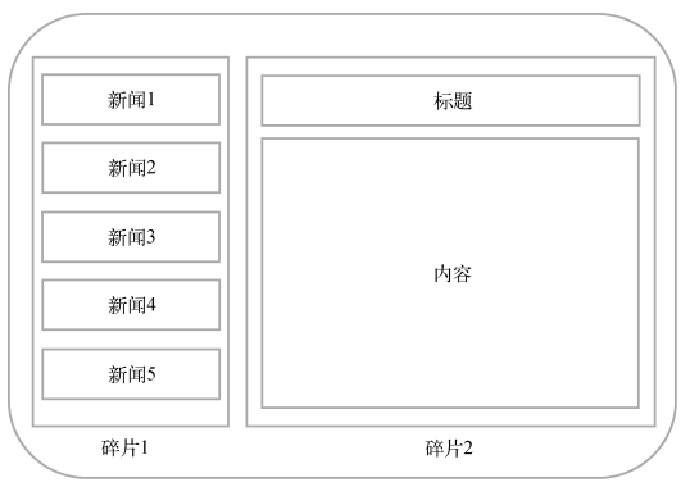
为了避免提高代码复用,这就有了Fragment,若果检测到设备屏幕宽读较小就使用上面的布局,如果屏幕宽度较大就使用下面的。
5.2 Fragment的使用方式
5.2.1 基础使用
首先执行下面两个步骤:
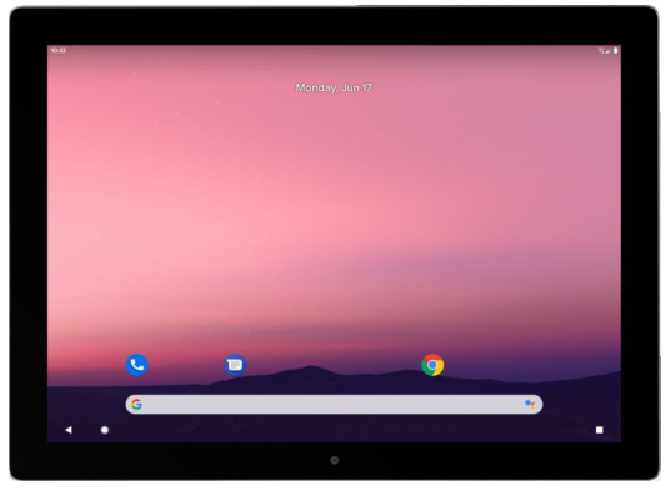
①首先创建一个平板模拟器,这次创建一个Pixel C平板模拟器,创建完成后启动模拟器,效果如图所示。
②接着新建一个FragmentTest项目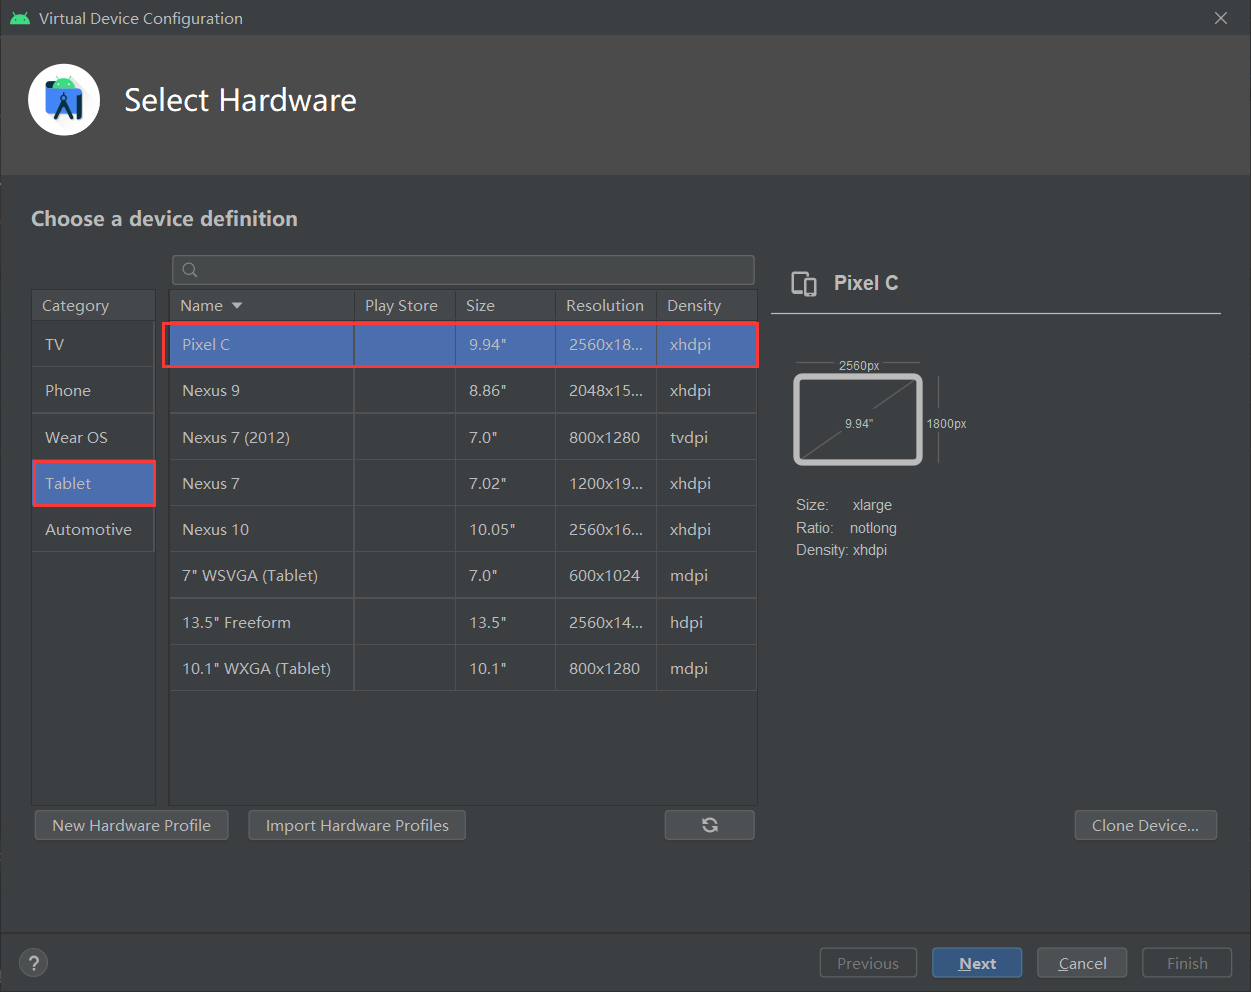
接下来的步骤如下:
①新建一个左侧Fragment的布局left_fragment.xml,代码如下所示:
<LinearLayout xmlns:android="http://schemas.android.com/apk/res/android"android:orientation="vertical"android:layout_width="match_parent"android:layout_height="match_parent"><Buttonandroid:id="@+id/button"android:layout_width="wrap_content"android:layout_height="wrap_content"android:layout_gravity="center_horizontal"android:text="Button"/></LinearLayout>
② 新建右侧Fragment的布局right_fragment.xml,代码如下所示:
<LinearLayout xmlns:android="http://schemas.android.com/apk/res/android"android:orientation="vertical"android:background="#00ff00"android:layout_width="match_parent"android:layout_height="match_parent"><TextViewandroid:layout_width="wrap_content"android:layout_height="wrap_content"android:layout_gravity="center_horizontal"android:textSize="24sp"android:text="This is right fragment"/></LinearLayout>
③新建一个`LeftFragment`类,让它**继承**自`Fragment`。
注:可能会有两个不同包下的Fragment:
- 系统内置的
android.app.Fragment- AndroidX库中的
androidx.fragment.app.Fragment。请一定使用AndroidX库中Fragment,因为它可以让Fragment的特性在所有Android系统版本中保持一致,而系统内置的Fragment在Android 9.0版本中已被废弃。
class LeftFragment : Fragment() {override fun onCreateView(inflater: LayoutInflater,container: ViewGroup?,savedInstanceState: Bundle?): View? {return inflater.inflate(R.layout.left_fragment, container, false)}}
④用同样的方法再新建一个RightFragment,代码如下所示:
class RightFragment : Fragment() {override fun onCreateView(inflater: LayoutInflater,container: ViewGroup?,savedInstanceState: Bundle?): View? {return inflater.inflate(R.layout.right_fragment, container, false)}}
这里再解释一下其中的参数的意义:
inflater: LayoutInflater:布局加载参数container: ViewGroup?:根视图(也就是这个Fragment需要被放置在哪个视图当中)savedInstanceState: Bundle?:用于传递数据的参数inflater.inflate中的三个参数分别指的是:- 布局的资源id(R.layout.right_fragment)
- 填充的根视图(container)
- 是否将载入的视图绑定到根视图中(false)
⑤修改activity_main.xml,在布局中引入Fragment。如下所示:
<LinearLayout xmlns:android="http://schemas.android.com/apk/res/android"android:orientation="horizontal"android:layout_width="match_parent"android:layout_height="match_parent" ><fragmentandroid:id="@+id/leftFrag"android:name="com.example.fragmenttest.LeftFragment"android:layout_width="0dp"android:layout_height="match_parent"android:layout_weight="1" /><fragmentandroid:id="@+id/rightFrag"android:name="com.example.fragmenttest.RightFragment"android:layout_width="0dp"android:layout_height="match_parent"android:layout_weight="1" /></LinearLayout>
这里只要注意name属性即可。
最后就可以运行了:<br />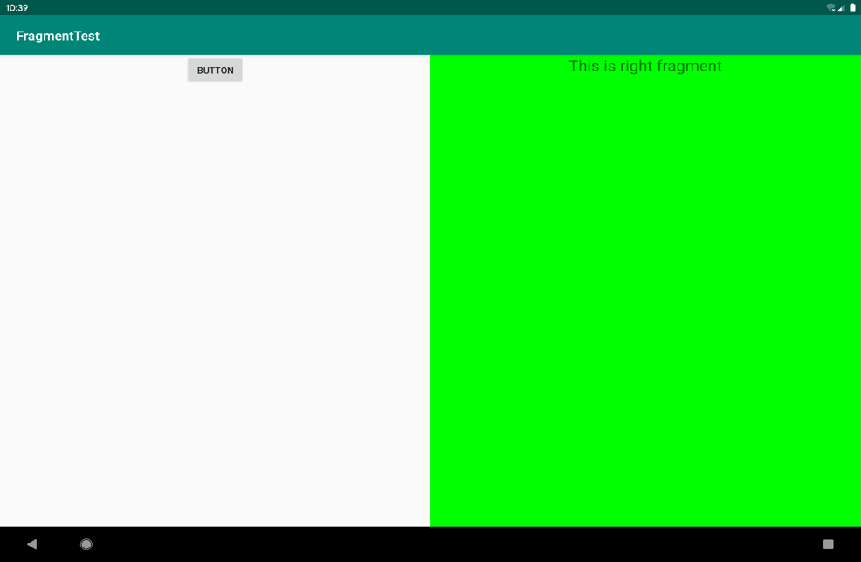
5.2.2 动态添加Fragment
Fragment真正的强大之处在于,它可以在程序运行时动态地添加到**Activity**当中。根据具体情况来动态地添加Fragment,你就可以将程序界面定制得更加多样化。
后面的步骤如下:
①在上一节基础上继续完善,新建another_right_fragment.xml,代码如下所示:
<LinearLayout xmlns:android="http://schemas.android.com/apk/res/android"android:orientation="vertical"android:background="#ffff00"android:layout_width="match_parent"android:layout_height="match_parent"><TextViewandroid:layout_width="wrap_content"android:layout_height="wrap_content"android:layout_gravity="center_horizontal"android:textSize="24sp"android:text="This is another right fragment"/></LinearLayout>
②新建`AnotherRightFragment`作为另一个**右侧**`Fragment`,代码如下所示:
class AnotherRightFragment : Fragment() {override fun onCreateView(inflater: LayoutInflater, container: ViewGroup?,savedInstanceState: Bundle?): View? {return inflater.inflate(R.layout.another_right_fragment, container, false)}}
③修改`activity_main.xml`:
<LinearLayout xmlns:android="http://schemas.android.com/apk/res/android"android:orientation="horizontal"android:layout_width="match_parent"android:layout_height="match_parent" ><fragmentandroid:id="@+id/leftFrag"android:name="com.example.fragmenttest.LeftFragment"android:layout_width="0dp"android:layout_height="match_parent"android:layout_weight="1" /><FrameLayoutandroid:id="@+id/rightLayout"android:layout_width="0dp"android:layout_height="match_parent"android:layout_weight="1" ></FrameLayout></LinearLayout>
现在将右侧
Fragment替换成了一个FrameLayout,该布局是Android中最简单的一种布局,所有的控件默认都会摆放在布局的左上角。
④向`FrameLayout`里**添加内容**,实现动态添加`Fragment`的功能。修改`MainActivity`中的代码:
class MainActivity : AppCompatActivity() {override fun onCreate(savedInstanceState: Bundle?) {super.onCreate(savedInstanceState)setContentView(R.layout.activity_main)// 获取在左侧Fragment的按钮val button:Button = findViewById(R.id.button)// 点击按钮 触发事件切换右侧的Fragmentbutton.setOnClickListener {replaceFragment(AnotherRightFragment())}replaceFragment(RightFragment())}private fun replaceFragment(fragment: Fragment) {val fragmentManager = supportFragmentManagerval transaction = fragmentManager.beginTransaction()transaction.replace(R.id.rightLayout, fragment)transaction.commit()}}
这里讲一下`replaceFragment`,动态添加`Fragment`的步骤有五步:<br /> ①创建待添加`Fragment`的实例。
这里就是传入的Fragment参数
②获取FragmentManager,在Activity中可以直接调用getSupportFragmentManager()方法获取。
这是是Kotlin的语法糖,
getSupportFragmentManager()方法可以简写成supportFragmentManager,也就是Fragment管理器。
③开启一个事务,通过调用beginTransaction()方法开启。
④ 向容器内添加或替换Fragment,一般使用replace()方法实现,需要传入容器的id和待添加的Fragment实例。
前面一个就是当前的布局id:
R.id.rightLayout,后面是需要替换的布局:fragment
⑤提交事务,调用commit()方法来完成。
这里补充一下什么是事务:
事务是指是程序中一系列严密的逻辑操作,而且所有操作必须全部成功完成,否则在每个操作中所作的所有更改都会被撤消。
简单一点的理解就是,在事务中执行的语句,只能全部完成,如果有一项有错误,那么整个就会回滚到之前的状态。
更多内容可以参照:
什么是事务?事务的四个特性以及事务的隔离级别 - Kevin.ZhangCG - 博客园
5.2.3 实现返回栈
很简单,只需要添加一条代码即可:
class MainActivity : AppCompatActivity() {…....private fun replaceFragment(fragment: Fragment) {val fragmentManager = supportFragmentManagerval transaction = fragmentManager.beginTransaction()transaction.replace(R.id.rightLayout, fragment)// 实现返回栈transaction.addToBackStack(null)transaction.commit()}}
在事务提交之前调用了FragmentTransaction的addToBackStack()方法,可以接收一个名字用于描述返回栈的状态,一般传入null即可。 这个时候我们按下Back键可以回到上一个Fragment。
5.2.4 Fragment和Activity之间的交互
为方便Fragment和Activity之间进行交互,FragmentManager提供了一个类似于findViewById()的方法,专门用于从布局文件中获取Fragment的实例,代码如下所示:
val fragment = supportFragmentManager.findFragmentById(R.id.leftFrag) as LeftFragment
用FragmentManager的findFragmentById()方法,可以在Activity中得到相应Fragment的实例,就能轻松调用Fragment里的方法。
在Fragment中怎样调用Activity里的方法?在每个Fragment中都可以通过调用getActivity()方法来得到和当前Fragment相关联的Activity实例,代码如下所示:
if (activity != null) {val mainActivity = activity as MainActivity}
5.3 Fragment的生命周期(了解即可)
5.3.1 Fragment的状态和回调
①运行状态
当一个Fragment所关联的Activity正处于运行状态时,该Fragment也处于运行状态。
②暂停状态
当一个Activity进入暂停状态时(由于另一个未占满屏幕的Activity被添加到了栈顶),与它相关联的Fragment就会进入暂停状态。
③停止状态
当一个Activity进入停止状态时,与它相关联的Fragment就会进入停止状态,或者通过调用FragmentTransaction的remove()、replace()方法将Fragment从Activity中移除,但在事务提交之前调用了addToBackStack()方法,这时的Fragment也会进入停止状态。总的来说,进入停止状态的Fragment对用户来说是完全不可见的,有可能会被系统回收。
④销毁状态
Fragment总是依附于Activity而存在,因此当Activity被销毁时,与它相关联的Fragment就会进入销毁状态。或者通过调用FragmentTransaction的remove()、replace()方法将Fragment从Activity中移除,但在事务提交之前并没有调用addToBackStack()方法,这时的Fragment也会进入销毁状态。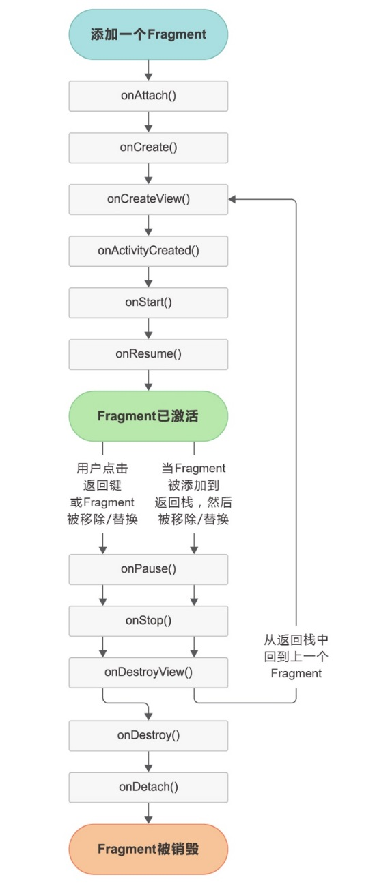
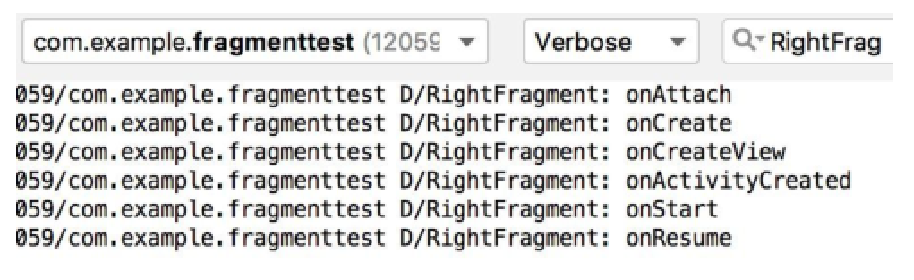
5.3.2 体验生命周期
class RightFragment : Fragment() {companion object {const val TAG = "RightFragment"}override fun onAttach(context: Context) {super.onAttach(context)Log.d(TAG, "onAttach")}override fun onCreate(savedInstanceState: Bundle?) {super.onCreate(savedInstanceState)Log.d(TAG, "onCreate")}override fun onCreateView(inflater: LayoutInflater, container: ViewGroup?,savedInstanceState: Bundle?): View? {Log.d(TAG, "onCreateView")return inflater.inflate(R.layout.right_fragment, container, false)}override fun onActivityCreated(savedInstanceState: Bundle?) {super.onActivityCreated(savedInstanceState)Log.d(TAG, "onActivityCreated")}override fun onStart() {super.onStart()Log.d(TAG, "onStart")}override fun onResume() {super.onResume()Log.d(TAG, "onResume")}override fun onPause() {super.onPause()Log.d(TAG, "onPause")}override fun onStop() {super.onStop()Log.d(TAG, "onStop")}override fun onDestroyView() {super.onDestroyView()Log.d(TAG, "onDestroyView")}override fun onDestroy() {super.onDestroy()Log.d(TAG,"onDestroy")}override fun onDetach() {super.onDetach()Log.d(TAG,"onDetach")}}
5.4 动态加载布局的技巧
5.4.1 使用限定符
基本使用
如果你经常使用平板,应该会发现很多平板应用采用的是双页模式(程序会在左侧的面板上显示一个包含子项的列表,在右侧的面板上显示内容),因为平板的屏幕足够大,完全可以同时显示两页的内容,但手机的屏幕就只能显示一页的内容,因此两个页面需要分开显示。在运行时判断程序应该使用双页模式还是单页模式,需要借助限定符(qualifier)来实现。
① 修改FragmentTest项目中的activity_main.xml文件,代码如下所示:
<LinearLayout xmlns:android="http://schemas.android.com/apk/res/android"android:orientation="horizontal"android:layout_width="match_parent"android:layout_height="match_parent" ><fragmentandroid:id="@+id/leftFrag"android:name="com.example.fragmenttest.LeftFragment"android:layout_width="match_parent"android:layout_height="match_parent"/></LinearLayout>
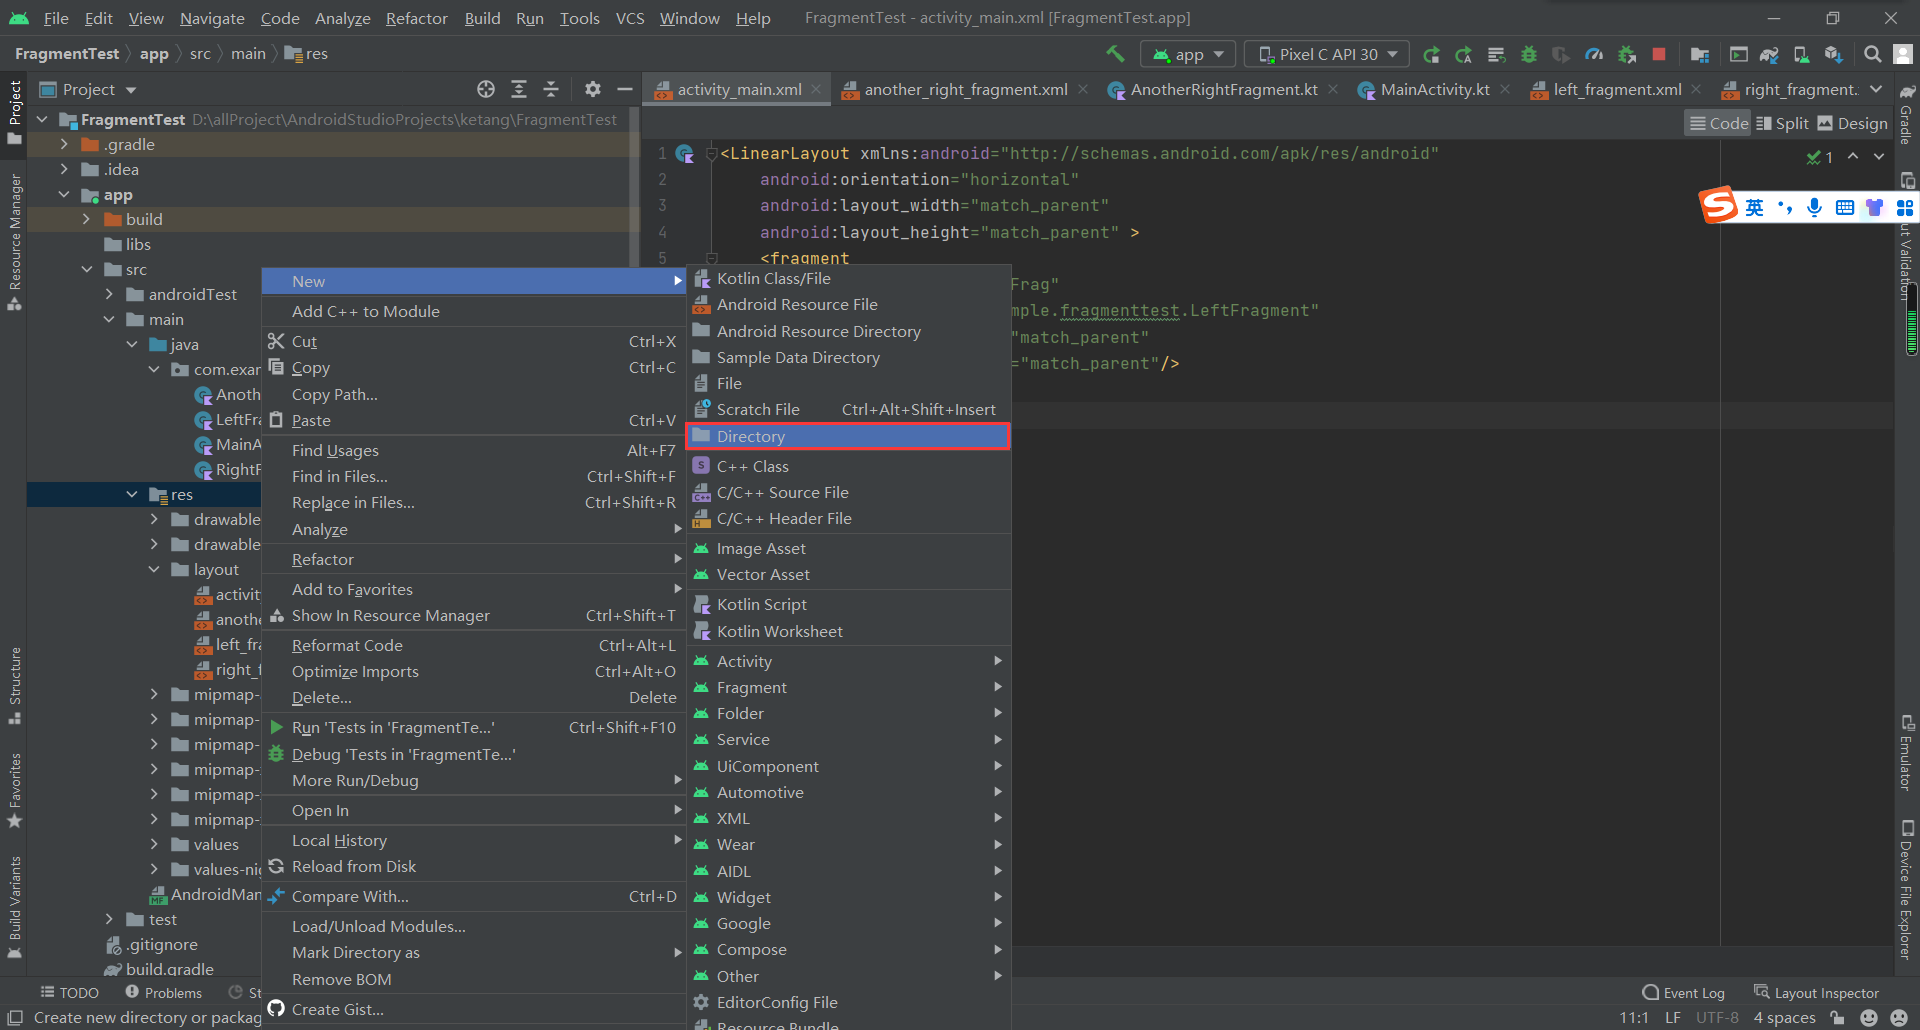
② 接着在res目录下新建`layout-large`文件夹(Project视图),在这个文件夹下新建一个布局,也叫作`activity_main.xml`,代码如下所示:
<LinearLayout xmlns:android="http://schemas.android.com/apk/res/android"android:orientation="horizontal"android:layout_width="match_parent"android:layout_height="match_parent"><fragmentandroid:id="@+id/leftFrag"android:name="com.example.fragmenttest.LeftFragment"android:layout_width="0dp"android:layout_height="match_parent"android:layout_weight="1" /><fragmentandroid:id="@+id/rightFrag"android:name="com.example.fragmenttest.RightFragment"android:layout_width="0dp"android:layout_height="match_parent"android:layout_weight="3" /></LinearLayout>

可以看到,layout/activity_main布局只包含了一个**Fragment**,即单页模式,而layout-large/activity_main布局包含了两个Fragment,即双页模式。
其中,large就是一个限定符,那些屏幕被认为是large的设备就会自动加载layout-large文件夹下的布局,小屏幕的设备则还是会加载layout文件夹下的布局。
③ 最后记得先注释掉以下代码: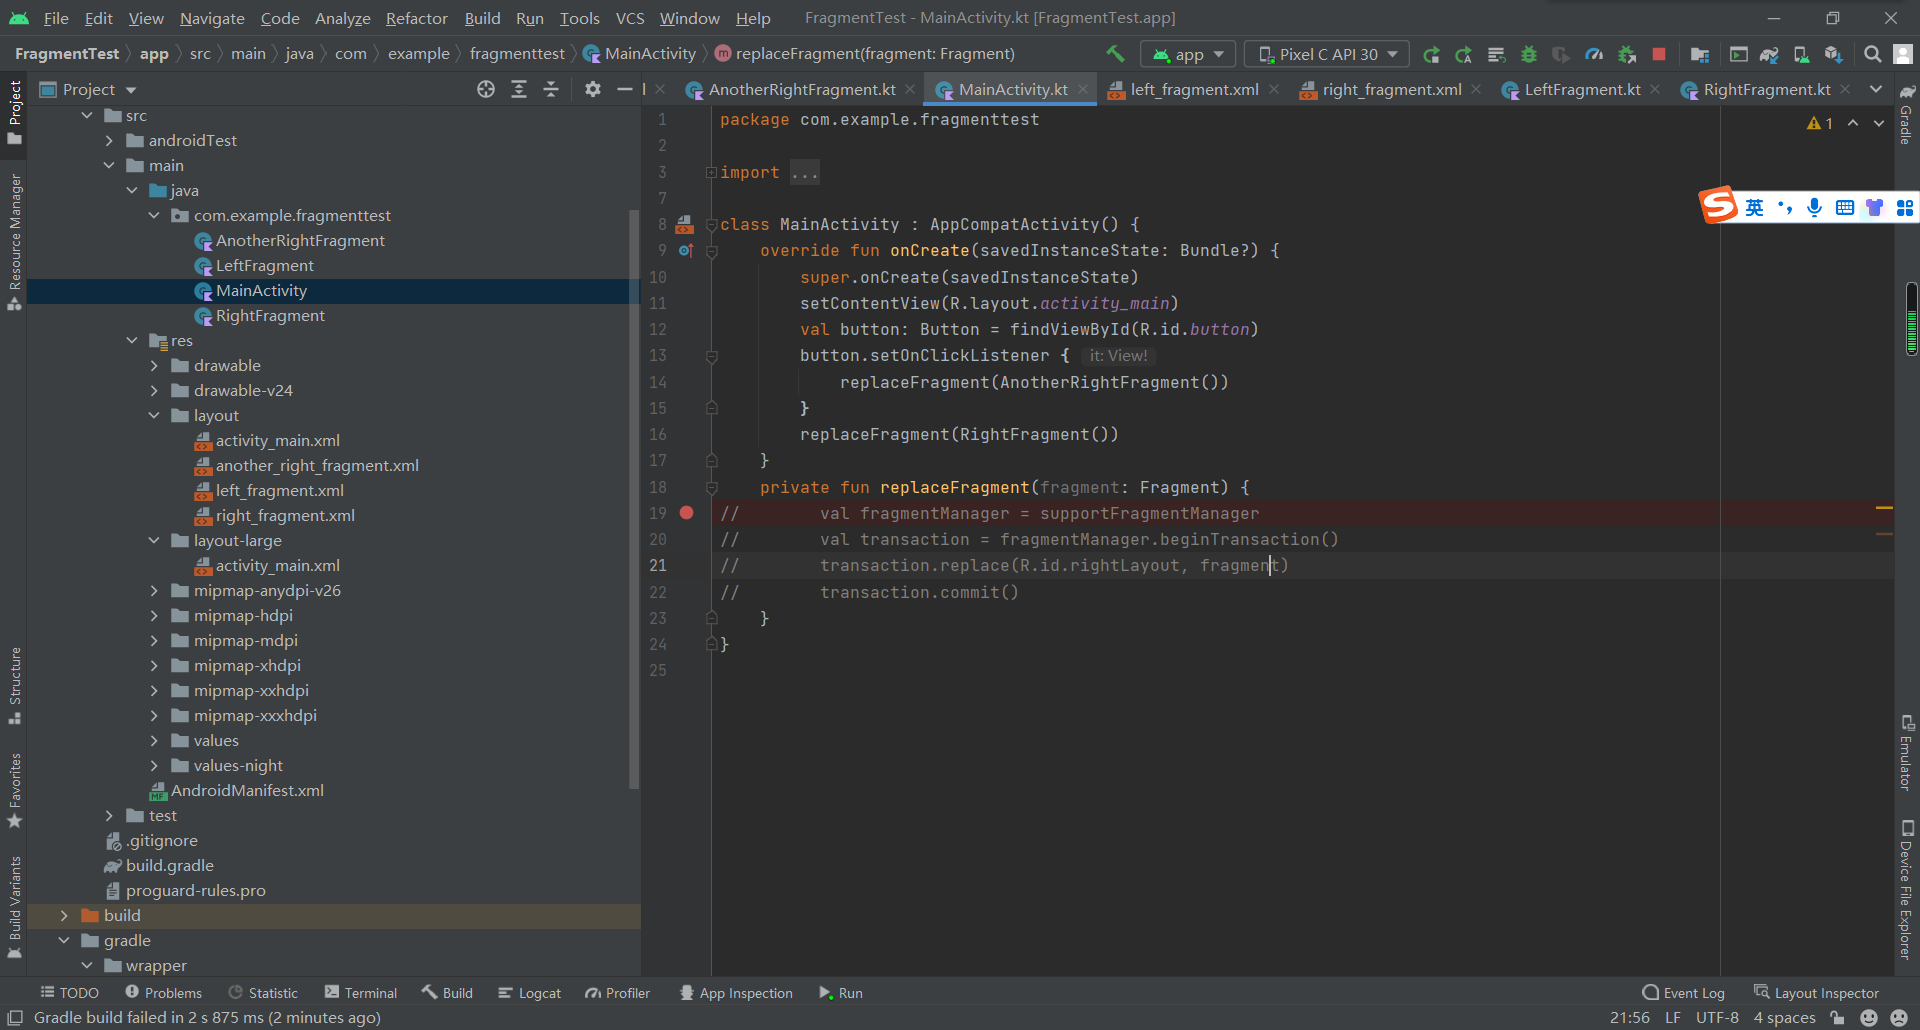
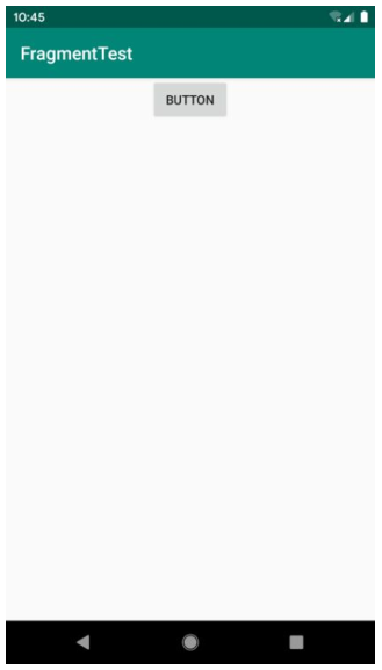
最后会发现在手机和在平板上的显示如下: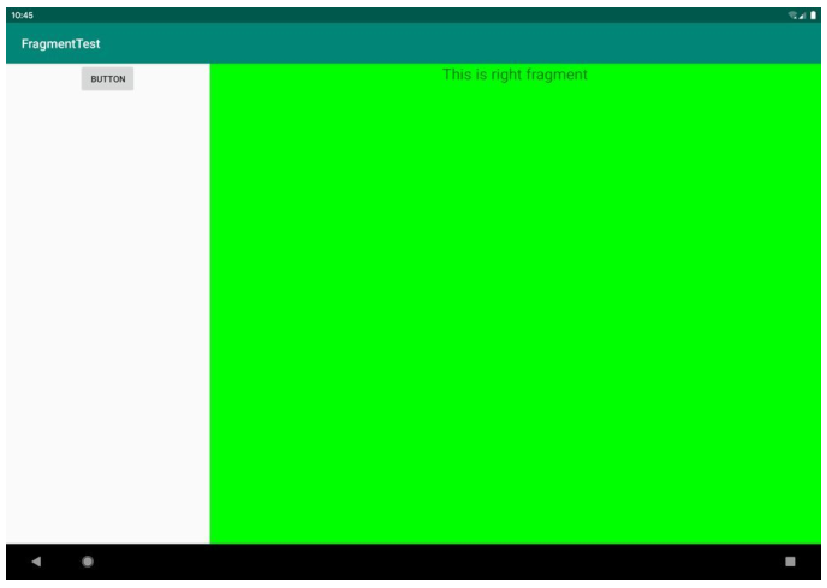
常见限定符
| 屏幕特征 | 限定符 | 描述 |
|---|---|---|
| 大小 | small | 提供给小屏幕设备的资源· |
| normall | 提供给中等屏幕设备的资源 | |
| large | 提供给大屏幕设备的资源 | |
| xlarge | 提供给超大屏幕设备的资源 | |
| 分辨率 | ldpi | 提供给低分辨率设备的资源(120dpi 以下) |
| mdpi | 提供给中等分辨率设备的资源( 120dpi到160dpi) | |
| hdpi | 提供给高分辨率设备的资源( 160dpi到240dpi) | |
| xhdpi | 提供给超高分辨率设备的资源(240dpi到 320dpi) | |
| 方向 | land | 提供给横屏设备的资源 |
| port | 提供给竖屏设备的资源 |
5.4.2 使用最小宽度限定符
有时候我们希望可以更加灵活地为不同设备加载布局,不管它们是不是被系统认定为large,这时就可以使用最小宽度限定符(smallest-width qualifier)。
最小宽度限定符允许对屏幕的宽度指定一个最小值(以dp为单位),然后以这个最小值为临界点,屏幕宽度大于这个值的设备就加载一个布局,屏幕宽度小于这个值的设备就加载另一个布局。
举个例子:
在res目录下新建layout-sw600dp文件夹,然后在这个文件夹下新建activity_main.xml布局,代码如下所示:
<LinearLayout xmlns:android="http://schemas.android.com/apk/res/android"android:orientation="horizontal"android:layout_width="match_parent"android:layout_height="match_parent"><fragmentandroid:id="@+id/leftFrag"android:name="com.example.fragmenttest.LeftFragment"android:layout_width="0dp"android:layout_height="match_parent"android:layout_weight="1" /><fragmentandroid:id="@+id/rightFrag"android:name="com.example.fragmenttest.RightFragment"android:layout_width="0dp"android:layout_height="match_parent"android:layout_weight="3" /></LinearLayout>
这意味着,当程序运行在屏幕宽度大于等于600 dp的设备上时,会加载layout-sw600dp/activity_main布局,当程序运行在屏幕宽度小于600 dp的设备上时,则仍然加载默认的layout/activity_main布局。
5.5 新闻实例分析
先看一下最终效果: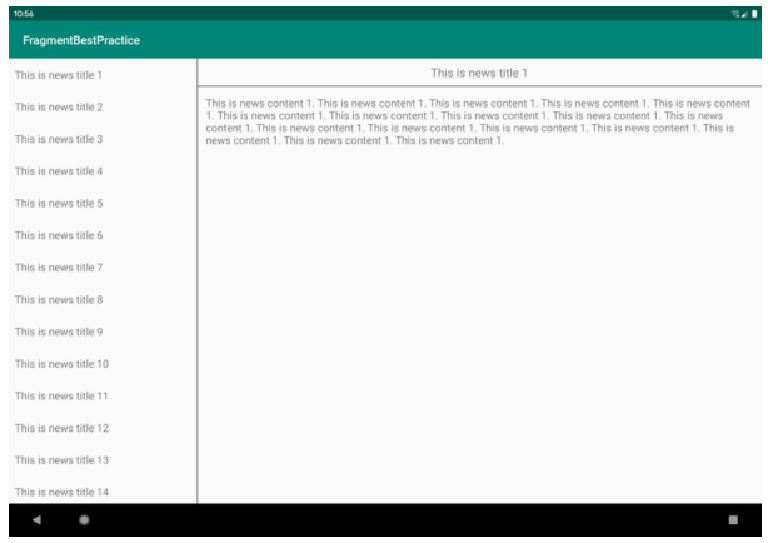

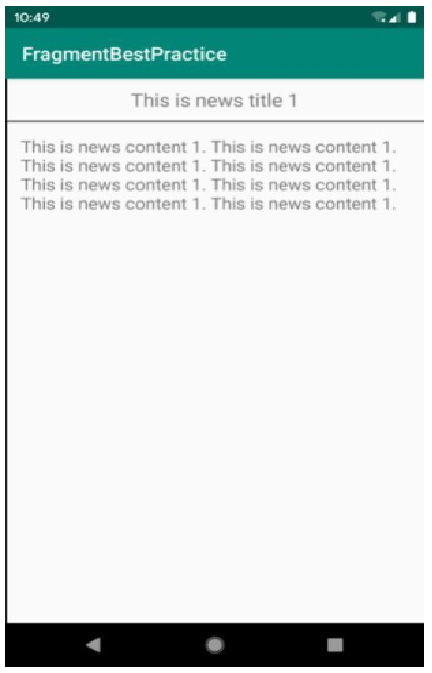
在平板上,点击左侧的title,右侧能够同步刷新相关的内容。
在手机上,点击title,能够跳转到相应的页面。
需求分析
根据上面的效果图以及需求,可以得出,我们需要两个fragment,一个是新闻标题栏的fragment,一个是具体内容的fragment,我们可以分别取名为:NewsTitleFragment和NewsContentFragment。
- 屏幕比较小的时候,
MainActivity当中应该只有一个NewsTitleFragment。- 点击每一个
title,会跳转到相应的新闻内容当中去,所以还需要一个Activity存放新闻内容,我们将这个Activity取名为:**NewContentActivity**。
- 点击每一个
- 屏幕比较大的时候,
MainActivity当中应该同时存在一个NewsTitleFragment和一个NewsContentFragment。- 点击每一个
title,右侧内容区域就会刷新相应的内容。
- 点击每一个
接下来分析一下布局:
NewsTitleFragment需要一个布局文件,这里我们取名为:news_title_frag- 由于这是个列表展示,所以这里需要使用到我们上一章学到的
RecyclerView,那就必需创建一个子项的布局:news_item。
- 由于这是个列表展示,所以这里需要使用到我们上一章学到的
NewsContentFragment也需要一个布局文件:news_content_frag- 剩下两个Activity也需要一个布局文件,这里是自动生成的不用管:
activity_main和activity_news_contents.- 需要注意的是,
MainActivity需要适配两个宽度的设备,layout下的是默认布局,所以还需要新建一个layout-sw600dp目录,这个目录下再创建一个activity_main,用于适配平板。
- 需要注意的是,
最后是根据上节课中的RecyclerView需要创建相应的News类,最后我们需要的布局和类如下: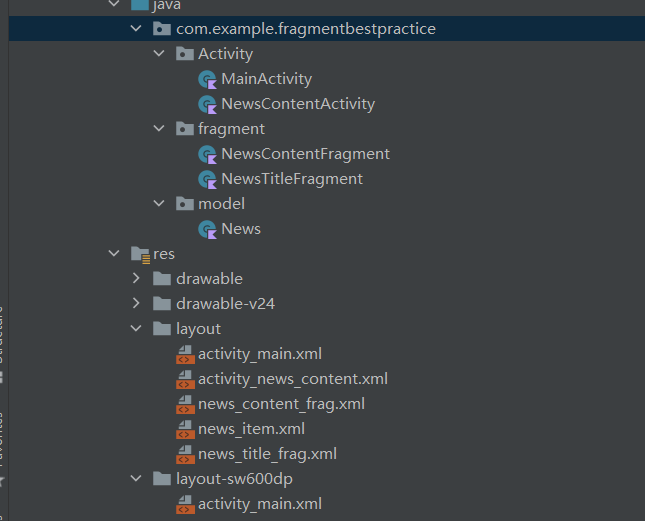
这里会发现没有建立对应的适配器,这个后面会提到,现在需要建立的布局和类就这么多。
设计阶段
设计基础模型
基础的News模型很简单,只需要有新闻的标题(title)和新闻的内容(content)即可:
package com.example.fragmentbestpractice.model;class News(val title: String, val content: String) {}
接下来给单个子项(news_item)设置布局:
<TextView xmlns:android="http://schemas.android.com/apk/res/android"android:id="@+id/newsTitle"android:layout_width="match_parent"android:layout_height="wrap_content"android:maxLines="1"android:ellipsize="end"android:textSize="18sp"android:paddingLeft="10dp"android:paddingRight="10dp"android:paddingTop="15dp"android:paddingBottom="15dp" />
注意这里只需要一个
TextView即可,不要添加任何的Layout
设置新闻内容区域
首先设置布局news_content_frag:
<RelativeLayout xmlns:android="http://schemas.android.com/apk/res/android"android:layout_width="match_parent"android:layout_height="match_parent"><LinearLayoutandroid:id="@+id/contentLayout"android:layout_width="match_parent"android:layout_height="match_parent"android:orientation="vertical"android:visibility="invisible" ><TextViewandroid:id="@+id/newsTitleAboveContent"android:layout_width="match_parent"android:layout_height="wrap_content"android:gravity="center"android:padding="10dp"android:textSize="20sp" /><Viewandroid:layout_width="match_parent"android:layout_height="1dp"android:background="#000" /><TextViewandroid:id="@+id/newsContent"android:layout_width="match_parent"android:layout_height="0dp"android:layout_weight="1"android:padding="15dp"android:textSize="18sp" /></LinearLayout><Viewandroid:layout_width="1dp"android:layout_height="match_parent"android:layout_alignParentLeft="true"android:background="#000" /></RelativeLayout>
这里的
View控件就是分割线的作用。
比较简单,就不细讲了。
接下来设计NewsContentFragment:
package com.example.fragmentbestpractice.fragmentimport android.os.Bundleimport android.view.LayoutInflaterimport android.view.Viewimport android.view.ViewGroupimport android.widget.LinearLayoutimport android.widget.TextViewimport androidx.fragment.app.Fragmentimport com.example.fragmentbestpractice.Rclass NewsContentFragment : Fragment() {override fun onCreateView(inflater: LayoutInflater, container: ViewGroup?,savedInstanceState: Bundle?): View? {return inflater.inflate(R.layout.news_content_frag, container, false)}fun refresh(title: String, content: String) {val contentLayout: LinearLayout? = activity?.findViewById(R.id.contentLayout)contentLayout?.visibility = View.VISIBLE// 获取新闻的标题,这个标题是在后面内容布局里面的标题val newsTitle: TextView? = activity?.findViewById(R.id.newsTitleAboveContent)// 获取新闻的内容,这个标题是在后面内容布局里面的内容val newsContent:TextView? = activity?.findViewById(R.id.newsContent)newsTitle?.text = title // 刷新新闻的标题newsContent?.text = content // 刷新新闻的内容}}
这里会有部分地方关联其他类或者布局,会有报错,先不用管。
主要讲一下这里的刷新方法:
刷新方法传入了两个参数:title: String,content: String,就是新闻的标题和内容。
刷新方法中后面四局代码很好理解,注释里面写了,这里不再赘述。
主要是讲一下这里前面两行:
val contentLayout: LinearLayout? = activity?.findViewById(R.id.contentLayout)contentLayout?.visibility = View.VISIBLE
第一句的作用是在fragment中调用activity的方法,通过id找寻到id为contentLayout的控件,这个控件在后面会提到,只在屏幕较大的时候使用了这个控件,也就是说只有屏幕大的时候,才有contentLayout,第二句的意思就是使这个控件可见。
为什么加?,是因为屏幕小的时候就不会有这个控件,所以这个变量可能是null,所以加上?防止了空指针异常。
设计新闻标题栏
首先设置布局news_title_frag:
<LinearLayout xmlns:android="http://schemas.android.com/apk/res/android"android:orientation="vertical"android:layout_width="match_parent"android:layout_height="match_parent"><androidx.recyclerview.widget.RecyclerViewandroid:id="@+id/newsTitleRecyclerView"android:layout_width="match_parent"android:layout_height="match_parent"/></LinearLayout>
设计`NewsTitleFragment`:
代码比较长,点击左上角三角形可以收起代码块。
package com.example.fragmentbestpractice.fragmentimport android.os.Bundleimport android.view.LayoutInflaterimport android.view.Viewimport android.view.ViewGroupimport android.widget.TextViewimport androidx.fragment.app.Fragmentimport androidx.recyclerview.widget.LinearLayoutManagerimport androidx.recyclerview.widget.RecyclerViewimport com.example.fragmentbestpractice.Activity.NewsContentActivityimport com.example.fragmentbestpractice.Rimport com.example.fragmentbestpractice.model.Newsclass NewsTitleFragment : Fragment() {private var isTwoPane = false // 判断是不是双页模式,默认不是// 基础创建视图override fun onCreateView(inflater: LayoutInflater, container: ViewGroup?,savedInstanceState: Bundle?): View? {return inflater.inflate(R.layout.news_title_frag, container, false)}// 当Activity创建的时候,执行的代码override fun onActivityCreated(savedInstanceState: Bundle?) {// 保存数据super.onActivityCreated(savedInstanceState)// 判断有没有id是newsContentLayout的空间,如果有说明是在平板上,说明是双页模式,后面的逻辑语句就成真,这个时候isTwoPane = True,反之就是默认不是isTwoPane = activity?.findViewById<View>(R.id.newsContentLayout) != null// 获取当前Activity下的布局管理器val layoutManager = LinearLayoutManager(activity)// 根据id获取RecyclerView的实例,activity可能是空的,因为可能没有activity使用这个fragmentval newsTitleRecyclerView: RecyclerView? = activity?.findViewById(R.id.newsTitleRecyclerView)// 下面就是布局管理器和适配器的配置newsTitleRecyclerView?.layoutManager = layoutManager// 适配器接受一个数组val adapter = NewsAdapter(getNews())newsTitleRecyclerView?.adapter = adapter}// 生成50个News实例,组装在一个List数组中返回private fun getNews(): List<News> {val newsList = ArrayList<News>()for (i in 1..50) {// 随机获取不同长度的内容,这个内容重复1-20次的标题val news = News("This is news title $i", getRandomLengthString("This is news content $i. "))newsList.add(news)}return newsList}// 随机获取不同长度的内容private fun getRandomLengthString(str: String): String {// 随机重复1-20次strval n = (1..20).random()val builder = StringBuilder()repeat(n) {builder.append(str)}return builder.toString()}// 这里把适配器定义为内部类了,因为需要使用到Fragment中的参数// 一个比较复杂的继承,没什么好讲的,我也不想去查官方文档了inner class NewsAdapter(val newsList: List<News>) : RecyclerView.Adapter<NewsAdapter.ViewHolder>() {// 这里和上一章内容一样inner class ViewHolder(view: View) : RecyclerView.ViewHolder(view) {val newsTitle: TextView = view.findViewById(R.id.newsTitle)}override fun onCreateViewHolder(parent: ViewGroup, viewType: Int): ViewHolder {val view = LayoutInflater.from(parent.context).inflate(R.layout.news_item, parent, false)val holder = ViewHolder(view)// 给每一个子项设置点击事件holder.itemView.setOnClickListener {// 获取新闻列表中对应位置的News实例val news = newsList[holder.bindingAdapterPosition]// 如果是双页模式,则刷新NewsContentFragment中的内容if (isTwoPane) {获取内容面板的实例val fragment = fragmentManager?.findFragmentById(R.id.newsContentFrag) as NewsContentFragment// 刷新的内容是获取的News实例的标题和内容fragment?.refresh(news.title, news.content)}// 如果是单页模式,则直接启动NewsContentActivityelse {// 这个启动方法后面会讲,这里只要知道是启动新闻内容页面即可,后面可以回过头了再看看NewsContentActivity.actionStart(parent.context, news.title, news.content)}}return holder}// 下面两个也和上一章内容一样override fun onBindViewHolder(holder: ViewHolder, position: Int) {val news = newsList[position]holder.newsTitle.text = news.title}override fun getItemCount() = newsList.size}}
解析都在注释里面了,这里就不讲了。 这里放一下上一章有关适配器的链接:
设计单独的新闻内容页
首先还是布局:activity_news_content:
<LinearLayout xmlns:android="http://schemas.android.com/apk/res/android"android:orientation="vertical"android:layout_width="match_parent"android:layout_height="match_parent"><fragmentandroid:id="@+id/newsContentFrag"android:name="com.example.fragmentbestpractice.fragment.NewsContentFragment"android:layout_width="match_parent"android:layout_height="match_parent"/></LinearLayout>
内容很简单,就是放了一个fragment,还是比较好理解的。
看一下Activity:
package com.example.fragmentbestpractice.Activityimport android.content.Contextimport android.content.Intentimport androidx.appcompat.app.AppCompatActivityimport android.os.Bundleimport com.example.fragmentbestpractice.Rimport com.example.fragmentbestpractice.fragment.NewsContentFragmentclass NewsContentActivity : AppCompatActivity() {companion object {fun actionStart(context: Context, title: String, content: String) {val intent = Intent(context, NewsContentActivity::class.java).apply {putExtra("news_title", title)putExtra("news_content", content)}context.startActivity(intent)}}override fun onCreate(savedInstanceState: Bundle?) {super.onCreate(savedInstanceState)setContentView(R.layout.activity_news_content)val title = intent.getStringExtra("news_title") // 获取传入的新闻标题val content = intent.getStringExtra("news_content") // 获取传入的新闻内容if (title != null && content != null) {val fragment = supportFragmentManager.findFragmentById(R.id.newsContentFrag)as NewsContentFragmentfragment.refresh(title, content) //刷新NewsContentFragment界面}}}
companion object就当做静态使用就好了,详情参照下面的文章,不理解也没关系。//
[kotlin]kotlin中的伴生对象(companion object)到底是个什么东西?_黑森林中的小木屋的博客-CSDN博客_companion object
讲一下里面的启动函数:
fun actionStart(context: Context, title: String, content: String) {val intent = Intent(context, NewsContentActivity::class.java).apply {putExtra("news_title", title)putExtra("news_content", content)}context.startActivity(intent)}
后面两个参数很好理解,第一个参数指的是上下文,实如果说是从`MainActivity`触发了这个时间,那么这个启动函数会从`MainActivity`跳转到`NewsContentActivity`。
这里的context指代的就是
Activity,就是可以从其他Activity转到NewsContentActivity。
设计MainActivity
这个就很简单了,直接看代码:
package com.example.fragmentbestpractice.Activityimport androidx.appcompat.app.AppCompatActivityimport android.os.Bundleimport com.example.fragmentbestpractice.Rclass MainActivity : AppCompatActivity() {override fun onCreate(savedInstanceState: Bundle?) {super.onCreate(savedInstanceState)setContentView(R.layout.activity_main)}}
设计布局:
<FrameLayout xmlns:android="http://schemas.android.com/apk/res/android"android:id="@+id/newsTitleLayout"android:layout_width="match_parent"android:layout_height="match_parent" ><fragmentandroid:id="@+id/newsTitleFrag"android:name="com.example.fragmentbestpractice.fragment.NewsTitleFragment"android:layout_width="match_parent"android:layout_height="match_parent"/></FrameLayout>
<LinearLayout xmlns:android="http://schemas.android.com/apk/res/android"android:orientation="horizontal"android:layout_width="match_parent"android:layout_height="match_parent" ><fragmentandroid:id="@+id/newsTitleFrag"android:name="com.example.fragmentbestpractice.fragment.NewsTitleFragment"android:layout_width="0dp"android:layout_height="match_parent"android:layout_weight="1" /><FrameLayoutandroid:id="@+id/newsContentLayout"android:layout_width="0dp"android:layout_height="match_parent"android:layout_weight="3" ><fragmentandroid:id="@+id/newsContentFrag"android:name="com.example.fragmentbestpractice.fragment.NewsContentFragment"android:layout_width="match_parent"android:layout_height="match_parent" /></FrameLayout></LinearLayout>
注意这里的
newsContentLayout,就是上面一直提到的新闻内容面板。

若有收获,就点个赞吧
0 人点赞
