一. 安装(固定)
npm install xlsx -S
二. 拷贝组件(固定)
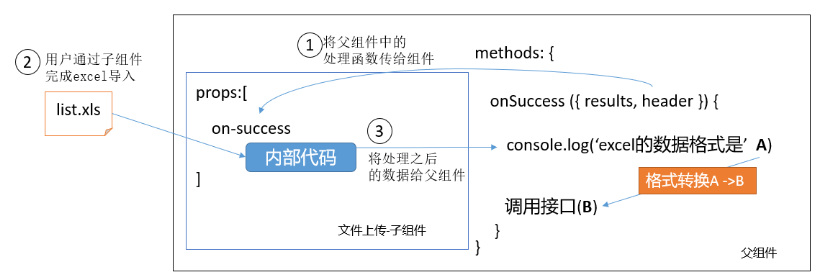
这个组件名字就是 UploadExcel 这个组件将作为儿子 被别的父亲用
1. 复制到我们自己项目的 src/components/UploadExcel
<template><div><input ref="excel-upload-input" class="excel-upload-input" type="file" accept=".xlsx, .xls" @change="handleClick"><div class="drop" @drop="handleDrop" @dragover="handleDragover" @dragenter="handleDragover">拖入excel文件 or<el-button :loading="loading" style="margin-left:16px;" size="mini" type="primary" @click="handleUpload">浏览</el-button></div></div></template><script>import XLSX from 'xlsx'export default {name: 'UploadExcel',props: {beforeUpload: Function, // eslint-disable-lineonSuccess: Function// eslint-disable-line},data() {return {loading: false,excelData: {header: null,results: null}}},methods: {generateData({ header, results }) {this.excelData.header = headerthis.excelData.results = resultsthis.onSuccess && this.onSuccess(this.excelData)},handleDrop(e) {e.stopPropagation()e.preventDefault()if (this.loading) returnconst files = e.dataTransfer.filesif (files.length !== 1) {this.$message.error('Only support uploading one file!')return}const rawFile = files[0] // only use files[0]if (!this.isExcel(rawFile)) {this.$message.error('Only supports upload .xlsx, .xls, .csv suffix files')return false}this.upload(rawFile)e.stopPropagation()e.preventDefault()},handleDragover(e) {e.stopPropagation()e.preventDefault()e.dataTransfer.dropEffect = 'copy'},handleUpload() {this.$refs['excel-upload-input'].click()},handleClick(e) {const files = e.target.filesconst rawFile = files[0] // only use files[0]if (!rawFile) returnthis.upload(rawFile)},upload(rawFile) {this.$refs['excel-upload-input'].value = null // fix can't select the same excelif (!this.beforeUpload) {this.readerData(rawFile)return}const before = this.beforeUpload(rawFile)if (before) {this.readerData(rawFile)}},readerData(rawFile) {this.loading = truereturn new Promise((resolve, reject) => {const reader = new FileReader()reader.onload = e => {const data = e.target.resultconst workbook = XLSX.read(data, { type: 'array' })const firstSheetName = workbook.SheetNames[0]const worksheet = workbook.Sheets[firstSheetName]const header = this.getHeaderRow(worksheet)const results = XLSX.utils.sheet_to_json(worksheet)this.generateData({ header, results })this.loading = falseresolve()}reader.readAsArrayBuffer(rawFile)})},getHeaderRow(sheet) {const headers = []const range = XLSX.utils.decode_range(sheet['!ref'])let Cconst R = range.s.r/* start in the first row */for (C = range.s.c; C <= range.e.c; ++C) { /* walk every column in the range */const cell = sheet[XLSX.utils.encode_cell({ c: C, r: R })]/* find the cell in the first row */let hdr = 'UNKNOWN ' + C // <-- replace with your desired defaultif (cell && cell.t) hdr = XLSX.utils.format_cell(cell)headers.push(hdr)}return headers},isExcel(file) {return /\.(xlsx|xls|csv)$/.test(file.name)}}}</script><style scoped>.excel-upload-input{display: none;z-index: -9999;}.drop{border: 2px dashed #bbb;width: 600px;height: 160px;line-height: 160px;margin: 0 auto;font-size: 24px;border-radius: 5px;text-align: center;color: #bbb;position: relative;}</style>
2. 注册成全局组件
此处 省略….. 看你是哪种全局,是在main.js里面还是Vue.use()下面
三: 准备页面(固定)
1 . 建立公共的导入页面:
这个组件就取个名字叫做 **import 组件吧, 创建在 src/views/import/index.vue 固定写法**<br />** 哪个页面要用到导入excel功能,哪个页面就调用这个子组件import**
<template><UploadExcel :on-success="handleSuccess" /> // 调用UploadExcel组件</template><script>export default {name: 'Import',methods: {handleSuccess({ header, results }) {console.log(header, results)}}}</script>
说明: :on-success=”handleSuccess” 表示成功之后的回调
2. 配置路由:
根据场景来看: 是定义为静态路由(不需要权限控制)或者 是动态路由
{path: '/import',component: Layout,hidden: true, // 不显示到左侧菜单children: [{path: '',component: () => import('@/views/import')}]}
3. 添加点击事件: (这一步不是固定的,具体就看你怎么使用这个
import组件了)
点击导入 , 路由跳转到import组件(这个组件现在充当父组件,就是用上面这个儿子组件的父组件)

效果图:

里面的功能就是我上面拷贝的那个组件里面的
小结:
excel导入插件本质:
把excel经过分析转换成js能够识别的常规数据,拿到数据我们可以进
行任何操作
四: 数据处理 (固定,但是要结合实际情况来处理)
(去看看我写的另外一个excel导出,里面也有处理数据)
1. 说明:
* 数据格式转换:将excel解析好的数据经过处理后,转成可以传给接口调用的数据
* 调用接口进行excel上传的**重点其实是数据的处理**,我们需要按照接口的要求,把excel表格中<br /> 经过插件处理好的数据处理成后端接口要求的格式<br />
2. 演示例子代码:
数据处理以及时间处理:
transExcel()是做数据转换的(自己取得名字)
转换的目标:
[{‘姓名’:’小张’, ‘手机号’:’13888888’, ….}]
转成
[{‘username’:’小张’,’mobile’:’13888888’}]
transExcel(results) {const mapInfo = {'入职日期': 'timeOfEntry','手机号': 'mobile','姓名': 'username','转正日期': 'correctionTime','工号': 'workNumber','部门': 'departmentName','聘用形式': 'formOfEmployment'}const arr = results.map(obj => {// 把一个对象数组中的每个对象的属性名从中文改成英文// 思路: 对于原数组的每个对象来说:// 1. 找出所有的中文key// 2. 得到对应该的英文的key// 3. 拼装一个新对象: 英文的key:值const _obj = {} // 定义一个新的对象 最后装入新的对象的// 1. 找出所有的中文keyconst zhKeys = Object.keys(obj)// zhKeys : ['姓名','手机号',.....]zhKeys.forEach(zhKey => {// 2. 得到对应该的英文的keyconst enKey = mapInfo[zhKey]console.log(enKey) // 已经拿到所有英文的key了// 日期处理。从excel中读入的时间是一个number值,而后端需要的是标准日期。if (enKey === 'timeOfEntry' || enKey === 'correctionTime') {// 后端需要的日期格式是标准时间// 这里的formatExcelDate方法就是封装的时间格式化的方法_obj[enKey] = new Date(formatExcelDate(obj[zhKey]))} else {// 3.拼装一个新对象: 英文的key:值_obj[enKey] = obj[zhKey]}})return _obj})return arr}
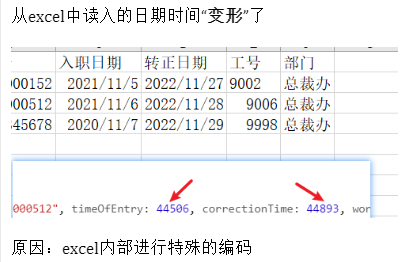
为什么要对时间进行处理? 是因为后端需要的是一个标准日期。

3. 把excel文件中的日期格式的内容转回成标准的时间
// 把excel文件中的日期格式的内容转回成标准时间// https://blog.csdn.net/qq_15054679/article/details/107712966export function formatExcelDate(numb, format = '/') {const time = new Date((numb - 25567) * 24 * 3600000 - 5 * 60 * 1000 - 43 * 1000 - 24 * 3600000 - 8 * 3600000)time.setYear(time.getFullYear())const year = time.getFullYear() + ''const month = time.getMonth() + 1 + ''const date = time.getDate() + ''if (format && format.length === 1) {return year + format + month + format + date}return year + (month < 10 ? '0' + month : month) + (date < 10 ? '0' + date : date)}
五: 封装接口并调用
1. 目标:
完成按钮跳转,导入完成(接口调用)之后,再跳回到原来的页面
2. 封装 导入excel的api接口
3. 在import页面导入使用
async doImport(data) {try {const res = await importEmployee(data)console.log('importEmployee', res)this.$message.success('导入成功')// 页面后退this.$router.back()} catch (err) {console.log('importEmployee', err)this.$message.error('导入失败')}},// 成功之后干了啥? 下面三样// 1. 把数据从excel文件读入到浏览器内存handleSuccess({ header, results }) {console.log(header, results)// 2. 按接口要求 组装数据const data = this.transExcel(results)console.log('按接口要求 组装数据', data)// 3. 调用接口做上传this.doImport(data)},


