什么是Message?
类似于elementUI中的$messageBox,给用户进行界面提示

功能:
- 固定顶部显示,有三种类型:成功,错误,警告。
- 显示消息提示时需要动画从上滑入。
- 组件使用的方式不够便利,封装成工具函数方式。
步骤:
一: 封装组件:
1. 创建一个全局组件,比如: src/components/xtx-message.vue
<template><div class="xtx-message" :style="style[type]"><!-- 上面绑定的是样式 --><!-- 不同提示图标会变 --><i class="iconfont" :class="[style[type].icon]"></i><span class="text">{{text}}</span></div></template><script>export default {name: 'XtxMessage',props: {text: {type: String,default: ''},type: {type: String,// warn 警告 error 错误 success 成功default: 'warn'}},setup () {// 定义一个对象,包含三种情况的样式,对象key就是类型字符串const style = {warn: {icon: 'icon-warning',color: '#E6A23C',backgroundColor: 'rgb(253, 246, 236)',borderColor: 'rgb(250, 236, 216)'},error: {icon: 'icon-shanchu',color: '#F56C6C',backgroundColor: 'rgb(254, 240, 240)',borderColor: 'rgb(253, 226, 226)'},success: {icon: 'icon-queren2',color: '#67C23A',backgroundColor: 'rgb(240, 249, 235)',borderColor: 'rgb(225, 243, 216)'}}return { style }}}</script><style scoped lang="less">.xtx-message {width: 300px;height: 50px;position: fixed;z-index: 9999;left: 50%;margin-left: -150px;top: 25px;line-height: 50px;padding: 0 25px;border: 1px solid #e4e4e4;background: #f5f5f5;color: #999;border-radius: 4px;i {margin-right: 4px;vertical-align: middle;}.text {vertical-align: middle;}}</style>
- 使用组件:
使用不同的type(error, warn, success)会有不同的效果<XtxMessage text="手机号或密码错误" type="error" />
二: 控制显示与隐藏
从不可见 ---> 可见 核心就是定义一个显示与隐藏的初始值,v-show绑定
<template><div class='xtx-message' :style="style" v-show="visible"><!-- 上面绑定的是样式 --><!-- 不同提示图标会变 --><i class="iconfont" :class="[style[type].icon]"></i><span class="text">{{text}}</span></div></template><script>import { ref, onMounted } from 'vue'export default {name: 'XtxMessage',// 省略其他...setup () {// 定义一个对象,包含三种情况的样式,对象key就是类型字符串const style = {// 省略其他...}// 定义一个数据控制显示隐藏,默认是隐藏,组件挂载完毕显示const visible = ref(false)onMounted(()=>{visible.value = true})return { style, visible }}}</script>
三: 动画效果 - 使用transition组件
在vue框架中, 是通过 [transition组件](https://v3.cn.vuejs.org/guide/transitions-overview.html#%E5%9F%BA%E4%BA%8E-class-%E7%9A%84%E5%8A%A8%E7%94%BB%E5%92%8C%E8%BF%87%E6%B8%A1) ,来实现动画的效果, 本质上还是c3动画 <br /> 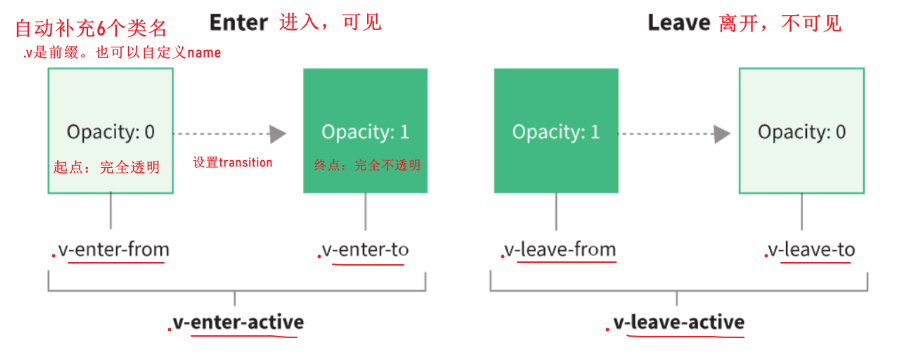
<template><!-- 目标:它从无到有是有动画过渡效果<transition name="down">: vue会元素可见和不可见的关键节点 自动补充 特殊的css类名-->+ <Transition name="down"><div class='xtx-message' :style="style" v-show="visible"><!-- 上面绑定的是样式 --><!-- 不同提示图标会变 --><i class="iconfont" :class="[style[type].icon]"></i><span class="text">{{text}}</span></div>+ </Transition></template>
css样式
<style scoped lang='less'>.down-enter-from {transform: translate3d(0,-75px,0);opacity: 0;}.down-enter-active {transition: all 0.5s;}.down-enter-to { transform: none; opacity: 1;}// transform: none; opacity: 1;// 省略其他....</style>
四: 把Message 封装成函数调用
我们希望通过函数形式动态调用Message({ type: 'error', text: '登录失败' })
基本步骤:
1. 导入组件
——- 显示 ———
2. 根据组件创建虚拟节点. const vnode = createVNode(XtxMessage, { type, text })
3. 准备一个DOM容器
4. 把虚拟节点渲染DOM容器中. render(vnode, div)
——-隐藏DOM——-
5. 开启定时器,移出DOM容器内容 render(null, div)
src/components/Message.js
// 导入.vue组件,导出一个函数,方便我们直接以函数的方式来调用组件// 1. 导入组件// ----- 显示 ------// 2. 根据组件创建虚拟节点. const vnode = createVNode(XtxMessage, { type, text })// 3. 准备一个DOM容器// 4. 把虚拟节点渲染DOM容器中. render(vnode, div)// -----隐藏DOM-----// 5. 开启定时器,移出DOM容器内容 render(null, div)import { createVNode, render } from 'vue'import XtxMessage from './xtx-message.vue'// 2. 准备一个DOM容器const div = document.createElement('div')div.setAttribute('class', 'xtx-message-wrapper')document.body.appendChild(div)let time = nullexport default ({ text, type }) => {// 3. 创建虚拟dom (组件对象, props)const vnode = createVNode(XtxMessage, { text, type })// 4. 把虚拟dom渲染到divrender(vnode, div)// 5. 设置定时器清空clearTimeout(time)time = setTimeout(() => {render(null, div)}, 2000)console.log('message.js')}
使用:
import Message from '@/components/Message'Message({ type: 'error', text: '登录失败' })
五: vue3中全局挂载
在main.js中
import Message from '@/components/Message'app.config.globalProperties.$message = Message
使用
选项式api (vue2) ```javascript created() { this.$message({ type: ‘error’, text: ‘登录失败’ }) }
组合式api(vue3)```javascriptimport { getCurrentInstance } from 'vue'export default {setup () {const internalInstance = getCurrentInstance()internalInstance.appContext.config.globalProperties.$message({ type: 'success', text: 'xxx' })}}
小结:
由于vue3中组合式api内没有this,所以使用全局挂载的方法其实也不方便,所以,在用Message还是先import,再使用。

若有收获,就点个赞吧
0 人点赞
