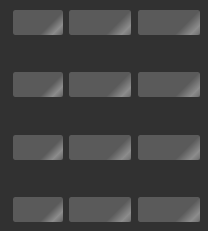
效果图:
为什么使用骨架屏:
在数据加载的过程中,一种等待效果,就是为了好看
原理:
- 有一小块, 有一个动画
- 多个小块组合在一起,模拟骨架
- 它可以定制: width , height , bg
一: 动态定制
封装插件
封装组件: src/components/xtx-skeleton.vue1. 先想好测试用例(也就是说你希望别人怎么用这个组件的)就要思考,传入什么值进去。
<XtxSkeleton style="margin-right:10px" width="200px" height="50px" bg="red"/><XtxSkeleton style="margin-right:50px" width="100px" height="100px" bg="blue"/><XtxSkeleton width="50px" height="18px" bg="blue"/>
2. 在组件内部,定义对应props去接收,实现具体效果
<template><div class="xtx-skeleton shan" :style="{width:width,height:height}"><!-- 1 盒子--><div class="block" :style="{backgroundColor:bg}"></div><!-- 2 闪效果 xtx-skeleton 伪元素 ---></div></template><script>export default {name: 'XtxSkeleton',props: {width: { type: String, default: '100px' },height: { type: String, default: '100px' },bg: { type: String, default: '#ccc' }}}</script><style scoped lang="less">.xtx-skeleton {display: inline-block;position: relative;overflow: hidden;vertical-align: middle;.block {width: 100%;height: 100%;border-radius: 2px;}}.shan {&::after {content: "";position: absolute;animation: shan 1.5s ease 0s infinite;top: 0;width: 50%;height: 100%;background: linear-gradient(to left,rgba(255, 255, 255, 0) 0,rgba(255, 255, 255, 0.3) 50%,rgba(255, 255, 255, 0) 100%);transform: skewX(-45deg);}}@keyframes shan {0% {left: -100%;}100% {left: 120%;}}</style>
二: vue3中插件格式定义全局组件
1. 封装插件 :
在src/componets/index.js vue3版本
import XtxSkeleton from './xtx-skeleton.vue'const myPlugin = {install (app) {// 在app上进行扩展,app提供 component directive 函数app.component(XtxSkeleton.name, XtxSkeleton)}}export default myPlugin
注意:
以插件的格式全局注册组件的时候: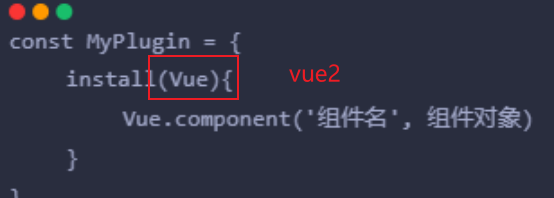
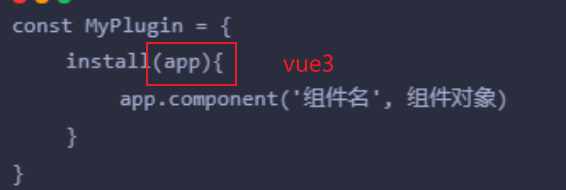
区别就是: vue2中install的参数是Vue构造器,vue3中install中的参数是vue实例。
2. 使用插件:
在 src/main.js
插件的使用,在main.js使用app.use(插件)
import myPlugin from './components/index'createApp(App).use(myPlugin)
最后就是测试使用

若有收获,就点个赞吧
0 人点赞
