1 介绍
参考连接:spring-boot-demo
springboot提供了mail的发送jar包,当然你可以选择其他jar包实现,比如阿里云提供的sdk来实现,腾讯云的sdk实现。
我们用阿里云的简单例子,来解释发送邮箱,需要的必须参数。
public class email {public static void main(String[] args) throws EmailException {SimpleEmail email =new SimpleEmail();//邮箱发送的地址email.setHostName("smtp.qq.com");//发信人账号和密码或授权码(授权码会过期)email.setAuthentication("***3457107", "your code");//邮箱标题email.setFrom("***3457107@qq.com","你好!");// ssl协议email.setSSLOnConnect(true);//发送邮箱地址email.addTo("***7887868@qq.com");//邮箱正文标题email.setSubject("我是一封简单文本邮件标题!");//邮箱内容email.setMsg("hello world!");//发送email.send();}}
从上面看,必选参数有邮件的服务器地址、发信人账号和授权码、邮件标题、邮件收信人、邮件正文标题、邮件内容。
这就是基本参数,而一些抄送、密送、发送时间、附件等都是可选参数。
而授权码则需要我们手动配置一下,登录QQ邮箱,找到设置->账户->生成授权码,发送对应的短信后,就会出现授权码。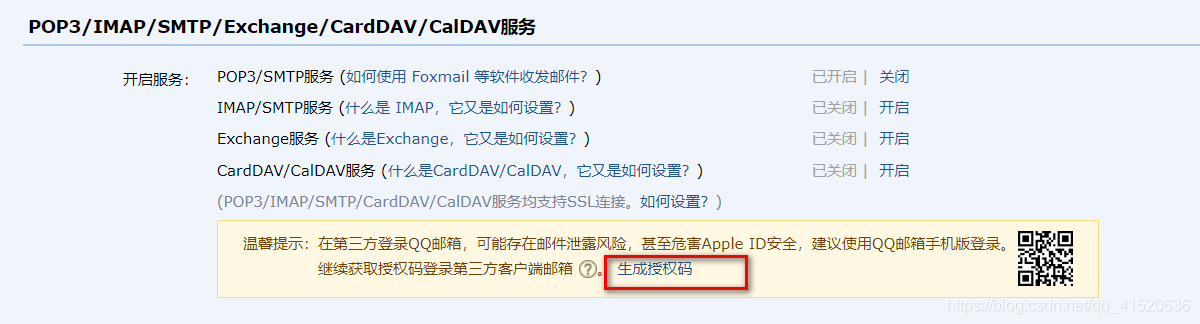
1 知识储备
在学习邮件发送之前,我们先来学习一下jasypt配置文件加解密。
当我们的application.yml配置文件一些敏感数据,不希望直接暴露在文件中,而使用密钥加密后,得到一串密码。
就比如,授权码这类信息过于敏感,那么我们可以进行加密。
选择jasypt技术,和springboot整合后,就不需要程序员去管加密解密过程,只需要在配置文件中,将加密字符串放在对应位置,以HNC(加密字符串)格式,springboot会自动识别,无需在写其他代码。
注意:加密字符串需要在@test生成,一旦你改变了密码,那么需要重新生成,并且配置文件的加密字符串需要空处理,当然你可以使用jar包来生成密文。
1.1 jasypt技术
1.1.1 引入依赖
<parent><groupId>org.springframework.boot</groupId><artifactId>spring-boot-starter-parent</artifactId><version>2.0.1.RELEASE</version></parent><dependencies><!-- Spring Boot 邮件依赖 --><dependency><groupId>org.springframework.boot</groupId><artifactId>spring-boot-starter-mail</artifactId></dependency><!--jasypt配置文件加解密--><dependency><groupId>com.github.ulisesbocchio</groupId><artifactId>jasypt-spring-boot-starter</artifactId><version>${jasypt.version}</version></dependency><dependency><groupId>org.springframework.boot</groupId><artifactId>spring-boot-starter-test</artifactId><scope>test</scope></dependency><dependency><groupId>org.springframework.boot</groupId><artifactId>spring-boot-starter-web</artifactId></dependency></dependencies>
1.1.2 测试类
@RunWith(SpringRunner.class)@SpringBootTestpublic class Encryptor {/*** 密码解码器自动注入*/@AutowiredStringEncryptor encryptor;//加密@Testpublic void getPass() {String name = encryptor.encrypt("javaJunitPassword");System.out.println("加密结果:" + name);//解密}@Testpublic void passDecrypt() {String username = encryptor.decrypt("7nVX7m3/rNiz+i+oMxGwa/fAOK8cBrsep0CmXZB8JuHtD9K5lNsjW0Jli3wn9X8U");System.out.println("解密结果:" + username);}}
1.1.3 application.yml
# 敏感数据时,可用jasypt加密,格式:ENC(加密字符串),算法:username: HNC(your code)# 为 jasypt 配置解密秘钥jasypt:encryptor:password: hikktn# 自定义算法,默认算法:PBEWithMD5AndDESivGeneratorClassname: org.jasypt.salt.RandomIVGenerator
3 正式开始
3.1 引入依赖
<parent><groupId>org.springframework.boot</groupId><artifactId>spring-boot-starter-parent</artifactId><version>2.0.1.RELEASE</version></parent><properties><project.build.sourceEncoding>UTF-8</project.build.sourceEncoding><project.reporting.outputEncoding>UTF-8</project.reporting.outputEncoding><java.version>1.8</java.version><jasypt.version>2.1.1</jasypt.version></properties><dependencies><!-- Spring Boot 邮件依赖 --><dependency><groupId>org.springframework.boot</groupId><artifactId>spring-boot-starter-mail</artifactId></dependency><!--jasypt配置文件加解密--><dependency><groupId>com.github.ulisesbocchio</groupId><artifactId>jasypt-spring-boot-starter</artifactId><version>${jasypt.version}</version></dependency><dependency><groupId>org.springframework.boot</groupId><artifactId>spring-boot-starter-test</artifactId><scope>test</scope></dependency><dependency><groupId>org.springframework.boot</groupId><artifactId>spring-boot-starter-web</artifactId></dependency><dependency><groupId>cn.hutool</groupId><artifactId>hutool-all</artifactId><version>5.4.1</version></dependency><!-- Spring Boot 模板依赖 --><dependency><groupId>org.springframework.boot</groupId><artifactId>spring-boot-starter-thymeleaf</artifactId></dependency></dependencies><build><finalName>spring-boot-demo-email</finalName><plugins><plugin><groupId>org.springframework.boot</groupId><artifactId>spring-boot-maven-plugin</artifactId></plugin></plugins></build>
3.2 application.yml
spring:mail:host: smtp.qq.com #SMTP服务器地址port: 465username: ***3457107 #登陆账号# 敏感数据时,可用jasypt加密,格式:ENC(加密字符串),算法:password: ENC(your encryptor code) #登陆密码(或授权码)#服务协议protocol: smtp# 连接失败,跳过错误test-connection: true# 编码集default-encoding: UTF-8properties:from: ***3457107@qq.com #邮件发信人(即真实邮箱)to: ***7887868@qq.com # 邮件接信人(为方便测试)# 设置是否需要认证mail.smtp.auth: true#mail.smtp.starttls.enable: truemail.smtp.starttls.required: true# sslmail.smtp.ssl.enable: trueservlet:multipart:max-file-size: 10MB #限制单个文件大小max-request-size: 50MB #限制请求总量# 为 jasypt 配置解密秘钥jasypt:encryptor:password: hikktn# 自定义算法,默认算法:PBEWithMD5AndDESivGeneratorClassname: org.jasypt.salt.RandomIVGenerator
3.3 MailService.java
public class MailService {/*** java邮件发送类*/@Autowiredprivate JavaMailSender mailSender;/*** 发件人邮箱*/@Value("${spring.mail.properties.from}")private String from;/*** 收件人邮箱*/@Value("${spring.mail.properties.to}")private String to;/*** 发送文本邮件** @param subject 邮件主题* @param content 邮件内容* @param cc 抄送地址*/public void sendSimpleMail(String subject, String content, String... cc) {// 创建文本邮箱消息类SimpleMailMessage message = new SimpleMailMessage();// 设置发件人邮箱message.setFrom(from);// 设置收件人邮箱message.setTo(to);// 设置邮箱标题message.setSubject(subject);// 设置邮箱主体内容message.setText(content);// 抄送人不为空的场合if (ArrayUtil.isNotEmpty(cc)) {// 设置抄送人message.setCc(cc);}// 发送消息mailSender.send(message);}}
3.4 测试类
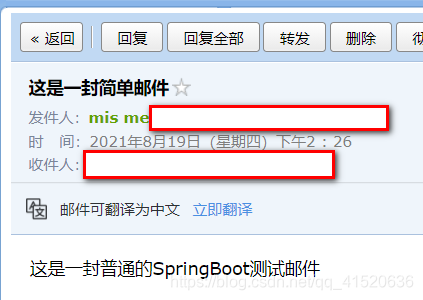
@RunWith(SpringRunner.class)@SpringBootTestpublic class MailServiceTest {@Autowiredprivate MailService mailService;/*** 测试简单邮件*/@Testpublic void sendSimpleMail() {mailService.sendSimpleMail("这是一封简单邮件", "这是一封普通的SpringBoot测试邮件");}}
3.5 结果

若有收获,就点个赞吧
0 人点赞
