Flink核心API介绍
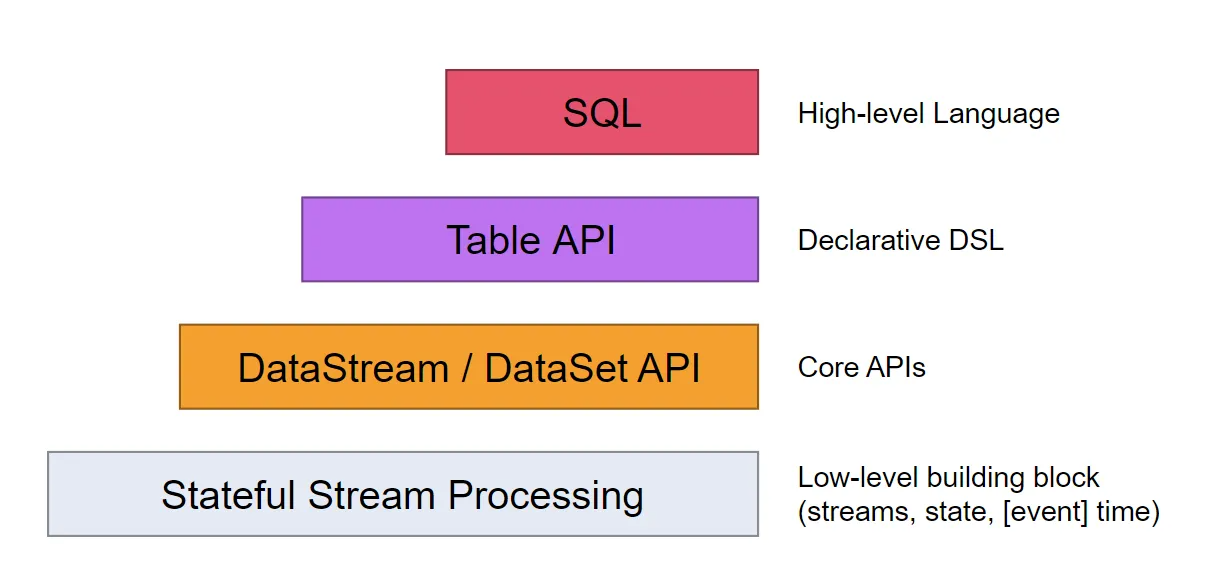
Flink中提供了4种不同层次的API,每种API在简洁和易表达之间有自己的权衡,适用于不同的场景。目前上面3个会用得比较多。
- 低级API(Stateful Stream Processing):提供了对时间和状态的细粒度控制,简洁性和易用性较差,主要应用在一些复杂事件处理逻辑上。
- 核心API(
DataStream/DataSet API):主要提供了针对流数据和批数据的处理,是对低级API进行了一些封装,提供了filter、sum、max、min等高级函数,简单易用,所以这些API在工作中应用还是比较广泛的。 - Table API:一般与DataSet或者DataStream紧密关联,可以通过一个DataSet或DataStream创建出一个Table,然后再使用类似于filter, join,或者 select这种操作。最后还可以将一个Table对象转成DataSet或DataStream。
- SQL:Flink的SQL底层是基于Apache Calcite,Apache Calcite实现了标准的SQL,使用起来比其他API更加灵活,因为可以直接使用SQL语句。Table API和SQL可以很容易地结合在一块使用,因为它们都返回Table对象。
针对这些API我们主要研究下面这些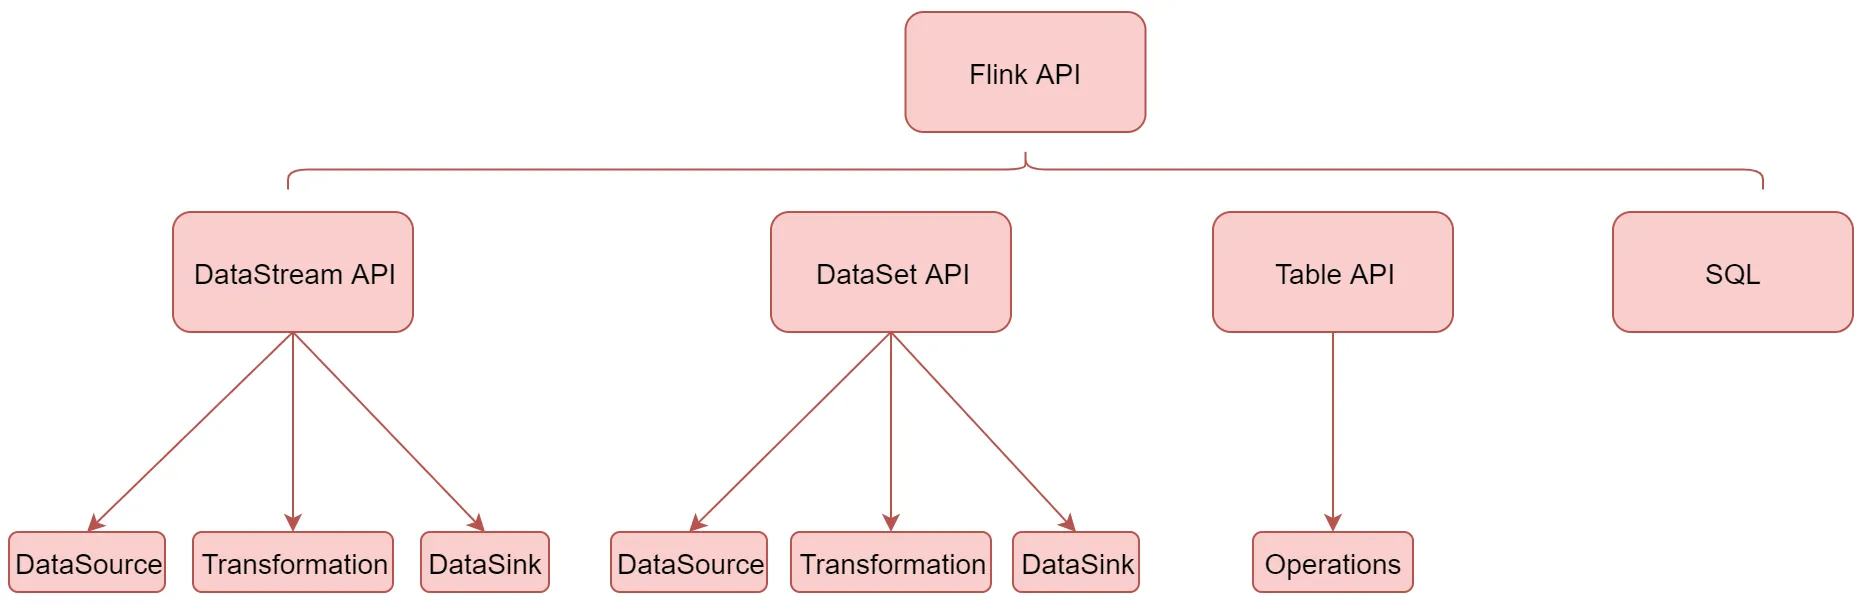
下面首先来看一下DataStream API
DataStream API介绍
DataStream API主要分为3块:DataSource、Transformation、DataSink。DataSource是程序的输入数据源。Transformation是具体的操作,它对一个或多个输入数据源进行计算处理,例如map、flatMap和filter等操作。DataSink是程序的输出,它可以把Transformation处理之后的数据输出到指定的存储介质中。
DataSoure(输入)
DataSource是程序的输入数据源,Flink提供了大量内置的DataSource,也支持自定义DataSource,不过目前Flink提供的这些已经足够我们正常使用了。
Flink提供的内置输入数据源:包括基于socket、基于Collection
还有就是Flink还提供了一批Connectors,可以实现读取第三方数据源
| Flink 内置 | Apache Bahir |
|---|---|
| Kafka(最常用) | ActiveMQ |
| Kinesis Streams | Netty |
| RabbitMQ | |
| NiFi | |
| Twitter Streaming API | |
| Google PubSub |
Flink 内置:表示Flink中默认自带的。
Apache Bahir:表示需要添加这个依赖包之后才能使用的。 针对source的这些Connector,我们在实际工作中最常用的就是Kafka
当程序出现错误的时候,Flink的容错机制能恢复并继续运行程序,这种错误包括机器故障、网络故障、程序故障等
针对Flink提供的常用数据源接口,如果程序开启了checkpoint快照机制,Flink可以提供这些容错性保证
| DataSource | 容错保证 | 备注 |
|---|---|---|
| Socket | at most once | |
| Collection | exactly once | |
| Kafka | exactly once | 需要使用0.10及以上版本 |
socket
基于socket的我们之前已经用过了
需求:通过socket实时产生一些单词,使用flink实时接收数据,对指定时间窗口内(例如:2秒)的数据进行聚合统计,并且把时间窗口内计算的结果打印出来
object SocketWindowWordCountScala {def main(args: Array[String]): Unit = {//获取运行环境val env = StreamExecutionEnvironment.getExecutionEnvironment//连接socket获取输入数据val text = env.socketTextStream("bigdata1", 9002)//处理数据val wordCount = text.flatMap(_.split(" ")) //将每一行数据按空格切分.map((_, 1)) //每一个单词转换成tuple2的形式(单词,1).keyBy(tup => tup._1) //官方推荐使用keySelector选择器选择数据.timeWindow(Time.seconds(2)) //时间窗口为2秒,表示每隔2秒钟计算一次接收到的数据.sum(1) //基于tup的第二列聚合,使用sum或者reduce都可以//使用一个线程执行打印操作wordCount.print().setParallelism(1)//执行程序env.execute("SocketWindowWordCountScala")}}
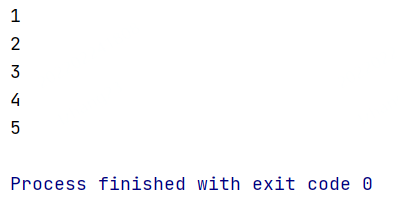
collection
/**
 * 基于collection的source的应用
 * 注意:这个source的主要应用场景是模拟测试代码流程的时候使用
 */
object StreamCollectionSourceScala {

  def main(args: Array[String]): Unit = {
    val env = StreamExecutionEnvironment.getExecutionEnvironment

    //使用collection集合生成DataStream
    val text = env.fromCollection(Array(1, 2, 3, 4, 5))

    text.print().setParallelism(1)

    env.execute()
  }
}
kafka
Transformation(算子)
transformation是Flink程序的计算算子,负责对数据进行处理,Flink提供了大量的算子
其实Flink中的大部分算子的使用和spark中算子的使用是一样的
| 算子 | 解释 |
|---|---|
| map | 输入一个元素进行处理,返回一个元素 |
| flatMap | 输入一个元素进行处理,可以返回多个元素 |
| filter | 对数据进行过滤,符合条件的数据会被留下 |
| keyBy | 根据key分组,相同key的数据会进入同一个分区 |
| reduce | 对当前元素和上一次的结果进行聚合操作 |
| aggregations | sum(),min(),max()等 |
这里面的map、flatmap、keyBy、reduce、sum这些算子我们都用过了。
往下面看。
| 算子 | 解释 |
|---|---|
| union | 合并多个流,多个流的数据类型必须一致 |
| connect | 只能连接两个流,两个流的数据类型可以不同 |
| split | 根据规则把一个数据流切分为多个流 |
| shuffle | 随机分区 |
| rebalance | 对数据集进行再平衡,重分区,消除数据倾斜 |
| rescale | 重分区 |
| partitionCustom | 自定义分区 |
union(合并多个,类型一致)
合并多个流,多个流的数据类型必须一致
多个流join之后,就变成了一个流
应用场景:多种数据源的数据类型一致,数据处理规则也一致
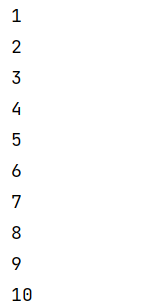
object StreamUnionScala {

  def main(args: Array[String]): Unit = {
    val env = StreamExecutionEnvironment.getExecutionEnvironment

    //第1份数据流
    val text1 = env.fromCollection(Array(1, 2, 3, 4, 5))
    //第2份数据流
    val text2 = env.fromCollection(Array(6, 7, 8, 9, 10))

    //合并流
    val unionStream = text1.union(text2)

    //打印流中的数据
    unionStream.print().setParallelism(1)

    env.execute("StreamUnionScala")
  }

}
connect(连接2个,类型不同)
只能连接两个流(不能多个),两个流的数据类型可以不同
两个流被connect之后,只是被放到了同一个流中,它们内部依然保持各自的数据和形式不发生任何变化,两个流相互独立。
connect方法会返回connectedStream,在connectedStream中需要使用CoMap、CoFlatMap这种函数,类似于map和flatmap
应用场景:可以将两种不同格式的数据统一成一种格式
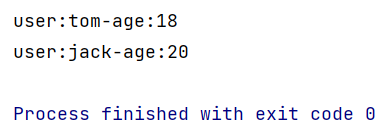
object StreamConnectScala {

  def main(args: Array[String]): Unit = {
    val env = StreamExecutionEnvironment.getExecutionEnvironment

    //第1份数据流
    val text1 = env.fromElements("user:tom,age:18")
    //第2份数据流
    val text2 = env.fromElements("user:jack_age:20")

    //连接两个流,connect返回ConnectedStreams
    val connectStream = text1.connect(text2)

    //CoMapFunction的泛型<第一份数据格式,第二份数据格式,返回数据格式>
    connectStream.map(new CoMapFunction[String, String, String] {
      //处理第1份数据流中的数据
      override def map1(in1: String): String = {
        in1.replace(",", "-")
      }

      //处理第2份数据流中的数据
      override def map2(in2: String): String = {
        in2.replace("_", "-")
      }
    }).print().setParallelism(1)

    env.execute()

  }

}
split(切分流)
根据规则把一个数据流切分为多个流
注意:split只能分一次流,切分出来的流不能继续分流
split需要和select配合使用,选择切分后的流
应用场景:将一份数据流切分为多份,便于针对每一份数据使用不同的处理逻辑
object StreamSplitScala {

  def main(args: Array[String]): Unit = {

    val env = StreamExecutionEnvironment.getExecutionEnvironment

    //初始化数据
    val text = env.fromCollection(Array(1, 2, 3, 4, 5, 6, 7, 8, 9, 10))

    //按照数据的奇偶性对数据进行分流
    val splitStream = text.split(new OutputSelector[Int] {
      override def select(value: Int): lang.Iterable[String] = {
        val list = new util.ArrayList[String]()

        if (value % 2 == 0) {
          //偶数
          list.add("even")
        } else {
          //奇数
          list.add("odd")
        }
        list
      }
    })

    //选择流
    val evenStream = splitStream.select("even")
    evenStream.print().setParallelism(1)

    //二次切流会报错:Consecutive multiple splits are not supported. Splits are deprecated. Please use side-outputs.
    //    val lowHighStream = evenStream.split(new OutputSelector[Int] {
    //      override def select(value: Int): lang.Iterable[String] = {
    //        val list = new util.ArrayList[String]()
    //        if (value <= 5) {
    //          list.add("low")
    //        } else {
    //          list.add("high")
    //        }
    //        list
    //      }
    //    })
    //    val lowStream = lowHighStream.select("low")
    //    lowStream.print().setParallelism(1)

    env.execute()
  }

}
side output(二次切分)
目前split切分的流无法进行二次切分,并且split方法已经标记为过时了,官方不推荐使用,现在官方推荐使用side output的方式实现。
下面我来看一下使用side output如何实现流的多次切分
object StreamSideOutputScala {
  def main(args: Array[String]): Unit = {
    val env = StreamExecutionEnvironment.getExecutionEnvironment

    val text = env.fromCollection(Array(1, 2, 3, 4, 5, 6, 7, 8, 9, 10))

    //按照数据的奇偶性对数据进行分流
    //首先定义两个sideoutput来准备保存切分出来的数据
    val outputTag1 = new OutputTag[Int]("even") //保存偶数
    val outputTag2 = new OutputTag[Int]("odd") //保存奇数

    //注意:process属于Flink中的低级api
    val outputStream = text.process(new ProcessFunction[Int, Int] {
      override def processElement(value: Int, ctx: ProcessFunction[Int, Int]#Context, out: Collector[Int]): Unit = {
        if (value % 2 == 0) {
          ctx.output(outputTag1, value)
        } else {
          ctx.output(outputTag2, value)
        }
      }
    })

    //获取偶数数据流
    val evenStream = outputStream.getSideOutput(outputTag1)
    //获取奇数数据流
    val oddStream = outputStream.getSideOutput(outputTag2)
    //打印偶数流:(2,4,6,8,10)
    //evenStream.print().setParallelism(1)

    //对evenStream流进行二次切分
    val outputTag11 = new OutputTag[Int]("low") //保存小于等于5的数字
    val outputTag12 = new OutputTag[Int]("high") //保存大于5的数字

    val subOutputStream = evenStream.process(new ProcessFunction[Int, Int] {
      override def processElement(value: Int, ctx: ProcessFunction[Int, Int]#Context, out: Collector[Int]): Unit = {
        if (value <= 5) {
          ctx.output(outputTag11, value)
        } else {
          ctx.output(outputTag12, value)
        }
      }
    })

    //获取小于等于5的数据流
    val lowStream = subOutputStream.getSideOutput(outputTag11)
    //获取大于5的数据流
    val highStream = subOutputStream.getSideOutput(outputTag12)

    lowStream.print().setParallelism(1)//打印偶数流:(2,4,6,8,10)中小于等于5的流:(2,4)

    env.execute("StreamSideOutputScala")

  }

}
其实想要实现多级流切分,使用filter算子也是可以实现的,可以有空实验一下。
最后针对这几个算子总结一下:
首先是union和connect的区别,如图所示: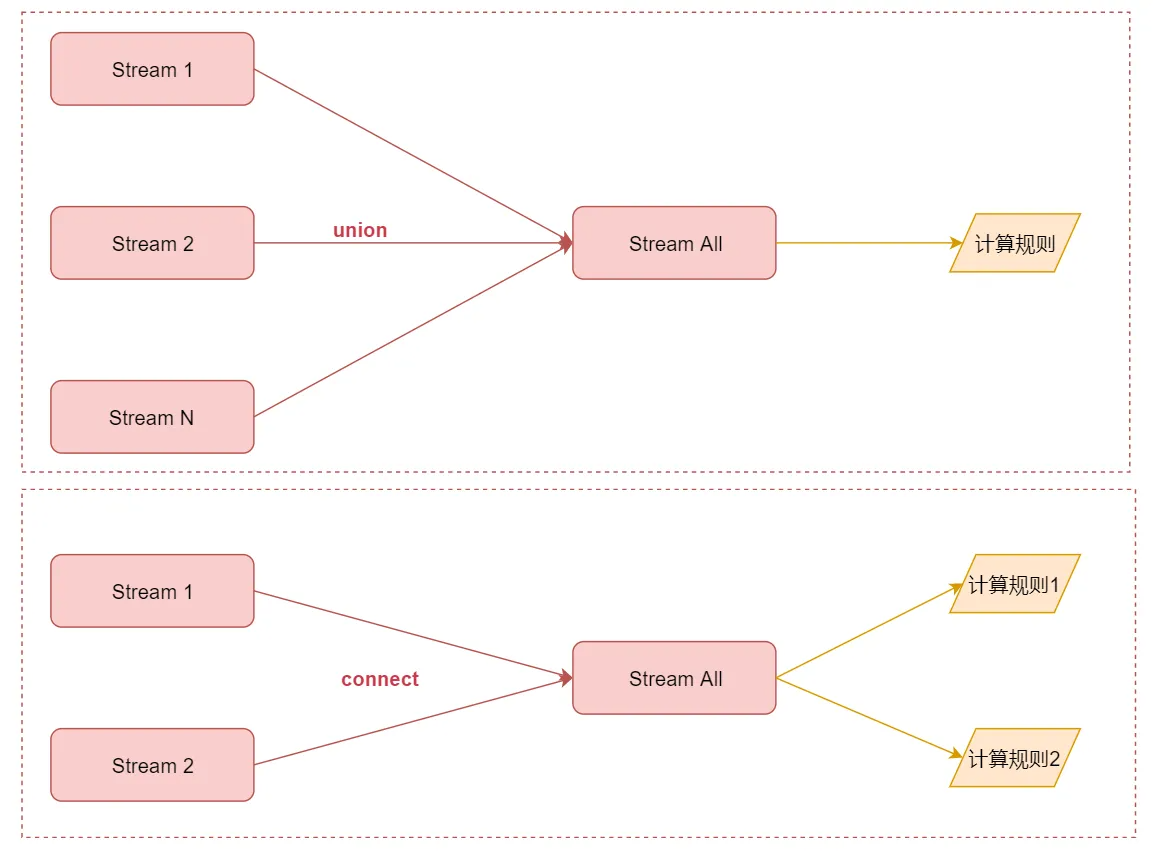
union可以连接多个流,最后汇总成一个流,流里面的数据使用相同的计算规则connect值只能连接2个流,最后汇总成一个流,但是流里面的两份数据相互还是独立的,每一份数据使用一个计算规则
然后是流切分
如果是只需要切分一次的话使用split或者side output都可以
如果想要切分多次,就不能使用split了,需要使用side output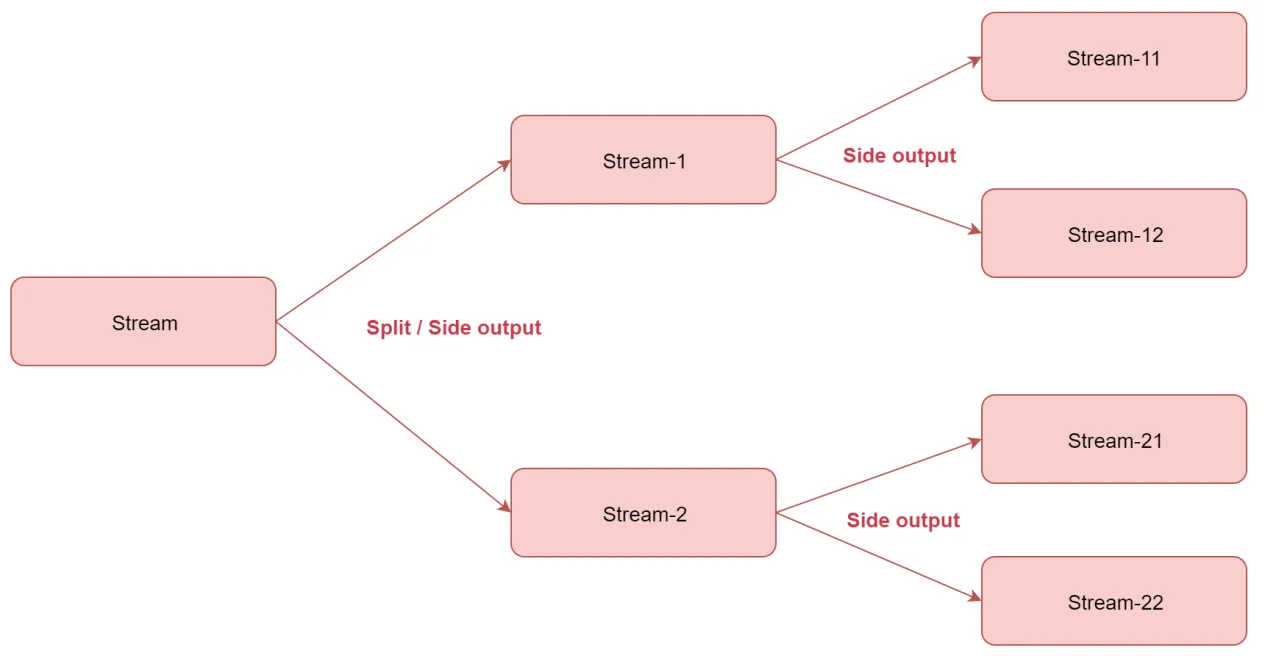
分区算子
接下来看一下这几个和分区相关的算子
| 算子 | 解释 |
|---|---|
| random | 随机分区 |
| rebalance | 对数据集进行再平衡,重分区,消除数据倾斜 |
| rescale | 重分区 |
| custom partition | 自定义分区 |
shuffle(random)
随机分区
它表示将上游数据随机分发到下游算子实例的每个分区中,在代码层面体现是调用shuffle()函数
查看源码 ,shuffle底层对应的是ShufflePartitioner这个类
这个类里面有一个selectChannel函数,这个函数会计算数据将会被发送给哪个分区,里面使用的是random.nextInt,所以说是随机的。
    public int selectChannel(SerializationDelegate<StreamRecord<T>> record) {
        return random.nextInt(numberOfChannels);
    }
rebalance
重新平衡分区(循环分区),我觉得叫循环分区更好理解,它表示对数据集进行再平衡,消除数据倾斜,为每个分区创建相同的负载,其实就是通过循环的方式给下游算子实例的每个分区分配数据,在代码层面体现是调用rebalance()函数
查看源码,rebalance底层对应的是RebalancePartitioner这个类
这个类里面有一个setup和selectChannel函数,setup函数会根据分区数初始化一个随机值nextChannelToSendTo ,然后selectChannel函数会使用nextChannelToSendTo 加1和分区数取模,把计算的值再赋给nextChannelToSendTo ,后面以此类推,其实就可以实现向下游算子实例的多个分区循环发送数据了,这样每个分区获取到的数据基本一致。
public void setup(int numberOfChannels) {
   super.setup(numberOfChannels);

   nextChannelToSendTo = ThreadLocalRandom.current().nextInt(numberOfChannels);
}

public int selectChannel(SerializationDelegate<StreamRecord<T>> record) {
   nextChannelToSendTo = (nextChannelToSendTo + 1) % numberOfChannels;
   return nextChannelToSendTo;
}
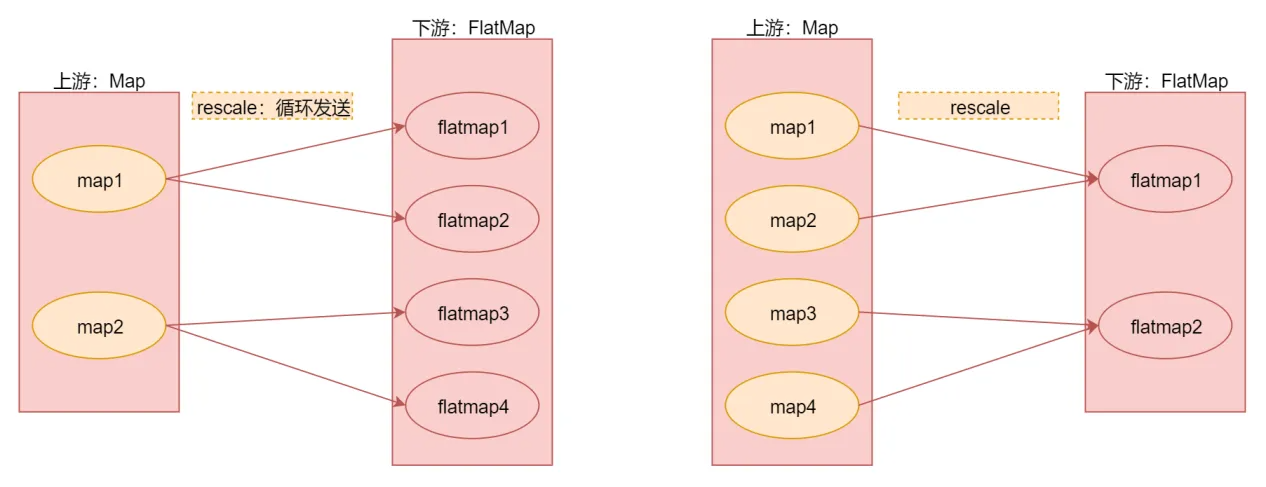
rescale
重分区
查看源码,rescale底层对应的是RescalePartitioner这个类
这个类里面有一个selectChannel函数,这里面的numberOfChannels是分区数量,其实也可以认为是我们所说的算子的并行度,因为一个分区是由一个线程负责处理的,它们两个是一一对应的。
public int selectChannel(SerializationDelegate<StreamRecord<T>> record) {
   if (++nextChannelToSendTo >= numberOfChannels) {
      nextChannelToSendTo = 0;
   }
   return nextChannelToSendTo;
}
详细的解释在这个类的注释中也是有的
* The subset of downstream operations to which the upstream operation sends
* elements depends on the degree of parallelism of both the upstream and downstream operation.
* For example, if the upstream operation has parallelism 2 and the downstream operation
* has parallelism 4, then one upstream operation would distribute elements to two
* downstream operations while the other upstream operation would distribute to the other
* two downstream operations. If, on the other hand, the downstream operation has parallelism
* 2 while the upstream operation has parallelism 4 then two upstream operations will
* distribute to one downstream operation while the other two upstream operations will
* distribute to the other downstream operations.
如果上游操作有2个并发,而下游操作有4个并发,那么上游的1个并发结果循环分配给下游的2个并发操作,上游的另外1个并发结果循环分配给下游的另外2个并发操作。另一种情况,如果上游有4个并发操作而下游有2个并发操作,那么上游的其中2个并发操作的结果会分配给下游的一个并发操作,而上游的另外2个并发操作的结果则分配给下游的另外1个并发操作。
注意:rescale与rebalance的区别是rebalance会产生全量重分区,而rescale不会。
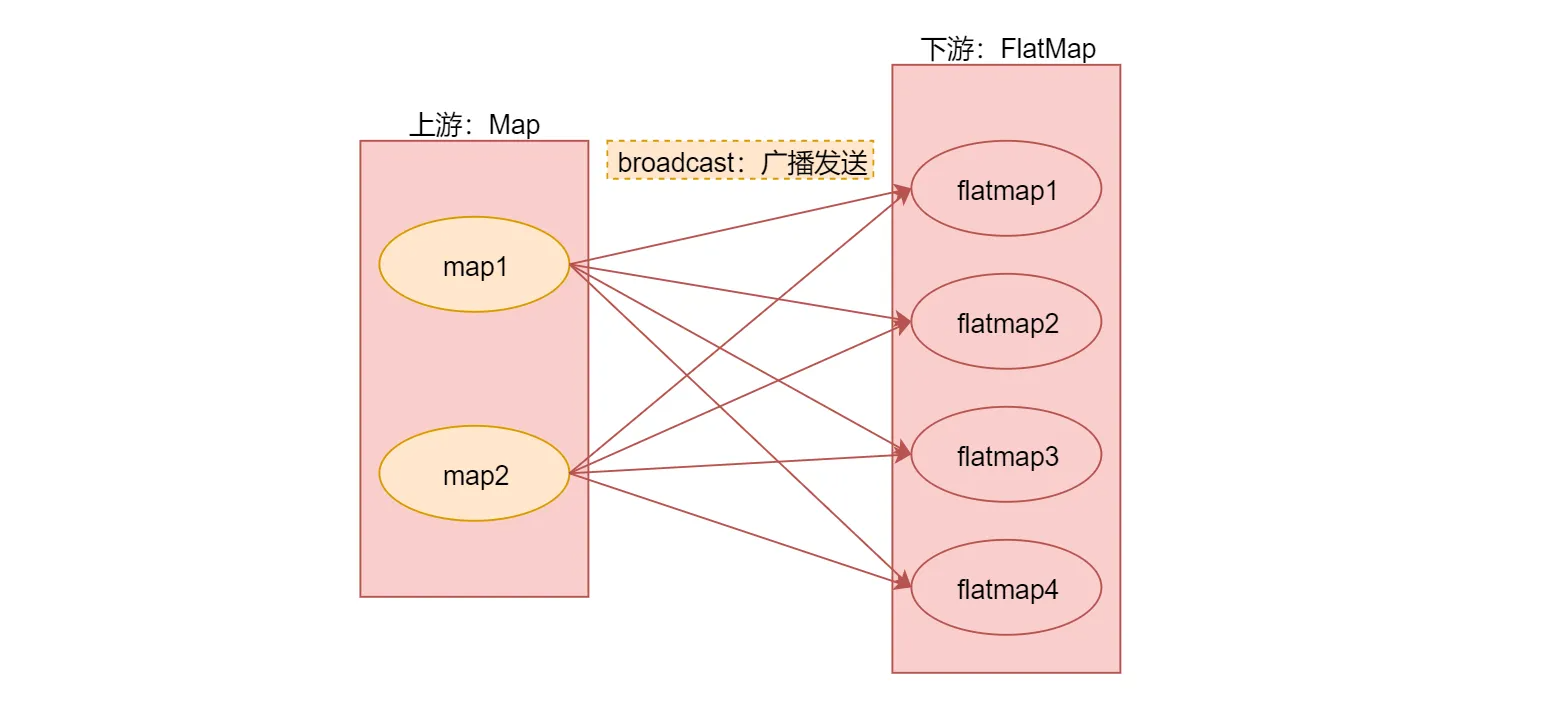
broadcast
广播分区,将上游算子实例中的数据输出到下游算子实例的每个分区中,适合用于大数据集Join小数据集的场景,可以提高性能。
查看源码,broadcast底层对应的是BroadcastPartitioner这个类
看这个类中的selectChannel函数代码的注释,提示广播分区不支持选择Channel,因为会输出数据到下游的每个Channel中,就是发送到下游算子实例的每个分区中
/**
 * Note: Broadcast mode could be handled directly for all the output channels
 * in record writer, so it is no need to select channels via this method.
 */
@Override
public int selectChannel(SerializationDelegate<StreamRecord<T>> record) {
   throw new UnsupportedOperationException("Broadcast partitioner does not support select channels.");
}
custom partition
自定义分区,可以按照自定义规则实现
自定义分区需要实现Partitioner接口
这是针对这几种分区的解释,下面来通过这个图总结一下,加深理解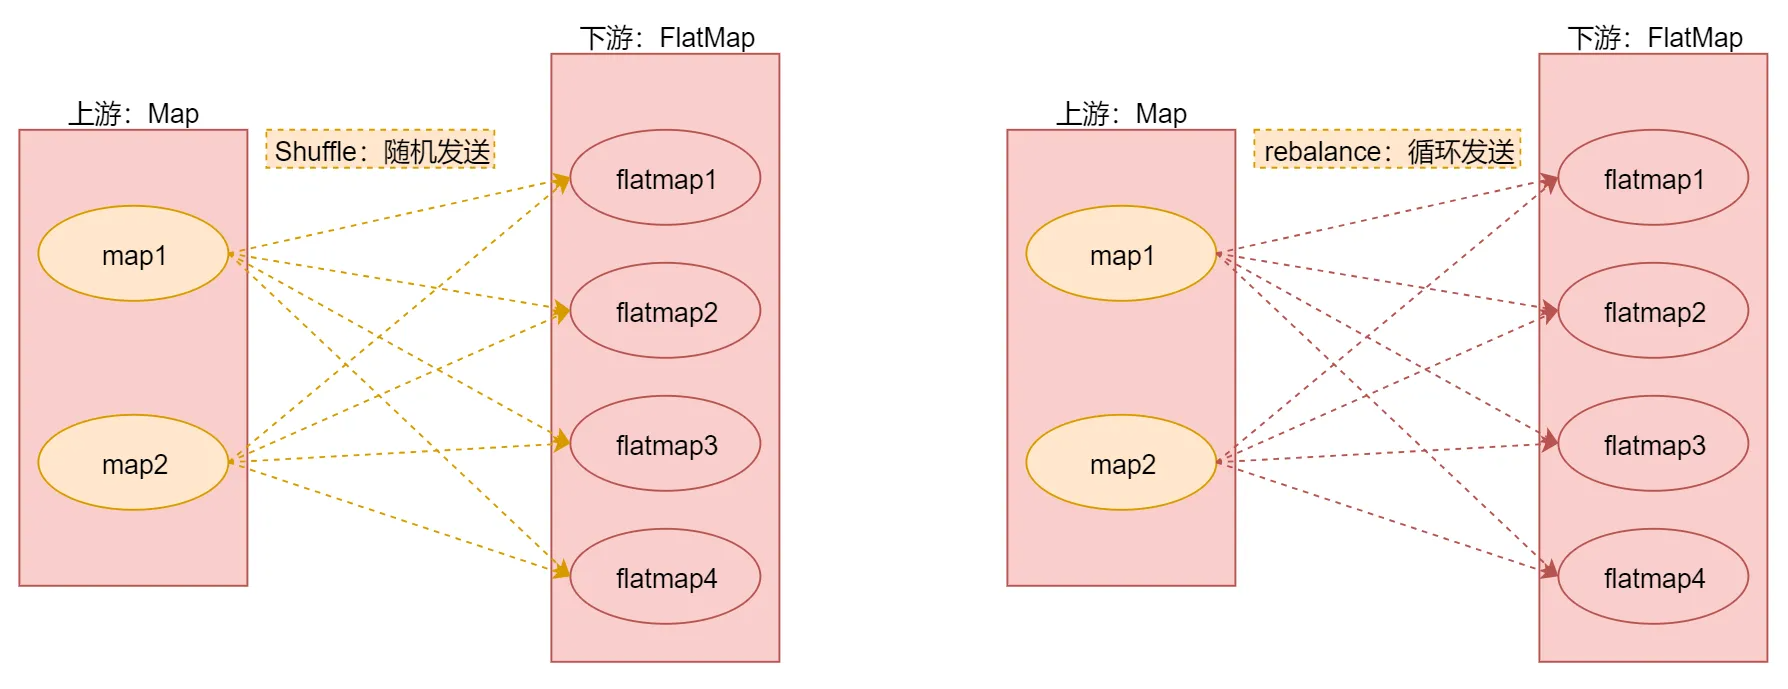
最后使用代码演示一下它们具体的用法
/**
 * 分区规则的使用
 */
object StreamPartitionOpScala {
  def main(args: Array[String]): Unit = {
    val env = StreamExecutionEnvironment.getExecutionEnvironment

    //注意:在这里将这个隐式转换代码放到类上面
    //因为默认它只在main函数生效,针对下面提取的shuffleOp是无效,否则也需要在shuffleOp添加这行代码
    //import org.apache.flink.api.scala._

    //注意:默认情况下Flink任务中算子的并行度会读取当前机器的CPU个数,但是fromCollection的并行度为1,
    val text = env.fromCollection(Array(1, 2, 3, 4, 5, 6, 7, 8, 9, 10))

    //使用shuffle分区规则
    //shuffleOp(text)

    //使用rebalance分区规则
    //rebalanceOp(text)

    //使用rescale分区规则
    //rescaleOp(text)

    //使用broadcast分区规则
    //broadcastOp(text)

    //自定义分区规则:根据数据的奇偶性进行分区
    //注意:此时虽然print算子的并行度为4,但是自定义的分区规则只会把数据分发给2个并行度,所以有2个是不干活
    custormPartitionOp(text)

    env.execute("StreamPartitionOpScala")

  }

  private def custormPartitionOp(text: DataStream[Int]) = {
    text.map(num => num)
      .setParallelism(2) //设置map算子的并行度为2
      //.partitionCustom(new MyPartitionerScala,0)//这种写法已经过期
      .partitionCustom(new MyPartitionerScala, num => num) //官方建议使用keySelector
      .print()
      .setParallelism(4) //设置print算子的并行度为4
  }

  private def broadcastOp(text: DataStream[Int]) = {
    text.map(num => num)
      .setParallelism(2) //设置map算子的并行度为2
      .broadcast
      .print()
      .setParallelism(4) //设置print算子的并行度为4
  }

  private def rescaleOp(text: DataStream[Int]) = {
    text.map(num => num)
      .setParallelism(2) //设置map算子的并行度为2
      .rescale
      .print()
      .setParallelism(4) //设置print算子的并行度为4
  }

  private def rebalanceOp(text: DataStream[Int]) = {
    text.map(num => num)
      .setParallelism(2) //设置map算子的并行度为2
      .rebalance
      .print()
      .setParallelism(4) //设置print算子的并行度为4
  }

  private def shuffleOp(text: DataStream[Int]) = {
    //由于fromCollection已经设置了并行度为1,所以需要再接一个算子才能修改并行度,在这使用map算子
    text.map(num => num)
      .setParallelism(2) //设置map算子的并行度为2
      .shuffle
      .print()
      .setParallelism(4) //设置print算子的并行度为4
  }
}
DataSink(输出)
DataSink是 输出组件,负责把计算好的数据输出到其它存储介质中
Flink支持把流数据输出到文件中,不过在实际工作中这种场景不多,因为流数据处理之后一般会存储到一些消息队列里面,或者数据库里面,很少会保存到文件中的。
还有就是print,直接打印,这个其实我们已经用了很多次了,这种用法主要是在测试的时候使用的,方便查看输出的结果信息
Flink提供了一批Connectors,可以实现输出到第三方目的地
| Flink 内置 | Apache Bahir |
|---|---|
| Kafka | ActiveMQ |
| Cassandra | Flume |
| Kinesis Streams | Redis |
| Elasticsearch | Akka |
| Hadoop FileSysterm | |
| RabbitMQ | |
| NiFi | |
| JDBC |
针对sink的这些connector,我们在实际工作中最常用的是kafka、redis
针对Flink提供的常用sink组件,可以提供这些容错性保证
| DataSink | 容错保证 | 备注 |
|---|---|---|
| Redis | at least once | |
| Kafka | at least once / exactly once | Kafka0.9和0.10提供at least once,Kafka0.11及以上提供exactly once |
kafka
redis
需求:接收Socket传输过来的数据,把数据保存到Redis的list队列中。
注意:redis sink是在Bahir这个依赖包中,所以在pom.xml中需要添加对应的依赖
        <dependency>
            <groupId>org.apache.bahir</groupId>
            <artifactId>flink-connector-redis_2.11</artifactId>
            <version>1.0</version>
        </dependency>
/**
 * 需求:接收socket传输过来的数据,把数据保存到redis的list队列中
 */
object StreamRedisSinkScala {
  def main(args: Array[String]): Unit = {
    val env = StreamExecutionEnvironment.getExecutionEnvironment

    //连接socket获取输入数据
    val text = env.socketTextStream("bigdata1", 9002)

    //组装数据,这里组装的是tuple2类型
    //第一个元素是指list队列的key名称
    //第二个元素是指需要向list队列中添加的元素
    val listData = text.map(("l_words_scala", _))

    //指定redissink
    val conf = new FlinkJedisPoolConfig.Builder().setHost("bigdata1").setPort(6379).build()
    val redisSink = new RedisSink[Tuple2[String, String]](conf, new MyRedisMapper)
    listData.addSink(redisSink)

    env.execute("StreamRedisSinkScala")
  }

  class MyRedisMapper extends RedisMapper[Tuple2[String, String]] {
    //指定具体的操作命令
    override def getCommandDescription: RedisCommandDescription = {
      new RedisCommandDescription(RedisCommand.LPUSH)
    }

    //获取key
    override def getKeyFromData(data: (String, String)): String = {
      data._1
    }

    //获取value
    override def getValueFromData(data: (String, String)): String = {
      data._2
    }
  }

}
注意:针对List数据类型,我们在定义getCommandDescription方法的时候,使用new RedisCommandDescription(RedisCommand.LPUSH)。
如果是Hash数据类型,在定义getCommandDescription方法的时候,需要使用new RedisCommandDescription(RedisCommand.HSET,“hashKey”);,在构造函数中需要直接指定Hash数据类型的key的名称。
注意:执行代码之前,需要先开启socket和redis服务
[root@bigdata1 ~]# nc -l 9002
通过socket传递单词
[root@bigdata1 ~]# nc -l 9002
hello world
hello scala
hello flink
到redis中查看结果

若有收获,就点个赞吧
0 人点赞
