01. requests模拟上网
1.1 requests模块介绍与安装
- requests模块用于模拟浏览器发送请求。
- requests是一个数据获取模块,常配合BeautifulSoup模块完成数据提取。
- requests模块可以通过pip工具安装:
```python
命令行安装
pip install requests
Jupyter Notebook安装
!pip install requests
<a name="lMzhb"></a>### 1.2 requests模拟用户上网<a name="IavNU"></a>#### 1.2.1 发送GET请求- 爬虫程序中的请求一般都是GET请求,因为爬虫一般就是请求数据,很少需要提交数据。- 可以通过requests模块中的`get()`函数发送一个GET请求,`get()`函数有以下三个常用参数:- url:服务器地址/资源路径。- headers:请求头,以字典形式定义。(若没有则可以不设置)- params:请求体,以字典形式定义。(若没有则可以不设置)- 示例:模拟在百度中搜索关键字“pip镜像源”。```pythonimport requests# 发送请求# 相当于在浏览器网址中输入https://www.baidu.com/s?wd=pip镜像源resp = requests.get(url="https://www.baidu.com/s",params={"wd": "pip镜像源"} # 百度时,搜索栏中输入的内容会以wd的值的形式被添加到请求参数中。) # requests.get()函数的返回内容就是HTTP响应,可以用一个变量去接收。# 输出响应的内容print(resp.text)
1.2.2 发送POST请求
- 可以通过requests模块中的
post()函数发送一个POST请求,post()函数有以下三个常用参数:- url:服务器地址/资源路径。
- headers:请求头,以字典形式定义。
- data:请求数据,以字典形式定义。
-
1.3 HTTP响应的常用属性
1.3.1 headers获取请求头
response.headers可用于获取响应头,返回的是JSON格式的数据。 ```python import requests
resp = requests.get(url=”https://www.baidu.com/s“, params={“wd”: “pip镜像源”}) print(resp.headers) “”” 运行结果(): { “Accept-Ranges”: “bytes”, “Cache-Control”: “no-cache”, “Connection”: “keep-alive”, “Content-Length”: “227”, “Content-Type”: “text/html”, “Date”: “Mon, 18 Jul 2022 14:50:08 GMT”, “P3p”: “CP=\” OTI DSP COR IVA OUR IND COM \”, CP=\” OTI DSP COR IVA OUR IND COM \””, “Pragma”: “no-cache”, “Server”: “BWS/1.1”, “Set-Cookie”: “BD_NOT_HTTPS=1; path=/; Max-Age=300, BIDUPSID=D9610EE3B4E5D43B0BF376D268337689; expires=Thu, 31-Dec-37 23:55:55 GMT; max-age=2147483647; path=/; domain=.baidu.com, PSTM=1658155808; expires=Thu, 31-Dec-37 23:55:55 GMT; max-age=2147483647; path=/; domain=.baidu.com, BAIDUID=D9610EE3B4E5D43B79D00C64C57F6421:FG=1; max-age=31536000; expires=Tue, 18-Jul-23 14:50:08 GMT; domain=.baidu.com; path=/; version=1; comment=bd”, “Strict-Transport-Security”: “max-age=0”, “Traceid”: “1658155808093754522611963952688037033994”, “X-Frame-Options”: “sameorigin”, “X-Ua-Compatible”: “IE=Edge,chrome=1” } “””
<a name="HWIgd"></a>#### 1.3.2 status_code获取响应状态码- `response.status_code`可用于获取响应状态码。```pythonimport requestsresp = requests.get(url="https://www.baidu.com/s", params={"wd": "pip镜像源"})print(resp.status_code) # 200
1.3.3 text/content获取响应体
response.text可用于以字符串的形式获取响应的体。 ```python import requests
resp = requests.get(url=”https://www.baidu.com/s“, params={“wd”: “pip镜像源”}) print(resp.text)
- `response.content`可用于以字节的形式获取响应的体。```pythonimport requestsresp = requests.get(url="https://www.baidu.com/s", params={"wd": "pip镜像源"})print(resp.content)
1.3.4 json()以JSON解析响应体
- JSON是网络中传输数据最主要的一种手段,很多URL的响应就是一段JSON数据。
- 如:https://movie.douban.com/j/search_subjects?type=movie&tag=%E7%83%AD%E9%97%A8&sort=recommend&page_limit=20。
- 此时,若直接用text获取,则获取到的是一堆字符串。 ```python import requests
resp = requests.get( url=”https://movie.douban.com/j/search_subjects?type=movie&tag=%E7%83%AD%E9%97%A8&sort=recommend&page_limit=20“,
# 豆瓣有418,因此需要填充请求头。# 这在1.5.2中有详细解释。headers={'User-Agent': 'Mozilla/5.0 (Windows NT 10.0; Win64; x64) AppleWebKit/537.36 (KHTML, like Gecko) Chrome/108.0.0.0 Safari/537.36 Edg/108.0.1462.46'}
)
print(type(resp.text)) #
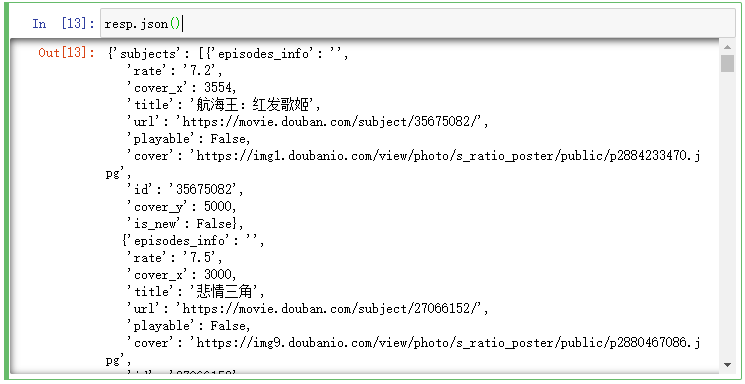
- 而若用`响应体.json()`函数获取,则会自动完成解析。(在Python中,JSON会被解析成字典数据)```pythonimport requestsresp = requests.get(url="https://movie.douban.com/j/search_subjects?type=movie&tag=%E7%83%AD%E9%97%A8&sort=recommend&page_limit=20",headers={'User-Agent': 'Mozilla/5.0 (Windows NT 10.0; Win64; x64) AppleWebKit/537.36 (KHTML, like Gecko) Chrome/108.0.0.0 Safari/537.36 Edg/108.0.1462.46'})print(type(resp.json())) # <class 'dict'>print(resp.json()) # {'subjects': [{'episodes_info': '', 'rate': '7.2', ……
- 并且在像Jupyter Notebook这种IDE中,还会有良好的可读性。
1.4 requests模拟下载文件
1.4.1 模拟下载图片
- 模拟图片下载实现思路:
- 在网络上随便找一张图片,然后右键图片复制图片地址。
- 对这张图片发起GET请求,然后判断请求的响应码是否为200(即请求是否成功)。
- 若响应的状态码是200,则将字节数据保存到本地文件中即可。
- 否则,提示用户请求失败。
- 代码实现: ```python import requests
resp = requests.get(url=”https://img1.baidu.com/it/u=223288250,1771099662&fm=253&fmt=auto&app=138&f=JPEG?w=800&h=500“) if resp.status_code == 200: with open(“./image/动漫.png”, “wb”) as file: file.write(resp.content) else: print(f”数据请求失败,状态码为{resp.status_code}”)
- 在了解了基本的图片爬取之后,还可以批量爬取一些具有相关性的图片:- 比如王者荣耀中瑶这个英雄的资料页面为:[https://pvp.qq.com/web201605/herodetail/505.shtml](https://pvp.qq.com/web201605/herodetail/505.shtml),在这个页面中我们可以看到瑶有好几张皮肤。- 通过鼠标小手工具可以找到这五个皮肤的相关源码,发现皮肤的大图连接就在其中。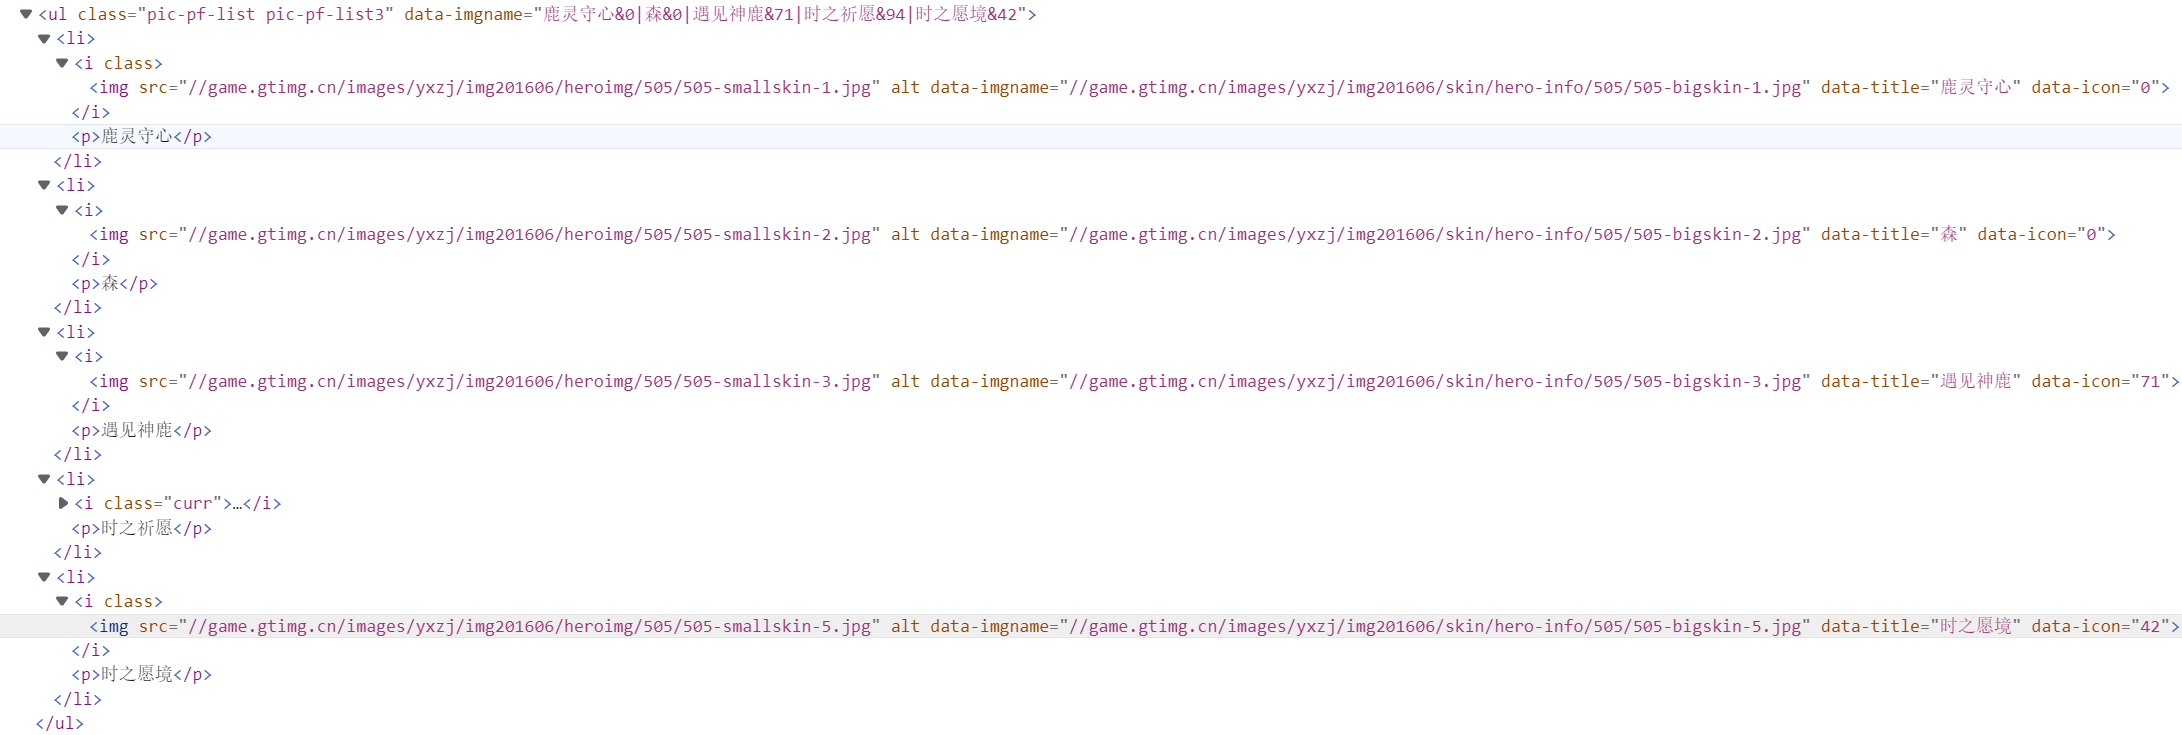- 可以手动将这些大图的链接提取出来:> 鹿灵守心:http://game.gtimg.cn/images/yxzj/img201606/skin/hero-info/505/505-bigskin-1.jpg> 森:http://game.gtimg.cn/images/yxzj/img201606/skin/hero-info/505/505-bigskin-2.jpg> 遇见神鹿:http://game.gtimg.cn/images/yxzj/img201606/skin/hero-info/505/505-bigskin-3.jpg> 时之祈愿:http://game.gtimg.cn/images/yxzj/img201606/skin/hero-info/505/505-bigskin-4.jpg> 时之愿境:http://game.gtimg.cn/images/yxzj/img201606/skin/hero-info/505/505-bigskin-5.jpg- 通过简单观察,可以发现这五张图的下载链接就是`http://game.gtimg.cn/images/yxzj/img201606/skin/hero-info/505/505-bigskin-{1~5}.jpg`,那么借助一个循环就可以很容易的实现批量下载。```pythonimport requestsfor i in range(1, 6):img_url = f"http://game.gtimg.cn/images/yxzj/img201606/skin/hero-info/505/505-bigskin-{i}.jpg"img_resp = requests.get(img_url)if img_resp.status_code == 200:with open(f"./瑶/皮肤{i}.png", 'wb') as img_file:img_file.write(img_resp.content)else:print(f"皮肤{i}请求失败")
1.4.2 音频视频爬取
- 音频和视频的爬取实际上与图片的爬取是一样的,就是将请求到的音频/视频数据写入到本地文件中即可。
- 示例:现有一段音频链接和视频链接,将对应的音频/视频文件爬下来。
- 音乐地址:http://dl.stream.qqmusic.qq.com/C400002etlBr14YnDT.m4a?guid=5323009909&vkey=B0D13363C2934707207DAD48A69C5A10F9E2094A484AF07C66B9699D612624E65F6070F791DD9704C23DE3B88129E16A067E867B2EFBB743&uin=850340745&fromtag=120032
- 视频地址:https://ks-xpc20.xpccdn.com/2f5f76c0-4132-4feb-952b-6118e1f10666.mp4 ```python import requests
下载音频
audio_resp = requests.get(“http://dl.stream.qqmusic.qq.com/C400002etlBr14YnDT.m4a?guid=5323009909&vkey=B0D13363C2934707207DAD48A69C5A10F9E2094A484AF07C66B9699D612624E65F6070F791DD9704C23DE3B88129E16A067E867B2EFBB743&uin=850340745&fromtag=120032“) if audio_resp.status_code == 200: with open(“./音视频/audio.mp3”, ‘wb’) as audio_file: audio_file.write(audio_resp.content) else: print(“音频请求失败”)
下载视频
video_resp = requests.get(“https://ks-xpc20.xpccdn.com/2f5f76c0-4132-4feb-952b-6118e1f10666.mp4“) if video_resp.status_code == 200: with open(“./音视频/video.mp4”, ‘wb’) as video_file: video_file.write(video_resp.content) else: print(“视频请求失败”)
<a name="LaufS"></a>### 1.5 基础反爬与应对方式<a name="ABEQ4"></a>#### 1.5.1 反扒解决方案之填充请求头- 情景复现:- 现有一个图片网站:[https://pixivic.com/?VNK=a4e45edf](https://pixivic.com/?VNK=a4e45edf),访问这个网站,网站中的图片基本都能正常下载。- 但右键图片复制图片地址后,将图片的URL放到`requests.get()`中,得到HTTP响应码为403,甚至用其他浏览器直接访问这个图片的URL得到的也是403。- 原因分析:- 有些资源从原生网站一步步操作可以正常访问,但直接使用URL却无法访问。- 这很有可能是由于在获取资源之前,该网站的服务器返回了一些Cookie和一些特殊的标记信息。- 在客户端浏览器正式请求资源时,发送的HTTP请求头中会加带有这些Cookie和标记信息。- 若服务器接收到的请求中有这些Cookie和标记信息,则响应码200且正常返回资源,否则就响应403。- 由于`requests.get()`中并没有填充请求头,用新浏览器访问这个URL时请求头中也没有这些信息。故当服务器接收到HTTP请求时,在里面无法看到这些Cookie和标记信息,因此响应403。- 解决方案:填充请求头。- 先用浏览器正常访问网站(访问时用F12调出Network进行监控),捕获HTTP请求数据(重要的是请求头)。- 将HTTP请求数据一点点填充到`get()`函数的header属性中,直到`resp.status_code`为200为止。- 但一般来说header中填充Cookie(用户令牌,类似于人的身份证)、Host(主机地址)、Referer(上一个页面)、User-Agent(用户身份)即可。- 添加顺序(建议,并不强制):先加User-Agent;若还是请求失败则添加Referer;若还是请求失败则添加Host;最后还是不行,则把Cookie加上。- referer常用于表示网站信息的来源,即数据是从哪个网站定向来的。- 这个图片爬取会造成403的主要原因就是请求头中缺少了referer。- 没有影响的字段(即不用管的字段):- 带冒号`:`的,如`:authority`、`:method`、`:path`、`:scheme`。- accept开头的,如`accept`、`accept-encoding`、`accept-language`。- sec开头的,如`sec-ch-ua`、`sec-ch-ua-mobile`、`sec-ch-ua-platform`、`sec-fetch-dest`、`sec-fetch-mode`、`sec-fetch-site`、`sec-fetch-user`。- 代码实现:用requests模块下载[https://pixivic.com/?VNK=a4e45edf](https://pixivic.com/?VNK=a4e45edf)中的一张图片。```pythonimport requestsresp = requests.get(url="https://acgpic.net/c/540x540_70/img-master/img/2022/07/15/00/00/27/99727021_p0_master1200.jpg",headers={'cookie': '_gid=GA1.2.1429353220.1658194205; ''__gads=ID=e3f93c65577b06e5-2281920d3bd5006c:T=1658194205:RT=1658194205:S=ALNI_MZzMTWGTGvjD5_qsfN3CNc4Vi2eug; ''__gpi=UID=000007d89c4eb20a:T=1658194205:RT=1658194205:S=ALNI_MaBfL_YHixfFr5O7P2zS1hpqdcO5g; ''_gat_gtag_UA_158701012_2=1; ''_ga_4FH141V9X0=GS1.1.1658194204.1.1.1658198544.0; ''_ga=GA1.1.625847025.1658194204','referer': 'https://pixivic.com/illusts/99726976?VNK=ff84c79b','user-agent': 'Mozilla/5.0 (Windows NT 10.0; Win64; x64) AppleWebKit/537.36 (KHTML, like Gecko) Chrome/103.0.0.0 Safari/537.36'})if resp.status_code == 200:with open("./image/动漫.png", "wb") as file:file.write(resp.content)else:print(f"数据请求失败,状态码为{resp.status_code}")
1.5.2 状态码418解决方案
- 情景复现:
- 豆瓣电影 Top 250是国内一个著名的电影评分网站,网址为:https://movie.douban.com/top250。
- 但是若直接用requests模块对该网站发送GET请求,其响应状态码一定是418。 ```python import requests
resp = requests.get(url=”https://movie.douban.com/top250“)
print(resp) #
- 原因分析:网站监测到你的HTTP请求来源于一个Python爬虫程序。- 在Network中监测的到有:Name请求资源名称、Status响应状态码、Type响应的资源类型、Initiator请求的发起者。- Initiator中Other固定为浏览器,如上图浏览器去请求豆瓣评分 Top 250网站的HTML文档top250(document)。然后top250下面其他资源的请求都是top250发起的。- 豆瓣评分 Top 250之所以可以在浏览器中200,而在requests程序中418,就是因为requests程序中的Initiator是Python而不是Other。- 解决方案:在请求头中填充User-Agent信息,将requests程序伪装成浏览器再发送HTTP请求。- 请求头的User-Agent字段描述了发送请求的设备信息。- 这些设备信息主要是操作系统和浏览器的信息,借助这些信息可以将一个爬虫程序伪装成一次浏览器发送的HTTP请求。- 代码实现:```pythonimport requestsresp = requests.get(url="https://movie.douban.com/top250",headers={'User-Agent': 'Mozilla/5.0 (Windows NT 10.0; Win64; x64) ''AppleWebKit/537.36 (KHTML, like Gecko) ''Chrome/103.0.0.0 Safari/537.36'})print(resp) # <Response [200]>
1.6 响应数据乱码的解决方式
1.6.1 响应数据乱码概述
- 在请求获取response后,直接打印响应体的
text,会发现数据可能会出现乱码。 ```python import requests
resp = requests.get( url=”https://pvp.qq.com/web201605/herolist.shtml“, headers={ ‘User-Agent’: ‘Mozilla/5.0 (Windows NT 10.0; Win64; x64) ‘ ‘AppleWebKit/537.36 (KHTML, like Gecko) ‘ ‘Chrome/103.0.5060.114 Safari/537.36 Edg/103.0.1264.62’ } ) print(resp.text)
<a name="x5dAz"></a>#### 1.6.2 encoding属性获取响应体编码- 使用响应的`encoding`属性可以获取到响应的编码格式。```pythonimport requestsresp = requests.get(url="https://pvp.qq.com/web201605/herolist.shtml",headers={'User-Agent': 'Mozilla/5.0 (Windows NT 10.0; Win64; x64) ''AppleWebKit/537.36 (KHTML, like Gecko) ''Chrome/103.0.5060.114 Safari/537.36 Edg/103.0.1264.62'})print(resp.encoding) # ISO-8859-1
encoding属性提取编码的方式是从响应体中提取内容的编码,若响应头中没有设置内容编码,则默认为默认为ISO-8859-1。-
1.6.3 apparent_encoding属性从meta中获取编码
apparent_encoding属性用于从响应内容中提取编码编码,即提取<head>标签中的<meta charset="XXX">的值。 ```python import requests
resp = requests.get( url=”https://pvp.qq.com/web201605/herolist.shtml“, headers={ ‘User-Agent’: ‘Mozilla/5.0 (Windows NT 10.0; Win64; x64) ‘ ‘AppleWebKit/537.36 (KHTML, like Gecko) ‘ ‘Chrome/103.0.5060.114 Safari/537.36 Edg/103.0.1264.62’ } ) print(resp.apparent_encoding) # gbk
<a name="XPrCN"></a>#### 1.6.4 乱码产生原因与解决方案- 原因:`response.encoding`和`response.apparent_encoding`的值不一致。- 解决方案一:将`response.encoding`的值改为`response.apparent_encoding`的值即可。```pythonimport requestsresp = requests.get(url="https://pvp.qq.com/web201605/herolist.shtml",headers={'User-Agent': 'Mozilla/5.0 (Windows NT 10.0; Win64; x64) ''AppleWebKit/537.36 (KHTML, like Gecko) ''Chrome/103.0.5060.114 Safari/537.36 Edg/103.0.1264.62'})resp.encoding = resp.apparent_encodingprint(resp.text) # 此时打印出来的内容就没有乱码了。
- 解决方案二:先获取字节格式的响应数据,再将其按照
response.apparent_encoding进行解码。 ```python import requests
resp = requests.get( url=”https://pvp.qq.com/web201605/herolist.shtml“, headers={ ‘User-Agent’: ‘Mozilla/5.0 (Windows NT 10.0; Win64; x64) ‘ ‘AppleWebKit/537.36 (KHTML, like Gecko) ‘ ‘Chrome/103.0.5060.114 Safari/537.36 Edg/103.0.1264.62’ } ) print(resp.content.decode(resp.apparent_encoding))
<a name="fDieB"></a>## 02. BeautifulSoup4爬虫数据转换工具<a name="RLorx"></a>### 2.1 BS4的介绍与安装- BeautifulSoup4是一个用于将爬虫数据转换成HTML文档的第三方工具。- BeautifulSoup4可以通过pip工具进行安装:```python# 命令行安装pip install beautifulsoup4# Jupyter Notebook安装!pip install beautifulsoup4
2.2 BeautifulSoup()转换文档
- 函数描述:
BeautifulSoup(markup, features)- markup:字符串形式的标记语言的代码,或者类似文件的对象。
- features:指定markup解析的格式,可以是以下两种类型:
- 解析器的名称(建议使用):lxml、lxml-xml、html.parser、html5lib。
- 要使用的标记类型:html、html5、xml。
- 示例:获取”豆瓣电影 Top 250“主页的数据,并用bs4转换成HTML。 ```python import requests from bs4 import BeautifulSoup # 从bs4库中导入BeautifulSoup模块
resp = requests.get( url=”https://movie.douban.com/top250“, headers={ ‘User-Agent’: ‘Mozilla/5.0 (Windows NT 10.0; Win64; x64) ‘ ‘AppleWebKit/537.36 (KHTML, like Gecko) ‘ ‘Chrome/103.0.5060.114 Safari/537.36 Edg/103.0.1264.62’ } ) if resp.status_code == 200: data = resp.text # 以字符形式获取HTTP响应的数据。 html_doc = BeautifulSoup(data, “html.parser”) # 将响应数据解析为HTML数据。 print(html_doc) else: print(f”数据请求失败,状态码为:{resp.status_code}”)
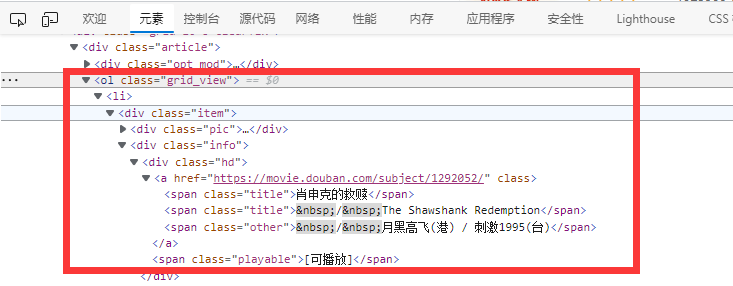
<a name="vpd3p"></a>### 2.3 标签对象的常用方法<a name="nX9C9"></a>#### 2.3.1 select()选择所有匹配元素(选择器)- 函数格式:`文档对象或者是先辈标签元素.select(选择器)`- 函数作用:从文档对象或者是先辈标签元素中,用选择器找出所有匹配的元素,并封装成列表。- 示例:获取”豆瓣电影 Top 250“中所有的电影信息。```python# 开头的代码参考2.1 BeautifulSoup()转换文档。if resp.status_code == 200:html_doc = BeautifulSoup(resp.text, "html.parser") # 将响应数据转换为HTML数据。movie_all_info = html_doc.select(".grid_view > li") # 分析页面结构,然后定义选择器匹配结果print(movie_all_info)else:print(f"数据请求失败,状态码为:{resp.status_code}")
- 快速匹配元素代码小技巧:右键页面中需要查看源代码的元素,点击检查。
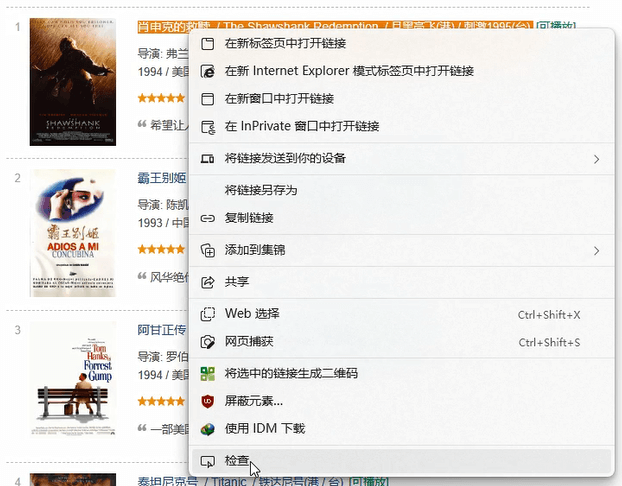
- 弹出的元素中会自动定位到需要的元素的源代码所在位置。
2.3.2 select_one()选择第一个匹配元素(选择器)
- 函数格式:
文档对象或者是先辈标签元素.select_one(选择器) - 函数作用:
- 与select()唯一的不同在于select()返回的是匹配到的是所有元素,而select_one()则只返回匹配到的第一个元素。
- 简单来说就是
select(选择器)[0]。
示例:获取”豆瓣电影 Top 250“中第一部电影的信息。
# 开头的代码参考2.1 BeautifulSoup()转换文档。if resp.status_code == 200:html_doc = BeautifulSoup(resp.text, "html.parser")movie_all_info = html_doc.select_one(".grid_view > li")print(movie_all_info)else:print(f"数据请求失败,状态码为:{resp.status_code}")
2.3.3 text获取标签值
属性格式:
标签对象.text- 函数用途:用于获取标签对象里,开始标签和结束标签包裹的标签值。
示例:获取所有电影的电影名称、电影评分、评价人数。
# 开头的代码参考2.1 BeautifulSoup()转换文档。if resp.status_code == 200:html_doc = BeautifulSoup(resp.text, "html.parser")movie_all_info = html_doc.select(".grid_view > li") # 获取电影列表中的所有元素。# 遍历电影列表(无序列表)中的每一项,然后依次进行分析取值。for movie_li in movie_all_info:movie_name = movie_li.select_one(".title").text # 电影名字存在li中的title类的span中movie_score = movie_li.select_one(".rating_num").text # 电影评分存在li中的rating_num类的span中evaluators = movie_li.select_one(".star > span:last-child").text # 评价人数存储在li中的star类中的最后一个span中print(f"{movie_name}评分为{movie_score}分,评价人数:{evaluators.strip('人评价')}")else:print(f"数据请求失败,状态码为:{resp.status_code}")
2.3.4 attrs获取标签属性
属性格式:
标签对象.attrs函数用途:以字典形式返回标签中所有属性及其属性值。
如这样一个标签元素:
<img class="pic" src="../image/picture.jpg" width="100px" alt="This is a picture.">
attrs的内容为:
{'class': ['pic'], 'src': '../image/picture.jpg', 'width': '100px', 'alt': 'This is a picture.'}
示例1:获取所有电影的电影名称及其作者。
- 需求分析:
- 电影名称在2.2.3中已经实现过了。
- 对于电影导演,我们可以点击电影标题信息,进入详情页。
- 虽然首页中也有导演信息。
- 但是首页的数据通过检查可以发现是一段连续的p段落,因此就算数据获取后还要经过索引、切片等处理。
- 需求分析:

- 然后在详情页中可以很轻松的获取导演的信息。
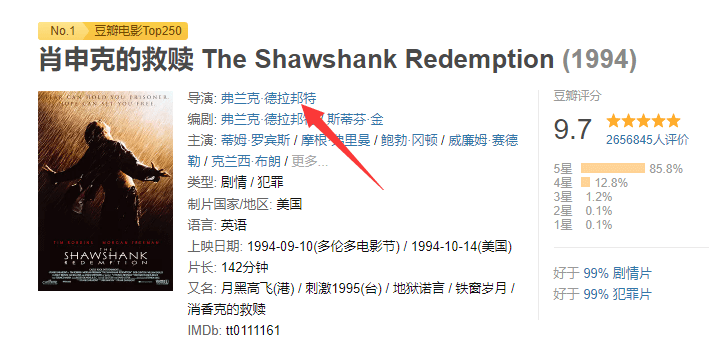
代码实现:
# 开头的代码参考2.1 BeautifulSoup()转换文档。if resp.status_code == 200:html_doc = BeautifulSoup(resp.text, "html.parser")movie_all_info = html_doc.select(".grid_view > li") # 获取每个电影的信息。# 遍历每个电影信息,找到每部电影的名称与详情页链接。for movie_li in movie_all_info:movie_name = movie_li.select_one(".title").textdetail_url = movie_li.select_one(".hd > a:first-child").attrs["href"]# 对详情页再发起一次请求,获取导演信息。time.sleep(random.randint(2, 5)) # 在请求前进行短暂休眠,请求太快会被服务器认为是攻击行为。resp = requests.get(url=detail_url,headers={'User-Agent': 'Mozilla/5.0 (Windows NT 10.0; Win64; x64) ''AppleWebKit/537.36 (KHTML, like Gecko) ''Chrome/103.0.5060.114 Safari/537.36 Edg/103.0.1264.62'})detail_html = BeautifulSoup(resp.text, "html.parser")author_name = detail_html.select_one("#info > span:first-child > .attrs > a").textprint(f"电影《{movie_name}》作者:{author_name}")else:print(f"数据请求失败,状态码为:{resp.status_code}")
示例2:获取所有电影的电影名称、编剧、电影类型、上映时间。
# 开头的代码参考2.1 BeautifulSoup()转换文档。if resp.status_code == 200:html_doc = BeautifulSoup(resp.text, "html.parser")movie_all_info = html_doc.select(".grid_view > li") # 获取每个电影的信息。# 遍历每个电影信息,找到每部电影的名称与详情页链接。for movie_li in movie_all_info:# 获取电影名称与详情页链接。movie_name = movie_li.select_one(".title").textdetail_url = movie_li.select_one(".hd > a:first-child").attrs["href"]# 对详情页再发起一次请求,获取编剧、电影类型、上映时间。time.sleep(random.randint(2, 5))resp = requests.get(url=detail_url,headers={'User-Agent': 'Mozilla/5.0 (Windows NT 10.0; Win64; x64) ''AppleWebKit/537.36 (KHTML, like Gecko) ''Chrome/103.0.5060.114 Safari/537.36 Edg/103.0.1264.62'})detail_html = BeautifulSoup(resp.text, "html.parser")# 编剧信息scriptwriter_in_html = detail_html.select("#info > span:nth-child(3) > .attrs > a")scriptwriter_list = [i.text for i in scriptwriter_in_html]scriptwriter = "、".join(scriptwriter_list)# 电影类型信息movie_type_in_html = detail_html.select("span[property='v:genre']")movie_type_list = [i.text for i in movie_type_in_html]movie_type = "、".join(movie_type_list)# 上映时间信息release_in_html = detail_html.select("span[property='v:initialReleaseDate']")release_list = [i.text for i in release_in_html]release = "、".join(release_list)print(f"电影:《{movie_name}》\n编剧:{scriptwriter}\n电影类型:{movie_type}\n上映时间:{release}\n")else:print(f"数据请求失败,状态码为:{resp.status_code}")
2.3.5 find_all()选择符合条件的元素
函数格式:
文档对象或者是先辈标签元素.find_all(name=标签名称, attrs={属性键值对}, text=标签的内容)- 三个参数不需要全写,只需要根据匹配条件挑选其中一个或多个填写即可。
- 但一般来说,name属性指定的标签名称是要写的。
- 函数作用:
- 筛选出指定名称,指定属性,指定内容的所有标签对象,并封装成列表返回。
- 与
select()和select_one()类似,find_all()也有一个兄弟函数find(),所有参数与find_all()一致。用于筛选出指定名称,指定属性,指定内容的所有标签对象中的第一个,即find()等价于find_all()[0]。
-
2.3.6 next_sibling获取下一个平级的内容
函数格式:
文档对象或者是先辈标签元素.next_sibling- 函数作用:筛选出与当前标签对象平级的(即兄弟关系)下一个标签或文本内容。
- 补充:
next_element属性:只筛选出与当前标签对象平级的下一个标签,不筛选出文本内容。previous_sibling属性:筛选出与当前标签对象平级的上一个标签或文本内容。
- 示例:从详情页中爬出当前电影的语言数据及制片国家/地区数据。
- 需求分析:
- 以肖申克的救赎为例,其语言数据“ 英语”和
<span class="pl">语言:</span>是平级的兄弟关系。 - 影片的语言存放在
<div id="info">中,该标签的子元素众多不好定位。最简单的方式就是先定位到<span class="pl">语言:</span>,然后再用next_sibling即可获取到语言数据。
- 以肖申克的救赎为例,其语言数据“ 英语”和
- 需求分析:
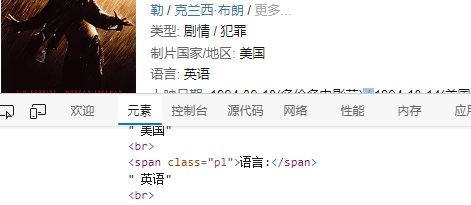
- 制片国家/地址的数据格式与语言数据的格式也是一样的,因此处理思路也是一样的。
代码实现:
# 开头的代码参考2.1 BeautifulSoup()转换文档。if resp.status_code == 200:html_doc = BeautifulSoup(resp.text, "html.parser")movie_all_info = html_doc.select(".grid_view > li")for movie_li in movie_all_info:movie_name = movie_li.select_one(".title").textdetail_url = movie_li.select_one(".hd > a:first-child").attrs["href"]time.sleep(random.randint(2, 5))resp = requests.get(url=detail_url,headers={'User-Agent': 'Mozilla/5.0 (Windows NT 10.0; Win64; x64) ''AppleWebKit/537.36 (KHTML, like Gecko) ''Chrome/103.0.5060.114 Safari/537.36 Edg/103.0.1264.62'})detail_html = BeautifulSoup(resp.text, "html.parser")# 获取语言数据language_ele = detail_html.find(name="span", text="语言:") # 定位详情页中的<span class="pl">语言:</span>标签。language_type = language_ele.next_sibling.text.strip() # 使用next_sibling属性获取语言数据。# 获取制片国家/地址数据nation_ele = detail_html.find(name="span", text="制片国家/地区:")nation = nation_ele.next_sibling.text.strip()print(f"电影《{movie_name}》的语言类型为:{language_type},制片国家/地址数据:{nation}")else:print(f"数据请求失败,状态码为:{resp.status_code}")
2.4 获取多页数据
- 从“豆瓣电影 Top 250”底部可以看出,该网站共有250条电影数据,分成了10页显示。

- 根据SQL数据的分页模型,前端向后端提交的URL中应该要包含有数据的起始位置,因此每页的URL如下:
- 由此可以看出,“豆瓣电影 Top 250”的分页参数是通过URL中的start参数指定的,start的值与页的关系是:
。
- 由此可以分别获取出每一页的电影数据。 ```python import requests from bs4 import BeautifulSoup import time import random
for pageNumber in range(1, 11):
# 每次请求前停一会,以防服务器识别成攻击流量。time.sleep(random.randint(2, 5))# 根据页码获取URL。start = (pageNumber - 1) * 25page_url = f"https://movie.douban.com/top250?start={start}&filter="print(f"第{pageNumber}页的数据:", "=" * 30)# 向指定页的URL发送HTTP请求resp = requests.get(url=page_url,headers={'User-Agent': 'Mozilla/5.0 (Windows NT 10.0; Win64; x64) ''AppleWebKit/537.36 (KHTML, like Gecko) ''Chrome/103.0.5060.114 Safari/537.36 Edg/103.0.1264.62'})# 如果响应成功,则爬取每一页中的基础电影数据。if resp.status_code == 200:html_doc = BeautifulSoup(resp.text, "html.parser")movie_all_info = html_doc.select(".grid_view > li")for movie_li in movie_all_info:movie_name = movie_li.select_one(".title").text # 电影名字存在li中的title类的span中movie_score = movie_li.select_one(".rating_num").text # 电影评分存在li中的rating_num类的span中evaluators = movie_li.select_one(".star > span:last-child").text # 评价人数存储在li中的star类中的最后一个span中print(f"{movie_name}评分为{movie_score}分,评价人数:{evaluators.strip('人评价')}")else:print(f"数据请求失败,状态码为:{resp.status_code}")
<a name="be1Ln"></a>## 03. 数据存储- 爬虫爬下来的数据可以存储到Excel文件、CSV文件、数据库中。- 示例:将“豆瓣电影 Top 250”中所有电影的电影名称、评分、评论人数、导演、编剧、类型、上映时间、语言、制片国家爬取下来,并保存到“./excel/top250.xlsx”文件中。```python# 导入相关模块import openpyxlimport requestsfrom bs4 import BeautifulSoupimport timeimport random# 创建工作簿,定位单元表。top250_wb = openpyxl.Workbook()top250_wb.worksheets[0].title = "电影信息表"movie_info_worksheet = top250_wb["电影信息表"]# 定义一个二维列表,首个元素为数据title,后面的是每个电影的数据。movie_info_list = [["电影名称", "评分", "评论人数", "导演", "编剧", "类型", "上映时间", "语言", "制片国家"]]# 用爬虫爬取数据,并封装成列表添加到二位列表中。(未完成)for page in range(10):# 请求前停2~3秒time.sleep(random.randint(2, 3))page_url = f"https://movie.douban.com/top250?start={page * 25}&filter="resp = requests.get(url=page_url,headers={'User-Agent': 'Mozilla/5.0 (Windows NT 10.0; Win64; x64) ''AppleWebKit/537.36 (KHTML, like Gecko) ''Chrome/103.0.5060.114 Safari/537.36 Edg/103.0.1264.62'})if resp.status_code == 200:print("=" * 20, f"第{page + 1}页数据", "=" * 20)html_doc = BeautifulSoup(resp.text, "html.parser")movies_base_info = html_doc.select(".grid_view > li")for movie_base_info in movies_base_info:movie_name = movie_base_info.select_one(".title").text # 电影名称movie_score = movie_base_info.select_one(".rating_num").text # 评分evaluators = movie_base_info.select_one(".star > span:last-child").text # 评论人数# 请求详情页,获取其他数据detail_url = movie_base_info.select_one(".hd > a:first-child").attrs["href"]time.sleep(random.randint(2, 5))detail_resp = requests.get(url=detail_url,headers={'User-Agent': 'Mozilla/5.0 (Windows NT 10.0; Win64; x64) ''AppleWebKit/537.36 (KHTML, like Gecko) ''Chrome/103.0.5060.114 Safari/537.36 Edg/103.0.1264.62'})if detail_resp.status_code == 200:detail_html = BeautifulSoup(detail_resp.text, "html.parser")author = detail_html.select_one("#info > span:first-child > .attrs > a").text # 导演# 编剧scriptwriter_in_html = detail_html.select("#info > span:nth-child(3) > .attrs > a")scriptwriter_list = [i.text for i in scriptwriter_in_html]scriptwriter = "、".join(scriptwriter_list)# 类型movie_type_in_html = detail_html.select("span[property='v:genre']")movie_type_list = [i.text for i in movie_type_in_html]movie_type = "、".join(movie_type_list)# 上映时间release_in_html = detail_html.select("span[property='v:initialReleaseDate']")release_list = [i.text for i in release_in_html]release = "、".join(release_list)# 语言language_ele = detail_html.find(name="span", text="语言:")language_type = language_ele.next_sibling.text.strip()# 制片国家nation_ele = detail_html.find(name="span", text="制片国家/地区:")nation = nation_ele.next_sibling.text.strip()else:print(f"详情页数据请求失败,状态码为:{detail_resp.status_code}")row_data = [movie_name, movie_score, evaluators, author, scriptwriter, movie_type, release, language_type, nation]movie_info_list.append(row_data)print(row_data)print()else:print(f"数据请求失败,状态码为:{resp.status_code}")# 将二维列表中的数据写入到Excel文件中。for line, line_data in enumerate(movie_info_list):for column, data in enumerate(line_data):movie_info_worksheet.cell(line + 1, column + 1, data)# 保存数据top250_wb.save("./excel/top250.xlsx")
