引言
TensorFlow 是 Google 基于 DistBelief 进行研发的第二代人工智能学习系统,被广泛用于语音识别或图像识别等多项机器深度学习领域。其命名来源于本身的运行原理。Tensor(张量)意味着 N 维数组,Flow(流)意味着基于数据流图的计算,TensorFlow 代表着张量从图象的一端流动到另一端计算过程,是将复杂的数据结构传输至人工智能神经网中进行分析和处理的过程。
TensorFlow 完全开源,任何人都可以使用。可在小到一部智能手机、大到数千台数据中心服务器的各种设备上运行。
『机器学习进阶笔记』系列将深入解析 TensorFlow 系统的技术实践,从零开始,由浅入深,与大家一起走上机器学习的进阶之路。
前段时间心血来潮,想写几个爬虫,但是实操过的同学都知道,现在爬虫程序对很多网站都无效。
打开一看,其实是验证码问题,12306 的坑爹验证码先不说,现在很多站都流行用 “倒字验证码”:
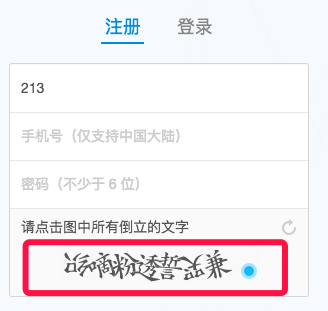
需要在一排汉字中找到, 简单看了下,大概 7 个汉字,不定数个汉字是倒置的,需要人为指出哪些汉字是倒置的,和以往常规的验证码识别有点区别,有点意思!!!
今天就给大家分享一下,如何用 TensorFlow 搞定 “倒字验证码”,问题很明确,主要是:
- 数据问题?如何生成这些数据
- 切字 + 单个分类器,还是直接输出所有的倒置情况(保证验证码字数一致)
数据准备
有天沙神在群里发了个链接,python 生成汉字的代码, 正好用得上,改改然后很快就搞定了,代码如下:
# -*- coding: utf-8 -*- from PIL import Image,ImageDraw,ImageFont import random import math, string import logging # logger = logging.Logger(name='gen verification') class RandomChar(): @staticmethod def Unicode(): val = random.randint(0x4E00, 0x9FBF) return unichr(val) @staticmethod def GB2312(): head = random.randint(0xB0, 0xCF) body = random.randint(0xA, 0xF) tail = random.randint(0, 0xF) val = ( head << 8 ) | (body << 4) | tail str = "%x" % val return str.decode('hex').decode('gb2312') class ImageChar(): def __init__(self, fontColor = (0, 0, 0), size = (100, 40), fontPath = '/Library/Fonts/Arial Unicode.ttf', bgColor = (255, 255, 255), fontSize = 20): self.size = size self.fontPath = fontPath self.bgColor = bgColor self.fontSize = fontSize self.fontColor = fontColor self.font = ImageFont.truetype(self.fontPath, self.fontSize) self.image = Image.new('RGB', size, bgColor) def drawText(self, pos, txt, fill): draw = ImageDraw.Draw(self.image) draw.text(pos, txt, font=self.font, fill=fill) del draw def drawTextV2(self, pos, txt, fill, angle=180): image=Image.new('RGB', (25,25), (255,255,255)) draw = ImageDraw.Draw(image) draw.text( (0, -3), txt, font=self.font, fill=fill) w=image.rotate(angle, expand=1) self.image.paste(w, box=pos) del draw def randRGB(self): return (0,0,0) def randChinese(self, num, num_flip): gap = 1 start = 0 num_flip_list = random.sample(range(num), num_flip) # logger.info('num flip list:{0}'.format(num_flip_list)) print 'num flip list:{0}'.format(num_flip_list) char_list = [] for i in range(0, num): char = RandomChar().GB2312() char_list.append(char) x = start + self.fontSize * i + gap + gap * i if i in num_flip_list: self.drawTextV2((x, 6), char, self.randRGB()) else: self.drawText((x, 0), char, self.randRGB()) return char_list, num_flip_list def save(self, path): self.image.save(path) err_num = 0 for i in range(10): try: ic = ImageChar(fontColor=(100,211, 90), size=(280,28), fontSize = 25) num_flip = random.randint(3,6) char_list, num_flip_list = ic.randChinese(10, num_flip) ic.save(''.join(char_list)+'_'+''.join(str(i) for i in num_flip_list)+".jpeg") except: err_num += 1 continue
为了简单,没有在生成的字加一些噪声,颜色什么的干扰的东西, 生成的图像差不多这样
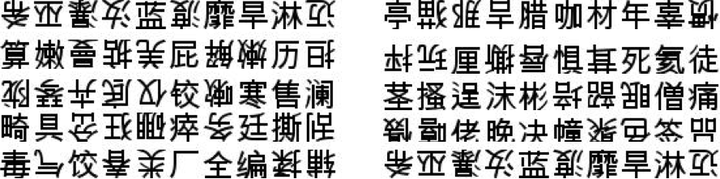
所以,接下来就是在 tensorflow 构建网络来识别了
模型
网络设计
受项亮的end2end 定长的 OCR 识别的启发, 因为我这里的验证码都是长度为 10 的,所以我们只需要构造网络,最后的 output 有 10 个输出,每个输出为 1 个二类分类器:
其中,0 表示正常,1 表示倒置,这样就可以构造一个 input 到 10 个 binary classification 的网络,网络结构很简单(小伙伴们可以在这里都试试网络的设计,多试试黑科技),好吧,废话不多说,show you code:
def network(): images = tf.placeholder(dtype=tf.float32, shape=[None, 28, 280, 1], name='image_batch') labels = tf.placeholder(dtype=tf.int32, shape=[None, 10], name='label_batch') endpoints = {} conv_1 = slim.conv2d(images, 32, [5,5],1, padding='SAME') avg_pool_1 = slim.avg_pool2d(conv_1, [2,2],[1,1], padding='SAME') conv_2 = slim.conv2d(avg_pool_1, 32, [5,5], 1,padding='SAME') avg_pool_2 = slim.avg_pool2d(conv_2, [2,2],[1,1], padding='SAME') conv_3 = slim.conv2d(avg_pool_2, 32, [3,3]) avg_pool_3 = slim.avg_pool2d(conv_3, [2,2], [1,1]) flatten = slim.flatten(avg_pool_3) fc1 = slim.fully_connected(flatten, 512, activation_fn=None) out0 = slim.fully_connected(fc1,2, activation_fn=None) out1 = slim.fully_connected(fc1,2, activation_fn=None) out2 = slim.fully_connected(fc1,2, activation_fn=None) out3 = slim.fully_connected(fc1,2, activation_fn=None) out4 = slim.fully_connected(fc1,2, activation_fn=None) out5 = slim.fully_connected(fc1,2, activation_fn=None) out6 = slim.fully_connected(fc1,2, activation_fn=None) out7 = slim.fully_connected(fc1,2, activation_fn=None) out8 = slim.fully_connected(fc1,2, activation_fn=None) out9 = slim.fully_connected(fc1,2, activation_fn=None) global_step = tf.Variable(initial_value=0) out0_argmax = tf.expand_dims(tf.argmax(out0, 1), 1) out1_argmax = tf.expand_dims(tf.argmax(out1, 1), 1) out2_argmax = tf.expand_dims(tf.argmax(out2, 1), 1) out3_argmax = tf.expand_dims(tf.argmax(out3, 1), 1) out4_argmax = tf.expand_dims(tf.argmax(out4, 1), 1) out5_argmax = tf.expand_dims(tf.argmax(out5, 1), 1) out6_argmax = tf.expand_dims(tf.argmax(out6, 1), 1) out7_argmax = tf.expand_dims(tf.argmax(out7, 1), 1) out8_argmax = tf.expand_dims(tf.argmax(out8, 1), 1) out9_argmax = tf.expand_dims(tf.argmax(out9, 1), 1) out_score = tf.concat([out0, out1, out2, out3, out4, out5, out6, out7, out8, out9], axis=1) out_final = tf.cast(tf.concat([out0_argmax, out1_argmax, out2_argmax, out3_argmax, out4_argmax, out5_argmax, out6_argmax, out7_argmax, out8_argmax, out9_argmax], axis=1), tf.int32) loss = tf.reduce_mean(tf.nn.softmax_cross_entropy_with_logits(logits=out0, labels=tf.one_hot(labels[:,0],depth=2))) loss1 = tf.reduce_mean(tf.nn.softmax_cross_entropy_with_logits(logits=out1, labels=tf.one_hot(labels[:,1],depth=2))) loss2 = tf.reduce_mean(tf.nn.softmax_cross_entropy_with_logits(logits=out2, labels=tf.one_hot(labels[:,2],depth=2))) loss3 = tf.reduce_mean(tf.nn.softmax_cross_entropy_with_logits(logits=out3, labels=tf.one_hot(labels[:,3],depth=2))) loss4 = tf.reduce_mean(tf.nn.softmax_cross_entropy_with_logits(logits=out4, labels=tf.one_hot(labels[:,4],depth=2))) loss5 = tf.reduce_mean(tf.nn.softmax_cross_entropy_with_logits(logits=out5, labels=tf.one_hot(labels[:,5],depth=2))) loss6 = tf.reduce_mean(tf.nn.softmax_cross_entropy_with_logits(logits=out6, labels=tf.one_hot(labels[:,6],depth=2))) loss7 = tf.reduce_mean(tf.nn.softmax_cross_entropy_with_logits(logits=out7, labels=tf.one_hot(labels[:,7],depth=2))) loss8 = tf.reduce_mean(tf.nn.softmax_cross_entropy_with_logits(logits=out8, labels=tf.one_hot(labels[:,8],depth=2))) loss9 = tf.reduce_mean(tf.nn.softmax_cross_entropy_with_logits(logits=out9, labels=tf.one_hot(labels[:,9],depth=2))) loss_list= [loss, loss1, loss2, loss3,loss4, loss5, loss6, loss7, loss8, loss9] loss_sum = tf.reduce_sum(loss_list) train_op = tf.train.AdamOptimizer(learning_rate=0.0001).minimize(loss_sum, global_step=global_step) accuracy = tf.reduce_mean(tf.cast(tf.reduce_all(tf.equal(out_final, labels), axis=1), tf.float32)) tf.summary.scalar('loss_sum', loss_sum) tf.summary.scalar('accuracy', accuracy) merged_summary_op = tf.summary.merge_all() endpoints['global_step'] = global_step endpoints['images'] = images endpoints['labels'] = labels endpoints['train_op'] = train_op endpoints['loss_sum'] = loss_sum endpoints['accuracy'] = accuracy endpoints['merged_summary_op'] = merged_summary_op endpoints['out_final'] = out_final endpoints['out_score'] = out_score return endpoints
注意 tf1.0 和 tf0.n 里面有一些 api 接口改了,这里的代码是 tf1.0 的要改成 0.n 大概需要改下 tf.concat,另外因为 label 是 10 为 binary 的数,所以这里很显然,loss 续传重新设计,这里把 10 为的 loss 全加起来作为去优化的 object func
其实我觉得这里可以用更多的方法,因为这里的 label 可以看出一个 10 位上的数据分布,因为我们的 predict 和原先的 groundtruth 的分布的差异,比如 kl 距离都可以尝试,我这里简单粗暴的直接加起来了,另外就是 tf.reduce_all 的使用
意思是只要其中有任意为 false,则结果为 false,恰好满足我这里必须 10 位都相同才视为识别正确
其他的代码没什么特别好说明的,想要学习这些 api 的直接 run 下代码就好了,再有不懂的直接在我文章下面留言,我会第一时间回复
模型训练
def train(): train_feeder = DataIterator(data_dir=FLAGS.train_data_dir) test_feeder = DataIterator(data_dir=FLAGS.test_data_dir) with tf.Session() as sess: train_images, train_labels = train_feeder.input_pipeline(batch_size=FLAGS.batch_size, aug=True) test_images, test_labels = test_feeder.input_pipeline(batch_size=FLAGS.batch_size) endpoints = network() sess.run(tf.global_variables_initializer()) coord = tf.train.Coordinator() threads = tf.train.start_queue_runners(sess=sess, coord=coord) saver = tf.train.Saver() train_writer = tf.summary.FileWriter('./log' + '/train',sess.graph) test_writer = tf.summary.FileWriter('./log' + '/val') start_step = 0 if FLAGS.restore: ckpt = tf.train.latest_checkpoint(FLAGS.checkpoint_dir) if ckpt: saver.restore(sess, ckpt) print "restore from the checkpoint {0}".format(ckpt) start_step += int(ckpt.split('-')[-1]) logger.info(':::Training Start:::') try: while not coord.should_stop(): start_time = time.time() train_images_batch, train_labels_batch = sess.run([train_images, train_labels]) feed_dict = {endpoints['images']: train_images_batch, endpoints['labels']: train_labels_batch} _, loss_val, train_summary, step = sess.run([endpoints['train_op'], endpoints['loss_sum'], endpoints['merged_summary_op'], endpoints['global_step']], feed_dict=feed_dict) train_writer.add_summary(train_summary, step) end_time = time.time() logger.info("[train] the step {0} takes {1} loss {2}".format(step, end_time-start_time, loss_val)) if step > FLAGS.max_steps: break if step % FLAGS.eval_steps == 1: logger.info('========Begin eval stage =========') start_time = time.time() # can't run test_images_batch, test_labels_batch = sess.run([test_images, test_labels]) logger.info('[test] gen test batch spend {0}'.format(time.time()-start_time)) feed_dict = { endpoints['images']: test_images_batch, endpoints['labels']: test_labels_batch } accuracy_val,test_summary = sess.run([endpoints['accuracy'], endpoints['merged_summary_op']], feed_dict=feed_dict) end_time = time.time() test_writer.add_summary(test_summary, step) logger.info( '[test] the step {0} accuracy {1} spend time {2}'.format(step, accuracy_val, (end_time-start_time))) if step % FLAGS.save_steps == 1: logger.info('Save the ckpt of {0}'.format(step)) saver.save(sess, os.path.join(FLAGS.checkpoint_dir, 'my-model'), global_step=endpoints['global_step']) except tf.errors.OutOfRangeError: # print "============train finished=========" logger.info('==================Train Finished================') saver.save(sess, os.path.join(FLAGS.checkpoint_dir, 'my-model'), global_step=endpoints['global_step']) finally: coord.request_stop() coord.join(threads)
训练过程会新建两个 DataIterator 的对象,这样就可以在训练的过程中对 test 的 dataset 来做训练的验证,训练过程的 loss 和 accuracy 见下图:
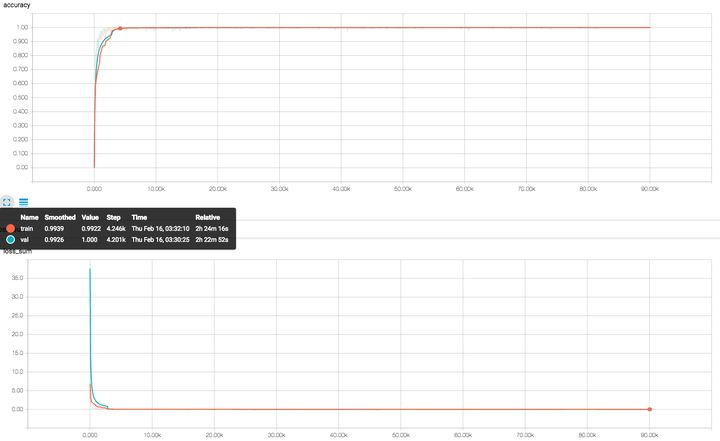
大家可以看看大概到了 4000 多个 step 的时候,train 和 val 的 batch 就的 accuracy 就特别高了,可能是我这里的 train 和 val 的 dataset 都太 simple 的,所以模型的训练很快就可以达到很高的性能,为了测试这里的模型是不是扯淡,
照常写了 validation 来做所有 test dataset 的数据集上 accuracy 的验证
模型验证
def validation(): # it should be fixed by using placeholder with epoch num in train stage logger.info("=======Validation Beigin=======") test_feeder = DataIterator(data_dir='../data/test_data/') predict_labels_list = [] groundtruth = [] with tf.Session() as sess: test_images, test_labels = test_feeder.input_pipeline(batch_size=FLAGS.batch_size,num_epochs=1) endpoints = network() sess.run(tf.global_variables_initializer()) sess.run(tf.local_variables_initializer()) coord = tf.train.Coordinator() threads = tf.train.start_queue_runners(sess=sess, coord=coord) saver = tf.train.Saver() ckpt = tf.train.latest_checkpoint(FLAGS.checkpoint_dir) if ckpt: saver.restore(sess, ckpt) logger.info('restore from the checkpoint {0}'.format(ckpt)) logger.info('======Start Validation=======') try: i = 0 acc_sum = 0.0 while not coord.should_stop(): i += 1 start_time = time.time() test_images_batch, test_labels_batch = sess.run([test_images, test_labels]) feed_dict = {endpoints['images']:test_images_batch, endpoints['labels']: test_labels_batch} labels_batch, predict_labels_batch, acc = sess.run([endpoints['labels'],endpoints['out_final'], endpoints['accuracy']], feed_dict=feed_dict) predict_labels_list += predict_labels_batch.tolist() groundtruth += labels_batch.tolist() acc_sum += acc logger.info('the batch {0} takes {1} seconds, accuracy {2}'.format(i, time.time()-start_time, acc)) except tf.errors.OutOfRangeError: logger.info('==================Validation Finished===================') logger.info('The finally accuracy {0}'.format(acc_sum/i)) finally: coord.request_stop() coord.join(threads) return {'predictions':predict_labels_list, 'gt_labels':groundtruth}
因为我这边太暴力了,在生成数据集的时候,训练数据 100w(有生成异常,最终 80 多万张),测试数据 60w(最后好像有 40 多 w 成功生成的), 跑一次全测试数据集也好长时间,但是看了好久的输出,都是下面的结果,吓死我了,全是 1:

模型 inference
有点害怕是不是代码写错的原因,再次确认,写了个 inference:
def inference(image): logger.info('============inference==========') temp_image = Image.open(image).convert('L') # temp_image = temp_image.resize((FLAGS.image_height, FLAGS.image_size),Image.ANTIALIAS) temp_image = np.asarray(temp_image) / 255.0 temp_image = temp_image.reshape([-1, 28, 280, 1]) sess = tf.Session() logger.info('========start inference============') # images = tf.placeholder(dtype=tf.float32, shape=[None, 280, 28, 1]) endpoints = network() saver = tf.train.Saver() ckpt = tf.train.latest_checkpoint(FLAGS.checkpoint_dir) if ckpt: saver.restore(sess, ckpt) feed_dict = {endpoints['images']: temp_image} predict_val, predict_index = sess.run([endpoints['out_score'],endpoints['out_final']], feed_dict=feed_dict) sess.close() return predict_val, predict_index
随机找了张图像, 然后做了下 inference,结果是
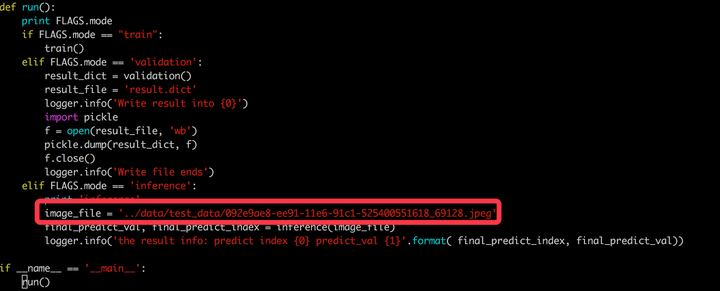
这里稍微做下解释../data/testdata/092e9ae8-ee91-11e6-91c1-525400551618_69128.jpeg 文件名前面有 uuid+’’+’label’组成,最开始我是把 uuid 部分用汉字表示,这样生成的图像既有汉字信息又有 label 信息,
在我本地 mac 上是 ok 的可以生成的,但是在 ubuntu 的云主机上,可能是汉字的不支持的原因,写入文件为汉字的时候,就生成不了,太忙了暂时没有解决这个问题。这里的 label 69128 转换为 10 位 binary 就是 0110001011, 看看我的结果

所以好像是没有大的问题。
总结
照例做个总结,综上,这次主要是设计一个小的网络做一个单 input,多 output 的网络,然后确定一个 loss 作为目标函数来最小化,整个网络很简单,但是确实是很有效,另外因为数据还有字数都是自己 DIY 的,当然不能直接使用,但是选择好合适字体,做一些扭曲变换,应该会很快 cover 到真正的生产环境上来,对此很有信心。
有兴趣的小伙帮可以 fork 下项目,然后探索下把倒字验证码搞定,以上的东西纯属抛砖引玉,有兴趣的小伙伴一起玩呀。
所有的代码都在tensorflow-101/zhihu_code,感觉有意思的 star 下吧,我们一起来玩。
——————
相关阅读推荐:
机器学习进阶笔记之八 | TensorFlow 与中文手写汉字识别
机器学习进阶笔记之七 | MXnet 初体验
机器学习进阶笔记之六 | 深入理解 Fast Neural Style
机器学习进阶笔记之五 | 深入理解 VGG\Residual Network
机器学习进阶笔记之四 | 深入理解 GoogLeNet
机器学习进阶笔记之三 | 深入理解 Alexnet
机器学习进阶笔记之二 | 深入理解 Neural Style
机器学习进阶笔记之一 | TensorFlow 安装与入门
本文由『UCloud 内核与虚拟化研发团队』提供。
关于作者:
Burness(@想飞的石头), UCloud 平台研发中心深度学习研发工程师,tflearn Contributor & tensorflow Contributor,做过电商推荐、精准化营销相关算法工作,专注于分布式深度学习框架、计算机视觉算法研究,平时喜欢玩玩算法,研究研究开源的项目,偶尔也会去一些数据比赛打打酱油,生活中是个极客,对新技术、新技能痴迷。
你可以在 Github 上找到他:http://hacker.duanshishi.com/
福利时间
如果你想亲自上手,在云上部署体验以上技术实践过程,大 U 为大家争取到了 100 元 UCloud 云服务代金券,够大家免费使用 1 个月的 1 核 / 2G/20G 数据盘云主机。
立即 注册 UCloud,在活动/邀请码一栏填入:zhihu-ucloud,即可获得代金券。
有需求的同学快去领代金券吧,有问题请添加 UCloud 运营小妹个人微信号:Surdur 进行咨询。
「UCloud 机构号」将独家分享云计算领域的技术洞见、行业资讯以及一切你想知道的相关讯息。欢迎提问 & 求关注 o(////▽////)q~

若有收获,就点个赞吧
0 人点赞
