前言
- 深度卷积网络极大地推进深度学习各领域的发展,ILSVRC 作为最具影响力的竞赛功不可没,促使了许多经典工作。我梳理了 ILSVRC 分类任务的各届冠军和亚军网络,简单介绍了它们的核心思想、网络架构及其实现。代码主要来自:https://github.com/weiaicunzai/pytorch-cifar100
- ImageNet 和 ILSVRC
- ImageNet 是一个超过 15 million 的图像数据集,大约有 22,000 类。
- ILSVRC 全称 ImageNet Large-Scale Visual Recognition Challenge,从 2010 年开始举办到 2017 年最后一届,使用 ImageNet 数据集的一个子集,总共有 1000 类。
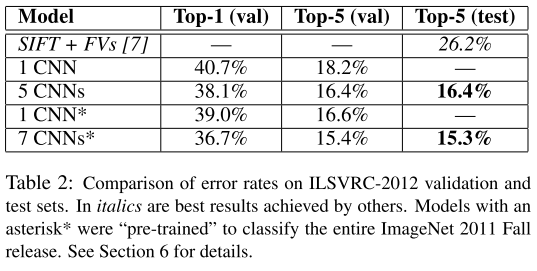
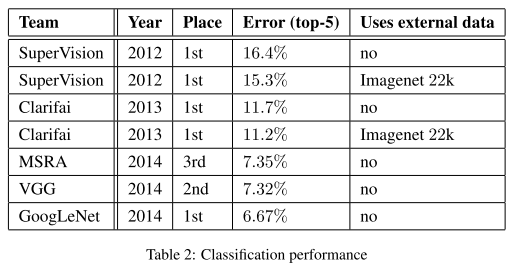
- 历届结果

| 年 | 网络 / 队名 | val top-1 | val top-5 | test top-5 | 备注 |
|---|---|---|---|---|---|
| 2012 | AlexNet | 38.1% | 16.4% | 16.42% | 5 CNNs |
| 2012 | AlexNet | 36.7% | 15.4% | 15.32% | 7CNNs。用了 2011 年的数据 |
| 2013 | OverFeat | 14.18% | 7 fast models | ||
| 2013 | OverFeat | 13.6% | 赛后。7 big models | ||
| 2013 | ZFNet | 13.51% | ZFNet 论文上的结果是 14.8 | ||
| 2013 | Clarifai | 11.74% | |||
| 2013 | Clarifai | 11.20% | 用了 2011 年的数据 | ||
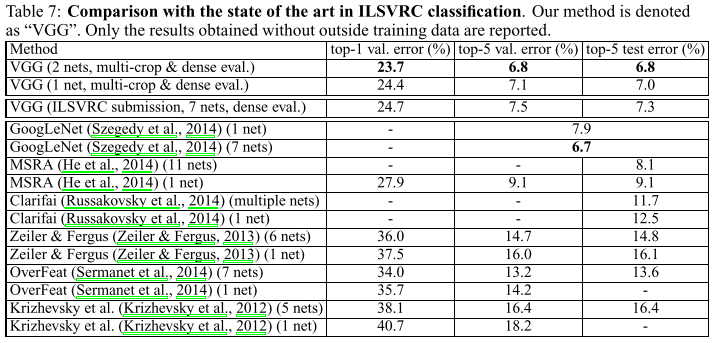
| 2014 | VGG | 7.32% | 7 nets, dense eval | ||
| 2014 | VGG(亚军) | 23.7% | 6.8% | 6.8% | 赛后。2 nets |
| 2014 | GoogleNet v1 | 6.67% | 7 nets, 144 crops | ||
| GoogleNet v2 | 20.1% | 4.9% | 4.82% | 赛后。6 nets, 144 crops | |
| GoogleNet v3 | 17.2% | 3.58% | 赛后。4 nets, 144 crops | ||
| GoogleNet v4 | 16.5% | 3.1% | 3.08% | 赛后。v4+Inception-Res-v2 | |
| 2015 | ResNet | 3.57% | 6 models | ||
| 2016 | Trimps-Soushen | 2.99% | 公安三所 | ||
| 2016 | ResNeXt(亚军) | 3.03% | 加州大学圣地亚哥分校 | ||
| 2017 | SENet | 2.25% | Momenta 与牛津大学 |
评价标准top1 是指概率向量中最大的作为预测结果,若分类正确,则为正确;top5 则只要概率向量中最大的前五名里有分类正确的,则为正确。
LeNet
Gradient-Based Learning Applied to Document Recognition
网络架构
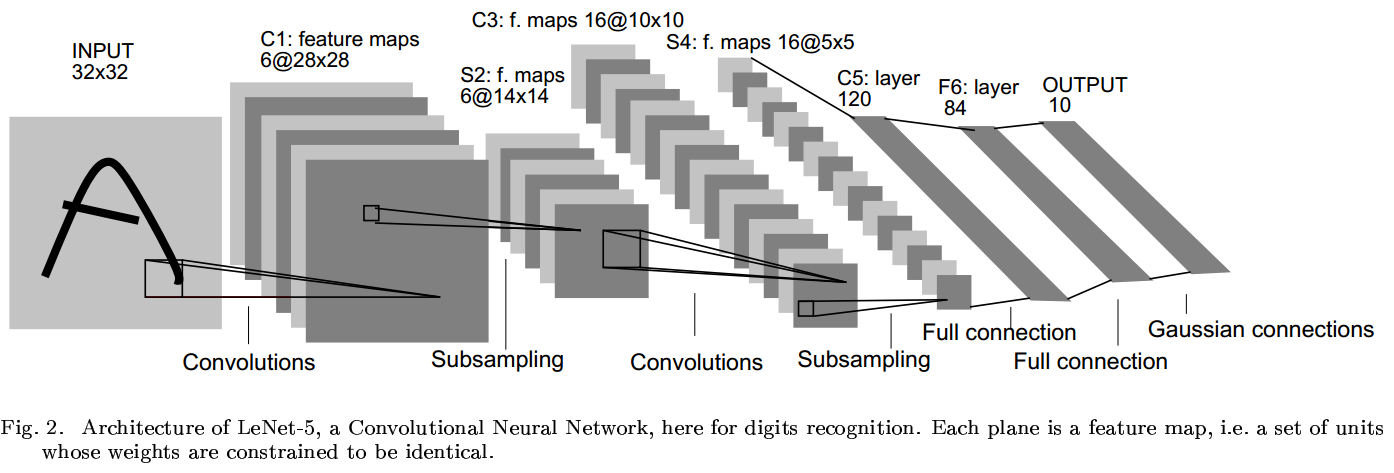
import torch.nn as nn import torch.nn.functional as func class LeNet(nn.Module): def init(self): super(LeNet, self).init() self.conv1 = nn.Conv2d(1, 6, kernel_size=5) self.conv2 = nn.Conv2d(6, 16, kernel_size=5) self.fc1 = nn.Linear(16*16, 120) self.fc2 = nn.Linear(120, 84) self.fc3 = nn.Linear(84, 10) def forward(self, x): x = func.relu(self.conv1(x)) x = func.max_pool2d(x, 2) x = func.relu(self.conv2(x)) x = func.max_pool2d(x, 2) x = x.view(x.size(0), -1) x = func.relu(self.fc1(x)) x = func.relu(self.fc2(x)) x = self.fc3(x) return xAlexNet
ImageNet Classification with Deep Convolutional Neural Networks
核心思想
AlexNet 相比前人有以下改进:
代码实现
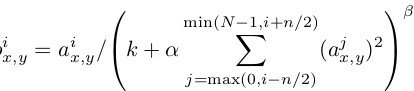
class AlexNet(nn.Module): def init(self, numclasses=NUMCLASSES): super(AlexNet, self).__init() self.features = nn.Sequential( nn.Conv2d(1, 96, kernel_size=11,padding=1), nn.ReLU(inplace=True), nn.MaxPool2d(kernel_size=2), nn.Conv2d(96, 256, kernel_size=3, padding=1), nn.ReLU(inplace=True), nn.MaxPool2d(kernel_size=2), nn.Conv2d(256, 384, kernel_size=3, padding=1), nn.ReLU(inplace=True), nn.Conv2d(384, 384, kernel_size=3, padding=1), nn.ReLU(inplace=True), nn.Conv2d(384, 256, kernel_size=3, padding=1), nn.ReLU(inplace=True), nn.MaxPool2d(kernel_size=2), ) self.classifier = nn.Sequential( nn.Dropout(), nn.Linear(256 2 2, 4096), nn.ReLU(inplace=True), nn.Dropout(), nn.Linear(4096, 4096), nn.ReLU(inplace=True), nn.Linear(4096, 10), ) def forward(self, x): x = self.features(x) x = x.view(x.size(0), 256 2 2) x = self.classifier(x) return x
实验结果
ZFNet
Visualizing and Understanding Convolutional Networks
核心思想
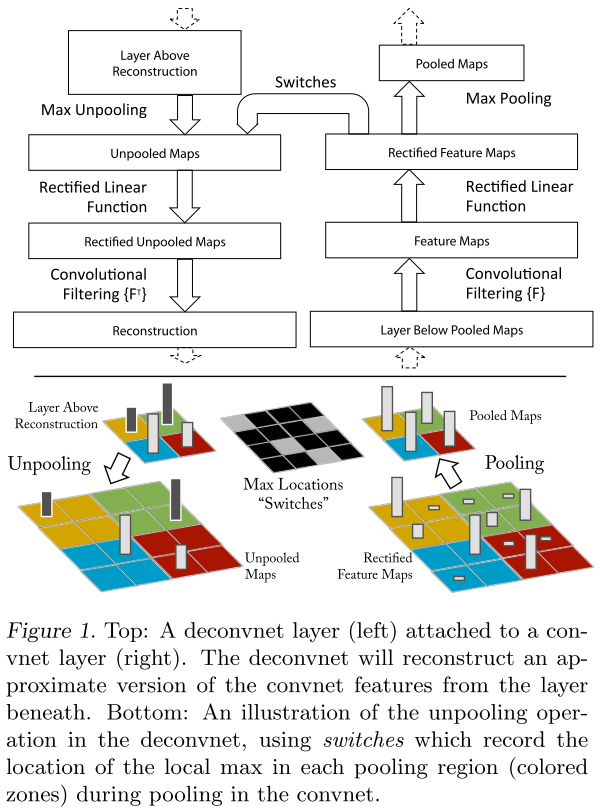
- 利用反卷积可视化 CNN 学到的特征。
- Unpooling:池化操作不可逆,但通过记录池化最大值的位置可实现逆操作。
- Rectification:ReLU
- Filtering:使用原卷积核的转置版本。
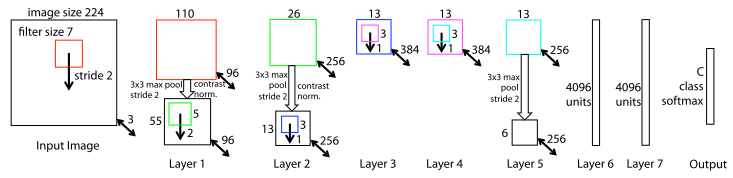
网络架构
实验结果
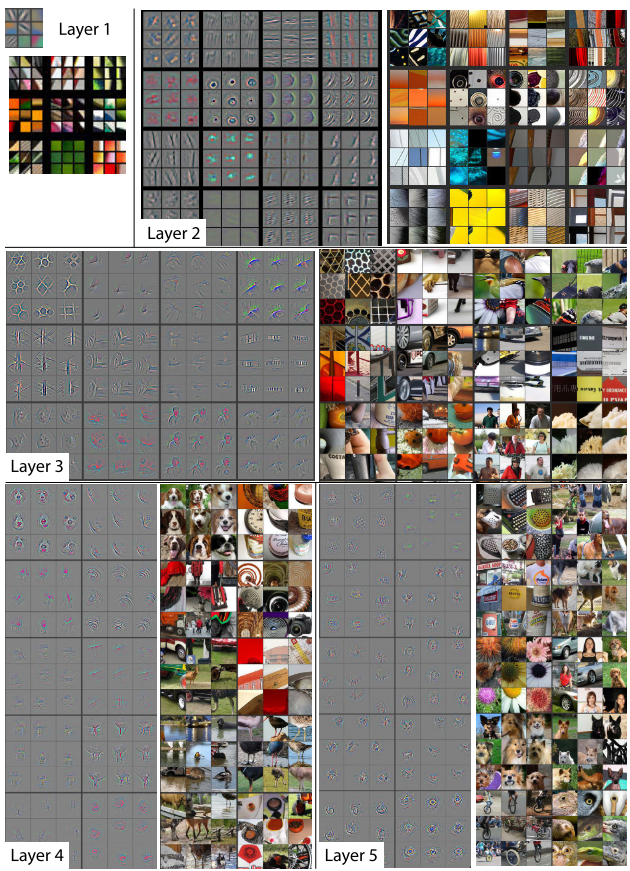
- 特征可视化: Layer2 响应角落和边缘、颜色连接;Layer3 有更复杂的不变性,捕获相似纹理;Layer4 展示了明显的变化,跟类别更相关;Layer5 看到整个物体。
- 训练过程特征演化:低层特征较快收敛,高层到后面才开始变化。

- 特征不变性:小变换在模型第一层变化明显,但在顶层影响较小。网络输出对翻转和缩放是稳定的,但除了旋转对称性的物体,输出对旋转并不是不变的。
- 遮挡敏感性:当对象被遮挡,准确性会明显下降。
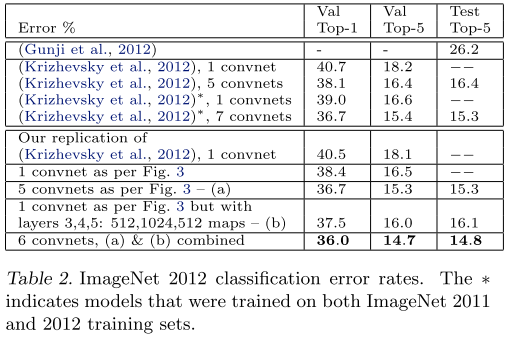
- ImageNet 结果
VGG
Very Deep Convolutional Networks for Large-Scale Image Recognition
核心思想
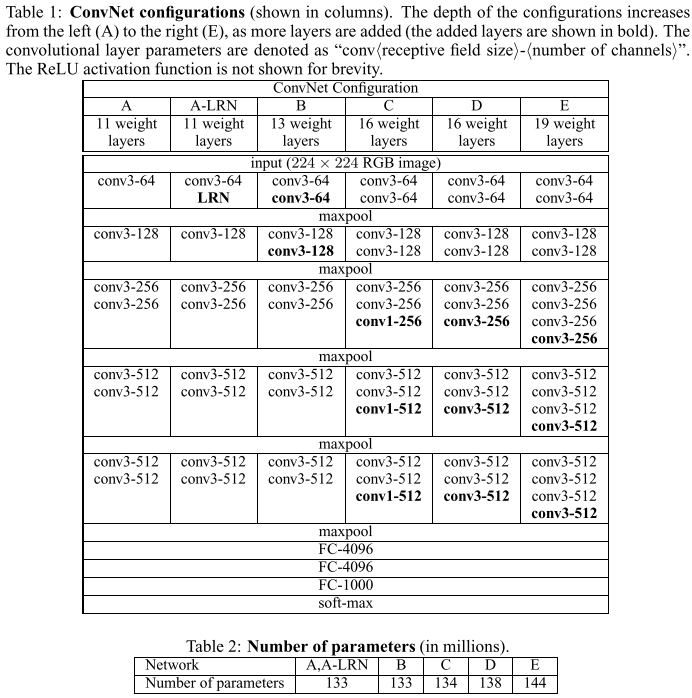
- 代码实现
cfg = { ‘A’ : [64, ‘M’, 128, ‘M’, 256, 256, ‘M’, 512, 512, ‘M’, 512, 512, ‘M’], ‘B’ : [64, 64, ‘M’, 128, 128, ‘M’, 256, 256, ‘M’, 512, 512, ‘M’, 512, 512, ‘M’], ‘D’ : [64, 64, ‘M’, 128, 128, ‘M’, 256, 256, 256, ‘M’, 512, 512, 512, ‘M’, 512, 512, 512, ‘M’], ‘E’ : [64, 64, ‘M’, 128, 128, ‘M’, 256, 256, 256, 256, ‘M’, 512, 512, 512, 512, ‘M’, 512, 512, 512, 512, ‘M’] } def vgg19bn(): return VGG(makelayers(cfg[‘E’], batchnorm=True)) class VGG(nn.Module): def _init(self, features, num_class=100): super().__init() self.features = features self.classifier = nn.Sequential( nn.Linear(512, 4096), nn.ReLU(inplace=True), nn.Dropout(), nn.Linear(4096, 4096), nn.ReLU(inplace=True), nn.Dropout(), nn.Linear(4096, num_class) ) def forward(self, x): output = self.features(x) output = output.view(output.size()[0], -1) output = self.classifier(output) return output def make_layers(cfg, batch_norm=False): layers = [] input_channel = 3 for l in cfg: if l == ‘M’: layers += [nn.MaxPool2d(kernel_size=2, stride=2)] continue layers += [nn.Conv2d(input_channel, l, kernel_size=3, padding=1)] if batch_norm: layers += [nn.BatchNorm2d(l)] layers += [nn.ReLU(inplace=True)] input_channel = l return nn.Sequential(*layers)
实验结果
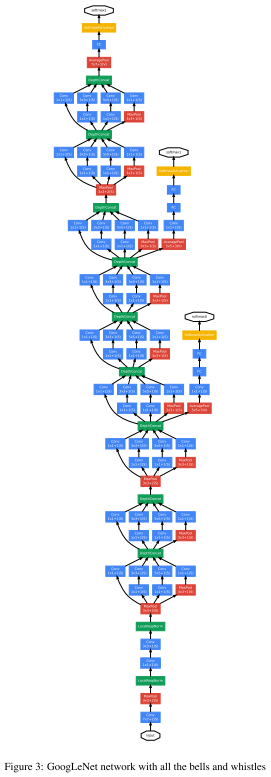
GoogLeNet(v1)
Going Deeper with Convolutions
核心思想
- 提出 Inception 模块,可在保持计算成本的同时增加网络的深度和宽度。

- 代码实现
class Inception(nn.Module): def init(self, inputchannels, n1x1, n3x3reduce, n3x3, n5x5_reduce, n5x5, pool_proj): super().__init() self.b1 = nn.Sequential( nn.Conv2d(input_channels, n1x1, kernel_size=1), nn.BatchNorm2d(n1x1), nn.ReLU(inplace=True) ) self.b2 = nn.Sequential( nn.Conv2d(input_channels, n3x3_reduce, kernel_size=1), nn.BatchNorm2d(n3x3_reduce), nn.ReLU(inplace=True), nn.Conv2d(n3x3_reduce, n3x3, kernel_size=3, padding=1), nn.BatchNorm2d(n3x3), nn.ReLU(inplace=True) ) self.b3 = nn.Sequential( nn.Conv2d(input_channels, n5x5_reduce, kernel_size=1), nn.BatchNorm2d(n5x5_reduce), nn.ReLU(inplace=True), nn.Conv2d(n5x5_reduce, n5x5, kernel_size=3, padding=1), nn.BatchNorm2d(n5x5, n5x5), nn.ReLU(inplace=True), nn.Conv2d(n5x5, n5x5, kernel_size=3, padding=1), nn.BatchNorm2d(n5x5), nn.ReLU(inplace=True) ) self.b4 = nn.Sequential( nn.MaxPool2d(3, stride=1, padding=1), nn.Conv2d(input_channels, pool_proj, kernel_size=1), nn.BatchNorm2d(pool_proj), nn.ReLU(inplace=True) ) def forward(self, x): return torch.cat([self.b1(x), self.b2(x), self.b3(x), self.b4(x)], dim=1)
网络架构
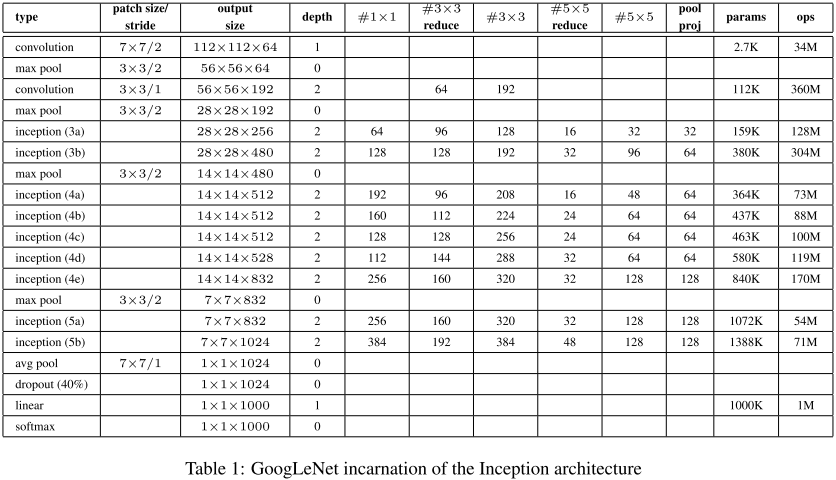
- 代码实现
def googlenet(): return GoogleNet() class GoogleNet(nn.Module): def init(self, numclass=100): super()._init() self.prelayer = nn.Sequential( nn.Conv2d(3, 192, kernel_size=3, padding=1), nn.BatchNorm2d(192), nn.ReLU(inplace=True) ) self.a3 = Inception(192, 64, 96, 128, 16, 32, 32) self.b3 = Inception(256, 128, 128, 192, 32, 96, 64) self.maxpool = nn.MaxPool2d(3, stride=2, padding=1) self.a4 = Inception(480, 192, 96, 208, 16, 48, 64) self.b4 = Inception(512, 160, 112, 224, 24, 64, 64) self.c4 = Inception(512, 128, 128, 256, 24, 64, 64) self.d4 = Inception(512, 112, 144, 288, 32, 64, 64) self.e4 = Inception(528, 256, 160, 320, 32, 128, 128) self.a5 = Inception(832, 256, 160, 320, 32, 128, 128) self.b5 = Inception(832, 384, 192, 384, 48, 128, 128) self.avgpool = nn.AdaptiveAvgPool2d((1, 1)) self.dropout = nn.Dropout2d(p=0.4) self.linear = nn.Linear(1024, num_class) def forward(self, x): output = self.prelayer(x) output = self.a3(output) output = self.b3(output) output = self.maxpool(output) output = self.a4(output) output = self.b4(output) output = self.c4(output) output = self.d4(output) output = self.e4(output) output = self.maxpool(output) output = self.a5(output) output = self.b5(output) output = self.avgpool(output) output = self.dropout(output) output = output.view(output.size()[0], -1) output = self.linear(output) return output
实验结果
ResNet
Deep Residual Learning for Image Recognition
核心思想
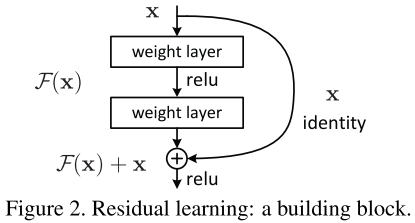
- 为了解决深层网络难以训练的问题,提出了残差模块和深度残差网络
- 假设网络输入是 x,经学习的输出是 F(x),最终拟合目标是 H(x)。
- 深层网络相比浅层网络有一些层是多余的,若让多余层学习恒等变换H(x)=x,那么网络性能不该比浅层网络要差。
- 传统网络训练目标 H(x)\=F(x),残差网络训练目标 H(x)\=F(x)+x。
- 为了学习恒等变换,传统网络要求网络学习 F(x)\=H(x)\=x,残差网络只需学习 F(x)\=H(x)−x\=x−x\=0。残差学习之所以有效是因为让网络学习 F(x)\=0 比学习 F(x)\=x 要容易。
- bottleneck
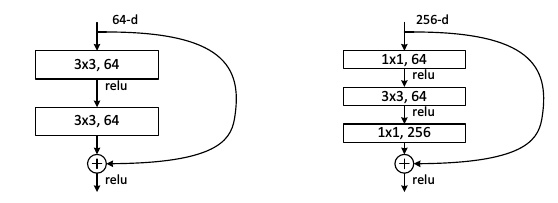
- 代码实现
class BottleNeck(nn.Module): “””Residual block for resnet over 50 layers “”” expansion = 4 def init(self, inchannels, outchannels, stride=1): super().__init() self.residual_function = nn.Sequential( nn.Conv2d(in_channels, out_channels, kernel_size=1, bias=False), nn.BatchNorm2d(out_channels), nn.ReLU(inplace=True), nn.Conv2d(out_channels, out_channels, stride=stride, kernel_size=3, padding=1, bias=False), nn.BatchNorm2d(out_channels), nn.ReLU(inplace=True), nn.Conv2d(out_channels, out_channels BottleNeck.expansion, kernel_size=1, bias=False), nn.BatchNorm2d(out_channels BottleNeck.expansion), ) self.shortcut = nn.Sequential() if stride != 1 or in_channels != out_channels BottleNeck.expansion: self.shortcut = nn.Sequential( nn.Conv2d(in_channels, out_channels BottleNeck.expansion, stride=stride, kernel_size=1, bias=False), nn.BatchNorm2d(out_channels * BottleNeck.expansion) ) def forward(self, x): return nn.ReLU(inplace=True)(self.residual_function(x) + self.shortcut(x))
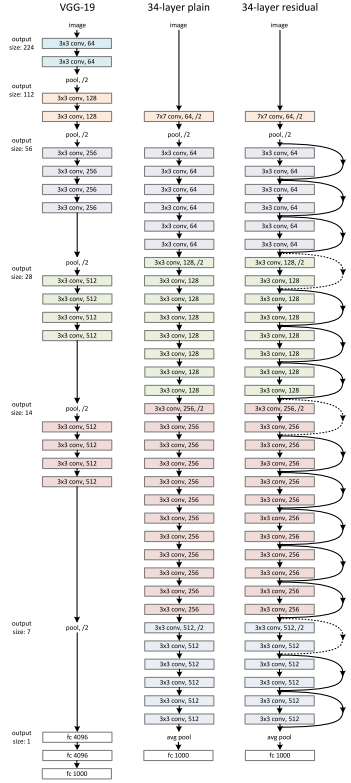
网络架构
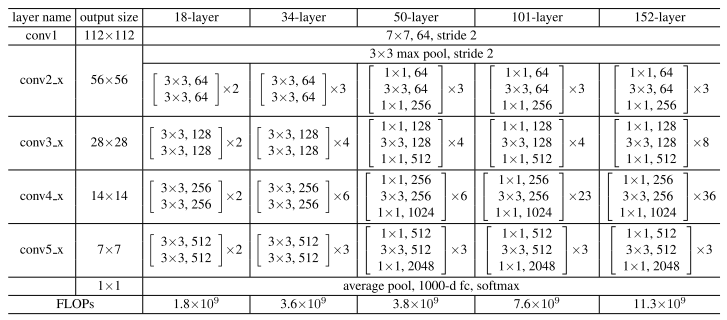
- 代码实现
def resnet152(): “”” return a ResNet 152 object “”” return ResNet(BottleNeck, [3, 8, 36, 3]) class ResNet(nn.Module): def init(self, block, numblock, numclasses=100): super().__init() self.in_channels = 64 self.conv1 = nn.Sequential( nn.Conv2d(3, 64, kernel_size=3, padding=1, bias=False), nn.BatchNorm2d(64), nn.ReLU(inplace=True)) self.conv2_x = self._make_layer(block, 64, num_block[0], 1) self.conv3_x = self._make_layer(block, 128, num_block[1], 2) self.conv4_x = self._make_layer(block, 256, num_block[2], 2) self.conv5_x = self._make_layer(block, 512, num_block[3], 2) self.avg_pool = nn.AdaptiveAvgPool2d((1, 1)) self.fc = nn.Linear(512 block.expansion, num_classes) def _make_layer(self, block, out_channels, num_blocks, stride): “””make resnet layers(by layer i didnt mean this ‘layer’ was the same as a neuron netowork layer, ex. conv layer), one layer may contain more than one residual block Args: block: block type, basic block or bottle neck block out_channels: output depth channel number of this layer num_blocks: how many blocks per layer stride: the stride of the first block of this layer Return: return a resnet layer “”” strides = [stride] + [1] (num_blocks - 1) layers = [] for stride in strides: layers.append(block(self.in_channels, out_channels, stride)) self.in_channels = out_channels block.expansion return nn.Sequential(layers) def forward(self, x): output = self.conv1(x) output = self.conv2_x(output) output = self.conv3_x(output) output = self.conv4_x(output) output = self.conv5_x(output) output = self.avg_pool(output) output = output.view(output.size(0), -1) output = self.fc(output) return output
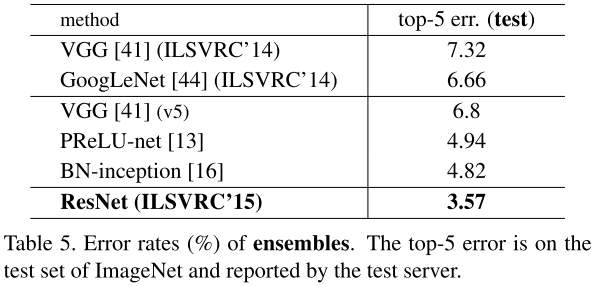
实验结果
ResNeXt
Aggregated Residual Transformations for Deep Neural Networks
核心思想
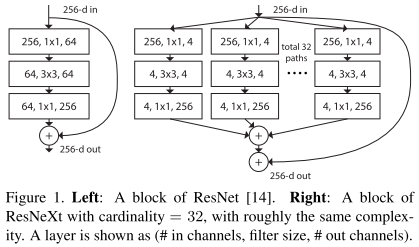
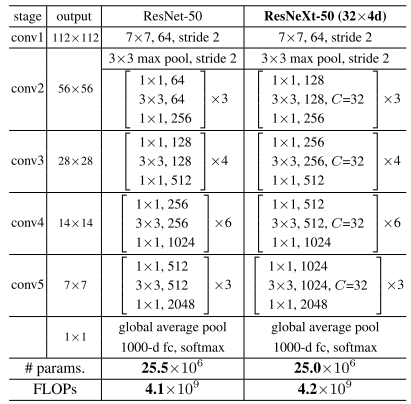
- 通过重复构建 block 来聚合一组相同拓扑结构的特征,并提出一个新维度”cardinality“。
- ResNeXt 结合了 VGG、ResNet 重复堆叠模块和 Inception 的 split-transform-merge 的思想。
以下三者等价,文章采用第三种实现,其使用了组卷积。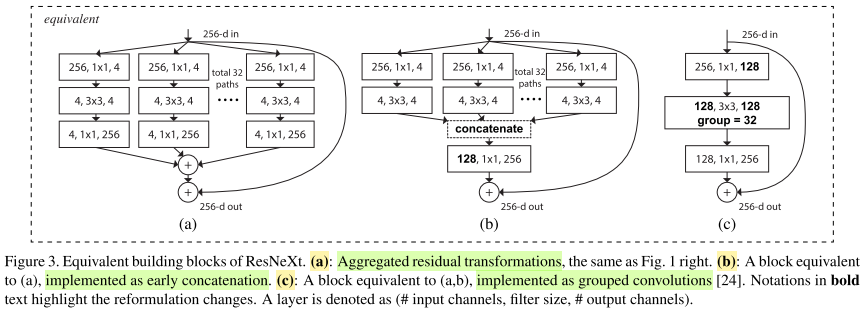
- 代码实现
CARDINALITY = 32 DEPTH = 4 BASEWIDTH = 64 class ResNextBottleNeckC(nn.Module): def init(self, inchannels, outchannels, stride): super().__init() C = CARDINALITY D = int(DEPTH out_channels / BASEWIDTH) self.split_transforms = nn.Sequential( nn.Conv2d(in_channels, C D, kernel_size=1, groups=C, bias=False), nn.BatchNorm2d(C D), nn.ReLU(inplace=True), nn.Conv2d(C D, C D, kernel_size=3, stride=stride, groups=C, padding=1, bias=False), nn.BatchNorm2d(C D), nn.ReLU(inplace=True), nn.Conv2d(C D, out_channels 4, kernel_size=1, bias=False), nn.BatchNorm2d(out_channels 4), ) self.shortcut = nn.Sequential() if stride != 1 or in_channels != out_channels 4: self.shortcut = nn.Sequential( nn.Conv2d(in_channels, out_channels 4, stride=stride, kernel_size=1, bias=False), nn.BatchNorm2d(out_channels 4) ) def forward(self, x): return F.relu(self.split_transforms(x) + self.shortcut(x))
网络架构
- 代码实现以下部分跟 ResNet 基本一致,重点关注 ResNextBottleNeckC 的实现。
def resnext50(): “”” return a resnext50(c32x4d) network “”” return ResNext(ResNextBottleNeckC, [3, 4, 6, 3]) class ResNext(nn.Module): def init(self, block, numblocks, classnames=100): super().__init() self.in_channels = 64 self.conv1 = nn.Sequential( nn.Conv2d(3, 64, 3, stride=1, padding=1, bias=False), nn.BatchNorm2d(64), nn.ReLU(inplace=True) ) self.conv2 = self._make_layer(block, num_blocks[0], 64, 1) self.conv3 = self._make_layer(block, num_blocks[1], 128, 2) self.conv4 = self._make_layer(block, num_blocks[2], 256, 2) self.conv5 = self._make_layer(block, num_blocks[3], 512, 2) self.avg = nn.AdaptiveAvgPool2d((1, 1)) self.fc = nn.Linear(512 4, 100) def forward(self, x): x = self.conv1(x) x = self.conv2(x) x = self.conv3(x) x = self.conv4(x) x = self.conv5(x) x = self.avg(x) x = x.view(x.size(0), -1) x = self.fc(x) return x def _make_layer(self, block, num_block, out_channels, stride): “””Building resnext block Args: block: block type(default resnext bottleneck c) num_block: number of blocks per layer out_channels: output channels per block stride: block stride Returns: a resnext layer “”” strides = [stride] + [1] (num_block - 1) layers = [] for stride in strides: layers.append(block(self.in_channels, out_channels, stride)) self.in_channels = out_channels 4 return nn.Sequential(layers)
实验结果
SENet
Squeeze-and-Excitation Networks
核心思想
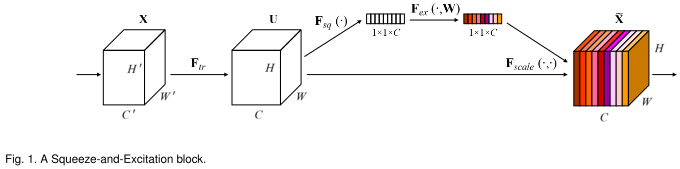
- 卷积操作融合了空间和特征通道信息。大量工作研究了空间部分,而本文重点关注特征通道的关系,并提出了 Squeeze-and-Excitation(SE)block,对通道间的依赖关系进行建模,自适应校准通道方面的特征响应。
- SE blockFtr 表示 transformation(一系列卷积操作);Fsq 表示 squeeze,产生通道描述;Fex 表示 excitation,通过参数 W 来建模通道的重要性。Fscale 表示 reweight,将 excitation 输出的权重逐乘以先前特征,完成特征重标定。
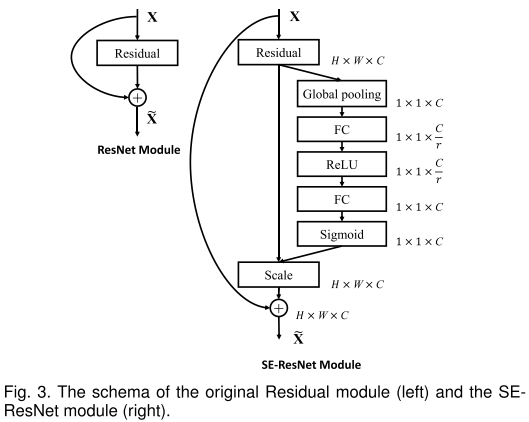
- SE-ResNet Module
- 代码实现
class BottleneckResidualSEBlock(nn.Module): expansion = 4 def init(self, inchannels, outchannels, stride, r=16): super().__init() self.residual = nn.Sequential( nn.Conv2d(in_channels, out_channels, 1), nn.BatchNorm2d(out_channels), nn.ReLU(inplace=True), nn.Conv2d(out_channels, out_channels, 3, stride=stride, padding=1), nn.BatchNorm2d(out_channels), nn.ReLU(inplace=True), nn.Conv2d(out_channels, out_channels self.expansion, 1), nn.BatchNorm2d(out_channels self.expansion), nn.ReLU(inplace=True) ) self.squeeze = nn.AdaptiveAvgPool2d(1) self.excitation = nn.Sequential( nn.Linear(out_channels self.expansion, out_channels self.expansion // r), nn.ReLU(inplace=True), nn.Linear(out_channels self.expansion // r, out_channels self.expansion), nn.Sigmoid() ) self.shortcut = nn.Sequential() if stride != 1 or in_channels != out_channels self.expansion: self.shortcut = nn.Sequential( nn.Conv2d(in_channels, out_channels self.expansion, 1, stride=stride), nn.BatchNorm2d(out_channels self.expansion) ) def forward(self, x): shortcut = self.shortcut(x) residual = self.residual(x) squeeze = self.squeeze(residual) squeeze = squeeze.view(squeeze.size(0), -1) excitation = self.excitation(squeeze) excitation = excitation.view(residual.size(0), residual.size(1), 1, 1) x = residual excitation.expand_as(residual) + shortcut return F.relu(x)
网络架构
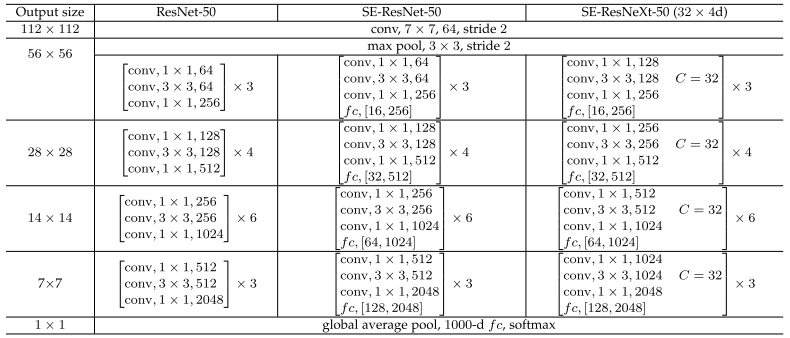
- 代码实现
def seresnet50(): return SEResNet(BottleneckResidualSEBlock, [3, 4, 6, 3]) class SEResNet(nn.Module): def init(self, block, blocknum, classnum=100): super().__init() self.in_channels = 64 self.pre = nn.Sequential( nn.Conv2d(3, 64, 3, padding=1), nn.BatchNorm2d(64), nn.ReLU(inplace=True) ) self.stage1 = self._make_stage(block, block_num[0], 64, 1) self.stage2 = self._make_stage(block, block_num[1], 128, 2) self.stage3 = self._make_stage(block, block_num[2], 256, 2) self.stage4 = self._make_stage(block, block_num[3], 516, 2) self.linear = nn.Linear(self.in_channels, class_num) def forward(self, x): x = self.pre(x) x = self.stage1(x) x = self.stage2(x) x = self.stage3(x) x = self.stage4(x) x = F.adaptive_avg_pool2d(x, 1) x = x.view(x.size(0), -1) x = self.linear(x) return x def _make_stage(self, block, num, out_channels, stride): layers = [] layers.append(block(self.in_channels, out_channels, stride)) self.in_channels = out_channels block.expansion while num - 1: layers.append(block(self.in_channels, out_channels, 1)) num -= 1 return nn.Sequential(layers)
实验结果

总结
- 小结
- LeNet[1998]:CNN 的鼻祖。
- AlexNet[2012]:第一个深度 CNN。
- ZFNet[2012]:通过 DeconvNet 可视化 CNN 学习到的特征。
- VGG[2014]:重复堆叠 3x3 卷积增加网络深度。
- GoogLeNet[2014]:提出 Inception 模块,在控制参数和计算量的前提下,增加网络的深度与宽度。
- ResNet[2015]:提出残差网络,解决了深层网络的优化问题。
- ResNeXt[2016]:ResNet 和 Inception 的结合体,Inception 中每个分支结构相同,无需人为设计。
- SENet[2017]:提出 SE block,关注特征的通道关系。
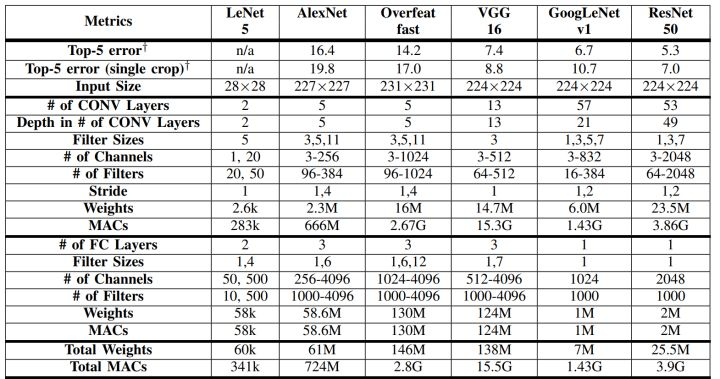
- 经典模型中结构、参数对比
参考
- paper
[1]LeCun Y, Bottou L, Bengio Y, et al. Gradient-based learning applied to document recognition[J]. Proceedings of the IEEE, 1998, 86(11): 2278-2324.
[2]Krizhevsky A, Sutskever I, Hinton G E. Imagenet classification with deep convolutional neural networks[C]//Advances in neural information processing systems. 2012: 1097-1105.
[3]Zeiler M D, Fergus R. Visualizing and understanding convolutional networks[C]//European conference on computer vision. springer, Cham, 2014: 818-833.
[4]Simonyan K, Zisserman A. Very deep convolutional networks for large-scale image recognition[J]. arXiv preprint arXiv:1409.1556, 2014.
[5]Szegedy C, Liu W, Jia Y, et al. Going deeper with convolutions[C]//Proceedings of the IEEE conference on computer vision and pattern recognition. 2015: 1-9.
[6]He K, Zhang X, Ren S, et al. Deep residual learning for image recognition[C]//Proceedings of the IEEE conference on computer vision and pattern recognition. 2016: 770-778.
[7]Xie S, Girshick R, Dollár P, et al. Aggregated residual transformations for deep neural networks[C]//Proceedings of the IEEE conference on computer vision and pattern recognition. 2017: 1492-1500.
[8]Hu J, Shen L, Sun G. Squeeze-and-excitation networks[C]//Proceedings of the IEEE conference on computer vision and pattern recognition. 2018: 7132-7141.
- blog
ImageNet 历年冠军和相关 CNN 模型
残差网络 ResNet 笔记
(二)计算机视觉四大基本任务(分类、定位、检测、分割)
论文笔记:CNN 经典结构 2(WideResNet,FractalNet,DenseNet,ResNeXt,DPN,SENet)
论文笔记:CNN 经典结构 1(AlexNet,ZFNet,OverFeat,VGG,GoogleNet,ResNet)
深度学习在计算机视觉领域(包括图像,视频,3-D 点云,深度图)的应用一览
https://www.cnblogs.com/vincent1997/p/10901875.html

若有收获,就点个赞吧
0 人点赞
