简介
Source是负责接收数据到Flume Agent的组件。Source组件可以处理各种类型、各种格式的日志数据,包括avro、thrift、exec、jms、spooling directory、netcat、sequence generator、syslog、http、legacy。官方提供的source类型已经很多,但是有时候并不能满足实际开发当中的需求,此时我们就需要根据实际需求自定义某些source。
官方也提供了自定义source的接口:
https://flume.apache.org/FlumeDeveloperGuide.html#source根据官方说明自定义MySource需要继承AbstractSource类并实现Configurable和PollableSource接口。
需求
使用flume接收数据,并给每条数据添加前缀,输出到控制台。前缀可从flume配置文件中配置。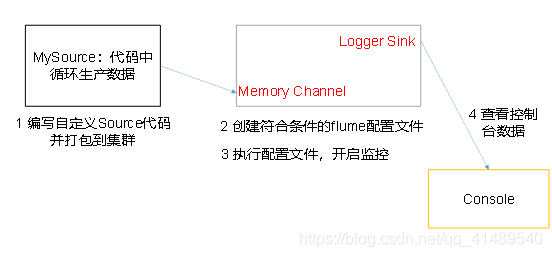
编写代码
创建个Maven工程
依赖
<dependency><groupId>org.apache.flume</groupId><artifactId>flume-ng-core</artifactId><version>1.7.0</version></dependency>
具体代码
import java.util.ArrayList;import java.util.List;import org.apache.flume.Context;import org.apache.flume.Event;import org.apache.flume.PollableSource;import org.apache.flume.channel.ChannelProcessor;import org.apache.flume.conf.Configurable;import org.apache.flume.event.SimpleEvent;import org.apache.flume.source.AbstractSource;/** 使用flume接收数据,并给每条数据添加前缀,输出到控制台。前缀可从flume配置文件中配置*/public class MySource extends AbstractSource implements Configurable, PollableSource {private String prefix;// 最核心方法,在process()中,创建Event,将event放入channel// Status{ READY, BACKOFF}// READY: source成功第封装了event,存入到channel,返回READY// BACKOFF: source无法封装了event,无法存入到channel,返回BACKOFF// process()方法会被Source所在的线程循环调用!@Overridepublic Status process() {Status status = Status.READY;//封装eventList<Event> datas = new ArrayList<>();for (int i = 0; i < 10; i++) {SimpleEvent e = new SimpleEvent();//向body中封装数据e.setBody((prefix + "hello" + i).getBytes());datas.add(e);}//将数据放入channel// 获取当前source对象对应的channelprocessortry {Thread.sleep(5000);ChannelProcessor cp = getChannelProcessor();cp.processEventBatch(datas);} catch (Exception e) {status = Status.BACKOFF;e.printStackTrace();}return status;}// 当source没有数据可封装时,会让source所在的线程先休息一会,休息的时间,由以下值*计数器系数@Overridepublic long getBackOffSleepIncrement() {return 2000;}@Overridepublic long getMaxBackOffSleepInterval() {return 5000;}// 从配置中来读取信息@Overridepublic void configure(Context context) {//从配置文件中读取key为prefix的属性值,如果没有配置,提供默认值default:prefix = context.getString("prefix", "default:");}}
Maven打包
Maven 先clean 再package
打成 Flume-0.0.1-SNAPSHOT.jar 之后放到apache-flume-1.7.0/lib目录下面
编写配置文件
# Name the components on this agenta1.sources = r1a1.sinks = k1a1.channels = c1# Describe/configure the sourcea1.sources.r1.type = com.zjj.flume.custom.MySourcea1.sources.r1.delay = 1000# Describe the sinka1.sinks.k1.type = logger# Use a channel which buffers events in memorya1.channels.c1.type = memorya1.channels.c1.capacity = 10000a1.channels.c1.transactionCapacity = 1000# Bind the source and sink to the channela1.sources.r1.channels = c1a1.sinks.k1.channel = c1
启动agent
[root@zjj101 job]# flume-ng agent -n a1 -c conf/ -f "/root/soft/apache-flume-1.7.0/conf/job/demo1.conf" -Dflume.root.logger=DEBUG,console
等待几秒 控制台打印内容
20/10/26 15:24:19 INFO sink.LoggerSink: Event: { headers:{} body: 64 65 66 61 75 6C 74 3A 68 65 6C 6C 6F 30 default:hello0 }20/10/26 15:24:19 INFO sink.LoggerSink: Event: { headers:{} body: 64 65 66 61 75 6C 74 3A 68 65 6C 6C 6F 31 default:hello1 }20/10/26 15:24:19 INFO sink.LoggerSink: Event: { headers:{} body: 64 65 66 61 75 6C 74 3A 68 65 6C 6C 6F 32 default:hello2 }20/10/26 15:24:19 INFO sink.LoggerSink: Event: { headers:{} body: 64 65 66 61 75 6C 74 3A 68 65 6C 6C 6F 33 default:hello3 }20/10/26 15:24:19 INFO sink.LoggerSink: Event: { headers:{} body: 64 65 66 61 75 6C 74 3A 68 65 6C 6C 6F 34 default:hello4 }20/10/26 15:24:19 INFO sink.LoggerSink: Event: { headers:{} body: 64 65 66 61 75 6C 74 3A 68 65 6C 6C 6F 35 default:hello5 }20/10/26 15:24:19 INFO sink.LoggerSink: Event: { headers:{} body: 64 65 66 61 75 6C 74 3A 68 65 6C 6C 6F 36 default:hello6 }20/10/26 15:24:19 INFO sink.LoggerSink: Event: { headers:{} body: 64 65 66 61 75 6C 74 3A 68 65 6C 6C 6F 37 default:hello7 }20/10/26 15:24:19 INFO sink.LoggerSink: Event: { headers:{} body: 64 65 66 61 75 6C 74 3A 68 65 6C 6C 6F 38 default:hello8 }20/10/26 15:24:19 INFO sink.LoggerSink: Event: { headers:{} body: 64 65 66 61 75 6C 74 3A 68 65 6C 6C 6F 39 default:hello9 }20/10/26 15:24:24 INFO sink.LoggerSink: Event: { headers:{} body: 64 65 66 61 75 6C 74 3A 68 65 6C 6C 6F 30 default:hello0 }
说明配置生效了..
代码

若有收获,就点个赞吧
0 人点赞
