QLineEdit
是一个单行文本编辑器,允许用户输入和编辑单行纯文本
文本的设置与删除
| API |
作用 |
| setText(str) |
设置内容文本 |
| insert(newText) |
在光标处插入文本 |
| text() |
获取真实内容文本 |
| displayText() |
获取用户能看到的内容文本 |
| clear() |
清除文本框内容 |
le = QLineEdit("Test",window)le.insert("uwuwuwu")print(le.text())print(le.display())
文本的输出
| API |
作用 |
代码 |
| setEchoMode() |
设置文本显示模式 |
|
| QLineEdit.Normal |
显示输入的默认样式 |
0 |
| QLineEdit.NoEcho |
不显示输入的内容 |
1 |
| QLineEdit.Password |
以密码密文样式显示 |
2 |
| QLineEditPasswordEchoOnEdit |
被编辑时明文,未被编辑时密文 |
3 |
模拟登录
from PyQt5.Qt import *class AccountTool: #自定义类 用来检测账号 ACCOUNT_ERROR = 1 PWD_ERROR = 2 SUCCESS = 3 @staticmethod #设置为静态函数 def check_login(account,passwd): #把账号和密码发送给服务器,等待服务器返回结果 if account != "1182350036": return AccountTool.ACCOUNT_ERROR if passwd != "mly118235": return AccountTool.PWD_ERROR return AccountTool.SUCCESSclass Window(QWidget): def __init__(self): super().__init__() self.setWindowTitle("QL的学习") self.resize(500, 500) self.setup_ui() self.setMinimumSize(300,300) def setup_ui(self): self.zh = QLineEdit(self) self.pwd = QLineEdit(self) self.pwd.setEchoMode(2) self.login = QPushButton("登 录", self) self.login.clicked.connect(self.login_cao) def login_cao(self): account = self.zh.text() passwd = self.pwd.text() state = AccountTool.check_login(account, passwd) if state == AccountTool.ACCOUNT_ERROR: print("账号或者密码错误") self.zh.clear() self.pwd.clear() return None if state == AccountTool.PWD_ERROR: print("账号或者密码错误") self.pwd.clear() self.pwd.setFocus() return None if state == AccountTool.SUCCESS: print("登录成功") def resizeEvent(self, evt): #设置当变换大小时跟着变换 x = 180 y = 35 margin = 60 self.zh.resize(x, y) self.pwd.resize(x, y) self.login.resize(x, y) mid = (self.width() - 180) / 2 self.zh.move(mid, self.height() / 4) self.pwd.move(mid, self.zh.y() + y + margin) self.login.move(mid, self.pwd.y() + y + margin)if __name__ == '__main__': import sys app = QApplication(sys.argv) window = Window() window.show() sys.exit(app.exec_())
占位提示符
| API |
作用 |
| setPlaceholderText() |
设置占位符 |
| placeholderText() |
获取占位符 |
创建清空按钮
| API |
作用 |
| setClearButtonEnabled(bool) |
设置清空按钮 |
| isClearButtonEnabled() -> bool |
查看清空按钮 |
添加自定义行为
| API |
作用 |
| QAction |
设置Qaction |
| addAction(QAction, QLineEdit.ActionPosition) |
添加控件按钮 |
| QLineEdit.LeadingPosition |
搁前面 |
| QLineEdit.TrailingPosition |
搁后面 |
显示隐藏密码
action = QAction(self.pwd) #设置QAction action.setIcon(QIcon("../qe.jpg")) #设置图标 def change(): if self.pwd.echoMode() == QLineEdit.Normal: #如果当前的模式为normal self.pwd.setEchoMode(2) #设置为密码模式 action.setIcon(QIcon("../qe.jpg")) #改变图标 else: self.pwd.setEchoMode(0) #设置为Normal模式 action.setIcon(QIcon("../test1.jpg")) #改变图标 action.triggered.connect(change) self.pwd.addAction(action,QLineEdit.TrailingPosition) #给QLineEdit添加A
自动补全联想
| API |
作用 |
| QCompleter([“liao”,”test”,”liao118235”],self.zh) |
创建完成器 |
| setCompleter(completer) |
设置完成器 |
completer = QCompleter(["liao","test","liao118235","1182350036"],self.zh) self.zh.setCompleter(completer)
文本内容限制
最大长度和只读
| API |
作用 |
| zh.setMaxLength(14) |
设置QLineEdit的长度 |
| maxLength() |
获取输入长度 |
| setReadOnly(bool) |
设置只读 |
| isReadOnly() |
判定是否为只读 |
规则验证 Qalidator
| API |
作用 |
| QValidator |
验证用户输入数据的合法性 |
| validate |
输入字符时数据检测函数 |
| QValidator.Acceptable |
通过验证 |
| QValidator.Intermediate |
不做判定的验证 |
| QValidator.Invalid |
验证不通过 |
| QIntValidator |
限制整型数据限制范围 |
| QDoubleValidator |
浮点类型数据限制范围 |
| QRegExpValidator |
通过正则表达式限定 |
| fixup(self, input_text) |
当数据不通过时调用 |
import sysfrom PyQt5.Qt import *class AgeVadidator(QValidator): def validate(self, input_str,pos_int): print(input_str,pos_int) try: if 18 <= int(input_str) <= 180: return (QValidator.Acceptable,input_str,pos_int) #通过验证 elif 1 <= int(input_str) <= 17: return (QValidator.Intermediate, input_str, pos_int) #中间状态 else: return (QValidator.Invalid, input_str, pos_int) # 拒绝状态 except: if len(input_str) == 0: return (QValidator.Intermediate, input_str, pos_int) return (QValidator.Invalid,input_str,pos_int) def fixup(self, p_str): try: if int(p_str) < 18: return "18" return "180" except: return "18"class MyAgeVadidator(QIntValidator): def fixup(self, p_str): #数值是无效状态时调用 print(p_str) if len(p_str) == 0 or int(p_str) < 18: return "18"class Window(QWidget): def __init__(self): super().__init__() self.setWindowTitle("验证器") self.resize(500,500) self.setup_ui() def setup_ui(self): le = QLineEdit(self) le.move(100,100) #vadidator = AgeVadidator() #vadidator = QIntValidator(18,188) vadidator = MyAgeVadidator(18,188) le.setValidator(vadidator) le1 = QLineEdit(self) le1.move(200, 200)if __name__ == "__main__": app = QApplication(sys.argv) window = Window() window.show() sys.exit(app.exec_())
掩码限制
指定固定位置的固定数据类型,达到一个格式的上限。
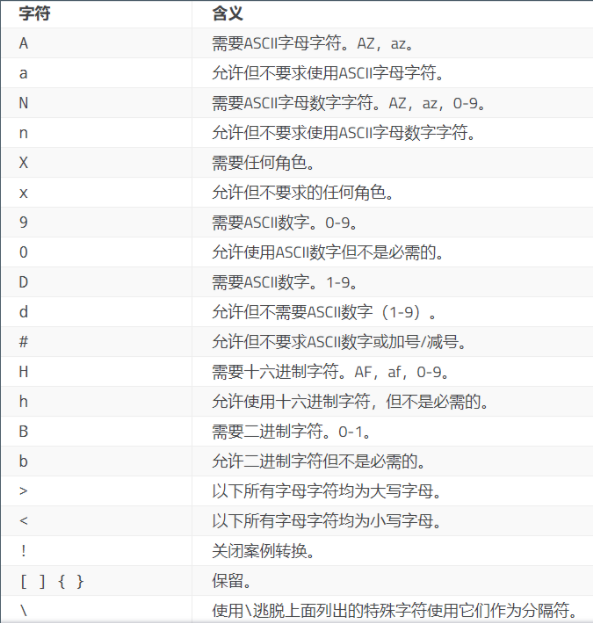
#总共设置5位 左边2 必须是大写字母 - 右边是数字le2.setInputMask(">AA-99;#")#座机号码 设置4个-7个数字 当没输入时为*le2.setInputMask("9999-9999999;*")
文本状态修改
标识文本内容是否被修改,默认就是False
| API |
作用 |
| isModified() |
查看是否被编辑 |
| setModified(bool) |
设置编辑状态 |
光标位置控制
True 光标移动时选择文本
False 光标移动不选择文本
| API |
作用 |
| cursorBackward(True,2) |
光标向左 |
| cursorForward(True,3) |
光标向右 |
| cursorWordBackward(True) |
向左移动一个单词 |
| le.cursorWordForward(True) |
向右移动一个单词 |
| home(True) |
从当前位置移动到行首 |
| end(True) |
从当前位置移动到行尾 |
| setCursorPosition(int(len(le.text()) / 2)) |
光标进入到指定位置 |
| cursorPositionAt(QPoint(55, 5)) |
以光标当前位置的像素位设置光标位 |
| cursorPosition() |
获取光标位置 |
def cursor_move(): #le.cursorBackward(True,2) #向左 #le.cursorForward(True,3) #向右 #le.cursorWordBackward(True) #向左移动一个单词 #le.cursorWordForward(True) #向右移动一个单词 #le.home(True) #从当前位置移动到行首 #le.end(True) #从当前位置移动到行尾 #le.setCursorPosition(int(len(le.text()) / 2)) #光标进入到指定位置 print(le.cursorPositionAt(QPoint(55, 5))) #以光标当前位置的像素位设置光标位 le.setFocus()btn.clicked.connect(cursor_move)
文本边距设定
| API |
作用 |
| setTextMargins(int left,int top,int right,int bottom) |
设置文本内容边距 |
| getTextMargins() |
获取文本内容边距 |
le.resize(300,300)le.setStyleSheet("background-color: cyan;")le.setTextMargins(100,-150,0,0)
对齐方式
| API |
作用 |
| setAlignment |
设置对齐 |
| Qt.AlignLeft |
水平靠左 |
| Qt.AlignRight |
水平靠右 |
| Qt.AlignHCenter |
水平居中 |
| Qt.AlignJustify |
水平对齐 |
| Qt.AlignTop |
垂直靠上 |
| Qt.AlignBottom |
垂直靠下 |
| Qt.AlignVCenter |
垂直居中 |
| Qt.AlignBaseline |
垂直基准 |
常用编辑功能
| API |
作用 |
| backspace() |
退格 |
| del_() |
删除 |
| clear() |
清空 |
| copy() |
复制 |
| paste() |
粘贴 |
| cut() |
剪切 |
| undo() isUndoAvailable() |
撤销 |
| redo() isRedoAvailable() |
重做 |
| setDragEnabled(bool) |
设置选中文本后是否可以拖拽 |
文本选中
| API |
作用 |
| selectAll() |
选中所有 |
| deselect() |
取消选中 |
| hasSelectedText() |
是否选中文字 |
| selectedText() |
选中的文字 |
| selectionStart() |
选中的起始点 |
| selectionEnd() |
选中的末尾点 |
| selectionLength() |
选中的长度 |
def cursor_move(): #le.setSelection(2,5) le.selectAll() #le.deselect() #print(le.hasSelectedText()) #print(le.selectedText()) #print(le.selectionStart()) le.selectionEnd() #print(le.selectionLength()) #le.setFocus()btn.clicked.connect(cursor_move)
信号的使用
| API |
作用 |
| textEdited( text) |
文本编辑时发射的信号 |
| textChanged(text) |
文本框文本发生改变时发出的信号 |
| returnPressed() |
按下回车键发出的信号 |
| editingFinished() |
结束编辑/焦点切换发出的信号 |
| cursorPositionChanged(int oldPos,int newPos) |
光标位置发生改变时发出的信号 |
| selectionChanged() |
选中的文本发生改变时发出的信号 |
def textEd(): print("我被编辑了")le.textEdited.connect(textEd)def textCh(): print("我状态变了")le.textChanged.connect(textCh)def textPr(): print("我按下了回车")le.returnPressed.connect(textPr)def textEdFi(): print("结束了编辑")le.editingFinished.connect(textEdFi)def textCP(): print("光标发生了改变")le.cursorPositionChanged.connect(textCP)def textSC(): print("选中的发生了改变")le.selectionChanged.connect(textSC)
QFrame 边框类
是一个基类, 可以选择直接使用
主要是用来控制一些边框样式:凸起,凹下,阴影,线宽
框架API
| API |
作用 |
| QFrame(parent: QWidget = None, flags: Union[Qt.WindowFlags, Qt.WindowType] = Qt.WindowFlags()) |
创建QFrame对象 |
| setFrameShape(QFrame.Shape) |
设置框架形状 |
| setFrameStyle(int style) |
设置框架样式 |
| setFrameRect(QRect) |
设置框架矩形 |
| QFrame.NoFrame |
QFrame什么都没画 |
| QFrame.Box |
QFrame围绕其内容绘制一个框 |
| QFrame.Panel |
QFrame绘制一个面板,使内容显得凸起或凹陷 |
| QFrame.HLine |
QFrame绘制一条没有框架的水平线(用作分隔符) |
| QFrame.VLine |
QFrame绘制一条无框架的垂直线(用作分隔符) |
| QFrame.StyledPanel |
绘制一个矩形面板,其外观取决于当前的GUI样式。它可以升起或凹陷。 |
qf = QFrame(window) #创建Frameqf.resize(100,100)qf.move(100,100)qf.setStyleSheet("background-color: green;")#qf.setFrameShape(QFrame.Box) #设置为Box矩形#qf.setFrameShape(QFrame.Panel) #设置为一个面板#qf.setFrameShadow(QFrame.Raised) #设置框架阴影为3D凸起qf.setFrameStyle(QFrame.Box | QFrame.Raised)qf.setLineWidth(6)qf.setMidLineWidth(8)print(qf.frameWidth())
框架阴影
设置框架边框阴影
| API |
作用 |
| setFrameShadow(QFrame.Shadow) |
设置框架阴影 |
| QFrame.Plain |
框架和内容与周围环境呈现水平;(没有任何3D效果) |
| QFrame.Raised |
框架和内容出现; 使用当前颜色组的浅色和深色绘制3D凸起线 |
| QFrame.Sunken |
框架和内容出现凹陷; 使用当前颜色组的浅色和深色绘制3D凹陷线 |
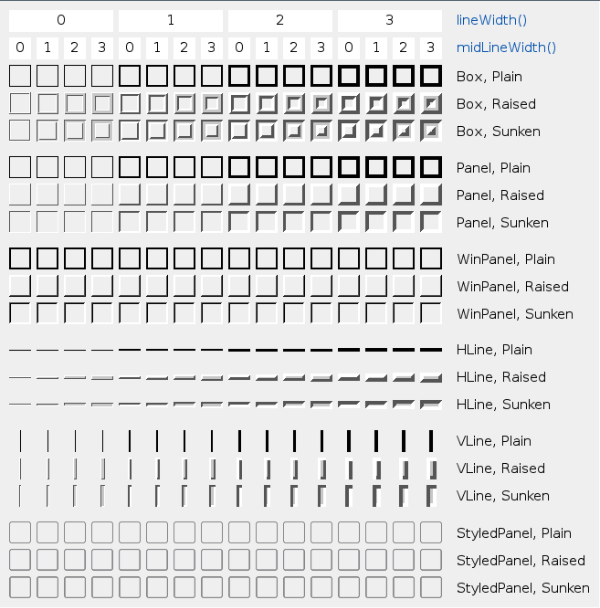
框架线宽
通过控制线宽, 来达到不同的组合效果
| API |
作用 |
| setLineWidth(int width) lineWidth() |
外线宽度 |
| setMidLineWidth(int width) midLineWidth() |
中线宽度 |
| frameWidth() |
总宽度 |
QAbstractScrollArea
滚动区域的低级抽象
import sysfrom PyQt5.Qt import *app = QApplication(sys.argv)window = QWidget()window.setWindowTitle("Test")window.resize(500,500)qe = QTextEdit("里奥",window)qe.setVerticalScrollBarPolicy(Qt.ScrollBarAlwaysOn) #设置垂直拉伸条状态 总是开启qe.setHorizontalScrollBarPolicy(Qt.ScrollBarAlwaysOn) #设置水平拉伸条状态 总是开启btn = QPushButton(window)btn.setIcon(QIcon("../qe.jpg"))qe.setCornerWidget(btn)window.show()sys.exit(app.exec_())
QTextEdit
是一个高级的WYSIWYG(What You See Is What You Get 所见即所得)查看器/编辑器,支持使用HTML样式标签的富文本格式。
支持的HTML4标签子集
https://doc.qt.io/qt-5/richtext-html-subset.html
如果不够, 可以考虑使用WebKit
它经过优化,可以处理大型文档并快速响应用户输入。
如果文本太大而无法在文本编辑的视口中查看,则会出现滚动条
文本编辑可以加载纯文本和富文本文件
import sysfrom PyQt5.Qt import *class Window(QWidget): def __init__(self): super().__init__() self.setWindowTitle("Test") self.resize(500, 500) self.setup_ui() def setup_ui(self): qte = QTextEdit("Test",self) qte.move(50,50) qte.setStyleSheet("background-color: green;")if __name__ == "__main__": app = QApplication(sys.argv) window = Window() window.show() sys.exit(app.exec_())
占位文本的设置
| API |
作用 |
| setPlaceholderText |
设置占位置 |
文本内容设置
| API |
作用 |
| setPlainText(str) |
设置普通文本 |
| insertPlainText(str) |
插入普通文本 |
| toPlainText() -> str |
打印组件普通文本内容 |
| setHtml(str) |
设置html文本 |
| insertHtml(str) |
插入html文本 |
| toHtml() -> str |
打印组件html文本内容 |
| setText(str) |
自动识别设置文本内容 |
| append(str) |
自动识别末尾追加文本内容 |
| clear() |
清理内容 |
文本光标与内容设置
整个文本编辑器, 其实就是为编辑 这个文本文档 提供了一个可视化的界面
简单理解, 可以比喻成 一个doc文档, 使用word软件打开了这个文档, 你可以随意编辑
插入文本
| API |
作用 |
| QTextCharFormat |
创建文本文字格式,针对于部分字符的格式描述 |
| textCursor() -> QTextCursor |
创建文本光标 |
| insertText(QString text, QTextCharFormat format) |
插入文本,带格式 |
| insertHtml(html_str) |
插入HTML 字符串 |
def gbcr(self): tcf = QTextCharFormat() tcf.setToolTip("芜湖~") tcf.setFontFamily("隶书") tcf.setFontPointSize(20) tc = self.qte.textCursor() tc.insertText("test123",tcf)
插入图片
| API |
作用 |
| QTextImageFormat() |
创建文本图片 |
| insertImage(QTextImageFormat) |
插入图片,可以自定义参数 |
| insertImage(QTextImageFormat, QTextFrameFormat.Position) |
插入图片,并设置图片浮动位置 |
| insertImage(name_str) |
直接添加图片,无任何参数 |
def gbcr(self): tc = self.qte.textCursor() tif = QTextImageFormat() tif.setName("../qe.jpg") tif.setWidth(100) tif.setHeight(100) tc.insertImage(tif)
插入文本片段
| API |
作用 |
QTextDocumentFragment.fromHtml(“xxx“) |
创建HTML句子对象 |
| QTextDocumentFragment.fromPlainText(“123”) |
创建Plain句子对象 |
def gbcr(self): tc = self.qte.textCursor() tdf = QTextDocumentFragment.fromHtml("<h1>xxx</h1>") tdf1 = QTextDocumentFragment.fromPlainText("<h1>xxx</h1>") tc.insertFragment(tdf1)
插入列表
| API |
作用 |
| insertList(QTextListFormat) -> QTextList |
在当前位置插入一个新块,并使其成为具有给定格式的新创建列表的第一个列表项。返回创建的列表 |
| createList(QTextListFormat ) -> QTextList |
创建并返回具有给定格式的新列表,并使当前段落的光标位于第一个列表项中 |
| QTextListFormat.Style |
列表符号样式 |
| QTextListFormat |
列表样式 |
| setIndent(1) |
设置缩进 |
| setNumberPrefix(“<<”) |
设置前缀 |
| setNumberSuffix(“<<”) |
设置后缀 |
| setStyle(QTextListFormat_Style) |
设置缩进样式 |
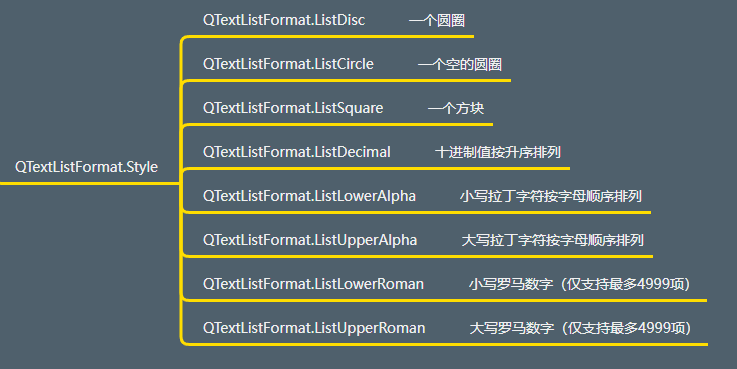
def gbcr(self): tc = self.qte.textCursor() #创建光标 # tl = tc.insertList(QTextListFormat.ListCircle) #插入列表 圆圈 # tl = tc.insertList(QTextListFormat.ListDecimal) #十进制数 # tl = tc.createList(QTextListFormat.ListDisc) tlf = QTextListFormat() #创建列表样式类 #设置样式 tlf.setIndent(1) #设置缩进 tlf.setNumberPrefix("<<") tlf.setNumberSuffix("<<") tlf.setStyle(QTextListFormat.ListDecimal) tl = tc.createList(tlf)
插入表格
def gbcr(self): tc = self.qte.textCursor() #创建qte(QTextEdit)的textCursor类 ttf = QTextTableFormat() #创建文本表格格式 ttf.setAlignment(Qt.AlignRight) #设置对齐 右对齐 ttf.setCellPadding(6) #设置填充为6 ttf.setCellSpacing(13) #设置间距为13 ttf.setColumnWidthConstraints((QTextLength(QTextLength.PercentageLength,50), QTextLength(QTextLength.PercentageLength,40), QTextLength(QTextLength.PercentageLength,10))) #设置列宽约束 #文本宽度设置为50 ,40 ,10 tc.insertTable(5,3,ttf) #添加5行3列 类型为ttf QTextTable #可以查看上面一行代码可以调用的函数
插入文本块
def gbcr(self): tc = self.qte.textCursor() tbf = QTextBlockFormat() #创建文本块格式 tcf = QTextCharFormat() #创建文字格式 tcf.setFontFamily("隶书") #设置文字字体 tcf.setFontItalic(True) #设置文字是否倾斜 tcf.setFontPointSize(30) #设置文字大小 tbf.setAlignment(Qt.AlignRight) tbf.setRightMargin(100) #对于右侧的边距 tbf.setIndent(3) #设置缩进为3 tc.insertBlock(tbf,tcf) self.qte.setFocus() #获得焦点
插入文本框架
def gbcr(self): tc = self.qte.textCursor() tff = QTextFrameFormat() #创建框架样式 tff.setBorder(10) #设置边框为10 tff.setBorderBrush(QColor(100,50,50)) #设置边框颜色 tff.setRightMargin(50) #设置距离右边的间隔 tc.insertFrame(tff) doc = self.qte.document() root_doc = doc.rootFrame() root_doc.setFrameFormat(tff)
格式操作
| API |
作用 |
| setBlockCharFormat(QTextCharFormat) |
设置要格式化的当前块(或选择中包含的所有块)的块char 格式 |
| setBlockFormat(QTextBlockFormat) |
设置当前块的块格式(或选择中包含的所有块)以进行格式化 |
| setCharFormat(QTextCharFormat) |
将光标的当前字符格式设置为给定格式。如果光标有选择,则给定格式应用于当前选择 |
| mergeBlockCharFormat(QTextCharFormat) |
合并当前块的char格式 |
| mergeBlockFormat(QTextBlockFormat) |
合并当前块的格式 |
| mergeCharFormat(QTextCharFormat) |
合并当前字符格式 |
def gszshb(self): tc = self.qte.textCursor() tcf = QTextCharFormat() tcf.setFontFamily("幼圆") tcf.setFontPointSize(30) tcf.setFontOverline(True) tcf.setFontUnderline(True) tc.setCharFormat(tcf) #将格式设置在选中的字符上 tcf2 = QTextCharFormat() tcf2.setFontStrikeOut(True) tc.mergeCharFormat(tcf2) #合并新块和老块 return None tc = self.qte.textCursor() tbf = QTextBlockFormat() tbf.setAlignment(Qt.AlignCenter) tbf.setIndent(2) tc.setBlockFormat(tbf) #设置当前块的块格式 return None tc = self.qte.textCursor() tcf = QTextCharFormat() tcf.setFontFamily("幼圆") tcf.setFontPointSize(30) tcf.setFontOverline(True) tcf.setFontUnderline(True) #tc.setBlockCharFormat(tcf) #设置格式化的当前块 tc.setBlockFormat(tcf)
获取格式内容
| API |
作用 |
| block() |
获取光标所在的文本块 |
| blockFormat() |
获取光标所在的文本块 |
| blockCharFormat() |
获取光标所在的文本块字符格式 |
| blockNumber() |
获取光标所在的文本块编号 |
| charFormat() |
获取文本字符格式 |
| currentFrame() |
获取当前所在的框架 |
| currentList() |
获取当前所在的文本列表 |
| currentTable() |
获取当前的表格 |
def nrgshq(self): tc = self.qte.textCursor() # print(tc.block().text()) #打印该行的内容 print(tc.blockNumber()) #打印块的编号 print(tc.currentList()) #打印段落的列表 .count() 获取列表数量
光标选中
def wbxz(self): tc = self.qte.textCursor() # tc.setPosition(6,QTextCursor.KeepAnchor) # 设置生成要移动的光标位置 设置移动模式 # tc.movePosition(QTextCursor.Up, QTextCursor.MoveAnchor, 1) # 移动光标 tc.select(QTextCursor.BlockUnderCursor) #选中该行 需要反向设置 self.qte.setTextCursor(tc) # 此时设置生成的光标位置 self.qte.setFocus()
选中内容的获取
def wbxznrhq(self): tc = self.qte.textCursor() #print(tc.selectedText()) #打印选中的内容 #print(tc.selection().toPlainText()) #父类是QTextDocumentFragment #打印选中的文本 print(tc.selectedTableCells()) #打印表格的选中范围
删除选中的字符
def wbxznrhq(self): tc = self.qte.textCursor() #tc.deleteChar() #删除选中的文本 # tc.deletePreviousChar() #如果没选中则删除光标前一个 #如果选中了则删除选中的文本
位置判定
def wbxznrhq(self): tc = self.qte.textCursor() print("*" * 15) print(tc.atBlockEnd()) #判断是否在文本块末尾 print(tc.atBlockStart()) #判断是否在文本块开头 print(tc.atEnd()) #判断是否在文档末尾 print(tc.atStart()) #判断是否在文档开始 print(tc.columnNumber()) #显示在文档第几列 print(tc.position()) #光标位置 print(tc.positionInBlock()) #在文本块中的位置
开始和结束编辑块
def wbxznrhq(self): tc = self.qte.textCursor() tc.beginEditBlock() tc.endEditBlock()
自动化格式设置
self.qte.setAutoFormatting(QTextEdit.AutoBulletList)
换行模式设置
def wbxznrhq(self): # self.qte.setLineWrapMode(QTextEdit.NoWrap) #取消软换行 # self.qte.setLineWrapMode(QTextEdit.FixedPixelWidth) #设置行的像素宽度 配合: # self.qte.setLineWrapColumnOrWidth(220) #设置像素 self.qte.setLineWrapMode(QTextEdit.FixedColumnWidth) # 设置行有多少列 self.qte.setLineWrapColumnOrWidth(8) #设置8列 self.qte.setWordWrapMode(QTextOption.WordWrap) # 以单词/空格来换行
覆盖模式
切换覆盖模式,修改文本内容
def wbxznrhq(self): self.qte.setOverwriteMode(True)
光标设置
提示处于覆盖模式
def wbxznrhq(self): if self.qte.overwriteMode(): self.qte.setOverwriteMode(False) self.qte.setCursorWidth(1) else: self.qte.setOverwriteMode(True) self.qte.setCursorWidth(10)
对其方式
self.qte.setAlignment(Qt.AlignCenter) # 设置单行居中RightLeft
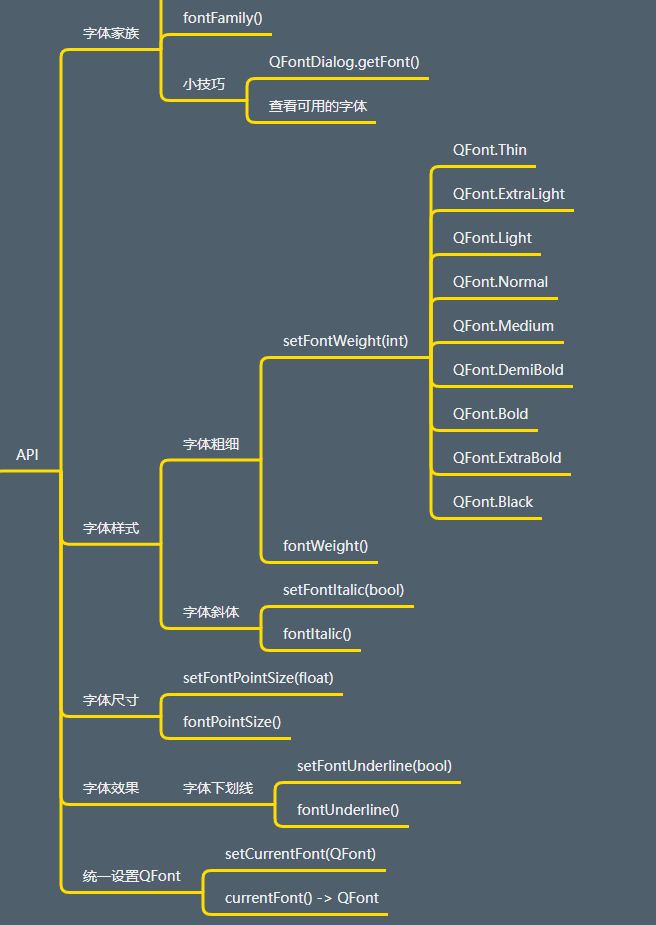
字体设置