Nginx常用版本
Nginx开源版
Nginx Plus 商业版
Openresty
- http://openresty.org
- 基于Nginx与Lua的高性能Web平台。
Tengine
- http://tengine.taobao.org
- 在基础Nginx上优化版本,是淘宝制作。
Nginx的编译安装
到官网下载最新版/稳定版tar包。使用xftp等工具上传到linux中!
tar -zxf nginx-1.21.6.tar.gz #解压到当前文件夹yum install -y gcc gcc-c++ pcre pcre-devel zlib zlib-devel openssl openssl-devel gd gd-devel libtool zlib zlib-devel make #c语言的编译器 pcre包groupadd nginxuseradd -g nginx nginx./configure --prefix=/usr/local/nginx \--user=nginx \--group=nginx \--with-http_stub_status_module \--with-http_gzip_static_module \--with-http_flv_module \--with-http_ssl_module \--with-http_mp4_module \--with-stream \--with-http_realip_module \--with-http_v2_module \--with-http_sub_module \--with-http_image_filter_module #编译安装nginx,并且设置安装路径make && make installcd /usr/local/nginx/ #进入配置文件

启动nginx
cd /usr/local/nginx/sbin #进入sbin目录./nginx #启动nginxsystemctl stop firewalld #关闭防火墙systemctl disable firewalld #禁止防火墙自启firewall-cmd --zone=public --add-port=80/tcp --permanent #放行
nginx命令
./nginx #启动./nginx -s stop #快速停止./nginx -s quit #优雅的停止,在退出前完成已经接受的连接请求./nginx -s reload #重载
安装成系统服务
vim /usr/lib/systemd/system/nginx.service #设置配置文件[Unit]Description=nginx - web serverAfter=network.target remote-fs.target nss-lookup.target[Service]Type=forkingPIDFile=/usr/local/nginx/logs/nginx.pidExecStartPre=/usr/local/nginx/sbin/nginx -t -c /usr/local/nginx/conf/nginx.confExecStart=/usr/local/nginx/sbin/nginx -c /usr/local/nginx/conf/nginx.confExecReload=/usr/local/nginx/sbin/nginx -s reloadExecStop=/usr/local/nginx/sbin/nginx -s stopExecQuit=/usr/local/nginx/sbin/nginx -s quitPrivateTmp=true[Install]WantedBy=multi-user.target
Nginx基本使用
Nginx目录结构
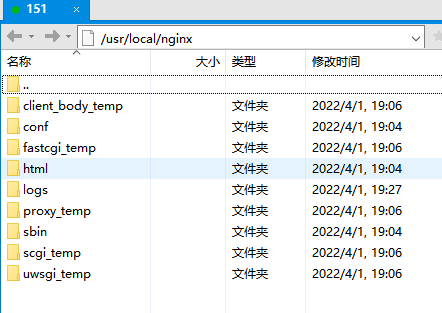
以_temp结尾的文件夹都是启动服务器后的临时文件夹,暂时不用管
conf:配置文件文件夹。最主要的就是nginx.conf
html:里面放网页,并且index.html是主文件夹
logs:放日志文件-access.log正常访问日志-error错误日志
Nginx.conf最小配置
worker_processes 1; #开启一个进程。能开几个需要根据CPU来判断# 只启动一个进程,nginx是多进程单线程模型,但是使用了epoll sendfile 非阻塞io。### 主要是网络连接相关的配置events {# worker能连接的客户端数量 1024个worker_connections 1024;# use epoll; 事件驱动模型 select|poll|epoll|resig}### http的配置http {include mime.types; #将别的配置文件引到当前配置文件中,并且文件中写的是请求头,文件类型。#mime.types 中写的是文件类型,判断文件是要展示还是下载。default_type application/octet-stream; #如果不包含在mime.types中,就用application/octet-stream的方式传输给客户端# application/octet-stream 下载# text/html 文本显示sendfile on; # 开启sendfile系统调用#数据0拷贝,免去一次调度过程,一次复制过程。直接让网络接口去读取这个文件传送给用户#如果不开启,就是先读取再到内存中再发送给网络接口。keepalive_timeout 65; #保持连接 超时时间#如果开多个端口,多个页面就是虚拟主机。server {listen 80; #监听端口号server_name localhost; #配置域名,主机名#子目录,子路径location / { #重点#root html;index index.html index.htm;}error_page 500 502 503 504 /50x.html; #错误代码 转向到 /50x.htmllocation = /50x.html {root html;}}}
Host解析域名
C:\Windows\System32\drivers\etc\hosts #修改hosts 建议用editplus打开#我们在末尾添加:192.168.218.151 liao.com
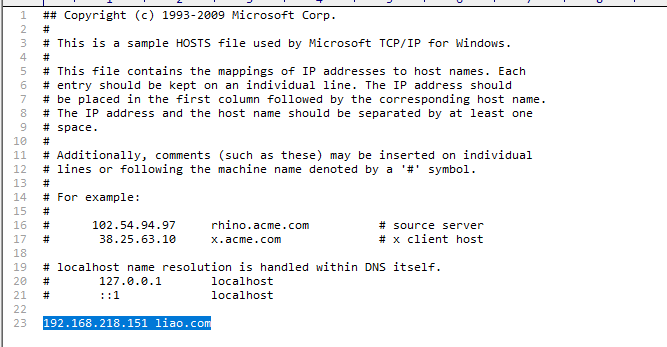
此时通过liao.com 会直接跳转到192.168.218.151
公网域名配置与泛域名解析实战
可以根据各个公有云的教程来做
Nginx虚拟主机域名配置
创建其他的文件,用来让其他虚拟主机显示
mkdir /wwwcd /wwwmkdir wwwrootmkdir testvim wwwroot/index.html #随便输入内容vim test/index.html #随便输入内容
#下面这段是虚拟主机 因为是虚拟的所以我们可以创建很多个。但是端口不要重合!server {listen 80;server_name localhost;location / {root html;index index.html index.htm;}error_page 500 502 503 504 /50x.html;location = /50x.html {root html;}}#添加新的虚拟主机:server {listen 88;server_name localhost;location / {root /www/wwwroot;index index.html index.htm;}error_page 500 502 503 504 /50x.html;location = /50x.html {root html;}}
此时你会发现,80和88端口都可以访问。
我们还可以通过修改子域名进行访问特殊的文件夹
server {listen 80;server_name a.mliaoyyds.top; #a.liao进入/www/wwwrootlocation / {root /www/wwwroot;index index.html index.htm;}error_page 500 502 503 504 /50x.html;location = /50x.html {root html;}}#添加新的虚拟主机:server {listen 80;server_name *.liao.com; #*.liao进入/www/testlocation / {root /www/test;index index.html index.htm;}error_page 500 502 503 504 /50x.html;location = /50x.html {root html;}}
servername多种匹配模式
#完整匹配server_name a.mliaoyyds.top; #只能通过a.mliaoyyds.top访问指定位置#通配符匹配server_name *.mliaoyyds.top; #不管是任何子域名开头都访问指定位置#通配符结束匹配server_name www.mliaoyyds.*; #不管是任何域名结尾都能访问指定位置#正则匹配server_name ~^[0-9]+\.mliaoyyds\.top$;#~ 设置以正则匹配#每个 . 都要添加\#并且要以$结尾
Nginx反向代理与负载均衡
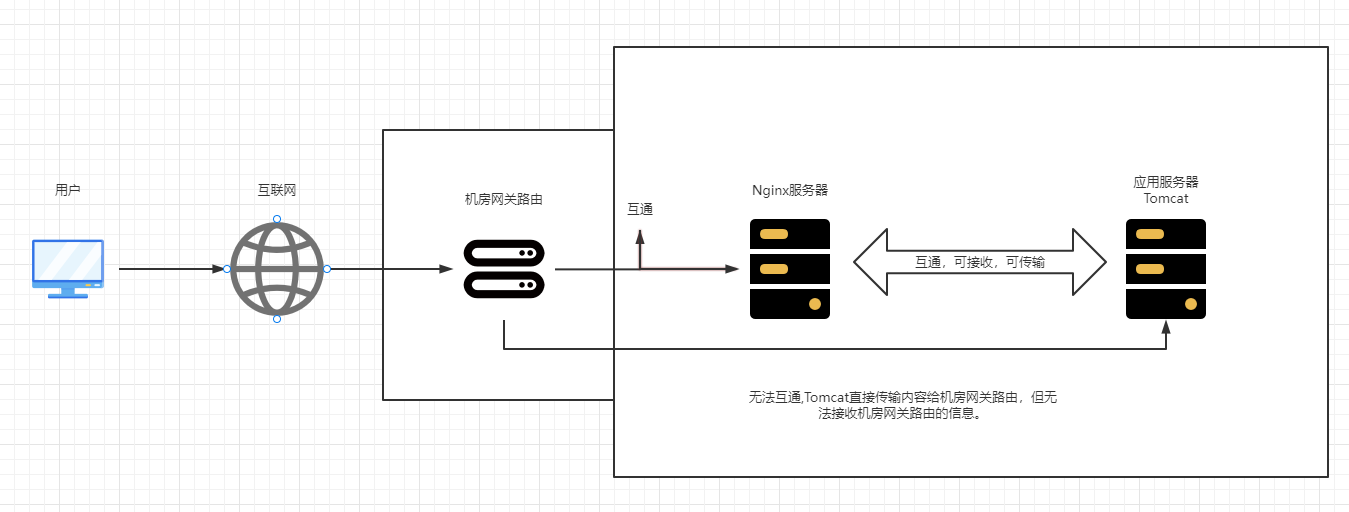
正常流程:
用户通过 互联网访问 到机房网关路由 接收数据到Nginx nginx再把流量发送到应用服务器 服务器再传回到nginx nginx再传给用户。
注意:加入tomcat速度为100MB但nginx为10MB。最后用户的传输效率就为10MB无法改变。
正向代理与反向代理
正向代理类似一个跳板机,代理访问外部资源。
比如早些时候我们连接上网络了,但是就是无法访问baidu。我们就通过正向代理服务器(路由器),就可以访问baidu,然后baidu返回数据给到正向代理服务器然后再发送给我们。
(1)访问原来无法访问的资源,如google
(2)可以做缓存,加速访问资源
(3)对客户端访问授权,上网进行认证
(4)代理可以记录用户访问记录(上网行为管理),对外隐藏用户信息
在正向代理中,我们和正向代理服务器是一家,进行的操作最多。
反向代理(Reverse Proxy)实际运行方式是指以代理服务器来接受internet上的连接请求,然后将请求转发给内部网络上的服务器,并将从服务器上得到的结果返回给internet上请求连接的客户端,此时代理服务器对外就表现为一个服务器。
(1)保证内网的安全,阻止web攻击,大型网站,通常将反向代理作为公网访问地址,Web服务器是内网
(2)负载均衡,通过反向代理服务器来优化网站的负载
在反向代理中,反向代理服务器和web服务器是一家,他们之间的操作最多。
Nginx负载均衡
我们将一批web服务器,作为一个集群来看待。用户访问nginx服务器,nginx将内容通过算法分配到集群中的服务器上。因为有时候修改机器时可能会停止机器或者机器故障无法访问,此时就负载均衡就会帮用户跳转到一个可以使用的机器上。因为有retry功能,所以当机器故障才会自动跳转。
- 解决突然出现的宕机,故障等。
- 合理分配流量。
Nginx反向代理实操
再创建一台机器作为web服务器。一台作为反向代理服务器。
外网代理
在反向代理服务器操作
vim /usr/local/nginx/conf/nginx.conf #进入配置文件location / {proxy_pass http://www.4399.com;#proxy_pass 则是反向代理网页,并且后面跟着网页链接即可!#root /www/wwwroot; 如果配置的是root 则是访问网页后在文件夹中显示文件#index index.html index.htm;}systemctl restart nginx
注意:proxy_pass如果连接外网一定要填写正确的地址,看清是http还是https,并且开头www也不能写错。否则反向代理就会变成网页跳转。

内网代理
还是在反向代理服务器操作
vim /usr/local/nginx/conf/nginx.conflocation / {proxy_pass http://192.168.218.152; #因为默认也是http协议,所以前面httpd即可。#proxy_pass 则是反向代理网页,并且后面跟着网页链接即可!#root /www/wwwroot; 如果配置的是root 则是访问网页后在文件夹中显示文件#index index.html index.htm;}systemctl restart nginx

负载均衡实操
再创建一台机器作为web服务器。
还是在反向代理服务器操作
vim /usr/local/nginx/conf/nginx.confhttp {include mime.types;default_type application/octet-stream;sendfile on;keepalive_timeout 65;upstream http_001{ #这里和后面一定要一样,并且upstream和server是一个等级的server 192.168.218.152:80;server 192.168.218.153:80;}server {listen 80;server_name localhost;location / {proxy_pass http://http_001; #因为变成了多个,所以这里类似创建了数组 里面可以随便写 但是前面一定要写对#root /www/wwwroot;#index index.html index.htm;}systemctl restart nginx
此时基础的反向代理/负载均衡就成功了。默认算法是雨露均沾型。
负载均衡策略 权重
比如有些机器的配置略微差一点,我们给他的权重低一些,用户访问也就少一些。合理分配。
vim /usr/local/nginx/conf/nginx.conf#假设第一台配置高,第二台配置低。我们可以进行如下配置upstream httpd{server 192.168.218.152:80 weight=8;server 192.168.218.153:80 weight=2;}systemctl restart nginx
会发现访问很多次都是152,153次数会少一些。还有更多参数
down:不参数负载
backup:当没有负载机器时使用
vim /usr/local/nginx/conf/nginx.confupstream httpd{server 192.168.218.152:80 weight=8 down; #不参数负载server 192.168.218.153:80 weight=2 backup; #当没有负载机器时使用}systemctl restart nginx
不过最常用的就是权重。
不常用的负载均衡策略
当负载均衡时,如果是默认的算法,并不会将我们访问网页的cookie,session等信息共享,刷新到了其他网页,这些信息就会消失需要重新填写。
不常用主要原因:不能动态的上下线。并且只能通过修改配置文件,既然修改了就需要重启,非常麻烦。
ip_hash#根据客户端的ip地址转发同一台服务器,可以保持会话。least_conn#最少连接访问fair#根据后端服务器响应时间转发请求 需要第三方组件url_hash#根据用户访问的url定向转发请求 定向流量转发#常用在固定资源,不在统一服务器#比如一批文件分散在3台服务器,你需要访问该文件的服务器,就根据url定位到有该文件的服务器。
常见的解决方法
将session放入到一个额外的服务器内,其中使用redis存储sessio。当用户访问了服务器,服务器会从redis服务器上获取session,这样就共享了session。不适用大规模场景。
大规模场景会下发token。会额外设置一台服务器来做权限校验,用户进入服务器后会对在权限校验服务器中进项校验,然后下发一个token,将token记录到文件中。
Nginx动静分离
就是区分开动态文件和静态文件
动态资源:用户多次访问,资源和源代码可能会发生改变。比如JS CSS
静态页面:用户多次访问,资源和源代码永远不会发生改变。比如视频 图片
- 动静分离是让动态网站里的动态网页根据一定规则把不变的资源和经常变的资源区分开来,动静资源做好了拆分以后,我们就可以根据静态资源的特点将其做缓存操作,这就是网站静态化处理的核心思路
- 动静分离简单的概括是:动态文件与静态文件的分离。
- 伪静态:网站如果想被搜索引擎搜素到,动态页面静态技术freemarker等模版引擎技术
创建一台新机器里面运行Tomcat,其中有静态和动态资源。
静态资源是js img css文件夹。所以将这些文件件删除,并移动到nginx服务器中。html文件夹下。
server {listen 80;server_name localhost;location / {proxy_pass http://192.168.218.154:80; #设置代理到tomcat服务器}location /css { #在tomcat页面中,是以css/xxx 格式访问。所以我们这里写localhost就写/css#因为nginx中配置了/js /img /css他们优先级是最高的,会最先被访问。因为存在了所以这些服务器就不用再额外添加这三个文件了root html; #因为是放到html下,所以这里要写html。index index.html index.htm}location /js {root html;index index.html index.htm}location /img {root html;index index.html index.htm}error_page 500 502 503 504 /50x.html;location = /50x.html {root html;}}
前面用了3个localtion来设置3个文件夹,当然可以用正则匹配
server {listen 80;server_name localhost;location / {proxy_pass http://192.168.218.154:80; #设置代理到tomcat服务器}location ~*/(js|css|img) {root html;index index.html index.htm}error_page 500 502 503 504 /50x.html;location = /50x.html {root html;}}
URLRewrite
URL Rewrite即URL重写,就是把传入Web的请求重定向到其他URL的过程。URL Rewrite最常见的应用是URL伪静态化,是将动态页面显示为静态页面方式的一种技术。
比如将www.baidu.com/index.asp?id=123 写成 www.baidu.com/123.html
server {listen 80;server_name localhost;location / {rewrite ^/([0-9]+).html$ /index.jsp?pageNum=$1 break; #proxy_pass http://192.168.218.154:80; #设置代理到tomcat服务器}location ~*/(js|css|img) {root html;index index.html index.htm}error_page 500 502 503 504 /50x.html;location = /50x.html {root html;}}
末尾的flag标记说明
last #本条规则匹配完成后,继续向下匹配新的location URI规则
break #本条规则匹配完成即终止,不再匹配后面的任何规则
redirect #返回302临时重定向,浏览器地址会显示跳转后的URL地址
permanent #返回301永久重定向,浏览器地址栏会显示跳转后的URL地址
防盗链
防止资源被盗用,主要方法就是区分哪些请求是非正式的用户请求。
比如某网站有logo等是使用动静分离调用,但是当我们通过反向外网代理等方法,可以直接代理他们的图片,或者直接访问图片,设置防盗链后,就不会被反向代理等操作代理使用了。
server {listen 80;server_name localhost;location / {rewrite ^/([0-9]+).html$ /index.jsp?pageNum=$1 break; #proxy_pass http://192.168.218.154:80; #设置代理到tomcat服务器}location ~*/(js|css|img) {valid_refers 192.168.218.158; #检测是否来自该网页(一般写原网站)if ($invaild_refer){ #如果不来自该网页,则返回403return 403;}root html;index index.html index.htm}error_page 500 502 503 504 /50x.html;location = /50x.html {root html;}}
valid_refers none 192.168.218.158; #当没有refer时,也能访问。(直接访问时就是没有refer)valid_refers blocked 192.168.218.158; #当检测是否以http https开头
curl测试防盗链
正常访问curl -I http://192.168.218.154/img/logo.png #-I 只返回头信息带引用访问curl -e "http://192.168.218.154" -I http://192.168.218.154/img/logo.png
盗链资源返回页面或提示图片
当设置了返回参数,比如403,那么我们可以自定义显示返回页面。大多时候在企业中使用
错误码跳转:error_page 401 /401.html;location = /401.html {root html;}返回报错图片:location ~*/(js|css|img) {valid_refers 192.168.218.158;if ($invaild_refer){ #设置返回的参数为图片rewrite ^/ /img/x.png break;}root html;index index.html index.htm}
高可用快速搭建
创建三台机器,分别都yum安装keepliaved#三台机器做以下操作yum install -y keepalived #yum安装keepalived#第一台机器vim /etc/keepalived/keepalived.conf! Configuration File for keepalivedglobal_defs {router_id ksnginx #路由ID}vrrp_instance liao { #设置vrrp 名称自定义state MASTER #设置为主节点interface ens33 #设置网卡virtual_router_id 51 #设置虚拟路由idpriority 100 #设置主备竞选的优先级advert_int 1authentication { #高可用服务器之间通信,需要一个小服务器来通信,下面设置通信密码auth_type PASSauth_pass 1111}virtual_ipaddress {192.168.218.200 #设置访问的虚拟IP}}#第二台机器vim /etc/keepalived/keepalived.conf! Configuration File for keepalivedglobal_defs {router_id ksnginx1 #路由ID要不相同}vrrp_instance liao {state BACKUPinterface ens33virtual_router_id 51priority 50advert_int 1authentication {auth_type PASSauth_pass 1111}virtual_ipaddress {192.168.218.200}}#第三台机器vim /etc/keepalived/keepalived.conf! Configuration File for keepalivedglobal_defs {router_id ksnginx2}vrrp_instance liao {state BACKUPinterface ens33virtual_router_id 51priority 49advert_int 1authentication {auth_type PASSauth_pass 1111}virtual_ipaddress {192.168.218.200}}
不安全的http协议

若有收获,就点个赞吧
0 人点赞
